
[Z06] Focal Speaker install writeup. (Detailed)
 03-19-2011, 09:01 PM
#1
Racer

Thread Starter

Member Since: Jan 2011
Location: McGuire AFB NJ
Posts: 390
Likes: 0
Received 0 Likes
on
0 Posts
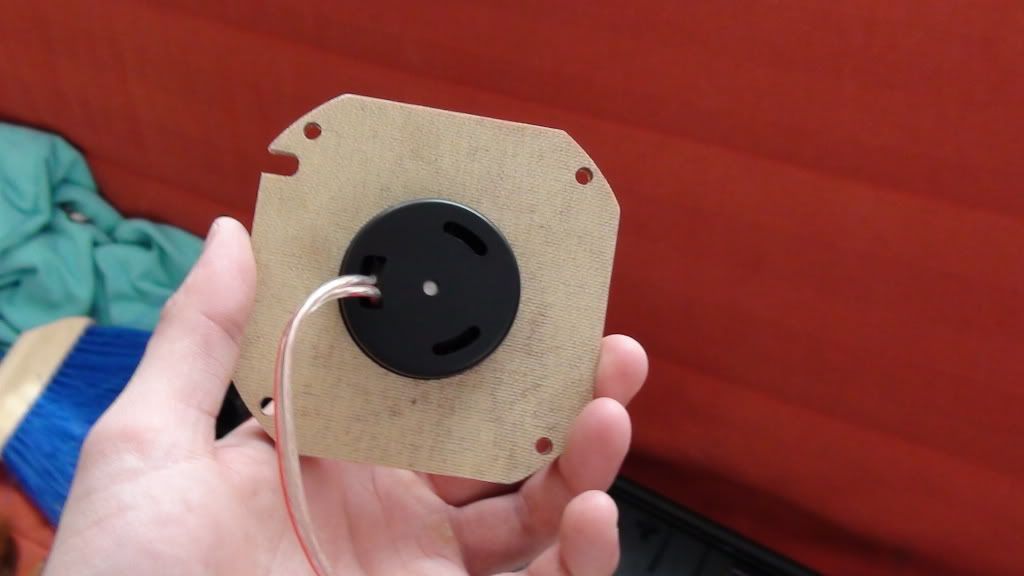
Well I got the new Vette as I have posted many times so far. Anyway, the ONLY thing I was really not happy with off the bat factory was the sound system (not Bose this was base line Mexico delphi BS). The car had a Pioneer head unit already installed in it. The factory speakers are complete trash though. Don't get me wrong I am not trash talking our beautiful Z06's they had to skimp somewhere to get a $75k car to do what my baby does... So here is my install of new speakers. I did a lot of searching to get all of the info for this install. That lead me to believe some of this information would be useful for everyone (especially the speaker wire polarities).
What I put in;
Focal 130A1 (5.25" and tweeters for rear)
Focal 165A1 (6.5" and tweeters for front)
Red Lion Front Speaker Mounting Plates
Tools/Accessories;
Screwdrivers (Phillips)
Wire Strippers
Wire Mates (crimp on type)
Wire Crimpers
Speaker Wire
Heavy Duty Velcro Stick On
Rear hatch prop (short broom stick works fine)
7mm Socket Wrench (for speaker mounting bolts)
I started with the rear speakers. The first thing you are going to want to do is find a nice dry place you can open your car up completely and have room to work. This will be a lot easier with the doors open as far as they can go etc.
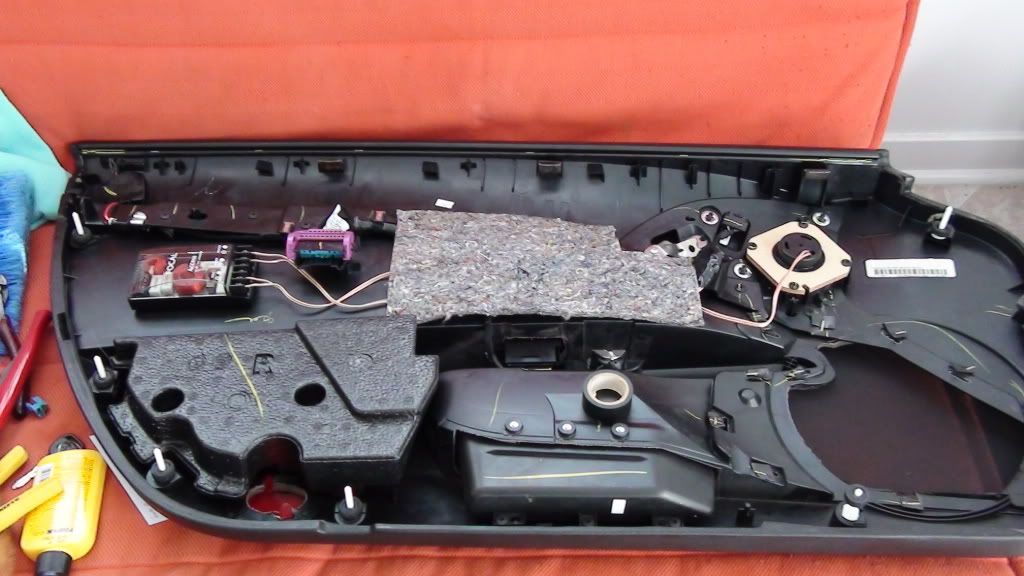
The firs step is removing the panels in front of the rear speakers. Start by removing the shocks that hold the hatch up. First slide the boot up the leg and then remove the sensor connector. After you have finished that take a flat head screw driver and pry outward on the clip to remove the shock (be careful not to damage the sensor connector post during this step). The shock should pop off of the mount. Keep in mind the hatch will fall with only one shock so have something ready to prop it up. I used a broom stick handle with a rag on it to stop scratches. Nothing special.
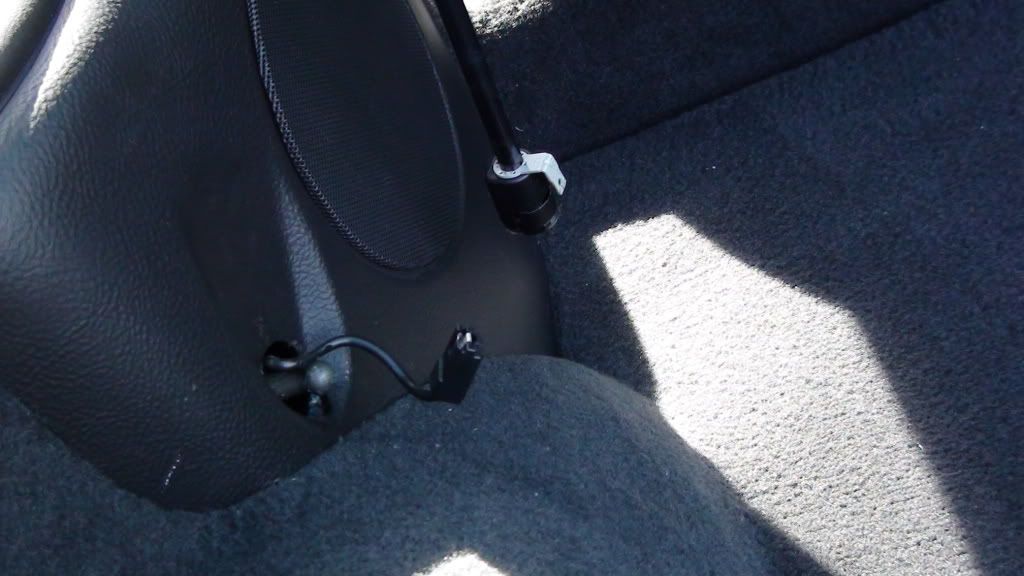
After you have the shocks off remove the seat belt slide through surround. This is very easy and simple. Just pull on it and it will pop right out. After you have pull that out the final step is simply popping the panel off of its connectors. Don't be shy it is pretty hard to get it off but don't go completely crazy and break the panel. The best bet here is getting as much hand surface under the panel as possible to stop from cracking it while you pull outwards.
After you have removed the panel simply unscrew the speaker from the mount and unplug the connector in the back. At this point you should have an opening ready for the new speaker.
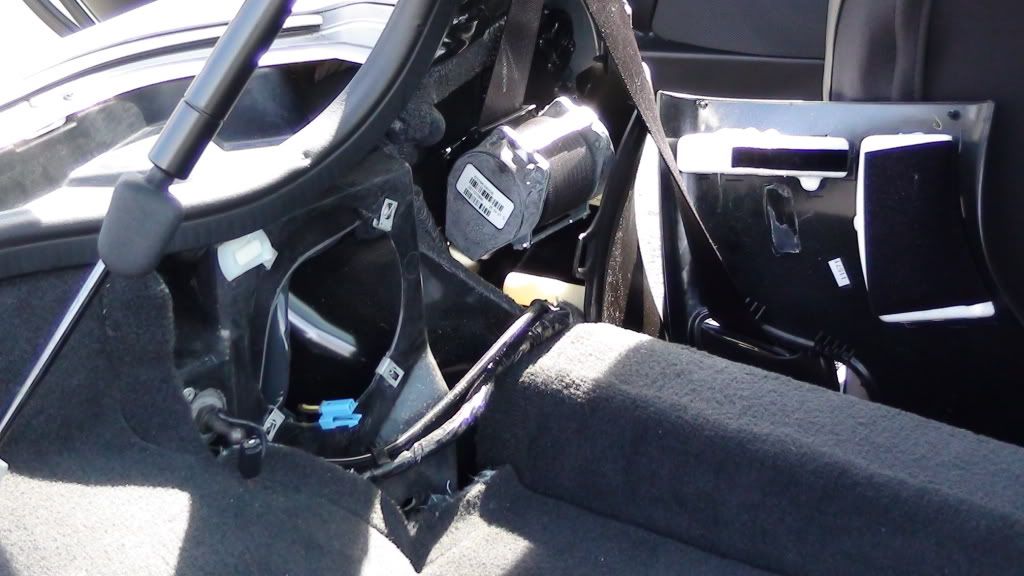
Now you have to cut the connectors off of the wiring harness and add the crimp on wire connectors ready to install the new speaker.
The RIGHT REAR will be Dark Blue + and Light Blue -
The LEFT REAR will be Brown + and Yellow -
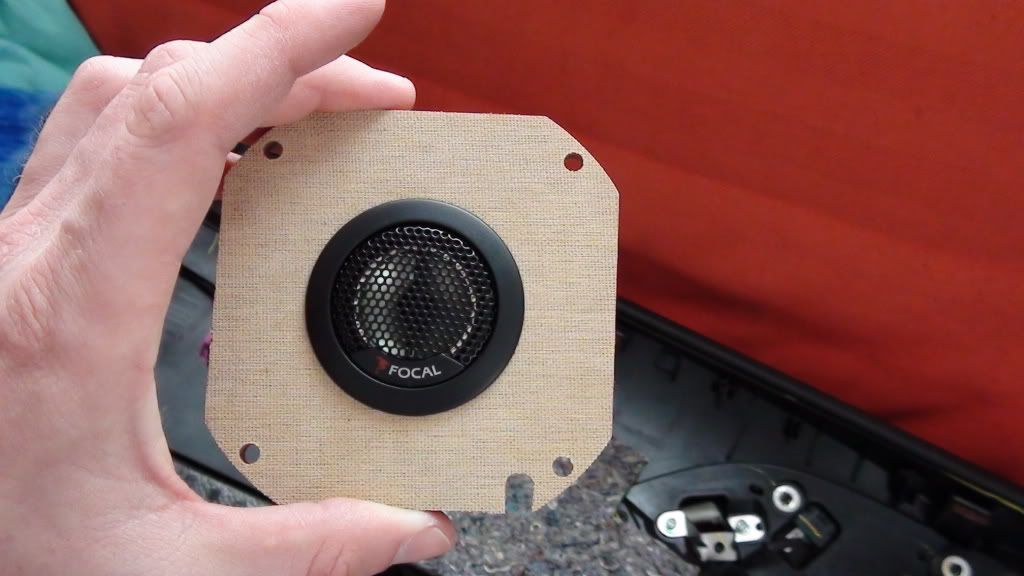
Connect those two to your crossover input and you can then mount the new speaker and tweeter (outside of the panel) by connecting them to the crossover in their corresponding locations. I used the heavy duty velcro stick on to mount the crossover in the gap between the speaker surround and the seat belt real.
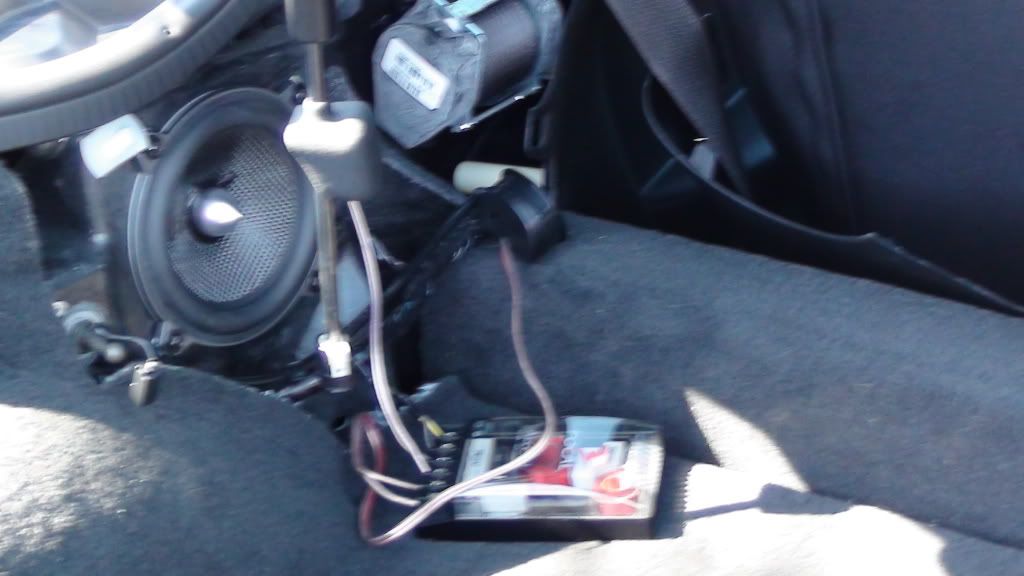
After the install is complete simply work backwards and replace the panel. You will be left with a factory look and a tweeter that needs to be mounted in a place of your choice (I used the heavy duty velcro here too as apposed to hard mounting them for easy removal).
Now that the rear of the car has new components installed you will need to work on the front. Door panel removal instructions can be found elsewhere so I will skip that here (although the ones I found stated the bolts as being allen wrench heads, the ones in my 2007 Z06 where torx headed bolts. You can find these bits at almost any tool store (Home Depot etc).
After you have removed the door panel you can remove the door speaker and tweeter from the factory locations.
At this point you will want to mark and pre drill your speaker mount plates ready for the new speakers. This is a MUST! Do not use self tapping screws or you risk cracking your beautiful new mounts.
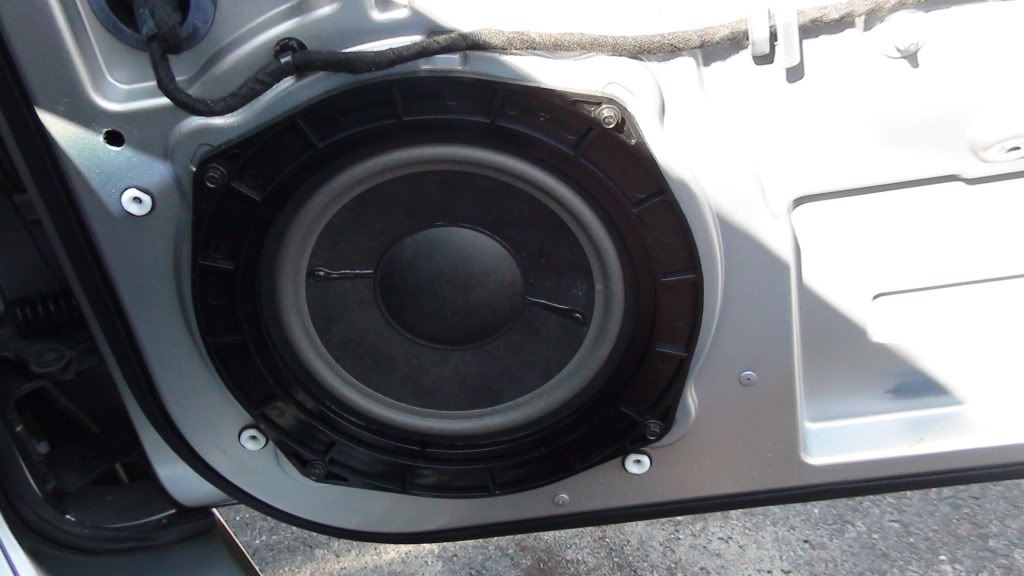
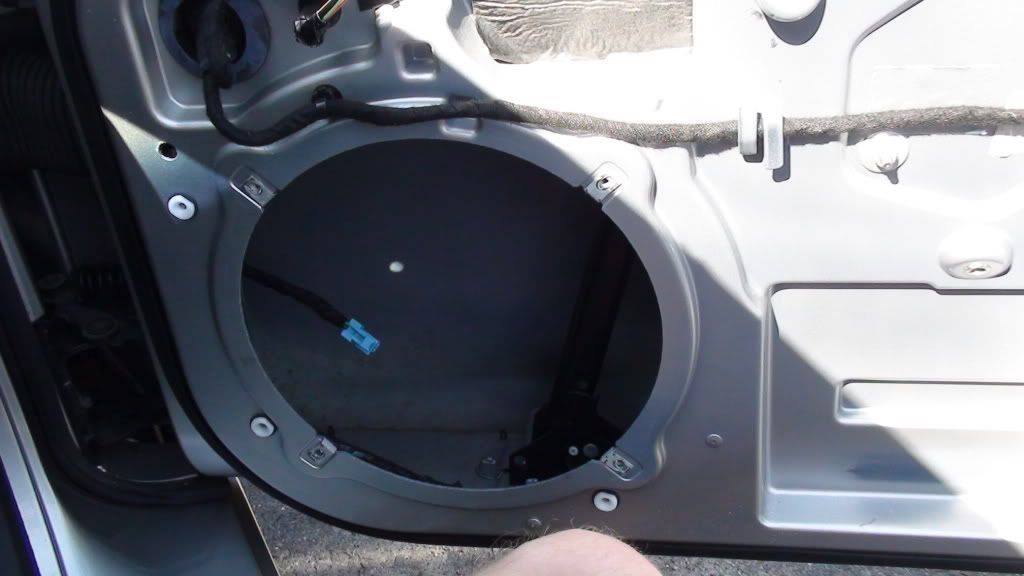
Now you can cut the factory connectors from both the door wiring and the door panel wiring for both the woofer and tweeter mounting places.
The FRONT RIGHT WOOFER (in door body) is Light Green + Dark Green -
The FRONT RIGHT TWEETER (in panel) is Orange + Dark Green -
The FRONT LEFT WOOFER (in door body) is Tan + Grey -
The FRONT LEFT TWEETER (in panel) is Dark Blue + Light Blue -
When doing the door speakers you will want to hook the 6.5" speaker in the door body DIRECTLY TO THE INPUT not to the crossover. This will give you a wider vocal range for the door speakers and will improve overall sound. The crossover will be used for the tweeter only in the front speaker sets. I mounted the crossovers to the inside of the door panel with the heavy duty velcro stick ons. I also selected the -3 decibel setting here for the tweeters in the crossover because they are relatively close to you.
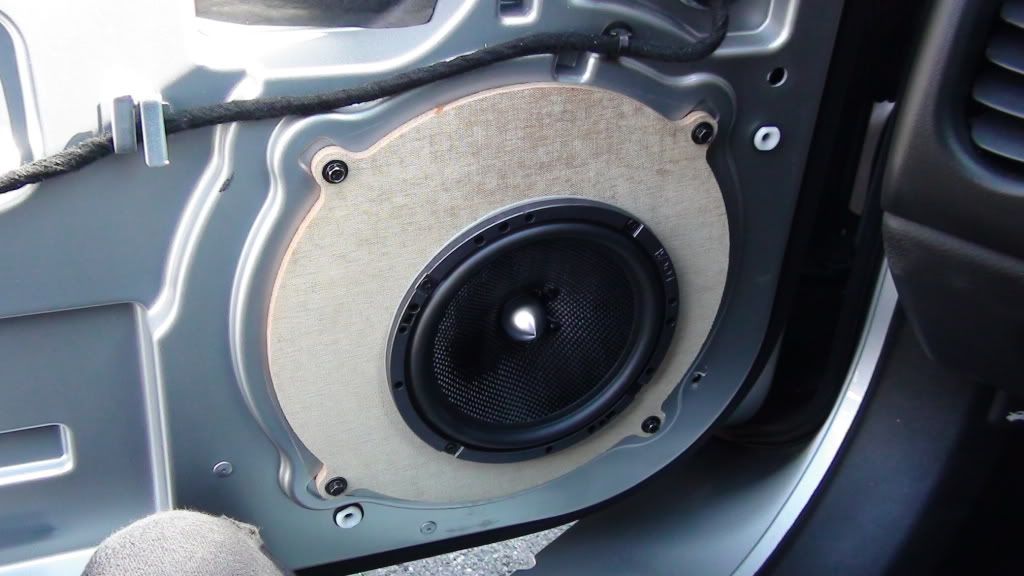
At this point attach the door panel connector to the wiring harness in the door and turn on the stereo to be sure everything is working correctly. After you have done that and given everything a once over go ahead and replace the door panel and bolt it back in place. Now take a drive down the street and be blown away by how much better your new speakers sound!
On a side note I was VERY impressed with the quality of the mounting plates for the speakers. The fit and finish are exceptional! I had no mounting problems at all and the material is relatively light and very rigid. I would recommend them any day of the week!
What I put in;
Focal 130A1 (5.25" and tweeters for rear)
Focal 165A1 (6.5" and tweeters for front)
Red Lion Front Speaker Mounting Plates
Tools/Accessories;
Screwdrivers (Phillips)
Wire Strippers
Wire Mates (crimp on type)
Wire Crimpers
Speaker Wire
Heavy Duty Velcro Stick On
Rear hatch prop (short broom stick works fine)
7mm Socket Wrench (for speaker mounting bolts)
I started with the rear speakers. The first thing you are going to want to do is find a nice dry place you can open your car up completely and have room to work. This will be a lot easier with the doors open as far as they can go etc.
The firs step is removing the panels in front of the rear speakers. Start by removing the shocks that hold the hatch up. First slide the boot up the leg and then remove the sensor connector. After you have finished that take a flat head screw driver and pry outward on the clip to remove the shock (be careful not to damage the sensor connector post during this step). The shock should pop off of the mount. Keep in mind the hatch will fall with only one shock so have something ready to prop it up. I used a broom stick handle with a rag on it to stop scratches. Nothing special.
After you have the shocks off remove the seat belt slide through surround. This is very easy and simple. Just pull on it and it will pop right out. After you have pull that out the final step is simply popping the panel off of its connectors. Don't be shy it is pretty hard to get it off but don't go completely crazy and break the panel. The best bet here is getting as much hand surface under the panel as possible to stop from cracking it while you pull outwards.
After you have removed the panel simply unscrew the speaker from the mount and unplug the connector in the back. At this point you should have an opening ready for the new speaker.
Now you have to cut the connectors off of the wiring harness and add the crimp on wire connectors ready to install the new speaker.
The RIGHT REAR will be Dark Blue + and Light Blue -
The LEFT REAR will be Brown + and Yellow -
Connect those two to your crossover input and you can then mount the new speaker and tweeter (outside of the panel) by connecting them to the crossover in their corresponding locations. I used the heavy duty velcro stick on to mount the crossover in the gap between the speaker surround and the seat belt real.
After the install is complete simply work backwards and replace the panel. You will be left with a factory look and a tweeter that needs to be mounted in a place of your choice (I used the heavy duty velcro here too as apposed to hard mounting them for easy removal).
Now that the rear of the car has new components installed you will need to work on the front. Door panel removal instructions can be found elsewhere so I will skip that here (although the ones I found stated the bolts as being allen wrench heads, the ones in my 2007 Z06 where torx headed bolts. You can find these bits at almost any tool store (Home Depot etc).
After you have removed the door panel you can remove the door speaker and tweeter from the factory locations.
At this point you will want to mark and pre drill your speaker mount plates ready for the new speakers. This is a MUST! Do not use self tapping screws or you risk cracking your beautiful new mounts.
Now you can cut the factory connectors from both the door wiring and the door panel wiring for both the woofer and tweeter mounting places.
The FRONT RIGHT WOOFER (in door body) is Light Green + Dark Green -
The FRONT RIGHT TWEETER (in panel) is Orange + Dark Green -
The FRONT LEFT WOOFER (in door body) is Tan + Grey -
The FRONT LEFT TWEETER (in panel) is Dark Blue + Light Blue -
When doing the door speakers you will want to hook the 6.5" speaker in the door body DIRECTLY TO THE INPUT not to the crossover. This will give you a wider vocal range for the door speakers and will improve overall sound. The crossover will be used for the tweeter only in the front speaker sets. I mounted the crossovers to the inside of the door panel with the heavy duty velcro stick ons. I also selected the -3 decibel setting here for the tweeters in the crossover because they are relatively close to you.
At this point attach the door panel connector to the wiring harness in the door and turn on the stereo to be sure everything is working correctly. After you have done that and given everything a once over go ahead and replace the door panel and bolt it back in place. Now take a drive down the street and be blown away by how much better your new speakers sound!
On a side note I was VERY impressed with the quality of the mounting plates for the speakers. The fit and finish are exceptional! I had no mounting problems at all and the material is relatively light and very rigid. I would recommend them any day of the week!
 03-20-2011, 10:15 AM
#2
Drifting


Great write up on the install. I bet it sounds great. My C5 was a DD so I replaced the speakers almost imediately. The Z I dont drive as much but still want to get them replaced at some point in time. I continue to hear great things about Focals.
03-20-2011, 10:37 AM
#3
Drifting
Member Since: Aug 2009
Location: Colorado Springs Colorado
Posts: 1,266
Likes: 0
Received 5 Likes
on
5 Posts

the only suggestion i would make is that since there is such a nice big hole on the corvette doors i would reccommend getting as large of a speaker as you can fit in that location, it provides all the midbass and bass. you would have been much better off getting a 6x9 or 9-10 in speaker.
ive toyed with the idea of getting the JL audio drivers, they have a 9 or 10 inch free air driver that would work well and then run a 4" in the door just like bose does. with a 4" you won't even need a tweeter if the 4" has a whizzler cone in the center.
ive toyed with the idea of getting the JL audio drivers, they have a 9 or 10 inch free air driver that would work well and then run a 4" in the door just like bose does. with a 4" you won't even need a tweeter if the 4" has a whizzler cone in the center.
03-20-2011, 10:42 AM
#4
Drifting
Only issue with the above install would be a distinct lack of bottom end. I installed 8" shallow subs in the door when I redid my sounds in the car and have never looked back.
03-20-2011, 11:09 AM
#5
Racer
Thread Starter
Member Since: Jan 2011
Location: McGuire AFB NJ
Posts: 390
Likes: 0
Received 0 Likes
on
0 Posts
I thought about low end sound but you would be suprised and the quality of the sound from the 165A1's they cover most bass notes extremely well. If I do end up wanting more I will probably just do a 10" in the back.
03-20-2011, 12:27 PM
#6
Pro


Member Since: Mar 2005
Location: San Jose Ca
Posts: 706
Likes: 0
Received 0 Likes
on
0 Posts
One of the biggest difference you can make in the doors is to insulate them. Taking off the vapor barrier and sealing off all the holes with an acoutstic material pays huge dividends. I actually have a decent low end punch now with the factory speakers after the change. Not only volume but it cleaned up the sound too. Less road noise is nice as well. I bet those focals have a nice mid/hi sound to them though.
03-20-2011, 12:48 PM
#7
Le Mans Master

If you don't mind posting or you can PM me, what would these components cost? It's a straight forward enough install that I can handle it myself. This is also one area I wanted to look at improving even though I have the BOSE and replaced the head unit last year with a Kenwood DVD/NAV.
 03-20-2011, 03:06 PM
#9
Racer
Thread Starter
Member Since: Jan 2011
Location: McGuire AFB NJ
Posts: 390
Likes: 0
Received 0 Likes
on
0 Posts
 03-20-2011, 03:11 PM
#10
Racer
Thread Starter
Member Since: Jan 2011
Location: McGuire AFB NJ
Posts: 390
Likes: 0
Received 0 Likes
on
0 Posts
If you don't mind posting or you can PM me, what would these components cost? It's a straight forward enough install that I can handle it myself. This is also one area I wanted to look at improving even though I have the BOSE and replaced the head unit last year with a Kenwood DVD/NAV.
You will not be disappointed with the speakers at all. They sound like some of the top of the line stuff that Pioneer or JL etc puts out. They are also considered Focal's middle of the road component sets. You can get even nicer ones from them. Unless you are a complete audio nit pick though I see no point as these sound great!
03-20-2011, 03:28 PM
#11
Safety Car

aren't the rear speakers in mono and just there for rear fill? i've always heard this but never confirmed it. wondered why you chose to go with components for the back instead of coaxial.
03-20-2011, 04:06 PM
#12
Racer
Thread Starter
Member Since: Jan 2011
Location: McGuire AFB NJ
Posts: 390
Likes: 0
Received 0 Likes
on
0 Posts
They are set up that way with the POS Delphi amp that is currently in the car. However, I am going to be installing an amp to power everything when I get the time to wire it in. At that point they will be doing what they are suppose to.
 03-20-2011, 05:13 PM
#14
Racer
Thread Starter
Member Since: Jan 2011
Location: McGuire AFB NJ
Posts: 390
Likes: 0
Received 0 Likes
on
0 Posts
Thanks for all the sarcasm... Of course you could have nicely suggested it be moved. I would move it myself if I could. Then again I don't see your bitter posts on the threads about superchargers or the C6R etc that show up in the Z06 thread. I posted here because my install was in a C6Z I apologize (to others, not to you) for not using the Audio section.
03-20-2011, 09:24 PM
#15
Procharged F1X 7.18 @ 197

Member Since: Feb 2002
Location: Staten Island NY
Posts: 2,321
Likes: 0
Received 2 Likes
on
2 Posts
St. Jude Donor '09-'10-'11

Thanks for all the sarcasm... Of course you could have nicely suggested it be moved. I would move it myself if I could. Then again I don't see your bitter posts on the threads about superchargers or the C6R etc that show up in the Z06 thread. I posted here because my install was in a C6Z I apologize (to others, not to you) for not using the Audio section.

Great write up.
03-20-2011, 09:36 PM
#16
Pro

How do you tell the difference between the Bose and nonBose? I was very unimpressed with my cars system and was thinking about doing the same.
Last edited by dsddcd; 03-20-2011 at 09:39 PM.
03-20-2011, 10:02 PM
#17
Racer
Thread Starter
Member Since: Jan 2011
Location: McGuire AFB NJ
Posts: 390
Likes: 0
Received 0 Likes
on
0 Posts
The Bose system will usually have emblems on the speaker grills. I have never personally heard the Bose setup from the factory but I have not heard anything great about it either. The mounting holes are the same for either setup so if you want to do an aftermarket install it will all fit the same regardless.
 03-20-2011, 10:43 PM
#19
Drifting
I installed a pair of 8" subs in the doors, Accumatted the doors fully...added an Audio Control Earthquake, Kenwood DNX9960, Alpine 5 channel with 4 x 75 and 300 watt mono for the subs, JL dual drivers in the rear and JL tweets in the doors. No holes were drilled anywhere, no boxes in the rear...and the bass will blow the doors of systems with twin 12's running more power in acoustically better vehicles all day long.
03-20-2011, 11:25 PM
#20
Drifting
Member Since: Aug 2009
Location: Colorado Springs Colorado
Posts: 1,266
Likes: 0
Received 5 Likes
on
5 Posts
I installed a pair of 8" subs in the doors, Accumatted the doors fully...added an Audio Control Earthquake, Kenwood DNX9960, Alpine 5 channel with 4 x 75 and 300 watt mono for the subs, JL dual drivers in the rear and JL tweets in the doors. No holes were drilled anywhere, no boxes in the rear...and the bass will blow the doors of systems with twin 12's running more power in acoustically better vehicles all day long.