
[Z06] Stang Killa's Z06!
 10-22-2016, 09:40 PM
#1
Safety Car

Thread Starter
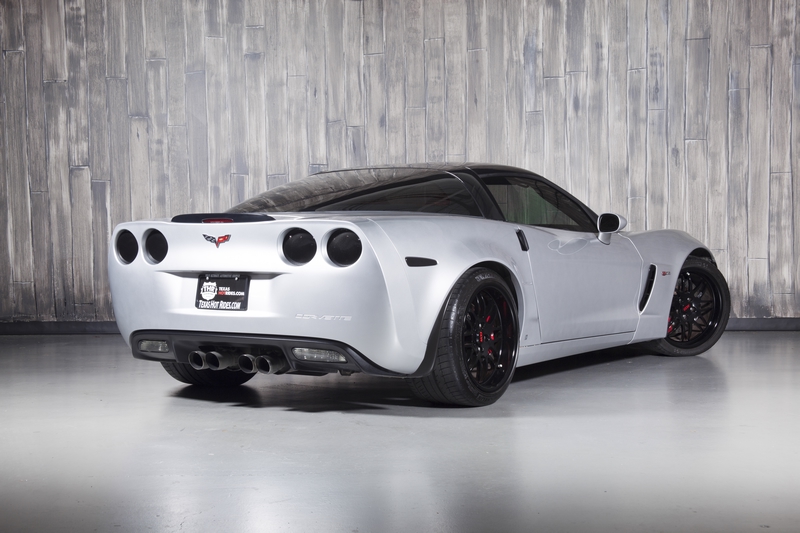
Well after racing the Camaro for awhile and building it up i found myself wanting more. Well actually less, weight that is. I also wanted the ability to have rear camber. Plus the Camaro was getting harder and harder to find parts for. Sooooo after watching the C6Z market for about 9 months and doing a ton of research i picked up my first vette yesterday!
2009 Z06 3LZ
38000 miles
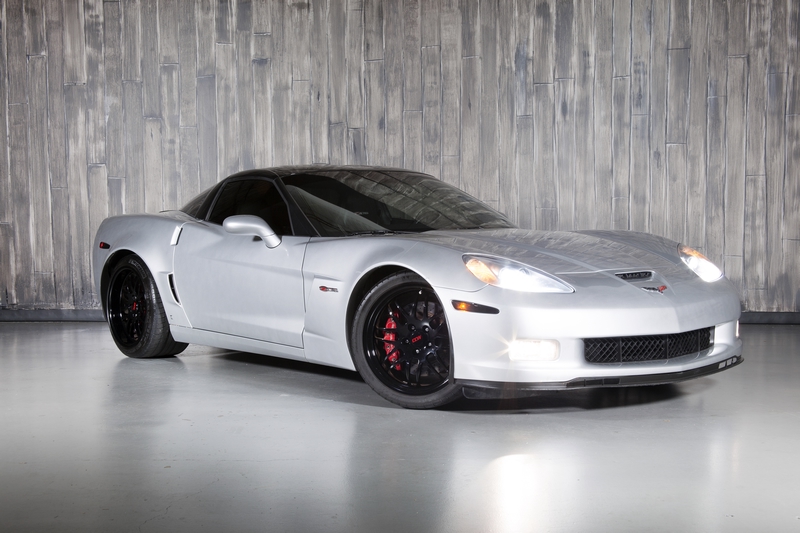
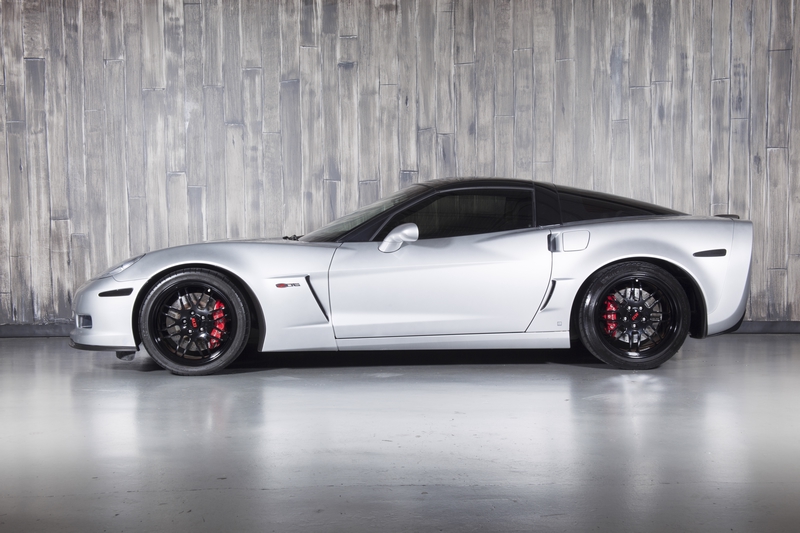
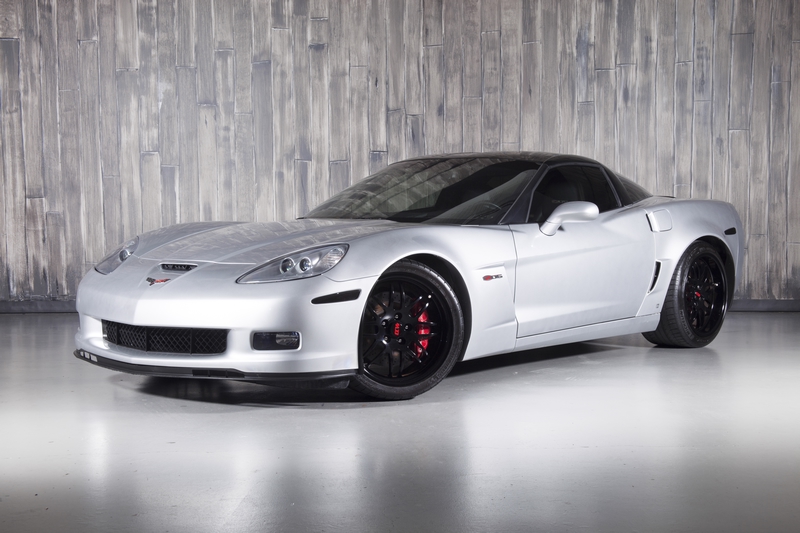
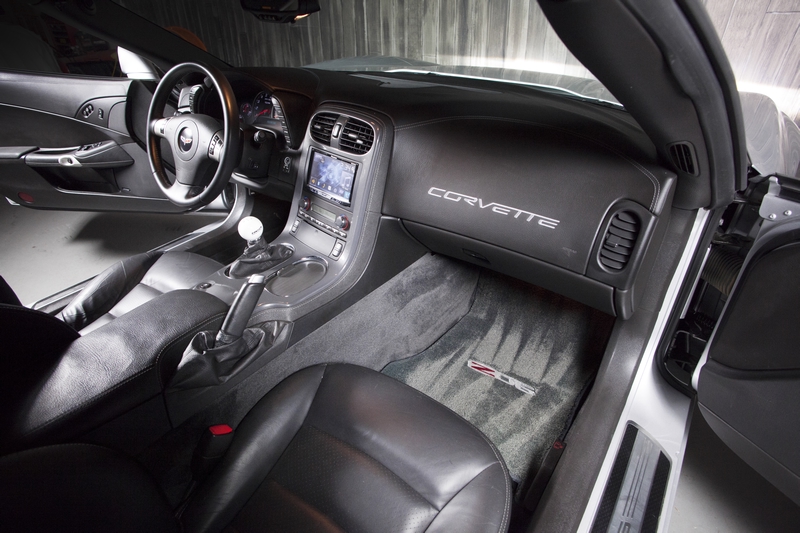
If i was going to spend this kind of coin i wanted a modded one with the basics already done, and this one had it, along with some extras.
Mod List:
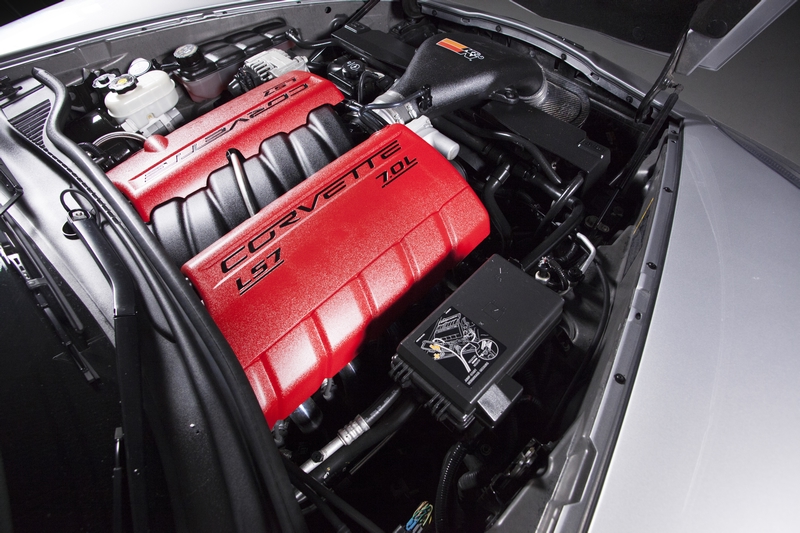
TSP Stage 3 LS7S cam: 242/250 .655/.655 114LSA
Upgraded valve springs and retainers
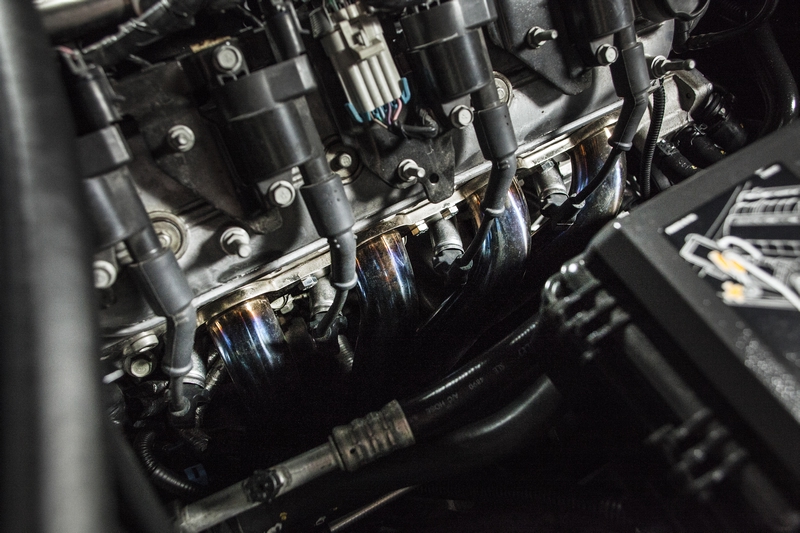
TSP 1-7/8" Polished Stainless Steel headers
TSP 3" Polished Stainless Steel X-pipe (no cats)
K & N cold air intake
Mild 2 Wild dual mode exhaust controller
Lingenfelter 160 degree thermostat
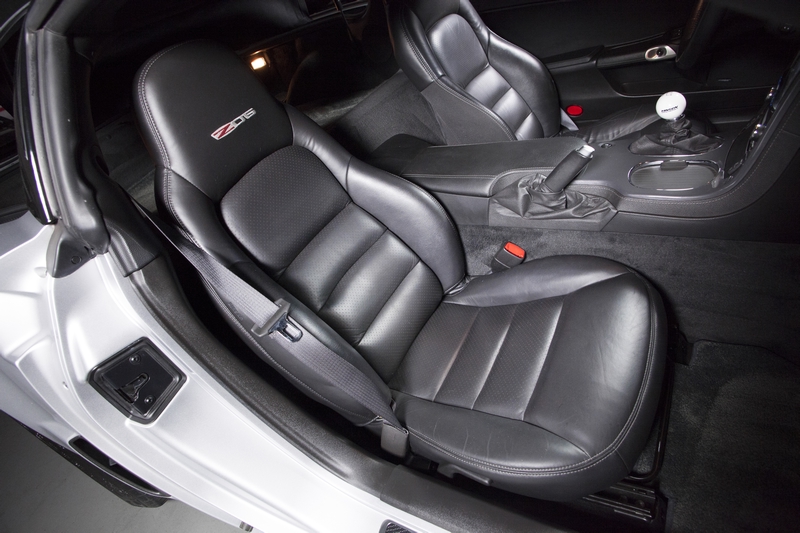
Hinson Motorsports short throw shifter and ****
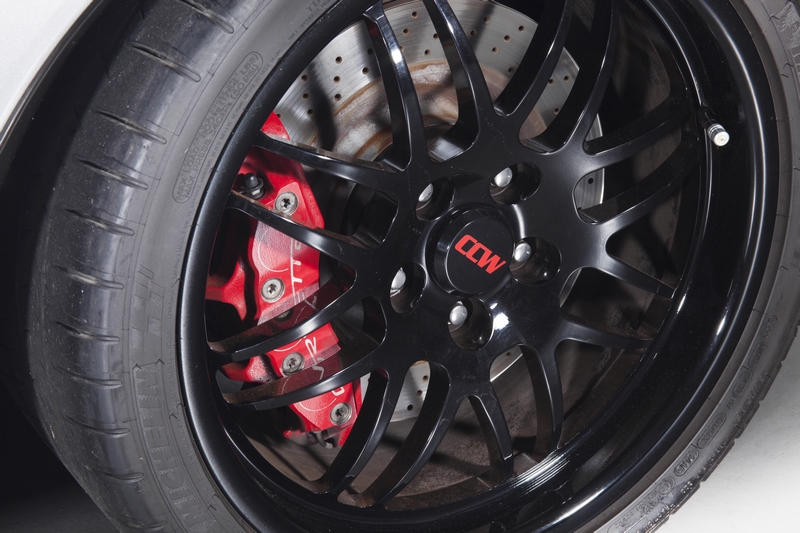
CCW Forged SP16A wheels: 19 x 9.5 and 19 x 13
Gloss black wrapped roof
Blacked out taillights
Blacked out side markers
Lloyds Z06 mats
Pioneer double din touch screen head unit
Gonna be weird starting all over again from nothing but it will be worth it in the end i think. The car is truly phenomenal so far. LOTS more to come!
2009 Z06 3LZ
38000 miles
If i was going to spend this kind of coin i wanted a modded one with the basics already done, and this one had it, along with some extras.
Mod List:
TSP Stage 3 LS7S cam: 242/250 .655/.655 114LSA
Upgraded valve springs and retainers
TSP 1-7/8" Polished Stainless Steel headers
TSP 3" Polished Stainless Steel X-pipe (no cats)
K & N cold air intake
Mild 2 Wild dual mode exhaust controller
Lingenfelter 160 degree thermostat
Hinson Motorsports short throw shifter and ****
CCW Forged SP16A wheels: 19 x 9.5 and 19 x 13
Gloss black wrapped roof
Blacked out taillights
Blacked out side markers
Lloyds Z06 mats
Pioneer double din touch screen head unit
Gonna be weird starting all over again from nothing but it will be worth it in the end i think. The car is truly phenomenal so far. LOTS more to come!
Last edited by STANG KILLA SS; 07-22-2017 at 07:00 PM.

The following 5 users liked this post by STANG KILLA SS:
evoviiiyou (05-30-2023),
Hankdawg30 (04-24-2017),
Landru (10-23-2016),
Renquest (08-11-2020),
VetteIndy (11-01-2020)

Popular Reply
06-12-2021, 07:45 PM
Safety Car
Thread Starter
Made the 8.5 hour drive to Hallet in Oklahoma last weekend.
All new track id never been too. A small short narrow track. Not exactly a corvette track. Luckily they split the classes into 3 groups, instead of two, so it wouldnt be so crowded/dangerous. Was supposed to rain but we got lucky and it stayed away during races. PLENTY of it towing though.
Attachment 48337350
Saturday:
Practice, Qualifying and two races. 20 and 25 minutes long. The average finish from those two races determained your starting position for the Sunday 50 minute Championship race. I picked up a vibtration early. the new wheel weights didnt stick and also warped the new rotors. i didnt bed them at all ahead of time. I just beat out my ST1 competition in both races, winning my class and 6th overall.
Attachment 48337351
Oil Cooler:
this had me worried Saturday. Temps rose REALLY fast. but the more testing we did it seemed to do ok. Outside temps were only 82ish and its a short slow track so not really a big test. But the oil definitely heats up really fast. But once it reaches about 265 it really starts to slow down. In the 20-25 minute races it peaked at 275. in the Sunday race it peaked at 277. COTA in July will be the true test. LONG straights and 100* air temps.
Attachment 48337352
Hoosiers:
So glad i had them. there was no way i could have brought the fight on this track on street tires. They werent the "holy ****" everyone discribed. but on the other side of the coin i never once had to worry about grip. i could do whatever i wanted and they just stuck. A track with more fast sweepers would have probly shined more. I also didnt find the first two laps when cold to be sketchy.
Brake Temps:
First time checking them. Ive always wondered if i was over-cooling them. cause i seem to go threw rotors every 2 weekends.
Attachment 48337353
This pic describes the entire weekend
Attachment 48337354
David Vs Goliath:
$75,000 Vs $750,000
Jeep Vs Semi Truck Toter
20' flat bed Vs Double stacker elevator race trailer
GM C6 Vs Maserati GT3
Harbor Freight Jack Vs Air Jacks
Sketchers Vs Gator UTV
Craftsman Hand box Vs Tool Cart
Hoosier DOTs Vs Pirelli Slicks
Attachment 48337355
Sunday:
I put new pads on Sunday morning before the 50 minute race. No way to bed them. I tried to do a bit on the formation lap. i do remember seeing smoke pouring from them on the first couple laps. I was REALLY worried if the stock 18 gallons was going to be enough to feed the 7 liter for 50 minutes. i put every last drop of fuel in i could. Then spent about 10 minutes putting in a shot glass at a time after the filler clicked. Car weighed 3195 lbs Post race with me in it. Car was a serious oven, gonna need to address that some more. Had a GREAT battle with the Maserati GT3 in my ST1 class. See Video.
What a weekend!, had an absolute blast despite the long drives towing threw all the rain.
Attachment 48337356
10-22-2016, 09:47 PM
#2
Le Mans Master


Nice looking Z06! There are deals to be had out there on modded Corvettes.
10-22-2016, 10:14 PM
#3
Safety Car

Sweet car!
10-22-2016, 11:19 PM
#4
Team Owner


Looks like a great find. 

 10-23-2016, 12:08 AM
#6
Melting Slicks

Very nice
10-23-2016, 12:13 AM
#7
Instructor

That gray and black color combo is killer!
 10-23-2016, 04:57 AM
#9
Safety Car
Congratulations!
 10-23-2016, 10:03 AM
#11
Melting Slicks

Nice.
At least you got the mod list from Texas Hot Rides.
My buddy and I went up there in the spring so he could check out a ZR1 that was fully built with a killer mod list and all receipts for stupid good price. They had a few Z06's and we checked those out as well, but they didnt know anything on them besides "heads, cam, headers, intake" which didnt excite me to not know exactly what was on them so I couldnt recommend he buy one of them. Not that they were bad cars, just the fact of not knowing what parts were on it, who tuned it, etc...
 11-26-2016, 12:18 PM
#13
Safety Car
Thread Starter
well work has begun.
First thing was to remove the Hinson short shifter, it was rediculous. Ive had several short throws on the camaro, but this one was way to short and stiff. throws were 1/4" to 1/2" long and so stiff you needed two hands at times. especially for neutral checks. even tore my shoulder muscle a couple times. and with throws that close it wasnt going to be safe on track. ie lots of wrong gears.
first i removed the console which was alot more involved than the SS.
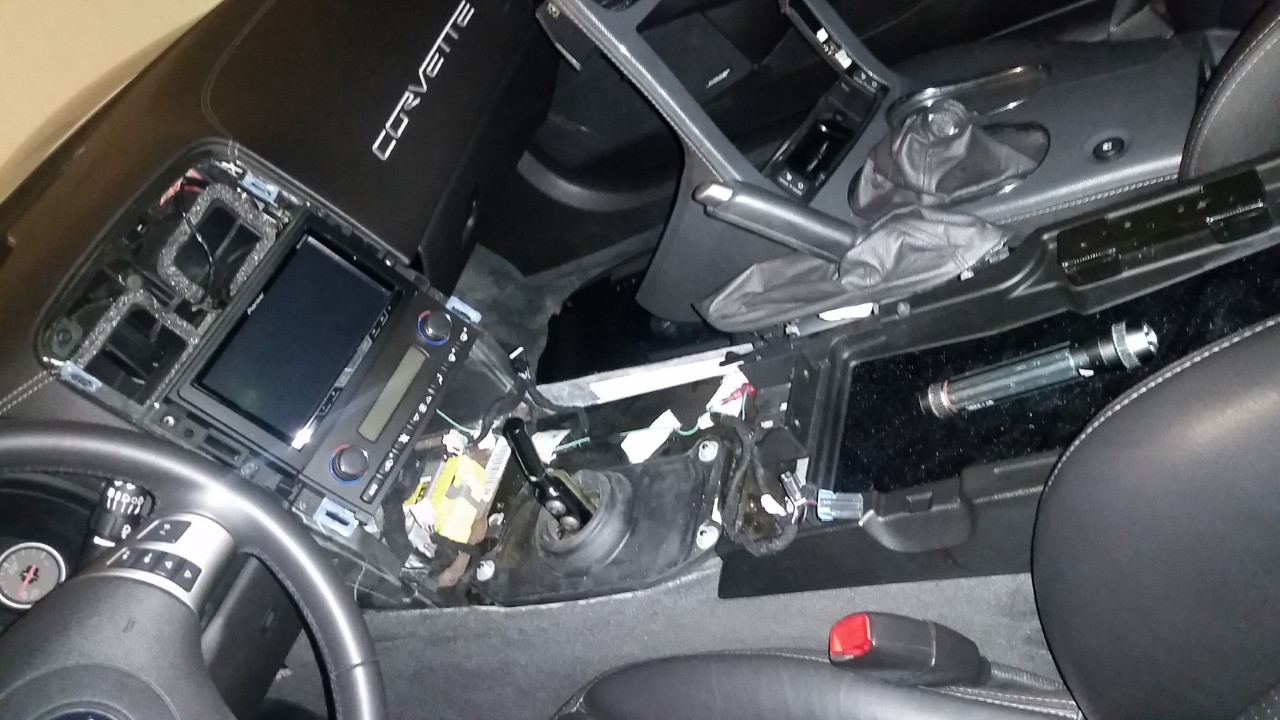
access and removed the Hinson
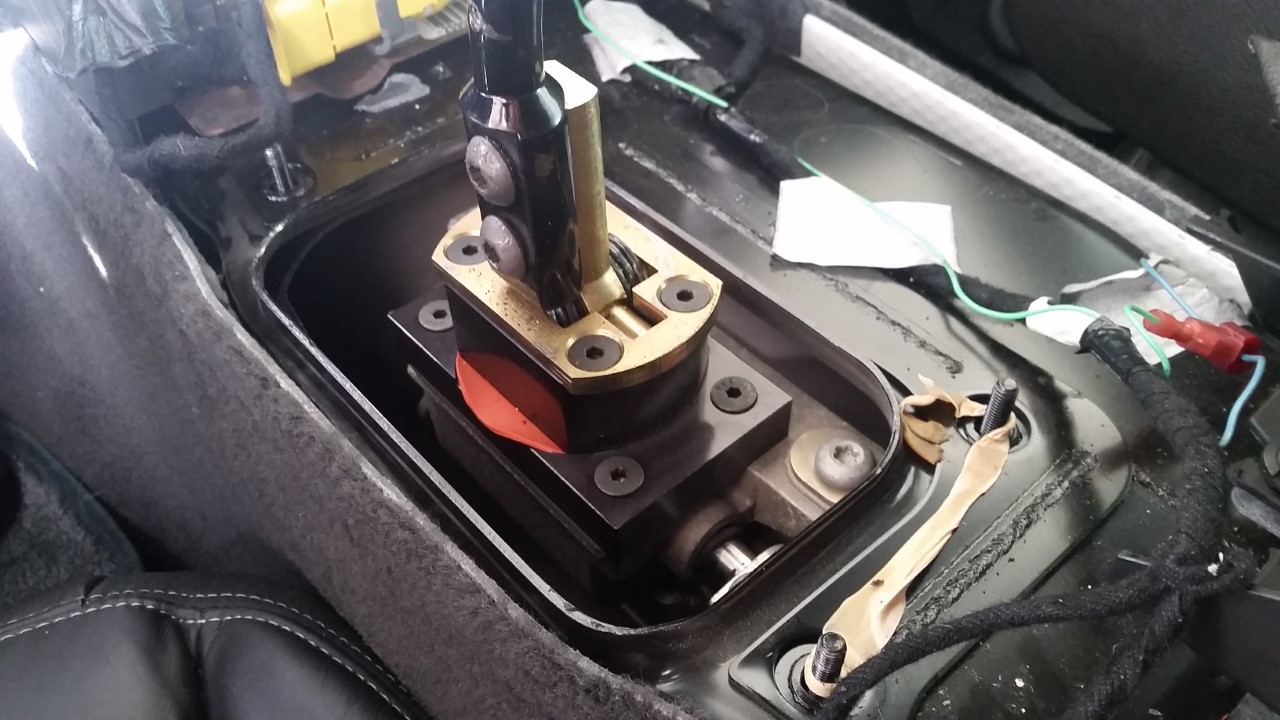
then reinstalled a stock shifter. much better. a bit rubbery but a big improvement for now, may look into a Core shifter in the future.

First thing was to remove the Hinson short shifter, it was rediculous. Ive had several short throws on the camaro, but this one was way to short and stiff. throws were 1/4" to 1/2" long and so stiff you needed two hands at times. especially for neutral checks. even tore my shoulder muscle a couple times. and with throws that close it wasnt going to be safe on track. ie lots of wrong gears.
first i removed the console which was alot more involved than the SS.
access and removed the Hinson
then reinstalled a stock shifter. much better. a bit rubbery but a big improvement for now, may look into a Core shifter in the future.
Last edited by STANG KILLA SS; 07-22-2017 at 07:04 PM.
11-26-2016, 12:28 PM
#14
Safety Car
Thread Starter
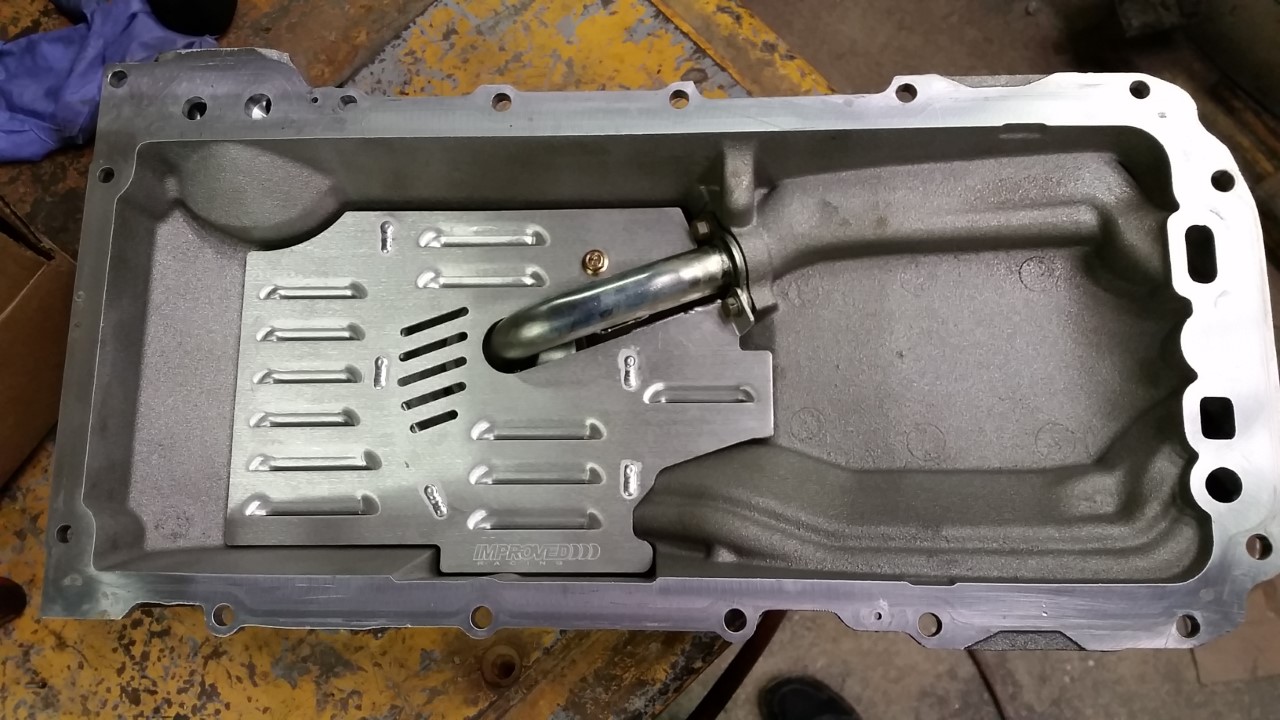
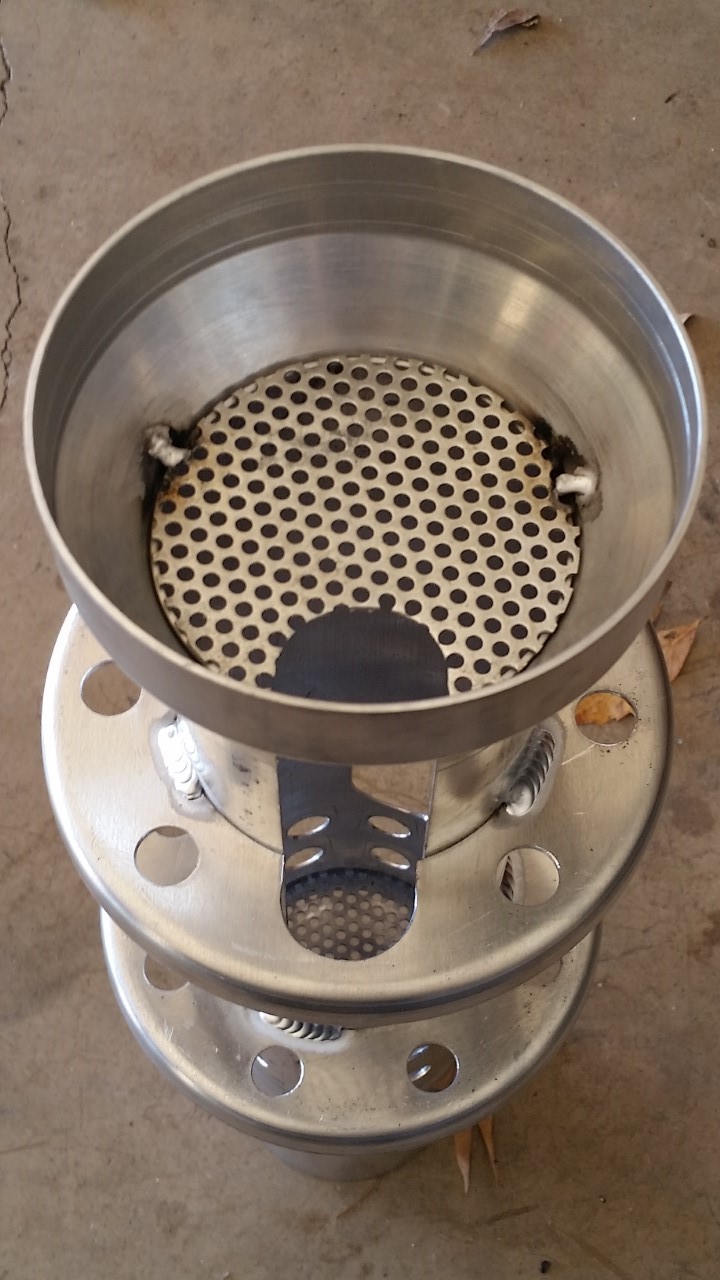
next up was the pan. picked up an improved racing oil pan baffle. i picked this one over the aviaid version because it was aluminum, and didnt require you to drill 3 holes in the bottom of your oil pan. also wraps around the right side a bit more.

first up was to drop the cradle. being Magnesium it didnt weigh nothing. could carry it with one hand!

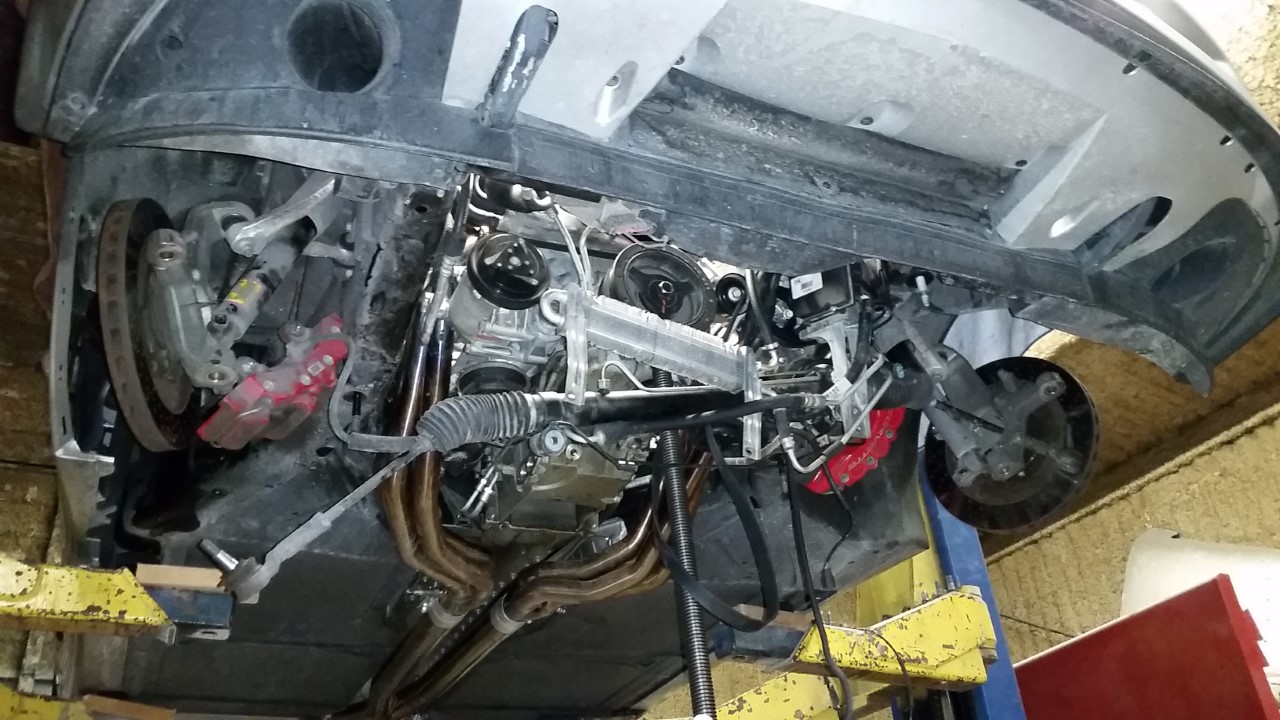
pan removed
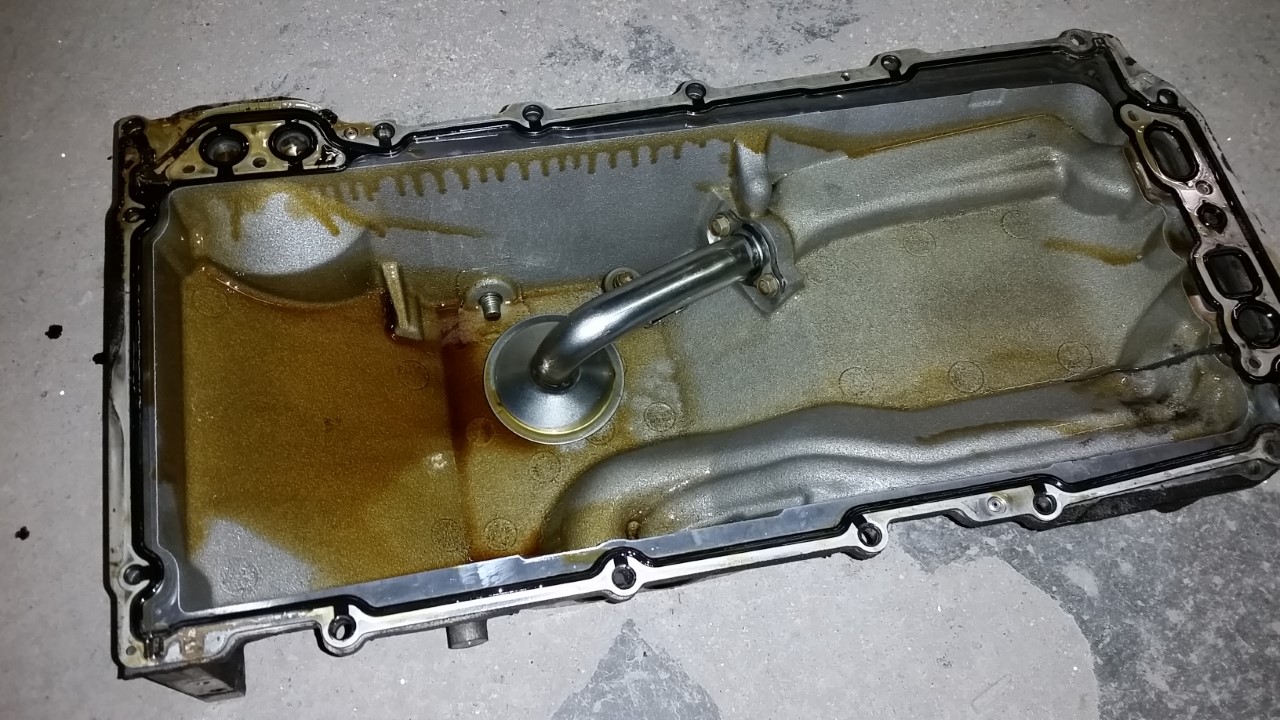

pan cleaned and baffle bolted in. not a hard job in itself, just getting to it was the chore.
first up was to drop the cradle. being Magnesium it didnt weigh nothing. could carry it with one hand!
pan removed
pan cleaned and baffle bolted in. not a hard job in itself, just getting to it was the chore.
Last edited by STANG KILLA SS; 07-22-2017 at 07:05 PM.
The following 2 users liked this post by STANG KILLA SS:
Dan_the_C5_Man (12-22-2016),
greatgonzer (05-18-2017)
11-26-2016, 12:39 PM
#15
Safety Car
Thread Starter
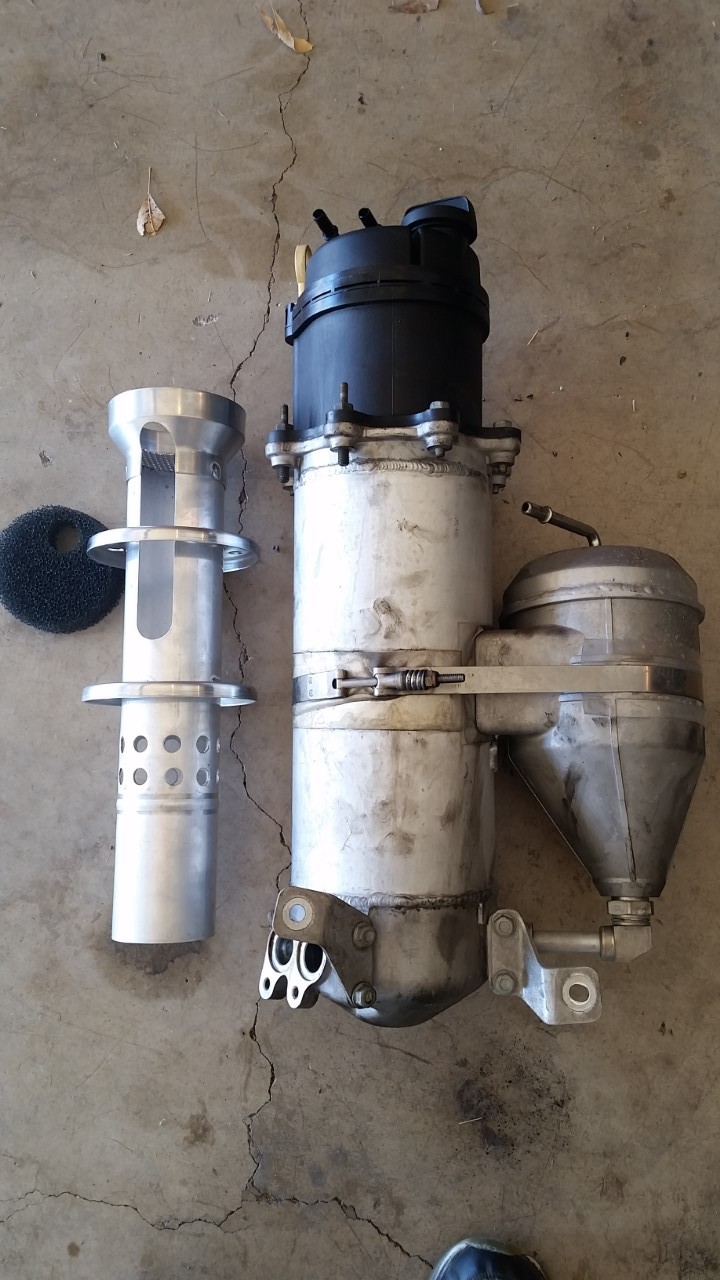
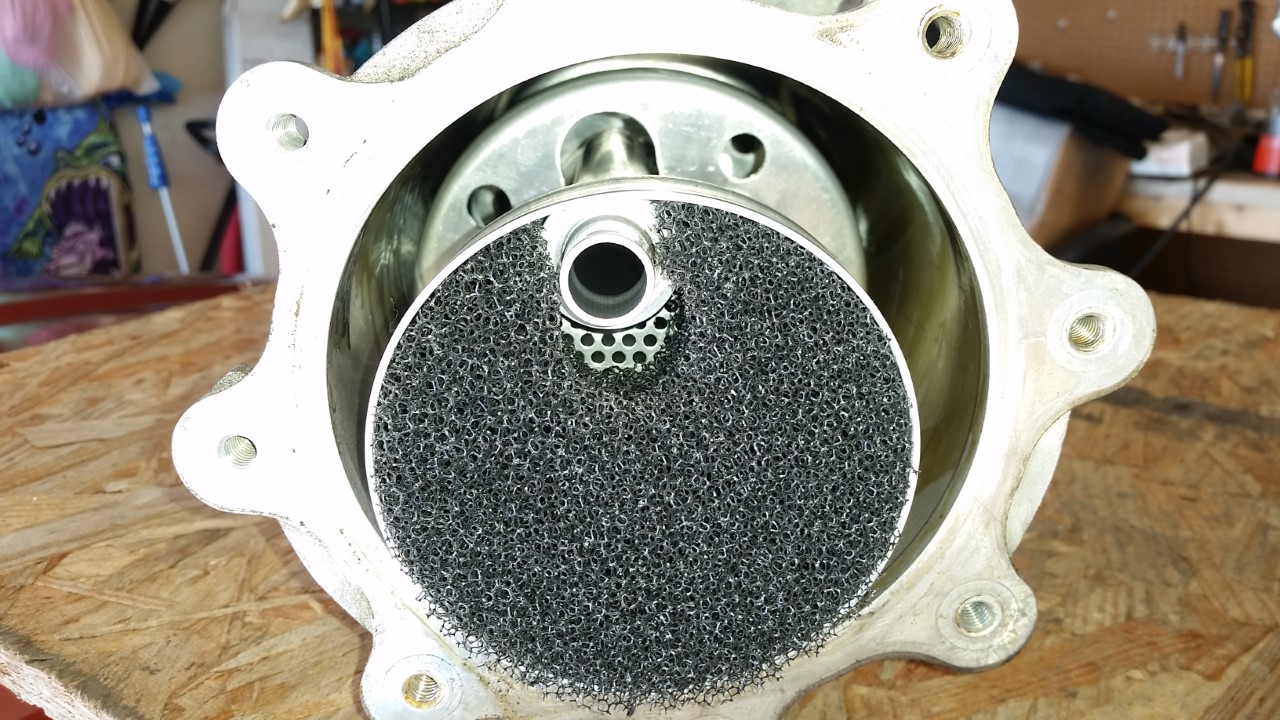
next up was the dry sump oil reservoir baffle. Aviaid was out of these but they built one for me and it came in right when we were in the middle of the pan baffle.
removed the reservoir from the fender cavity from below by removing the fender liner and loosing the fender bolts.
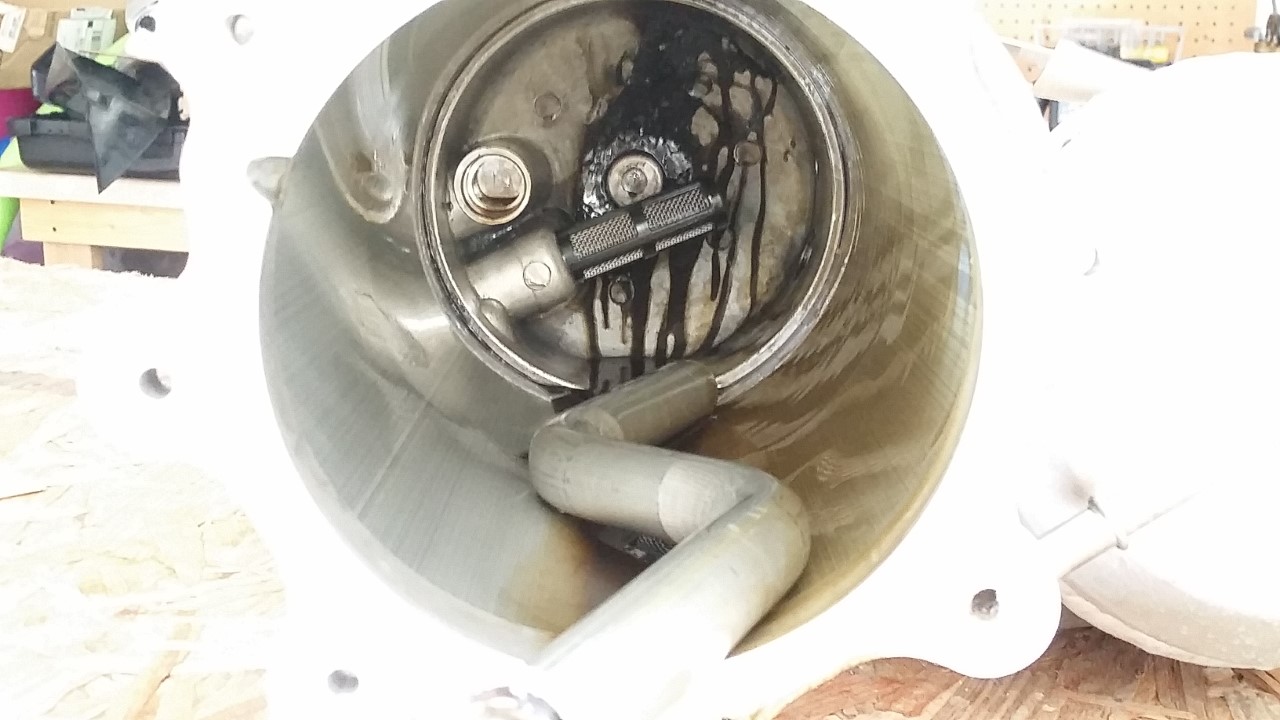
removed the top black plastic part. you can see the transfer tube and the port in sticks into on the left.
the baffle
next was the hard part, inserting the baffle and trying to get the transfer tube back into its port completely blind with the baffle blocking your view. but with some reference marks and some dry runs without the baffle i got it back together without too much hassle.
removed the reservoir from the fender cavity from below by removing the fender liner and loosing the fender bolts.
removed the top black plastic part. you can see the transfer tube and the port in sticks into on the left.
the baffle
next was the hard part, inserting the baffle and trying to get the transfer tube back into its port completely blind with the baffle blocking your view. but with some reference marks and some dry runs without the baffle i got it back together without too much hassle.
Last edited by STANG KILLA SS; 07-22-2017 at 07:08 PM.
The following 2 users liked this post by STANG KILLA SS:
Dan_the_C5_Man (12-22-2016),
evoviiiyou (05-30-2023)


