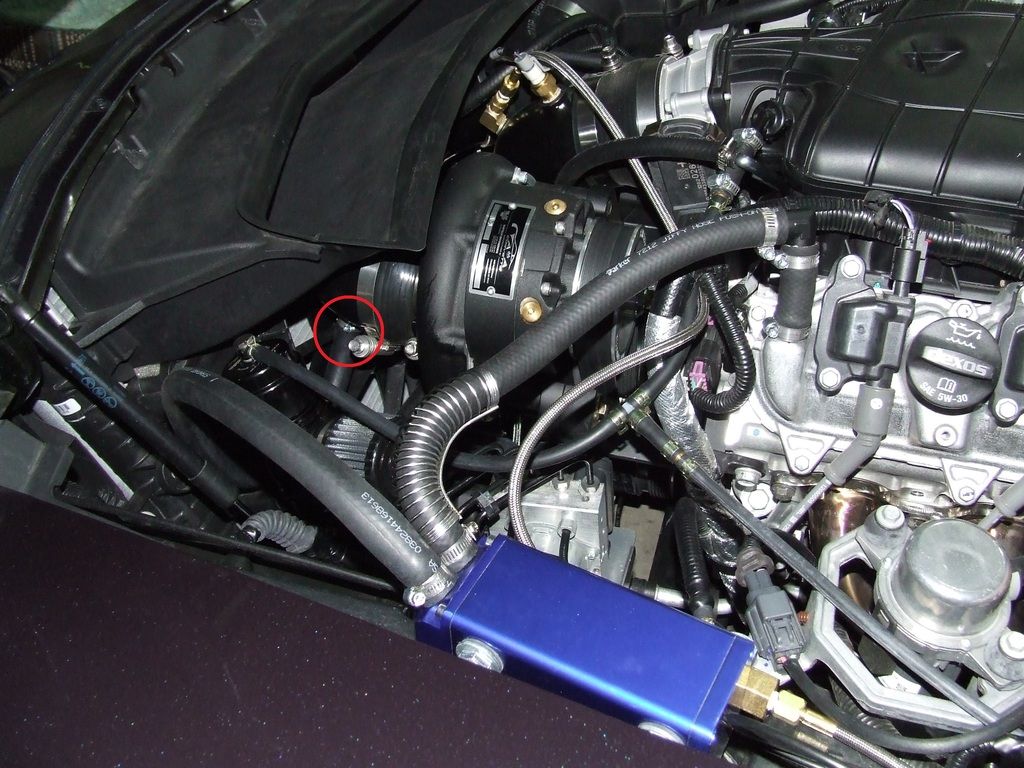
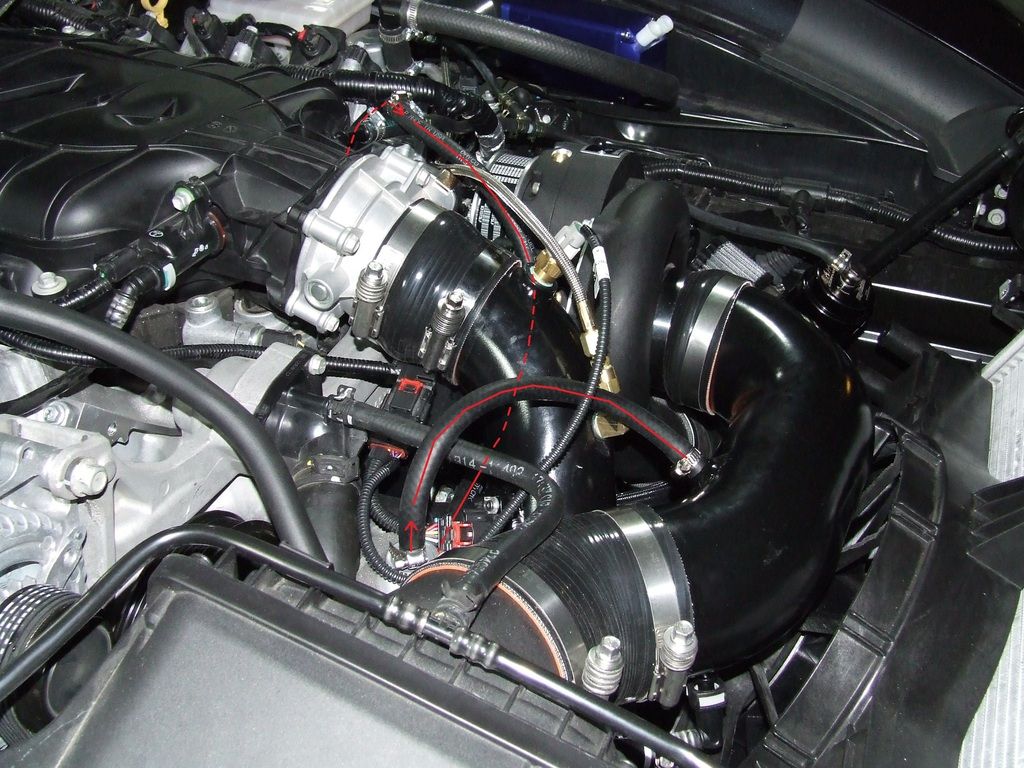
My photo illustration of A&A install plus Vengeance Racing dyno tune
#21
Drifting


Thread Starter
I'll be down to Dallas again in the spring. We'll have to meet up again! I think you'll like a test drive in the A8 at this power level...
#22
Pro


It's like I told Brandon Hutton (on3wego on the forum), he's running 416ci and 15 psi @ 937rwhp and I've been in is car. You can only accelerate as fast as your tires let you. Zero to 100 I'm very close to being as quick as anything out there on OEM tires. In other words, it's a freaking blast and like most people say, I don't know why I waited so long to mod it. Had about 3500 miles when I drove to Atlanta and now have 5000 miles. Time for my first oil change.
I'll be down to Dallas again in the spring. We'll have to meet up again! I think you'll like a test drive in the A8 at this power level...
I'll be down to Dallas again in the spring. We'll have to meet up again! I think you'll like a test drive in the A8 at this power level...
Have to admit Clark. It was fun riding in my car. I'm ready see how that A8 feels boosted.
#24
Drifting


Thread Starter
Absolutely, keep the stock MAP in when driving on stock tune. The car did just fine on 800 miles with FI, Meth and headers on stock tune! Just don't dip into boost too much and if you don't have a boost gauge, just don't put a significant load on her. Drive like a state trooper is in sight. Don't be afraid to get rolling moderately quickly, it's not that touchy.
Last edited by imxz28; 01-15-2016 at 02:55 PM.
#25
Burning Brakes


Absolutely, keep the stock MAP in when driving on stock tune. The car did just fine on 800 miles with FI, Meth and headers on stock tune! Just don't dip into boost too much and if you don't have a boost gauge, just don't put a significant load on her. Drive like a state trooper is in sight. Don't be afraid to get rolling moderately quickly, it's not that touchy.
#26
Drifting


Thread Starter
PM me for my cell if you hit any snags. I became quite intimate with all three components and would be happy to help if needed. What systems are you installing? A&A and Alky Control? I have the TSP headers and those require a special touch so they don't rub anywhere but they are among the best on the market and the best price too!
#28
Drifting


Thread Starter
#30
Drifting


Thread Starter
Any "B" level do it yourself guy can do it. There are a couple of gotcha's but nothing you won't figure out. PM me if you want my cell and we can chat about the gothcha's.
#32
Drifting


Thread Starter
They don't need to be complicated and expensive to function well. Just be sure to have negative pressure on the can and good flow in and out. I siphon about 8oz of oil colored liquid from mine every 800 miles or so. The liquid is as thin as water and likely a mixture of oil, condensed gas and moisture vapor. My engine oil level never seems to drop so I lean towards the condensed vapor theory. I also have a home made can on the intake valley (formerly the PCV valve). It needed to be small enough to fit in the tight space I had. You should note that this can off the intake valley is always dry as a bone.
Here's a couple of photos of my set up.


#33
Drifting


Thread Starter
You may find some interest in this thread about my catch can.
https://www.corvetteforum.com/forums...lications.html
https://www.corvetteforum.com/forums...lications.html
#34
Melting Slicks


Member Since: Dec 2008
Location: Mount Airy NC
Posts: 2,073
Received 560 Likes
on
379 Posts
C7 of Year Finalist (performance mods) 2019

I'm getting ready to do an A&A install and stock ported exhaust manifolds very soon, kit is in the mail. I would be interested on what you think were the "gotchas" . I've read the instructions about a dozen times so far now and honestly the hardest part looks like it's cutting out the plastic and mounting the intercooler. But any things that would be of help would be great to know....thanks.
#35
I'm getting ready to do an A&A install and stock ported exhaust manifolds very soon, kit is in the mail. I would be interested on what you think were the "gotchas" . I've read the instructions about a dozen times so far now and honestly the hardest part looks like it's cutting out the plastic and mounting the intercooler. But any things that would be of help would be great to know....thanks.
#36
Drifting


Thread Starter
I'm getting ready to do an A&A install and stock ported exhaust manifolds very soon, kit is in the mail. I would be interested on what you think were the "gotchas" . I've read the instructions about a dozen times so far now and honestly the hardest part looks like it's cutting out the plastic and mounting the intercooler. But any things that would be of help would be great to know....thanks.
If you have an A8, you will need to remove your starter to lock your flywheel. I think M7 is just putting the trans in high gears to lock the crank still.
There's a few more things that come to mind... use caution when dismantling the main fuse box to gain access to the passenger side exhaust manifold and don't over tighten the main electrical connectors when installing. I've heard of more than one guy who over tightened and broke the plastic housing. See pics 5 and 6 at the top of page one here.
The ABS relocation is not rocket science but is time consuming. I was careful to loosen the brake lines just enough to twist but not so much that it leaked fluid or burp air. It takes lots of prying and moving in little increments to get the bracket and angle you need to fit the supercharger. Just keep working it. The lines are more flexible than you think. Just don't force too much too fast and kink one!
My Supercharger bracket was off a couple of millimeter and simply would not bolt up. Not a big deal. I used a dremel tool to off set one or two of the bracket holes.
One of my bolts on the stock exhaust collector was really hard to get to and in the end I had to cut it off. That was painful but only cost me an hour. Be cautious not to strip the bolts. P.S. impact guns can be your friend or enemy here!
Getting the charge tube between the air filter and the supercharger to fit well and at a good angle is tough. I cut into the "fins" on my radiator fan with a grinder (about 1 inch or so) made all the difference in getting the good fit.
Cutting the plastic to fit the air to air heat exchanger is time consuming. Go slow and cut in very small increments. I wanted a good fit. Took me about 3 hours.
There's a really good thread on installing Alky Control if you're doing that. There's a few tips i can add to that if you let me know.
Oh... one important subject - I contacted Andy about the complete lack of any bolt torque values. I shared my research/findings with him and he was going to update his pdf files. If that's not been done and you need any values, I have most of them written down. Don't over tighten certain bolts as it can cause problems with stripping and breaking cast parts. I used blue thread locker on almost everything I touched.
As usual, if you get stuck with anything, it's always good to talk it out with someone who's been there.
PM if you want my phone number. Happy to help anytime.
Last edited by imxz28; 03-25-2016 at 11:30 AM.
#37
Bruno is right, my biggest gotcha was the crank bolt. I literally broke my finger when the the breaker bar slipped off. Mine was that tough to get off. The problem is this... GM used red thread locker all over the bolt head which has a one piece built in over sized washer. Solution - hit it with a standard propane blow torch on the bolt head for a good minute or two. It melts the red thread locker and presto.
If you have an A8, you will need to remove your starter to lock your flywheel. I think M7 is just putting the trans in high gears to lock the crank still.
There's a few more things that come to mind... use caution when dismantling the main fuse box to gain access to the passenger side exhaust manifold and don't over tighten the main electrical connectors when installing. I've heard of more than one guy who over tightened and broke the plastic housing. See pics 5 and 6 at the top of page one here.
The ABS relocation is not rocket science but is time consuming. I was careful to loosen the brake lines just enough to twist but not so much that it leaked fluid or burp air. It takes lots of prying and moving in little increments to get the bracket and angle you need to fit the supercharger. Just keep working it. The lines are more flexible than you think. Just don't force too much too fast and kink one!
My Supercharger bracket was off a couple of millimeter and simply would not bolt up. Not a big deal. I used a dremel tool to off set one or two of the bracket holes.
One of my bolts on the stock exhaust collector was really hard to get to and in the end I had to cut it off. That was painful but only cost me an hour. Be cautious not to strip the bolts. P.S. impact guns can be your friend or enemy here!
Getting the charge tube between the air filter and the supercharger to fit well and at a good angle is tough. I cut into the "fins" on my radiator fan with a grinder (about 1 inch or so) made all the difference in getting the good fit.
Cutting the plastic to fit the air to air heat exchanger is time consuming. Go slow and cut in very small increments. I wanted a good fit. Took me about 3 hours.
There's a really good thread on installing Alky Control if you're doing that. There's a few tips i can add to that if you let me know.
Oh... one important subject - I contacted Andy about the complete lack of any bolt torque values. I shared my research/findings with him and he was going to update his pdf files. If that's not been done and you need any values, I have most of them written down. Don't over tighten certain bolts as it can cause problems with stripping and breaking cast parts. I used blue thread locker on almost everything I touched.
As usual, if you get stuck with anything, it's always good to talk it out with someone who's been there.
PM if you want my phone number. Happy to help anytime.
The following users liked this post:
chefcg1 (03-25-2016)
#38
Melting Slicks


Member Since: Dec 2008
Location: Mount Airy NC
Posts: 2,073
Received 560 Likes
on
379 Posts
C7 of Year Finalist (performance mods) 2019

Great info guys, really appreciate it! I'm sure as I get closer to the install I'll contact you all again. I'm still probably a couple weeks out because of work schedule, but want all my ducks in a row.
#39
Just search for install threads. Even for different kits. Since the three centrifugal kits are fairly similar, a lot of the advice goes for all. My install thread should be somewhere on the lower front page still. I spoke a lot about short comings and issues I ran into.
The following users liked this post:
chefcg1 (03-26-2016)
#40
Melting Slicks


Member Since: Dec 2008
Location: Mount Airy NC
Posts: 2,073
Received 560 Likes
on
379 Posts
C7 of Year Finalist (performance mods) 2019

Okay guys, I received my used kit and everything looks really good, BUT it looks like I'm missing 2 things. The first is the installation 160mm crank bolt. It's the one used only to pull the pulley on a little. The other part is the coolant extension pipe for the radiator hose and the clamps. I assume these were not available with the used kit as it was installed originally proffecionally and when it was taken off they didn't replace the radiator hose.
So can I sorce these 2 locally or do I need to buy from A&A?
Next question, should I also get a new crank pulley bolt?
Sorry for all the questions but basically I got a bag of bolts and I'm not 100% sure what is what yet. I emailed A&A to see if they can give me a parts list.
Everything came well packed and in perfect condition so I'm very happy with the purchase.


 you have guts my friend.


