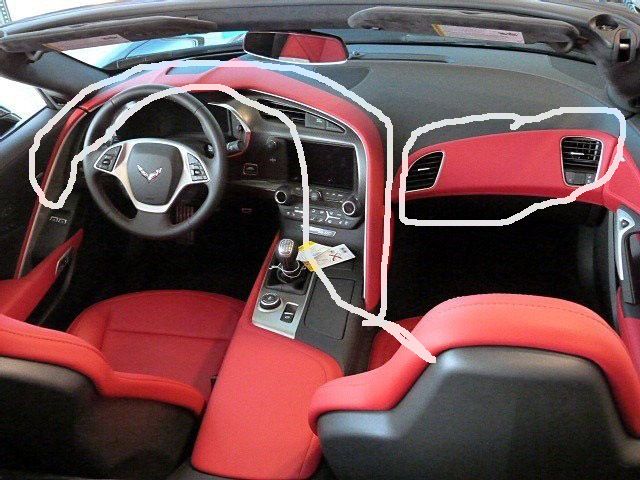
Factory interior parts replacement
#21
Thanks,
Marty
#22
Racer


How hard is it to replace the trim pad? Is there any videos how to's or picture how to's beside the drawing from the manual? It looks like the glove box has to come off first? I'm debating whether to do this or to have a leather upholstery place dye my interior. Does anyone have any referrals to a place in either central or Southern CA? Thanks.
Last edited by vincent_esq; 12-02-2015 at 03:16 PM.
#23
Safety Car


How hard is it to replace the trim pad? Is there any videos how to's or picture how to's beside the drawing from the manual? It looks like the glove box has to come off first? I'm debating whether to do this or to have a leather upholstery place dye my interior. Does anyone have any referrals to a place in either central or Southern CA? Thanks.
Last edited by Red C8 of Jax; 12-02-2015 at 05:16 PM.
#24
Pro


Last edited by monicatomokc; 12-03-2015 at 01:01 PM.
#25
Safety Car


I'd agree. I often think about adding a little more red to my 1LT interior, but start to think it might be a little too much. I did all the stitching in red (can't really see it in the pic) and am really happy with the way it is. Still saving to upgrade my MyLink HMI module so I can get Apple CarPlay, so that's where my money is headed next year...

#26
Le Mans Master


How hard is it to replace the trim pad? Is there any videos how to's or picture how to's beside the drawing from the manual? It looks like the glove box has to come off first? I'm debating whether to do this or to have a leather upholstery place dye my interior. Does anyone have any referrals to a place in either central or Southern CA? Thanks.
https://www.corvetteforum.com/forums...nger-dash.html
Really a major pain!
Remove console piece to get the handrail piece out that blocks removal of the glove box; remove door trim to allow the removal of the box; plastic piece under box towards the firewall covers three screws...broke of one retainer that holds it up. Three screws hold the hinge for the box; and the biggest pain is removal of the box surround that holds the vents. Two screws are obvious just on the front lip in plain view; another screw is horizontal on the immediate inside the left upper and screws into the handhold area; the most trouble are two screws that are hidden on the inside of the surround piece. Must get a socket up inside the box cavity via holes in the fiberglass next to the two initial screws that were removed. Had to use a hacksaw blade to cut out a small amount of fiberglass to allow for the 7 mm socket clearance into the screws wbich hold the central section of the box surround.
Once out the vent silver trim pieces come off fairly easily and separate from the vent for ease of painting.
I am installing the Spice Red interior ( replacing black) and this surround is one that is being replaced along with the complete door panels, console cover, console drivers side trim, hood piece that we discussed around instrument cluster, and comp. seat skins.
My black Z06 has several exterior areas painted in crystal red, so that is the reason I wanted to have more red in the interior and it snowballed into this total replacement.
Anyway, this upper glovebox surround is a lengthy removal due to the difficulty in accessing the various scres in the glove box and the surround.
Last edited by BOBSZ06; 12-04-2015 at 12:03 PM.
The following users liked this post:
matt3310 (12-03-2015)
#29
Melting Slicks


Member Since: Sep 2016
Location: Northville Michigan
Posts: 3,074
Received 1,195 Likes
on
663 Posts
C7 of the Year - Unmodified Finalist 2021
How much did dealer charge to install the passenger side glove box trim pad?
I used an auto upholstery shop to install the Upper molding and Finish panel. If you have interior trim tools you could probably do these parts yourself. The Upper molding snaps out and the Finish panel, you have two screws to remove it. When you receive the new parts you can tell how they are attached. The upholstery shop did not want to install the Trim pad, so I had the dealer install it. I know you have to remove the glove box first before you install the Trim pad. I did install the Console Side Panel, it took about 5 min. For most of my projects, what can go wrong will go wrong! Good Luck.


