
2014 Corvette Stingray C7 Rear Bumper Removal
 02-15-2014, 11:38 AM
#1
Supporting Vendor
Thread Starter

We have had many requests asking how to remove the rear bumper on your C7. We have compiled a quick run through of how to do so. Along the way if you have any pointers please feel free to add to them based on your experience with the removal. This is a fairly easy process and only requires two people when it comes time for the bumper to actually to be removed. Make sure to have a soft area to set the bumper on.
First, you want to start off by loosening the interior trim panel by pulling towards the front of the vehicle. You do not want to remove this completely as it is not necessary. You are just loosening it to reveal the cable that attaches to your trunk latch. Once you locate this, you must remove it from the latch.
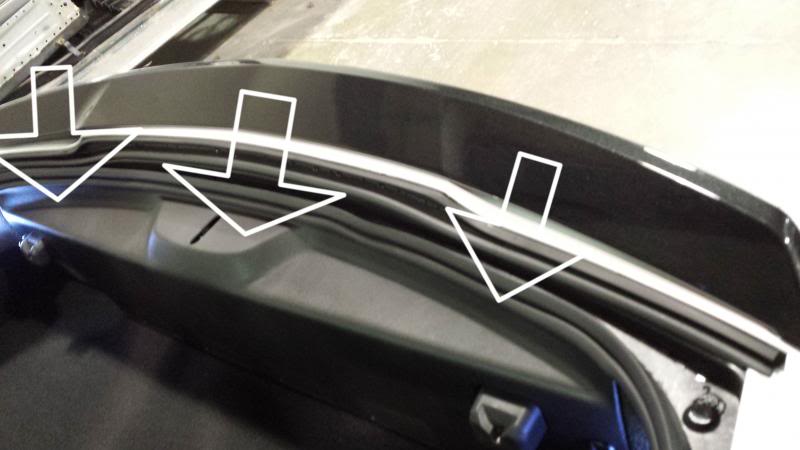
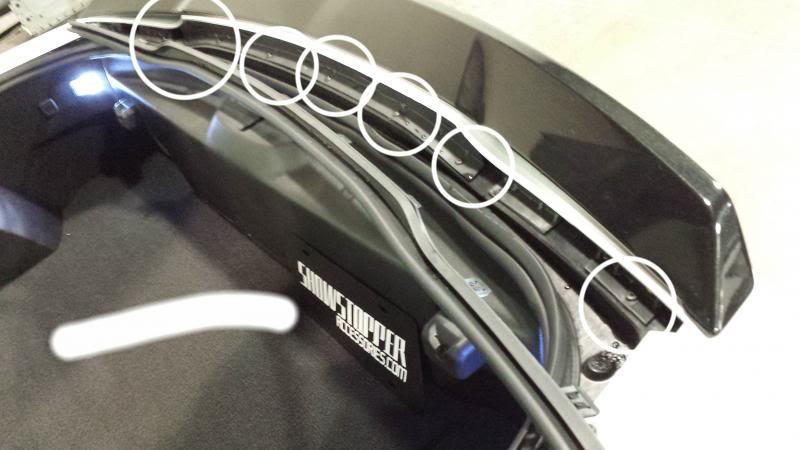
Next you want to remove the rubber gasket trim piece that covers the Torx screws that you need to remove. This is done by grabbing it and giving it a wiggle. You should be able to remove the entire trim piece by doing so. If it does not wiggle out, a flat head screw driver will help by depressing the tabs to they come out easier. Once this trim piece is removed, you will see the T15 screws that need to be removed.
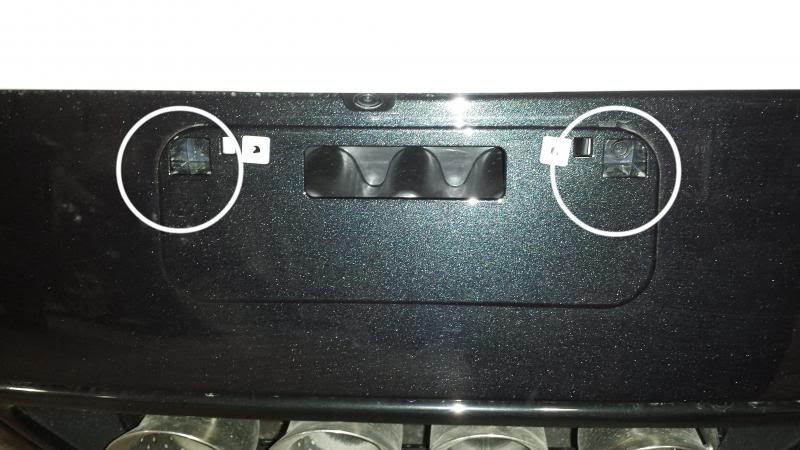
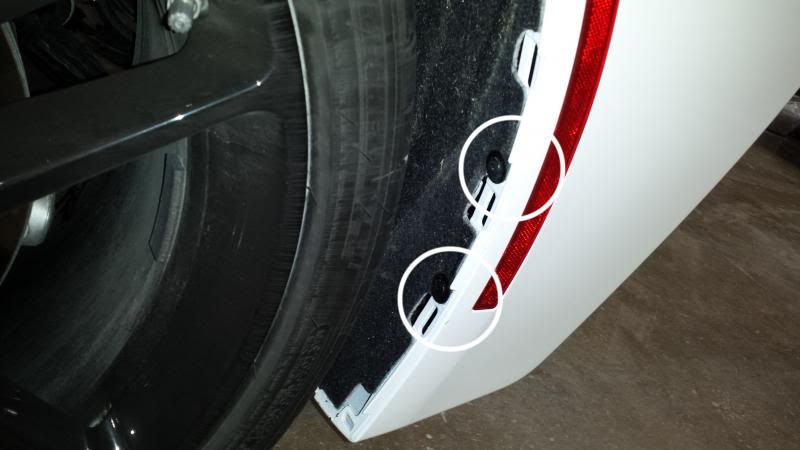
After you remove the t15 screws along the top, it is time to start removing fasteners towards the bottom. In order to do this, remove your rear license plate. You will reveal two 10mm bolts. Remove these.
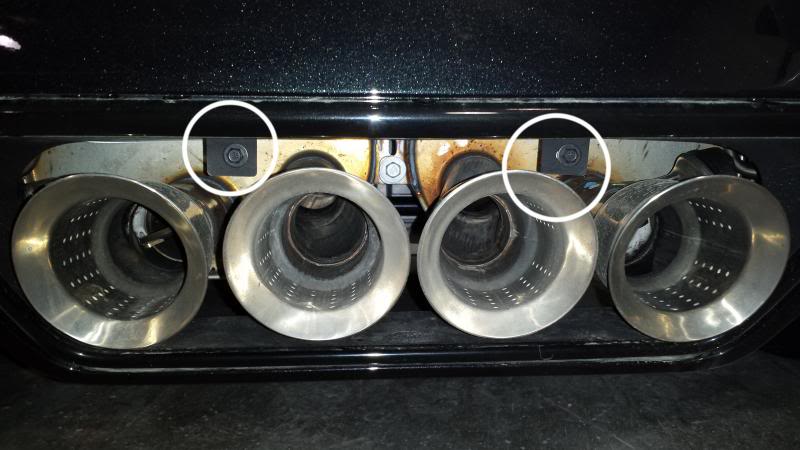
Once those two bolts behind the license plate are removed there are two additional 10mm bolts that also need to be removed that are located just above the exhaust tip. You will most likely need a short 6 inch extension for these.
Next, way at the bottom of the bumper there will be a total of 10 7mm bolts that need to be removed. 5 on the left and 5 on the right.
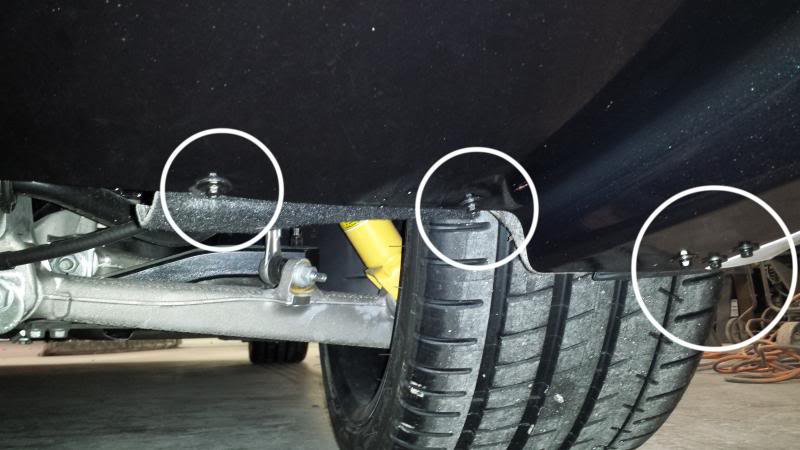
Once the 7mm bolts on the bottom of the bumper are removed the next step will be to remove the mudflaps that are just snapped into the bumper. It is best to use a plastic pry tool to get this started then once it is started you can pull the rest off by hand. After this mudflap is removed, it will reveal two t15 torx screws. Remove these as well.

This next step is a little tedious. You need a small tool that has a hook on it. You want to hook the tool in the mesh part of the bezel around your taillights. Pulling back, the corner will release. Once the corner is released you will be able to persuade the rest of the bezel out. Do this same step for the other side.
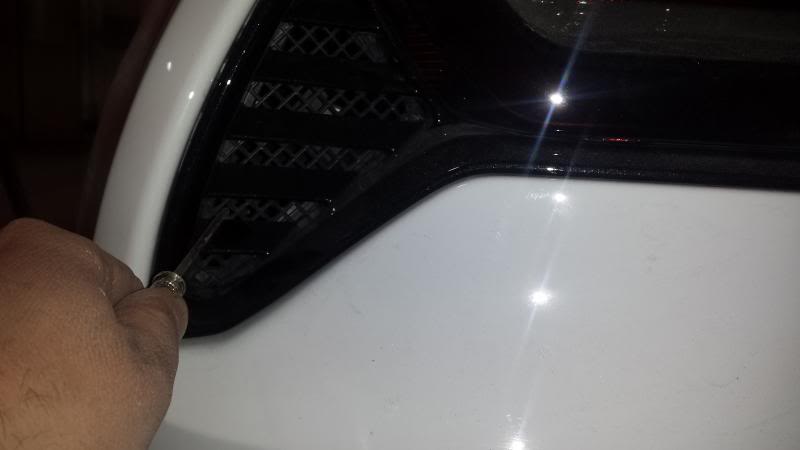
Now that the bezel is out, you will reveal a t15 torx screw. Remove that screw. You want to repeat this for the other side as well.

So all of the bolts are removed. What do you do next? This is when you want to call over a neighbor to give you a hand. One person should be on each side of the car. Grab the bumper and pull straight back. Don't be afraid. It will seem like you are breaking stuff but you are not. Once you pull back, you will need to fish the rest of the cable out that was connected to your trunk latch. In additions to this there are two electrical connectors that also need to be disconnected. After this is all done, your bumper is free.
First, you want to start off by loosening the interior trim panel by pulling towards the front of the vehicle. You do not want to remove this completely as it is not necessary. You are just loosening it to reveal the cable that attaches to your trunk latch. Once you locate this, you must remove it from the latch.

Next you want to remove the rubber gasket trim piece that covers the Torx screws that you need to remove. This is done by grabbing it and giving it a wiggle. You should be able to remove the entire trim piece by doing so. If it does not wiggle out, a flat head screw driver will help by depressing the tabs to they come out easier. Once this trim piece is removed, you will see the T15 screws that need to be removed.

After you remove the t15 screws along the top, it is time to start removing fasteners towards the bottom. In order to do this, remove your rear license plate. You will reveal two 10mm bolts. Remove these.

Once those two bolts behind the license plate are removed there are two additional 10mm bolts that also need to be removed that are located just above the exhaust tip. You will most likely need a short 6 inch extension for these.

Next, way at the bottom of the bumper there will be a total of 10 7mm bolts that need to be removed. 5 on the left and 5 on the right.

Once the 7mm bolts on the bottom of the bumper are removed the next step will be to remove the mudflaps that are just snapped into the bumper. It is best to use a plastic pry tool to get this started then once it is started you can pull the rest off by hand. After this mudflap is removed, it will reveal two t15 torx screws. Remove these as well.


This next step is a little tedious. You need a small tool that has a hook on it. You want to hook the tool in the mesh part of the bezel around your taillights. Pulling back, the corner will release. Once the corner is released you will be able to persuade the rest of the bezel out. Do this same step for the other side.

Now that the bezel is out, you will reveal a t15 torx screw. Remove that screw. You want to repeat this for the other side as well.

So all of the bolts are removed. What do you do next? This is when you want to call over a neighbor to give you a hand. One person should be on each side of the car. Grab the bumper and pull straight back. Don't be afraid. It will seem like you are breaking stuff but you are not. Once you pull back, you will need to fish the rest of the cable out that was connected to your trunk latch. In additions to this there are two electrical connectors that also need to be disconnected. After this is all done, your bumper is free.


The following 16 users liked this post by Pete@Showstopper:
!00%DISVET (03-02-2016),
brentil (02-03-2017),
Chazzmania (12-10-2016),
Crossed Flags Fan (08-14-2020),
danh63 (08-04-2017),
and 11 others liked this post.

 02-18-2014, 03:58 PM
#4
SUPPORT AUTISM

 03-04-2014, 11:41 PM
#5
Supporting Vendor
Thread Starter
The following users liked this post:
Frank P. (03-02-2017)
03-05-2014, 12:33 AM
#6
Administrator

Member Since: Mar 2001
Location: In a parallel universe. Currently own 2014 Stingray Coupe.
Posts: 342,882
Received 19,282 Likes
on
13,960 Posts
C7 of the Year - Modified Finalist 2021
MO Events Coordinator
St. Jude Co-Organizer
St. Jude Donor '03-'04-'05-'06-'07-'08-'09-'10-'11-'12-'13-'14-'15-'16-'17-'18-'19-
'20-'21-'22-'23-'24
NCM Sinkhole Donor
CI 5, 8 & 11 Veteran


Thanks for taking the time to document and post up this info.
03-16-2014, 03:56 PM
#7
Supporting Vendor
Thread Starter
03-29-2014, 04:35 PM
#8
Pro

My spoiler came in after they delivered the car, so I used your instructions to install it myself, worked great!! Thanks for posting them.
One thing I didn't do was take the bumper all the way off, just pulled it back enough to get the nuts on, a little tedious, but all went well.
Again thanks for taking the time.
Cal
One thing I didn't do was take the bumper all the way off, just pulled it back enough to get the nuts on, a little tedious, but all went well.
Again thanks for taking the time.
Cal
Last edited by 1SG; 03-29-2014 at 04:47 PM.
The following users liked this post:
!00%DISVET (03-02-2016)
03-29-2014, 05:13 PM
#9
SUPPORT AUTISM
My spoiler came in after they delivered the car, so I used your instructions to install it myself, worked great!! Thanks for posting them.
One thing I didn't do was take the bumper all the way off, just pulled it back enough to get the nuts on, a little tedious, but all went well.
Again thanks for taking the time.
Cal
One thing I didn't do was take the bumper all the way off, just pulled it back enough to get the nuts on, a little tedious, but all went well.
Again thanks for taking the time.
Cal
If you drilled the holes did you remove the tail lights ?
Thanks
 03-29-2014, 06:24 PM
#10
Pro
Yes I had to drill 13/32 holes (9). No I did not remove the tail lights. It would be easier with them out, but got all nuts tight with a little more effort. Just be careful when the drill goes through. Used a ratchet wrench that has a swivel head, and a small ratchet worked. You can get to a couple of the nuts through the tail lights. Took 2 hours
The following users liked this post:
Johnp94 (04-27-2017)


The following users liked this post:
alphavette (02-18-2016)
 12-09-2014, 12:45 PM
#15

Thanks Pete, This is a real help in getting to the area needed to install a tow hook receiver that Chev so thoughtfully did not install unless you get a European car. Did they really think all the racing organizations were just going to let us C7 owners slide???
The following users liked this post:
adidadrivnmyZ51 (12-31-2015)
12-09-2014, 01:08 PM
#16
Supporting Vendor
Thread Starter
Hopefully it helped a bit.


