
Theta - how to adjust headlights up slightly
 05-30-2014, 02:10 PM
#1
Burning Brakes

Thread Starter

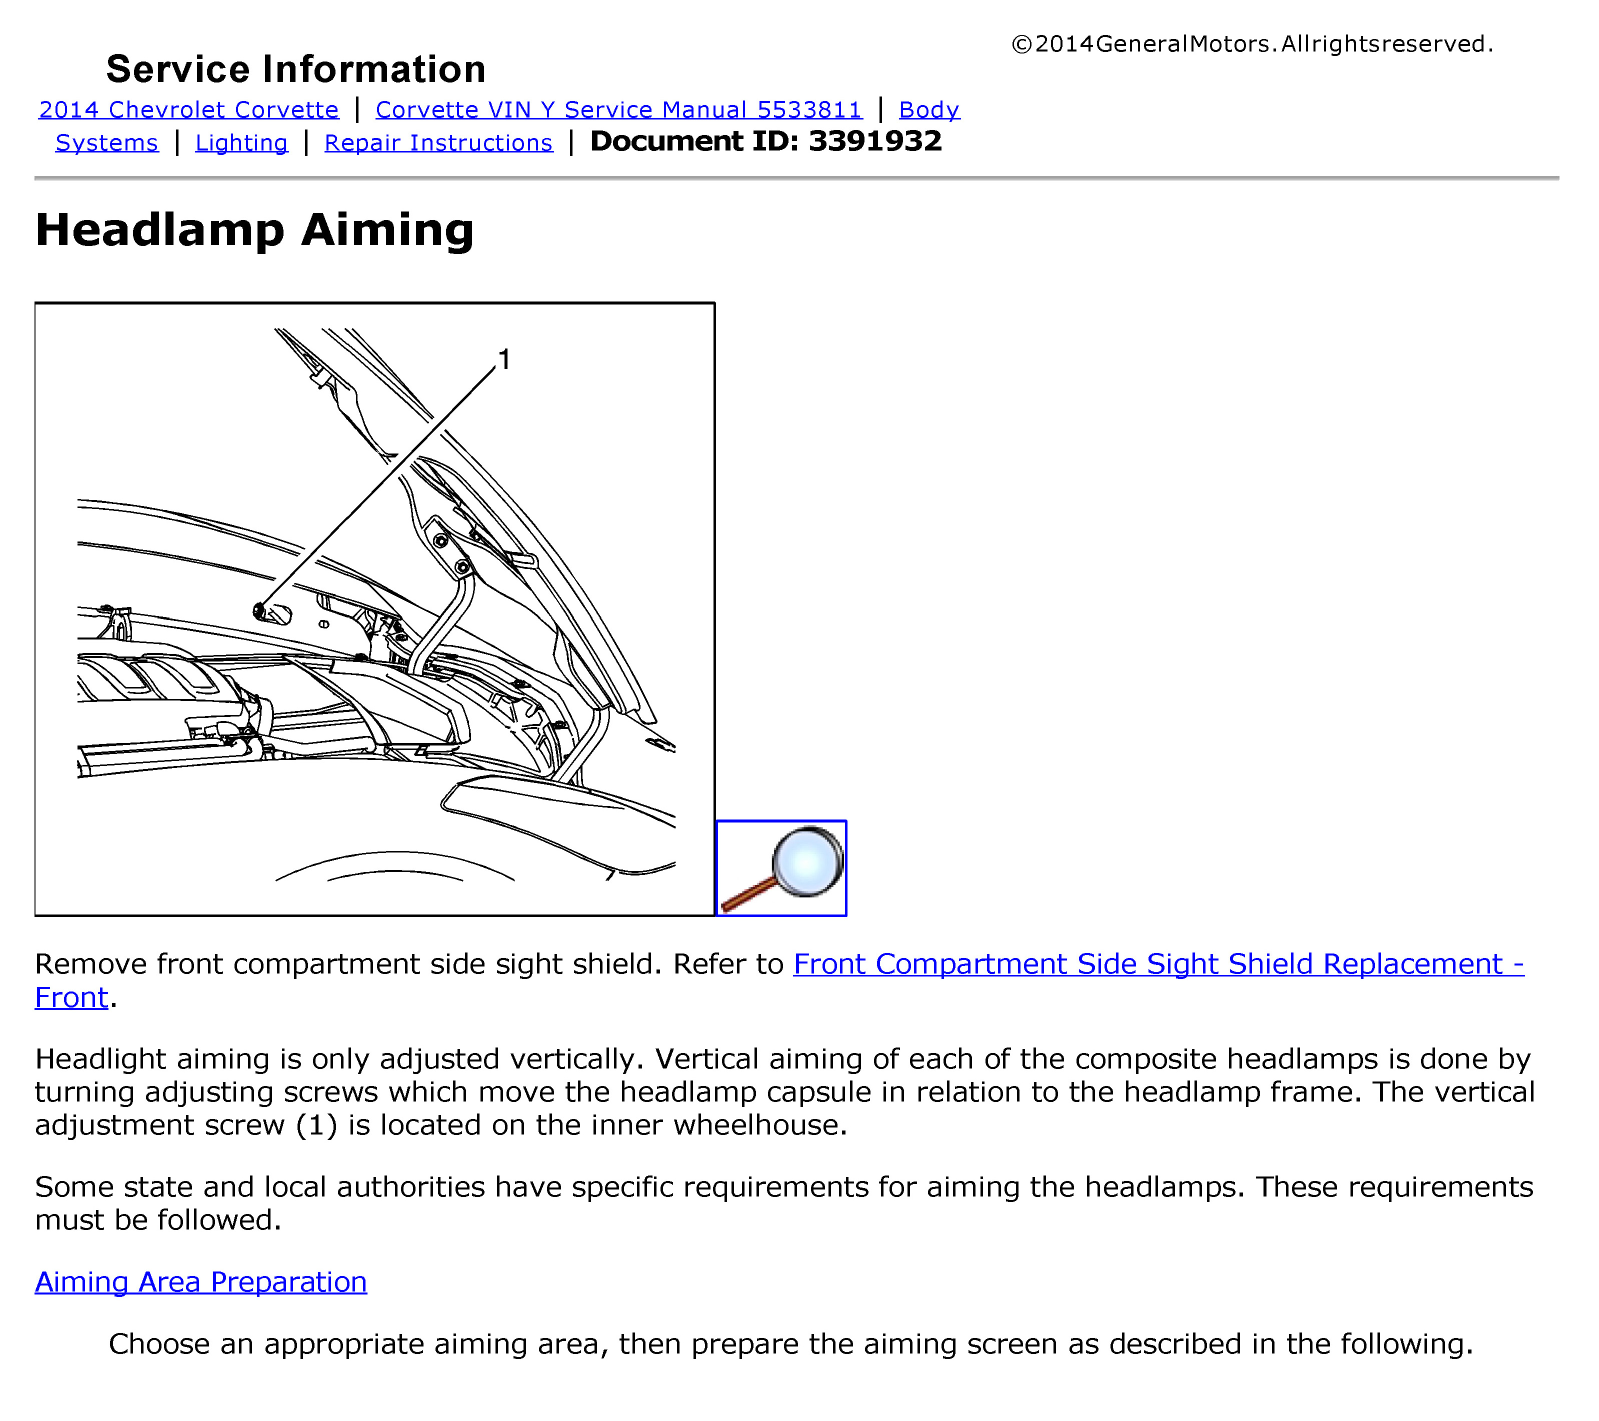
Theta, I would like to adjust my headlights up slightly.. currently just
don't shine far enough. Do you have any information on how to do this and get access to the headlights?
Thanks..
don't shine far enough. Do you have any information on how to do this and get access to the headlights?
Thanks..

The following users liked this post:
BostonVette (01-02-2020)
05-30-2014, 06:19 PM
#4
Burning Brakes
Thread Starter
Theta...
WOW, Fantastic...
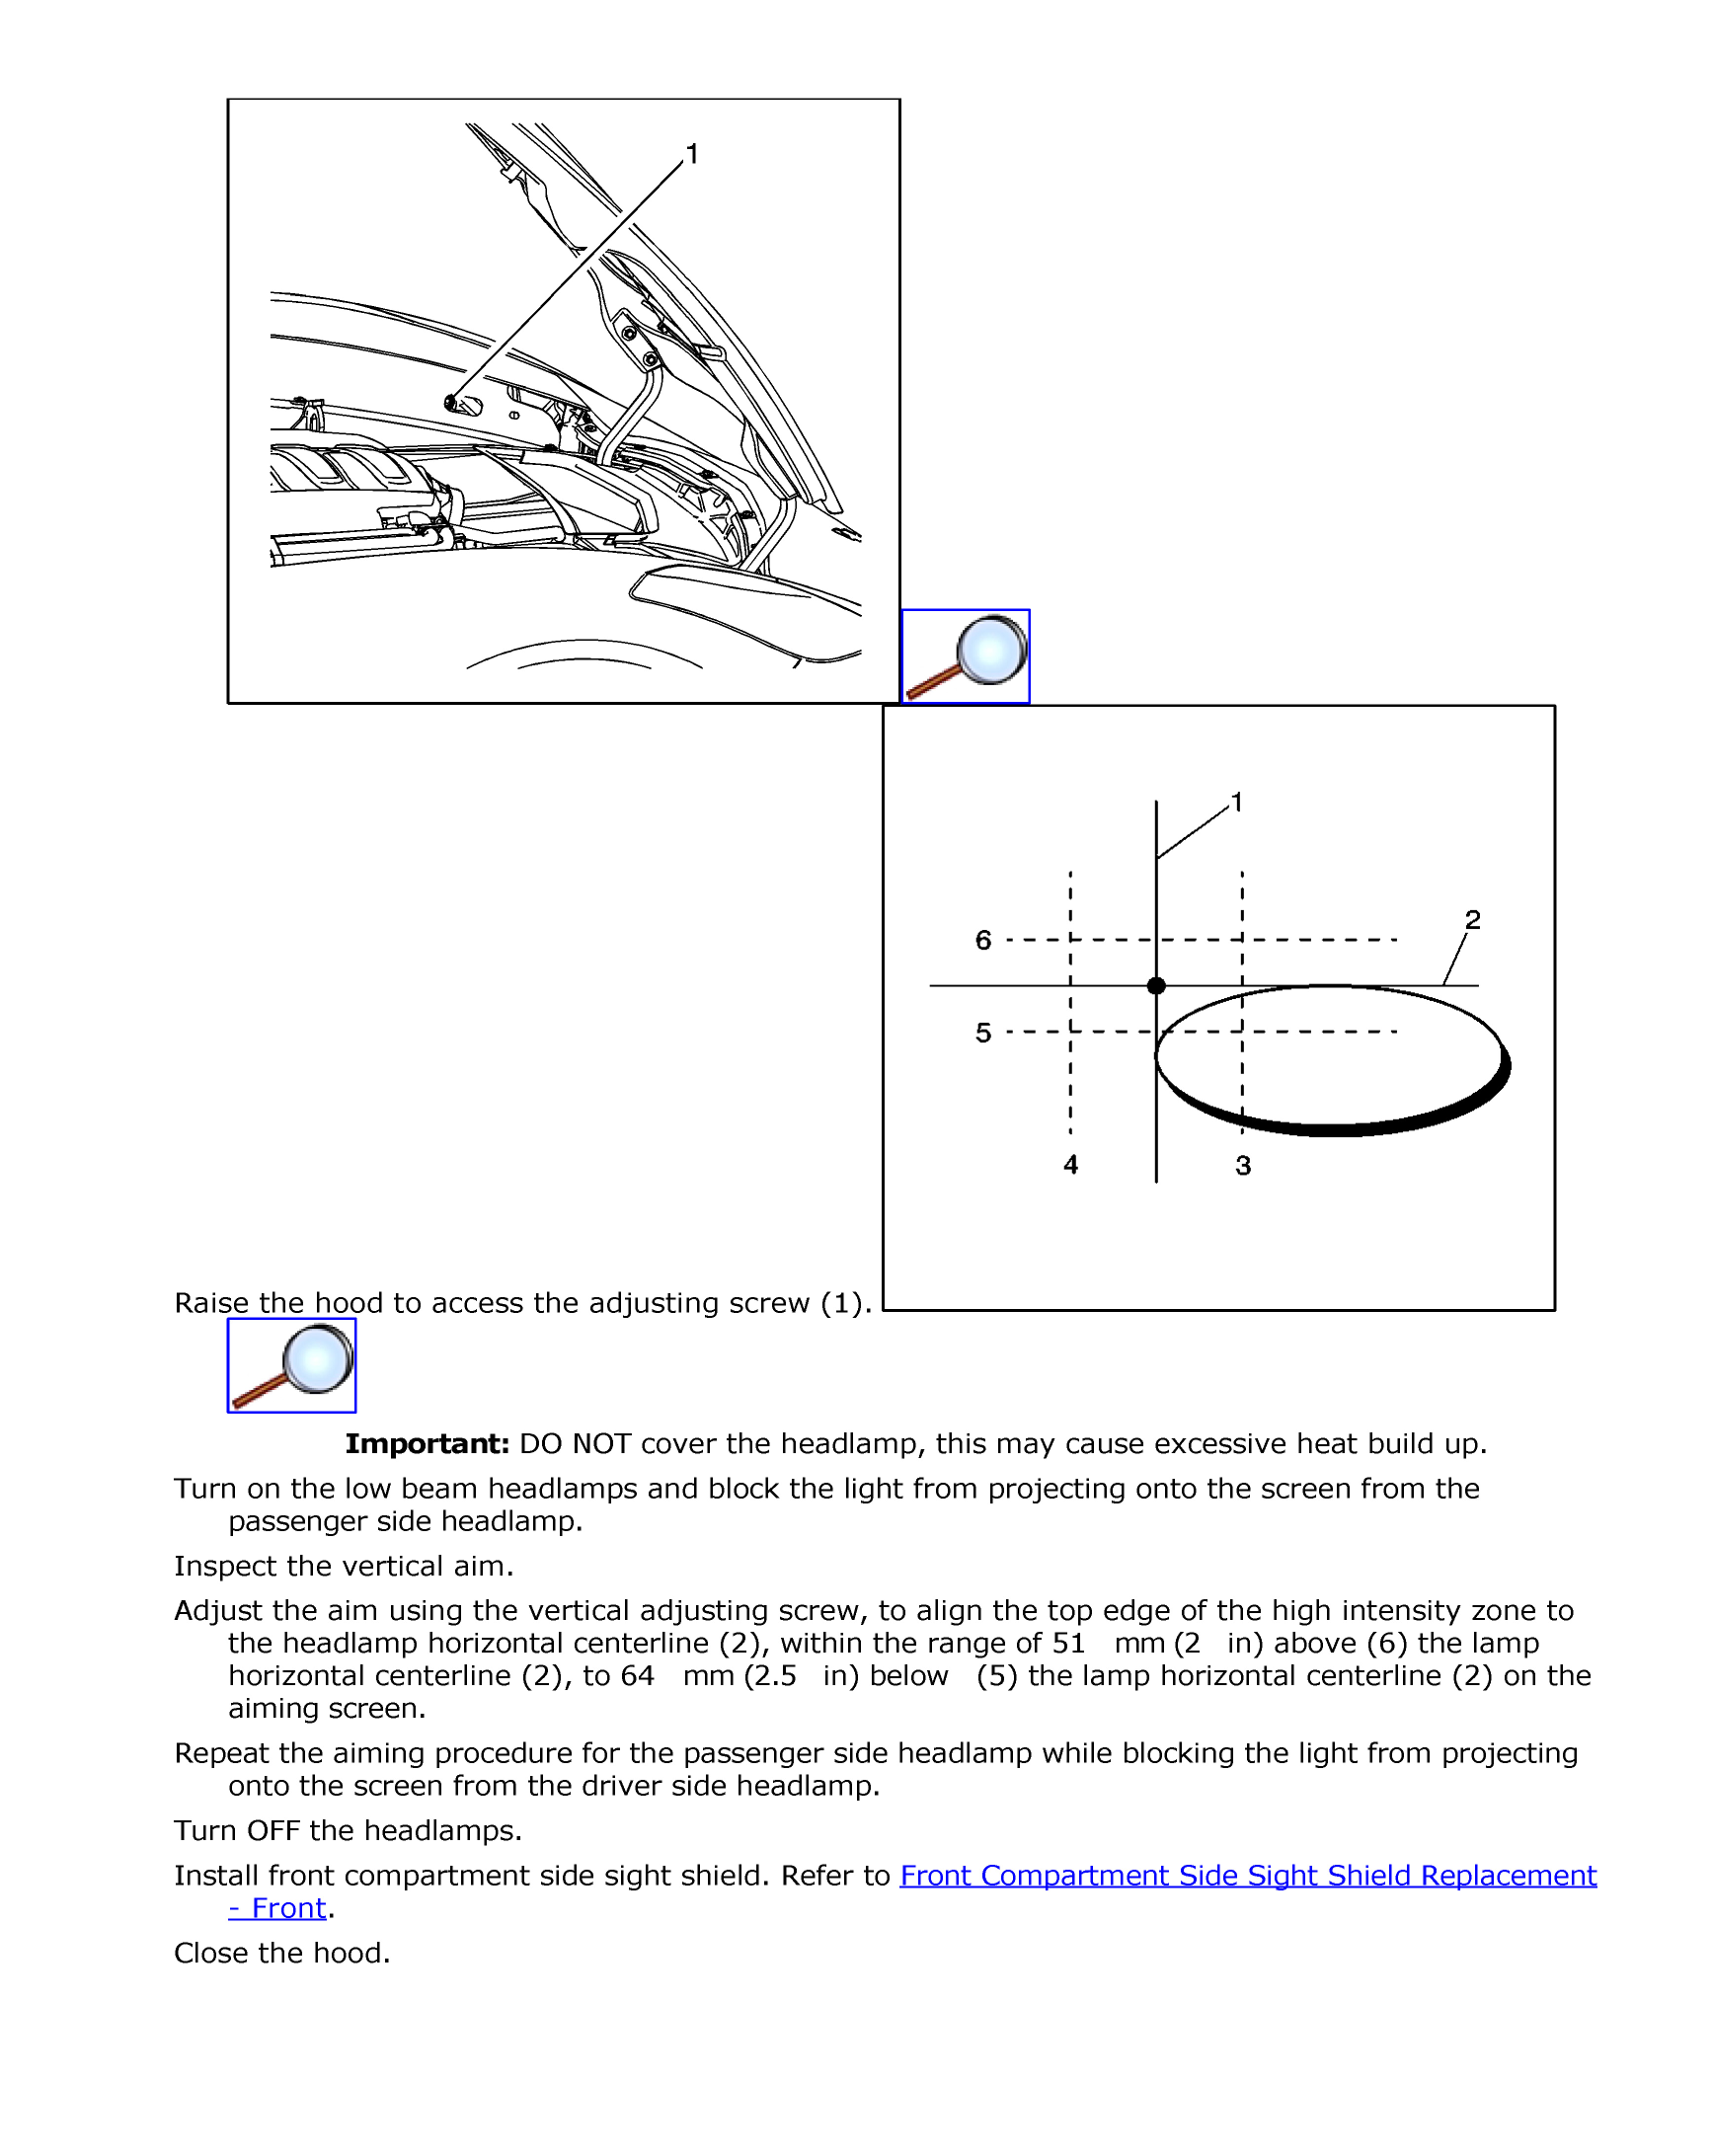
The adjustment appears to be right there.. a simple phillips
screwdriver will do.
I was previously told i would have to remove the front wheels and wheel well liners and go through there.. what a headache.
But , if the adjustment is as appears, just remove the cover and it's right there...
You are a blessing...
THANKS
WOW, Fantastic...
The adjustment appears to be right there.. a simple phillips
screwdriver will do.
I was previously told i would have to remove the front wheels and wheel well liners and go through there.. what a headache.
But , if the adjustment is as appears, just remove the cover and it's right there...
You are a blessing...
THANKS
 05-30-2014, 07:36 PM
#6
Tech Contributor
Member Since: Jan 2006
Location: Saint Louis MO
Posts: 4,761
Likes: 0
Received 219 Likes
on
110 Posts
St. Jude Donor '14-'15
Theta...
WOW, Fantastic...
The adjustment appears to be right there.. a simple phillips
screwdriver will do.
I was previously told i would have to remove the front wheels and wheel well liners and go through there.. what a headache.
But , if the adjustment is as appears, just remove the cover and it's right there...
You are a blessing...
THANKS
You actually have to remove the wheels, wheel liners, and front bumper to gain access to change a bulb.
Now that's fun stuff.

Enjoy!
05-30-2014, 10:46 PM
#7
Drifting


Say it ain't so on the bulb replacement..

 05-30-2014, 10:47 PM
#8
Tech Contributor
Member Since: Jan 2006
Location: Saint Louis MO
Posts: 4,761
Likes: 0
Received 219 Likes
on
110 Posts
St. Jude Donor '14-'15
Sadly, I'm not joking. I was going to replace my bulbs (Corrected: D2S) with slightly cooler temps (5000k), and couldn't believe it when I found that....
/facepalm
/facepalm
Last edited by Theta; 12-19-2014 at 04:42 AM.

 12-19-2014, 09:02 AM
#10
Moderator/Tech Contributor

Member Since: Jun 2001
Location: Jacksonville Florida BWO Dayton, Cincinnati, Bloomsbury NJ, Cincinnati
Posts: 18,244
Received 3,822 Likes
on
2,066 Posts
2015 C7 of the Year Finalist

I believe you will need a metric allen wrench and a fairly big one.
Elmer
Elmer
12-19-2014, 09:09 AM
#11
Le Mans Master

12-29-2019, 02:03 PM
#12
1st Gear


Member Since: Dec 2019
Posts: 1
Likes: 0
Received 0 Likes
on
0 Posts
So first off thanks for the tutorial on aiming headlights. I couldn�t find it anywhere on YouTube and I�m tired of not being able to see. Now, when the time comes that I see my Z06 has turned into One-eyed *****, you will all see a post 2016 Z06 for sale, low miles, excellent condition, needs nothing except one headlight bulb. I already bought the bulb, just no time to change it.
12-30-2019, 10:54 AM
#13
Melting Slicks


You "only" need to remove the front bumper cover, and then remove the headlight assembly to change the bulb or ballast. The wheels and wheel well liners do not have to be removed.
 11-08-2021, 11:57 AM
#15

OP;
*Counter clockwise= Up headlight.
*Clockwise= Down headlight.
I adjusted mine one complete revolution, (Counterclockwise).
Note1: Reference point, Red marking pen to plastic adjustment screw.
Note2: Philips screwdriver.
Note3: 3-5 minutes to complete.
Many thanks,
Ray
*Counter clockwise= Up headlight.
*Clockwise= Down headlight.
I adjusted mine one complete revolution, (Counterclockwise).
Note1: Reference point, Red marking pen to plastic adjustment screw.
Note2: Philips screwdriver.
Note3: 3-5 minutes to complete.
Many thanks,
Ray
Last edited by Rayland; 11-08-2021 at 11:59 AM. Reason: added note 3.