Questions for Polishing Experts
 03-05-2011, 02:01 PM
#1
Pro

Thread Starter

I have a high-end set of wheels that were damaged due to use of an acidic wheel cleaner. The clearcoat on the centers was destroyed and the polished outer rim has a white, milky look to them.
I have removed the FM5 centers and have been concentrating on them first. I stripped the clear off of them and wet-sanded with 600 then 1200 grit, then hit them with six progressive steps using micro-mesh with water.
The last micro-mesh cloth was MX1200, which is probably equivilent to 2,300 paper.
So with the sanding done, I have hand polished twice with NUVITE grade S. The finish is very nice and although it has quite a shine, it is not the mirror-like shine I hoped for.
The NUVITE S is claimed to me professional grade polish but I also have Mothers billet polish and WENOL, but I have stayed with the NUVITE for now. So for my questions to anyone that has experiance polishing aluminum:
1) If I repeatedly hand polish using the NUVITE S (or any other high-grade polish) can I expect a progressively deeper shine, or after a couple of applications would you think it's as good as it's going to get?
If continued, repeated polishing will pay off I will press on. Just don't want to waste my time - and don't know when it's "as good as it gets".
2) I have read of alot of people applying clearcoat to the centers after polishing for ease of maintenance. My first thought is I would rather not do so and try to keep up with the polishing. The car is basically a sunny weekend car and stays garaged and covered. Will the polish finish constantly degrade even kept waxed and dry?
I am afraid that after all this work an off-the-shelf- clear product might yellow on me. If a little preventative effort will keep those polished finish nice I would like to go that route.
3) Lastly, to the outer rims. I have hit them twice with WENOL and have not been able to buff that white, milky look off of them. Should I put them through the same sanding regimen as the centers or is there something easier that would bring them back as new?
I appreciate your time and any feedback from the experts here.
 03-06-2011, 03:42 PM
#2


Photos would be really helpful.
I would consult the Nuvite website for their polishing procedures, such as this PDF I found. It appears you may have missed a step prior to S.
You may need to polish out the sanding scratches before jumping to a finishing polish, and this pretty much holds with any such process, no matter the brand.
You might try Mothers Mag & Aluminum or one of the coarser Nuvite polishes. Mothers also has a PowerMetal Scratch Removing Polish in a can, and that can remove acid wheel stains on polished aluminum when used with the PowerBall Mini MD (both available online).
I am also familiar with the Mothers Billet Metal Polish, and you certainly don't have anything to lose but it may be close to what you're using now -- but if you don't have a good base, you may be wasting your time.
Wenol has both a red (to remove oxidation and stains) and a soft blue polish (finishing), so whichever one you have would have to fit within the progressively-finer scale of polishing.
03-06-2011, 08:13 PM
#3
Pro
Thread Starter
Thanks for your time Jim, I appreciate it.
I switched to the Mothers Billet Polish and found that made a big difference. I've hit them four times and each time seems to have helped a bit. The Nuvite seemed to leave the finish much duller and it really took more effort to buff it out. I think my first couple of applications were too liberal as well.
I only have the red Wenol and think perhaps that might be a step backwards at this point? I didn't realize there was a blue Wenol for finishing polish and will have to get some of it.
I have alot of work to do on the outer rims. Started with the red wenol without much luck getting the oxidization or white, milky appearance off. I was hoping to avoid the progressive sanding steps but guess I may not have a choice.
Here are a few pics of one center:
[IMG] [/IMG]
[IMG] [/IMG]
[IMG] [/IMG]
I switched to the Mothers Billet Polish and found that made a big difference. I've hit them four times and each time seems to have helped a bit. The Nuvite seemed to leave the finish much duller and it really took more effort to buff it out. I think my first couple of applications were too liberal as well.
I only have the red Wenol and think perhaps that might be a step backwards at this point? I didn't realize there was a blue Wenol for finishing polish and will have to get some of it.
I have alot of work to do on the outer rims. Started with the red wenol without much luck getting the oxidization or white, milky appearance off. I was hoping to avoid the progressive sanding steps but guess I may not have a choice.
Here are a few pics of one center:
[IMG]
[/IMG][IMG]
[/IMG][IMG]
[/IMG]
03-06-2011, 08:40 PM
#4
If the centers were actually painted a color, that could explain the satin finish -- painted wheel surfaces aren't generally as smooth as clearcoated surfaces. I see some indications of imperfections in picture #2 between the lug holes at about 1 o'clock and 3:30.
As for the lips, are they clearcoated? Most metal polishes, including Billet Metal Polish, will turn black on the applicator almost instantly if they are bare and uncoated.
Photos of the lips and of an untreated wheel might also be helpful.
As for the lips, are they clearcoated? Most metal polishes, including Billet Metal Polish, will turn black on the applicator almost instantly if they are bare and uncoated.
Photos of the lips and of an untreated wheel might also be helpful.
03-06-2011, 09:05 PM
#5
Pro
Thread Starter
The centers were not painted. The technipolish finish involves use of a special diamond cutting tool in the final finish machining stage, then clear coated to preserve the resulting shimmering appearance. They looked spectacular before Bubba hit them with the 4x4 wheel cleaner! Short of having them re-machined, they won't have a completely smooth surface. And maybe that's my problem.
The outer rims are certainly not cleared. The polish turns black when being applied and the rims do shine - there is just a cloudy trace in spots where it looks like the cleaner pooled. I will try to get pics of them tomorrow.
The outer rims are certainly not cleared. The polish turns black when being applied and the rims do shine - there is just a cloudy trace in spots where it looks like the cleaner pooled. I will try to get pics of them tomorrow.
03-06-2011, 09:25 PM
#6
Thanks for the clarification.
So it appears the centers are about as good as they're going to get -- it's a unique look, and certainly nothing wrong with it.
The rims will need an aggressive polish, and I'd recommend the PowerMetal Scratch Removing Polish and the PowerBall Mini MD -- it's ideal for this situation. Amazon and other places online also sell it.
03-08-2011, 12:29 PM
#9
Former Vendor

Member Since: Feb 2006
Location: Orlando/Oviedo FL
Posts: 1,943
Likes: 0
Received 2 Likes
on
2 Posts
I have a high-end set of wheels that were damaged due to use of an acidic wheel cleaner. The clearcoat on the centers was destroyed and the polished outer rim has a white, milky look to them.
I have removed the FM5 centers and have been concentrating on them first. I stripped the clear off of them and wet-sanded with 600 then 1200 grit, then hit them with six progressive steps using micro-mesh with water.
The last micro-mesh cloth was MX1200, which is probably equivilent to 2,300 paper.
So with the sanding done, I have hand polished twice with NUVITE grade S. The finish is very nice and although it has quite a shine, it is not the mirror-like shine I hoped for.
The NUVITE S is claimed to me professional grade polish but I also have Mothers billet polish and WENOL, but I have stayed with the NUVITE for now. So for my questions to anyone that has experiance polishing aluminum:
1) If I repeatedly hand polish using the NUVITE S (or any other high-grade polish) can I expect a progressively deeper shine, or after a couple of applications would you think it's as good as it's going to get?
If continued, repeated polishing will pay off I will press on. Just don't want to waste my time - and don't know when it's "as good as it gets".
2) I have read of alot of people applying clearcoat to the centers after polishing for ease of maintenance. My first thought is I would rather not do so and try to keep up with the polishing. The car is basically a sunny weekend car and stays garaged and covered. Will the polish finish constantly degrade even kept waxed and dry?
I am afraid that after all this work an off-the-shelf- clear product might yellow on me. If a little preventative effort will keep those polished finish nice I would like to go that route.
3) Lastly, to the outer rims. I have hit them twice with WENOL and have not been able to buff that white, milky look off of them. Should I put them through the same sanding regimen as the centers or is there something easier that would bring them back as new?
I appreciate your time and any feedback from the experts here.
I have removed the FM5 centers and have been concentrating on them first. I stripped the clear off of them and wet-sanded with 600 then 1200 grit, then hit them with six progressive steps using micro-mesh with water.
The last micro-mesh cloth was MX1200, which is probably equivilent to 2,300 paper.
So with the sanding done, I have hand polished twice with NUVITE grade S. The finish is very nice and although it has quite a shine, it is not the mirror-like shine I hoped for.
The NUVITE S is claimed to me professional grade polish but I also have Mothers billet polish and WENOL, but I have stayed with the NUVITE for now. So for my questions to anyone that has experiance polishing aluminum:
1) If I repeatedly hand polish using the NUVITE S (or any other high-grade polish) can I expect a progressively deeper shine, or after a couple of applications would you think it's as good as it's going to get?
If continued, repeated polishing will pay off I will press on. Just don't want to waste my time - and don't know when it's "as good as it gets".
2) I have read of alot of people applying clearcoat to the centers after polishing for ease of maintenance. My first thought is I would rather not do so and try to keep up with the polishing. The car is basically a sunny weekend car and stays garaged and covered. Will the polish finish constantly degrade even kept waxed and dry?
I am afraid that after all this work an off-the-shelf- clear product might yellow on me. If a little preventative effort will keep those polished finish nice I would like to go that route.
3) Lastly, to the outer rims. I have hit them twice with WENOL and have not been able to buff that white, milky look off of them. Should I put them through the same sanding regimen as the centers or is there something easier that would bring them back as new?
I appreciate your time and any feedback from the experts here.
Let me see if I can help because I have some (not a ton) of experience polishing aluminum.
I have a high-end set of wheels that were damaged due to use of an acidic wheel cleaner. The clearcoat on the centers was destroyed and the polished outer rim has a white, milky look to them.
I have removed the FM5 centers and have been concentrating on them first. I stripped the clear off of them and wet-sanded with 600 then 1200 grit, then hit them with six progressive steps using micro-mesh with water.
The last micro-mesh cloth was MX1200, which is probably equivilent to 2,300 paper.
I have removed the FM5 centers and have been concentrating on them first. I stripped the clear off of them and wet-sanded with 600 then 1200 grit, then hit them with six progressive steps using micro-mesh with water.
The last micro-mesh cloth was MX1200, which is probably equivilent to 2,300 paper.
If you think of the scratches like a mountain range with peaks and valleys.. The peaks are the top of the material and the valleys are the depth of the scratch. To remove the scratches you have to remove all the material above the deepest point. By rubbing it out with gentle polishes, you aren't really cutting off the top of the mountain as much as you are rounding it off into a hill. When you cut off the tops of the mountains you have to be able to just cut the peaks, but once you have created hills, your polishing compound now flows up and down the gradual peaks and you end up removing material not only from the top of the hill but from the valleys as well. This is why you cannot polish away orange peel from paint as well, you have to sand it off (for the most part).
So with the sanding done, I have hand polished twice with NUVITE grade S. The finish is very nice and although it has quite a shine, it is not the mirror-like shine I hoped for.
1) If I repeatedly hand polish using the NUVITE S (or any other high-grade polish) can I expect a progressively deeper shine, or after a couple of applications would you think it's as good as it's going to get?
2) I have read of alot of people applying clearcoat to the centers after polishing for ease of maintenance. My first thought is I would rather not do so and try to keep up with the polishing. The car is basically a sunny weekend car and stays garaged and covered. Will the polish finish constantly degrade even kept waxed and dry?
Aluminum will oxide if it is contact with oxygen, although the rate of oxidation can greatly be reduced by protecting the aluminum with a high quality metal specific sealant such as Blackfire Wet Diamond All Metal Sealant.
As far as polishing the aluminum, if you keep it sealed, you might need to go over it every 3-6 months by hand and give it a light touch up.
3) Lastly, to the outer rims. I have hit them twice with WENOL and have not been able to buff that white, milky look off of them. Should I put them through the same sanding regimen as the centers or is there something easier that would bring them back as new?
To fix your gloss and get a mirror like shine you are going to need to...
A) Make sure the surface is sanded properly. In my experience this cannot be rushed through. I have polished aluminum show pieces that had to be perfect for various car shows and the most important lesson I have learned is that sanding is the most important part. You cannot rush through it.
It would probably take 30 minutes to an hour per grit per wheel to do it right. So if you are starting with 500 grit than moving to 1000, 2000, 3000, I would expect to spend four hours (by hand) per wheel.
The best way I have found to sand aluminum is by crosshatching, or running each grit in one direction that is 90 degrees to the previous grit. So 500 grit in only left to right, right to left motions. Then come back with the finer grit and go up to down, down to up. This will change the scratch pattern on piece, so you can see any scratches that are not removed from the previous step. If you still see some right to left (500 grit) scratches keep going over them up and down with 1000 grit until they are gone. Any thing you miss will show up later on.
Once the wheels are sanded with a super fine grit (I like at least 3000, if not higher on most aluminum) you need to cut the piece. This means using an aggressive metal compound, usually with cerium oxide abrasives and a machine.
After cutting the surface level, then you need to use a a finer grade polish to remove the very fine marks from the compound. Finally you can use an ultra fine grade polish to bring that mirror shine to the aluminum (which is what it seems you have been using right now).
The two options for polishing aluminum would be to take to a professional metal polisher who is going to use various grades of 'bars' of compounds and a big polishing well or you can attempt to do it yourself. We carry the Blackfire Metal Polishing kit, which includes everything you need to polish your wheels to that mirror like shine, but does require the use of a rotary or da polisher.
Here is a quote of a thread I posted using that kit.
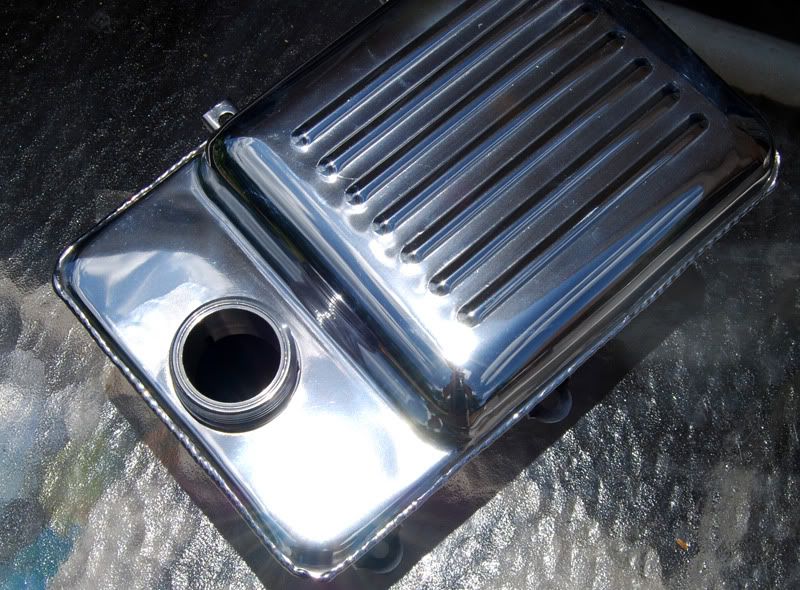
The coolant tank (for a 360 Ferrari) was sent to me by a gentleman in Virgina who had asked if I could polish it. The same principles apply if you are polishing any piece of coated aluminum.
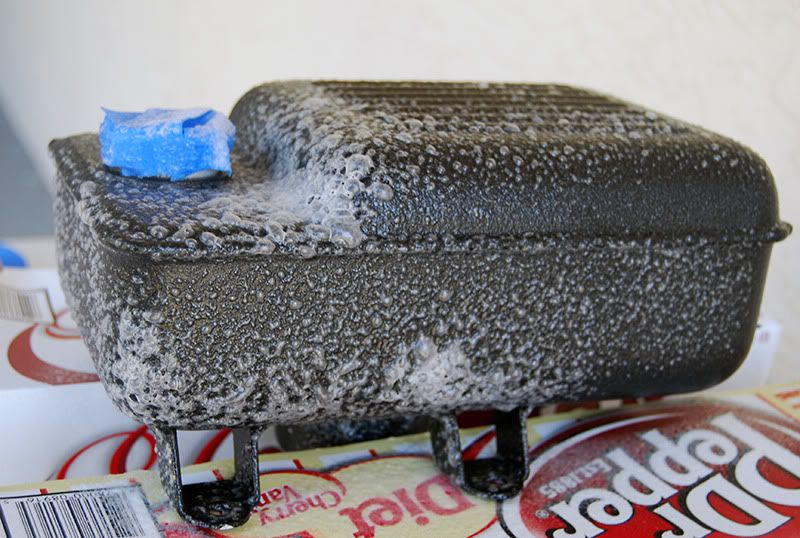
The first thing to do is strip the coating (powder coating or clear coating) You can use an automotive aircraft stripper, just spray it on (in a well ventilated area) and let it dwell for 15-30 minutes, until the finish bubbles up.
Use a fine brush (old tooth brush) to agitate any stubborn areas where the clear coat wants to stick. Then use a plastic scrapper to remove the clear coat and wash each wheel thoroughly.
Now you will have exposed the aluminum for polishing. If your aluminum has deep gouges or texture you will want to remove those by wet sanding each; starting with 220 grit and moving up to 1000 grit before polishing. Sanding them is extremely time consuming because you want to make sure you remove all of the previous sanding marks (from the rougher grit) before moving to the next finer grit.
You can accomplish this by cross-hatching. Sanding is one direction with say 220 grit, then sand in the opposite direction (left-to-right, then up-to-down) with say 400 grit until you no longer see the 220 grit marks, and repeat finer and finer.
When it comes time to polish the wheel to a super high luster (or remove the sanding marks) you are going to need an aluminum compound (similar to a compound for paint in principle), and then follow it up with an aluminum (fine cut) polish.
The Blackfire Aluminum Polishing Kit was (to my knowledge) the first boutique line of aluminum polishes that delivers professional results to the end-user. It is an idea that has been replicated (although perhaps not equaled).
You will need to have skill with a machine polisher how ever to use it.
Here is a link to the system and directions at out store: BLACKFIRE Aluminum Polishing System.
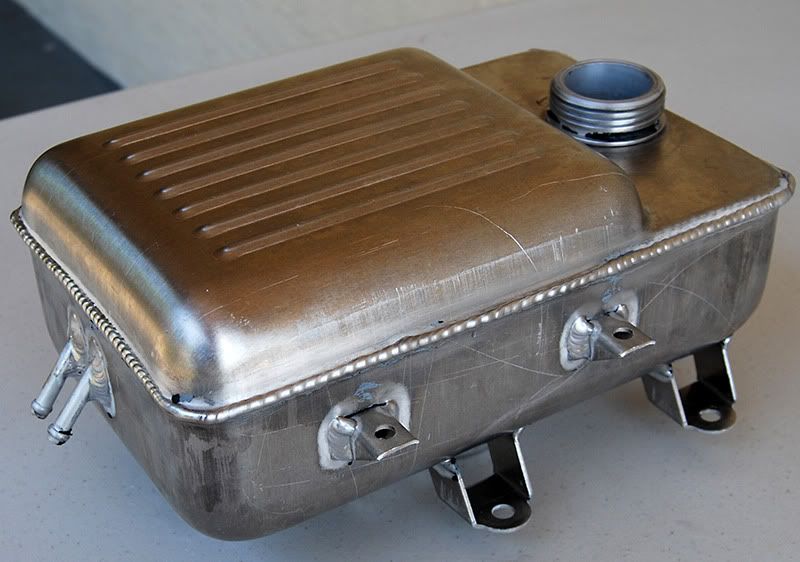
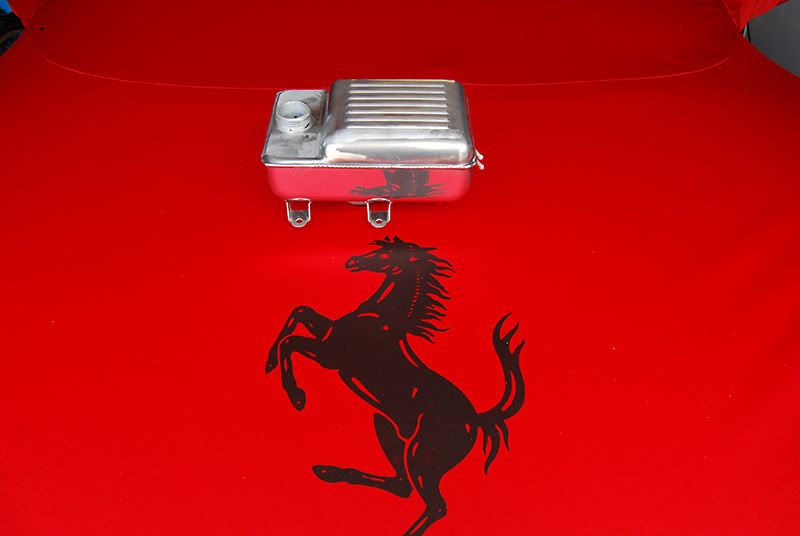
Here is a coolant tank from a Ferrari (that is actually a much cheaper casting of aluminum and much harder to polish and make look good).
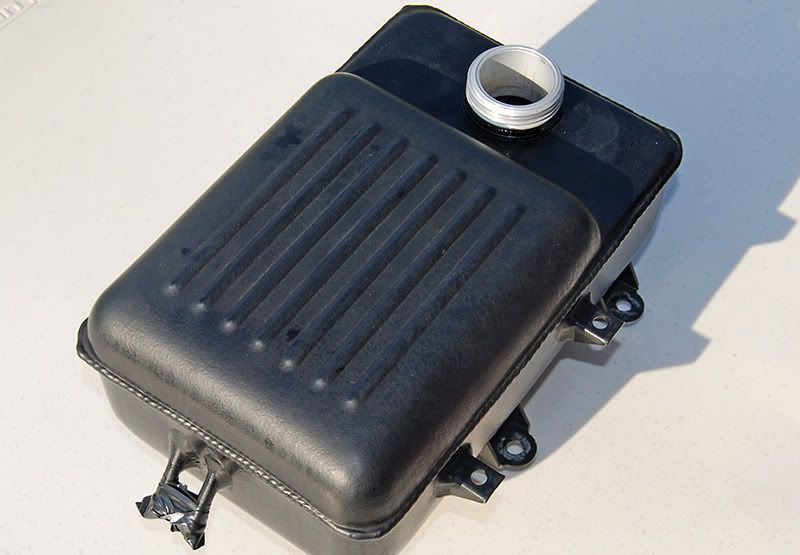
The first step was using an aircraft stripper to remove the black powder coat (or in your case the factory clear). You can pick this up at just about any automotive supply store (Pepboys, Autozone, etc).
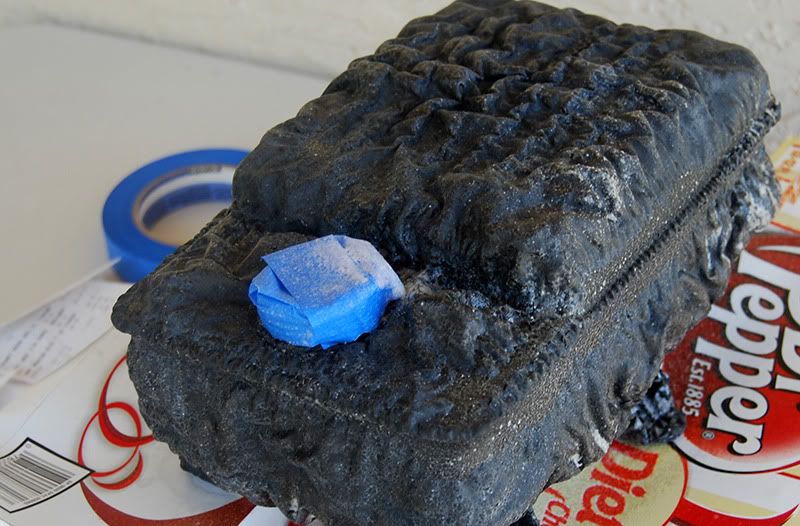
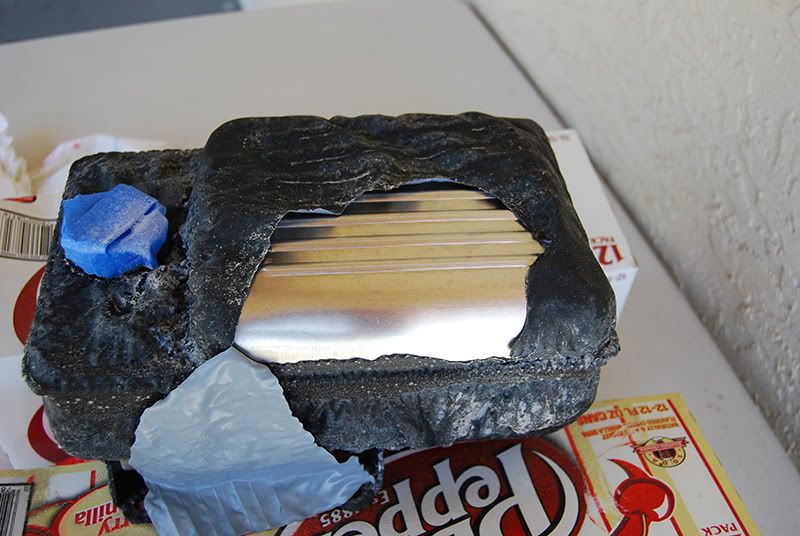
After removing all of the coating I could see that the casting was in terrible shape: factory casting scratches, texture, and deep cuts everywhere!
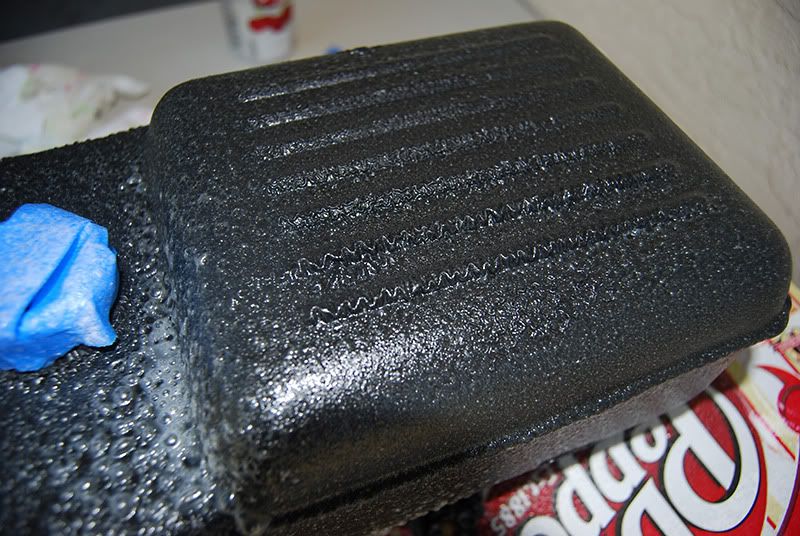
I tried polishing a test spot to see how the results would turn out.
The amount of gloss I was able to get from the Blackfire Polishing System was impressive and only took minutes.
However a cropped area of the photo shows that there are still a lot of these very deep (you stick the tip of a pencil into them) scratches that meant I had to sand the tank. If your wheels are not heavily scratched (or have texture) you can go right to polishing!
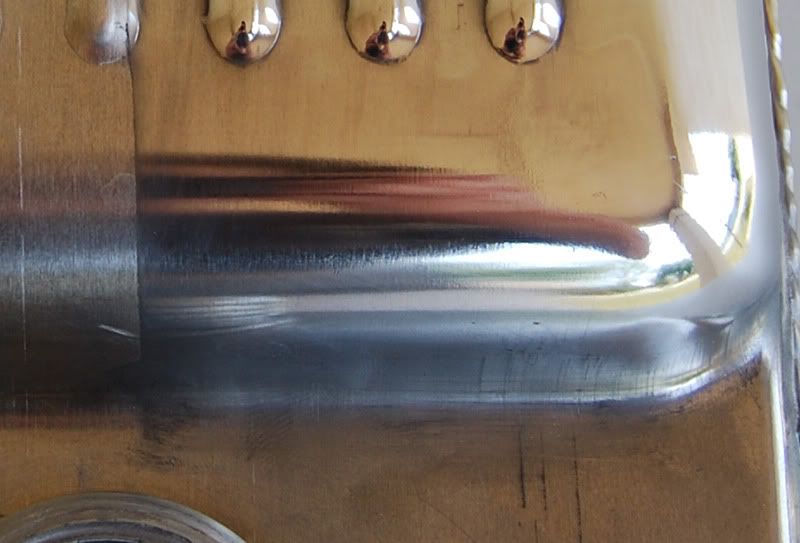
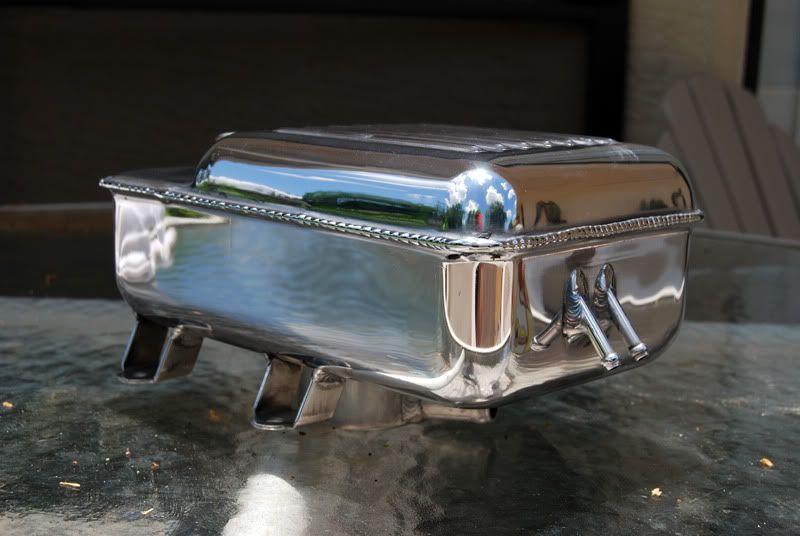
The right side of the tank has been sanded to 1000 grit, the rest to 400 grit. You can see the uniformity in the sanding marks (cross-hatching). I did sand a couple areas to 3000 grit, but the Blackfire Aluminum Compound is so strong that it made no difference in the outcome.
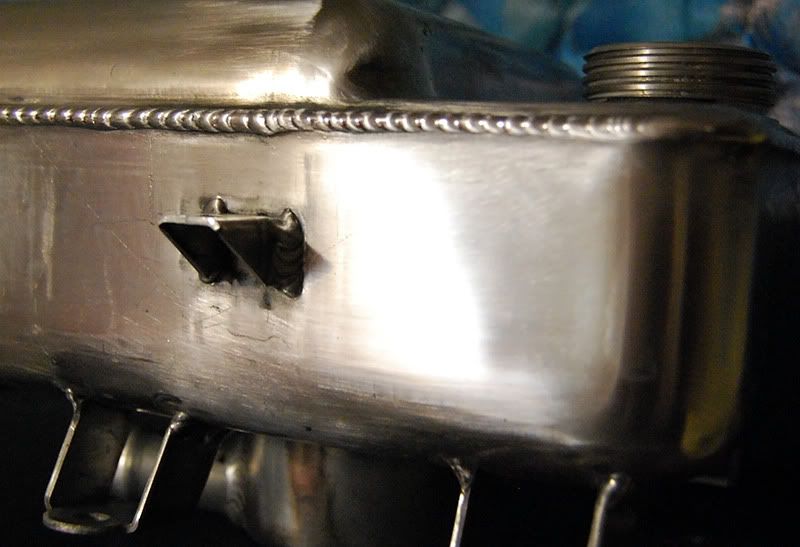
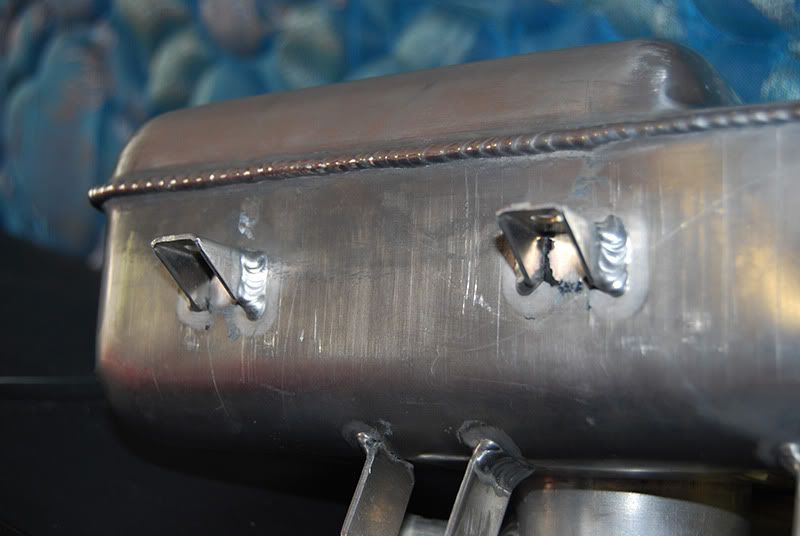
In this picture the edge of the tank (reflecting the horse) has been polished with just the compound, the rest of the tank is just sanded.
On this piece I found it easier to use a Porter Cable 7242XP (DA) Polisher and 4 inch pads. I used a Lake Country 4 inch High Gloss Yellow Pad with the Blackfire Aluminum Compound. I worked at Speed 5 with firm pressure until the aluminum was really bleeding black and the polish started to become opaque. I pays to clean the pad frequently by pressing it against a cotton towel and turning it on.
Then I followed with Blackfire Fine Cut Aluminum Polish (step two) with a Lake Country 4 inch H20 Tangerine pad, starting at step 5 then slowing to step 3 when the polish began to breakdown/dry up. Again firm pressure.
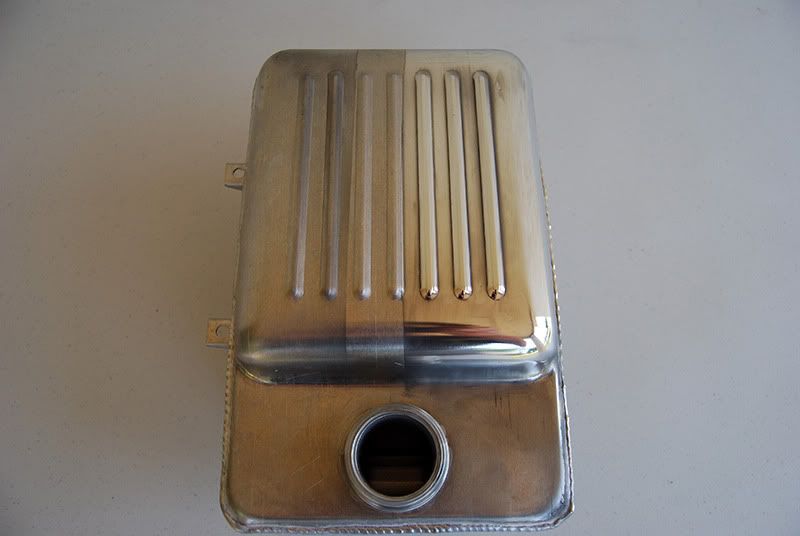
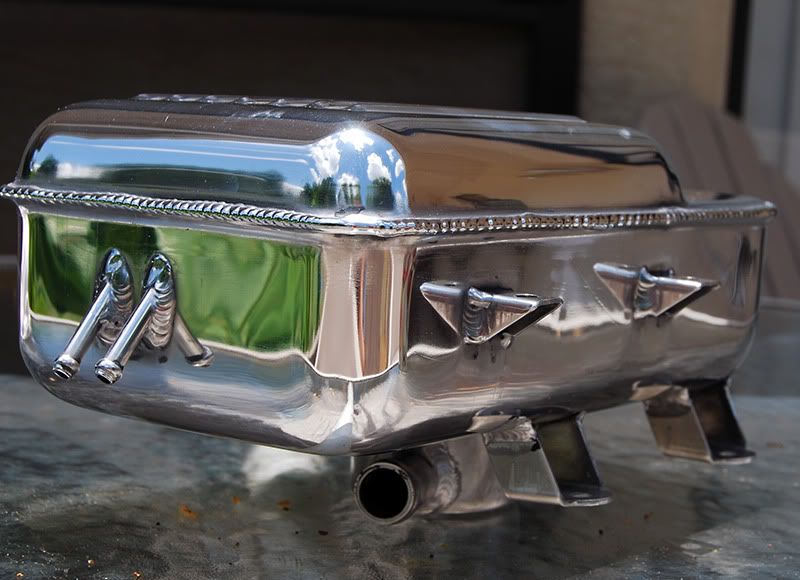
The final step was Blackfire Wet Diamond Aluminum Show Polish on a 4 inch Lake Country Hi Gloss White Pad, speed 4 with moderate pressure until almost clear.
After cleaning thoroughly I used Blackfire Wet Diamond All-Metal Sealant to lock in the shine with out the use of solvents that can dull the highly polished surface.
The results....
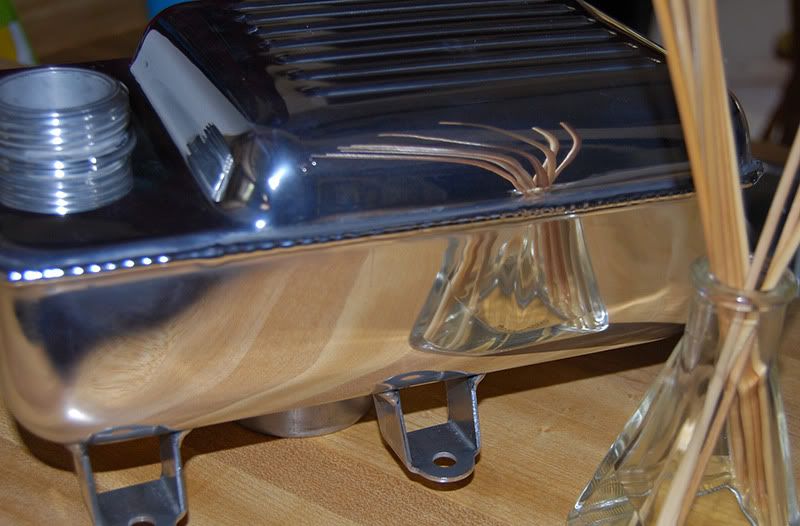
You can achieve a true mirror like finish on your wheels with our kit, no doubt, but it will take a little bit of time and patience ... but be warned... Polishing aluminum (and stainless) is addictive, my wife hasn't forgiven me for what I have down to our refrigerator and appliances in our kitchen
So from this...
to this...
The first thing to do is strip the coating (powder coating or clear coating) You can use an automotive aircraft stripper, just spray it on (in a well ventilated area) and let it dwell for 15-30 minutes, until the finish bubbles up.
Use a fine brush (old tooth brush) to agitate any stubborn areas where the clear coat wants to stick. Then use a plastic scrapper to remove the clear coat and wash each wheel thoroughly.
Now you will have exposed the aluminum for polishing. If your aluminum has deep gouges or texture you will want to remove those by wet sanding each; starting with 220 grit and moving up to 1000 grit before polishing. Sanding them is extremely time consuming because you want to make sure you remove all of the previous sanding marks (from the rougher grit) before moving to the next finer grit.
You can accomplish this by cross-hatching. Sanding is one direction with say 220 grit, then sand in the opposite direction (left-to-right, then up-to-down) with say 400 grit until you no longer see the 220 grit marks, and repeat finer and finer.
When it comes time to polish the wheel to a super high luster (or remove the sanding marks) you are going to need an aluminum compound (similar to a compound for paint in principle), and then follow it up with an aluminum (fine cut) polish.
The Blackfire Aluminum Polishing Kit was (to my knowledge) the first boutique line of aluminum polishes that delivers professional results to the end-user. It is an idea that has been replicated (although perhaps not equaled).
You will need to have skill with a machine polisher how ever to use it.
Here is a link to the system and directions at out store: BLACKFIRE Aluminum Polishing System.
Here is a coolant tank from a Ferrari (that is actually a much cheaper casting of aluminum and much harder to polish and make look good).
The first step was using an aircraft stripper to remove the black powder coat (or in your case the factory clear). You can pick this up at just about any automotive supply store (Pepboys, Autozone, etc).
After removing all of the coating I could see that the casting was in terrible shape: factory casting scratches, texture, and deep cuts everywhere!
I tried polishing a test spot to see how the results would turn out.
The amount of gloss I was able to get from the Blackfire Polishing System was impressive and only took minutes.
However a cropped area of the photo shows that there are still a lot of these very deep (you stick the tip of a pencil into them) scratches that meant I had to sand the tank. If your wheels are not heavily scratched (or have texture) you can go right to polishing!
The right side of the tank has been sanded to 1000 grit, the rest to 400 grit. You can see the uniformity in the sanding marks (cross-hatching). I did sand a couple areas to 3000 grit, but the Blackfire Aluminum Compound is so strong that it made no difference in the outcome.
In this picture the edge of the tank (reflecting the horse) has been polished with just the compound, the rest of the tank is just sanded.
On this piece I found it easier to use a Porter Cable 7242XP (DA) Polisher and 4 inch pads. I used a Lake Country 4 inch High Gloss Yellow Pad with the Blackfire Aluminum Compound. I worked at Speed 5 with firm pressure until the aluminum was really bleeding black and the polish started to become opaque. I pays to clean the pad frequently by pressing it against a cotton towel and turning it on.
Then I followed with Blackfire Fine Cut Aluminum Polish (step two) with a Lake Country 4 inch H20 Tangerine pad, starting at step 5 then slowing to step 3 when the polish began to breakdown/dry up. Again firm pressure.
The final step was Blackfire Wet Diamond Aluminum Show Polish on a 4 inch Lake Country Hi Gloss White Pad, speed 4 with moderate pressure until almost clear.
After cleaning thoroughly I used Blackfire Wet Diamond All-Metal Sealant to lock in the shine with out the use of solvents that can dull the highly polished surface.
The results....
You can achieve a true mirror like finish on your wheels with our kit, no doubt, but it will take a little bit of time and patience ... but be warned... Polishing aluminum (and stainless) is addictive, my wife hasn't forgiven me for what I have down to our refrigerator and appliances in our kitchen
So from this...
to this...

 03-08-2011, 04:22 PM
#11
Pro
Thread Starter
Thanks for the detailed response Todd. I appreciate it very much. As Jim pointed out too, I missed the important step of using an aggressive compound with a polisher, and went straight to the mild polishing by hand. I also did not think to crosshatch until halfway through my sanding regimen.
Seems I am going to need to start over. I have a Cyclo polisher - probably not the polisher of choice for this task having dual heads.
I also just purchased a 6' buffing wheel, but quickly decided I'd need to invest some time learning how to use it on something besides these wheels.
Well, nobody said it would be easy! Thanks again for your time and help.
03-09-2011, 08:49 AM
#12
Former Vendor
Member Since: Feb 2006
Location: Orlando/Oviedo FL
Posts: 1,943
Likes: 0
Received 2 Likes
on
2 Posts
Thanks for the detailed response Todd. I appreciate it very much. As Jim pointed out too, I missed the important step of using an aggressive compound with a polisher, and went straight to the mild polishing by hand. I also did not think to crosshatch until halfway through my sanding regimen.
Seems I am going to need to start over. I have a Cyclo polisher - probably not the polisher of choice for this task having dual heads.
I also just purchased a 6' buffing wheel, but quickly decided I'd need to invest some time learning how to use it on something besides these wheels.
Well, nobody said it would be easy! Thanks again for your time and help.
Seems I am going to need to start over. I have a Cyclo polisher - probably not the polisher of choice for this task having dual heads.
I also just purchased a 6' buffing wheel, but quickly decided I'd need to invest some time learning how to use it on something besides these wheels.
Well, nobody said it would be easy! Thanks again for your time and help.
Todd
03-09-2011, 01:14 PM
#13
Pro
Thread Starter
Bob, thank you so much your compliments.
My pleasure Scott. Please let us know if there is anything we can help you with. (myself or Angelo@properautocare.com)
Todd
My pleasure Scott. Please let us know if there is anything we can help you with. (myself or Angelo@properautocare.com)
Todd
Do you think my Cyclo polisher would be effective with the Blackfire Heavy Cut Aluminum Polish?
I first thought it would not due to it's dual head design but on second thought don't think that would cause me a problem.
But I don't know if it will functionally do the job with the polishing compound?
TIA
03-09-2011, 04:03 PM
#14
Former Vendor
Member Since: Feb 2006
Location: Orlando/Oviedo FL
Posts: 1,943
Likes: 0
Received 2 Likes
on
2 Posts
Todd,
Do you think my Cyclo polisher would be effective with the Blackfire Heavy Cut Aluminum Polish?
I first thought it would not due to it's dual head design but on second thought don't think that would cause me a problem.
But I don't know if it will functionally do the job with the polishing compound?
TIA