
PHADT Poly Bushing Install
 01-18-2009, 04:05 PM
#1
Racer

Thread Starter

Member Since: Jun 2004
Location: Reinholds PA
Posts: 272
Likes: 0
Received 0 Likes
on
0 Posts

OK. I just got my Phadt bushing kit delivered. Once the temperature in my garage goes up substantially above 10 deg F, I will jump into this project. Then car goes to Kurt at Phoenix for alignment.
If anyone has 2 cents to add about: getting old rubber out and pushing new bushings in, I would appreciate it!
If anyone has 2 cents to add about: getting old rubber out and pushing new bushings in, I would appreciate it!


 01-18-2009, 08:18 PM
#3
Melting Slicks

Member Since: Sep 2006
Location: San Mateo CA
Posts: 2,173
Likes: 0
Received 0 Likes
on
0 Posts
it's pfadt, not phadt, and this was just discussed. here, i'll do the work of hitting the search button for you.
http://forums.corvetteforum.com/auto...g-install.html
http://forums.corvetteforum.com/auto...g-install.html

 01-19-2009, 03:45 PM
#7
Drifting

Member Since: Dec 2005
Location: Dayton, OH
Posts: 1,822
Likes: 0
Received 0 Likes
on
0 Posts

I've done it both ways, torch and cut the ends off then press out.
They do press out easily after you cut the ends off but cutting the ends off is a PAIN.
I got a $13 propane torch from the hardware store and then just directed the flame into the center of the sleeve to heat the metal up. Just when it started to smoke I took a screwdriver and pushed the metal sleeve out. After that the rubber bushing just pushed out with little effort. This was MUCH easier than cutting and pressing. I was worried about flames etc. but if you keep the torch on the inside of the metal sleeve no flames and burning rubber.
Pressing in the new bushings is another story!
LOTS of Lube! I did it with a vise and blocks of wood. It was a pain and took a bunch of patience. With a press it would be very easy.
If I do it again I will buy a $119 benchtop press!
01-20-2009, 11:55 PM
#8
Racer

Member Since: May 2008
Posts: 470
Likes: 0
Received 0 Likes
on
0 Posts
You can get the center bit out with a hole saw on a drill. 1-1/4"
worked nicely on my GTO.
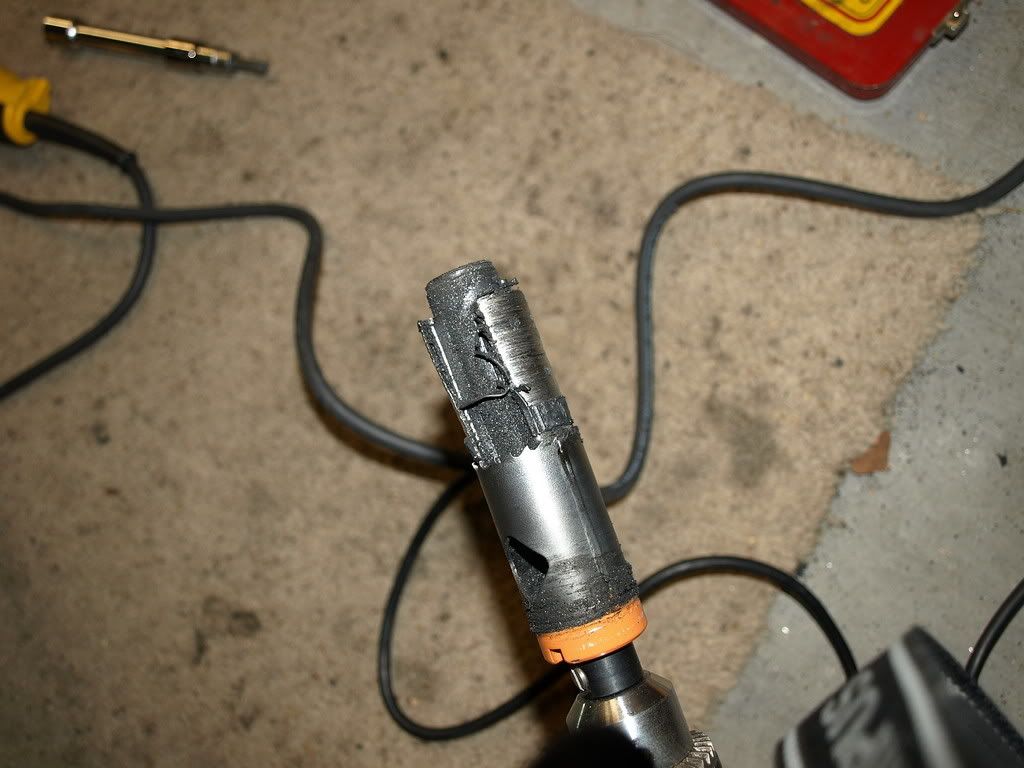
I then removed the jackets by cutting 90% of the way through with a hacksaw
then hammering a screwdriver blade up between the arm and the jacket, under
the hacksaw cut.
worked nicely on my GTO.
I then removed the jackets by cutting 90% of the way through with a hacksaw
then hammering a screwdriver blade up between the arm and the jacket, under
the hacksaw cut.
01-21-2009, 04:09 PM
#9
Melting Slicks
Member Since: Sep 2006
Location: San Mateo CA
Posts: 2,173
Likes: 0
Received 0 Likes
on
0 Posts
01-21-2009, 04:13 PM
#10
Melting Slicks
Member Since: Sep 2006
Location: San Mateo CA
Posts: 2,173
Likes: 0
Received 0 Likes
on
0 Posts
really? mine were very easy to press both in and out with a vise. no cutting required to get them out, and didn't need any lube to get the new ones in, just a very thin finger smear on the leading edge to help it go in straight.
01-21-2009, 04:57 PM
#11
Racer

Member Since: Jun 2006
Location: SLC UT
Posts: 250
Likes: 0
Received 0 Likes
on
0 Posts
St. Jude Donor '08-'09
Autocross & Roadrace Forum Sponsor
The new bushings can then be pressed in and the inner sleeves installed second. Make sure you use lube on the outer portion of the bushing, it will help when installing. You should install the majority of the grease between the I.D. of the bushing and the O.D. of the sleeve as this is what moves. Our bushings are graphite impregnated which helps with lubrication as well.
Please feel free to call or email us anytime you have questions.
 01-21-2009, 05:35 PM
#12
Drifting
Member Since: Dec 2005
Location: Dayton, OH
Posts: 1,822
Likes: 0
Received 0 Likes
on
0 Posts
As far as getting them in and especially out, that was hard.
Probably the difference between an '08 from CA and a '99 in NJ. My guess is that my bushings were much less compliant than yours due to age.
The hardest part on the install was keeping the bushing square with the hole in the A-arm while trying to turn the handle on the vise. Once it started it went pretty smooth and easy.
01-21-2009, 06:06 PM
#13
Racer
Member Since: May 2008
Posts: 470
Likes: 0
Received 0 Likes
on
0 Posts
Many people burn the guts out, but a saw is so much neater..
01-21-2009, 07:24 PM
#14
Melting Slicks
Member Since: Sep 2006
Location: San Mateo CA
Posts: 2,173
Likes: 0
Received 0 Likes
on
0 Posts
i was told this in direct response to my specific question, should i lube the bushings when pressing them in.
As far as getting them in and especially out, that was hard.
Probably the difference between an '08 from CA and a '99 in NJ. My guess is that my bushings were much less compliant than yours due to age.
Probably the difference between an '08 from CA and a '99 in NJ. My guess is that my bushings were much less compliant than yours due to age.
The hardest part on the install was keeping the bushing square with the hole in the A-arm while trying to turn the handle on the vise. Once it started it went pretty smooth and easy.
01-21-2009, 07:30 PM
#15
Melting Slicks
Member Since: Sep 2006
Location: San Mateo CA
Posts: 2,173
Likes: 0
Received 0 Likes
on
0 Posts
Jordan, I think you or maybe Aaron gave me a slightly different answer, anyway even the above statement seems to amount to: only enough lube for assembly, which in my case turned out to be negligible.
01-21-2009, 08:01 PM
#16
Drifting
Member Since: Dec 2005
Location: Dayton, OH
Posts: 1,822
Likes: 0
Received 0 Likes
on
0 Posts
Now one season later they are making a bunch of noise. Seemed to be the sway bars more than the bushings at first but now it's both!
Of course some of it could be that it's only 15 degrees around here!

They seem to be quieter when it warms up or I drive for longer periods of time.
I'm toying with the idea of pulling all of them and going to spherical bearings.
Last edited by geerookie; 01-21-2009 at 08:03 PM.
 01-21-2009, 10:22 PM
#18
Drifting
Member Since: Dec 2005
Location: Dayton, OH
Posts: 1,822
Likes: 0
Received 0 Likes
on
0 Posts
 01-23-2009, 12:41 AM
#19
Instructor
Member Since: Apr 2006
Location: Lancaster Pennsylvania
Posts: 197
Likes: 0
Received 0 Likes
on
0 Posts
You failed to properly capitalize the "I" in the words "it's" and "i'll" plus the word "here" should be capitalized as well. Atleast you almost properly punctuated your sentence. Lighted up a little bud!
01-23-2009, 03:20 AM
#20
Melting Slicks
Member Since: Sep 2006
Location: San Mateo CA
Posts: 2,173
Likes: 0
Received 0 Likes
on
0 Posts

i was just correcting him because it's a proper name, but more importantly because it breaks search.
must ... resist ... temptation ... to ... correct ... your ... post ...