
alignment
 06-14-2011, 09:08 AM
#1
Racer

Thread Starter
Member Since: Nov 2009
Location: Cape elizabeth Me
Posts: 380
Likes: 0
Received 0 Likes
on
0 Posts
I need to have my 07 base aligned just installed z51 springs. I am heading to watkins glen then VIR for our event. I am running 305 30 19 rear 265 35 18 fronts and looking for a combo street / track alignment. I will drive down on runflats and change to my track tires pads and rotors at the track
I need the Caster, Camber and toe remember need to run both street and track. My experence is 7 track days and adding 4 more over the next 2 weeks
I need the Caster, Camber and toe remember need to run both street and track. My experence is 7 track days and adding 4 more over the next 2 weeks

 06-14-2011, 02:52 PM
#3
Melting Slicks


Set the front camber at max, -1.3 to -1/5 in the back 1/8 of an inch of toe in front and back. Front caster will fall out at about 6 degrees. Mark the front tie rods, and when you change your tires crank one turn of toe out into the fronts on each side. When you change back to street tires put the toe back one turn to toe in.
It is toe out that eats the front tires more than negative camber. You will wear out the insides of the front tires but if you are doing a lot of track days you will eat the outsides of the front tires a lot faster on the track. Without enough negative front camber at the track you can eat a set of front tires in two track days.
It is toe out that eats the front tires more than negative camber. You will wear out the insides of the front tires but if you are doing a lot of track days you will eat the outsides of the front tires a lot faster on the track. Without enough negative front camber at the track you can eat a set of front tires in two track days.
06-14-2011, 05:29 PM
#5
Race Director


I disagree, oem front toe is 1/32" or 0.1deg.....you need that for grip and it won't hurt wear.
You probably don't need much more than 2deg front camber unles you are running a6's at super low pressures
06-14-2011, 08:24 PM
#6
Racer
Thread Starter
Member Since: Nov 2009
Location: Cape elizabeth Me
Posts: 380
Likes: 0
Received 0 Likes
on
0 Posts
Front Camber -2.0
Rear Camber -1.3 or -1.5
Toe +.1
I am guessing factory for caster
06-14-2011, 09:02 PM
#7
Race Director
yes, -.2 toe rear....or 1/16 toe in.
around 8deg castor.... you aren't realistically going to go too far astray unless you start some major shimming on the upper control arms
Grippier tires would require more camber, street tires slightly less, but that is the ballpark.
Good luck!
around 8deg castor.... you aren't realistically going to go too far astray unless you start some major shimming on the upper control arms
Grippier tires would require more camber, street tires slightly less, but that is the ballpark.
Good luck!
06-14-2011, 09:28 PM
#8
Safety Car


Just to be clear on the toe:
Front: Toe out \ / I run zero degrees but maybe you want a little toe out.
Rear: Toe in : / \ Run about 1/8" which is just over 1/4 turn of the tie rod on each tire (each flat of the hex is 1/32" and the 1/8" is total toe from both tires).
On camber: I used -1.7 F / -1.0 rear
Caster: as much as you can with the other settings.
06-15-2011, 02:10 AM
#9
Former Vendor
Member Since: Jan 2002
Location: Defending the US Constitution in Northern CA
Posts: 1,703
Likes: 0
Received 1 Like
on
1 Post
For a streetable track setup on relatively sticky street tires with an intermediate skilled driver, non-track specific...
Caster 7.5 degrees on both sides (C6 can take a bit more, C5 will smoke the PS pump and rack with 8 degrees or more)
Front Camber -1.3 to -1.6 on each side
Rear camber 0.2 degree less negative camber than the front (ie. if the front is -1.5 then set the rears at -1.3 degrees
Toe: in 0.05 degrees for each side front and rear
06-15-2011, 10:09 PM
#11
Melting Slicks
You want the back toe'd in ALWAYS!!!!] Toe out in the back makes the car oversteer on turn and oversteer under power on corner exit. BAD IDEA
On the track you want a little bit of toe out in the front. This helps the car on initial turn in and makes it more responsive.
You want a little bit of toe in on the street because the car won't wander and tramline and it won't wear the front tires and cup them in daily driving.
Since you have the front end jacked up and you are changing to track tires, it takes only about an extra minute per side to loosen the tie rod, turn it one full turn to toe out, and then retighten it. Marking the tie rod with a slash of paint or nail polish across the tie rod end and the tie rod will allow you to make sure you reset it to the right place.
Easy and effective
06-15-2011, 11:15 PM
#12
Former Vendor
Member Since: Jan 2002
Location: Defending the US Constitution in Northern CA
Posts: 1,703
Likes: 0
Received 1 Like
on
1 Post
I concur on always a tad of toe in on the rear for reasons stated above.
IMHO the toe out in the front does make the the front more unstable allowing it to more quickly change direction, which is great for autocross, and for cars without adequate Ackerman (which modern Corvettes are not included), and for cars that are lazy to initial steering input, or for advanced drivers that can overcome the dartyness under braking and over washboard track surfaces.
I would rather put 0.1 degrees total toe in and adjust the turn down and responsiveness to steering input with shock adjustment, spring rates and anti-sway bar rates.
In taking this approach, we have gotten faster lap times and easier to drive cars.
But that is just my experience.
Ultimately, you need to test for yourself what works best for you, based on the stop watch. Most of my customers and past team cars went faster with a touch of toe in and a bit softer spring/shock setup in the front. Racing is the perfect use of the scientific method... Plan, do, check. Was it better or worse? Then try something else and measure better or worse.
There really isn't one right answer for everyone. Some things that work well for one guy, make the care painfully slow for the next guy.
06-18-2011, 06:48 PM
#13
Racer
Thread Starter
Member Since: Nov 2009
Location: Cape elizabeth Me
Posts: 380
Likes: 0
Received 0 Likes
on
0 Posts
You want the back toe'd in ALWAYS!!!!] Since you have the front end jacked up and you are changing to track tires, it takes only about an extra minute per side to loosen the tie rod, turn it one full turn to toe out, and then retighten it. Marking the tie rod with a slash of paint or nail polish across the tie rod end and the tie rod will allow you to make sure you reset it to the right place.
Easy and effective
Easy and effective
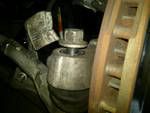
does anyone have a picture of how I change the toe from in to out? I am not a mechanic and need to know exactly what I am mark and turning counter clockwise 1 turn. A picture would be perfect.
06-18-2011, 10:38 PM
#14
Melting Slicks
Take some of your significant others nail polish and paint a stripe across the top of the tie rod end, across the jam nut and onto the tie rod.
First loosen the jam nut. Put yourself as looking from the middle of the car towards the outside and front wheel. Break loose the jam nut at the end of the tie rod just inside of the rod end, from this position it turns counterclockwise to break it loose. That is, looking from the inside of the car towards the outside you want to break it loose buy turning it counterclockwise from the point of view of being in the middle of the car and looking out.
After you break it loose hand turn it back to where the jam nut is just touching the rod end. There is a flat spont on the tie rod. If I recall correctly it fits a 13mm open end wrench. Slip the wrench on the tie rod and turn it one full turn in the same direction that you just turned the jam nut (counter clock wise when looking from the middle of the car). The nut will then be one turn away from the tie rod end. Keep the 13mm wrench on the tie rod and spin the jam nut one full turn to where it is sungged up. The stripe on the rod and the rod end should be aligned. Then hold the rod end and torque the jam nut and you are done.
Reverse the procedure to reset.
06-19-2011, 04:30 PM
#15
Racer
Thread Starter
Member Since: Nov 2009
Location: Cape elizabeth Me
Posts: 380
Likes: 0
Received 0 Likes
on
0 Posts
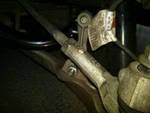
Let's try this I believe this picture is the bolt I have to remove to turn the tie rod. I think I need to pull it out completely. Please confirm
 06-19-2011, 05:15 PM
#17
Former Vendor
Member Since: Jan 2002
Location: Defending the US Constitution in Northern CA
Posts: 1,703
Likes: 0
Received 1 Like
on
1 Post
you don't remove the "Bolt" (Tie Rod End and retaining nut).
leave that nut that holds the tie rod to the steering knuckle torqued and attached. Don't loosen it at all.
From that "BOLT" go inboard along the tie rod, you will find a 7/8" jamb nut and inboard of that you will see where the tie rod has flats (Hex) shaped into the tie rod (these are 13mm).
All you do is break the 7/8" jamb nut loose, then with your 13mm open end wrench, turn the tie rod so that it screws into the tie rod end to get more toe in, or unthread it from the tie rod end resulting in toe out. Once you have the adjustment that you want, then tighten the 7/8" jamb nut.
06-19-2011, 06:35 PM
#18
Racer
Thread Starter
Member Since: Nov 2009
Location: Cape elizabeth Me
Posts: 380
Likes: 0
Received 0 Likes
on
0 Posts
I finally got it thank you all so much for being so patience with me. I am posting the final pictures for other like me so thaqt everyone will understand. It is a 7/8 and 13mm wrench needed.
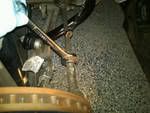
http://i1226.photobucket.com/albums/...cv/tierod2.jpg
http://i1226.photobucket.com/albums/...cv/tierod2.jpg
06-20-2011, 12:37 AM
#19
Former Vendor
Member Since: Jan 2002
Location: Defending the US Constitution in Northern CA
Posts: 1,703
Likes: 0
Received 1 Like
on
1 Post
I finally got it thank you all so much for being so patience with me. I am posting the final pictures for other like me so thaqt everyone will understand. It is a 7/8 and 13mm wrench needed.
http://i1226.photobucket.com/albums/...cv/tierod2.jpg
http://i1226.photobucket.com/albums/...cv/tierod2.jpg
PS. Don't worry if the steering wheel isn't straight after you adjust it, it will not effect alignment nor tire wear.
Some autoxers that I know only adjust one side at an event, cause it is half of the work. When they move back to their street setting then wheels goes back to straight.
One caviot for guys down the road with newer cars...
...more cars (like the new CTS-V) have steering position sensor that needs to be reset after any significant toe change is made to the car. If you don't reset the computer to know where Zero steering angle is, then the traction control and active handling FREEKS OUT!!! Ask me how I know. To say the least, it felt like the brakes were coming on by themselves and the steering wheel shock like you couldn't believe.