
Hardbar Camber Kit Installation Issues
 05-03-2014, 02:01 PM
#1
Racer

Thread Starter


I picked up a Hardbar camber kit and below is everything I received. I did not buy the stud kit. I received 12 identical blue spacers, 6 bolts, 12 washers, 6 nylock nuts. I saw an older set of instructions from Hardbar that shows D-shaped plates which I did not receive. Instructions are here: http://hardbarusa.com/uploads/image/...0rev%201%20PDF[2].pdf
I don't see a way to install my rectangular plates into the D-shaped recessions. In the picture, you can see the upper left corner of the plate getting hung up on the radius.
I emailed Gary about it, but I wanted to see if anyone else received 12 rectangular plates and made them work. Any help is appreciated.
Thank you,
Andrew
Last edited by Ramo7769; 05-03-2014 at 02:14 PM.
 05-03-2014, 06:19 PM
#2
Race Director

If you take the nut/bolt out does the blue piece fit in the cutout area?

If yes, you have some bind going on, the control arms are a bit tricky to line up, use a medium pry bar & try it again.
Watch my video on installing the Pfadt kit, basically the same.
If yes, you have some bind going on, the control arms are a bit tricky to line up, use a medium pry bar & try it again.
Watch my video on installing the Pfadt kit, basically the same.
05-03-2014, 09:21 PM
#3
Tech Contributor
Member Since: Oct 1999
Location: Charlotte, NC (formerly Endicott, NY)
Posts: 40,088
Received 8,927 Likes
on
5,332 Posts

Like Froggy says just use a big pry bar to move the control arm around and they will pop into place. You don't need the D shaped plates as these ones are short enough to fit in the slot and not get involved with the rounded shape at the top. You can change alignment from track to street with these plates just by loosening the bolt enough to get some space and then rotating the plate 180 degrees. You may notice the holes are offset just a bit as well so you can change your max and min camber by the hole you choose to put the bolt through.
That offset could be the reason your plate doesn't line up. Which hole did you use with the other plate on that bolt? The bolt has to go through the same hole on each plate as the slight offset will cause just what your picture shows. I just finished installing a set of Z06 plates today.
Bill
That offset could be the reason your plate doesn't line up. Which hole did you use with the other plate on that bolt? The bolt has to go through the same hole on each plate as the slight offset will cause just what your picture shows. I just finished installing a set of Z06 plates today.
Bill
05-04-2014, 01:12 PM
#5
Racer
Thread Starter
Like Froggy says just use a big pry bar to move the control arm around and they will pop into place. You don't need the D shaped plates as these ones are short enough to fit in the slot and not get involved with the rounded shape at the top. You can change alignment from track to street with these plates just by loosening the bolt enough to get some space and then rotating the plate 180 degrees. You may notice the holes are offset just a bit as well so you can change your max and min camber by the hole you choose to put the bolt through.
That offset could be the reason your plate doesn't line up. Which hole did you use with the other plate on that bolt? The bolt has to go through the same hole on each plate as the slight offset will cause just what your picture shows. I just finished installing a set of Z06 plates today.
Bill
That offset could be the reason your plate doesn't line up. Which hole did you use with the other plate on that bolt? The bolt has to go through the same hole on each plate as the slight offset will cause just what your picture shows. I just finished installing a set of Z06 plates today.
Bill
Bill, I noticed that the blue plates were not completely symmetrical, but when I fixed that I still put another half an hour into trying to get it through with no luck. Also, I think the plates would have an even harder time fitting in "street" setting because the slot follows a path that has it placed higher in a lower-camber-setting.
I can get the blue plate into the slot without the bolt in the way. I can also get the bolt all the way through without the plate in the way. But when I tried wedging the plate up as far as it would go (it gets stopped by the upper radius), and tried tapping the bolt through, I can see the bolt is taking some blue paint off just slightly above the hole on the plate. That's telling me that the plate is not going high enough due to the radius. I'm not sure how this will work without removing material.
Thank you for the responses. I'll check out Froggy's video and maybe try a second corner to see if I ran into an anomaly.
05-04-2014, 03:47 PM
#7

I just went through this. The kit I got from Hardbar actually came from a company in Florida, forget the name. Doesn't say Hardbar at all.
No instructions.
I had blue blocks for the rear and red for the front. The blocks were all the same, just two colors.
It was a huge wrestling match to try to get the blocks in the most aggressive hole.
We ultimately had to use the less aggressive holes and hope the top shims will allow me to get -3 degrees camber.
Get a set of crowbars and force the control arm so they fit in.
It is a total pita. Especially when there are no instructions.
05-04-2014, 06:37 PM
#8
I ordered the same kit from hardbar for c5z but received the vansteel kit, my blocks are all blue like yours. I called to understand what was going on, apparently hardbar and vansteel have partnered on this product. I then asked about the install and got a verbal instruction to measure the blocks, they are NOT symetrical...the verbal instructions were over the phone were confusing without me being under the car at the time . I was told they would update their website instructions, that was several months ago. I haven't started this install yet because of this. Im glad you started this thread, keep us posted on how it works out. Together maybe we can get some info here for future reference
Last edited by tungstenfoot; 05-04-2014 at 07:22 PM.
05-04-2014, 06:58 PM
#9
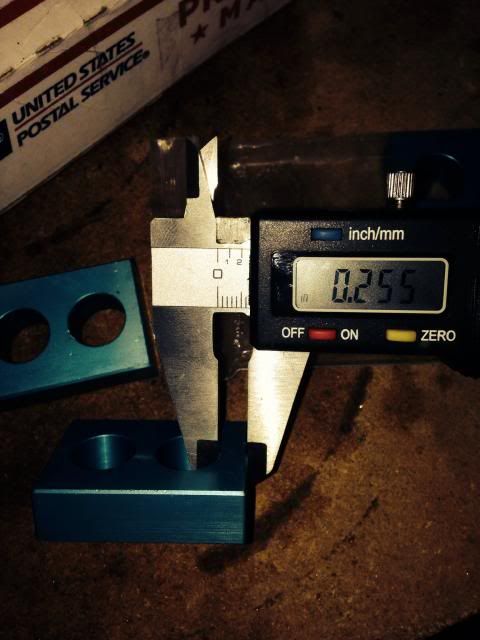
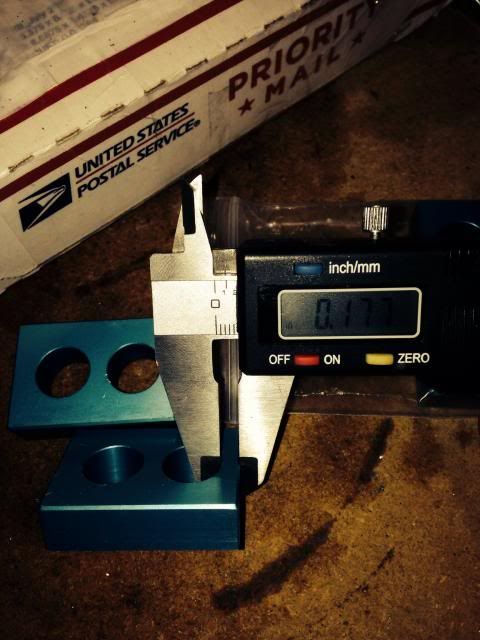
The blocks are definitely offset, measured from the ends they check .255" and approx. .175" at the other end. Which setting is "most aggresive"? What camber ranges are you guys getting for each setting? I dont understand why there are no instructions with these...
EDIT: compared to OP, it also looks like my plates are missing chamfered corners. I sure hope this doesnt cause any clearance issues...


EDIT: compared to OP, it also looks like my plates are missing chamfered corners. I sure hope this doesnt cause any clearance issues...
Last edited by tungstenfoot; 05-14-2014 at 07:25 PM.
05-04-2014, 07:49 PM
#10
Tech Contributor
Member Since: Oct 1999
Location: Charlotte, NC (formerly Endicott, NY)
Posts: 40,088
Received 8,927 Likes
on
5,332 Posts
I ordered the plates for a Z06 a few weeks ago. When I went to install them I had all blue plates. Called Van Steel and was told they sent the wrong front plates. Z06 takes larger plates which are red. When I got those I took out my Pfadt plates and installed the new ones. Even the less aggressive hole in the plate givers me more negative camber than the Pfadt plates did. To get them in you need two big crow bars. One big and the other bigger. You will also need a long (18 in) flat blade screwdriver. to get in the space between the control arm and the cradle and open things up so you can stick the crowbar in. Place the bar so the angled end with the fork at the end is angled toward the outside. Once it is up in the hole you can pull toward the inside to force the control arm slightly downward and out. If you push the bar toward the outside it will go slightly upward and out. When you get it right the bolt just pushes through with your finger tip. Make sure you wear high impact gloves as the bars can slip and can do some damage to your hands if they aren't protected.
These plates allow a lot more adjustment than the Pfadt plates which have just bolt hole in each plate. I just set mine up for a street alignment so I had the bolts in the rear in the hole with more distance to the edge located to the outside and in the front I located the same hole toward the inside. That gave me some ready made positive caster. Next time I think I will move the bolt to the hole that is mounted further out.
If anybody wants the Pfadt Plates for a C6Z I will be selling them along with some studs I have. The rear Pfadt plates provide a lot more adjustment than the Van Steel Plates so I may keep them will decide next week on those ones.
Bill
Last edited by Bill Dearborn; 05-04-2014 at 07:54 PM.
05-04-2014, 08:24 PM
#11
Drifting

Installed mine last month on a C6Z. The VanSteel plates and hardware are 1st rate products with fantastic fit and finish.
The front plates in the most camber position use "every bit of the slots" and take some work to get in, but can get -3.3 degrees in the front. Bills crowbar instructions apply. Just remember not to screw up those stock wimpy aluminum sleeves if on stock bushings. If they slip into the slot you will fight the bolts.
A bit of CPC on the bolts and threading them through instead of just beating them in will ease things a bit.
Must use the hardbar studs if you want a street setting with these, as you need a huge washer stack the shorter PFADT studs just wont allow.
The Vansteel websight has instructions, you just have to remember some alignment basics during the install. Thought the hole locations were pretty obvious, just depends how much track camber you want. Ended up running the front in the agressive position and the rear in the less camber position.
Really one of those things i would only recommend if you are doing your own alignments, and have everything you need to measure caster, camber, toe and TA.
05-04-2014, 08:41 PM
#12
Tech Contributor
Member Since: Oct 1999
Location: Charlotte, NC (formerly Endicott, NY)
Posts: 40,088
Received 8,927 Likes
on
5,332 Posts
Installed mine last month on a C6Z. The VanSteel plates and hardware are 1st rate products with fantastic fit and finish.
The front plates in the most camber position use "every bit of the slots" and take some work to get in, but can get -3.3 degrees in the front. Bills crowbar instructions apply. Just remember not to screw up those stock wimpy aluminum sleeves if on stock bushings. If they slip into the slot you will fight the bolts.
A bit of CPC on the bolts and threading them through instead of just beating them in will ease things a bit.
Must use the hardbar studs if you want a street setting with these, as you need a huge washer stack the shorter PFADT studs just wont allow.
The Vansteel websight has instructions, you just have to remember some alignment basics during the install. Thought the hole locations were pretty obvious, just depends how much track camber you want. Ended up running the front in the agressive position and the rear in the less camber position.
Really one of those things i would only recommend if you are doing your own alignments, and have everything you need to measure caster, camber, toe and TA.
The front plates in the most camber position use "every bit of the slots" and take some work to get in, but can get -3.3 degrees in the front. Bills crowbar instructions apply. Just remember not to screw up those stock wimpy aluminum sleeves if on stock bushings. If they slip into the slot you will fight the bolts.
A bit of CPC on the bolts and threading them through instead of just beating them in will ease things a bit.
Must use the hardbar studs if you want a street setting with these, as you need a huge washer stack the shorter PFADT studs just wont allow.
The Vansteel websight has instructions, you just have to remember some alignment basics during the install. Thought the hole locations were pretty obvious, just depends how much track camber you want. Ended up running the front in the agressive position and the rear in the less camber position.
Really one of those things i would only recommend if you are doing your own alignments, and have everything you need to measure caster, camber, toe and TA.
Bill
05-04-2014, 08:54 PM
#13
Melting Slicks


wow, this seems like a lot more work (PITA) than it should be...no instructions...pry bars...wrong colors sent out?? why can't someone other than Pfadt make a camber plate kit that is easy DIY. not enough demand I guess?
05-04-2014, 09:01 PM
#14
Yeah, ive been doing my own alignments for awhile...but this is my first on a vette. I think i follow but i think i need to get under the car still. I assume the "most aggressive" max camber position you describe is with the plates oriented to move the lower arm pivot furthest outboard from car centerline, correct? Without looking at it, its not clear how these can get you additional caster...
Last edited by tungstenfoot; 05-04-2014 at 09:19 PM.
05-04-2014, 09:17 PM
#15
Drifting
Correct. If you stick the lower mounts there most outbd. position you will gain the most negative camber. But they are a PITA to install like this as it gives you everything possible in the arm and slot, not needed unless you are on slicks.
Caster is done with shims on the top studs not the lower lock plates.
Bill, why would you ever need positive camber in a Vette?
Caster is done with shims on the top studs not the lower lock plates.
Bill, why would you ever need positive camber in a Vette?
Last edited by blkbrd69; 05-04-2014 at 09:19 PM.
05-05-2014, 09:25 AM
#16
Racer
I spent the day yesterday figuring all this out. Instructions would have been very helpful, I must admit. My big question was the studs... which side goes into the frame. After some trial and error and a shot of whiskey, I figured the short side goes into the frame, and the long side goes out for maximum adjustability. I am a bit concerned about the the tire hitting the stud though (running 315s up front).
I also found if you unbolt the sway bar and shock/coilover, the control arm moves around a lot easier. I'm using Phoenix Delrin bushings with the offset at the most aggressive on the top and had over 4.5* camber!! I turned them over and got something more reasonable.
I also found if you unbolt the sway bar and shock/coilover, the control arm moves around a lot easier. I'm using Phoenix Delrin bushings with the offset at the most aggressive on the top and had over 4.5* camber!! I turned them over and got something more reasonable.
05-05-2014, 11:49 AM
#17
Race Director
I spent the day yesterday figuring all this out. Instructions would have been very helpful, I must admit. My big question was the studs... which side goes into the frame. After some trial and error and a shot of whiskey, I figured the short side goes into the frame, and the long side goes out for maximum adjustability. I am a bit concerned about the the tire hitting the stud though (running 315s up front).
I also found if you unbolt the sway bar and shock/coilover, the control arm moves around a lot easier. I'm using Phoenix Delrin bushings with the offset at the most aggressive on the top and had over 4.5* camber!! I turned them over and got something more reasonable.
I also found if you unbolt the sway bar and shock/coilover, the control arm moves around a lot easier. I'm using Phoenix Delrin bushings with the offset at the most aggressive on the top and had over 4.5* camber!! I turned them over and got something more reasonable.
05-05-2014, 01:32 PM
#18
Racer
Originally Posted by froggy
You could have left them and shimmed out the tops to what you needed, but I'm sure you know that.
I ordered some DIY alignment tools today, so that's what I'll be doing this weekend.
05-05-2014, 03:53 PM
#19
Drifting

Caster can be added with the lower plates, with this kit or with the Pfadt kit. It is the same procedure as with the OEM eccentrics in that you use less push-out on the front lower arm than on the rear lower arm which tilts the knuckle back ( / ) by moving the bottom forward.
With the Pfadt kit you can use the 5 notch on the front and a 6 notch on the rear of the lower a-arm to do this. Same with this kit but it looks like you need to measure the hole-offset to know whats' what.
If choosing the same offset F&R on the lower a-arm you then can only adjust caster on top with shims as most do.
--Dan
05-05-2014, 08:00 PM
#20
Race Director
Caster can be added with the lower plates, with this kit or with the Pfadt kit. It is the same procedure as with the OEM eccentrics in that you use less push-out on the front lower arm than on the rear lower arm which tilts the knuckle back ( / ) by moving the bottom forward.
With the Pfadt kit you can use the 5 notch on the front and a 6 notch on the rear of the lower a-arm to do this. Same with this kit but it looks like you need to measure the hole-offset to know whats' what.
If choosing the same offset F&R on the lower a-arm you then can only adjust caster on top with shims as most do.
--Dan
With the Pfadt kit you can use the 5 notch on the front and a 6 notch on the rear of the lower a-arm to do this. Same with this kit but it looks like you need to measure the hole-offset to know whats' what.
If choosing the same offset F&R on the lower a-arm you then can only adjust caster on top with shims as most do.
--Dan