old-school, hand-made restrictor plate
 09-20-2015, 02:09 PM
#1
Race Director

Thread Starter

recently, a racer asked if I could make him a 4-hole restrictor plate, to fit under his carburetor, to keep the car from running too-fast for his class, and chassis certification:
I have been making gages (or templates) by-hand since 1984, and in the past, I have been asked to do this for other racers who index race, so this time, I took a few photos with my new camera, to show how this is done (and, figure-out how to use this camera)
First, the racer sent me a gasket to fit under the carburetor, which I used to determine the exterior shape & size, locate the 4 bolt-holes, and accurate locate the centers of the throttle bore:
I made a rough diagram, or blue-print, which I would use to follow during the fabrication process
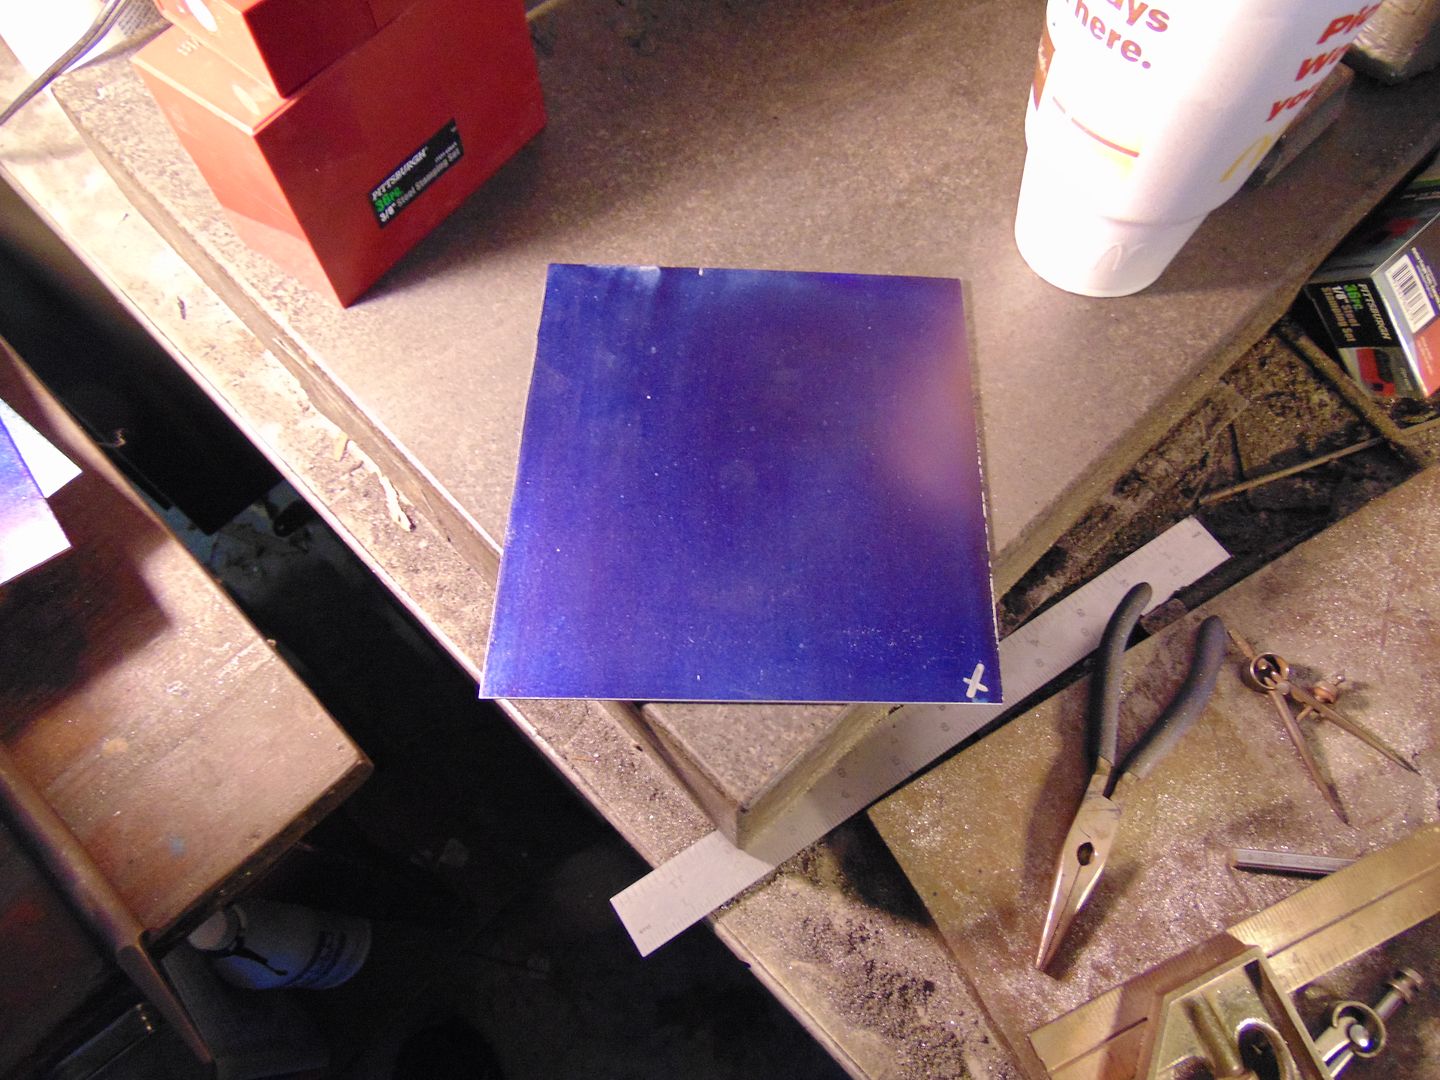
next, I took a scrap piece of .063"-thick aluminum from my pile of stock

then, I scuffed-up one side with 60-grit paper using an old rotary sander, and used a thin coat of dye to 'paint' that side
then, using a machinist's square, I made the lower Right corner in this photo absolutely square, with a 90* corner, marking it with a Silver 'X'
after stamping the piece '1.625' (the racer asked for a plate with four holes, each being 1 5/8" in diameter), I used the height gage (seen next to the aluminum) to strike lines perpendicular to each-other, locating the exact centers of the bolt-holes and throttle bores, as-well-as laying-out the exterior dimensions
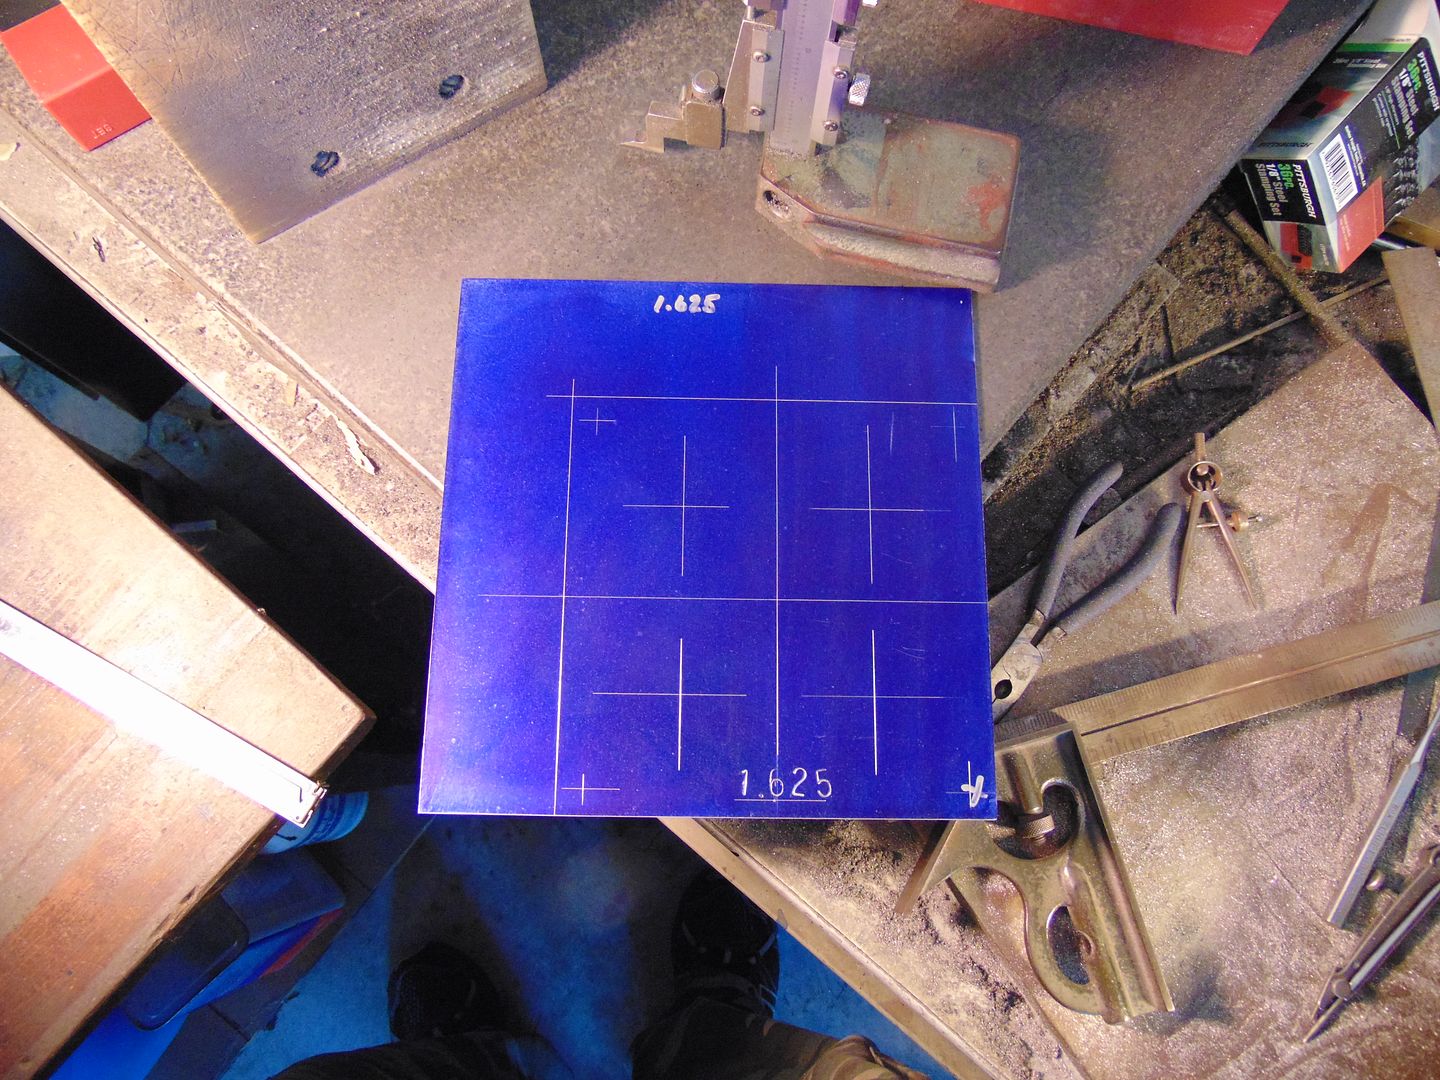
using layout dividers (seen next to the machinist's square), I could scribe the bolt-holes & throttle bores, and using radius gages, I scribed the corners, rounded-off at 1/2" radius
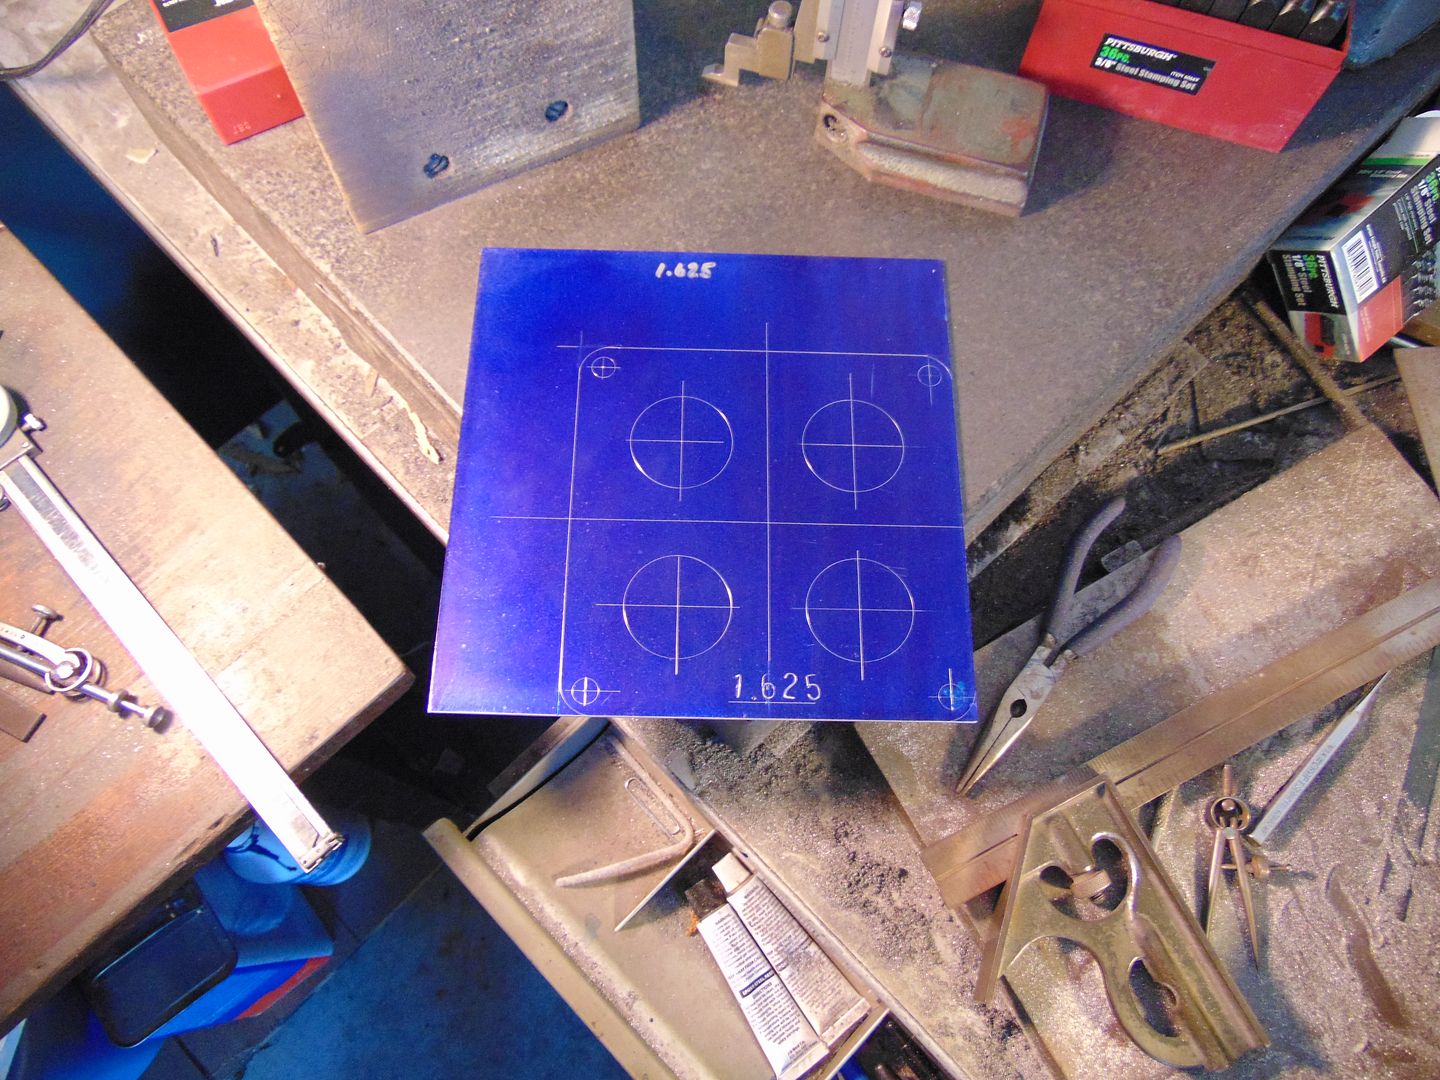
I next cut along the top & Left sides of the plate, and filed it by-hand square, then I drilled-out the bolt-holes, filed them by-hand, and dubbed-off the 1/2" radius'd corners
you can see that I have also drilled pilot holes in the throttle bores, and scribed lines at 30* and 60* to vertical of those bores:
these lines will help me control the diameter of the holes, as I will repeatedly check them, using a vernier dial caliper
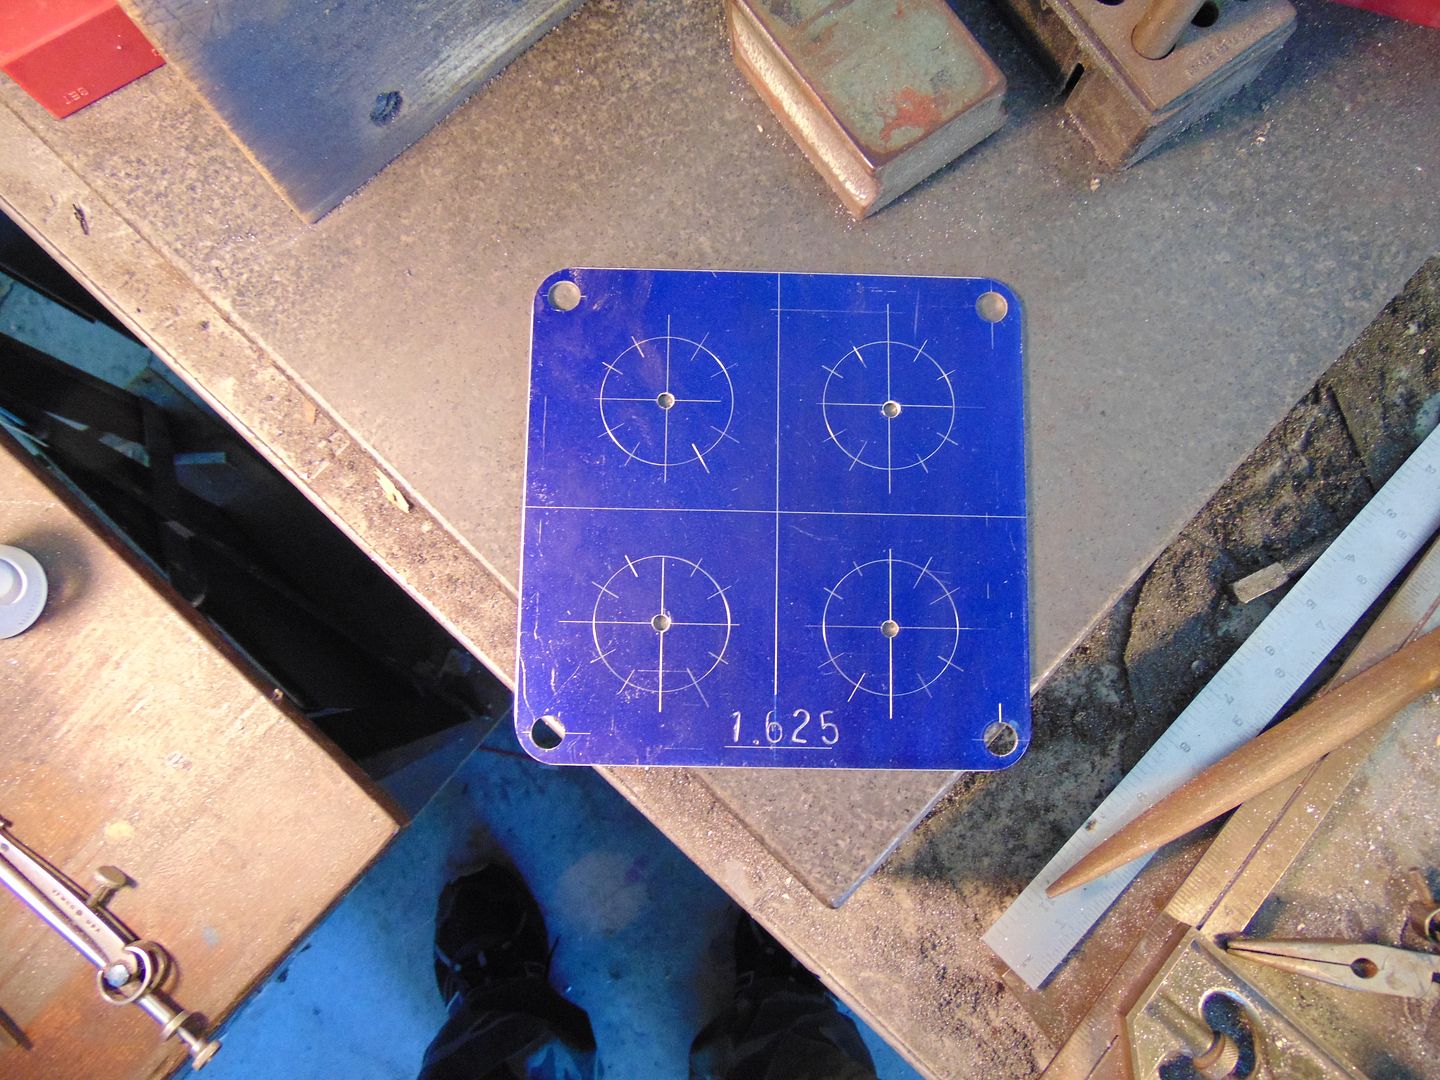
after using a 1 1/2" hole-saw to drill the throttle bores, I had to finish them by-hand, using various radius files, with various cuts (grit)

each bore had 12 positions around them (like numbers on a clock), and when I was positive each point was accurate, I placed a Silver check, or 'x' next to them, and never again rubbed that point with a file:
with many years of math behind me, I can locate them by measuring from any 2 adjacent sides, triangulating each point to with-in .001"
when all 4 throttle bores were finished, I stamped the date and my initials along the Right side of the plate, then again used the rotary sander, but used 180-grit paper, to remove the dye & leave a smooth finish
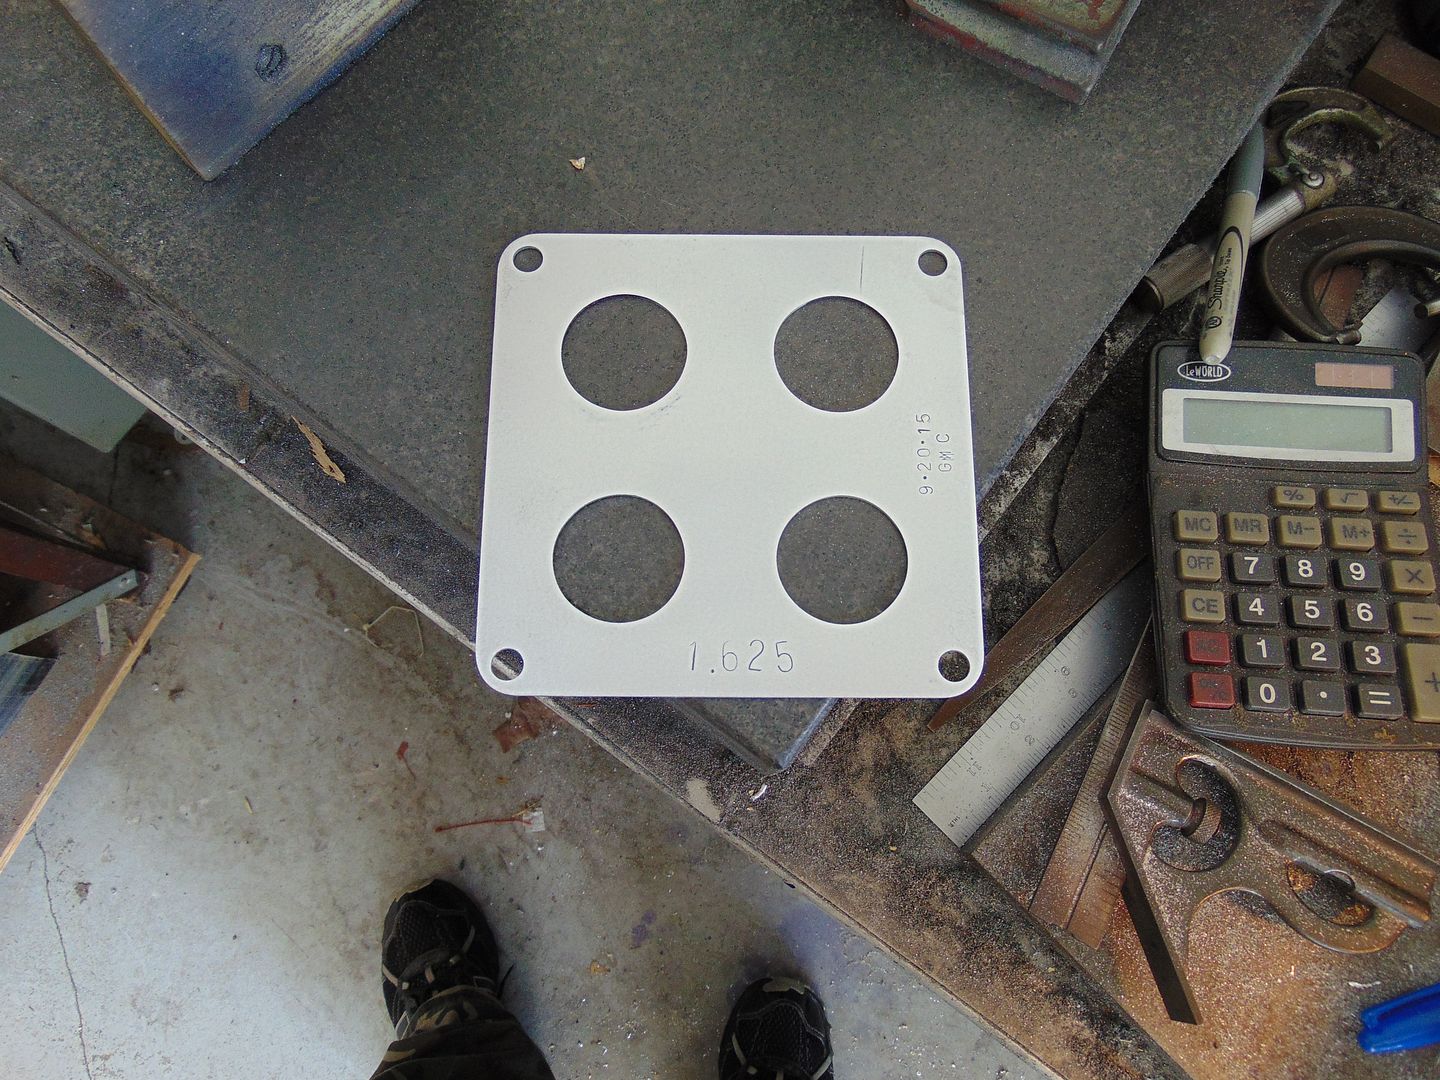
this isn't up to the level that NASCAR uses at Daytona or Talladega (my holes are between 1.624" and 1.626", with 1.625" being 1 5/8"), but it is close-enough for what we do:
when I am asked to make plates for index racers, I try to hold my tolerances + or - .0005" (1/2 thousandths of an inch)
I have been making gages (or templates) by-hand since 1984, and in the past, I have been asked to do this for other racers who index race, so this time, I took a few photos with my new camera, to show how this is done (and, figure-out how to use this camera)
First, the racer sent me a gasket to fit under the carburetor, which I used to determine the exterior shape & size, locate the 4 bolt-holes, and accurate locate the centers of the throttle bore:
I made a rough diagram, or blue-print, which I would use to follow during the fabrication process
next, I took a scrap piece of .063"-thick aluminum from my pile of stock
then, I scuffed-up one side with 60-grit paper using an old rotary sander, and used a thin coat of dye to 'paint' that side
then, using a machinist's square, I made the lower Right corner in this photo absolutely square, with a 90* corner, marking it with a Silver 'X'
after stamping the piece '1.625' (the racer asked for a plate with four holes, each being 1 5/8" in diameter), I used the height gage (seen next to the aluminum) to strike lines perpendicular to each-other, locating the exact centers of the bolt-holes and throttle bores, as-well-as laying-out the exterior dimensions
using layout dividers (seen next to the machinist's square), I could scribe the bolt-holes & throttle bores, and using radius gages, I scribed the corners, rounded-off at 1/2" radius
I next cut along the top & Left sides of the plate, and filed it by-hand square, then I drilled-out the bolt-holes, filed them by-hand, and dubbed-off the 1/2" radius'd corners
you can see that I have also drilled pilot holes in the throttle bores, and scribed lines at 30* and 60* to vertical of those bores:
these lines will help me control the diameter of the holes, as I will repeatedly check them, using a vernier dial caliper
after using a 1 1/2" hole-saw to drill the throttle bores, I had to finish them by-hand, using various radius files, with various cuts (grit)
each bore had 12 positions around them (like numbers on a clock), and when I was positive each point was accurate, I placed a Silver check, or 'x' next to them, and never again rubbed that point with a file:
with many years of math behind me, I can locate them by measuring from any 2 adjacent sides, triangulating each point to with-in .001"
when all 4 throttle bores were finished, I stamped the date and my initials along the Right side of the plate, then again used the rotary sander, but used 180-grit paper, to remove the dye & leave a smooth finish
this isn't up to the level that NASCAR uses at Daytona or Talladega (my holes are between 1.624" and 1.626", with 1.625" being 1 5/8"), but it is close-enough for what we do:
when I am asked to make plates for index racers, I try to hold my tolerances + or - .0005" (1/2 thousandths of an inch)


 09-20-2015, 09:11 PM
#4
Race Director
Thread Starter
if you have a test-n-tune this week, I can 2-day this 1 5/8" plate to you in the morning, and you can have it for Wednesday:
I'm already going past the Post Office tomorrow.
the 1 3/4", and 1 7/8" plates will be done later this week, and I can send them later:
it's up to you???
I'm already going past the Post Office tomorrow.
the 1 3/4", and 1 7/8" plates will be done later this week, and I can send them later:
it's up to you???
09-20-2015, 09:31 PM
#5
Drifting

Member Since: Nov 2008
Location: South Jersey
Posts: 1,494
Likes: 0
Received 0 Likes
on
0 Posts

if you have a test-n-tune this week, I can 2-day this 1 5/8" plate to you in the morning, and you can have it for Wednesday:
I'm already going past the Post Office tomorrow.
the 1 3/4", and 1 7/8" plates will be done later this week, and I can send them later:
it's up to you???
I'm already going past the Post Office tomorrow.
the 1 3/4", and 1 7/8" plates will be done later this week, and I can send them later:
it's up to you???
 on Sat and Harley Day
  on Sunday.