Impala Paint repair help
 07-05-2014, 02:48 PM
#1
Pro

Thread Starter

Hello everyone. I have a 2009 Impala with some paint damage and am looking for advice on how to properly repair it (it drives me crazy!)
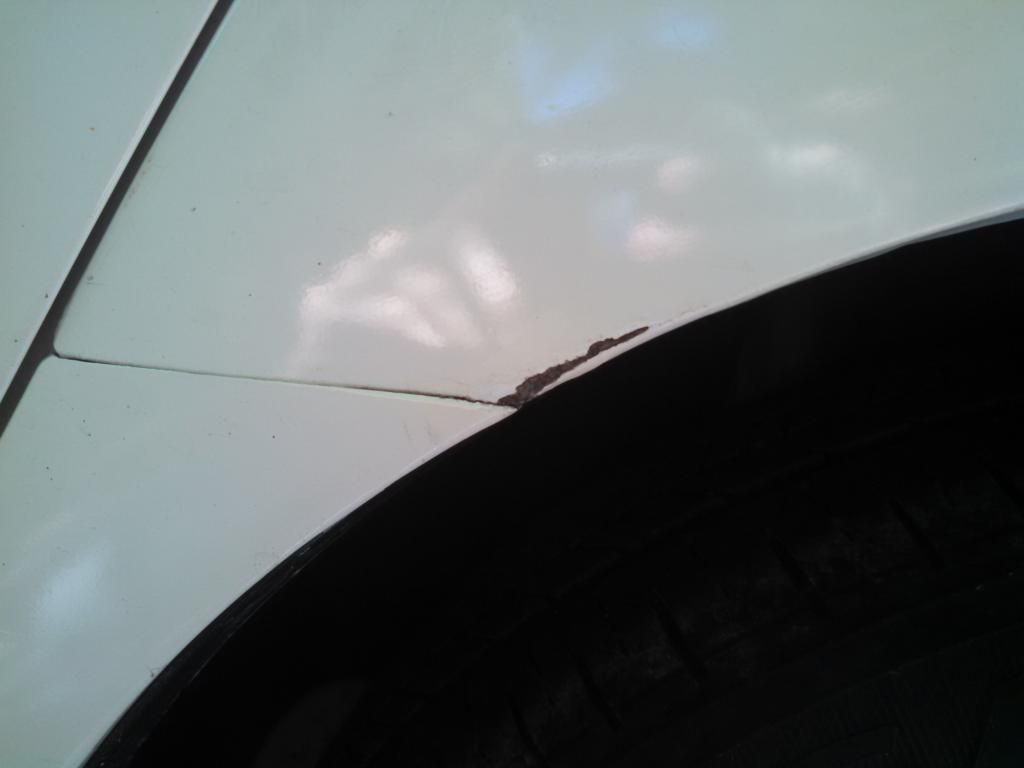
The paint it down to the metal in the rear wheel arch and I don't want it to rust. It hasn't really rusted yet. I have Primer, Base and Clear in aerosol cans. I'd like to blend it if possible but the repair is in a bad spot. Let me know what you think.
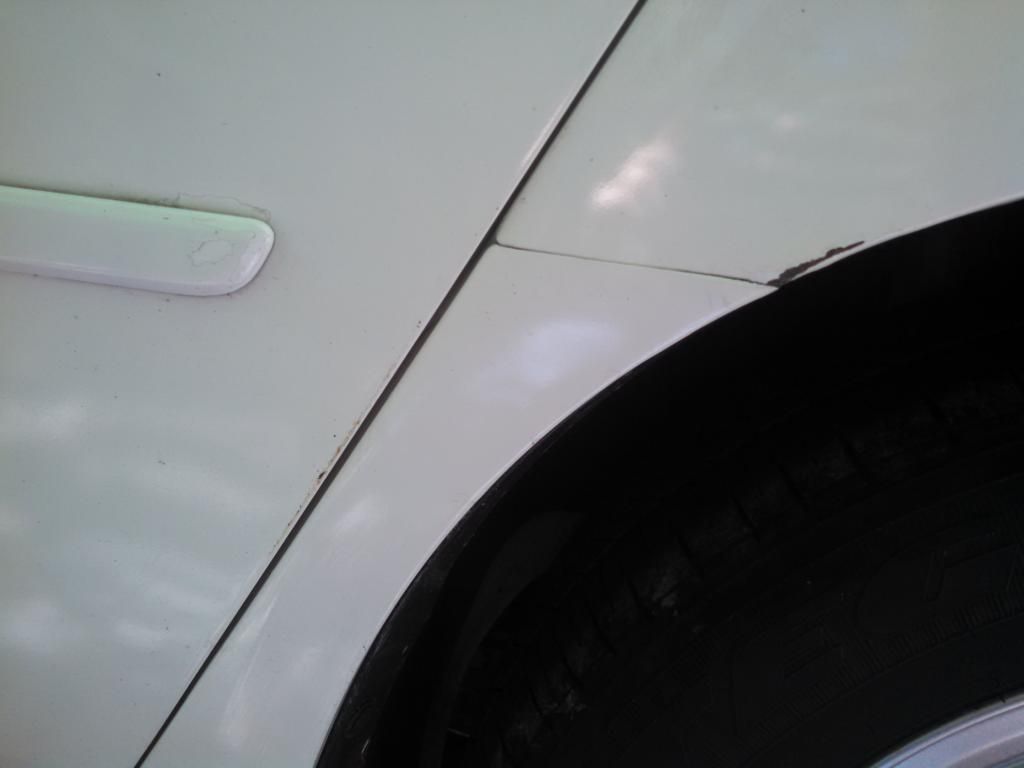
I'd also like to fix the door strip paint and door edge as seen in the pictures.
Thanks,
Will
The paint it down to the metal in the rear wheel arch and I don't want it to rust. It hasn't really rusted yet. I have Primer, Base and Clear in aerosol cans. I'd like to blend it if possible but the repair is in a bad spot. Let me know what you think.
I'd also like to fix the door strip paint and door edge as seen in the pictures.


Thanks,
Will
 07-05-2014, 06:38 PM
#2
Race Director


Will,
I do not think that using aerosol paint cans is the PROPER way of repairing this.
Is that a bad scuff on the door edge in your photo???
Need a photo of the panel that you want to fix from further away.
DUB
I do not think that using aerosol paint cans is the PROPER way of repairing this.
Is that a bad scuff on the door edge in your photo???
Need a photo of the panel that you want to fix from further away.
DUB
07-06-2014, 11:17 PM
#3
Pro
Thread Starter
The damage on the door edge is not a scuff it is an area of "cracked" paint. I'm unsure why it is like that. It reminds me of late 80's early 90's GM paint and what happens to that.. I regularly wash the car and wax it, it is not an abused vehicle.
I will get you a picture tomorrow showing the entire side of the car and the door damage. I am less worried about the door, the down to metal part in the wheel arch is the top priority.
Will
07-07-2014, 05:34 PM
#4
Race Director
This is repairable...obviously. I will let you know what I think and how I would do it when I can see other photo's.
Touch up paints do work. It has everything to do with the foundation that the touch up paint is being applied on. On an edge of a panel and white....this is not bad...UNLESS you are wanting it PERFECT.
DUB
Touch up paints do work. It has everything to do with the foundation that the touch up paint is being applied on. On an edge of a panel and white....this is not bad...UNLESS you are wanting it PERFECT.
DUB
07-07-2014, 07:11 PM
#5
Pro
Thread Starter
This is repairable...obviously. I will let you know what I think and how I would do it when I can see other photo's.
Touch up paints do work. It has everything to do with the foundation that the touch up paint is being applied on. On an edge of a panel and white....this is not bad...UNLESS you are wanting it PERFECT.
DUB
Touch up paints do work. It has everything to do with the foundation that the touch up paint is being applied on. On an edge of a panel and white....this is not bad...UNLESS you are wanting it PERFECT.
DUB


I have tried to use a touch up paint before. It just flaked right off and had no actual metal protection. It was touch up paint from GM. I put a little primer down and then put the paint on. I did not clear coat it maybe that would've made a difference. The problem is it is down to bare metal.
The lower panel that goes under the doors but goes to the damage can be pulled back a little allowing for more access.
Let me know what you think. It doesn't need to be perfect just as good as I can get it and primarily for rust protection. The car is a well taken care of daily driver, not a brand new C7


Thanks,
Will
07-08-2014, 08:47 AM
#6
Race Director

Here's what I would do:
Grind down to clean metal with a dremel tool. You need it to be clean, rough, metal. Go into the good paint as little as possible.
Mask around it and spray primer. Once it dries lightly sand it to get it smooth and blend it into the surrounding area. Again keeping the area small.
Mask again and spray white. Finish by polishing by hand, just to blend it in a bit.
When you mask, fold the tape back on itself and you won't get the hard line and it will blend better.
With this being white, and fairly far down the body it will look ok. You'd probably have to point it out for people to see it.
Whatever you do, don't start spraying large areas with rattle cans. It will look like crap.
07-08-2014, 05:17 PM
#7
Pro
Thread Starter
Here's what I would do:
Grind down to clean metal with a dremel tool. You need it to be clean, rough, metal. Go into the good paint as little as possible.
Mask around it and spray primer. Once it dries lightly sand it to get it smooth and blend it into the surrounding area. Again keeping the area small.
Mask again and spray white. Finish by polishing by hand, just to blend it in a bit.
When you mask, fold the tape back on itself and you won't get the hard line and it will blend better.
With this being white, and fairly far down the body it will look ok. You'd probably have to point it out for people to see it.
Whatever you do, don't start spraying large areas with rattle cans. It will look like crap.
Grind down to clean metal with a dremel tool. You need it to be clean, rough, metal. Go into the good paint as little as possible.
Mask around it and spray primer. Once it dries lightly sand it to get it smooth and blend it into the surrounding area. Again keeping the area small.
Mask again and spray white. Finish by polishing by hand, just to blend it in a bit.
When you mask, fold the tape back on itself and you won't get the hard line and it will blend better.
With this being white, and fairly far down the body it will look ok. You'd probably have to point it out for people to see it.
Whatever you do, don't start spraying large areas with rattle cans. It will look like crap.

Like I said, it doesn't need to be flawless just an acceptable repair on a daily driver. Once the rain and extreme heat where I am goes away, I'll commence on the repair and report back. Keep letting me know any further suggestions on how to do the repair, I'm all ears on this one.
Will
07-08-2014, 07:28 PM
#8
Race Director
Here's what I would do:
Grind down to clean metal with a dremel tool. You need it to be clean, rough, metal. Go into the good paint as little as possible.
Mask around it and spray primer. Once it dries lightly sand it to get it smooth and blend it into the surrounding area. Again keeping the area small.
Mask again and spray white. Finish by polishing by hand, just to blend it in a bit.
When you mask, fold the tape back on itself and you won't get the hard line and it will blend better.
With this being white, and fairly far down the body it will look ok. You'd probably have to point it out for people to see it.
Whatever you do, don't start spraying large areas with rattle cans. It will look like crap.
Grind down to clean metal with a dremel tool. You need it to be clean, rough, metal. Go into the good paint as little as possible.
Mask around it and spray primer. Once it dries lightly sand it to get it smooth and blend it into the surrounding area. Again keeping the area small.
Mask again and spray white. Finish by polishing by hand, just to blend it in a bit.
When you mask, fold the tape back on itself and you won't get the hard line and it will blend better.
With this being white, and fairly far down the body it will look ok. You'd probably have to point it out for people to see it.
Whatever you do, don't start spraying large areas with rattle cans. It will look like crap.
 100%
100%DUB
 07-12-2014, 06:07 PM
#10
Race Director
07-20-2014, 04:37 PM
#11
Pro
Thread Starter
So I did the job, I'll post up some pictures. It came out well there was a slight paint line but I wet sanded it with 2000 grit. However it dulled the finish of both the original paint and the new paint.
Should I just buff with compound or add a coat or two of clear just to blend it?
Will
Should I just buff with compound or add a coat or two of clear just to blend it?
Will
07-20-2014, 04:46 PM
#12
Race Director
So I did the job, I'll post up some pictures. It came out well there was a slight paint line but I wet sanded it with 2000 grit. However it dulled the finish of both the original paint and the new paint.
Should I just buff with compound or add a coat or two of clear just to blend it?
Will
Should I just buff with compound or add a coat or two of clear just to blend it?
Will
Obviously...adding some clear will protect the white....and add more mil thickness which can help also.
DUB
07-22-2014, 04:58 PM
#13
Pro
Thread Starter
You can do it either way. Buffing it by hand will remove some of the white paint...so depending on how much you put on will determine on how aggressive you get with the buffing compound and pressure.
Obviously...adding some clear will protect the white....and add more mil thickness which can help also.
DUB
Obviously...adding some clear will protect the white....and add more mil thickness which can help also.
DUB

