Fixing "Bubbas" Repairs
 10-05-2014, 01:32 AM
#1
Racer


Thread Starter


I had the rest of the paint removed from my 1965 Convertible via media blasting (walnut shells). It came out really well however it further highlighted the Bubba fixes that had been performed in the past. My plan is to show the issues here one by one and hopefully between everyone's input and some perseverance on my part, I will manage to fix all of them successfully.
The first "repair" up for discussion is the ugly looking patch on the hood (see picture). The repair once exposed by the media blasting is very rough with obvious air pockets (some "popped" some not) but doesn't go through to the underside. I believe I should grind out the old repair and reglass it. Opinions?
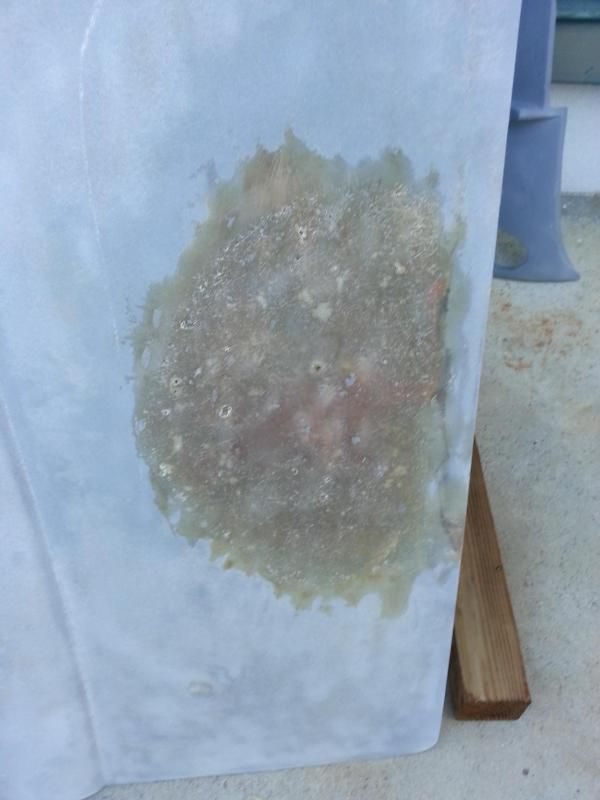
The first "repair" up for discussion is the ugly looking patch on the hood (see picture). The repair once exposed by the media blasting is very rough with obvious air pockets (some "popped" some not) but doesn't go through to the underside. I believe I should grind out the old repair and reglass it. Opinions?

 10-05-2014, 03:44 PM
#2
Melting Slicks


That is what I would do. After you grind it out, several layers of resin(many recommend epoxy vs polyester) with mat, finish, fill and paint. Good luck. There are several good resources on this forum.
10-05-2014, 05:41 PM
#3
Race Director


I would grind it all the way out and I personally would use a polyester resin instead of an epoxy resin. REASON being is that this is a polyester bodied car and it does not require the epoxy resin.
And...regardless of which resin you choose ( obviously the choice is your)...the WHOLE TRICK is CORRECTLY laminating the area. It has NOTHING to do with how much resin your slap on the panel to get the fiberglass to absorb it...it is getting the air out and the concentrations correct. Too much resin is not GOOD. Too little and your fiberglass will be dry.
You also want the polyester resin to cure out in 24 hours...and NOT 3 hours. I usually apply no more than 3 layers of 1-1/2 ounce fiberglass matt at one time. If I need more...I come in the next day and add more.
Remember....depending on the air temperatures when laminating...I adjust the amount of MEKP ( Methyl Ethyl Ketone Peroxide) I add to my resin. And if you do a test with the polyester resin...you CAN NOT have a 1/2 pint in a cup (for example)...then add the drops of MEKP to it and stir it up...and check it on how fast it cures. Reason being...the VOLUME of resin is so great it will cure rather fast...and is NOT a true test. The internal heat from the chemical reaction will build up and cure the resin fast.....which is also why I do not like applying NUMEROUS layers at one time. Which is why I stop at 3 layers.
IF you want to check your mix...you actually have to laminate some fiberglass with it and check it. And do not put it in the sun.
DUB
10-05-2014, 09:12 PM
#4
Racer
Thread Starter
I would grind it all the way out and I personally would use a polyester resin instead of an epoxy resin. REASON being is that this is a polyester bodied car and it does not require the epoxy resin.
And...regardless of which resin you choose ( obviously the choice is your)...the WHOLE TRICK is CORRECTLY laminating the area. It has NOTHING to do with how much resin your slap on the panel to get the fiberglass to absorb it...it is getting the air out and the concentrations correct. Too much resin is not GOOD. Too little and your fiberglass will be dry.
You also want the polyester resin to cure out in 24 hours...and NOT 3 hours. I usually apply no more than 3 layers of 1-1/2 ounce fiberglass matt at one time. If I need more...I come in the next day and add more.
Remember....depending on the air temperatures when laminating...I adjust the amount of MEKP ( Methyl Ethyl Ketone Peroxide) I add to my resin. And if you do a test with the polyester resin...you CAN NOT have a 1/2 pint in a cup (for example)...then add the drops of MEKP to it and stir it up...and check it on how fast it cures. Reason being...the VOLUME of resin is so great it will cure rather fast...and is NOT a true test. The internal heat from the chemical reaction will build up and cure the resin fast.....which is also why I do not like applying NUMEROUS layers at one time. Which is why I stop at 3 layers.
IF you want to check your mix...you actually have to laminate some fiberglass with it and check it. And do not put it in the sun.
DUB
And...regardless of which resin you choose ( obviously the choice is your)...the WHOLE TRICK is CORRECTLY laminating the area. It has NOTHING to do with how much resin your slap on the panel to get the fiberglass to absorb it...it is getting the air out and the concentrations correct. Too much resin is not GOOD. Too little and your fiberglass will be dry.
You also want the polyester resin to cure out in 24 hours...and NOT 3 hours. I usually apply no more than 3 layers of 1-1/2 ounce fiberglass matt at one time. If I need more...I come in the next day and add more.
Remember....depending on the air temperatures when laminating...I adjust the amount of MEKP ( Methyl Ethyl Ketone Peroxide) I add to my resin. And if you do a test with the polyester resin...you CAN NOT have a 1/2 pint in a cup (for example)...then add the drops of MEKP to it and stir it up...and check it on how fast it cures. Reason being...the VOLUME of resin is so great it will cure rather fast...and is NOT a true test. The internal heat from the chemical reaction will build up and cure the resin fast.....which is also why I do not like applying NUMEROUS layers at one time. Which is why I stop at 3 layers.
IF you want to check your mix...you actually have to laminate some fiberglass with it and check it. And do not put it in the sun.
DUB

I ground out all the old patch and it does turn out that it did go all the way through in two spots. One is accessible easily from the other side but the other spot is on the edge and you can't get to it from the other side so you can't put a backing or anything. I need some advice on that spot.
Here is the picture after I ground out the ugly patch:
 10-06-2014, 05:51 PM
#5
Race Director
I can see what you did....but I need a photo further away so I can see where this damage is located. I have no idea where this damage is on the car....which can make a difference in procedure.
IS this the hood???? IF SO...I need photos of the under-structure also....because I am sure it is broken/cracked also.
DUB
IS this the hood???? IF SO...I need photos of the under-structure also....because I am sure it is broken/cracked also.
DUB
10-07-2014, 01:14 AM
#6
Racer
Thread Starter
I can see what you did....but I need a photo further away so I can see where this damage is located. I have no idea where this damage is on the car....which can make a difference in procedure.
IS this the hood???? IF SO...I need photos of the under-structure also....because I am sure it is broken/cracked also.
DUB
IS this the hood???? IF SO...I need photos of the under-structure also....because I am sure it is broken/cracked also.
DUB

The one spot that goes through (you can see the other spot is where the "ridge" is so you can't get to it from that side:

Overall location:
 10-07-2014, 06:42 PM
#7
Race Director
Thanks for the photos.
Am I seeing crack in the under structure...basically in the middle ...forward of where the air cleaner would be?????
QUESTION: What are you expecting from your repairs when you get done with this hood????
Reason being...has it been fitted up to the car and how well does it fit. And this also depends on what you are expecting it to look like and fit.
Advice to come.
DUB
10-07-2014, 11:09 PM
#8
Racer
Thread Starter
Thanks for the photos.
Am I seeing crack in the under structure...basically in the middle ...forward of where the air cleaner would be?????
QUESTION: What are you expecting from your repairs when you get done with this hood????
Reason being...has it been fitted up to the car and how well does it fit. And this also depends on what you are expecting it to look like and fit.
Advice to come.
DUB
Am I seeing crack in the under structure...basically in the middle ...forward of where the air cleaner would be?????
QUESTION: What are you expecting from your repairs when you get done with this hood????
Reason being...has it been fitted up to the car and how well does it fit. And this also depends on what you are expecting it to look like and fit.
Advice to come.
DUB
The hood fit very well and you couldn't see the repair when I bought the car. The only damage to the hood is what you see in the pictures. The one part of the repair went all the way through - that is #1 in the pictures. The other issue labeled #2 which went through the top layer is over the ridge as you can see in the picture of the hood from the back. There is a crack you can see that runs from #1 to #2.
I would expect the hood to fit well and look good

Shot of issues from front of hood:

Shot of issues from back of hood:

Last edited by PierreOlivier; 10-07-2014 at 11:19 PM.
10-08-2014, 05:53 PM
#9
Race Director
I would mask off the underside and prep the top side and grind it and taper it so my matt and resin will flow easily WITHOUT any severe humps or gouges with sharp edges or steps in them.
I would open up and slightly widen the crack that goes from side to side a little bit so you know you can get resin and matt in this crack.
Once I laminated it from the outside. I would prep the underside and laminate it a little bit...so when I am done laminating. I grind it down a little bit so I know that a thin layer of Vette Panel Adhesive and be applied to cover the ENTIRE repair area.
DO NOT be afraid to have it end up looking as big as what you saw before you ground out the old stuff.
Laminating the cracks that you can not support with tape or anything that are over the channel for your under structure...IF you have to apply ONE layer to get it to cover the gap...then do it...then come in the next day...grind that so your next layer will adhere ...and NOW ...you have a solid base to laminate on. AIR BUBBLES are you enemy here. ESPECIALLY on a the hood where it gets heat from the sun...and the engine compartment. Being very precise in your lamination will be to your best benefit.
DUB
10-09-2014, 11:52 AM
#10
Racer
Thread Starter
I would mask off the underside and prep the top side and grind it and taper it so my matt and resin will flow easily WITHOUT any severe humps or gouges with sharp edges or steps in them.
I would open up and slightly widen the crack that goes from side to side a little bit so you know you can get resin and matt in this crack.
Once I laminated it from the outside. I would prep the underside and laminate it a little bit...so when I am done laminating. I grind it down a little bit so I know that a thin layer of Vette Panel Adhesive and be applied to cover the ENTIRE repair area.
DO NOT be afraid to have it end up looking as big as what you saw before you ground out the old stuff.
Laminating the cracks that you can not support with tape or anything that are over the channel for your under structure...IF you have to apply ONE layer to get it to cover the gap...then do it...then come in the next day...grind that so your next layer will adhere ...and NOW ...you have a solid base to laminate on. AIR BUBBLES are you enemy here. ESPECIALLY on a the hood where it gets heat from the sun...and the engine compartment. Being very precise in your lamination will be to your best benefit.
DUB
I would open up and slightly widen the crack that goes from side to side a little bit so you know you can get resin and matt in this crack.
Once I laminated it from the outside. I would prep the underside and laminate it a little bit...so when I am done laminating. I grind it down a little bit so I know that a thin layer of Vette Panel Adhesive and be applied to cover the ENTIRE repair area.
DO NOT be afraid to have it end up looking as big as what you saw before you ground out the old stuff.
Laminating the cracks that you can not support with tape or anything that are over the channel for your under structure...IF you have to apply ONE layer to get it to cover the gap...then do it...then come in the next day...grind that so your next layer will adhere ...and NOW ...you have a solid base to laminate on. AIR BUBBLES are you enemy here. ESPECIALLY on a the hood where it gets heat from the sun...and the engine compartment. Being very precise in your lamination will be to your best benefit.
DUB