
Diff breather/vent size & removal?
 06-27-2011, 12:57 PM
#1
Safety Car

Thread Starter
Two questions about the above:
1. Is it possible to pop out the diff breather with the diff in the car - how securely is it pressed in?
2. Has anyone installed a remote breather? If so, what size is the opening in the diff and what type of fitting did you use?
Thanks.
1. Is it possible to pop out the diff breather with the diff in the car - how securely is it pressed in?
2. Has anyone installed a remote breather? If so, what size is the opening in the diff and what type of fitting did you use?
Thanks.
 06-27-2011, 02:11 PM
#2
Le Mans Master


Member Since: May 2007
Location: Belleville Mich.
Posts: 5,393
Likes: 0
Received 15 Likes
on
14 Posts

I have no idea if you would be able to remove the vent while still
in the car, but I don't think so. The o/s dia of the vent is 11/16".
Being that it's a press fit, it's in there pretty tight.
No idea of of the remote breather you speak of.
I would think you would get a better/correct response from RPM,DTE .
Good luck.
in the car, but I don't think so. The o/s dia of the vent is 11/16".
Being that it's a press fit, it's in there pretty tight.
No idea of of the remote breather you speak of.
I would think you would get a better/correct response from RPM,DTE .
Good luck.
06-28-2011, 12:45 PM
#3
Melting Slicks


Member Since: Dec 2003
Location: Near Jacksonville Fl.
Posts: 3,314
Likes: 0
Received 12 Likes
on
11 Posts

This will allow the vent to work like a normal vent and cure 99.9% of all rear axle leaks.

Just don't drive through deep standing water and if you do change the diff fluid ASAP as it may ingest water.
And don't over fill when cold the fluid should be 1/8-1/4" below the fill plug.
 06-28-2011, 01:05 PM
#4
Safety Car
Thread Starter
How are the spring and rubber washer attached? Any chance they were fall into the diff when the cap is removed?
Is the pressure desireable (to prevent aeration of the diff fluid)?
Is the pressure desireable (to prevent aeration of the diff fluid)?
06-28-2011, 04:42 PM
#5
Tech Contributor


Member Since: Dec 1999
Location: Anthony TX
Posts: 32,736
Received 2,180 Likes
on
1,583 Posts
CI 6,7,8,9,11 Vet
St. Jude Donor '08
NOTE!!!!!
The VENT for the differential has a spring loaded ball check valve in side it. The ball check allows air OUT but none back in.
When the differential heats up and then cools down, the differential goes into a slight vacuum... This vacuum helps prevent seepage/leakage when the car is not moving. When you remove the drain or fill pilg, most people hear an inrush of air when the plug is removed.
If you remove the vent check valve, you "MAY" see it start leaking more fluid than your use to seeing.
BC
The following users liked this post:
Tusc (06-21-2023)
06-29-2011, 10:47 AM
#6
Melting Slicks
Member Since: Dec 2003
Location: Near Jacksonville Fl.
Posts: 3,314
Likes: 0
Received 12 Likes
on
11 Posts
NOTE!!!!!
The VENT for the differential has a spring loaded ball check valve in side it. The ball check allows air OUT but none back in.
When the differential heats up and then cools down, the differential goes into a slight vacuum... This vacuum helps prevent seepage/leakage when the car is not moving. When you remove the drain or fill pilg, most people hear an inrush of air when the plug is removed.
If you remove the vent check valve, you "MAY" see it start leaking more fluid than your use to seeing.
BC
The VENT for the differential has a spring loaded ball check valve in side it. The ball check allows air OUT but none back in.
When the differential heats up and then cools down, the differential goes into a slight vacuum... This vacuum helps prevent seepage/leakage when the car is not moving. When you remove the drain or fill pilg, most people hear an inrush of air when the plug is removed.
If you remove the vent check valve, you "MAY" see it start leaking more fluid than your use to seeing.
BC

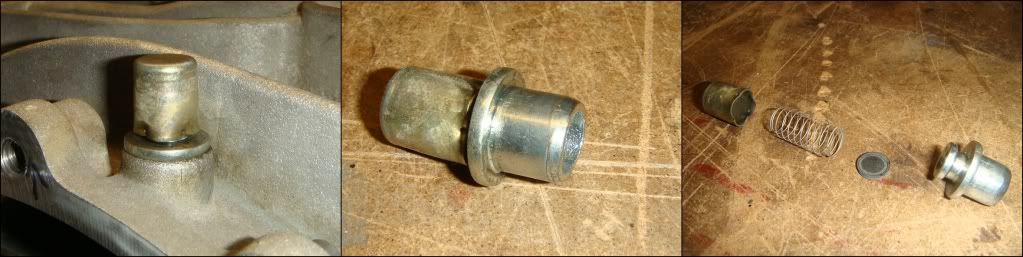
There is NO ball check it is a flat rubber washer and it is spring loaded against the cap, the issue is the rubber washer will stick causing a pressure to build in the diff.
This is the cause of your diff leaking, lip seals can only withstand ~5psi or so if they are made to hold more the seal will score the rotating surface causing a bigger leak.

The reason GM used a tabs valve in the diff was to prevent water intrusion while driving through the grit troughs at the proving grounds.

Since most of us will never encounter this type of abuse it will be to our advantage to use this fix.
I have personally used this fix on a number of Corvettes and not 1 of them has ever leaked afterwards.
09-10-2011, 05:50 PM
#7
1st Gear


Member Since: Sep 2011
Posts: 1
Likes: 0
Received 0 Likes
on
0 Posts

What is a plastic jiggle top vent and where can I get one? Any idea what diameter tubing is needed? I have not had a chance to look up there yet, but I want to try this before I do anything else. Otherwise i have a leaky axle seal..... Thank you!
 09-12-2011, 06:08 AM
#9

I also read somewhere that GM issued a service bulletin to replace that valve with a hose to prevent fluid from constantly spitting out of the diff. However, I believe that it was for one of the Cadillac models.
Update:
Here it is - I realize that it's not for our cars but the problem is similar. Same type of vent.
Subject: Axle Fluid Seeping/Leaking from Rear Axle (Install Rear Differential Hose and Vent) #07-04-20-001 - (02/02/2007)
Models: 2003-2007 Cadillac CTS
2004-2007 Cadillac SRX
2005-2007 Cadillac STS
2006-2007 Pontiac Solstice
2007 Saturn SKY
--------------------------------------------------------------------------------
Do This
Do Not Do This
Install a rear differential hose and vent.
DO NOT replace the rear differential axle assembly.
Condition
Some customers may comment on fluid seeping or leaking from the rear axle.
Correction
Install a rear differential hose, clamps and a new metal differential vent following the procedures listed below:
CTS, SRX and STS Models
Place the vehicle in neutral.
Raise and support the vehicle. Refer to Lifting and Jacking the Vehicle in SI.
Determine if the leak is coming from the rear axle differential vent.
If the leak is not coming from the axle vent, then do not proceed to the next step. Refer to Rear Axle Lubricant Leak Diagnosis in SI.
Remove the rear propeller shaft. Refer to Rear Propeller Shaft Replacement in SI.
Place a jack stand under the rear axle assembly for support.
Remove the three rear axle bolts and nut.
Lower the rear axle enough to gain access to the rear differential vent, located on the top of the axle.
Pry the top of the metal rear differential vent cap off.
Discard the old vent cap and spring.
Obtain a 9.50 mm (3/8 in) inside diameter hose by 30.50 cm (12 in) long of rubber low fuel pressure/oil resistant hose or equivalent, a new differential vent, P/N 15852707, and two hose clamps.
Important: If the clamp is not positioned correctly, the vent may fall off.
Assemble the new vent onto the hose and clamp the outer shoulder of the vent. Refer to the illustration above.
Install the second clamp onto the hose.
Attach the other end of the rear differential hose and vent to the axle vent.
Position the second clamp around the shoulder of the rear axle vent and hose as you did previously.
Tighten the second clamp.
Raise the axle assembly back into the vehicle.
Install the three axle bolts and nut.
Tighten
Tighten the bolts to 175 N·m (129 lb ft).
Remove the jack stand.
CTS, STS
SRX
Important: To prevent a rattle from occurring, make sure the vent cap is not touching anything when tied down.
Tie strap the hose and vent assembly (referring to the graphic above, depending on the vehicle model). The CTS and STS should be strapped to the rear crossmember frame. The SRX should be strapped to the underbody sheet metal reinforcement.
Important: An over-filled differential will cause fluid to seep out of the rear axle vent.
Check the differential fluid level. Refer to Rear Axle Lubricant Level Inspection in SI.
Clean off any axle fluid residue with GM Brake Cleaner, P/N 12378392 (in Canada, P/N 88901247), or the equivalent.
Install the rear propeller shaft back into the vehicle. Refer to Rear Propeller Shaft Replacement in SI.
Solstice and SKY Models
Some 2006 Pontiac Solstice models may have a plastic-style rear differential vent in the axle assembly. The plastic vent will need to be replaced with the new style metal vent, P/N 15852707.
Raise and support the vehicle. Refer to Lifting and Jacking the Vehicle in SI.
Determine if the leak is coming from the rear axle differential vent.
If the leak is not coming from the axle vent, then do not proceed to the next step. Refer to Rear Axle Lubricant Leak Diagnosis in SI
Remove the exhaust system. Refer to Muffler Replacement in SI.
Remove the driveline tunnel closet panel for vehicles equipped with a turbo. Refer to Driveline Tunnel Closeout Panel Replacement in SI.
Place a jack stand under the rear axle assembly.
Remove the rear axle bolts.
Lower the axle assembly to gain access to the vent.
Pry the top of the metal rear differential vent cap off.
Discard the old vent cap and spring.
Obtain a 9.50 mm (3/8 in) inside diameter hose by 30.50 cm (12 in) long of rubber low fuel pressure/oil resistant hose or equivalent, a new differential vent, P/N 15852707, and two hose clamps.
Important: If the clamp is not positioned correctly, the vent may fall off.
Assemble the new vent onto the hose and clamp the outer shoulder of the vent. Referring to the graphic above.
Install the second clamp onto the hose.
Attach the other end of the rear differential hose and vent to the axle vent.
Position the second clamp around the shoulder of the rear axle vent and hose as you did previously.
Tighten the second clamp.
Raise the axle assembly back into the vehicle.
Install the axle bolts.
Tighten
Tighten the bolts to 175 N·m(129 lb ft).
Remove the jack stand.
Important: To prevent a rattle from occurring, make sure the vent cap is not touching anything when tied down.
Tie strap the hose and vent assembly to the left body cross brace, referring to the graphic above.
Important: Over-filling the differential will cause axle fluid to seep out of the rear axle vent.
Check the differential fluid level. Refer to Rear Axle Lubricant Level Inspection in SI.
Clean off any axle fluid residue with GM Brake Cleaner, P/N 12378392 (in Canada, P/N 88901247), or the equivalent.
Install the driveline tunnel closet panel if equipped with a turbo. Refer to Driveline Tunnel Closet Panel Replacement in SI.
Install the exhaust system. Refer to Muffler Replacement in SI.
Parts Information
Part Number
Description
Qty
15852707
Vent, Rear Axle
As needed
1648216
Clamp, Hose
2
12337820
Strap, Nylon
2
9439238
Hose, 3/8 Fuel and Oil Resistance (25 ft)
1
89021677 (U.S.)
89021678 (Canada)
Synthetic Axle Lubricant (75W90)
1
Warranty Information
For vehicles repaired under warranty, use:
Labor Operation
Description
Labor Time
F9706*
Install Rear Differential Hose and Vent (Cadillac)
1.8 hrs
F9707*
Install Rear Differential Hose and Vent (Pontiac, Saturn)
1.0 hr (Non-Turbo) 1.2 hr (Turbo)
Add
Replace Plastic Vent in Rear Axle (2006 Pontiac Only)
0.1 hr
*This labor operation is for bulletin use only. It will not be published in the Labor Time Guide.
GM bulletins are intended for use by professional technicians, NOT a "do-it-yourselfer". They are written to inform these technicians of conditions that may occur on some vehicles, or to provide information that could assist in the proper service of a vehicle. Properly trained technicians have the equipment, tools, safety instructions, and know-how to do a job properly and safely. If a condition is described, DO NOT assume that the bulletin applies to your vehicle, or that your vehicle will have that condition. See your GM dealer for information on whether your vehicle may benefit from the information.
WE SUPPORT VOLUNTARY TECHNICIAN CERTIFICATION
© Copyright General Motors Corporation. All Rights Reserved.
--------------------------------------------------------------------------------
Document ID# 1897095
Cadillac STS
1G6Dxxxxxxxxxxxxx
Last edited by Cybermind; 09-12-2011 at 06:42 AM.
10-23-2011, 06:15 PM
#10
Le Mans Master
I think I might try this mod, as I believe my slight differential leak is caused by pressure build-up due to the check valve sticking in the vent. Seems my leak is from the side cover and sometimes the vent itself - I know it's not the axle seal, as there is no sign of fluid at the seal.
Has anyone picked up the new vent called out in the TSB from the dealer and tried this mod yet?
Part No. 15852707
Vent, Rear Axle
Has anyone picked up the new vent called out in the TSB from the dealer and tried this mod yet?
Part No. 15852707
Vent, Rear Axle
10-24-2011, 07:47 PM
#11
Le Mans Master
Wonder if adding a K&N breather filter in place of the new GM vent on top of the new 1 foot hose (per TSB instructions) would work OK. Never plan on 4-wheeling my Z06 any time soon. This one has the convenient 3/8" nipple to attached the hose to.

10-26-2011, 07:48 PM
#12
Le Mans Master
Info for all interested in this subject. I found a local dealer who had the vent (Part No. 15852707) in stock. The P/N has actually been superseded to a new number... don't have it with me to post.
UPDATE - The new GM part number for this differential vent is 19132947.
But anyway, this vent called out in the Cadillac TSB is the same vent that is installed in the differential housing and also has the rubber washer and spring setup. The TSB just puts it on a 12 inch hose up and away from the differential. Maybe getting it away from the heat of the differential helps the rubber washer from sticking and the vent working as it should (?). The new vent is ~$30.
I was digging around my tool box last night and found a motorcycle in-line fuel filter that has a fine mesh screen in it, and the body isn't much larger than the diameter of the fuel line the TSB calls out. This weekend I'm going to install this new vent setup, but use this in-line fuel filter instead. Will be interesting to see if the differential "leak" stops after the mod.
Last edited by ZeeOSix; 10-26-2011 at 10:03 PM.
10-26-2011, 09:25 PM
#13
Burning Brakes

I just bought a used differential from the bay, and when I unboxed it the vent was broken. I couldn't fins a GM part number so I started researching. It turns out the Dodge Charger uses a Getrag differential that uses the same vent.
The Dodge part number is 4809686AB, and they charged me $9.10 retail.
The Dodge part number is 4809686AB, and they charged me $9.10 retail.
Last edited by DIXZ; 10-26-2011 at 09:29 PM. Reason: Fat fingered.
10-26-2011, 10:04 PM
#14
Le Mans Master
I just bought a used differential from the bay, and when I unboxed it the vent was broken. I couldn't fins a GM part number so I started researching. It turns out the Dodge Charger uses a Getrag differential that uses the same vent.
The Dodge part number is 4809686AB, and they charged me $9.10 retail.
The Dodge part number is 4809686AB, and they charged me $9.10 retail.
10-27-2011, 08:50 AM
#15
Tech Contributor
 10-27-2011, 08:02 PM
#16
Burning Brakes
I just looked at it installed and the cap feels just like the stock vent. If you push down on the cap it comes back up like the stock one, so I know there is a spring in it, but can't comment on the rubber washer.
10-27-2011, 08:34 PM
#17
Le Mans Master
I did not take it apart to see, as I had not seen this thread before I installed the vent.
I just looked at it installed and the cap feels just like the stock vent. If you push down on the cap it comes back up like the stock one, so I know there is a spring in it, but can't comment on the rubber washer.
I just looked at it installed and the cap feels just like the stock vent. If you push down on the cap it comes back up like the stock one, so I know there is a spring in it, but can't comment on the rubber washer.
11-07-2011, 01:18 AM
#18
Le Mans Master
I would sporadically get small differential oil stains on my garage floor, and inspection of the differential would always find fluid on the bottom of the LH differential side cover area. I would never find fluid at the LH axle seal though. I could never really determine if it was coming from the vent, or from the O-ring where the side cover mates to the differential housing. So I decided to do the differential mod as described in the Cadillac TSB, and wanted to report my results.
I popped off the floating cap on the vent (used a small flat screw driver), and removed the spring and flat rubber washer under the cap so there was just the vent body/nipple left. When I removed the rubber washer, there was quite a bit of POSITIVE pressure inside the differential ... I could feel the air rush out the vent hole. Obviously, the rubber washer will stick to the vent nipple and not relieve the pressure, and allow pressure to build up in the differential. This can be the cause of fluid leaks or vent puking that results in what looks like a leak.
I installed a 1 foot piece of 5/16" ID fuel line, but instead of using the vent called out in the TSB (which is exactly the same vent that's already in the differential), I used a small in-line fuel filter used on motorcycles (typically used dirt bikes). Used a small worm screw type hose clamp on both ends of the fuel line, and loosely zip-tied the fuel line to the LH parking brake cable to keep if from flopping around. All worked out nicely. It was a little tricky working in the tight quarters where the vent lives, but it just took some patience to get this mod done.
So, I've driven the Zee 3 or 4 times (200+ miles) after the vent mod, and have even had some pretty good highway speed runs to see if any fluid appears. Inspection showed zero evidence of any fluid on the differential where it would usually show up. There was also zero evidence of any fluid at the end of the 1 foot vent line.
This mod works to stop the fluid leaks you might see from a stuck vent valve or puking vent.
05-16-2012, 01:03 PM
#19
I apologize for raising this thread from the dead but I have a question. Has anyone solved this issue by simply changing the gear lub to another brand or viscosity? I also wonder if the friction modifier additive actually causes the lube to expand more during spirited driving? I know that most of the newer GL-5 gear lubes are designed for LS diffs and no longer need the additive. I'm at witts end with this problem and I am preparing to change the diff fluid. I'm going to try Castrol Syntec 75W90 without the additive. I'm hoping that it will have better temperature tolerance and lower expansion during very hot temperatures and thus less of a tendency to spew out the vent tube.
05-16-2012, 01:14 PM
#20
Le Mans Master
I apologize for raising this thread from the dead but I have a question. Has anyone solved this issue by simply changing the gear lub to another brand or viscosity? I also wonder if the friction modifier additive actually causes the lube to expand more during spirited driving? I know that most of the newer GL-5 gear lubes are designed for LS diffs and no longer need the additive. I'm at witts end with this problem and I am preparing to change the diff fluid. I'm going to try Castrol Syntec 75W90 without the additive. I'm hoping that it will have better temperature tolerance and lower expansion during very hot temperatures and thus less of a tendency to spew out the vent tube.
I don't think changing the fluid is going to help at all. I don't think the fluid level really rises that much between cold and fully hot anyway ... maybe 1/2" is my guess. If you look at the level of the fill hole vs. the level of the vent nipple, there is a lot of distance between them. There is probably some fluid flying around inside the differential housing when the car is driven fast, but I'd think there would be some kind of baffle inside around the vent tube area to help prevent slinging of fluid out the vent. I've never seen the inside of the differential housing, so just guessing on that theory.
Anyway, doing a vent mod to prevent the differential from pressurizing from a stuck check valve in the stock vent seemed to cure my leakage all together.