
OFFICIAL A&A SUPERCHARGERS Q&A thread
 04-07-2012, 10:24 PM
#1
Platinum Supporting Vendor
Thread Starter

PLEASE TAKE A MOMENT TO TAKE A LOOK AT OUR NEW WEBSITE UNDER CONSTRUCTION and TEMPORARILY LOCATED AT WWW.AandACORVETTE.COM. Feel free to PM or email me any comments on the site. Constructive critisism is welcome!
SPECIAL NOTICE: As of 4-1-2013 A&A Superchargers now offers 50 State legal systems for all years and models of C5 and C6 Corvettes! C.A.R.B. # D-707 makes our base systems legal for sale and installation in California and all states adopting California emissions regulations.
A&A Superchargers is now sponsoring the C6 Forced induction section as we have the C5 Forced induction section for many years. http://forums.corvetteforum.com/c5-f...-a-thread.html
We want this section, and this thread in particular, to be informative and interesting for all those interested in Forced Induction.
Feel free to ask questions of us or other members here. As in our C5 thread, you will find a wealth of information as the thread develops.
A&A Superchargers is a division of A&A Corvette Performance. We have been Corvette Forum members since 2001 and sponsors since 2003.
Our systems can be configured in many ways. From 500 RWHP Emissions Compliant daily drivers to all the way up to a 1000 RWHP plus drag race specific vehicles. Please contact us for any custom build you may have in mind.
We are the authorized manufacturer of supercharger systems for C5 and C6 Corvette utilizing proprietary Vortech head units. All design work and assembly of the A&A supercharger system is performed at our facility near Oxnard California.
A&A Supercharger systems and individual components are available through our network of dealers as as well as through our website and retail store.
With over 3000 systems built, we have learned a lot over the last few years and this knowledge is reflected in the final product. We are always looking at ways to improve the efficiency and value of our products.
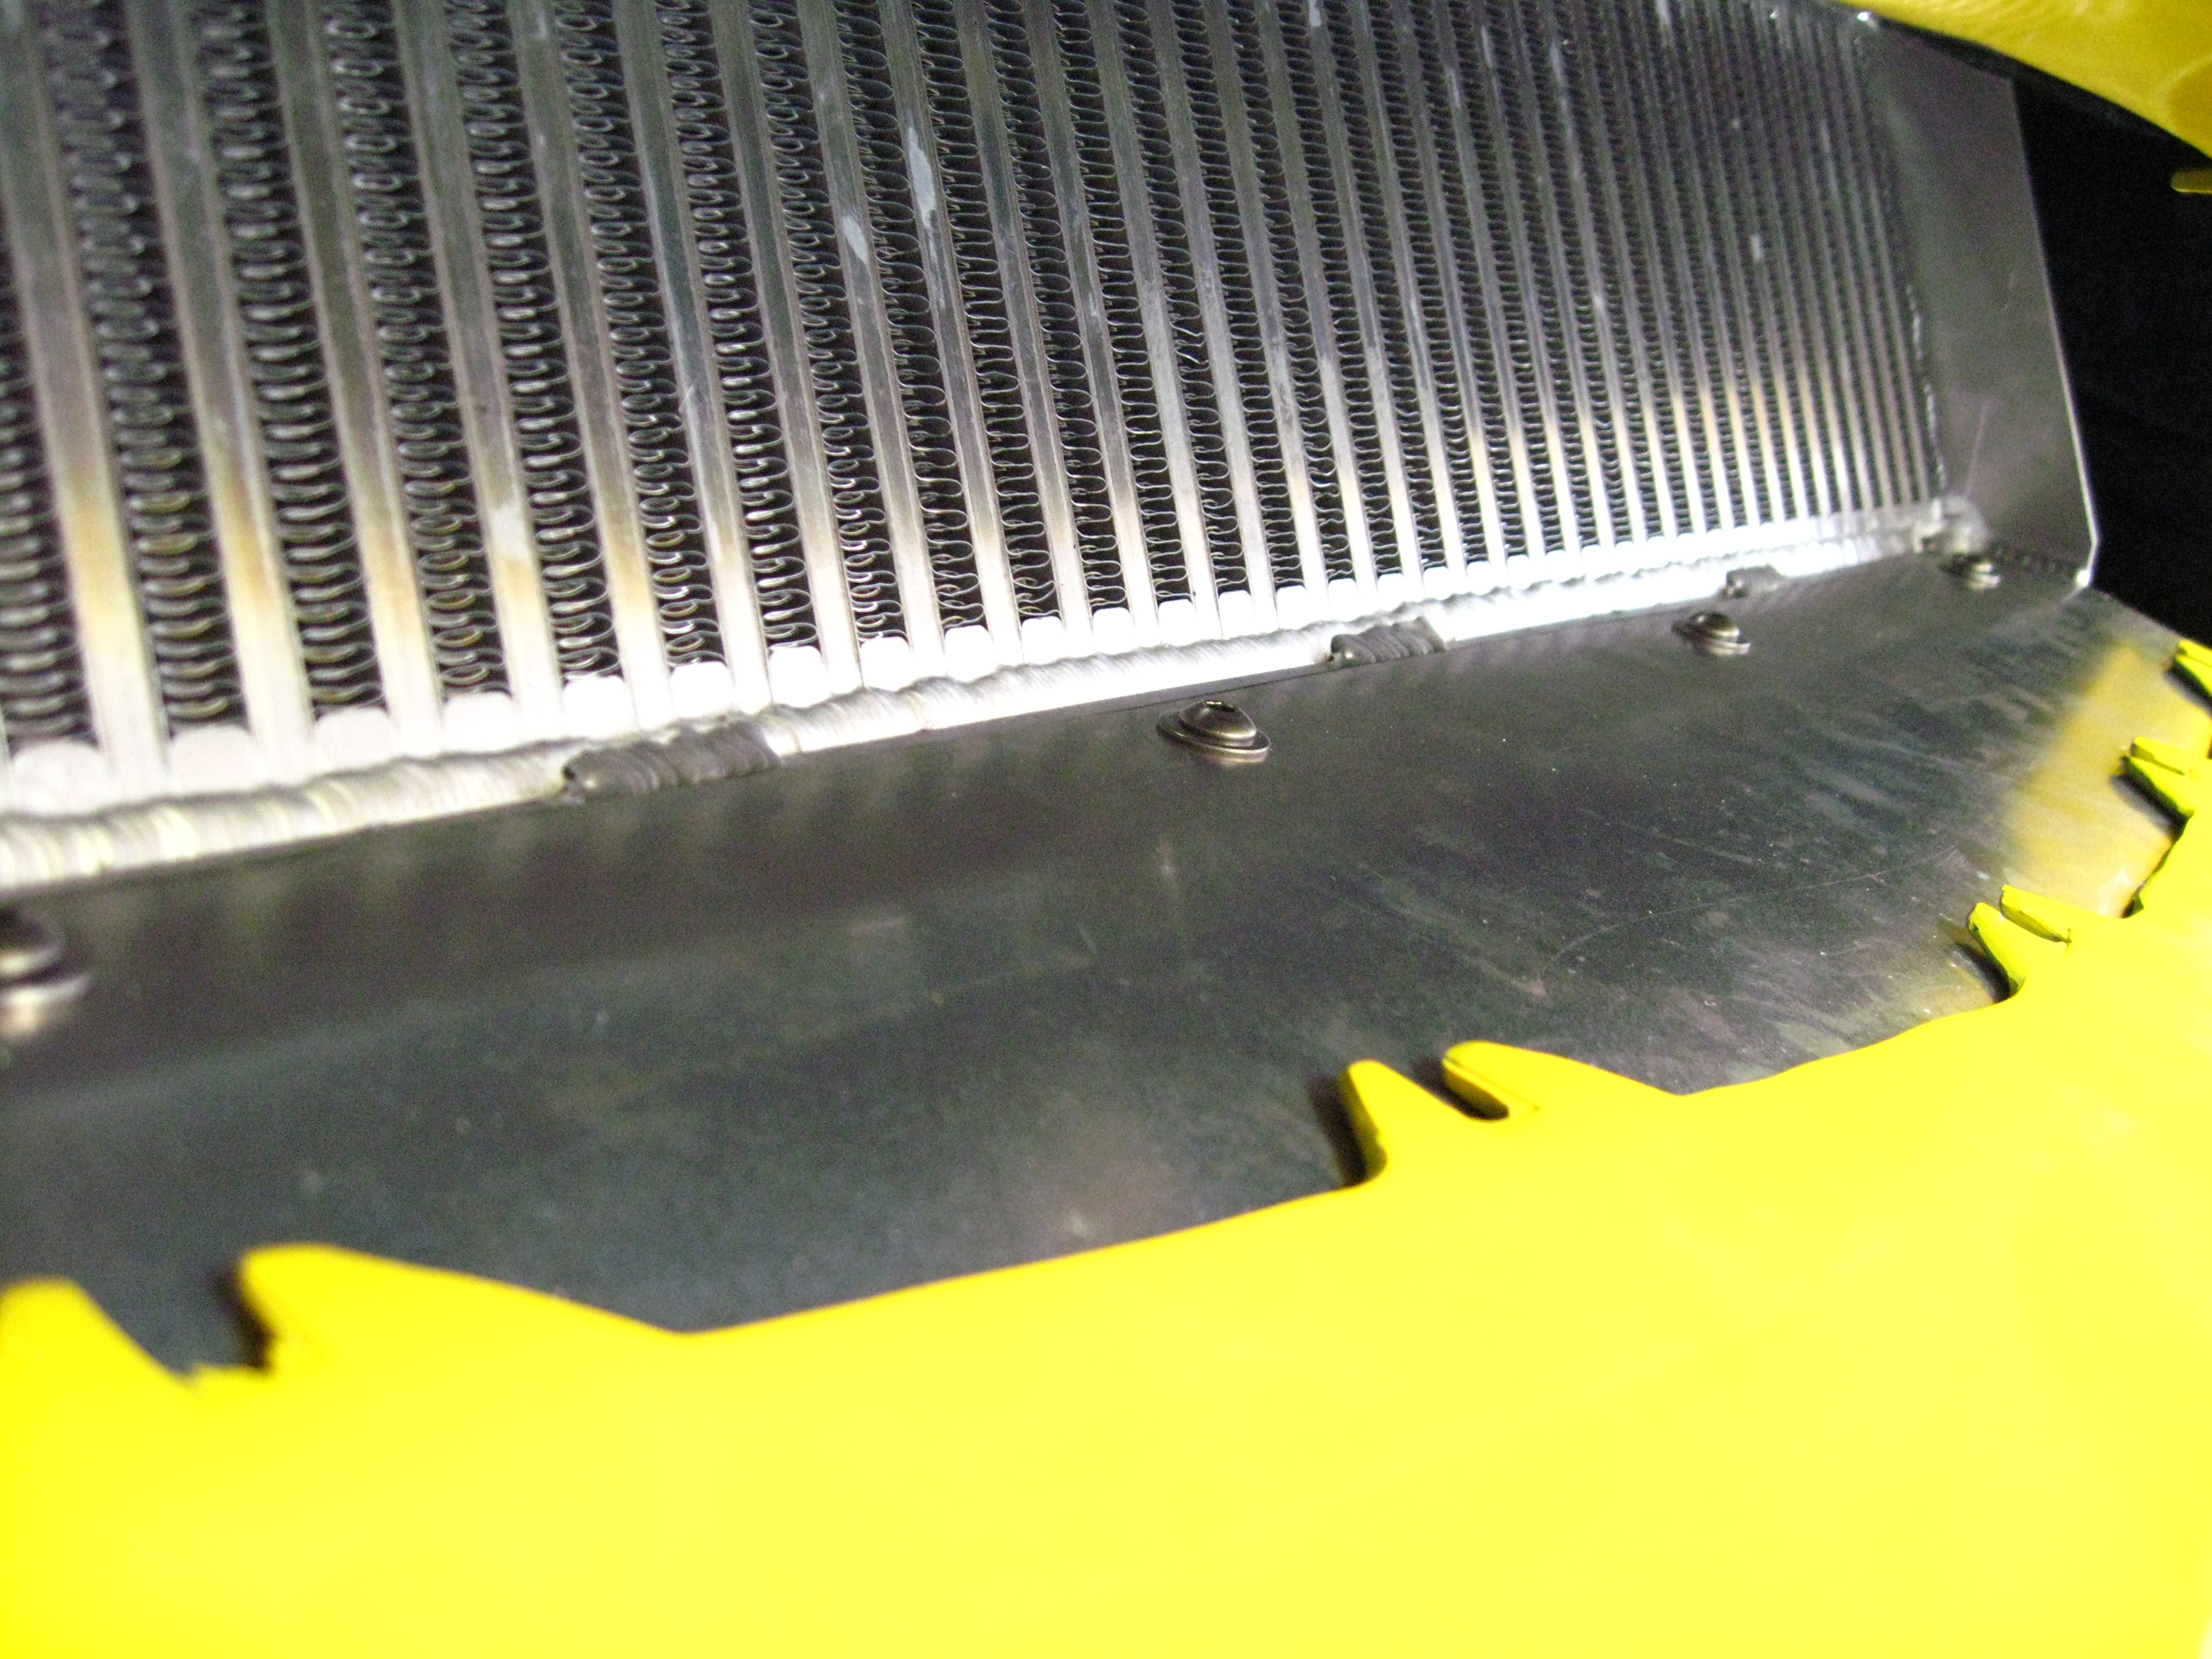
Our intercooler design is innovative and unprecedented. After much testing with smoke generators we found that a good portion the ambient airflow would actually hit the front of the intercooler and just �roll� over the sides. We are the only manufacturer to implement aluminum side plates on our intercoolers that capture this air and prevent this. The top seam of the intercooler is flush up against the frame which stops any air from going up and over the intercooler. The bottom of the intercooler has a duckbill that seals the area between the intercooler and the front fascia. 100% of the actual intercooler core is exposed to frontal airflow. None of this area is hidden behind the frame of the vehicle. These innovations made a huge difference in intercooler efficiency.
Look at the pictures below to understand how our RAM AIR INTERCOOLER design works. You can see how the aluminum panels help capture the incoming air flow.
We also use CNC laser cut aluminum panels that mount to the skid bar assembly to enclose the radiator area for efficient cooling and aesthetics.
Airflow management is the key to an efficient supercharger system.!
Our bracketry is now manufactured from 3/4� thick 6061 aluminum plate and machined on BOTH sides down to it�s 5/8� final dimension. Our competitors do not perform this important and expensive step. This is the only way to make sure the final product is completely flat and dimensionally to specification. Again, look at the picture below to see just how impressive our mounting bracket and tensioner are. There is nothing even close on the market.
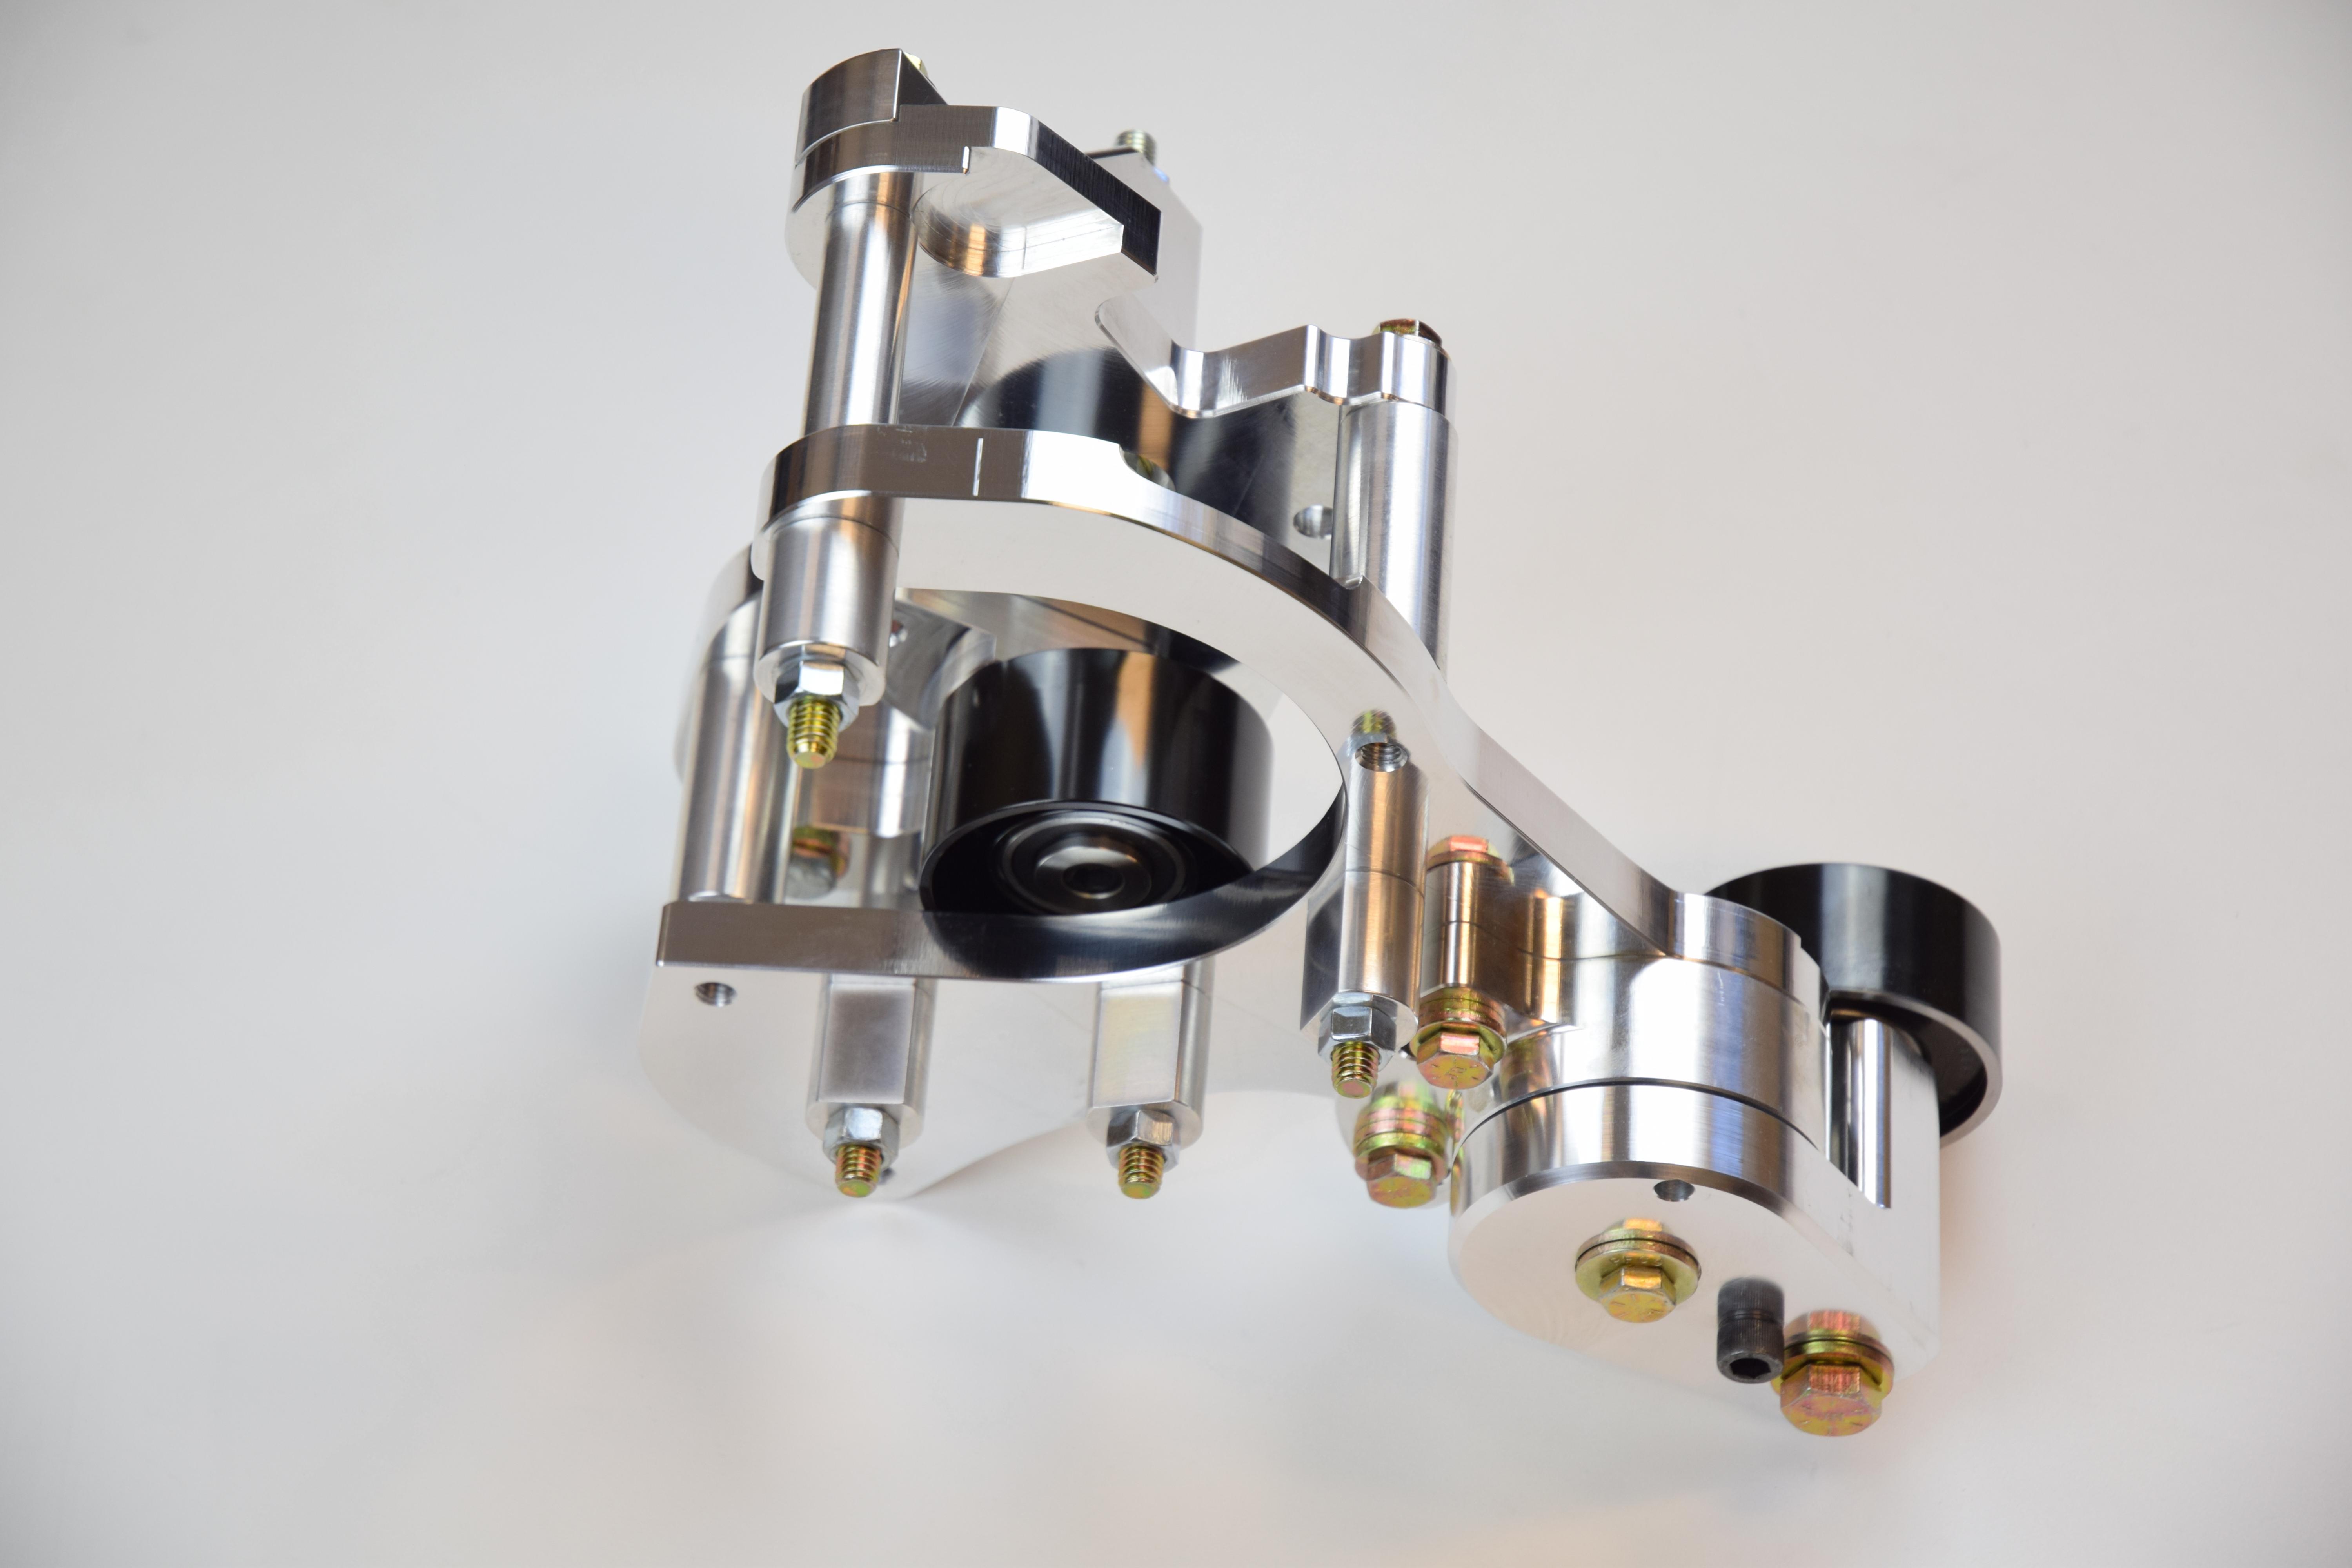
OUR BRACKETS HAVE OFTEN BEEN DESCRIBED AS "JEWELRY"
We are the only manufacturer to utilize 5 ply silicone hoses with complex bends for clearance around the sway bar, skid bar assembly and for proper intercooler entry without kinks. These are important features that ease installation as well as promote efficient airflow.
Our tubing is CNC bent, bead rolled and polished (or black anodized) for a professional look and to assure that hoses will not blow off under pressure.
We invite you to download our instructions to get a good overview of how the system is designed and how well the different parts integrate into a complete system. We have gone to great lengths to make sure we have the highest quality system available, regardless of price.
Our systems are generally ready to ship in two to three days and are 100% complete. We include a correctly sized head unit and pulley for your application, 60#or 80# injectors, Kenne Bell Boost A Pump, NGK spark plugs and a base tune, if needed. Nothing else is needed to get you up and running in your supercharged Corvette.
Either Josh or I (or other CF members) will try our best to answer any questions you may have.
I will also post any specials, used kits or new products in this thread.
UPDATE JUNE 2013 !! 2000 systems manufactured and sold.
Our commitment to ever improving our product and our unbeatable customer service has allowed us to pass the 2000 mark!
UPDATE JANUARY 2016!! We've hit the 3000 mark. Over 3000 A&A Systems have been produced! With the major improvements we've made for 2016, 4000 can't be far off!
Please feel free to ask any questions you may have about our systems in particular, or forced induction in general
Our high capacity fuel system is an A&A exclusive. Under normal driving conditions, only the factory pump fuels the engine. This means that the fuel isn't being heated by the large external pump.
Only under boost does the big pump kick in, almost tripling the available fuel output.
The stock fuel rail is utilized and the factory covers fit right on.
We've recently developed a dual pump setup that incorporates two separate pumps in one housng. This will supply fuel for ultra high horsepower builds.
A nice stainless steel bracket mounts our adjustable regulator to the brake booster.
All lines and fittings come pre assembled for easy installation.
No cutting of any factory lines is necessary. Our braided lines snap right on to the factory lines and fuel rail.
A hotwire kit runs power straight from the alternator to the pump. Our dual pump setup includes dual wire harnesses and dual relays that can be set at different boost activation levels.
Each relay is triggered by a boost activated switch.
NEW FOR 2016!
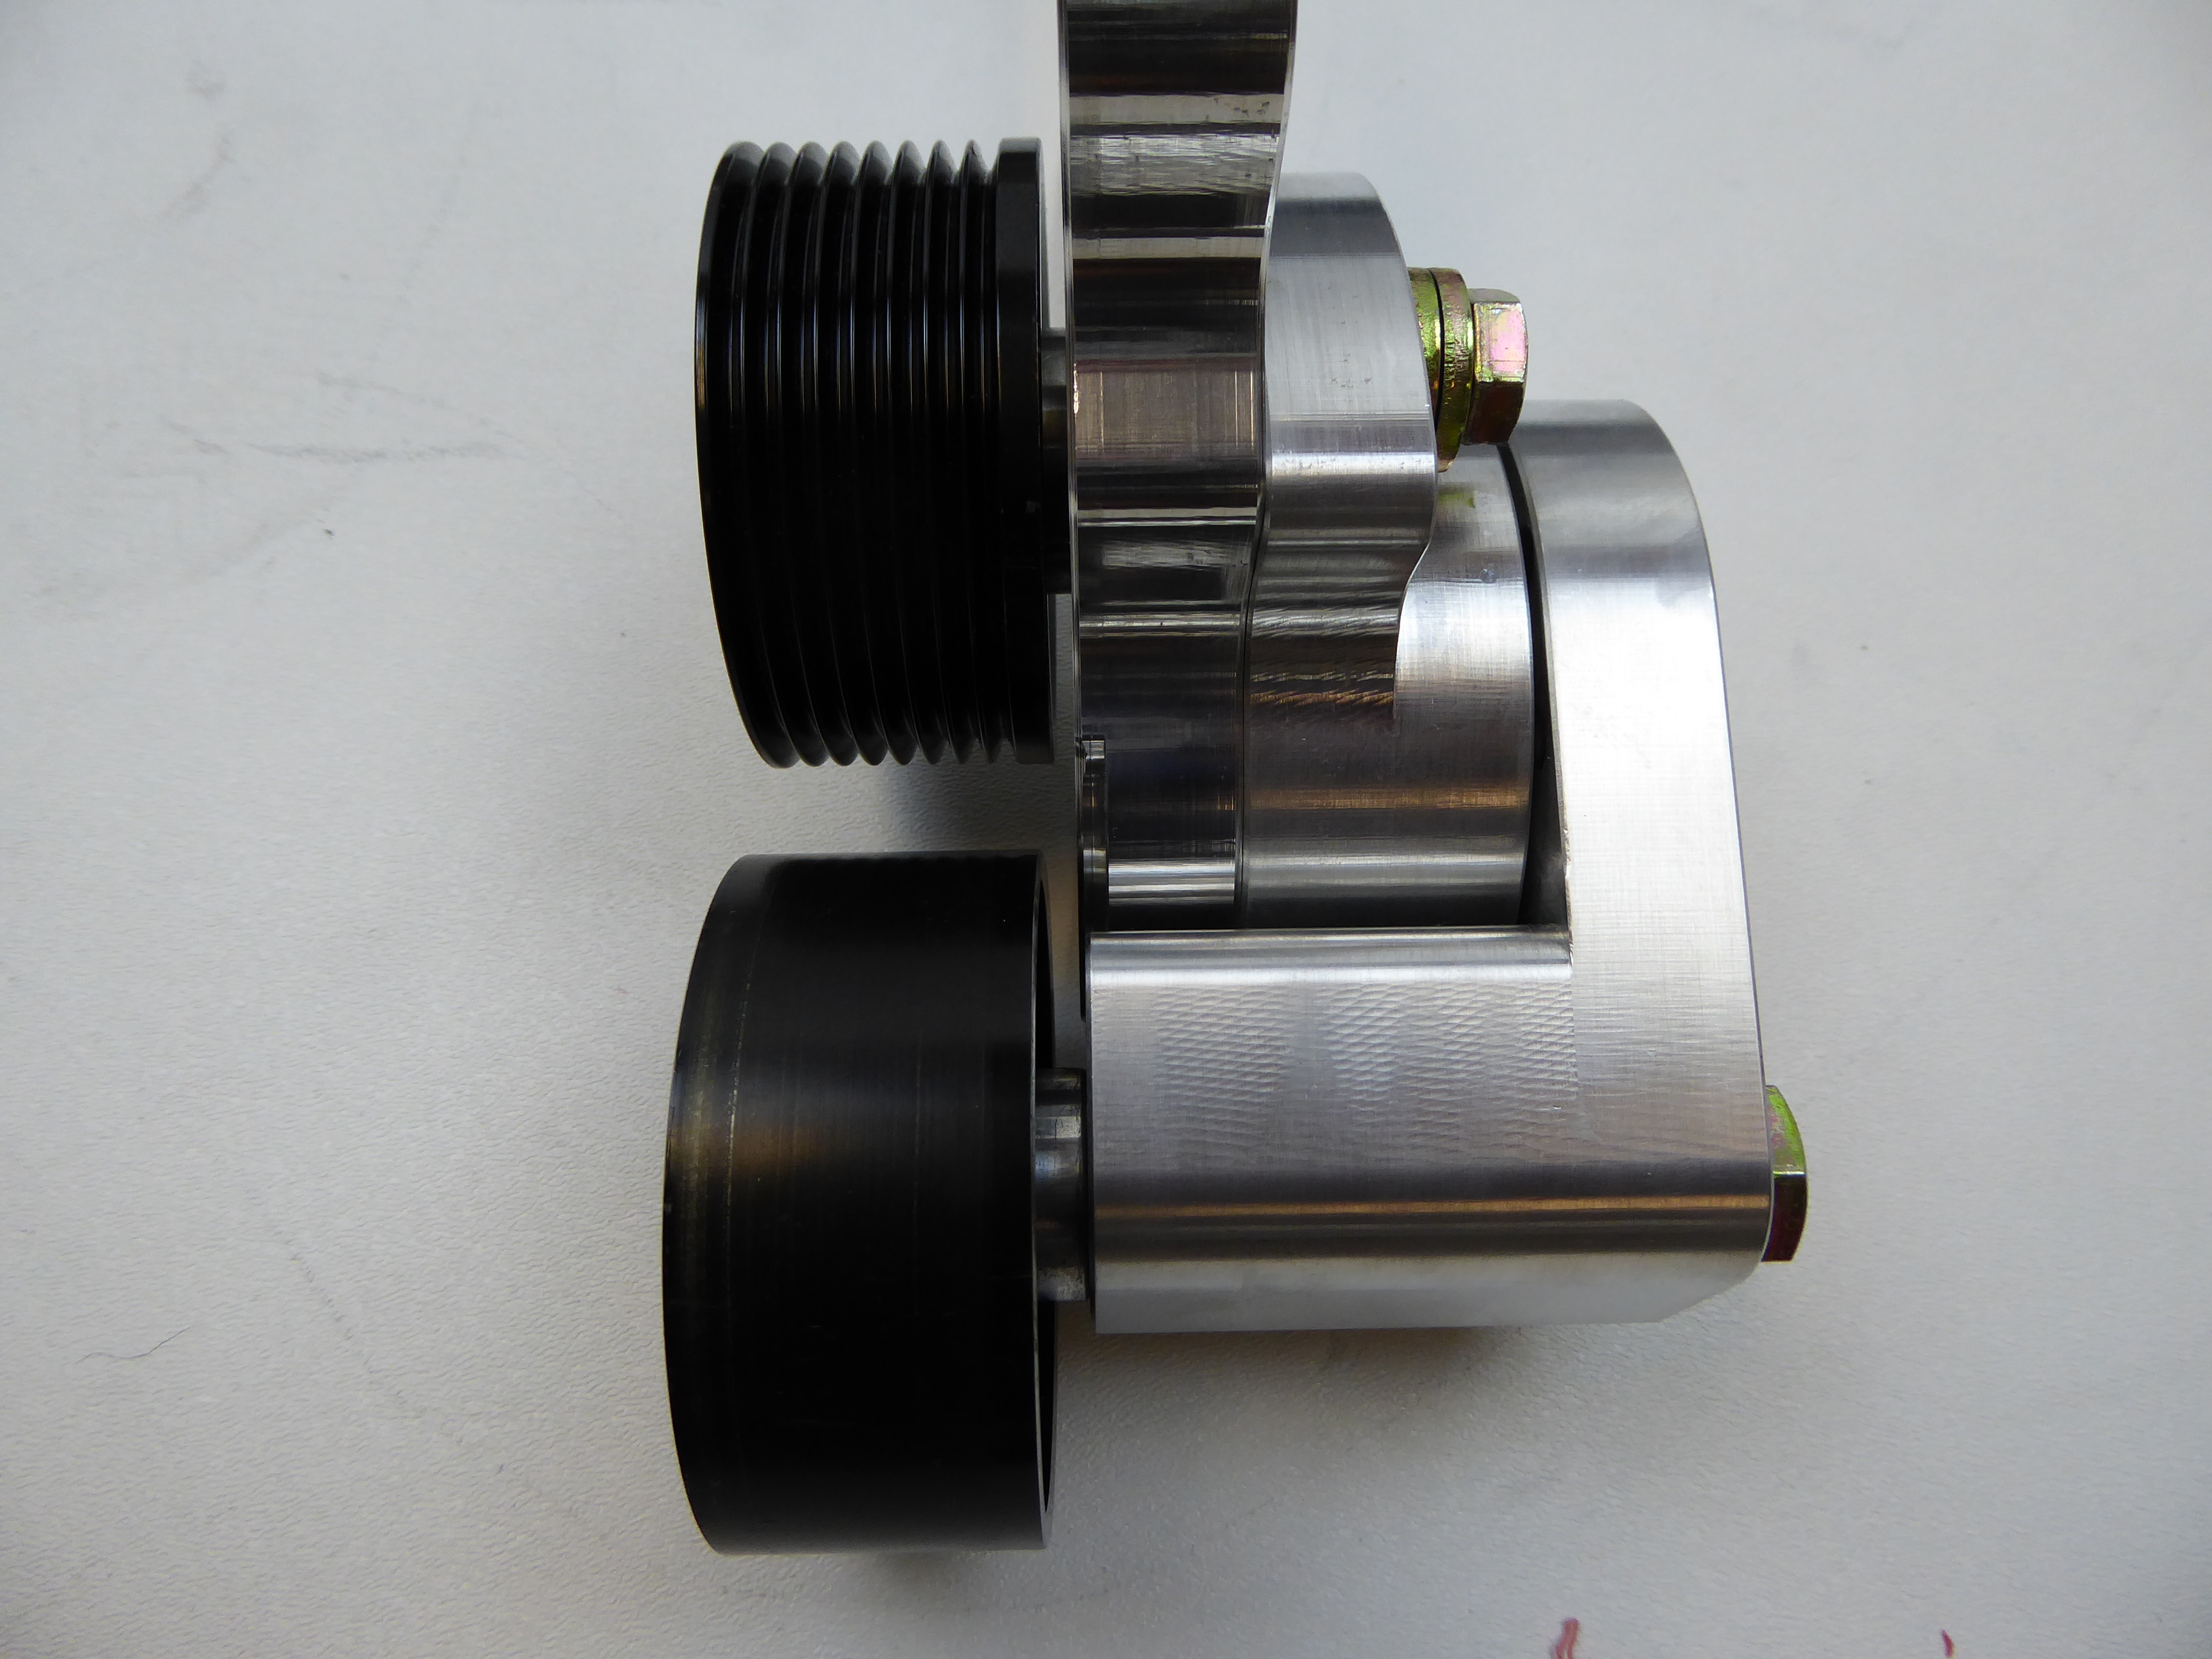
I've been obsessing over this project for a couple of months now. I wanted to build a solid billet tensioner with all the best features I could pack into it. I think I have achieved that in this new tensioner/ bracket design.
First of all it is EXTREMELY STRONG. It has German manufactured polymer bearings press fit into a precision machined bore that ride on a 4340 Chromoly shaft. NO DEFLECTION! Most, if not all, tensioners have aluminum rubbing on aluminum with "maybe" a plastic sleeve to separate them.
The two main halves of the tensioner are machined from 4 1/2" blocks of 6061 aluminum.
It features a LOCK MECHANISM so that you can easily move the tensioner to the open position and lock it in place. This allows you to remove your ratchet or wrench from the car and install the belt without having to hold the tensioner open with your other hand. Believe me, this a HUGE improvement over other designs.
IT IS "CLOCKABLE TO ALLOW CLEARANCE FOR STOCK AND OVERSIZE BALANCERS AND TO CHANGE SPRING PRELOAD. You can easily set the clearance between the tensioner pulley and the balancer. This way there is no danger of the tensioner pulley hitting the balancer in case you snap a belt. I hear complaints that other designs allow the pulley to hit the balancer and cause substantial damage when this happens.
There are 3 different internal spring settings as well as an optional spring that can be changed easily. Obviously a YSi with a 2.85 pulley, 8 rib and secondary drive making 900 RWHP will require more spring pressure than an Si or Ti Trim with a 3.8 6 rib pulley making 600 RWHP. We will offer different spring rates for this reason.
ALL THE NEW BRACKET/ TENSIONERS WILL BE SET UP FOR 8 RIB DRIVE If using a 6 rib pulley we simply insert a .280" spacer behind the pulley to line everything up. Nothing in the bracket- tensioner setup will need to be changed to go to 8 rib.
This will be coming in all the kits shortly. The billet tensioner has nearly TRIPLE THE SPRING RATE AND DOUBLE THE TRAVEL of our previous tensioner.
Because the distance from the fulcrum to the centerline of the pulley is so long (triple the measurement of our old tensioner) the pulley follows a NEAR LINEAR TRAJECTORY rather
On all "oil fed" blowers (such as the YSi) we will now be including AN fittings and braided lines for the oil drain. This is something I have thought would be a nice addition for some time now.
SPECIAL NOTICE: As of 4-1-2013 A&A Superchargers now offers 50 State legal systems for all years and models of C5 and C6 Corvettes! C.A.R.B. # D-707 makes our base systems legal for sale and installation in California and all states adopting California emissions regulations.
A&A Superchargers is now sponsoring the C6 Forced induction section as we have the C5 Forced induction section for many years. http://forums.corvetteforum.com/c5-f...-a-thread.html
We want this section, and this thread in particular, to be informative and interesting for all those interested in Forced Induction.
Feel free to ask questions of us or other members here. As in our C5 thread, you will find a wealth of information as the thread develops.
A&A Superchargers is a division of A&A Corvette Performance. We have been Corvette Forum members since 2001 and sponsors since 2003.
Our systems can be configured in many ways. From 500 RWHP Emissions Compliant daily drivers to all the way up to a 1000 RWHP plus drag race specific vehicles. Please contact us for any custom build you may have in mind.
We are the authorized manufacturer of supercharger systems for C5 and C6 Corvette utilizing proprietary Vortech head units. All design work and assembly of the A&A supercharger system is performed at our facility near Oxnard California.
A&A Supercharger systems and individual components are available through our network of dealers as as well as through our website and retail store.
With over 3000 systems built, we have learned a lot over the last few years and this knowledge is reflected in the final product. We are always looking at ways to improve the efficiency and value of our products.
Our intercooler design is innovative and unprecedented. After much testing with smoke generators we found that a good portion the ambient airflow would actually hit the front of the intercooler and just �roll� over the sides. We are the only manufacturer to implement aluminum side plates on our intercoolers that capture this air and prevent this. The top seam of the intercooler is flush up against the frame which stops any air from going up and over the intercooler. The bottom of the intercooler has a duckbill that seals the area between the intercooler and the front fascia. 100% of the actual intercooler core is exposed to frontal airflow. None of this area is hidden behind the frame of the vehicle. These innovations made a huge difference in intercooler efficiency.
Look at the pictures below to understand how our RAM AIR INTERCOOLER design works. You can see how the aluminum panels help capture the incoming air flow.
We also use CNC laser cut aluminum panels that mount to the skid bar assembly to enclose the radiator area for efficient cooling and aesthetics.
Airflow management is the key to an efficient supercharger system.!
Our bracketry is now manufactured from 3/4� thick 6061 aluminum plate and machined on BOTH sides down to it�s 5/8� final dimension. Our competitors do not perform this important and expensive step. This is the only way to make sure the final product is completely flat and dimensionally to specification. Again, look at the picture below to see just how impressive our mounting bracket and tensioner are. There is nothing even close on the market.
OUR BRACKETS HAVE OFTEN BEEN DESCRIBED AS "JEWELRY"
We are the only manufacturer to utilize 5 ply silicone hoses with complex bends for clearance around the sway bar, skid bar assembly and for proper intercooler entry without kinks. These are important features that ease installation as well as promote efficient airflow.
Our tubing is CNC bent, bead rolled and polished (or black anodized) for a professional look and to assure that hoses will not blow off under pressure.
We invite you to download our instructions to get a good overview of how the system is designed and how well the different parts integrate into a complete system. We have gone to great lengths to make sure we have the highest quality system available, regardless of price.
Our systems are generally ready to ship in two to three days and are 100% complete. We include a correctly sized head unit and pulley for your application, 60#or 80# injectors, Kenne Bell Boost A Pump, NGK spark plugs and a base tune, if needed. Nothing else is needed to get you up and running in your supercharged Corvette.
Either Josh or I (or other CF members) will try our best to answer any questions you may have.
I will also post any specials, used kits or new products in this thread.
UPDATE JUNE 2013 !! 2000 systems manufactured and sold.
Our commitment to ever improving our product and our unbeatable customer service has allowed us to pass the 2000 mark!
UPDATE JANUARY 2016!! We've hit the 3000 mark. Over 3000 A&A Systems have been produced! With the major improvements we've made for 2016, 4000 can't be far off!
Please feel free to ask any questions you may have about our systems in particular, or forced induction in general
Our high capacity fuel system is an A&A exclusive. Under normal driving conditions, only the factory pump fuels the engine. This means that the fuel isn't being heated by the large external pump.
Only under boost does the big pump kick in, almost tripling the available fuel output.
The stock fuel rail is utilized and the factory covers fit right on.
We've recently developed a dual pump setup that incorporates two separate pumps in one housng. This will supply fuel for ultra high horsepower builds.
A nice stainless steel bracket mounts our adjustable regulator to the brake booster.
All lines and fittings come pre assembled for easy installation.
No cutting of any factory lines is necessary. Our braided lines snap right on to the factory lines and fuel rail.
A hotwire kit runs power straight from the alternator to the pump. Our dual pump setup includes dual wire harnesses and dual relays that can be set at different boost activation levels.
Each relay is triggered by a boost activated switch.
NEW FOR 2016!
I've been obsessing over this project for a couple of months now. I wanted to build a solid billet tensioner with all the best features I could pack into it. I think I have achieved that in this new tensioner/ bracket design.
First of all it is EXTREMELY STRONG. It has German manufactured polymer bearings press fit into a precision machined bore that ride on a 4340 Chromoly shaft. NO DEFLECTION! Most, if not all, tensioners have aluminum rubbing on aluminum with "maybe" a plastic sleeve to separate them.
The two main halves of the tensioner are machined from 4 1/2" blocks of 6061 aluminum.
It features a LOCK MECHANISM so that you can easily move the tensioner to the open position and lock it in place. This allows you to remove your ratchet or wrench from the car and install the belt without having to hold the tensioner open with your other hand. Believe me, this a HUGE improvement over other designs.
IT IS "CLOCKABLE TO ALLOW CLEARANCE FOR STOCK AND OVERSIZE BALANCERS AND TO CHANGE SPRING PRELOAD. You can easily set the clearance between the tensioner pulley and the balancer. This way there is no danger of the tensioner pulley hitting the balancer in case you snap a belt. I hear complaints that other designs allow the pulley to hit the balancer and cause substantial damage when this happens.
There are 3 different internal spring settings as well as an optional spring that can be changed easily. Obviously a YSi with a 2.85 pulley, 8 rib and secondary drive making 900 RWHP will require more spring pressure than an Si or Ti Trim with a 3.8 6 rib pulley making 600 RWHP. We will offer different spring rates for this reason.
ALL THE NEW BRACKET/ TENSIONERS WILL BE SET UP FOR 8 RIB DRIVE If using a 6 rib pulley we simply insert a .280" spacer behind the pulley to line everything up. Nothing in the bracket- tensioner setup will need to be changed to go to 8 rib.
This will be coming in all the kits shortly. The billet tensioner has nearly TRIPLE THE SPRING RATE AND DOUBLE THE TRAVEL of our previous tensioner.
Because the distance from the fulcrum to the centerline of the pulley is so long (triple the measurement of our old tensioner) the pulley follows a NEAR LINEAR TRAJECTORY rather
On all "oil fed" blowers (such as the YSi) we will now be including AN fittings and braided lines for the oil drain. This is something I have thought would be a nice addition for some time now.
__________________
PLEASE TAKE A MOMENT TO VISIT OUR WEBSITE AT WWW.AACORVETTE.COM
NOW PARTNERING WITH AFFIRM TO OFFER INTEREST FREE FINANCING!
A&A CORVETTE
477 LAMBERT ST
OXNARD CA 93036
WWW.AACorvette.com
A&A CORVETTE SUPERCHARGER SYSTEMS
HOME OF THE WORLDS FIRST
CENTRIFUGALLY SUPERCHARGED C7
SUPERIOR ENGINEERING- SUPERIOR POWER
SUPERIOR PRICING- SUPERIOR CUSTOMER SUPPORT
Andy@AACorvette.com 805- 278 4107
Last edited by Andy@A&ACorvette; 09-05-2017 at 09:59 AM.


 04-18-2012, 08:30 PM
#3
Instructor

Hi Andy I just purchased a A&A kit for a 2007 C6 Saturday from a vendor. The kit is a v-3 with the 3.8 pulley. What kinda boost is that going to make? Will it be too much for a bone stock LS2? Thanks can't wait to get it and install it.
04-19-2012, 10:46 PM
#4
Platinum Supporting Vendor
Thread Starter
It will probably make close to 9 at the top but only 6 or 7 at peak torque. That's where the highest cylinder pressure is.
We've done hundreds with that pulley and it's worked out great.
The following users liked this post:
sallen619 (04-21-2019)
04-19-2012, 10:51 PM
#5
Instructor
Awesome thanks.
04-22-2012, 08:56 AM
#7
Getting ready to place my order... Last 2 questions...I have an 07 A6, with headers and a 3200 stall, otherwise stock.. This is a mostly drag car, but I want it to live... Not exactly sure how far I can go and be somewhat safe, yet getting most HP that I can..
1) I assume the headers will already reduce my boost level..So Which pulley shall I order to obtain roughly 10psi, 12psi, 14psi?
2) Do I, or should I replace the valve springs (25k miles on the car) or is it unnecccessary with this set-up?
Thanks
1) I assume the headers will already reduce my boost level..So Which pulley shall I order to obtain roughly 10psi, 12psi, 14psi?
2) Do I, or should I replace the valve springs (25k miles on the car) or is it unnecccessary with this set-up?
Thanks

 04-23-2012, 06:00 PM
#9
Platinum Supporting Vendor

http://www.aacorvette.com/supercharg...n_page=dealers
Getting ready to place my order... Last 2 questions...I have an 07 A6, with headers and a 3200 stall, otherwise stock.. This is a mostly drag car, but I want it to live... Not exactly sure how far I can go and be somewhat safe, yet getting most HP that I can..
1) I assume the headers will already reduce my boost level..So Which pulley shall I order to obtain roughly 10psi, 12psi, 14psi?
2) Do I, or should I replace the valve springs (25k miles on the car) or is it unnecccessary with this set-up?
Thanks
1) I assume the headers will already reduce my boost level..So Which pulley shall I order to obtain roughly 10psi, 12psi, 14psi?
2) Do I, or should I replace the valve springs (25k miles on the car) or is it unnecccessary with this set-up?
Thanks
Replacing the valve springs isn't necessary unless you're swapping the cam.
Turbosmart recommends that the following maintenance procedure is carried out at six monthly intervals. Regular maintenance will
ensure that your BOV III PB is operating at its peak and will extend the working life of the product.
- Remove the cap of the BOV III PB by rotating in an anti-clockwise direction (see figure 1) � CAUTION The cap is under spring
tension, wear safety glasses and remove with care!
- Remove the spring and measure the free length or the overall length of the spring (should be no less than 155mm) � replace if
below
- Remove the piston, thoroughly clean the piston and the bore of the BOV III PB
- Inspect the surface of the piston and the bore of the BOV III PB for scoring or excessive wear, silver coloured marks are an
indication of excessive wear
- Check the Base O-ring and the Cap O-ring for any damage � replace if necessary
- Lubricate the bore and the piston with Turbosmart Multispray (see figure 1) � DO NOT use grease or viscous oils
- Re-assemble the BOV III PB in the reverse order
You can find the instructions on our website here:
http://www.aacorvette.com/pdf/turbosmart_bov.pdf
__________________
Thanks, Josh Dodson
PLEASE TAKE A MOMENT TO VISIT OUR NEW WEBSITE AT WWW.AACORVETTE.COM
NOW PARTNERING WITH AFFIRM TO OFFER INTEREST FREE FINANCING!
A&A CORVETTE PERFORMANCE
477 LAMBERT ST Ste A
OXNARD CA 93036
(805) 278-4107
Instagram @aacorvettesuperchargers
� Facebook.com/AACorvette �
Thanks, Josh Dodson
PLEASE TAKE A MOMENT TO VISIT OUR NEW WEBSITE AT WWW.AACORVETTE.COM
NOW PARTNERING WITH AFFIRM TO OFFER INTEREST FREE FINANCING!
A&A CORVETTE PERFORMANCE
477 LAMBERT ST Ste A
OXNARD CA 93036
(805) 278-4107
Instagram @aacorvettesuperchargers
� Facebook.com/AACorvette �
04-26-2012, 09:24 AM
#10

I am curious about the A&A 2005-2007 LS2 Intercooler Upgrade Kit and had some questions I was hoping to discuss.
Is the intercooler and shroud a standard stock item or would it take a couple weeks or months to build and ship?
Does the A&A kit come w/ a radiator cradle drop kit? I already have a 2" lowered core Ron Davis radiator.
I would like to use a full round polished intake tube between the S/C and air filter instead of the preformed air horn style. Would that be possible? In stock? Lead time to put together?
On the charged side between the I/C and throttlebody, I will not be using MAF. What are my options for this w/ the kit? Different polished tube that goes all the way to the TB? or a tube inserted to replace the MAF?
I have a P/C Red BOV that I'd like to use. Is that something that you would make provisions for? If not, I can CNC machine a flange/adapter tube and TIG weld it to you charge pipe if your pipe is aluminum.
For some reason the kit I now have used a steel pipe and flange tube to mount the P/C BOV. I'm not sure if steel is a necessity or a prefered option. Your opinion?
The intercooler I have now is a custom one. In mounting it, it looks like most of the bottom of the nose facia will have to be cut out. If thats the way it has to be, then that's fine. But I'm wondering how much clearance is needed for the A&A intercooler? I saw some pics of a tiny portion on each side needing clearance for the bottom of the intercooler, but I can't remember now if that was a C5 or C6.
It would be helpful to see installed pics of the intercooler and piping. Where the A&A I/C mounts, what factory plastic can/needs to go back in the car underneath.
Thanks in advance.
Last edited by jimmyb496; 04-26-2012 at 09:28 AM.
The following users liked this post:
1slickvette (04-05-2021)
04-26-2012, 09:35 AM
#11
Should have read post #1 entirely before posting, looks like inventory is usually in stock or 2-3 days away. I would like to discuss my other questions and see if any of my requests would be cause for other delays or longer lead time.
Last edited by jimmyb496; 08-05-2012 at 08:44 PM.
04-26-2012, 11:16 AM
#13
Platinum Supporting Vendor
Thread Starter
I am curious about the A&A 2005-2007 LS2 Intercooler Upgrade Kit and had some questions I was hoping to discuss.
Is the intercooler and shroud a standard stock item or would it take a couple weeks or months to build and ship?
Does the A&A kit come w/ a radiator cradle drop kit? I already have a 2" lowered core Ron Davis radiator.
I would like to use a full round polished intake tube between the S/C and air filter instead of the preformed air horn style. Would that be possible? In stock? Lead time to put together?
On the charged side between the I/C and throttlebody, I will not be using MAF. What are my options for this w/ the kit? Different polished tube that goes all the way to the TB? or a tube inserted to replace the MAF?
I have a P/C Red BOV that I'd like to use. Is that something that you would make provisions for? If not, I can CNC machine a flange/adapter tube and TIG weld it to you charge pipe if your pipe is aluminum.
For some reason the kit I now have used a steel pipe and flange tube to mount the P/C BOV. I'm not sure if steel is a necessity or a prefered option. Your opinion?
The intercooler I have now is a custom one. In mounting it, it looks like most of the bottom of the nose facia will have to be cut out. If thats the way it has to be, then that's fine. But I'm wondering how much clearance is needed for the A&A intercooler? I saw some pics of a tiny portion on each side needing clearance for the bottom of the intercooler, but I can't remember now if that was a C5 or C6.
It would be helpful to see installed pics of the intercooler and piping. Where the A&A I/C mounts, what factory plastic can/needs to go back in the car underneath.
Thanks in advance.
Is the intercooler and shroud a standard stock item or would it take a couple weeks or months to build and ship?
Does the A&A kit come w/ a radiator cradle drop kit? I already have a 2" lowered core Ron Davis radiator.
I would like to use a full round polished intake tube between the S/C and air filter instead of the preformed air horn style. Would that be possible? In stock? Lead time to put together?
On the charged side between the I/C and throttlebody, I will not be using MAF. What are my options for this w/ the kit? Different polished tube that goes all the way to the TB? or a tube inserted to replace the MAF?
I have a P/C Red BOV that I'd like to use. Is that something that you would make provisions for? If not, I can CNC machine a flange/adapter tube and TIG weld it to you charge pipe if your pipe is aluminum.
For some reason the kit I now have used a steel pipe and flange tube to mount the P/C BOV. I'm not sure if steel is a necessity or a prefered option. Your opinion?
The intercooler I have now is a custom one. In mounting it, it looks like most of the bottom of the nose facia will have to be cut out. If thats the way it has to be, then that's fine. But I'm wondering how much clearance is needed for the A&A intercooler? I saw some pics of a tiny portion on each side needing clearance for the bottom of the intercooler, but I can't remember now if that was a C5 or C6.
It would be helpful to see installed pics of the intercooler and piping. Where the A&A I/C mounts, what factory plastic can/needs to go back in the car underneath.
Thanks in advance.
I just bought 300 intercooler cores so we should be able to build an intercooler in 1 day if we don't have one built already. The shrouding should also be in stock.
We do use a cradle lowering kit but it probably will not be needed with your radiator.
I should have 4" polished inlet tubes by next week.
I have longer charge tubes for mafless applications.
I may not have the correct flange for your particular BOV. If you have the flange, we can TIG weld it on the correct tube for you.
We use aluminum throughout. You would need an aluminum flange in order for us to weld it to our tubing.
There is just a small amout of trimming required on the fascia (C6) We spent a lot of time optimizing the intercooler placement and design of the side fins to capture ambient airflow. If you look at the design of the actual inlet to the intercooler you will see something that is quite unique. We actually anneal (soften) the aluminum form it to the contours of the lower tank and then heat treat it again before welding it on. This is the only way to get the inlet at exactly the right angle so that our articulated hose can clear the skid bar.
Download our instructions from the website. You will get a good overview of how well everything fits.
04-26-2012, 11:18 AM
#14
Platinum Supporting Vendor
Thread Starter
It does not control boost like a turbo wastegate.
04-28-2012, 09:18 PM
#15
It's probably best to call and discuss this, but I'll give some quick answers.
I just bought 300 intercooler cores so we should be able to build an intercooler in 1 day if we don't have one built already. The shrouding should also be in stock.
We do use a cradle lowering kit but it probably will not be needed with your radiator.
I should have 4" polished inlet tubes by next week.
I have longer charge tubes for mafless applications.
I may not have the correct flange for your particular BOV. If you have the flange, we can TIG weld it on the correct tube for you.
We use aluminum throughout. You would need an aluminum flange in order for us to weld it to our tubing.
There is just a small amout of trimming required on the fascia (C6) We spent a lot of time optimizing the intercooler placement and design of the side fins to capture ambient airflow. If you look at the design of the actual inlet to the intercooler you will see something that is quite unique. We actually anneal (soften) the aluminum form it to the contours of the lower tank and then heat treat it again before welding it on. This is the only way to get the inlet at exactly the right angle so that our articulated hose can clear the skid bar.
Download our instructions from the website. You will get a good overview of how well everything fits.
Per your recommendation, I called. I chatted w/ Frank. He led me to the website store which was helpful in letting me see the items available, see the piping fit-up pictures, and also per you recommendation, I've downloaded and read the instructions which are very detailed. I printed them out (all 43 pages) and have them sitting in the shop for reference.
I've started building a cart in the online store. I'm going to order an extra 3" dia x 6" OAL tube to use in the BOV tube section between the Custom 90deg tube and the Custom Discharge tube. (I have a P/C Race Valve flange in alum now) I figure I can order some longer aluminum tube from one of my metal suppliers and fabricate that portion here. With the bigger dia of the BOV I plan to use, I speculating I might need to put a little bend in the BOV tube to wrap around the brake air duct, maybe 5 or 10 degs. Just hard to envision for me without trying to mock it up and see. Maybe I can find room without running under the brake duct... just need to get some part mounted up and see whats what.
If you have some 4" polish tube coming in, to make the Air Filter to S/C pipe, that would be great!
I talked to Frank about a radiator shroud to go w/ the 4" Air Intake tube. The more I'm thinking about it, I wonder if the standard shroud would suit and look just fine. Trying to get a custom shroud made, I'm guessing would not be cost effective. I'd like to hear your thoughts on that, but I'm open to trying the standard shroud if its a stocked item and would be much easier.
I found the "mafless" polished charged tube in the online store. PERFECT. Will this go directly to the I/C outlet or is it necessary to use an extension pipe between the mafless charge tube and the I/C? The assembled example pictures on the website show an extra extension tube installed. But the individual pic of the mafless pipe looks like it is very long on the I/C side (in addition to the extra length on the MAF delete side)... as if it would go all the way to the I/C outlet and only require a silicone coupler.
Thanks again.
04-29-2012, 04:32 PM
#16
What size Hose fits best over an LS2 throttle body? My factory TB actually measures about 3.9" dia.
The example assembly picture on the website, shows a hose identified as 3-1/2" x 3". I wasn't sure if a 3-1/2" dia hose would fit over the throttle body, so I wanted to double check and make sure I shouldn't be ordering a 4" hose. Which case I would order the 4" to 3-1/2" reducer hose to connect the Mafless 60deg Polished Tube to the LS2 throttle body.
http://www.aacorvette.com/supercharg...ort=20a&page=3
04-29-2012, 10:53 PM
#17
Platinum Supporting Vendor
Thread Starter
Go with the 4" coupler. The 3 1/2" will stretch But there's no need to do that with a 4" tube.
The 4" tube will hook up to the intercooler with a 4" to 3 1/2" silicone coupler. No extra tube is needed.
The 4" tube will hook up to the intercooler with a 4" to 3 1/2" silicone coupler. No extra tube is needed.
04-30-2012, 11:46 AM
#18
Platinum Supporting Vendor
Thread Starter
Andy... can you tell me what kind of problems (if any) I will encounter with my '05 Automatic ?
I see the tranny cooler lines are right in the area where the blower discharge pipe/hose will be passing through.
Is this 'gonna be a problem ?
Also... can you elaborate on what is involved with doing a "throttle body flip" on my Fast 102 equipped car ? It looks like the PS reservoir will interfere if I flip the throttle body.
On the FAST manifold, the trottle body placememt intereferes with the bracket. There's no way around it.
Just flip the throttle body over and bolt it back on. The wires should be long enough.
Now the TB will hit the PS reservoir. We'll make you a spacer kit to move the reservoir forward slightly.
I'd think about selling the FAST and reinstalling the stock manifold. Under boost, the manifold isn't going to do anything anyway. Yu can put the $$ you get for the manifold towards the supercharger kit.
Thanks, andy
04-30-2012, 12:48 PM
#19
However, I didn't see a 4" 'Mafless' Polished I/C to T/B Tube on your website, otherwise I would have preferred to go that route. If you offer it, please let me know and I'll substitute/exchange for that.
04-30-2012, 11:48 PM
#20
Platinum Supporting Vendor
Thread Starter
Thanks Andy. I ordered the 'mafless' charge tube which is 3-1/2" today. So if I'm understanding everything correctly, I'll use 3-1/2" Hose Coupler from I/C to Polished Tube and a 3-1/2" x 4" reducer coupler from the Polish Tube to T/B.
However, I didn't see a 4" 'Mafless' Polished I/C to T/B Tube on your website, otherwise I would have preferred to go that route. If you offer it, please let me know and I'll substitute/exchange for that.
However, I didn't see a 4" 'Mafless' Polished I/C to T/B Tube on your website, otherwise I would have preferred to go that route. If you offer it, please let me know and I'll substitute/exchange for that.
Regular C5 and early C6 will still use the standard 3 1/2" tube.
I can tell you, without reservation, that a 4" tube will make absolutely NO difference. All the tubing from the blower to the intercooler is 3". Even stepping up to 3 1/2" is only done to make the transition to the MAF and throttle body size easier. The air is compressed (denser) as well as being forced through the tube under pressure. The 3 1/2" tube would not start to become a restriction until you reached some airflow number that is astronomically high.