When you click on links to various merchants on this site and make a purchase, this can result in this site earning a commission. Affiliate programs and affiliations include, but are not limited to, the eBay Partner Network.
I need to access the block drain plugs on my 67-327. Can I remove lower shielding only or do I have to start with upper shields.
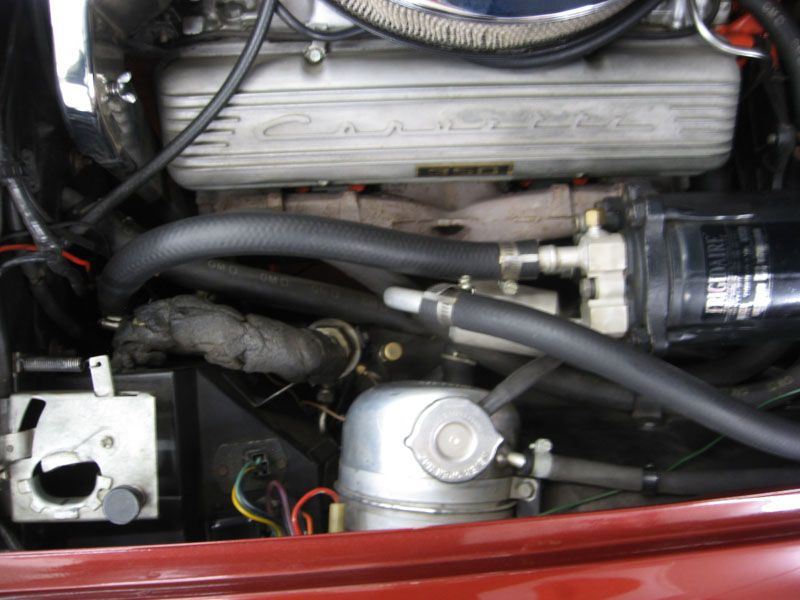
The lower boomerang shields can be removed independently from the upper shields. They are attached with a motor mount bolt and a 7/16 head at the rear. Here's a pic of right side, left side is similar.
The lower boomerang shields can be removed independently from the upper shields. They are attached with a motor mount bolt and a 7/16 head at the rear. Here's a pic of right side, left side is similar.
That is a great picture and will save me lots of time, thanks so much
I just did an entire coolant flush on my '66 coupe last week. That was the first time I had done a car with the lower shielding in place.
The engine block drain plugs are behind that lower shielding so it needs to be removed or at least moved out of the way. I found the job was much easier with the upper shielding removed and out of the way. They're only held on by thumb screws. The drivers side is relatively easy to remove but the passenger side can be a real bear.
My coupe has factory A/C and getting to the right side upper shielding from above is virtually impossible with all the A/C and heater hoses in the way. I felt it was best to remove that upper shielding from below. I couldn't see the thumb screws, I just had to work by feel. With the upper shielding out of the way you can get to the one of the bolts on the lower shielding.
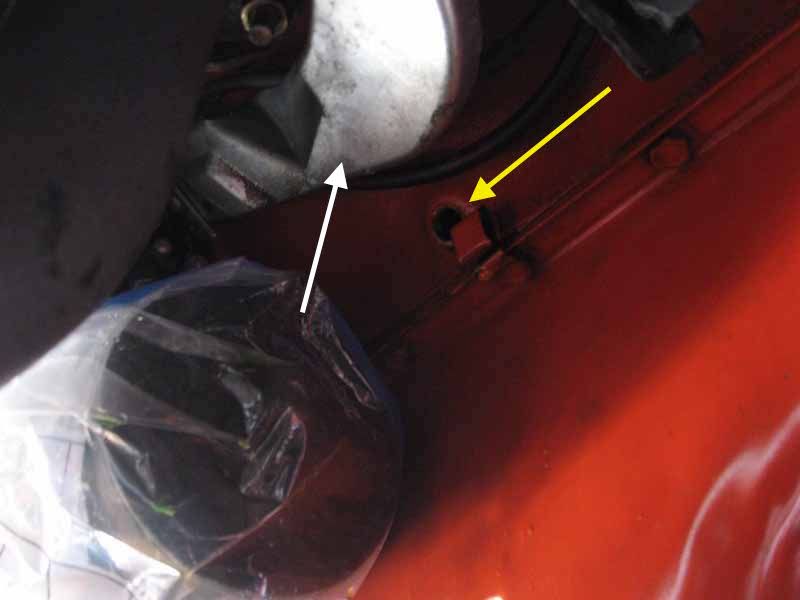
The starter motor certainly complicates removing the lower shielding. Rather than remove the right side, lower shielding altogether, since I had the upper shielding off, once the bolts were off the lower shielding, I just moved it out of the way by pushing it up a little bit, see the white arrow. The block drain plug is where the yellow arrow is pointing just above the spark plug wire clip. I put a plastic bag over the nose of the starter to keep it dry.
The previous owner had thoughtfully installed hex headed, brass plugs with pipe dope on the threads so they came out easily. I wrote him an email to thank him for doing that!
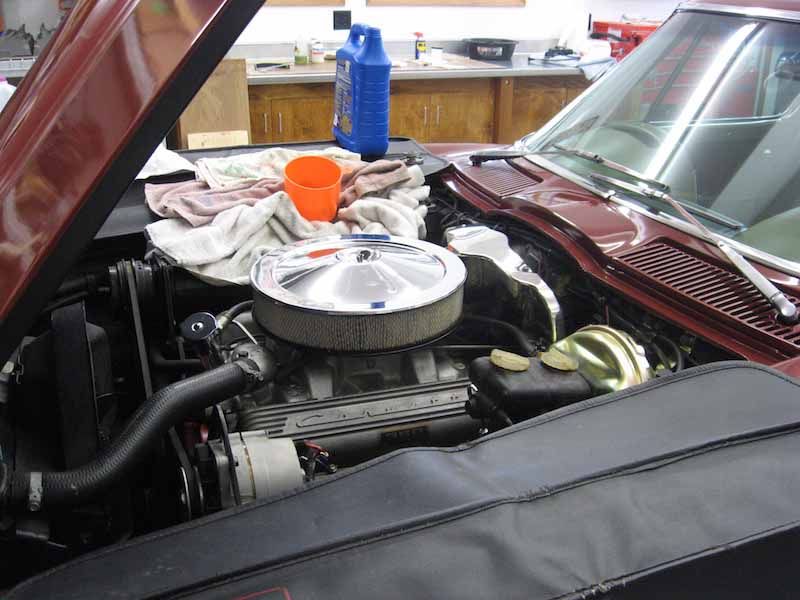
To refill through the expansion tank I placed a bunch of towels around the funnel to help hold it in place and catch any fluid spills.
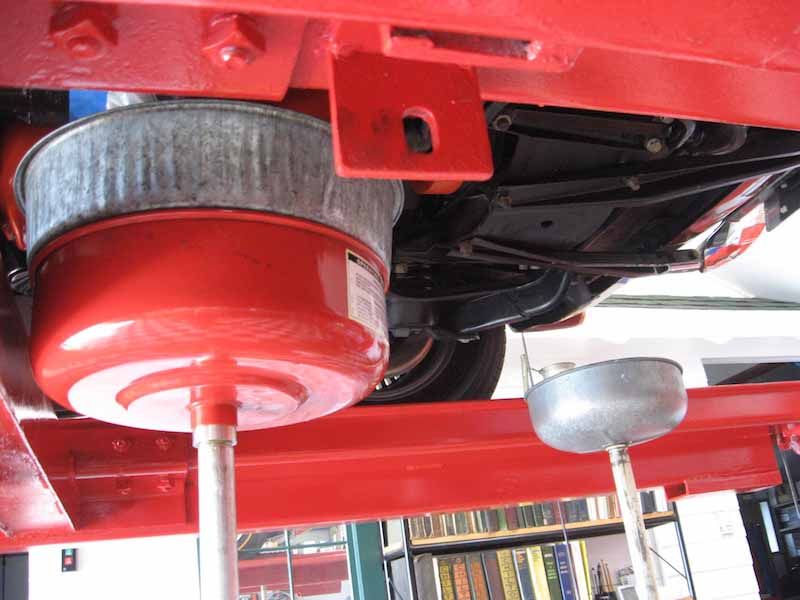
Having a lift certainly made everything easier.
Taking my time and enjoying the work, the whole flush and refill process took about 3 hours but I'll be much quicker next time.
Just a suggestion but disconnect the battery when screwing around with that PS hockey stick. Maneuvering odd-shaped metal around those hi-current starter connections just gets me nervous.
The plastic over the starter motor nose during flushing (as shown above) is a great idea...
Here is one of JohnZ�s articles on midyear cooling systems. I especially like the section on �Coolant Fill� and recommend it. Once you try filling through the thermostat opening in the intake manifold, you�ll never do the burp routine through the expansion tank again.
I'm not where I can look at my shielding. I have been having a heck of a time trying to reinstall the pass side upper Does removing the starter help? Got it out to remove and refinish manifold but but can't get the one piece upper shield back in
Are you talking about the boomerangs (hockey sticks) ? Or, the vertical shielding that mates to the top piece ? If the latter that should go on easily and have nothing to do with the starter; although getting that bottom wing nut on is MUCH easier from underneath and on a lift.
Are you talking about the boomerangs (hockey sticks) ? Or, the vertical shielding that mates to the top piece ? If the latter that should go on easily and have nothing to do with the starter; although getting that bottom wing nut on is MUCH easier from underneath and on a lift.
I'm talking about the one piece cover that shields the spark plugs. I remember twisting and turning it a finally getting it out of the engine bay. But when I try to put back just can't get it back in place. Kinda reminds of reinstalling the radio(lol). It is a 63 by the way and has Vintage air.
I'm not where I can look at my shielding. I have been having a heck of a time trying to reinstall the pass side upper Does removing the starter help? Got it out to remove and refinish manifold but but can't get the one piece upper shield back in
Removing the starter will definitely help give you more room to work but that's kind of a pain to remove. I was able to re-install my upper shielding from underneath, but I had the car up on a lift which helps a bunch. Re-installing that upper shielding takes patience but isn't nearly as bad as re-installing the radio. To me, that's the gold standard that defines pain-in-the-A$$!
If you can access the shielding at all from the top, try using a short taper punch to locate and line up the holes for the thumb screws.
Can you get any of the thumb screws started?
Thomas
Not that far along. I'm having trouble just getting the shield in position to start adjusting the bolt tabs that were removed with the manifold and then try to get thumb bolts started.
I have NEVER removed a starter to put the PS horizontal spark plug shields on my '61 or '63 and the '63 has an A/C compressor and pressure hoses on that side. I also never do it from the bottom.
There is a sweet spot that will let the piece go in. IIRC (its been a while) you have to stab the piece down nearly vertically at either the far rear or at the far front and then 'rock' it back to get it over the brackets and positioned...
Tighten the wing nuts by hand and then get a 2"-4" bolt/screw and use it in between the wing nut tips as a "handle" to tighten them fully.
Last edited by Frankie the Fink; 04-08-2015 at 06:36 AM.
Thanks guys. I'll give it another try this weekend. I know it came out, so it's gotta go back in. Getting those manifold mounted brackets lined up to fit the shielding thumb screw holes will be the next hurdle. Randy
Thanks guys. I'll give it another try this weekend. I know it came out, so it's gotta go back in. Getting those manifold mounted brackets lined up to fit the shielding thumb screw holes will be the next hurdle. Randy
My '63 was missing ALL of the shielding when I purchased it. I bought the Long Island entire kit ($$$). The ignition shielding brackets can be bent some once installed if that helps you align things for the actual shielding. The shielding on any of these cars is a royal PITA and mostly unnecessary now - but it is very distinctive and adds the underhood WOW factor for sure...
You prob will have to get under the car to attach the lower wing nut for the vertical shielding on the PS side - nearly impossible to do it otherwise
No, the starter does not have to be removed to install the shielding. It’s a tight fit but it can be done. If you have difficulty, loosen or remove the rear starter brace to get more access. Route the number 2 & 4 spark plug wires first and just gather them into the lower shield as you install it. Your number 2 & 4 plug wires should also be routed under the motor mount.
I should add, disconnect your negative battery cable when working around the starter.
Thanks Mike. I've spent hours laying underneath it and even trying to come in from the top; akk to no avail. I'll try loosening the bracket on the starter nose; anything to avoid dropping the starter if unnecessary. Again, thx for the pics. I have printed them and put them into my NCRS manual for future reference.
 04-06-2015, 10:49 PM


 ). The ignition shielding brackets can be bent some once installed if that helps you align things for the actual shielding. The shielding on any of these cars is a royal PITA and mostly unnecessary now - but it is very distinctive and adds the underhood WOW factor for sure...