
Need advice, stuck lower ball joint nut/stud
 07-23-2016, 11:08 AM
#1
Advanced

Thread Starter

I'm working on changing out a front hub/bearing assembly and I'm really stuck with this lower ball joint nut. I got a few turns on it with a 21mm wrench and a 6mm bit in the end of the stud, but the hole in the top of the stud stripped out and turned to rusty goo. Any advice here? I already tried hammering the next larger size bit in there, but the same thing happened with that. Its basically just a round hole at this point, so I have no way of holding the stud while I take the nut off the rest of the way, they just spin together.

 07-23-2016, 11:50 AM
#2
Safety Car


Tighten it until the shaft binds then loosen it. If you cant tighten it then clamp the knuckle to the lower control arm to bind it up a bit.
Last edited by Rob 02; 07-23-2016 at 11:53 AM.
07-23-2016, 11:52 AM
#3
Advanced
Thread Starter
Problem is the allen hole is so buggered that at this point I can't loosen it anymore, or tighten it back up either.
If the ball joint were replaceable I'd just cut the boot and clamp the lower part with vice grips.
I have a bad feeling I have a lower control arm replacement in my future.
If the ball joint were replaceable I'd just cut the boot and clamp the lower part with vice grips.
I have a bad feeling I have a lower control arm replacement in my future.
07-23-2016, 12:00 PM
#4
Safety Car
I have replaced the lower ball joint.
You have to hold the knuckle to the ball joint to keep the shaft from spinning. You want the taper shaft to bind in the hole so you can remove the nut.
You have to hold the knuckle to the ball joint to keep the shaft from spinning. You want the taper shaft to bind in the hole so you can remove the nut.
07-23-2016, 12:15 PM
#5
Advanced
Thread Starter
How bad is the ball joint replacement? Would I be able to press it in/out with a typical rental tool? If I'm able to replace it I'll just grind the nut off the old one if it comes to it.
07-23-2016, 12:19 PM
#6
Le Mans Master

I hate farting around with something like that (if your replacing it anyway) for hours trying to get the damn thing off...(in the past) just couldn't let it go... NOW smarter or lazier I would just take high speed grinder with a thin blade and cut the shaft and nut down the middle from the top (careful not to cut into the arm) then when the nut either falls off either side or if it's cut deep enough you should be able to break it off (the nut halves), and the spindle should just drop out or at the very least just tap it out...
slice that thing like a piece of bread...
slice that thing like a piece of bread...
Last edited by 73Corvette; 07-23-2016 at 12:20 PM.
07-23-2016, 12:32 PM
#7
Safety Car
I would try to remove this one first. The shaft shouldn't be spinning because that means it has been loose in there. If you can get it to bind then your home free. You may be able to use an easy out to hold the shaft while you tighten the nut. Then when it binds you should be able to loosen it.
Replacing the ball joint can be a pita. The first time I tried it I had an aftermarket ball joint that kept going it crooked. So I measured it and it was .015" larger than stock. So I ordered an AC Delco one and it went right in. Moral of the story was to use an AC Delco one.
I used a press from Amazonhttps://www.amazon.com/gp/product/B0...?ie=UTF8&psc=1
It is a bit of a pita because you need enough space for the tool to fit and preferably an impact wrench. It is a little tricky. I used the tool upside down because of ground clearance.
 07-23-2016, 12:47 PM
#9
Advanced
Thread Starter
Agreed, it seems like the taper has popped already which means it's spinning in there. I can move the ball joint up and down a tiny bit in the control arm when I use a jack.
Assuming the easy out fails, are there any other ways to get the taper to lock back into place? I remember people talking about using a ratchet strap or something.
Assuming the easy out fails, are there any other ways to get the taper to lock back into place? I remember people talking about using a ratchet strap or something.
07-23-2016, 12:59 PM
#10
Safety Car
Thinking about what 73Corvette said. If you can cut the shaft with a grinder then maybe you can make a slot for a screw driver to fit the top of it.
There are a dozen ways to skin a cat. I guess it depends on what tools you have at your disposal.
There are a dozen ways to skin a cat. I guess it depends on what tools you have at your disposal.
07-23-2016, 01:08 PM
#11
Advanced
Thread Starter
I do have a grinder and a dremel.
I think i'll try getting the taper to seat again and zapping it on/off with my impact. Failing that, I'll try cutting a slot in the top of the stud. Failing that, gonna cut the nut off, and attempt to salvage the ball joint. Worst case I press out the ball joint and replace it, worst worst case it's new LCA time.
I think i'll try getting the taper to seat again and zapping it on/off with my impact. Failing that, I'll try cutting a slot in the top of the stud. Failing that, gonna cut the nut off, and attempt to salvage the ball joint. Worst case I press out the ball joint and replace it, worst worst case it's new LCA time.
Last edited by opengl128; 07-23-2016 at 01:09 PM.
07-24-2016, 12:00 PM
#12
Race Director

Member Since: Apr 2007
Location: South Western Ontario
Posts: 11,061
Received 845 Likes
on
721 Posts

Put you floor jack under the arm at the ball joint. Then put a chain over the top of the spindle to the base of the jack. Jack it more until it is tight. Then undo the nut. A good ratchet strap would work too.
07-24-2016, 01:11 PM
#13
Advanced
Thread Starter
Tried that this morning, couldn't get it snug enough with anything I have on hand. Also tried the prybar trick, wedging it between the spindle and LCA and applying pressure upwards while loosening the nut, no luck there either.
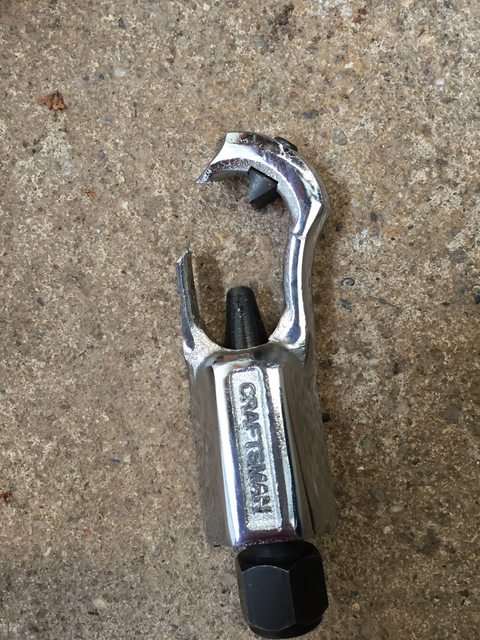
Picked up a nut cracker this morning and it was immediately obvious grinding would be needed to get it to fit. Took a little off at a time until it fit about 3/4 of the way on the nut. Any more and I'd be making one side of it way too thin. Started off well enough, but was only able to get around halfway through the nut until I ran out of clearance and the cracker slipped off. Went for broke and ground some more off it.
Yeah, doubt I'll be able to return this one.
So I resorted to the Dremel. This is where I'm at, and I burned through my last cutting disc.
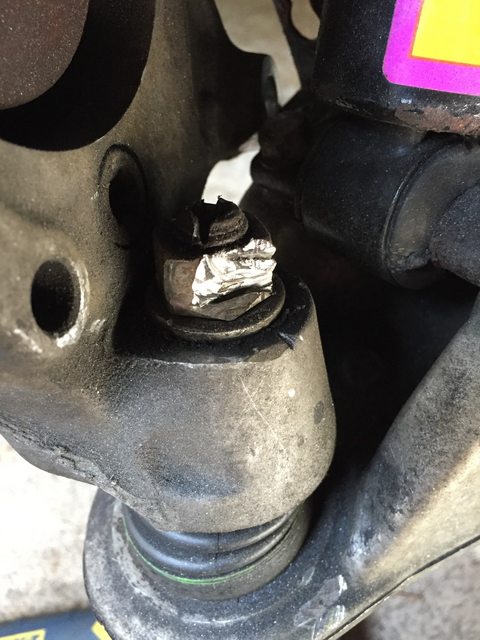
It's too small of an area for me to comfortably get the grinder in there. Gonna call it quits for the day before I make it even worse.
Picked up a nut cracker this morning and it was immediately obvious grinding would be needed to get it to fit. Took a little off at a time until it fit about 3/4 of the way on the nut. Any more and I'd be making one side of it way too thin. Started off well enough, but was only able to get around halfway through the nut until I ran out of clearance and the cracker slipped off. Went for broke and ground some more off it.
Yeah, doubt I'll be able to return this one.
So I resorted to the Dremel. This is where I'm at, and I burned through my last cutting disc.
It's too small of an area for me to comfortably get the grinder in there. Gonna call it quits for the day before I make it even worse.
07-24-2016, 01:46 PM
#14

Tried that this morning, couldn't get it snug enough with anything I have on hand. Also tried the prybar trick, wedging it between the spindle and LCA and applying pressure upwards while loosening the nut, no luck there either.
Picked up a nut cracker this morning and it was immediately obvious grinding would be needed to get it to fit. Took a little off at a time until it fit about 3/4 of the way on the nut. Any more and I'd be making one side of it way too thin. Started off well enough, but was only able to get around halfway through the nut until I ran out of clearance and the cracker slipped off. Went for broke and ground some more off it.

Yeah, doubt I'll be able to return this one.
So I resorted to the Dremel. This is where I'm at, and I burned through my last cutting disc.

It's too small of an area for me to comfortably get the grinder in there. Gonna call it quits for the day before I make it even worse.
Picked up a nut cracker this morning and it was immediately obvious grinding would be needed to get it to fit. Took a little off at a time until it fit about 3/4 of the way on the nut. Any more and I'd be making one side of it way too thin. Started off well enough, but was only able to get around halfway through the nut until I ran out of clearance and the cracker slipped off. Went for broke and ground some more off it.
Yeah, doubt I'll be able to return this one.
So I resorted to the Dremel. This is where I'm at, and I burned through my last cutting disc.
It's too small of an area for me to comfortably get the grinder in there. Gonna call it quits for the day before I make it even worse.
The following users liked this post:
lionelhutz (07-24-2016)
07-24-2016, 01:52 PM
#15
Advanced
Thread Starter
To put pressure on the ball joint shaft put a jack under the lca and lift until the car raises. I think by your explanation you applied the pressure in the wrong direction. This and an impact should do it but you may not have enough nut left. (On the ball joint that is)
I think my mistake was starting it off with a wrench instead of my impact, since I was able to get the tie rod end off easily like that. It loosened a few turns then seized up good where it sits now.
07-24-2016, 02:32 PM
#16
Safety Car
What ever engineer decided to put the bearing bolt behind the ball joint needs a beating.
Sorry for all your trouble. Hope the Craftsman nut cracker is under warranty (ACE carries Craftsman too).
Now the nut is squeezed sideways out of round. You may be able to put pressure on it the other way or go with 73Vette's original idea and do the deed.
Sorry for all your trouble. Hope the Craftsman nut cracker is under warranty (ACE carries Craftsman too).
Now the nut is squeezed sideways out of round. You may be able to put pressure on it the other way or go with 73Vette's original idea and do the deed.
07-24-2016, 02:48 PM
#17
Race Director
Member Since: Apr 2007
Location: South Western Ontario
Posts: 11,061
Received 845 Likes
on
721 Posts
To put pressure on the ball joint shaft put a jack under the lca and lift until the car raises. I think by your explanation you applied the pressure in the wrong direction. This and an impact should do it but you may not have enough nut left. (On the ball joint that is)
If you lifted under the hub ur upper arm you could.
07-24-2016, 05:30 PM
#18
Advanced
Thread Starter
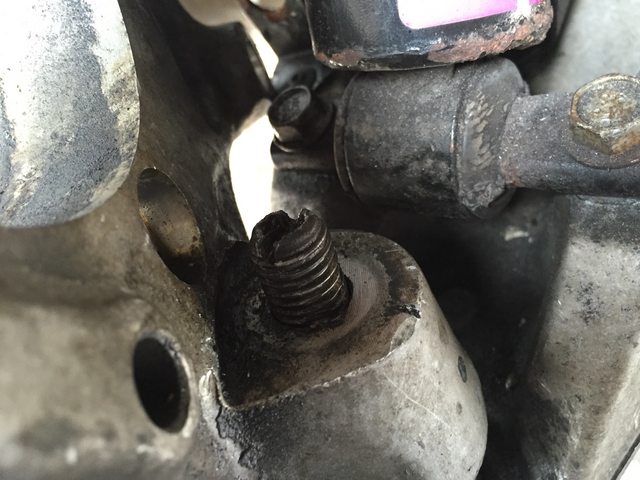
Thanks for the help all. Finally got the nut out. After Dremeling it down quite a bit, it had deformed to the point where holding the slot I made in the top I could slowly loosen it a tiny bit, then was able to pop it right off with the impact.
I already have a replacement nut, any tips for cleaning up the threads to give me the best shot at salvaging the ball joint? They're not in awful shape, but I'd like to clean them up as much as possible.
I already have a replacement nut, any tips for cleaning up the threads to give me the best shot at salvaging the ball joint? They're not in awful shape, but I'd like to clean them up as much as possible.
Last edited by opengl128; 07-24-2016 at 05:30 PM.
07-24-2016, 05:50 PM
#19
Thanks for the help all. Finally got the nut out. After Dremeling it down quite a bit, it had deformed to the point where holding the slot I made in the top I could slowly loosen it a tiny bit, then was able to pop it right off with the impact.
I already have a replacement nut, any tips for cleaning up the threads to give me the best shot at salvaging the ball joint? They're not in awful shape, but I'd like to clean them up as much as possible.

I already have a replacement nut, any tips for cleaning up the threads to give me the best shot at salvaging the ball joint? They're not in awful shape, but I'd like to clean them up as much as possible.
The following users liked this post:
opengl128 (07-26-2016)