C6 Corvette: How to Take Care of Your Hydraulic Clutch
Maintaining your hydraulic clutch fluid is a task that's easy to neglect. However, it's simple to check and even easier to keep in tiptop shape.
This article applies to the C6 Corvette (2005-2013).
Hydraulic clutch fluid might not exactly place on your top-ten list of car maintenance checks, and most people think about checking the transmission fluid before even considering the clutch fluid. By taking some time to regularly maintain the clutch fluid and replace it as necessary, you can save yourself some extensive wear-and-tear down the road and extend the life of your clutch.

Materials Needed
- Plastic syringe or reverse bleeder
- Lint-free disposable cloth (if necessary)
Step 1 – Access and locate the hydraulic clutch reservoir
To access the hydraulic clutch reservoir, turn off the engine and open the hood to the engine bay.
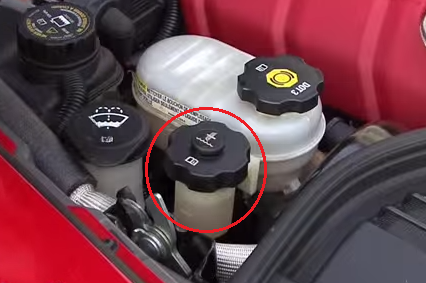
Locate the cluster of four fluid reservoirs in the corner nearest to the driver's side. The hydraulic clutch reservoir is on the furthermost corner. If you are viewing the engine from the front of the car, it is directly in line with the windshield wiper fluid reservoir.
Step 2 – Check the hydraulic clutch fluid
Remove the reservoir cap by rotating it counterclockwise, and inspect the fluid. Depending on the brand, fresher clutch fluids tend to be clear or light-gold in color. You should easily be able to see through the fluid. If it is darker in color and murky or hazy, it needs to be replaced. Also, if the fluid is clear or light-gold in color but has small particles floating in it or on the walls of the reservoir, it must also be replaced.

Figure 2. Dark and murky clutch fluid. 
Figure 3. Particles in the clutch fluid.
Pro Tip
Small particles are a sign of metal flakes entering the system due to the switching of gears from the clutch. Do not wait to replace this fluid.
Step 3 – Remove and replace the fluid
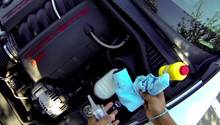
Place a plastic syringe into the reservoir and pull up on the plunger to remove the hydraulic clutch fluid. Slowly pour or drip new clutch fluid into the reservoir to a level between the marked lines.

Figure 4. Removing the clutch fluid with a syringe. 
Figure 5. Replaced clutch fluid between lines.
Pro Tip
Make sure not to get any of the fluid on the paint of your car. It's corrosive and may damage the paint.
Step 4 – Replace the reservoir cap
Replace the cap. It will snap or click when secured in place.
Pro Tip
Check the fluid during every other fuel fill-up with daily driving patterns. If you are racing or driving more aggressively, check the fluid after each fuel fill-up.
Related Discussion
- Prevent and Cure Cluth Pedal Issues - CorvetteForum.com