Corvette: How to Align Your Tires
The perfect wheel alignment differs from car to car based on what each individual wants out of their car. Before you pay a professional to align it for you, check out this step-by-step guide on how to do it yourself. You may just save a few bucks in the process!
This article applies to the C5 Corvette (1997-2004), C6 Corvette (2005-2013), and C7 Corvette (2014-current).
It would be nice if cars just stayed in alignment forever, but that simply isn't the case. We just don't usually have the benefit of driving on perfectly smooth roads all the time. Eventually you will need an alignment, especially if your car is showing signs of being out of whack. These can include uneven tire wear, a pull to one side while driving, a loud humming noise, or a wobbly wheel. While you could just take your car to a reputable shop to get the alignment completed, the job can also be done at home in your own driveway. Keep reading to see how it is done.

Materials Needed
- 6' carpenter's level
- Castor/camber gauge (or a regular level with blocks)
- Steel tape measure
- Wrench set
- Torque wrench
- 4 Jack stands
- String
Step 1 – Find a level surface
Use a 6' carpenter's level to find a leveled side-to-side spot in your garage. If you don't have a level surface, you can use masonite shims or vinyl floor tiles to bring the low spots up as needed. Verify that all four tires are set to the same air pressure and adjust as needed.

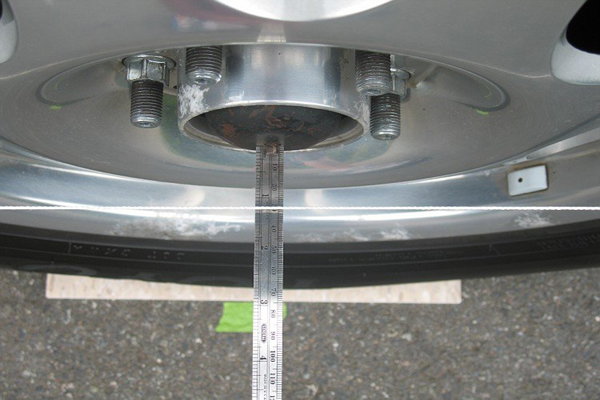
Step 2 – Measure castor and camber
Use a castor/camber gauge (around $70 at parts stores) or a regular level with a block attached to fit on the wheels. If you use a regular level, you will need a scale to read off the distance from level and convert it to degrees. Camber is the tilt in or out when looking at the wheel from the front of the car. Measure the camber of each wheel and write it down. For the front, measure castor by turning the wheel full lock to left and measuring the camber on both wheels. Then, turn the wheel full lock to the right and repeat. Subtract the two left camber numbers to get the left wheel castor setting, and do the same for the right side.
Step 3 – Adjust castor and camber
Compare your numbers to factory specs. To make adjustments, jack up the front of the car and remove the wheels. Removing shims from the rear of the a-arm increases negative camber and castor. Pulling out the same number of shims from each side adjusts only camber. Big shims account for roughly 0.25 degrees, and there are smaller sizes available as well. Try to keep camber within 0.2 degrees and castor within 0.3 degrees from side to side to minimize pulling.
In the rear, remove the wheels and loosen the inner lower control arm bolt. Then, rotate the bolt to increase or decrease camber. Moving the arm to the outside of the car increases camber, while moving it to the center of the car decreases camber. Use small increments because the lines on the washer represent about one degree each. Once you complete all of your castor and camber adjustments, re-install your wheels and drive the car around the block. Then, you will need measure again and adjust as needed.
Step 4 – Measure and adjust toe
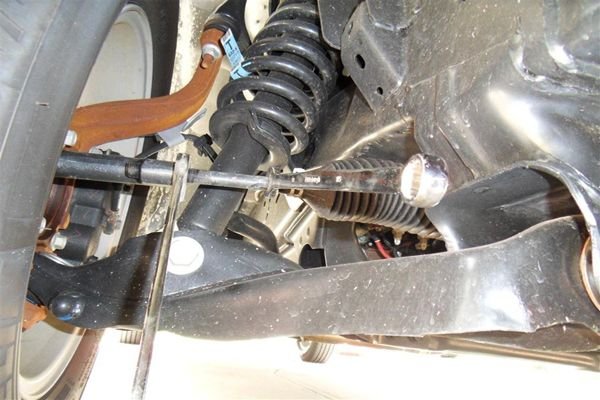
Once you have completed your camber and castor adjustments, you can then move on to toe. For front toe, use a steel tape measure to measure the distance between the two front tires and then the rear. Then, subtract those numbers to find the toe. Front toe can be adjusted from under the car. Simply loosen the jamb nut on the tie rod end and turn the steering arm to adjust. Be sure to drive the car around the block before measuring it again.
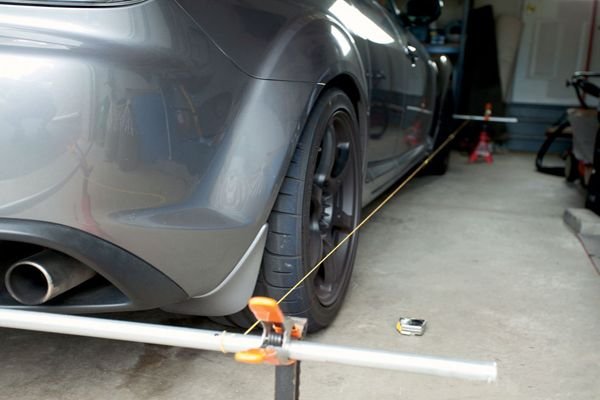
For the rear toe, place four jack stands (two on each side of the car) and tie a long string between them. Tie the string parallel to each side of the car at the center point of each wheel. Measure the distance from the front of the wheel to the rear. The difference is the toe in/out. To make adjustments, loosen the jamb nut on the tie rod ends. This can be done without jacking the car up, but is easier if you do so. Just remember to drive the car around the block before making further adjustments.
Related Discussions
- I Did My Own Four Wheel Alignment - CorvetteForum.com
- Alignment Specs - CorvetteForum.com
- DIY Alignment Which Tools - CorvetteForum.com