Corvette: How to Install an Amplifier
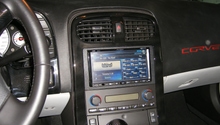
You don't need to settle for your Corvette's built-in stereo, which isn't built to compete with loud traffic noise or an A/C on high. Improve your stereo's sound quality and increase its volume by installing an amplifier. Here's how to do it.
This article applies to the C5 Corvette (1997-2004), C6 Corvette (2005-2013) and C7 Corvette (2014-current).
If you've ever cranked up your car's factory stereo, you've likely heard some distortion. This is common when your main unit is powering your speakers. Adding an amplifier lets you increase the signal sent to your speakers, which in turn limits or outright eliminates sound distortion when you turn up the volume. There are several types of amplifiers, from simple mono block bass amps to five-channel amps that turn any ride into a mobile, surround-sound-enabled experience. Installing an amp may be a tricky DIY project, but doing it yourself means you have more to spend on the amp unit itself; amp unit prices range from $70-1,000. Having an amp unit installed professionally will cost $250-450 in labor, plus the price you pay for the unit itself.

Materials Needed
- Mounting tape or screws
- Screwdriver
- Power drill and steel drill bits (only if you need to drill a hole in the firewall)
- Solderless or other termination connector
- Fuses
- Paint
- Caulk (optional)
Step 1 – Mount the amplifier on a solid surface
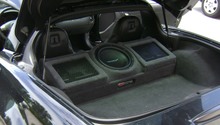
Place your amplifier on a solid surface that does not conduct electricity. Consider using a piece of particleboard or plywood. Do not mount the amplifier on a piece of metal. Place your amplifier where you intend to keep it, such as in your trunk or under the passenger or driver's seat. Make sure your amp has enough room to "breathe" because amplifiers tend to get warm over long periods of use.
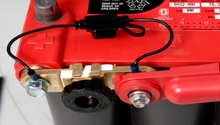
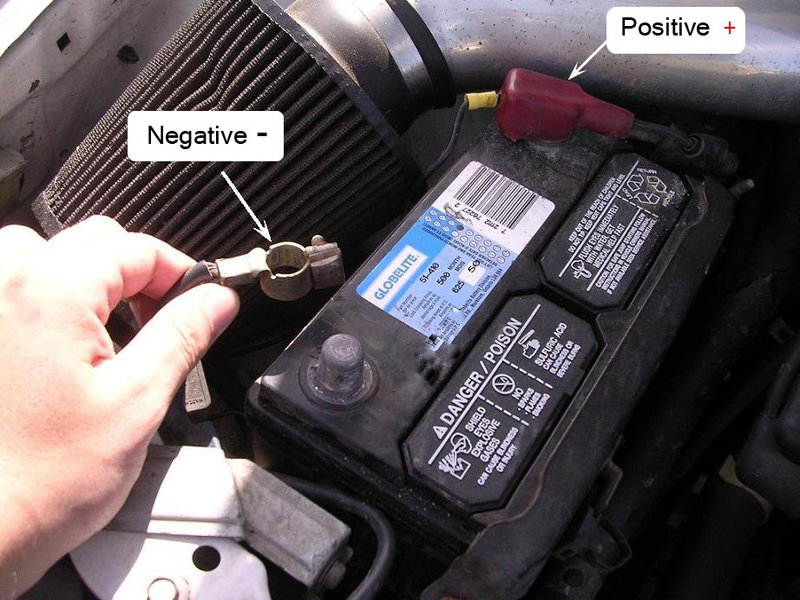
Step 2 – Disconnect the negative terminal of your car's battery
If you don't know the difference between the negative and positive terminals, look in your owner's manual. A negative terminal usually has a negative sign (-) on it. A positive terminal usually has a plus sign on it (+).
Step 3 – Connect a ground wire from the ground terminal on the amplifier to a piece of bare metal in the car
You can connect the ground wire to a sheet metal screw in your car's sheet metal, but only if you're installing a small amplifier. If you're installing a larger amplifier, connect the ground wire to a bolt or something larger. Your ground wire should be no longer than about 18 inches. Any longer and you run the risk of you or someone else getting tangled in it when you're getting in or out of the car, or even while in the car. Your ground wire should be the same length as your power wire. Avoid using a bolt that is part of your seat belt system, because you may accidentally affect its efficacy as a safety feature.
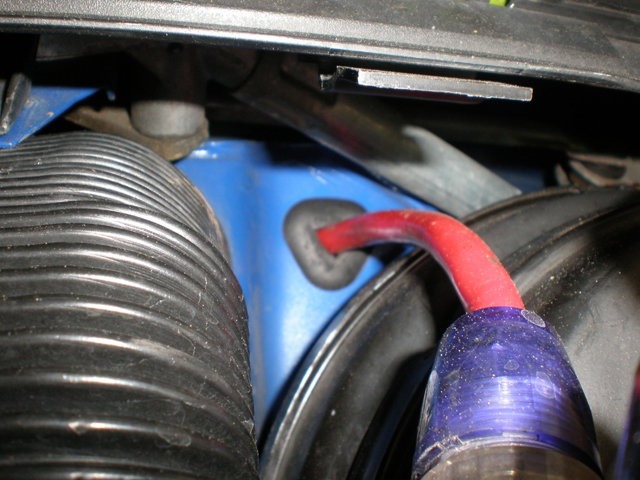
Step 4 – Locate a hole in your car's firewall
You can usually find a factory hole in the firewall. Look for an empty rubber grommet. It likely hides an unused hole. If you can't find a factory hole, then you'll need to make one. Using a power drill and steel drill bits, drill a hole. Be sure you know where the hole is in relation to the battery. If you're drilling a hole, aim to position it in front of the positive terminal on your battery.
Pro Tip
If you drill your own hole, help prevent it from rusting by adding paint or a similar material. You should then install a rubber grommet to prevent the wire you'll run through the hole from chaffing. Be sure the grommet is watertight. Consider caulking the gap between the inner diameter of the grommet and the power wire.
Step 5 – Run the power supply wire from the positive terminal on the battery to the amplifier
Run the power wire from the amplifier to the positive terminal of the battery. You must put a fuse at the battery and one at the amp to protect your car from catching fire, and your amplifier itself, if there is a shortage. The size of the fuse depends on the current the power wire will carry. The manual that comes with the amplifier will include this information. Keep in mind that if you're installing multiple amplifiers, you'll need a fuse that can carry that maximum current draw. For example, if your maximum current draw is 100 amps, then you'll need a 100-amp fuse. When you run the wire to your amplifier, avoid places where it may get tangled, such as seat tracks or door jambs.

Pro Tip
Consider running the wire under the carpet. You may need to remove panels and panel covers in order to lift up the carpet and run the wire beneath it.
Step 6 – Run the remote line and RCA cable from the rest of the head unit to the amplifier
Following a similar process that you used to connect the amplifier to the positive terminal on the battery, run the cable and remote turn-on lead to the amplifier. Your owner's manual will help you identify which connection is the remote turn-on lead. Make sure you run the RCA cables on the opposite side of the vehicle that you ran your power wire. Running them on the same side of your vehicle can cause sound distortion and minimize your amp's effectiveness. This remote turn-on wire tells your amplifier to turn on or turn off, and your amplifier will not work without it.

Step 7 – Connect the amplifier to your speakers
Connect the speaker wires to your amplifier and to the stereo using appropriate connectors.

Warning
If your stereo is currently connected to speakers, you'll need to disconnect them. You'll use these ports when connecting your amplifier. You cannot have your speakers and amplifier connected to the stereo or you risk damaging the entire system.
Step 8 – Connect the amplifier's negative terminal to the car's chassis ground
Be sure to use a short negative power wire that is the same diameter as the wire you used to connect the positive battery terminal to the amplifier. You can connect the wire to any metal point on the vehicle. You may need to scrape off some paint from the grounding surface to improve the contact between the negative power wire terminal and the vehicle ground.
Pro Tip
To protect the connection between the negative terminal and the ground, cover the connection with paint, caulk, or something similar.
Step 9 – Insert the main power wire fuse
After connecting all of the other wires and making sure they are securely fastened and connected, insert the main power wire fuse.

Step 10 – Re-connect the negative battery terminal
Connect the negative battery terminal to the battery and tighten its screws.
Step 11 – Adjust amplifier settings
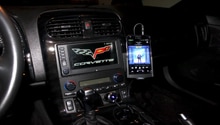
To set and adjust your amplifier settings, begin by setting all input level gain controls to their lower setting, and then set the bass, treble and loudness levels to 0. If you have one or more equalizers, set them to their center or neutral position. Put a CD in your stereo and play it. Using a CD will give you a cleaner sound than if you play the radio. You also can use an MP3 player if your stereo can connect to one. Turn the volume of your stereo up as loud as you can before you hear distortion. If you can turn up the stereo all the way without distortion, then your unit is in good shape. Do the same when adjusting the input gain and with all the other components, setting each to just below you begin to hear distortion. Continue to adjust settings to your preferences.
Related Discussions, Sites and Videos
- C5 Amp Installation - Corvetteforum.com
- Amp/Sub Install - Location and Wiring - SmokinVette.com
- JL Audio Corvette Install HD Amps, W3, Pioneer - YouTube.com
- Corvette Z06 Stereo System Install - YouTube.com
- When Do You Need a Car Stereo Amplifier? - CarsDirect.com