Corvette: How to Install Front Splash Guards
Corvette owners cringe when thinking about the pounding that rocker panels take from road debris. Most of those paint chips can be prevented with the easy installation of splash guards. Learn how here.
This article applies to the C5, C6 and C7 Corvette (1997-current).
There are ways to protect your paint without installing mud flaps on the Corvette. GM sells splash guards (sometimes dealer installed prior to sale), as well as many aftermarket companies that offer a wide range of styles. Options include different widths and profiles as well as assorted surfaces such as flat black, body color and even carbon fiber.

Materials Needed
- Pry tool (or flat head screwdriver)
- Cleaner/degreaser (alcohol based)
As with any styling modification, do some research first to decide what is best for you. Splash guards have some subtle differences, and although their first priority is to protect your paint, they also modify the look of your car but only to the keenest of eyes. Narrow and low profile guards may fit the taste of the traditionalist but may not offer enough protection. Wider guards may offer maximum protection, yet change the look of the car to a greater degree. Painted guards may be what you desire, but they more drastically alter the lines of the car and may eventually show wear themselves. Consider your driving environment and assess your needs as well as your desired look.
Although rear guards require wheel removal and some drilling, front guards are easily installed with one tool and no wheel removal in less than an hour.
Pro Tip
It is best to do this job when the outside temperature is between 65 and 85 degrees with low humidity. The adhesive tape may expand or contract (slightly changing guard position) hours after installation if installed during extreme and/or changing conditions.
Step 1 – Turn tires to gain the greatest amount of access to the wheel well
Turn extreme left to best access the driver side and extreme right for the passenger side.

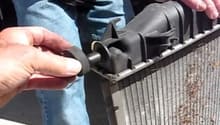
Step 2 – Remove the OEM push pins
With a pry tool or flat head screwdriver, remove the push pins on the back side of the front wheel well.
Pro Tip
You do not have to worry about damaging these factory pins, as they will be replaced with the pins that come in the splash guard set, but be very careful not to damage the wheel well or body paint.
Step 3 – Clean the inside of the wheel well thoroughly
Using an alcohol based cleaner, remove all debris, grease, wax, etc. from the surface to which you will be installing the splash guard.

Pro Tip
It is very important to get this area clean so that the adhesive tape adheres to the wheel well surface. After cleaning, test this adhesion with some masking tape. If the tape does not securely adhere to the surface, clean until it does.
Step 4 – Attach splash guard using new push pins
With the proactive film still on the adhesive strip of the new splash guard, line up the new splash guard and secure it with the new push pins in the factory holes. Do not push the pins all the way in yet as you will need space to access the tape strip.

Pro Tip
Although the new push pins will appear larger, the shaft is still the proper size to fit securely in the factory pin holes.
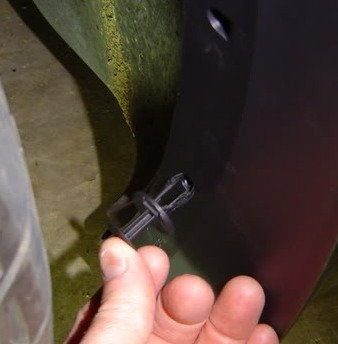
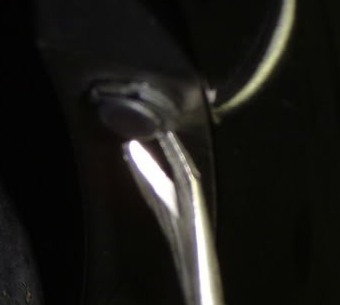
Figure 5. Set new push pins. 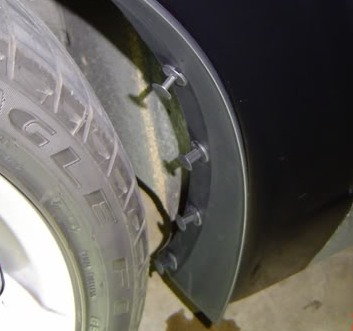
Figure 6. Partial installation of push pins.
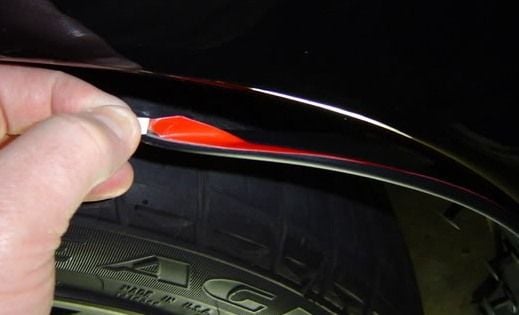
Step 5 – Remove adhesive strip protective film and adhere guard to wheel well surface
With the push pins loosely installed, pull the guard away from the car and remove the proactive strip from the adhesive tape. Start from the top and work your way to the bottom. Apply pressure from the outside in, manipulating the guard to ensure proper positioning.
Pro Tip
Make sure that you have achieved the desired position of the guard. You will not be able to move the tape/guard to a great degree once it adheres to the car. Also, although there is no way to know how much force you are applying, instructions call for 20-30 lbs. of force to properly secure.
Step 6 – Press push pins to locking position
Press the pins back in their holes, firmly enough for them to snap on, but not too hard.

Figure 8. Securing push pins. 
Figure 9. Installation complete.
Step 7 – Repeat the process
Repeat Steps 1 through 6 for the other side of the car.
Related Discussion
- Genuine Accessory Splash Guard Installation - CorvetteForum.com