
2015 Corvette Z06 Z07 build log - petite speaker upgrade
 03-10-2016, 05:05 PM
#21
Safety Car

Thread Starter

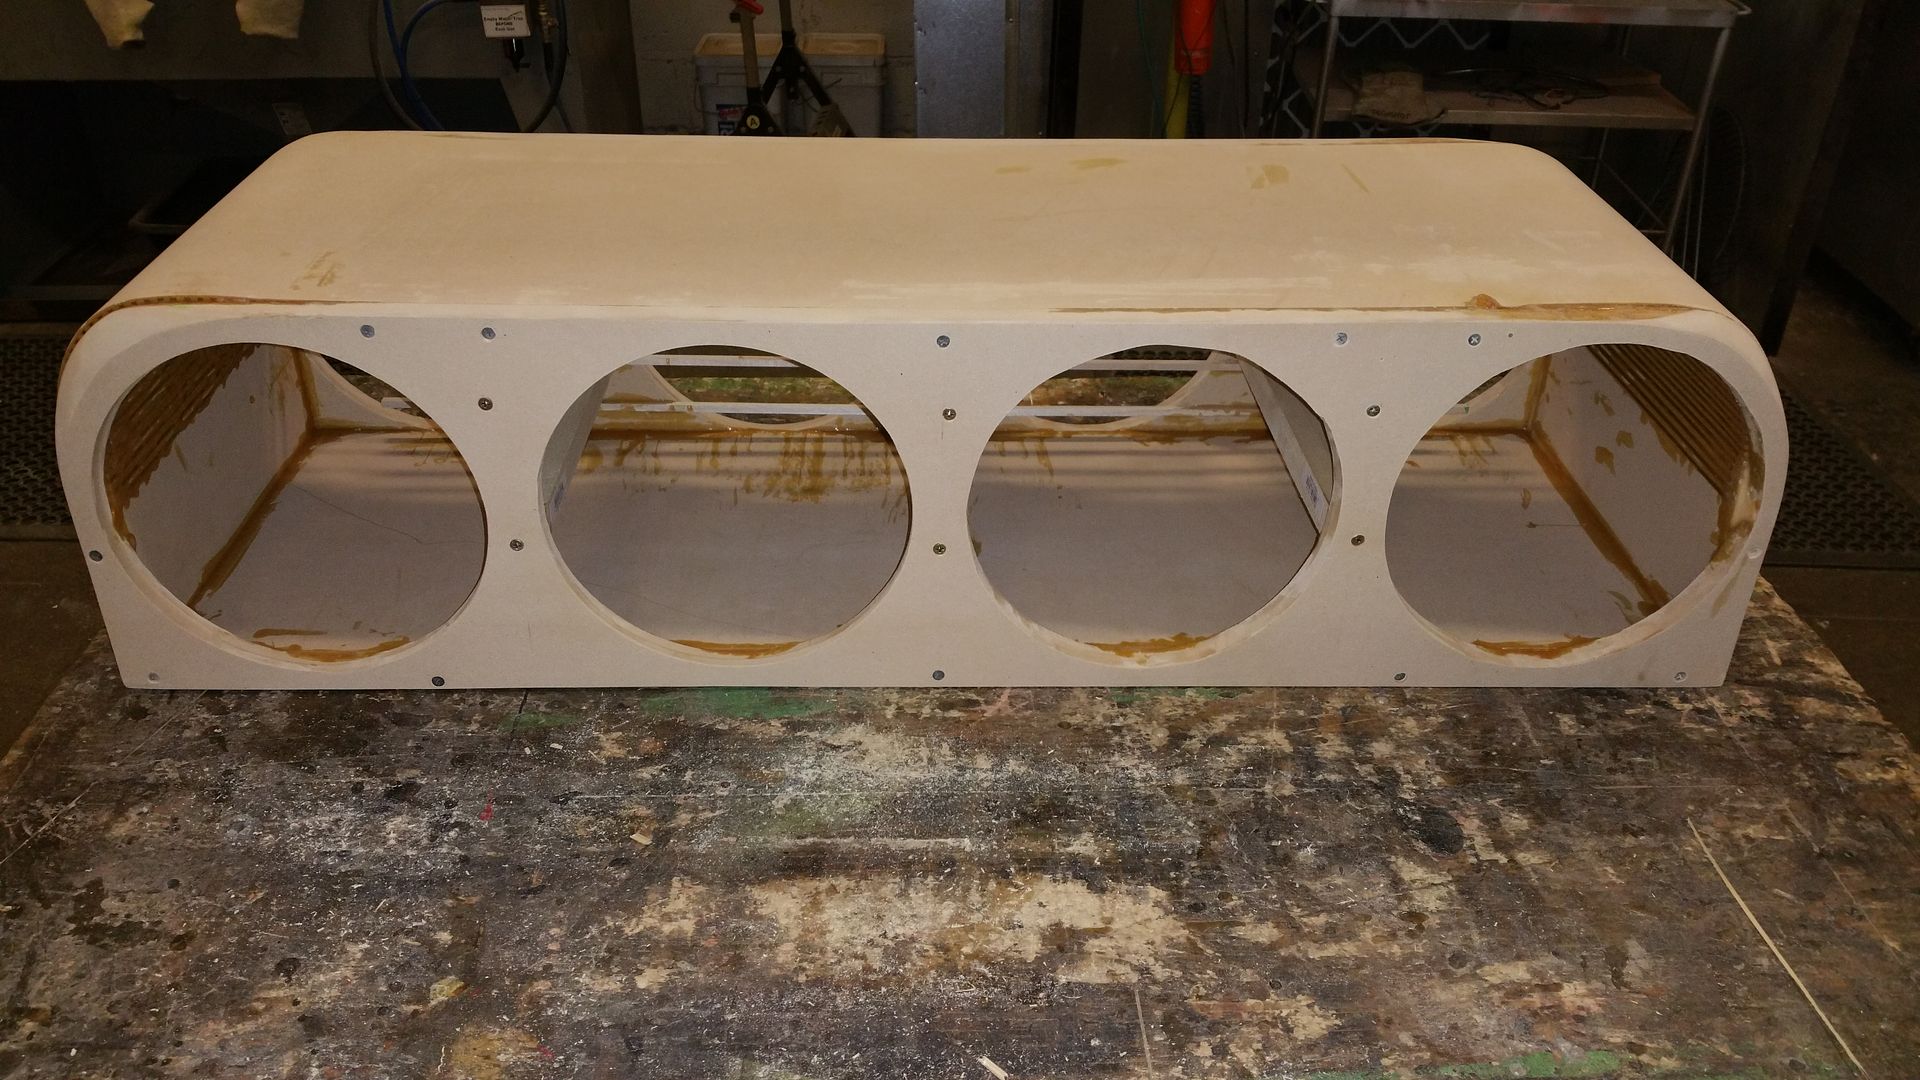
Here is what it looks like after 4 hours of hard sanding.
Front
Rear
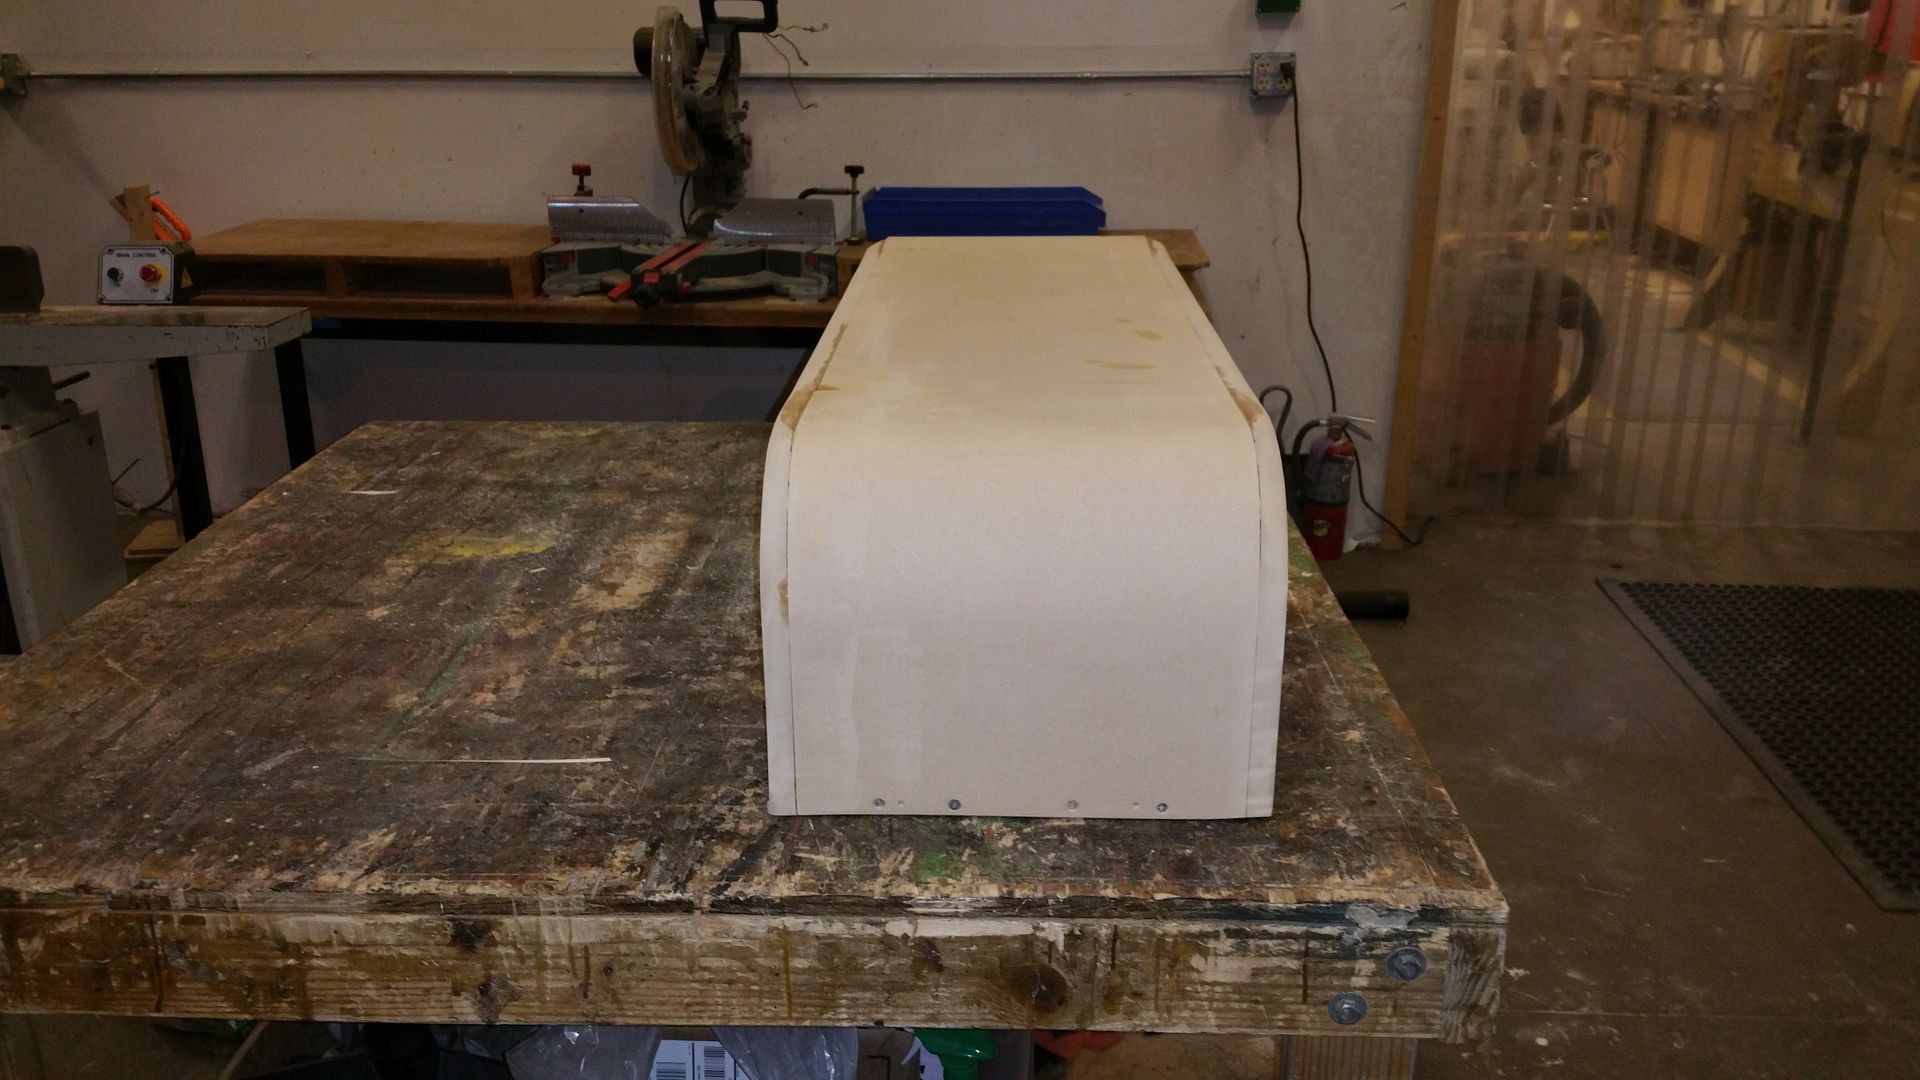
Sides

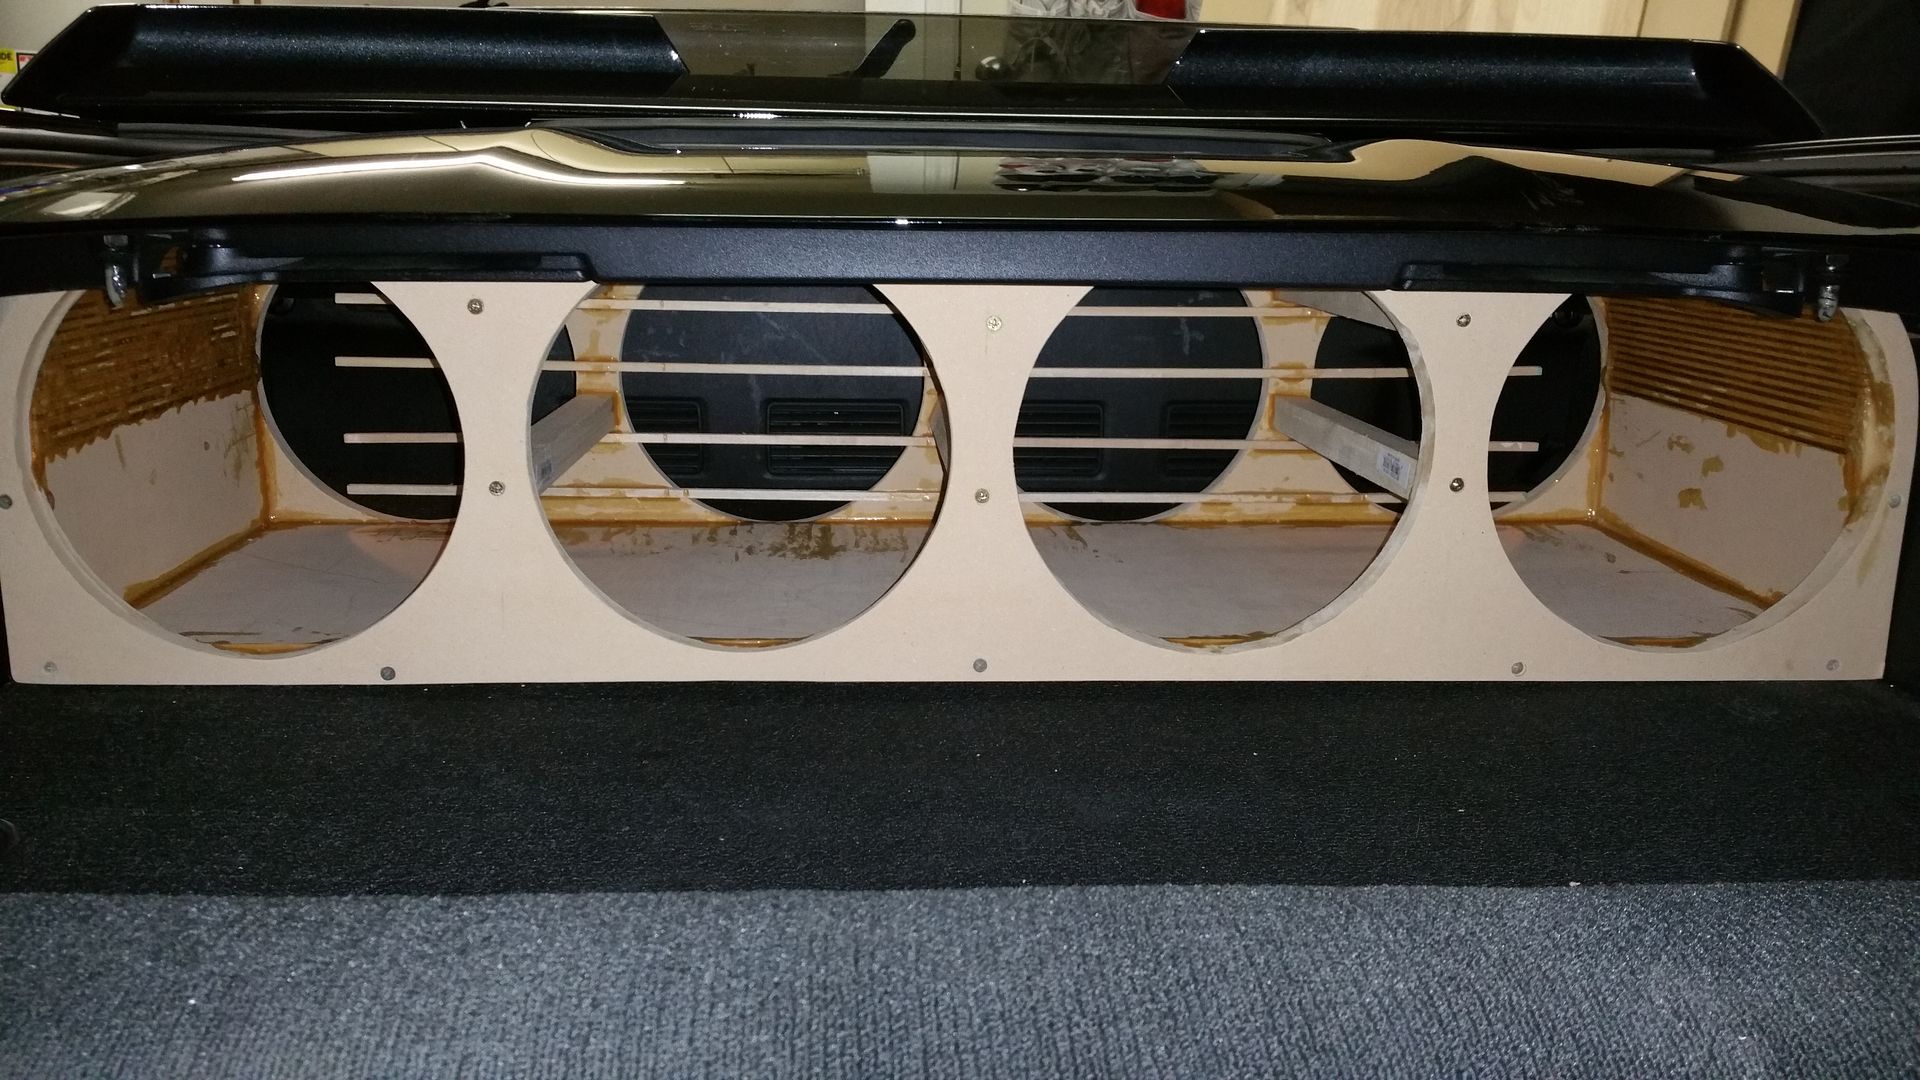
Test fitting with the targa top. Fits this time but very tight. Still have to shave off a bit of the corners.
Front
Rear
Sides
Test fitting with the targa top. Fits this time but very tight. Still have to shave off a bit of the corners.
 03-15-2016, 04:23 AM
#22
Safety Car
Thread Starter
UPDATE
I sanded the box down until it fit in the car without hassle. This required quite a bit of rounding off in the corners. I used the orbital sander this time to get a bit more precision.
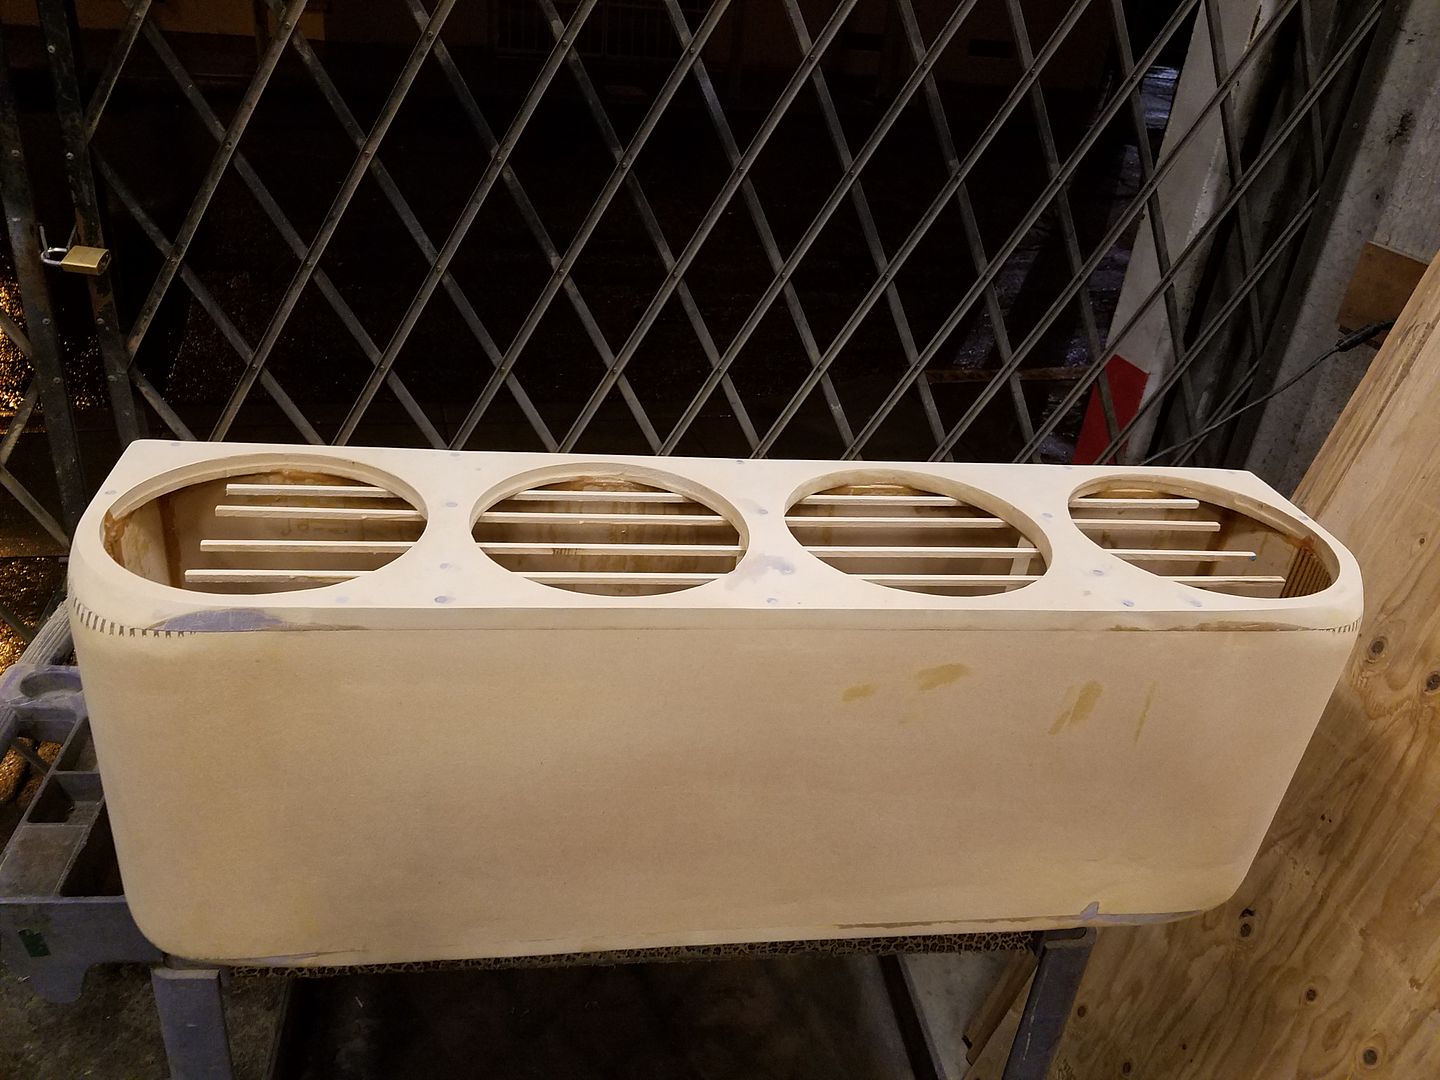
Wherever there were any gaps between the kerfed piece and the box faces I filled it in with the reinforced body filler. Same for covering screws. That stuff works like a charm.
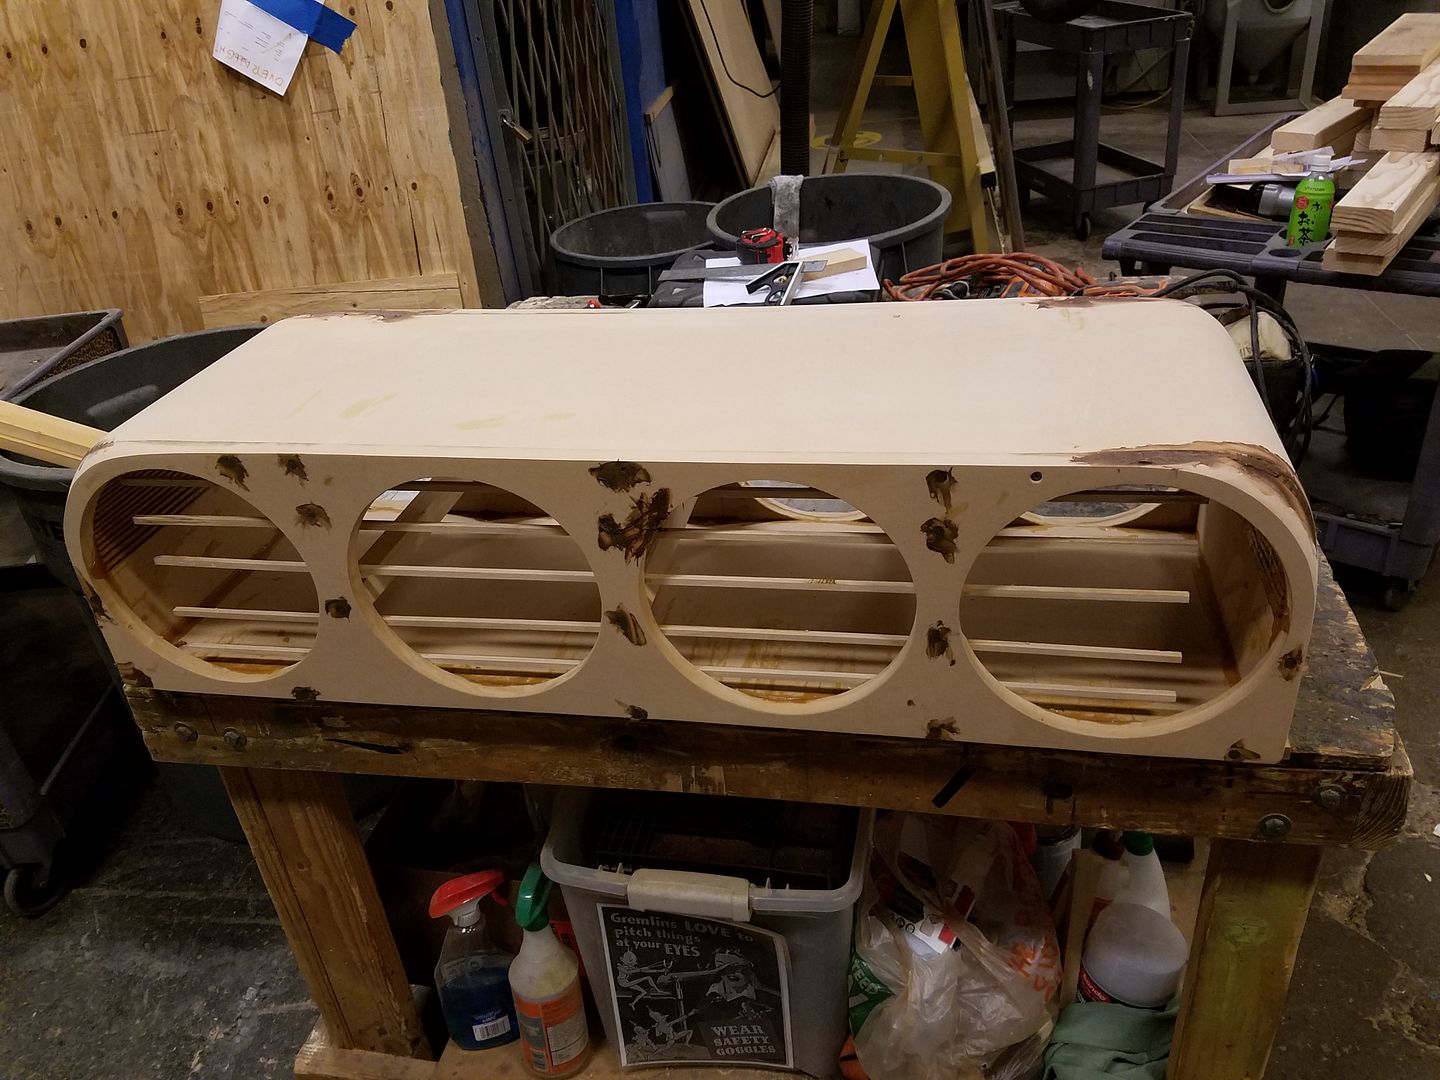
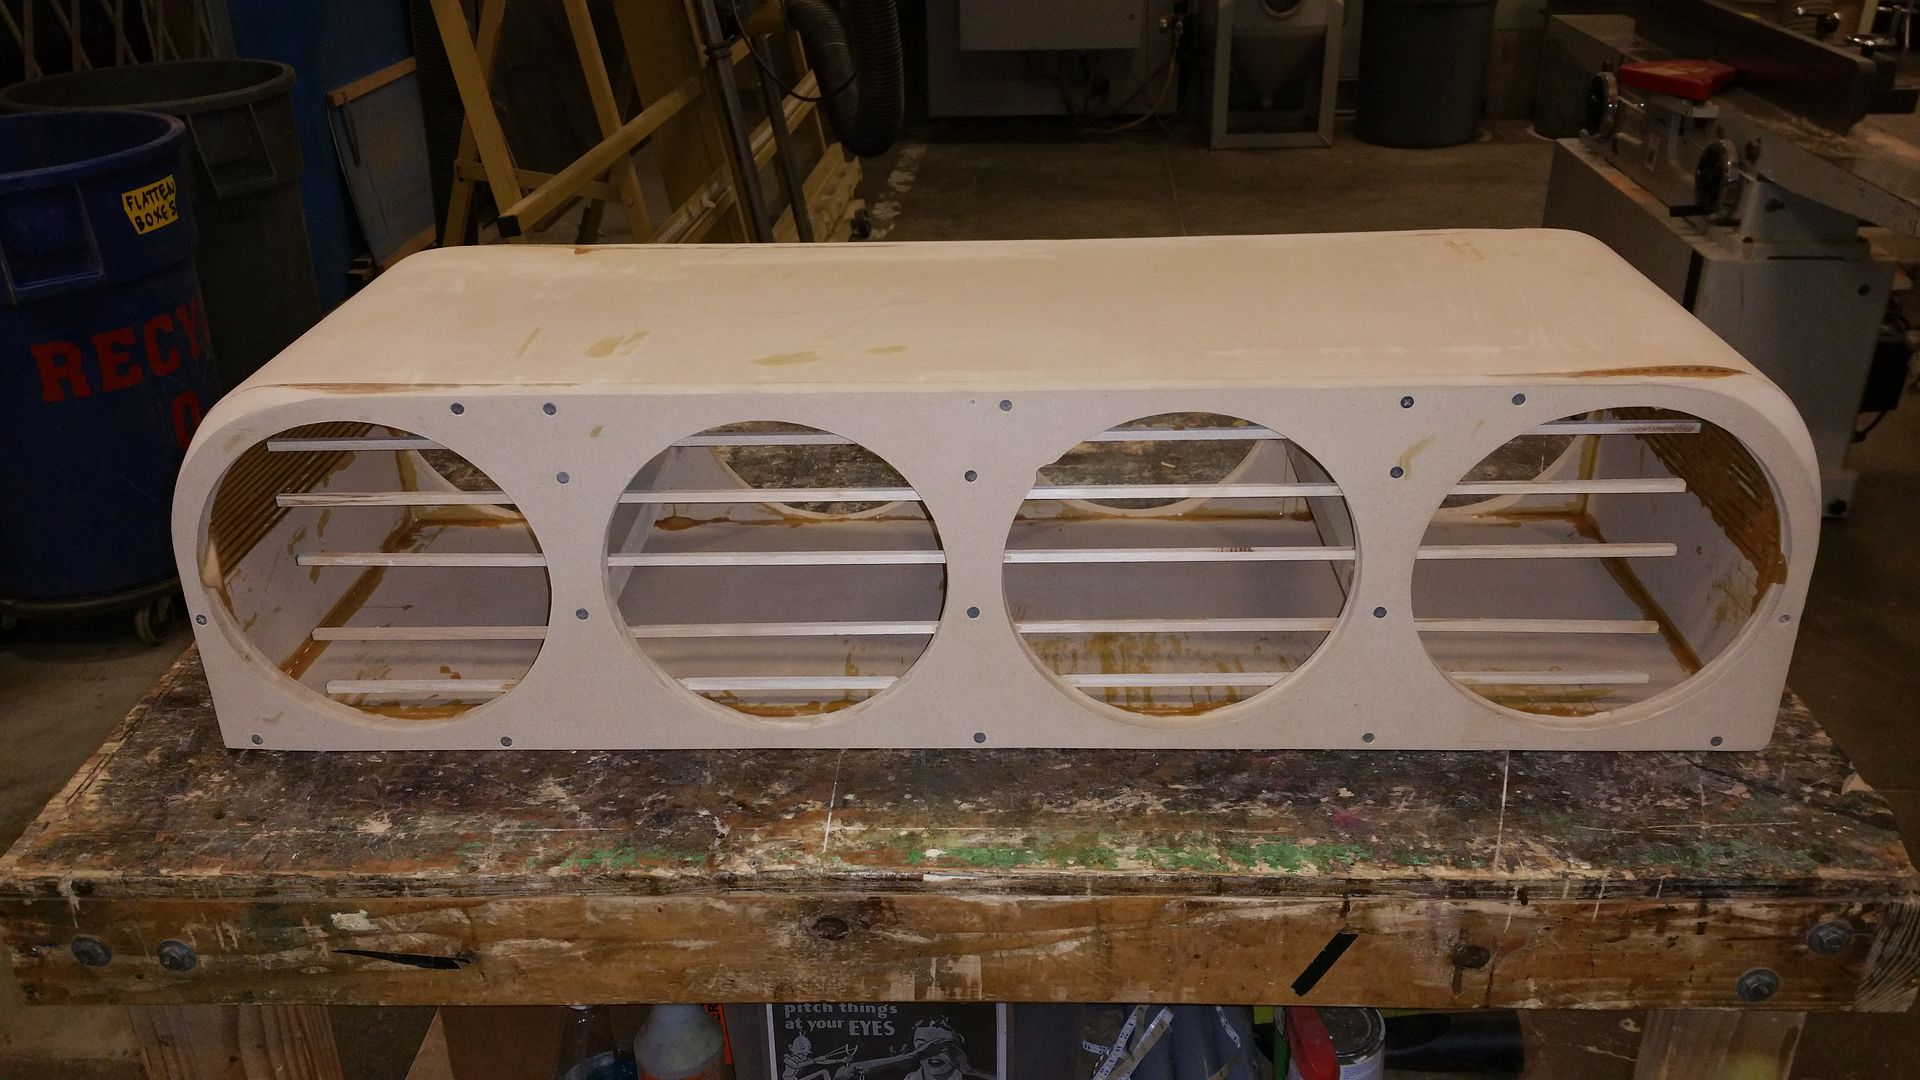
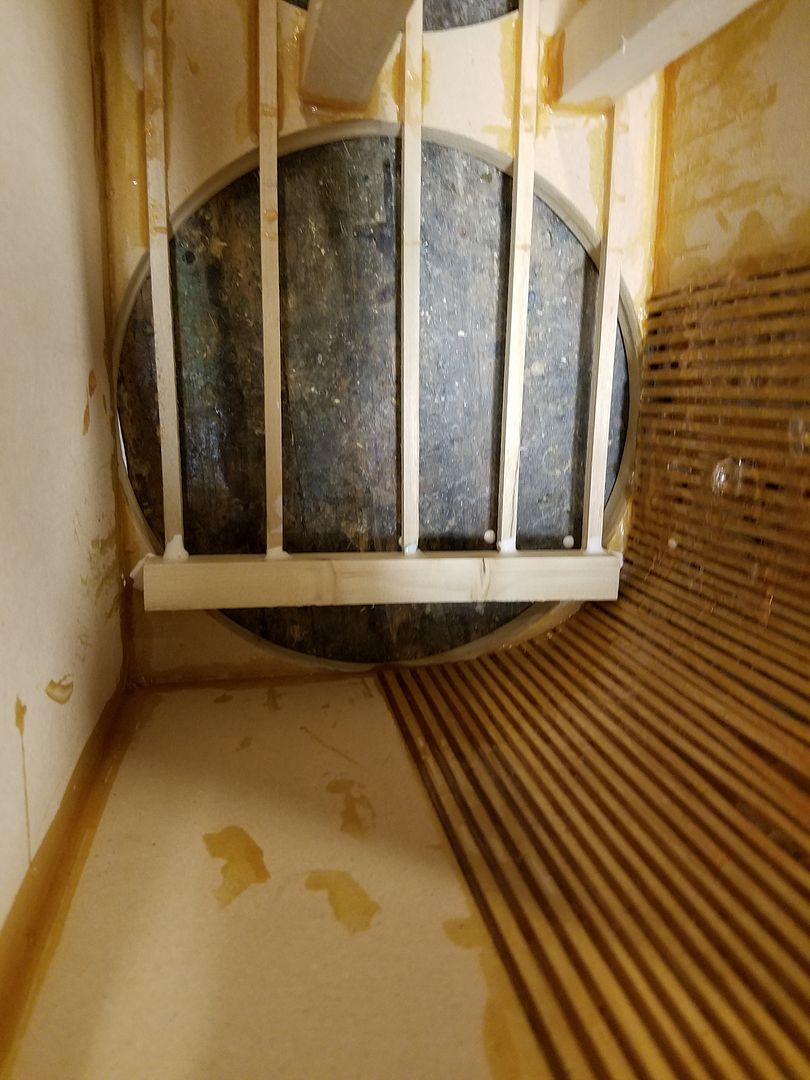
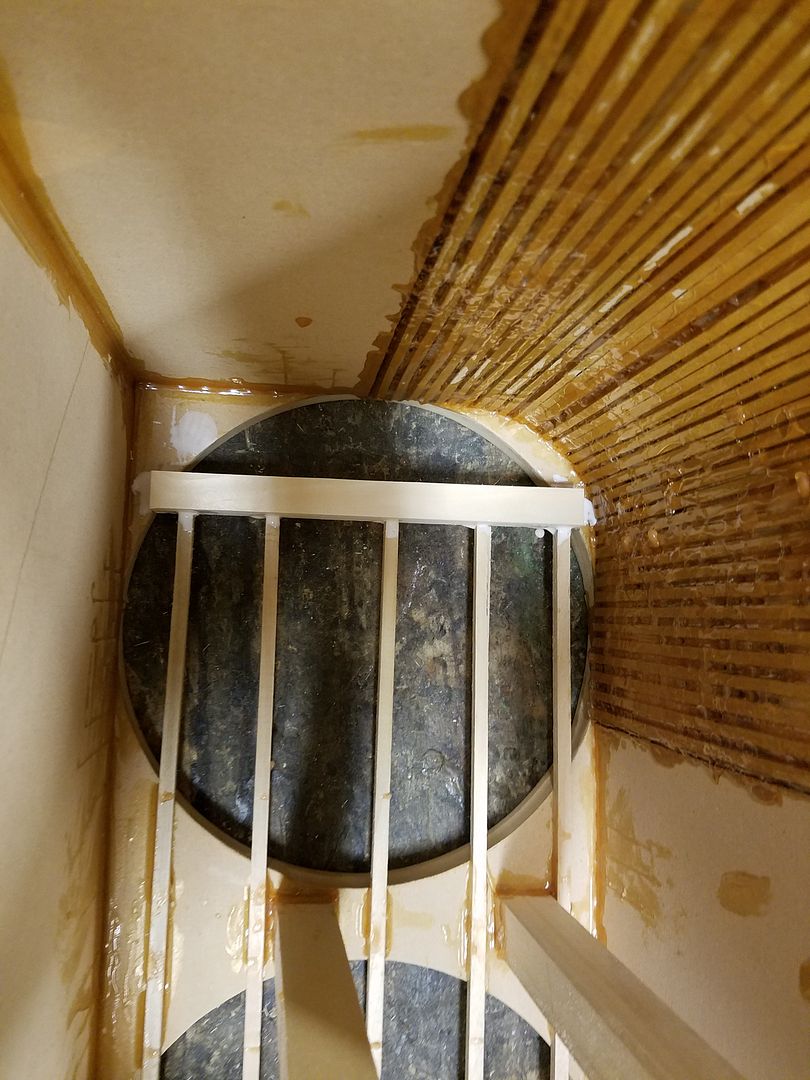
Next I realized that the grilles I made to keep the stuffing at bay were resonating loudly when flicked. It only resonated where the ends were terminated in thin air. So I picked up some scrap wood and glued the ends down to the box. So close to doing something silly!
Here you can see a 2" hole drilled for the 5 way connection post. It is the smallest heavy duty connection post I could find. As you can see the clearance is minimal in this build.
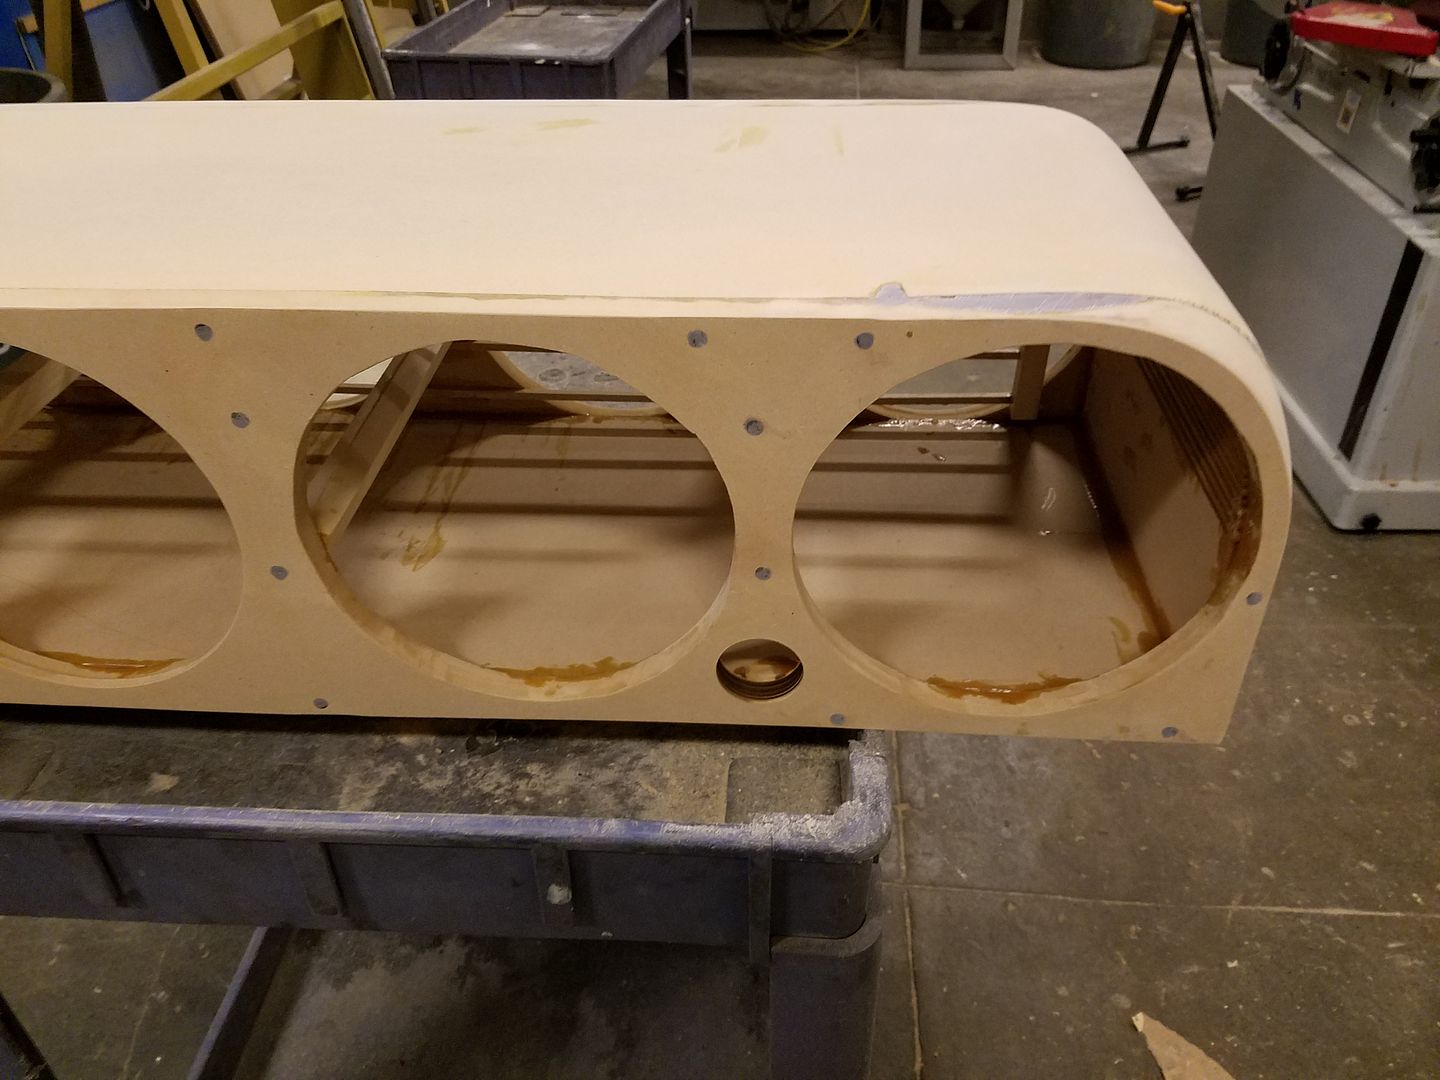
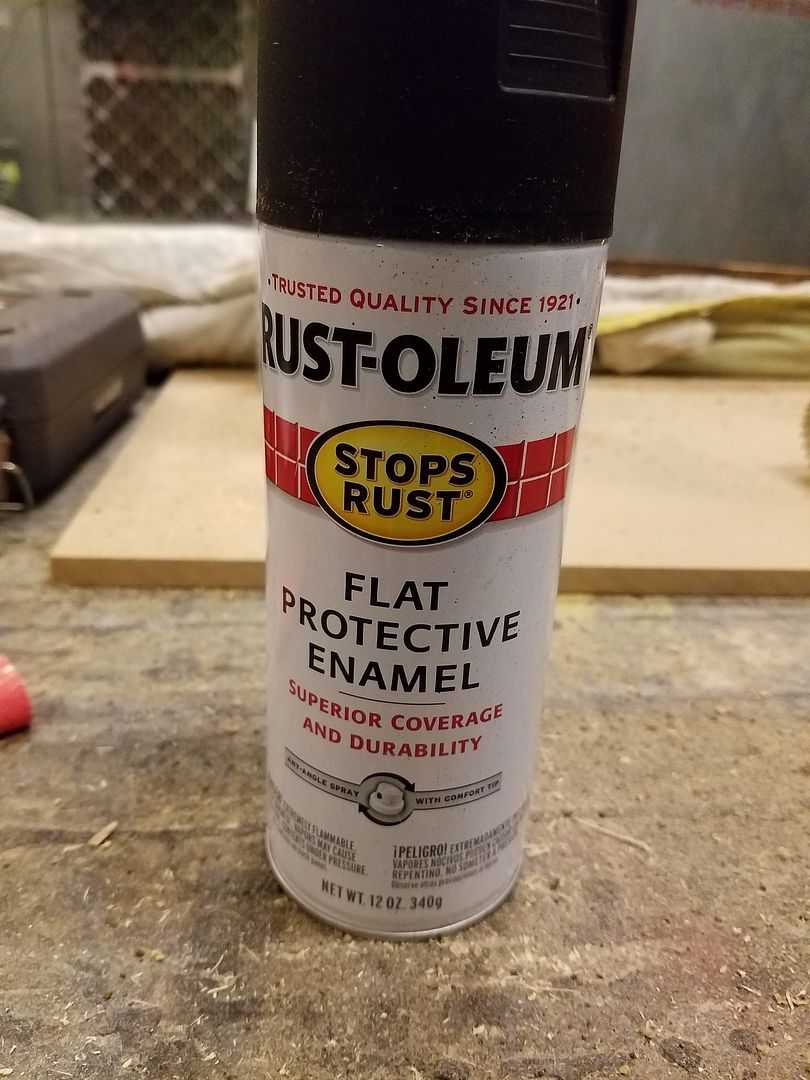
I made a decision to waterproof everything in this build inside and out. So I started with the inside of the box. I found this guy at Home Depot which promised to waterproof things.
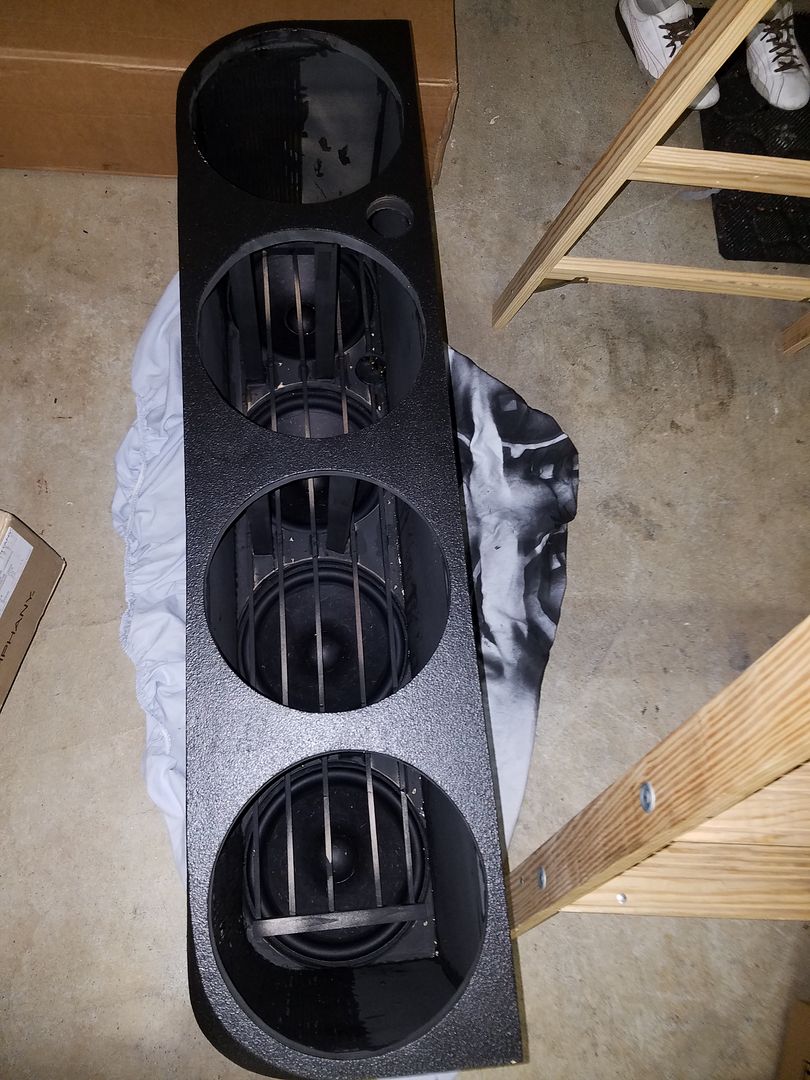
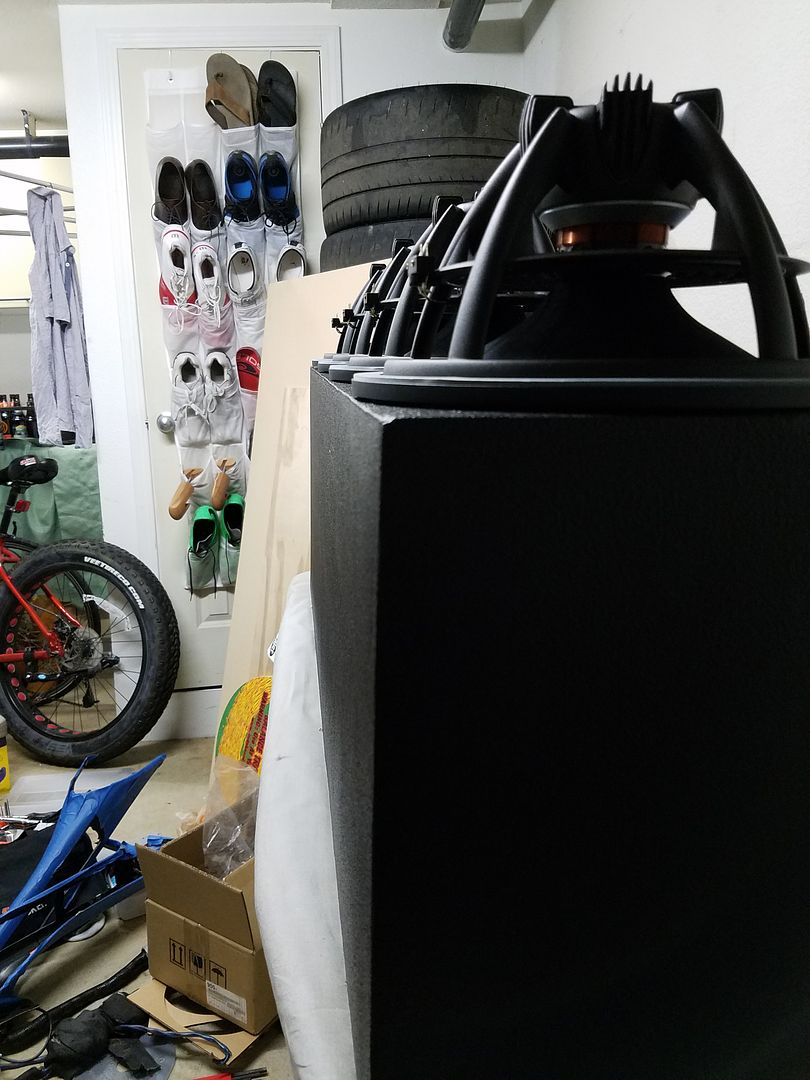
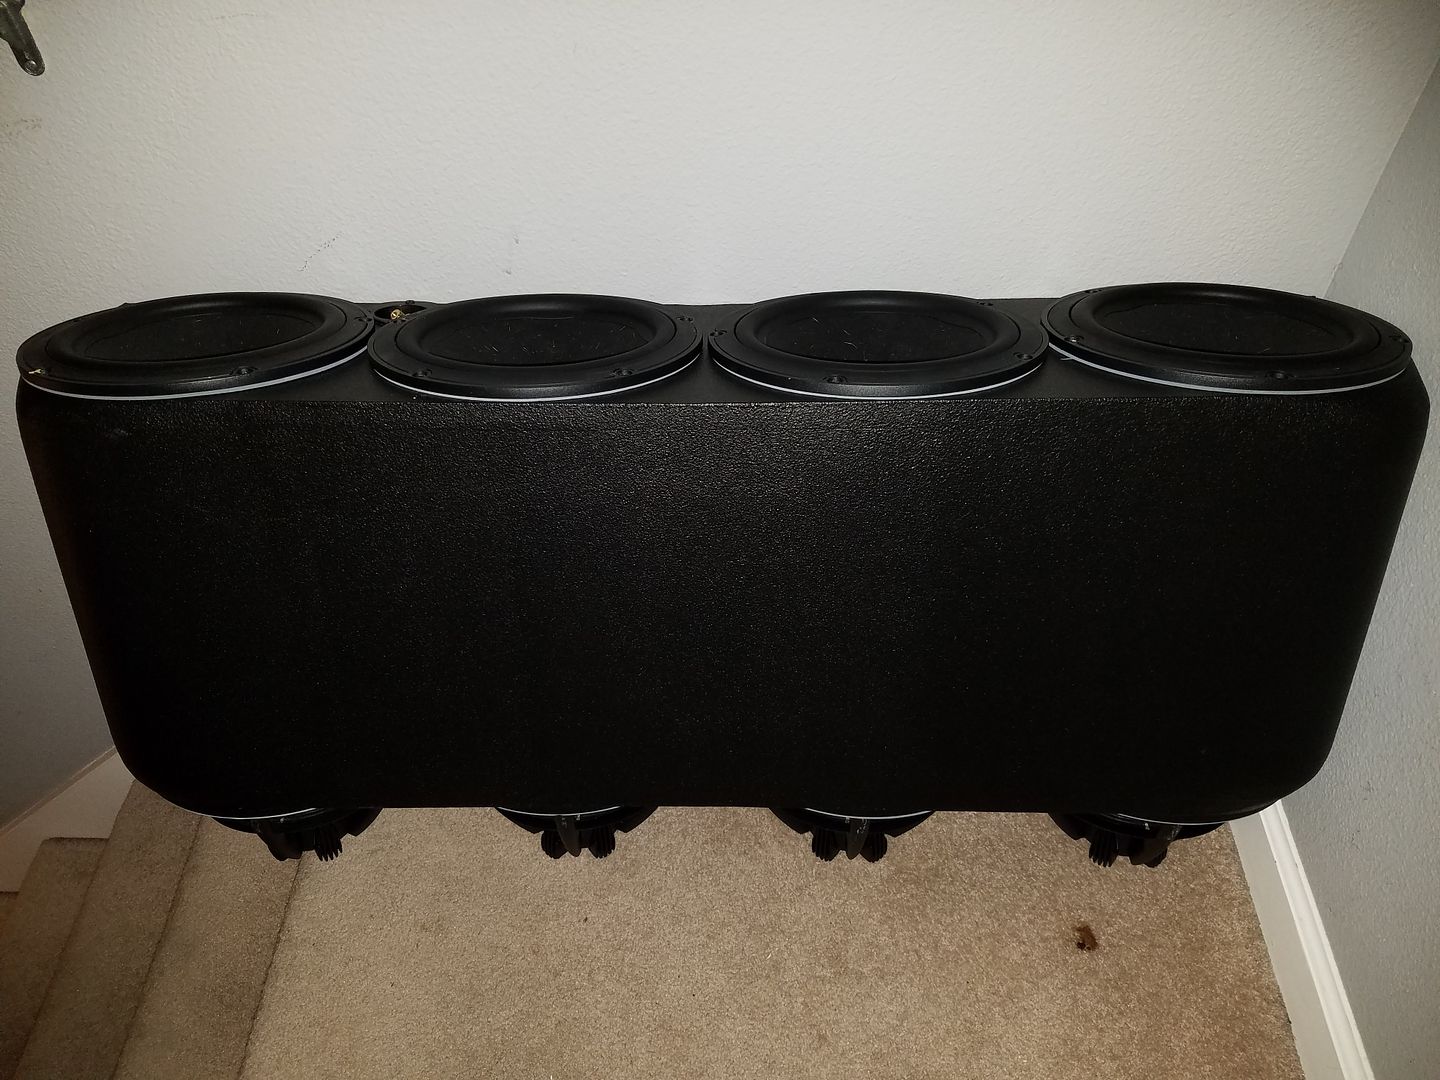
At this point the box is built! On with the coating.
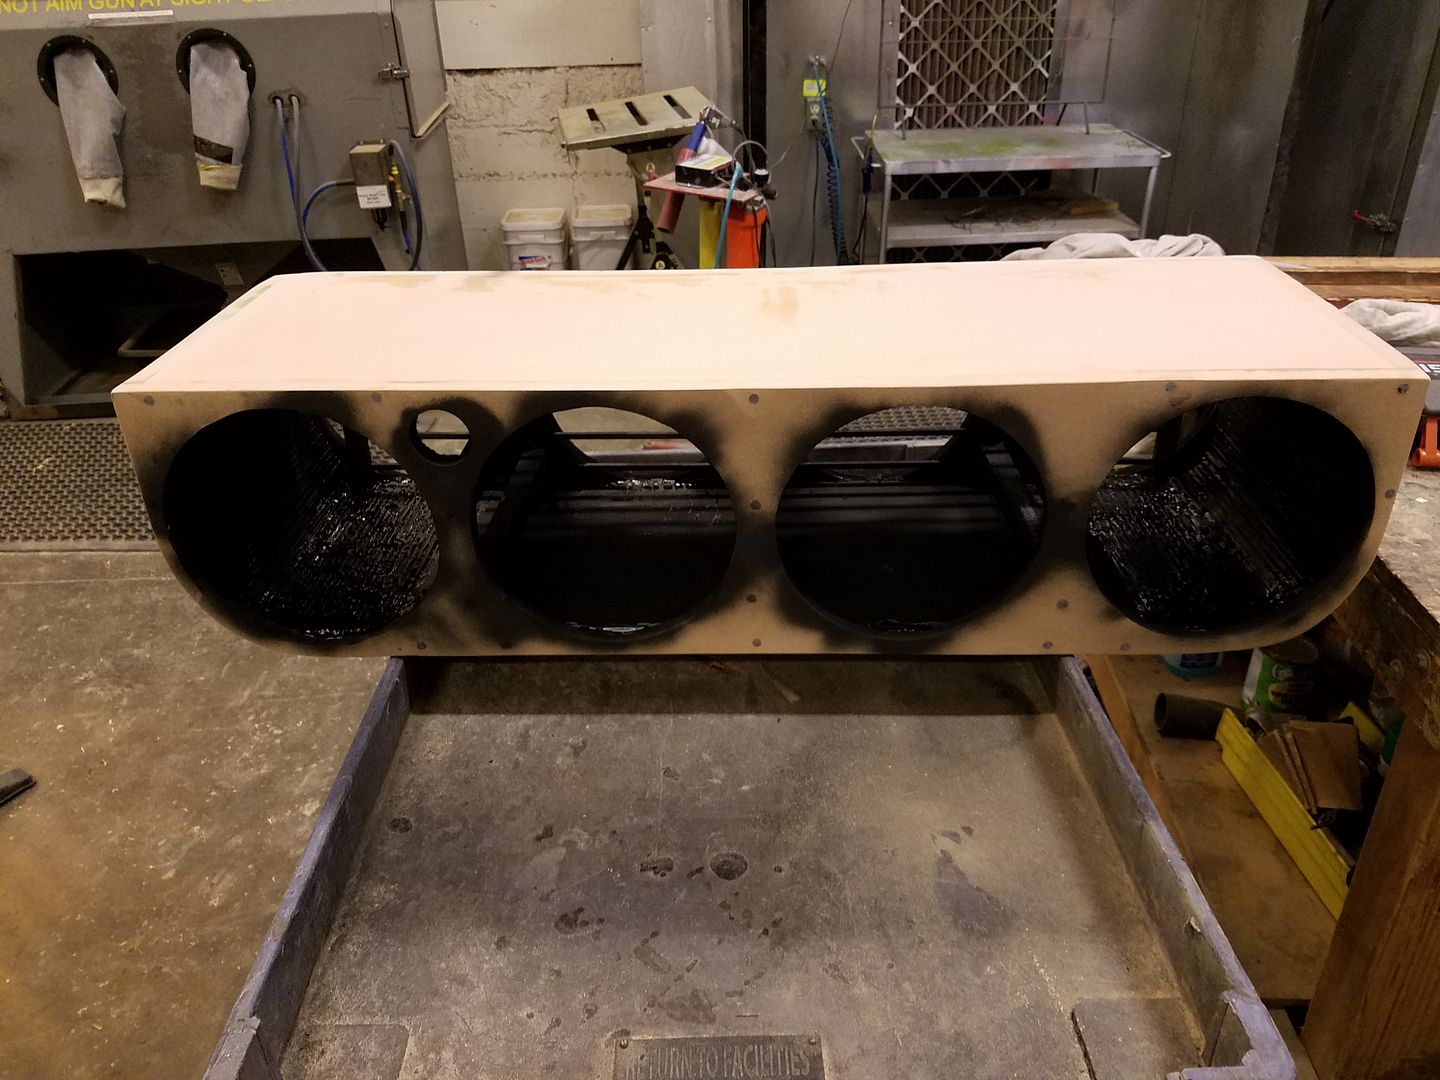
Typically I just wrap things in carpet and call it a day. This time I wanted to try something new. Duratex fit the bill. I never used it, it's thinner than carpet which helps with fitment under the targa top, it's chip proof, and waterproof.

First layer, looking really good but mostly rugged and pro-audio flavored. I just noticed my BG Radia 520i 7 foot floor standers at home are also finished with this stuff. Awesome!
I sanded the box down until it fit in the car without hassle. This required quite a bit of rounding off in the corners. I used the orbital sander this time to get a bit more precision.
Wherever there were any gaps between the kerfed piece and the box faces I filled it in with the reinforced body filler. Same for covering screws. That stuff works like a charm.
Next I realized that the grilles I made to keep the stuffing at bay were resonating loudly when flicked. It only resonated where the ends were terminated in thin air. So I picked up some scrap wood and glued the ends down to the box. So close to doing something silly!
Here you can see a 2" hole drilled for the 5 way connection post. It is the smallest heavy duty connection post I could find. As you can see the clearance is minimal in this build.
I made a decision to waterproof everything in this build inside and out. So I started with the inside of the box. I found this guy at Home Depot which promised to waterproof things.
At this point the box is built! On with the coating.
Typically I just wrap things in carpet and call it a day. This time I wanted to try something new. Duratex fit the bill. I never used it, it's thinner than carpet which helps with fitment under the targa top, it's chip proof, and waterproof.
First layer, looking really good but mostly rugged and pro-audio flavored. I just noticed my BG Radia 520i 7 foot floor standers at home are also finished with this stuff. Awesome!
03-16-2016, 02:56 PM
#23
Safety Car
Thread Starter
UPDATE
I find that there is at most 0.5 inches of depth available by gutting the a-pillar. That is unfortunate. I was hoping for an inch of depth to mount the tweeters directly to the a-pillar panel. Instead, I will have to make half inch spacers to fit them. That translates to a bit of viewing area loss as well. The good news is the a-pillar is very robust, made out of thick plastic and held down by screws and clips. None of the clips have to be broken to fit the tweeters. The tweeter is an air motion transformer line array, more on that later.
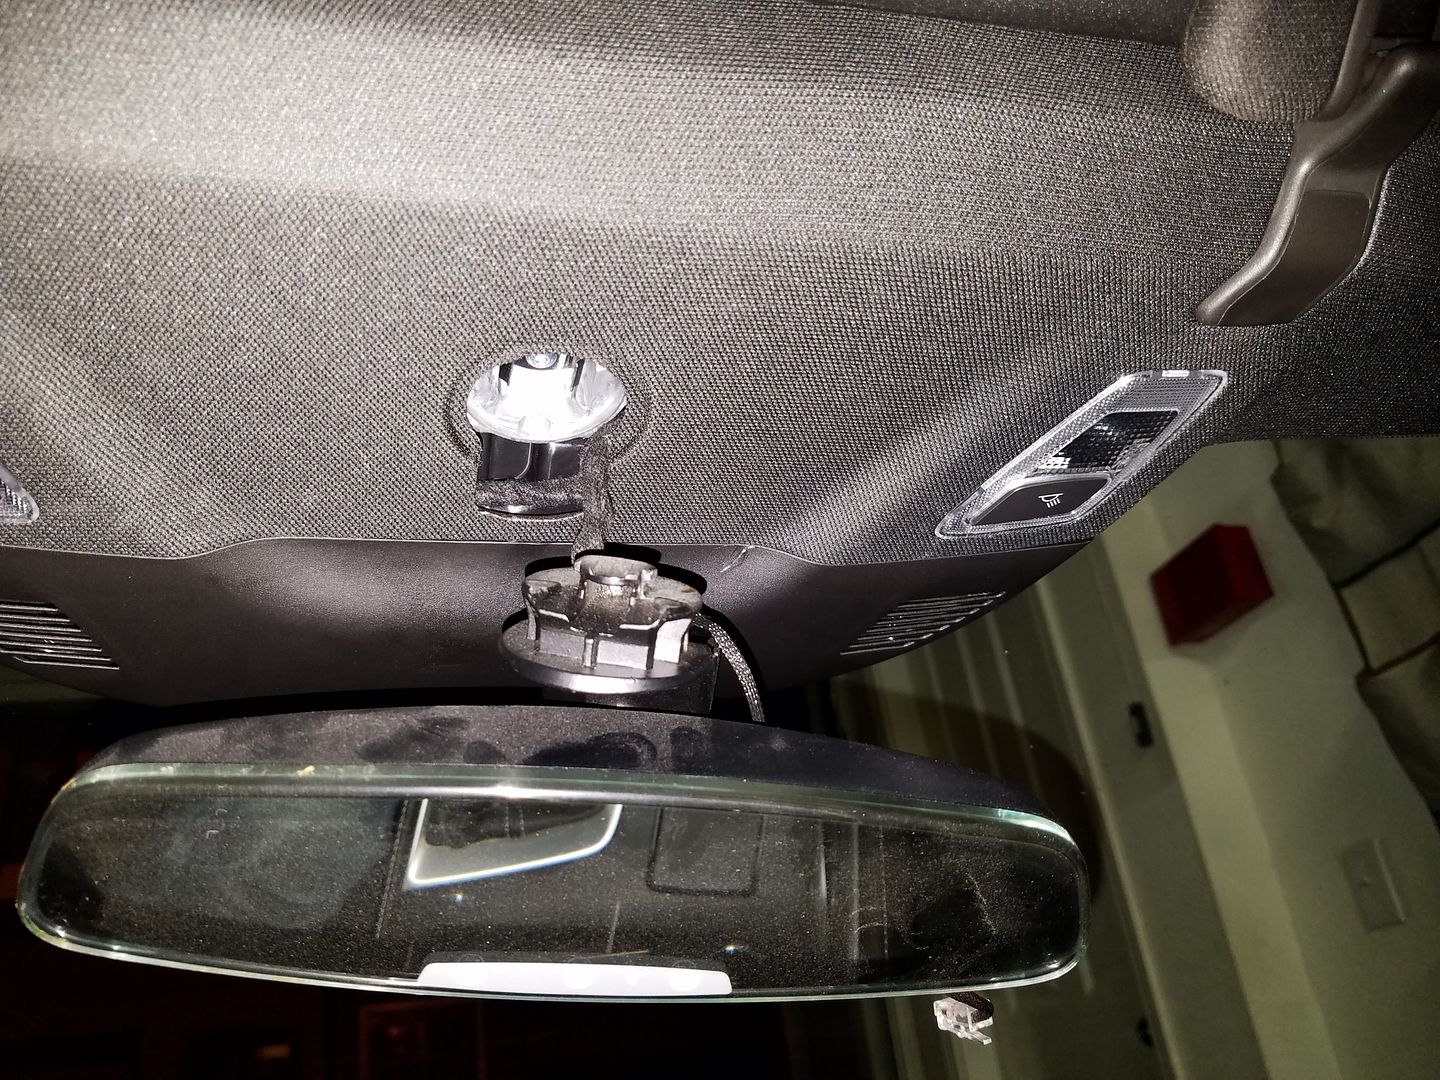
First, I had to remove the rear view mirror. Twist the base with Thor like strength.
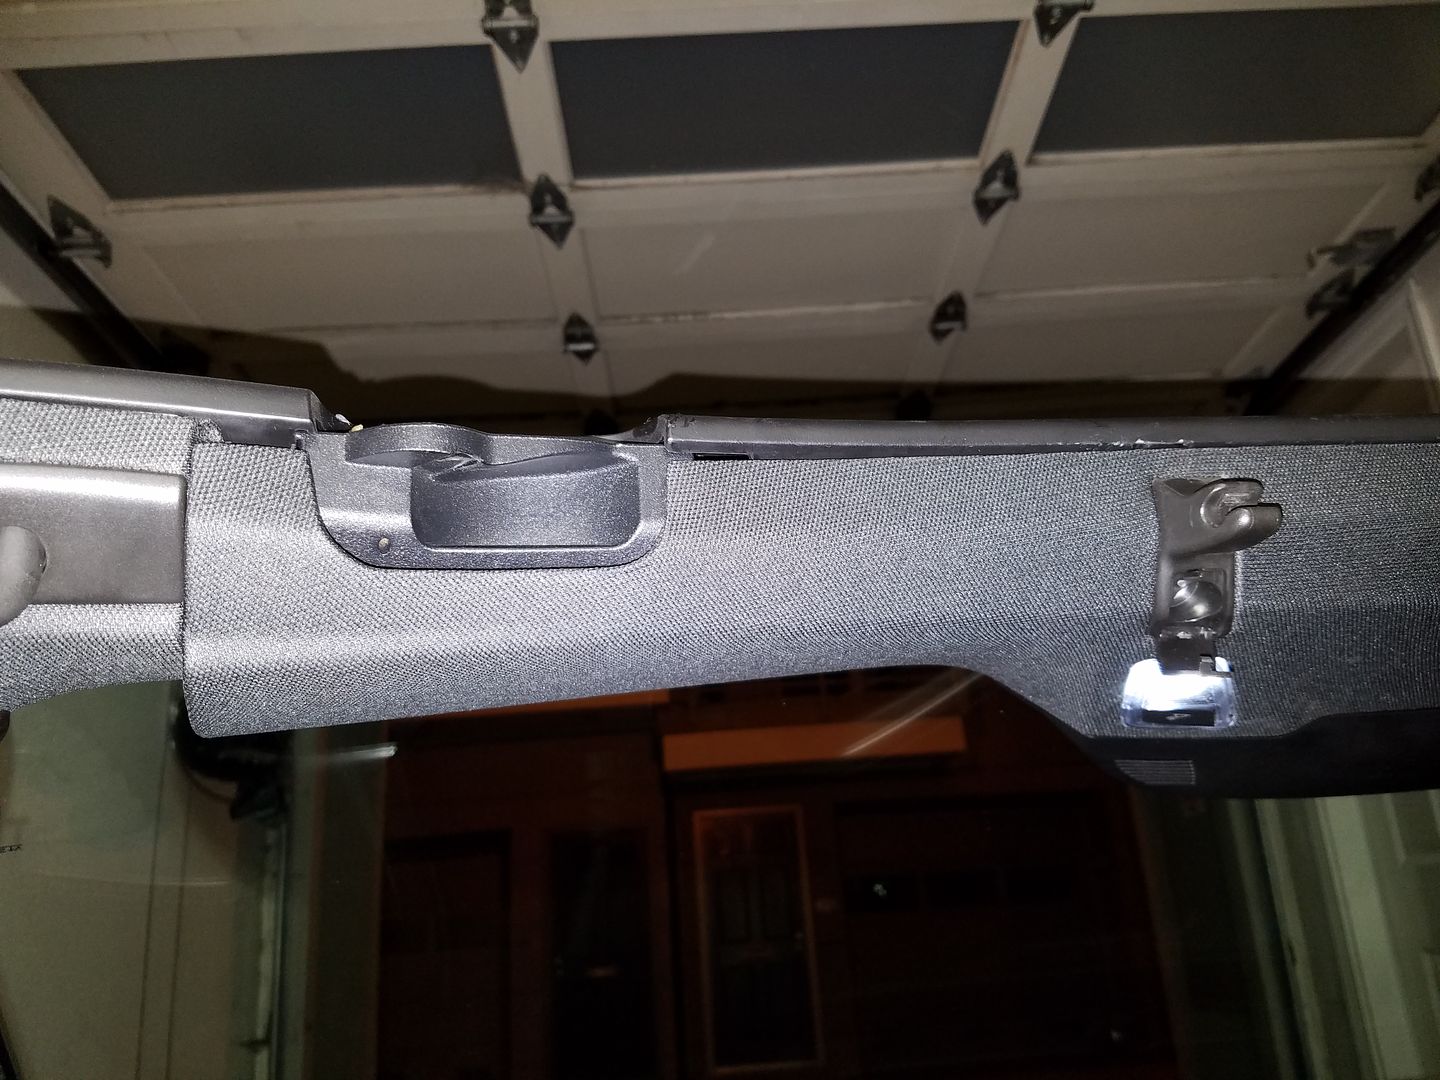
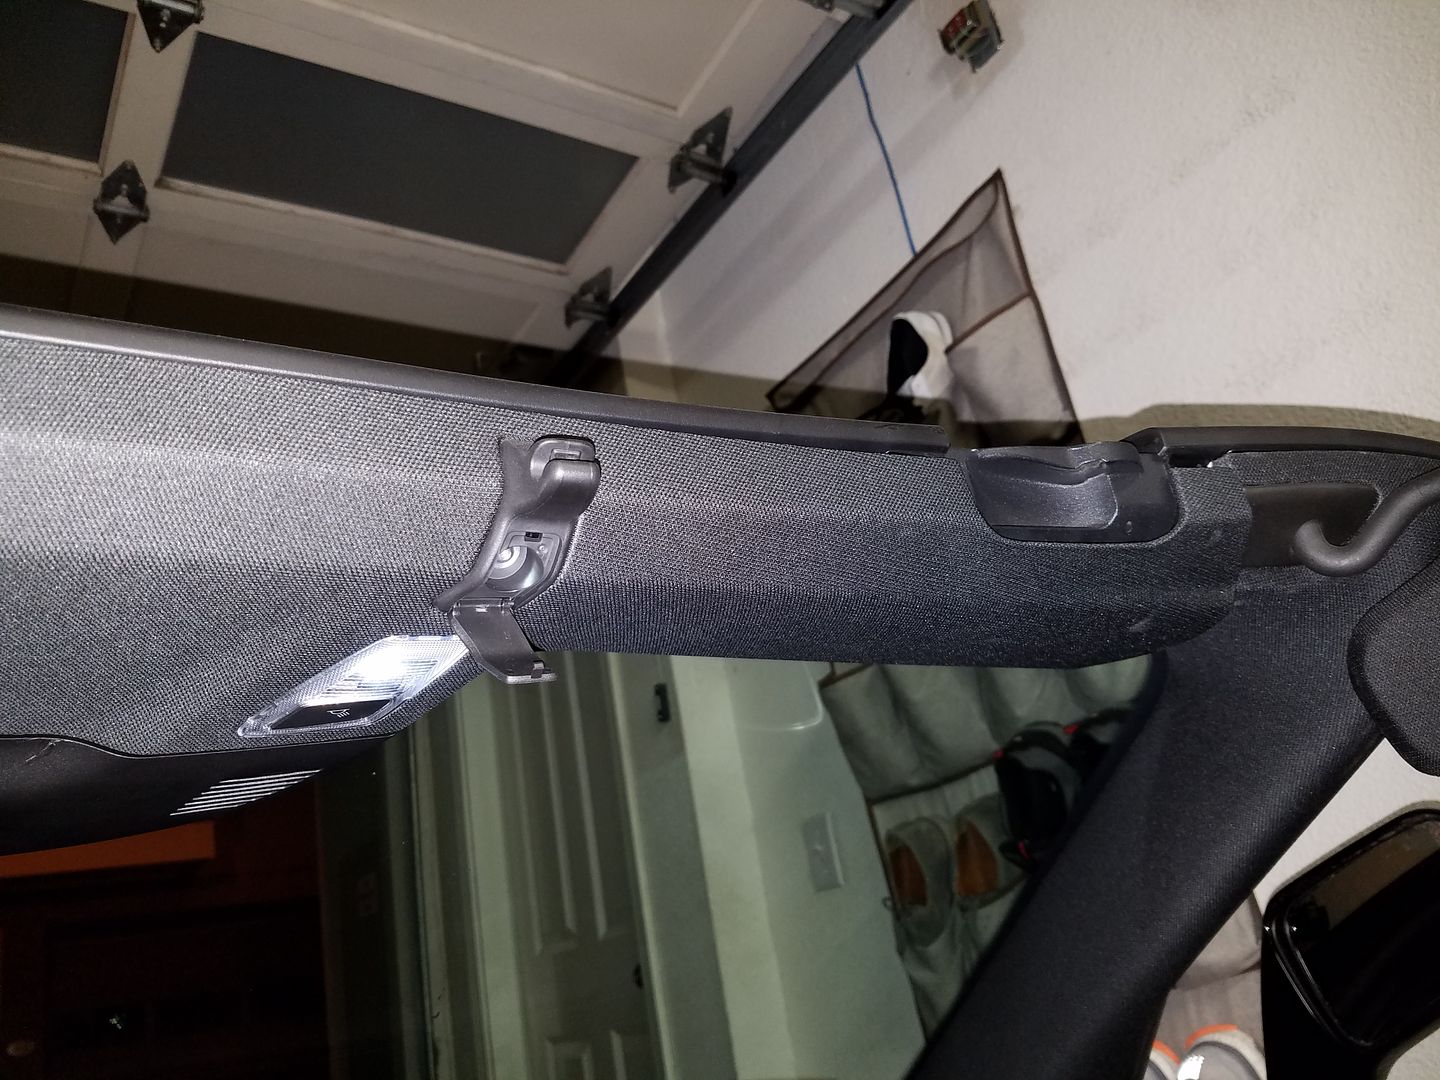
Second, start removing the center trim piece as it it holds the a-pillar ends. Move the sunvisors to the side by dislodging them from the inner mount. Pull down on the sides of the center trim to remove the clips. As you do so a panel pops out on the inner sunvisor mounts revealing a torx screw. Remove the screw. Pull down on the center trim piece to remove. Leave it hanging by the wires enough to get the a-pillars out.
Third, remove the sunvisor. Pull down on the beauty cover to reveal the three torx screws. Remove the screws.
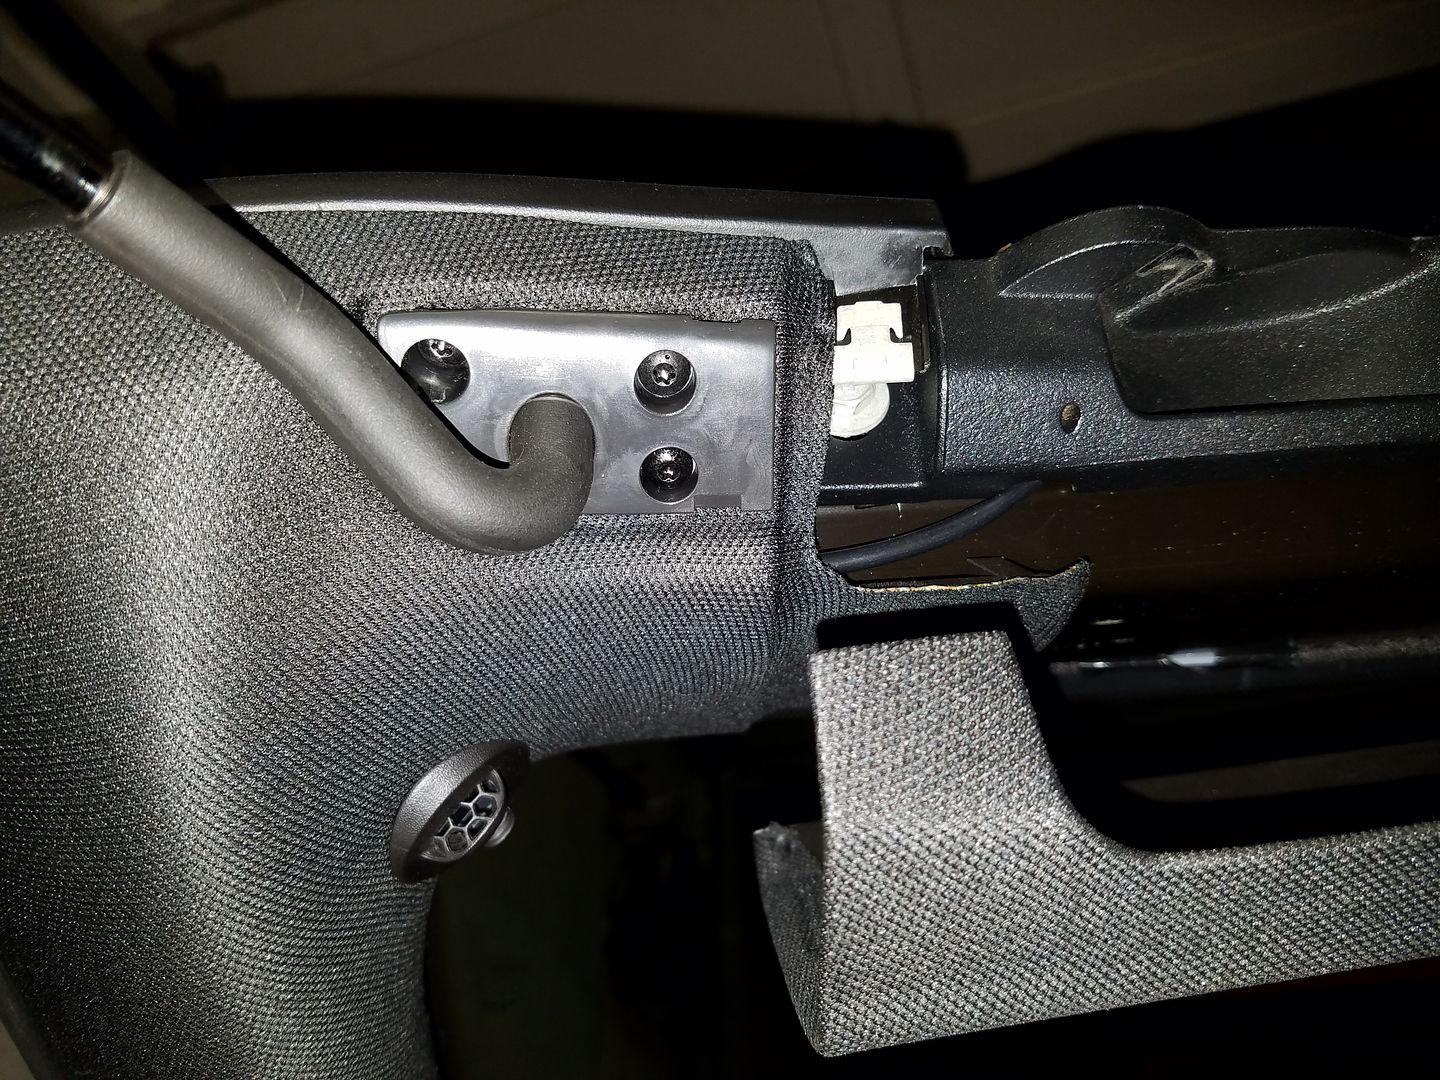
Fourth, unhook cables behind a-pillar and pull to release the a-pillar from the clips. That's it.
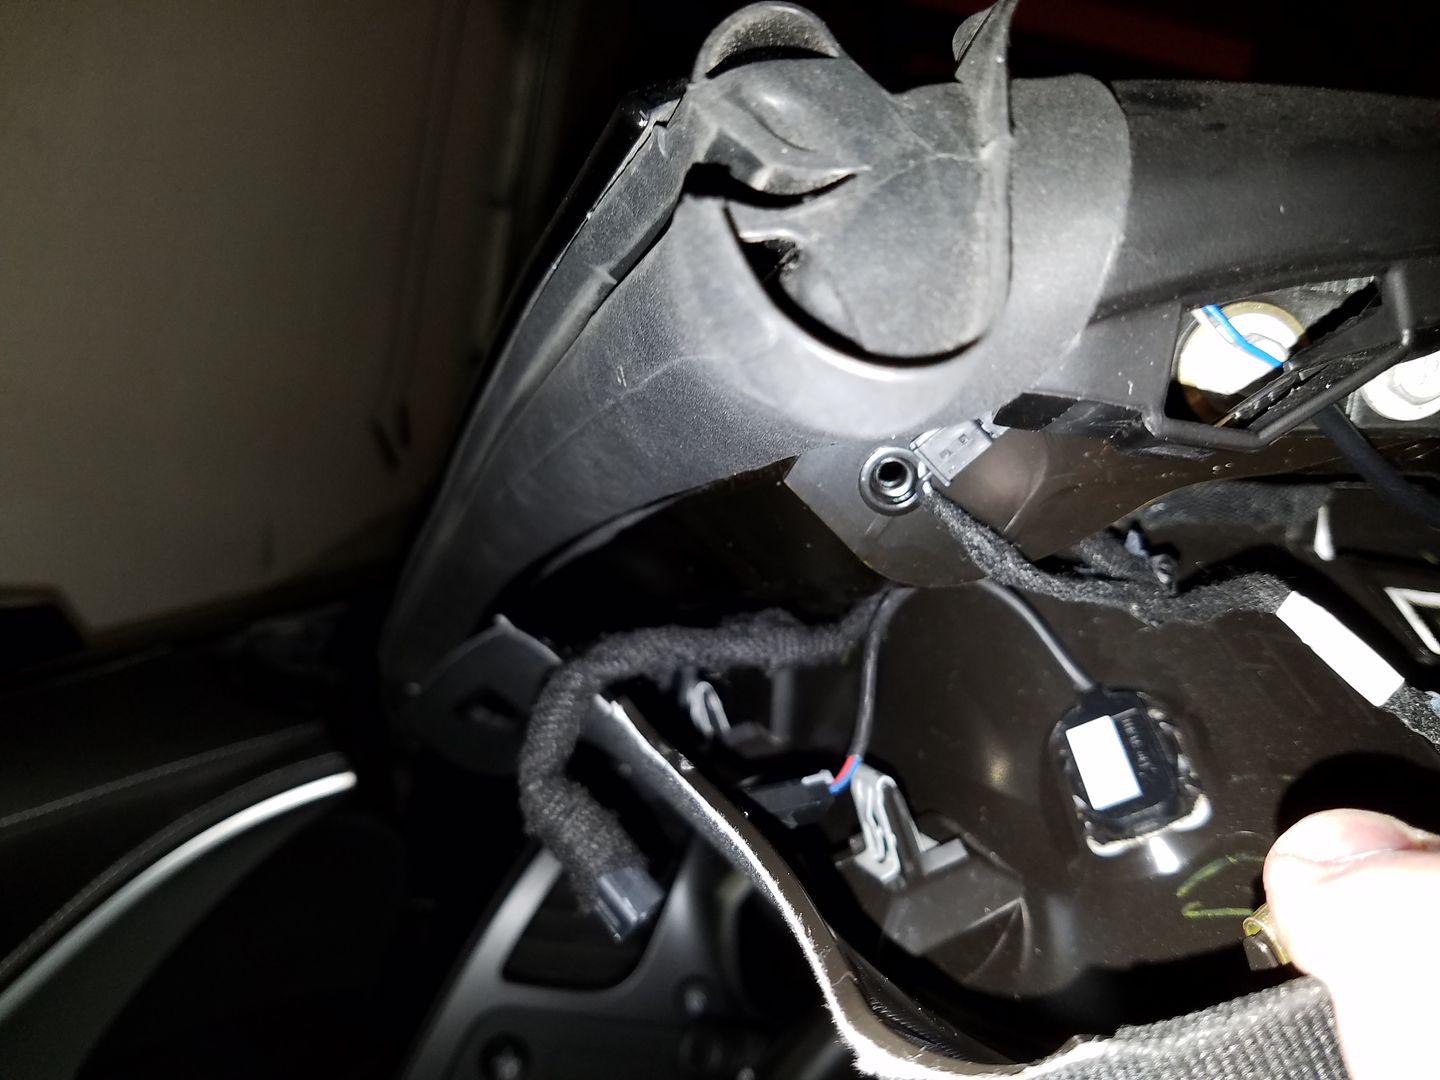
So what is there to know about the a-pillars for audio. The plastic is thick and robust. It shouldn't deform if mounting tweeters directly to it. It is held by the sunvisor's torx scrws up top so it can hold heavy loads. None of the clips mount on the big face so it can be drilled and trimmed at will. One thing left to do, find out how much room there is behind it. The frame itself looks like a heavy steel bar with a channel inside to route cables. I took the a-pillar out and drilled it to measure the depth.
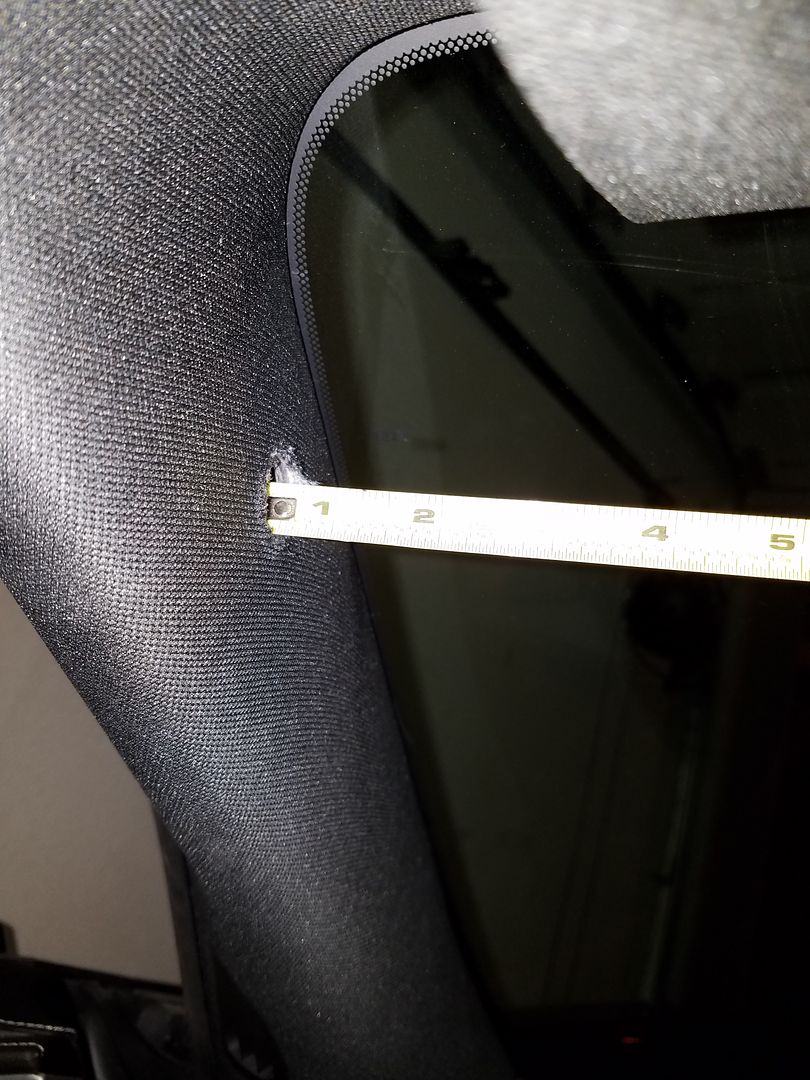
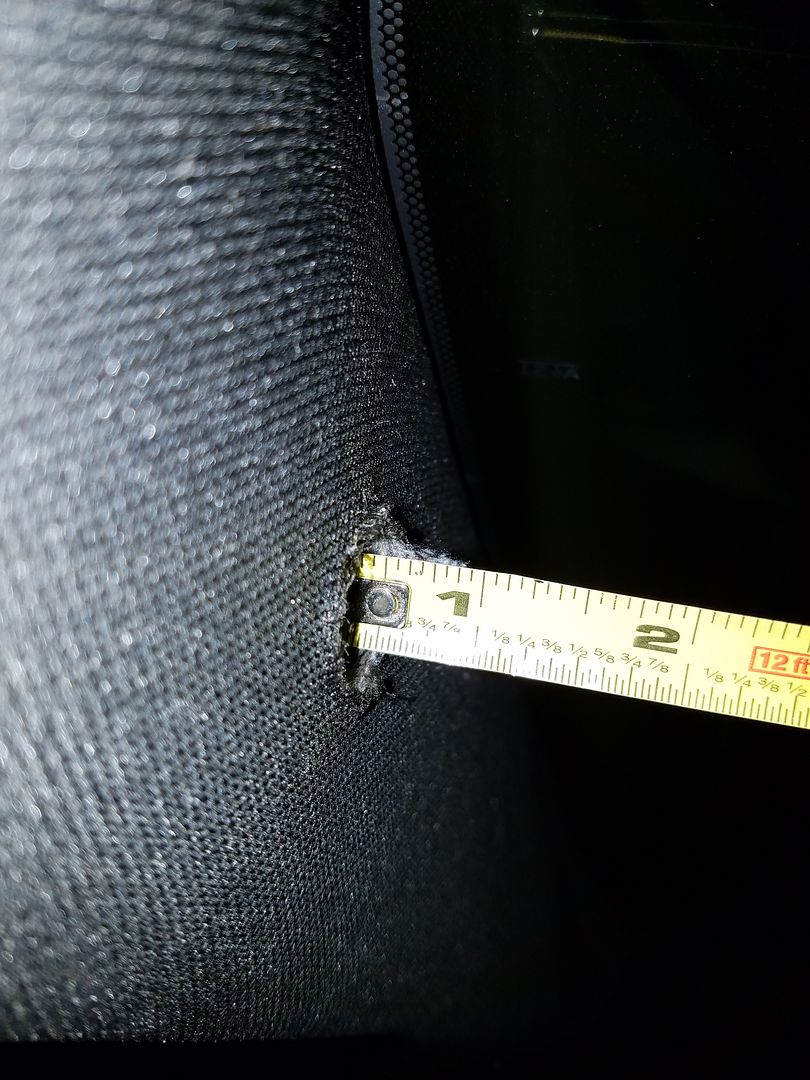
Half inch of depth.
I find that there is at most 0.5 inches of depth available by gutting the a-pillar. That is unfortunate. I was hoping for an inch of depth to mount the tweeters directly to the a-pillar panel. Instead, I will have to make half inch spacers to fit them. That translates to a bit of viewing area loss as well. The good news is the a-pillar is very robust, made out of thick plastic and held down by screws and clips. None of the clips have to be broken to fit the tweeters. The tweeter is an air motion transformer line array, more on that later.
First, I had to remove the rear view mirror. Twist the base with Thor like strength.
Second, start removing the center trim piece as it it holds the a-pillar ends. Move the sunvisors to the side by dislodging them from the inner mount. Pull down on the sides of the center trim to remove the clips. As you do so a panel pops out on the inner sunvisor mounts revealing a torx screw. Remove the screw. Pull down on the center trim piece to remove. Leave it hanging by the wires enough to get the a-pillars out.
Third, remove the sunvisor. Pull down on the beauty cover to reveal the three torx screws. Remove the screws.
Fourth, unhook cables behind a-pillar and pull to release the a-pillar from the clips. That's it.
So what is there to know about the a-pillars for audio. The plastic is thick and robust. It shouldn't deform if mounting tweeters directly to it. It is held by the sunvisor's torx scrws up top so it can hold heavy loads. None of the clips mount on the big face so it can be drilled and trimmed at will. One thing left to do, find out how much room there is behind it. The frame itself looks like a heavy steel bar with a channel inside to route cables. I took the a-pillar out and drilled it to measure the depth.
Half inch of depth.
03-17-2016, 04:20 PM
#24
Safety Car
Thread Starter
UPDATE
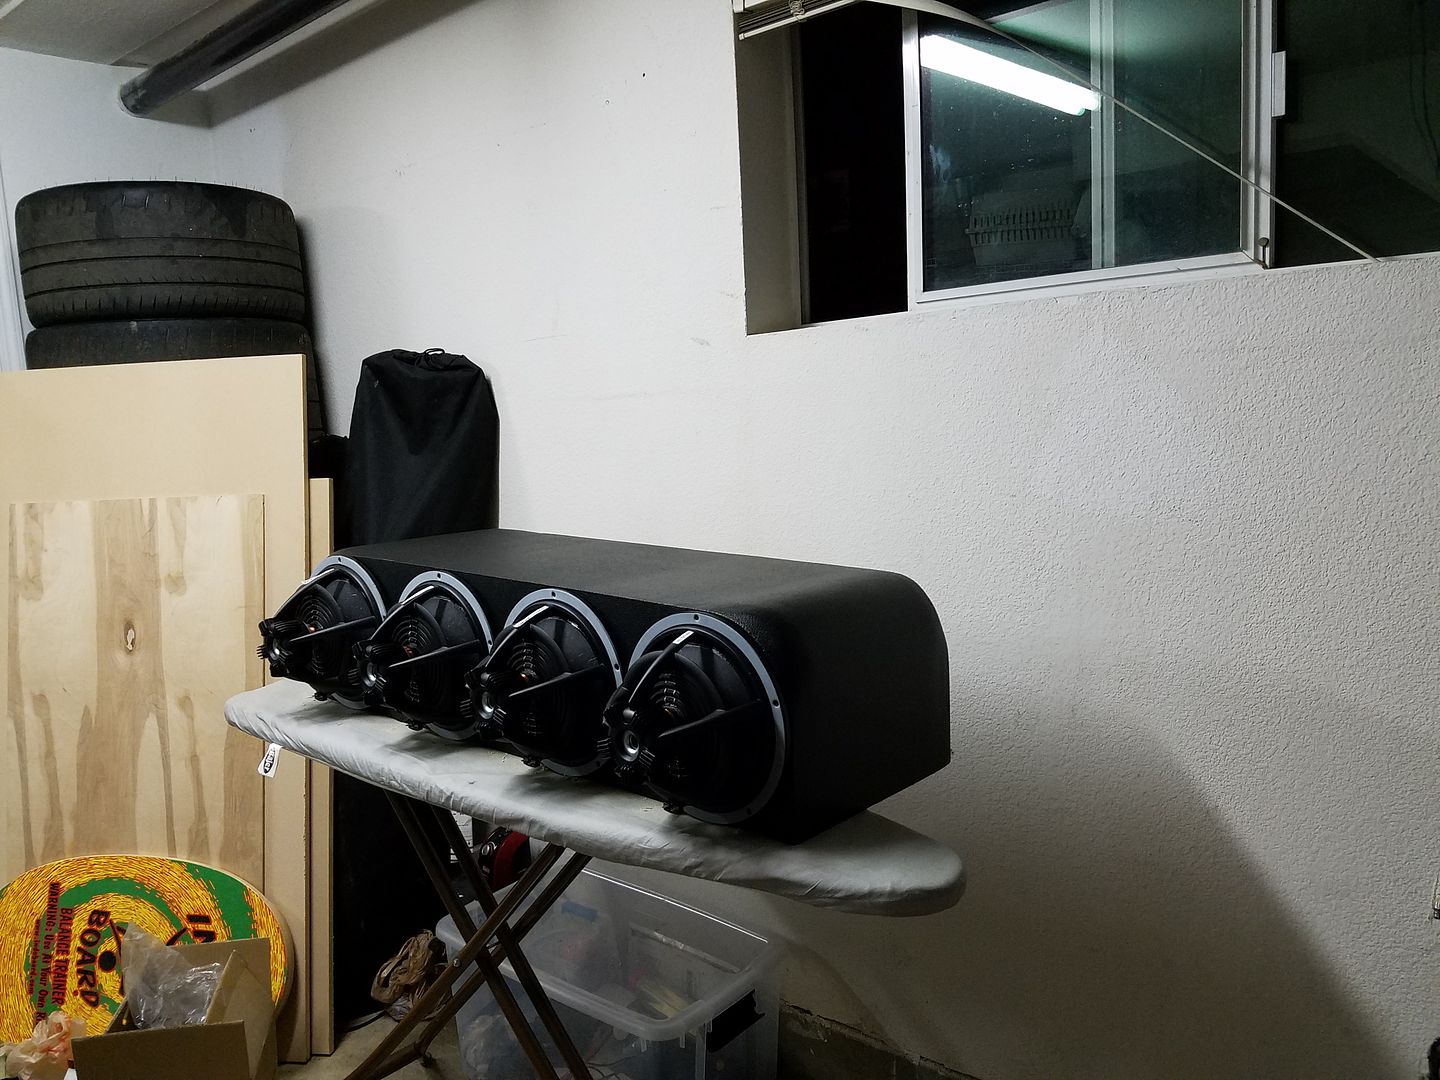
The subwoofer of choice is the Vifa NE265W-08HS. Let's break that down. Vifa is one of the world's largest producer of speakers, a lot of it being OEM product in TVs, sound bars, etc. Vifa as well as many other traditional Danish companies are now part of Tymphany. It seems like they have Danish and Chinese design and like almost everyone they build in China.
The NE woofers are ideal for this application. Weighing only 5 lbs the woofer is one of the lightest on the market. Eight of them still weigh only 40lbs so that I can lift the subwoofer box easily over the rear spoiler once a month at the track and not break my back. How did they do it? Aluminum frame, neodymium magnets, and titanium coil. That is the winning combination for low weight, cooling, and high fidelity sound. To top it off they implemented copper in the motor for Faraday shielding to keep inductance low and specified an ideal suspension made out of well damped composite and low resonance soft rubber for great transient response. The spider is large, light, looks fairly permeable and has fine etched voicecoil leads symmetrically along its diameter. The woofer is high fidelity enough to be used as a midrange, thanks in part to the asymetrical terminations of the cone and surround mating. See if you can spot them! Here are the specs.
Transducer Detail | Tymphany
BONUS ROUND WITH ENGINEERS:
As meany of you know XMech, or the total mechanical limit of the speaker is a specification that is unusually hard to get and doesn't appear on white sheets. For that I had to contact Tympany. Here is what I got. The Xmech is 16.84mm in both directions, limited by the suspension surround.
So where does that put the Vifa NE? Well it is a Scan Speak Revelator 10" competitor and well matched, and that is as far as I can tell the best in the business. Xmax is higher at 9.4 vs. 9mm. Xmech is higher at 16.84 vs. 14mm. It has a neo magnet instead of ferrite. But is that xmax true? As far as I can tell it is underrated, or if you wish rated at 10% distortion not 20% like most subwoofers. At 20% distortion is about 12mm. I know this because it's the same motor as the 12" and I've seen a Klippel of it. Ok so it's as good or better SQ wise as the Revelator, it is(2.5lbs or 50%) lighter, and it has almost 3mm more throw in both directions. That's why I didn't buy the Scan Speak.
The neo motor is a godsend for use in a small sealed box. Because of the high BL the woofers has very good extension in a tight box. The motor is strong enough to offset the box's inherent air spring. It also results in low inductance. Other bits that make it work great in a small box are the soft suspension parts enabling it to reach a resonant frequency of 23hz and a low Q of just .3! I modeled them in WinISD for years against competitors, only a few woofers work better in a small box and all of them have large double or tripple stacked ferrite magnets. When you account for the displacement of their magnets, the Vifa beats them too!
Ok, enough theory.
BUILD
I used some wide speaker gasketing from PE although the speakers seem to have built in gasketing on both sides. Better safe than sorry, air leaks can be terrible.
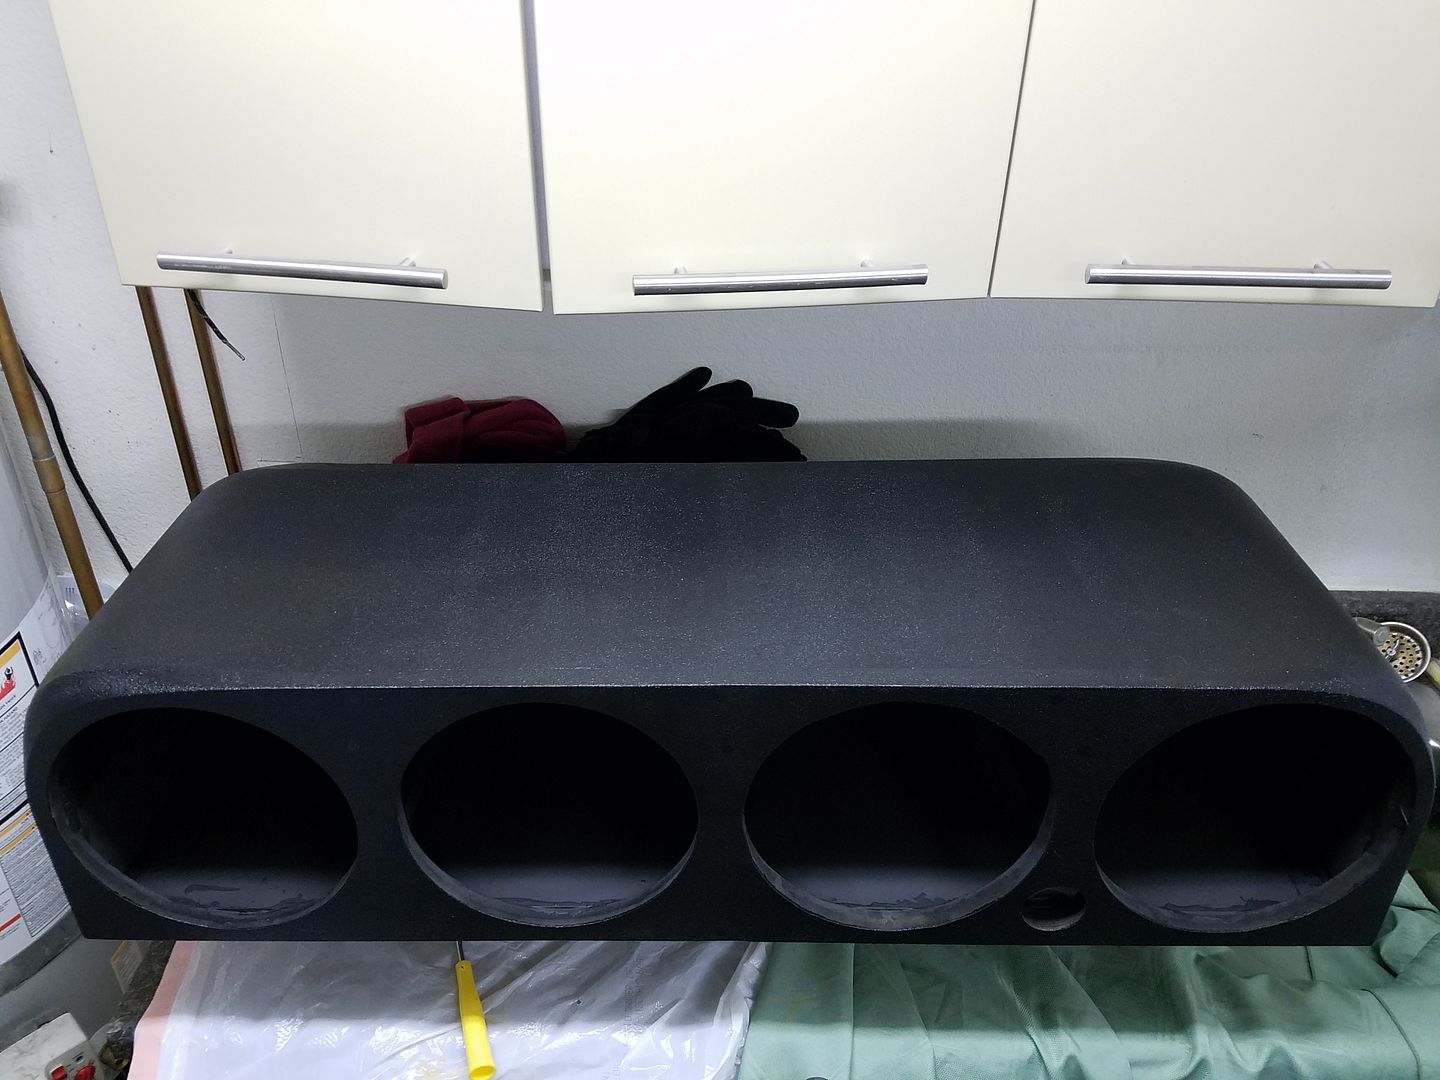
This is the start of the assembly process. I put 3 layers of Duratex on the box. The directions state one coat for indoors, two for outdoors. I think you need at least two coats to get the finish right no matter what. The 3rd one was added insurance.
Found a good way to bolt the drivers face in by dropping my phone in there with the flashlight on to see any misalignment as light seeping by.
Checked the clearance between the grille and the surround: .6", more than enough.
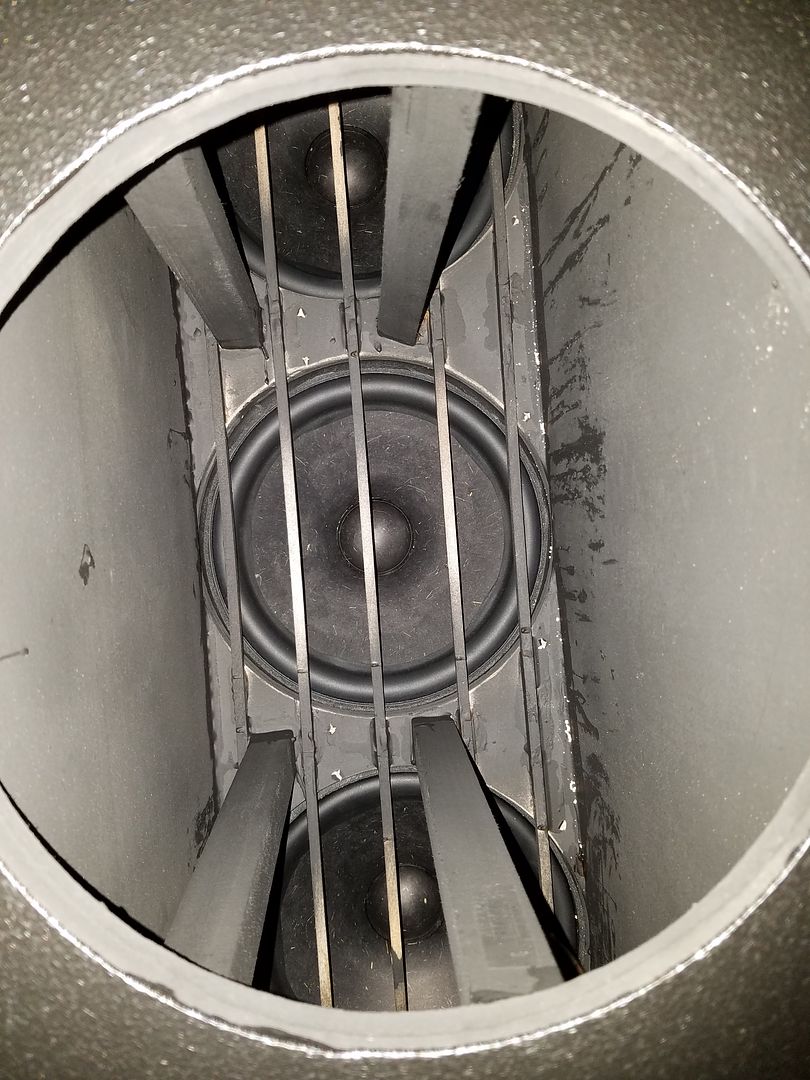
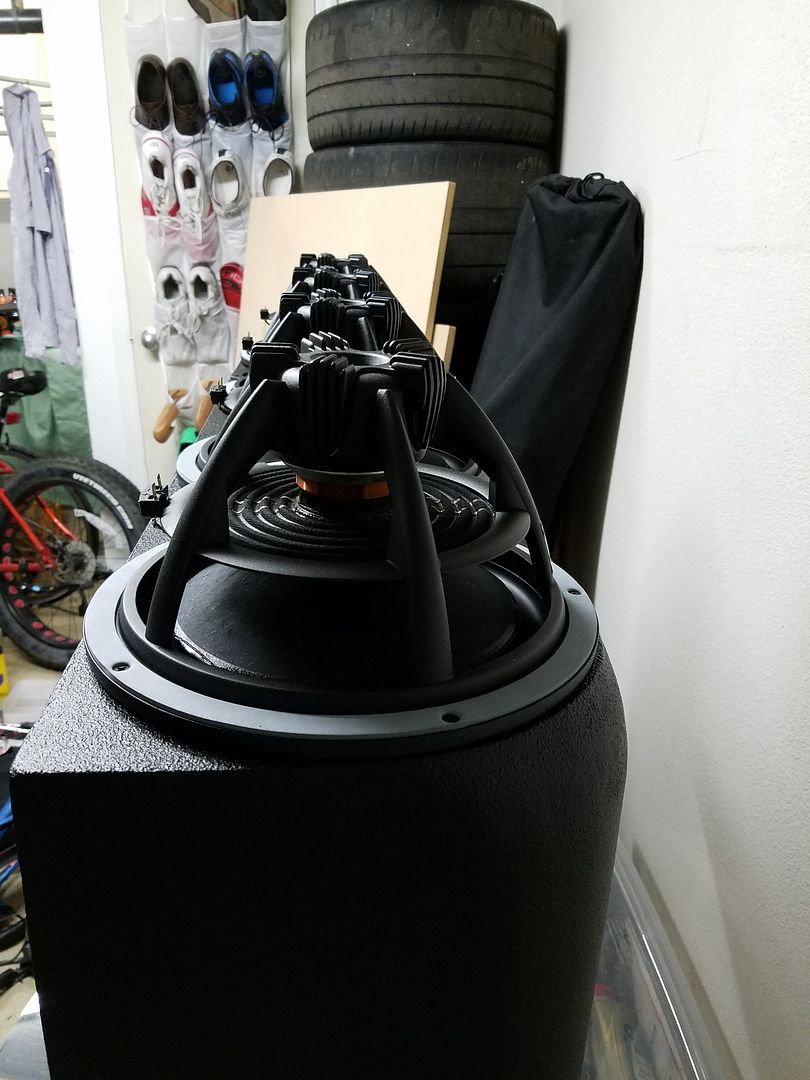
Notice the spokes are near the screws, smart design to keep the basket from bending without increasing its weight.
Notice the heatsink on the motor. I special ordered the subs to come with the heatsink option. I wouldn't use it in infinite baffle but with a small sealed enclosure I need all the cooling I can get on those neo magnets.
Next I fired up Woofer Tester 2 to check coil resistance, QTS, and FS for every driver.

With flash:

Without flash:

The subwoofer of choice is the Vifa NE265W-08HS. Let's break that down. Vifa is one of the world's largest producer of speakers, a lot of it being OEM product in TVs, sound bars, etc. Vifa as well as many other traditional Danish companies are now part of Tymphany. It seems like they have Danish and Chinese design and like almost everyone they build in China.
The NE woofers are ideal for this application. Weighing only 5 lbs the woofer is one of the lightest on the market. Eight of them still weigh only 40lbs so that I can lift the subwoofer box easily over the rear spoiler once a month at the track and not break my back. How did they do it? Aluminum frame, neodymium magnets, and titanium coil. That is the winning combination for low weight, cooling, and high fidelity sound. To top it off they implemented copper in the motor for Faraday shielding to keep inductance low and specified an ideal suspension made out of well damped composite and low resonance soft rubber for great transient response. The spider is large, light, looks fairly permeable and has fine etched voicecoil leads symmetrically along its diameter. The woofer is high fidelity enough to be used as a midrange, thanks in part to the asymetrical terminations of the cone and surround mating. See if you can spot them! Here are the specs.
Transducer Detail | Tymphany
BONUS ROUND WITH ENGINEERS:
As meany of you know XMech, or the total mechanical limit of the speaker is a specification that is unusually hard to get and doesn't appear on white sheets. For that I had to contact Tympany. Here is what I got. The Xmech is 16.84mm in both directions, limited by the suspension surround.
So where does that put the Vifa NE? Well it is a Scan Speak Revelator 10" competitor and well matched, and that is as far as I can tell the best in the business. Xmax is higher at 9.4 vs. 9mm. Xmech is higher at 16.84 vs. 14mm. It has a neo magnet instead of ferrite. But is that xmax true? As far as I can tell it is underrated, or if you wish rated at 10% distortion not 20% like most subwoofers. At 20% distortion is about 12mm. I know this because it's the same motor as the 12" and I've seen a Klippel of it. Ok so it's as good or better SQ wise as the Revelator, it is(2.5lbs or 50%) lighter, and it has almost 3mm more throw in both directions. That's why I didn't buy the Scan Speak.
The neo motor is a godsend for use in a small sealed box. Because of the high BL the woofers has very good extension in a tight box. The motor is strong enough to offset the box's inherent air spring. It also results in low inductance. Other bits that make it work great in a small box are the soft suspension parts enabling it to reach a resonant frequency of 23hz and a low Q of just .3! I modeled them in WinISD for years against competitors, only a few woofers work better in a small box and all of them have large double or tripple stacked ferrite magnets. When you account for the displacement of their magnets, the Vifa beats them too!
Ok, enough theory.
BUILD
I used some wide speaker gasketing from PE although the speakers seem to have built in gasketing on both sides. Better safe than sorry, air leaks can be terrible.
This is the start of the assembly process. I put 3 layers of Duratex on the box. The directions state one coat for indoors, two for outdoors. I think you need at least two coats to get the finish right no matter what. The 3rd one was added insurance.
Found a good way to bolt the drivers face in by dropping my phone in there with the flashlight on to see any misalignment as light seeping by.
Checked the clearance between the grille and the surround: .6", more than enough.
Notice the spokes are near the screws, smart design to keep the basket from bending without increasing its weight.
Notice the heatsink on the motor. I special ordered the subs to come with the heatsink option. I wouldn't use it in infinite baffle but with a small sealed enclosure I need all the cooling I can get on those neo magnets.
Next I fired up Woofer Tester 2 to check coil resistance, QTS, and FS for every driver.
With flash:
Without flash:
 03-17-2016, 04:36 PM
#26
Safety Car
Thread Starter
Not this time around. I limited my time on my previous builds but this time I always stop, breathe, and take it easy when something doesn't go as planned. I think it's hard enough to get all my goals in. Limiting the time would be a ball buster!
So far I'd say:
planning: months
Techshop: ~20 hours
Testing raw drivers: ~5 hours
The rest: ~40 hours
I forecast I'll need some additional:
20 more hours for install
8 hours for tuning on Omnimic past install
So far I'd say:
planning: months
Techshop: ~20 hours
Testing raw drivers: ~5 hours
The rest: ~40 hours
I forecast I'll need some additional:
20 more hours for install
8 hours for tuning on Omnimic past install
03-21-2016, 06:34 PM
#27
Safety Car
Thread Starter
UPDATE - Midbass/midrange install
I picked to install the ProAudio midbass instead of the HiFi midbass the first time around. The custom order 4 ohm B&C 10NW64 is then the chosen midbass. Quick run of the benefits of the driver:
PROs:
*Neodymium magnet and aluminum heatsink result in a low weight of just 6.5 lbs
*waterprof assembly and pro-audio construction to fight the elements in a car door
*Ventilated voice coil gap and large 2.5" copper coil with 300 watts continous rating and 600 watt peak
*high damping surround and suspension assembly means it can withstand abuse in free air
*96 db sensitivity
*4 ohm coil means I can feed it 350 watts continuous
*Copper shorting cap on polepiece and typical high quality B&C construction mean extended HF response and low distortion to cross over at 1 khz
CONs:
*Ventilated voice coil gap is possibly noisy, I may plug it, or deaden the door more
*light cone may not be as well damped as the HiFi verison
*high damping surround and suspension assembly
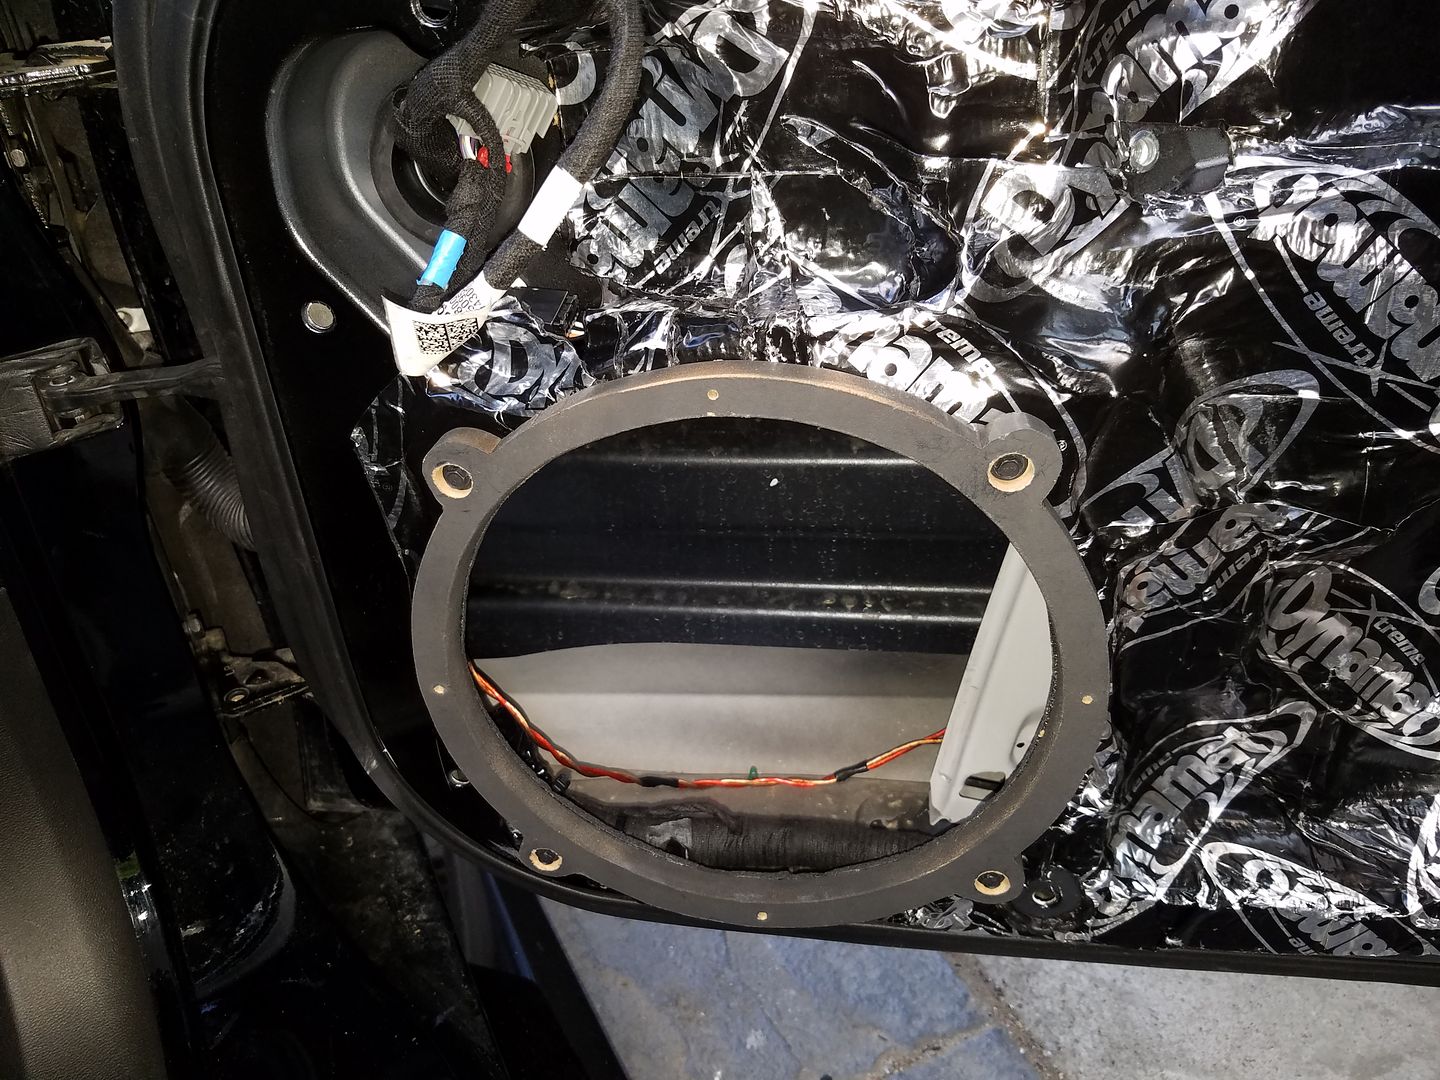
I first built some 1/2" spacers out of MDF using the stock BOSE drivers to ascertain mounting tab locations
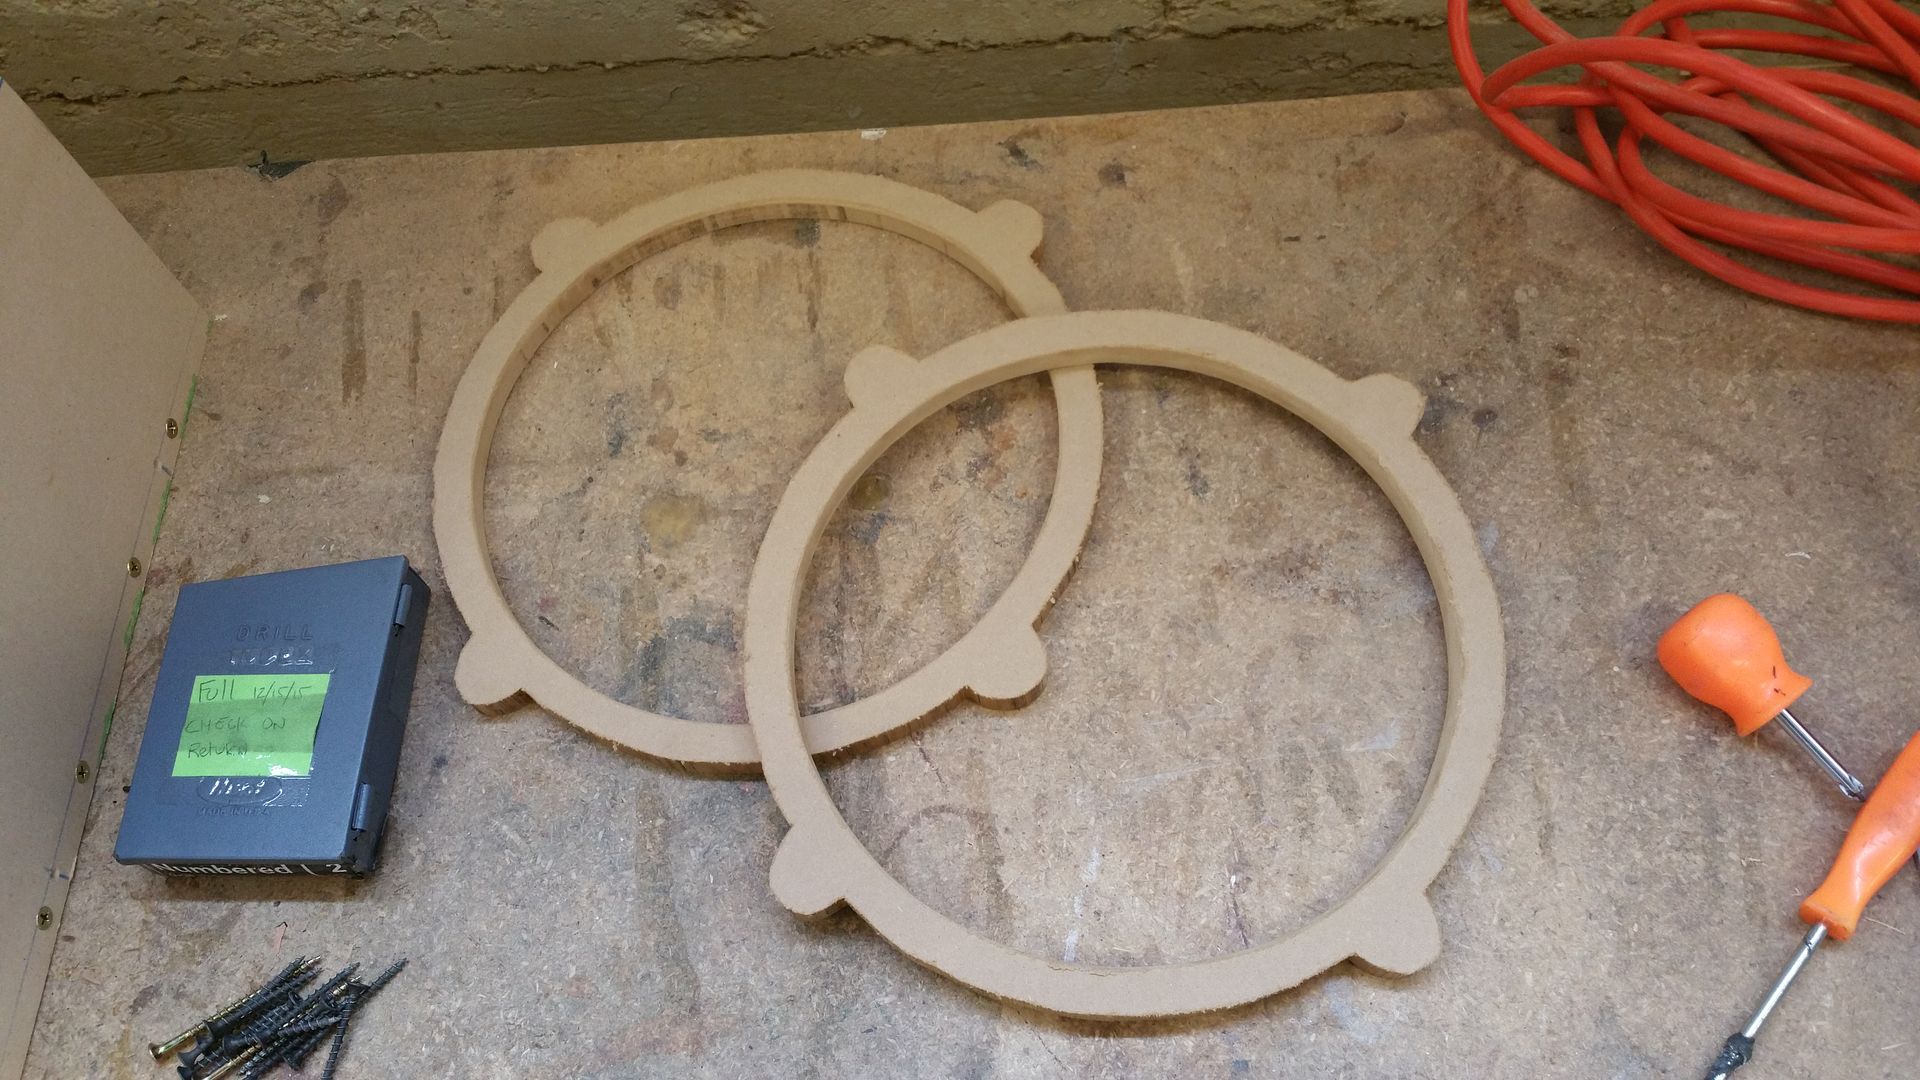
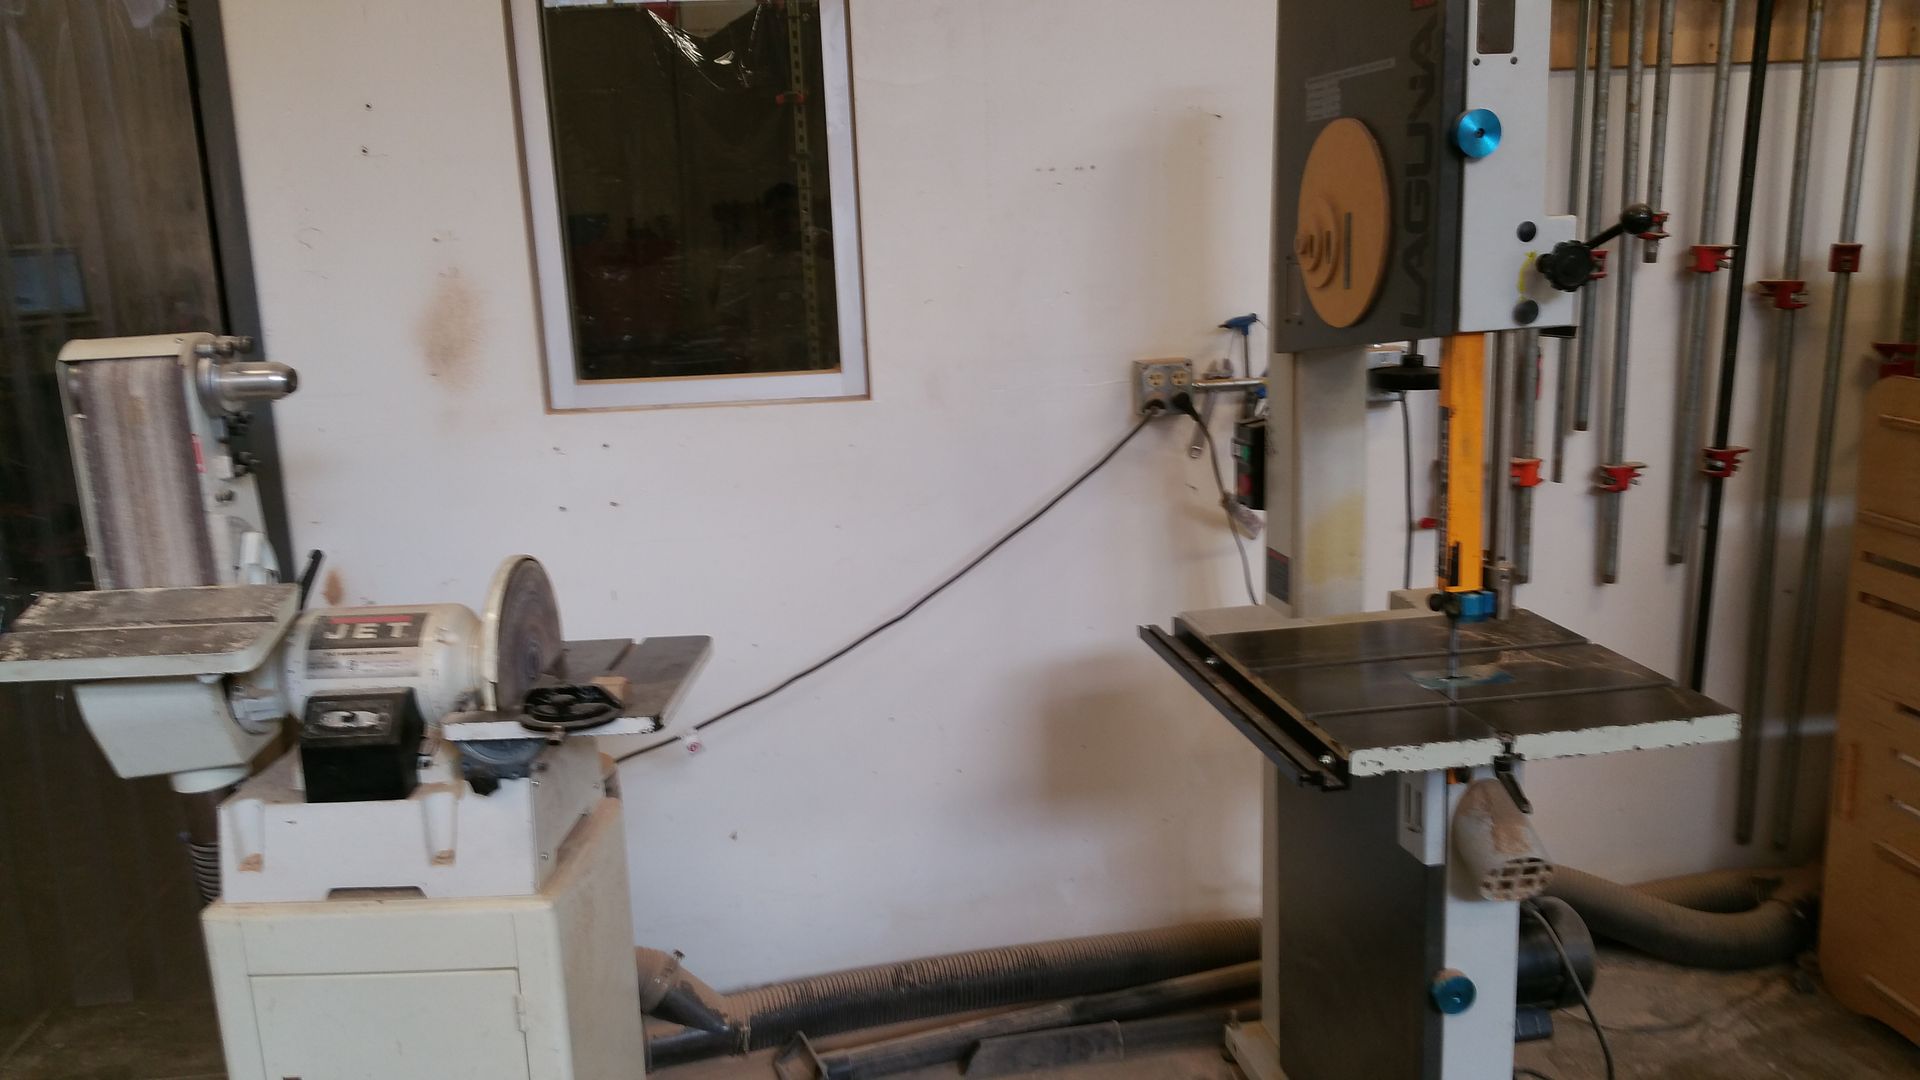
Spacers were sanded.
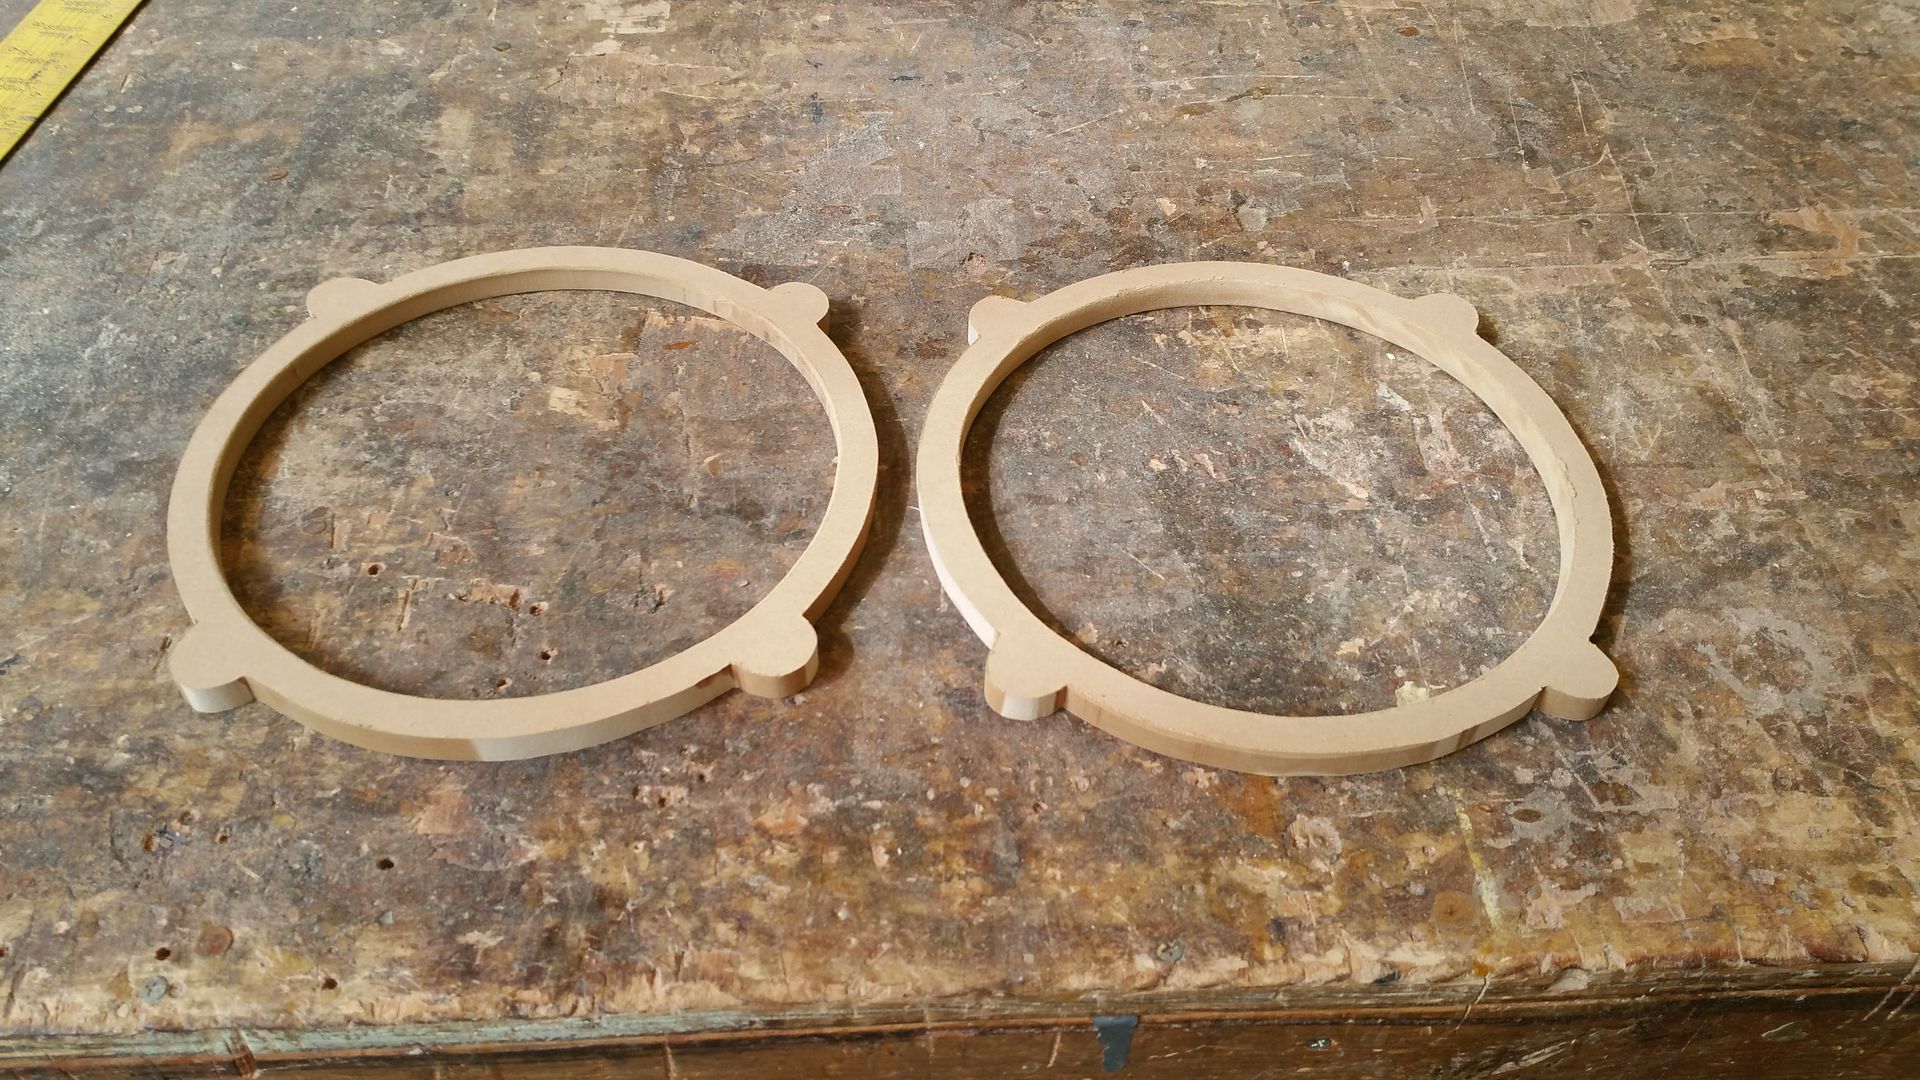
Machine on the left did the sanding, machine on the right did the cutting
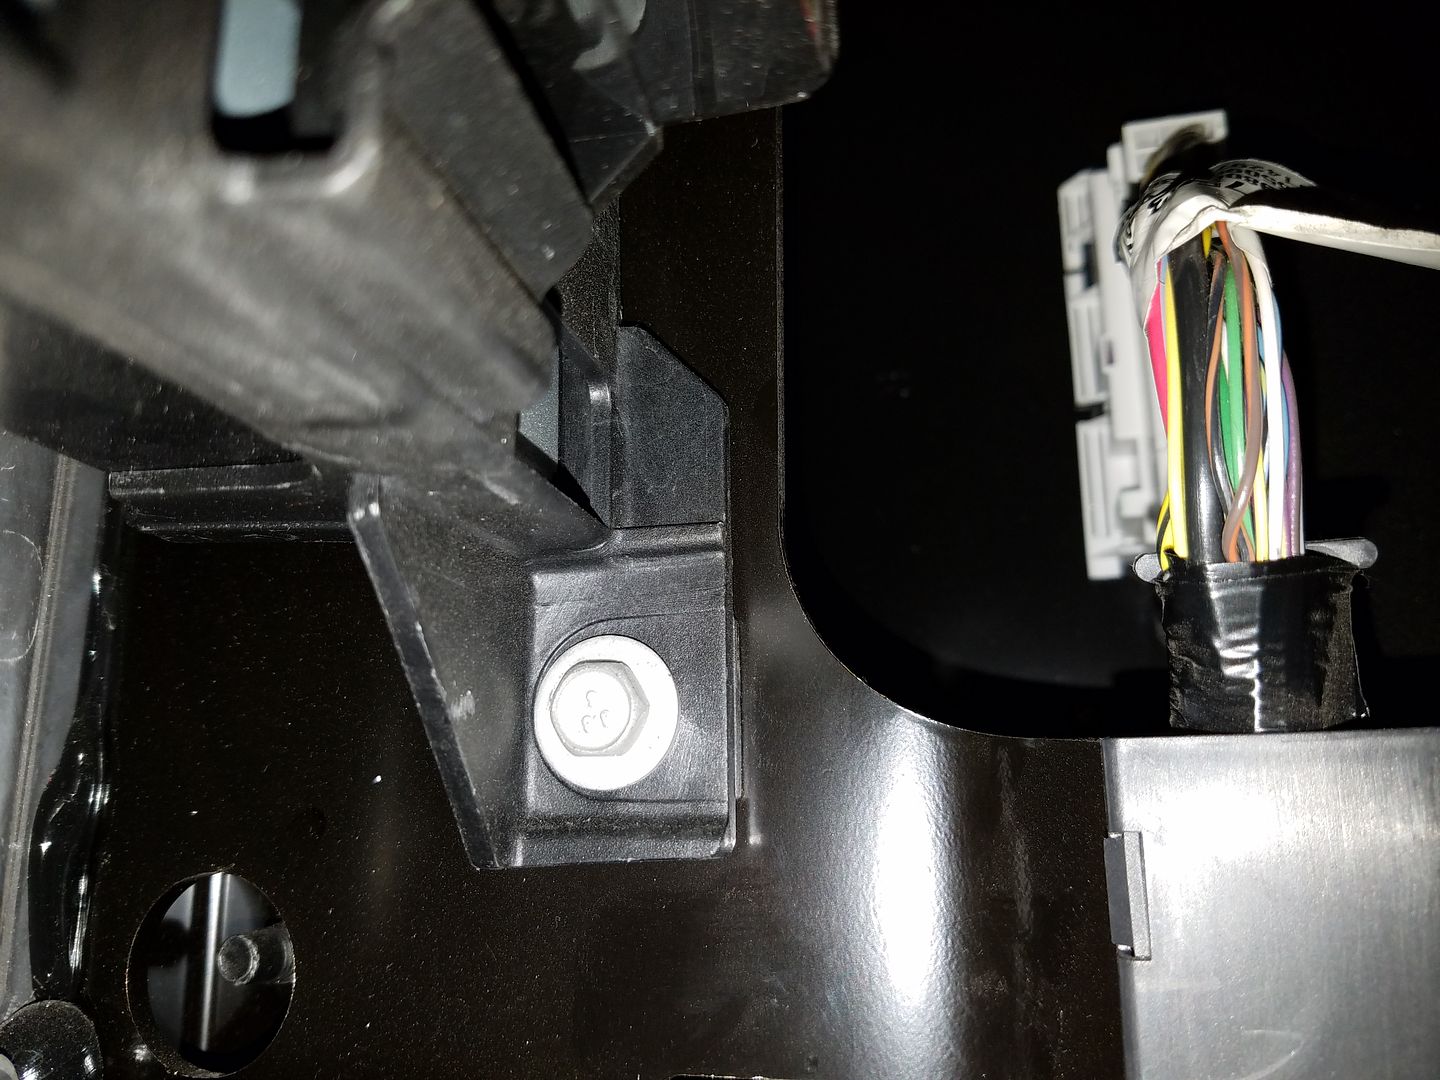
Wires were run around the stock Molex plug. I left the stock wiring alone, sealed it against shorts and zip tied it to the wire loom in the door. The only opening to run wire is below the Molex plug, between the plug and the hose clip. 16 awg thick wire fit easily. 12 awg fit as well, but very tight. I did the math and I can get away with 16 awg for this length cable.
From the inside:
From the outside, notice the new wire ran through the bottom.
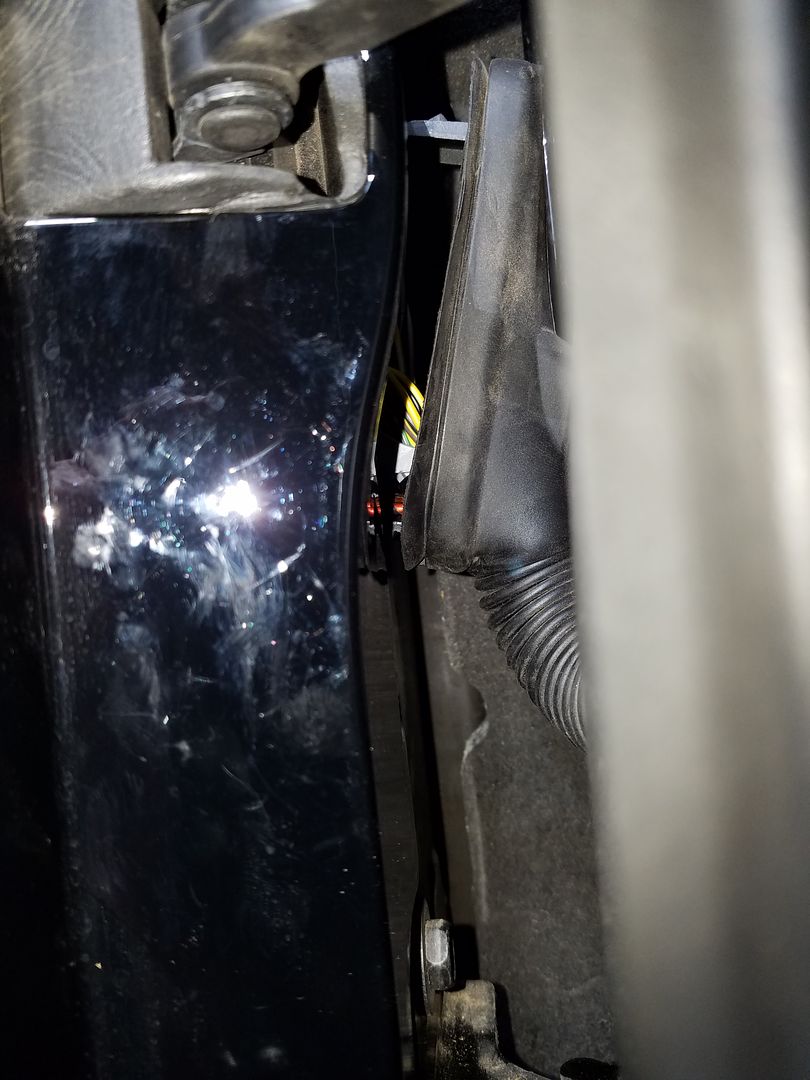
From the door perspective. I forced my finger in the stock wire loom until it came undone to run the wire through. A bit painful but I didn't poke any of the stock wiring.

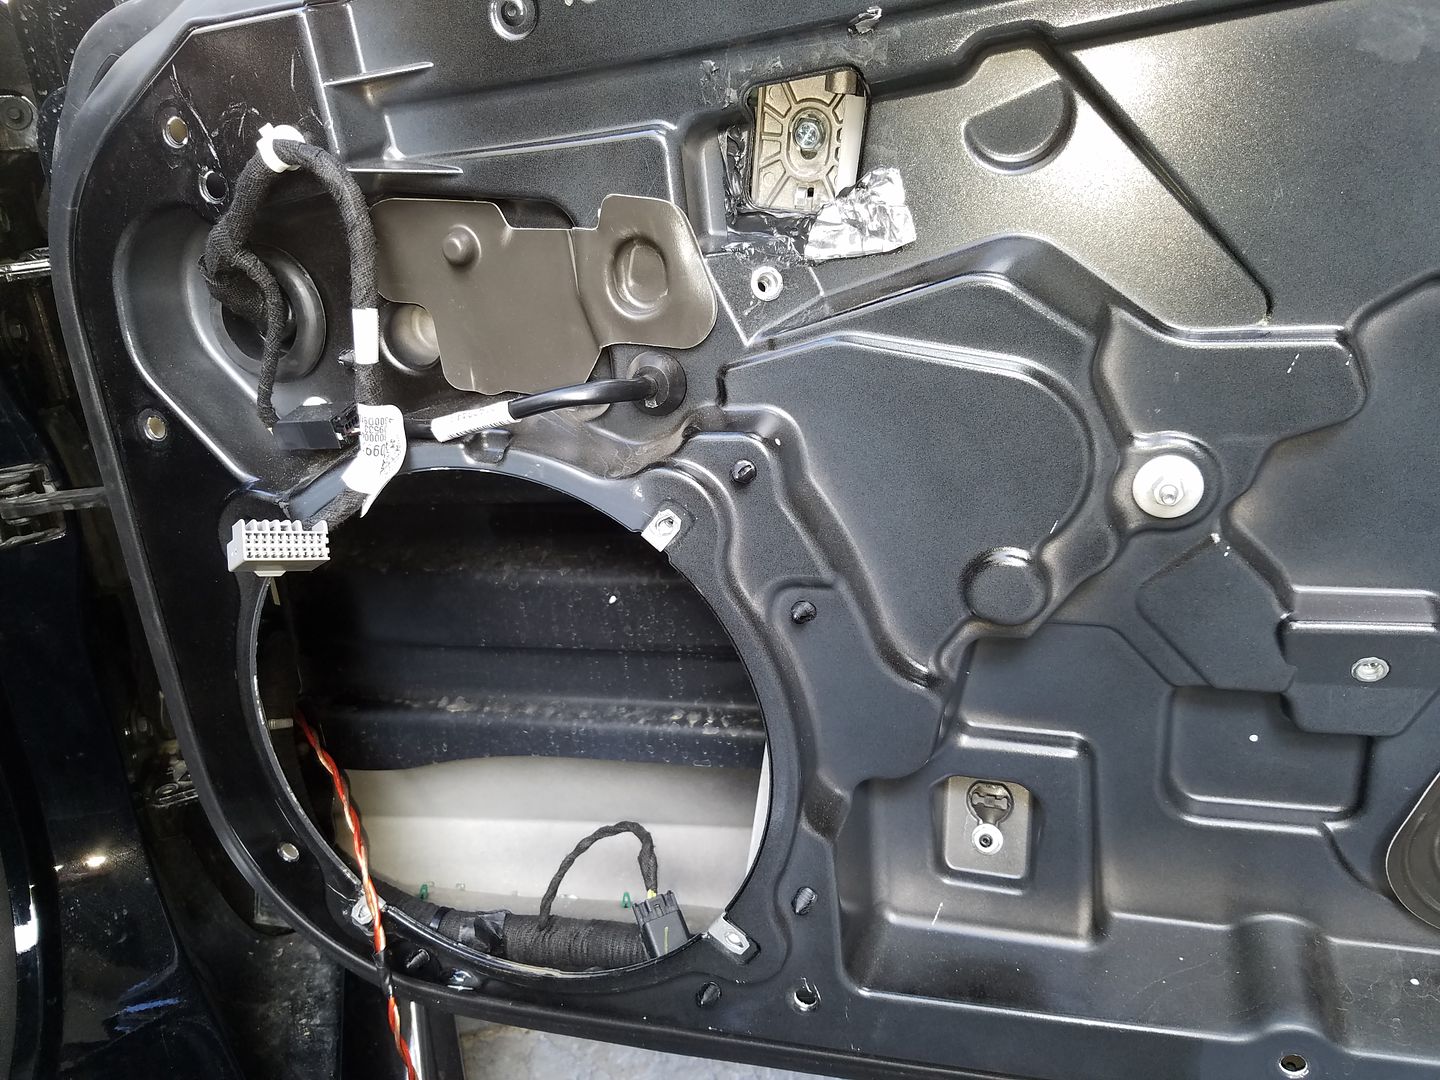
The doors are stupendous. I think the doors alone make the entry cost into a 7th generation Corvette worth it. Large 9" cutout for a 10" driver, composite construction, large, very few mechanisms on board, and sealed from factory.
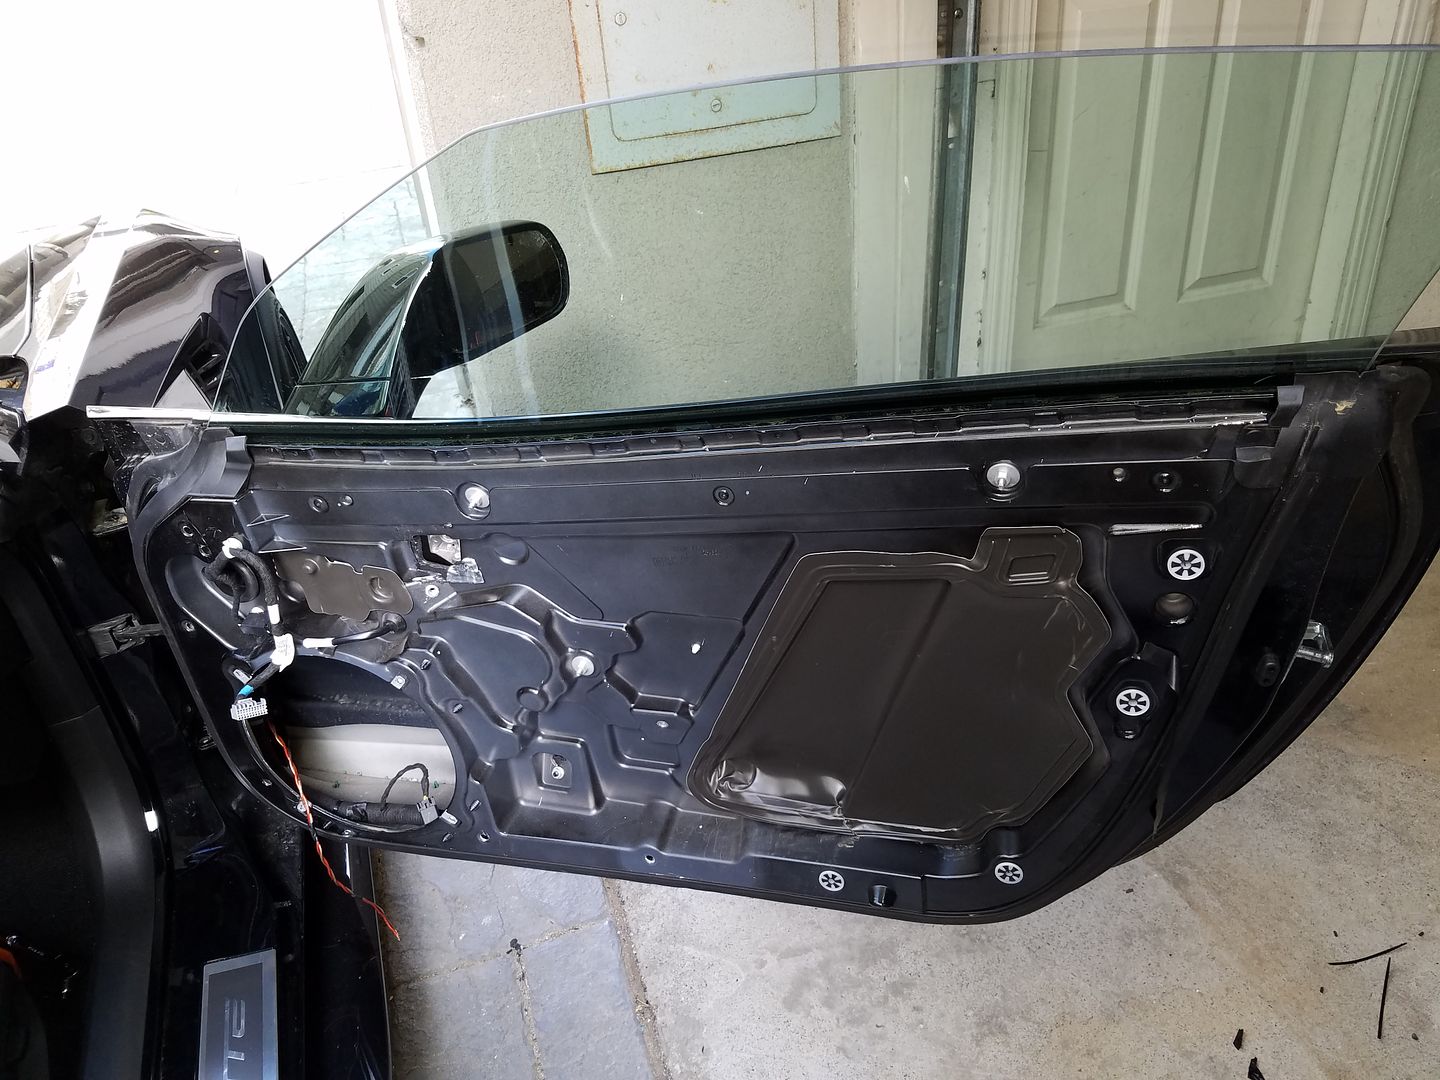
A closer look:
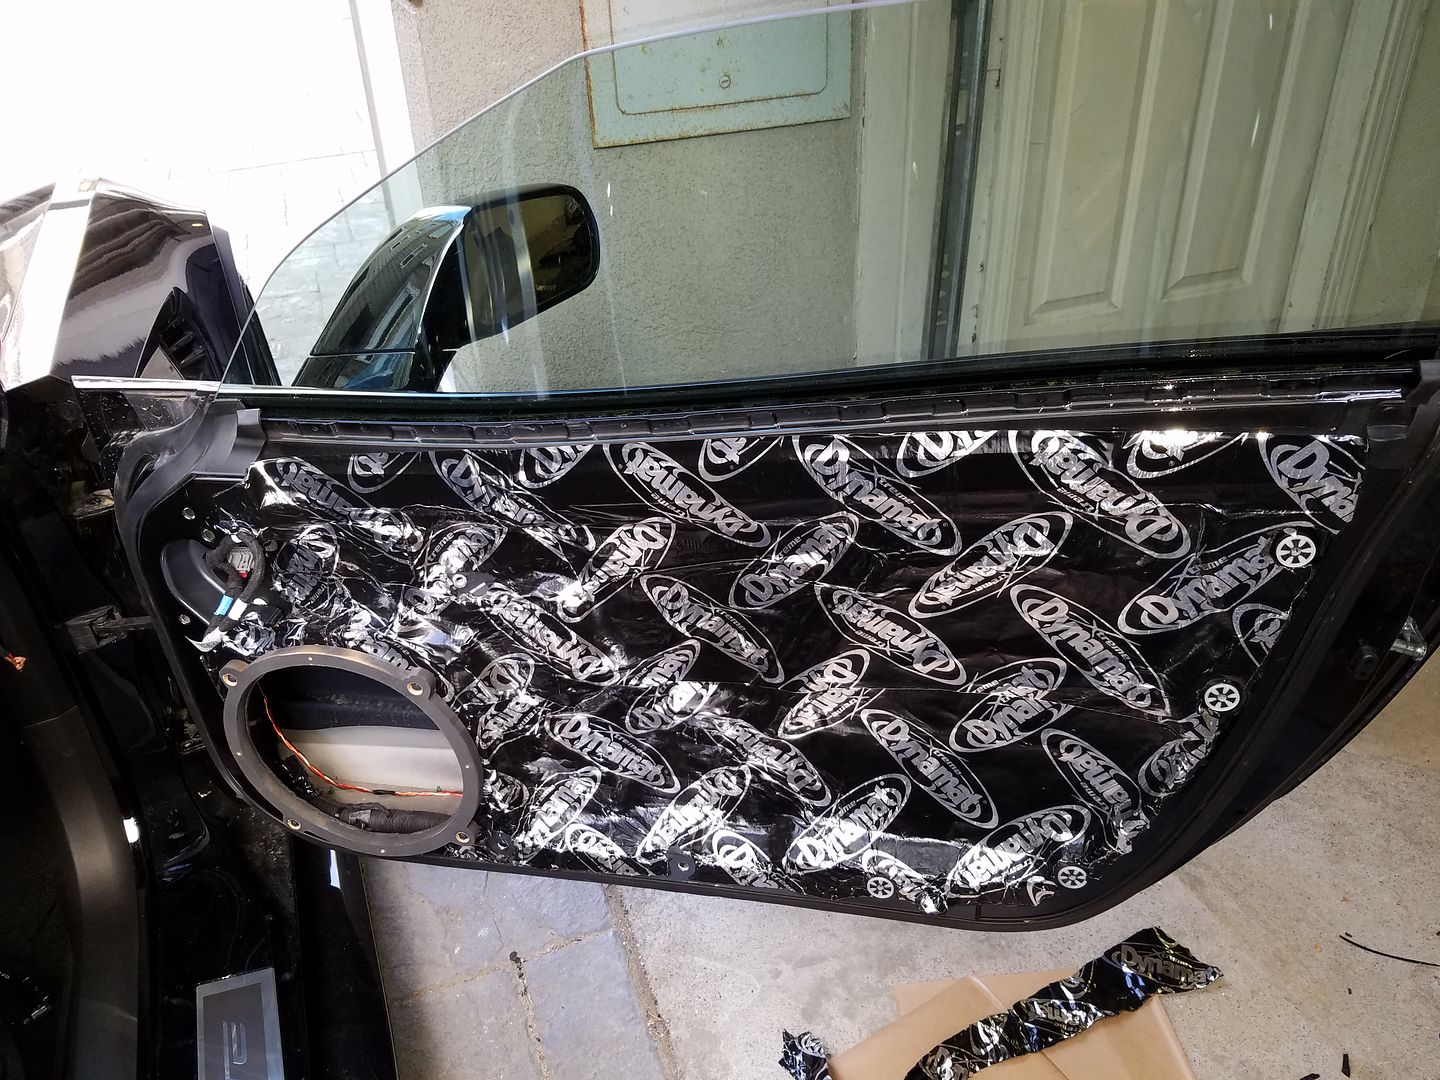
Sound treatment is minimal. I only applied one layer of Dynamat Extreme. The door itself is stout and I don't see much gain from putting on more weight. My technique for applying Dynamat is to use it as one uncorrupted piece. That way the sheet works as a sealant as well as a mass treatment. In addition you'll see I spray painted the spacers to make them more water proof. I used the stock bolts to keep it into place. No cutting of any parts. Using the Dynamat in large chunks makes it easier to remove if the door needs fixing.
A closer look
Passenger side is the same.
The money shot. Door fit over the speaker without trimming. All original clips and screws were reused. All the door functions remain unchanged. I used Parts Express speaker gasketing tape on the speaker and the spacer. The door shuts with more authority and the interior road noise level is noticeably decreased.
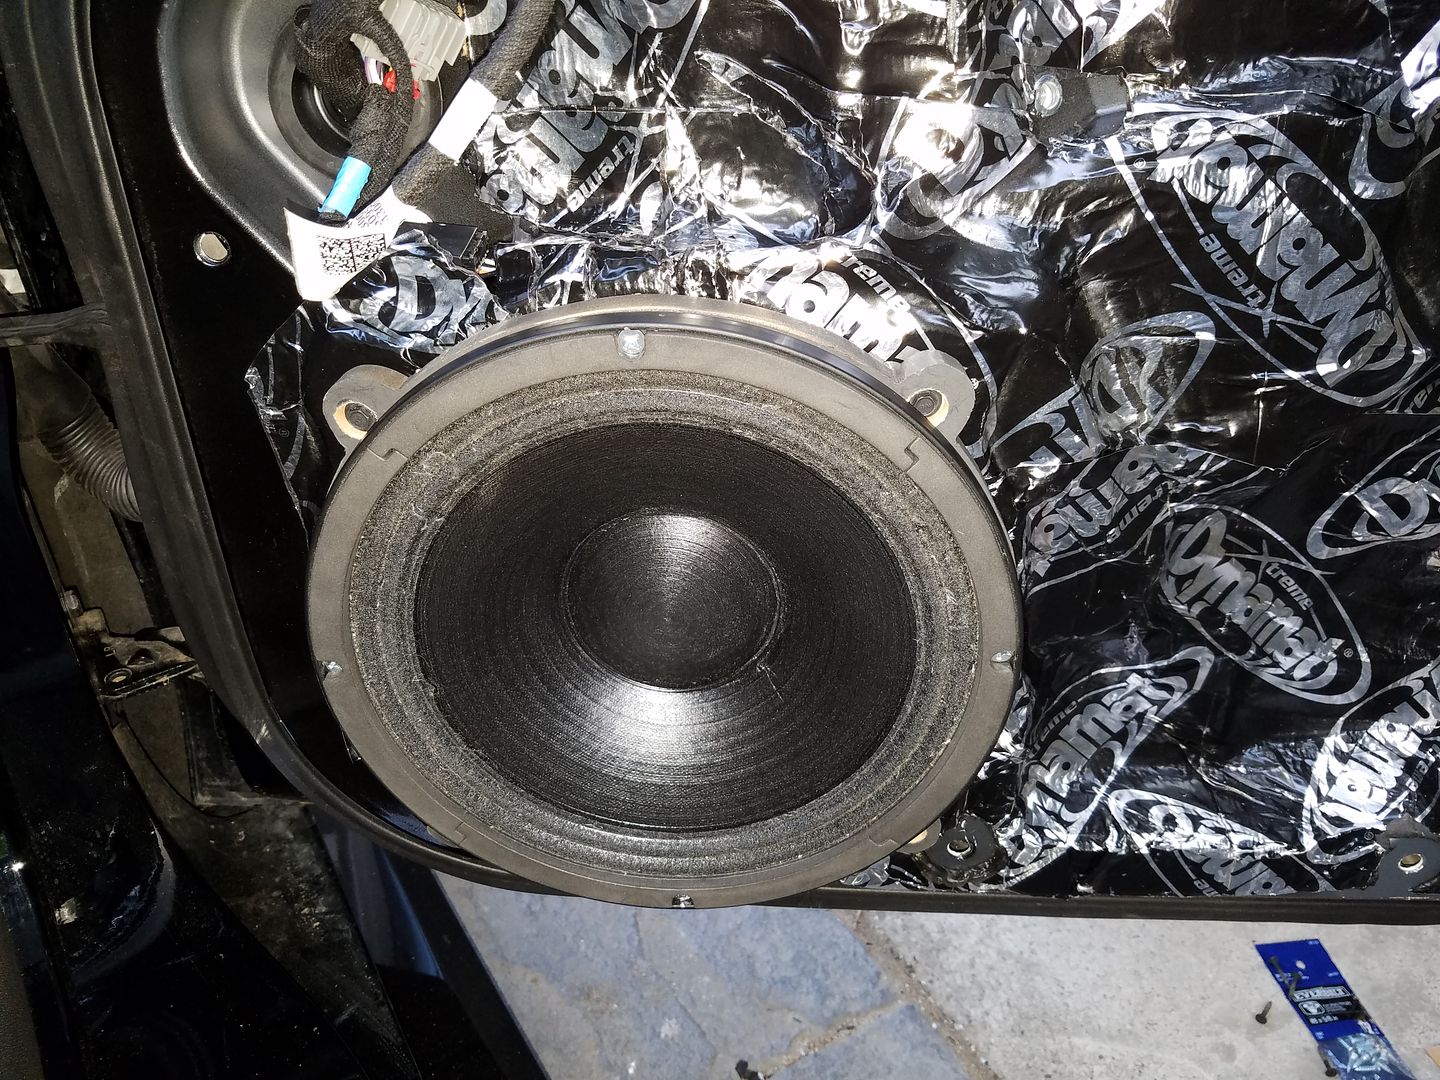
The OEM door panel itself is a perfect grille, sealing against the ProAudio rubber basket trim, and allowing 100% of the output to go through the door panel with the most minor deflection.
I picked to install the ProAudio midbass instead of the HiFi midbass the first time around. The custom order 4 ohm B&C 10NW64 is then the chosen midbass. Quick run of the benefits of the driver:
PROs:
*Neodymium magnet and aluminum heatsink result in a low weight of just 6.5 lbs
*waterprof assembly and pro-audio construction to fight the elements in a car door
*Ventilated voice coil gap and large 2.5" copper coil with 300 watts continous rating and 600 watt peak
*high damping surround and suspension assembly means it can withstand abuse in free air
*96 db sensitivity
*4 ohm coil means I can feed it 350 watts continuous
*Copper shorting cap on polepiece and typical high quality B&C construction mean extended HF response and low distortion to cross over at 1 khz
CONs:
*Ventilated voice coil gap is possibly noisy, I may plug it, or deaden the door more
*light cone may not be as well damped as the HiFi verison
*high damping surround and suspension assembly
I first built some 1/2" spacers out of MDF using the stock BOSE drivers to ascertain mounting tab locations
Spacers were sanded.
Machine on the left did the sanding, machine on the right did the cutting
Wires were run around the stock Molex plug. I left the stock wiring alone, sealed it against shorts and zip tied it to the wire loom in the door. The only opening to run wire is below the Molex plug, between the plug and the hose clip. 16 awg thick wire fit easily. 12 awg fit as well, but very tight. I did the math and I can get away with 16 awg for this length cable.
From the inside:
From the outside, notice the new wire ran through the bottom.
From the door perspective. I forced my finger in the stock wire loom until it came undone to run the wire through. A bit painful but I didn't poke any of the stock wiring.
The doors are stupendous. I think the doors alone make the entry cost into a 7th generation Corvette worth it. Large 9" cutout for a 10" driver, composite construction, large, very few mechanisms on board, and sealed from factory.
A closer look:
Sound treatment is minimal. I only applied one layer of Dynamat Extreme. The door itself is stout and I don't see much gain from putting on more weight. My technique for applying Dynamat is to use it as one uncorrupted piece. That way the sheet works as a sealant as well as a mass treatment. In addition you'll see I spray painted the spacers to make them more water proof. I used the stock bolts to keep it into place. No cutting of any parts. Using the Dynamat in large chunks makes it easier to remove if the door needs fixing.
A closer look
Passenger side is the same.
The money shot. Door fit over the speaker without trimming. All original clips and screws were reused. All the door functions remain unchanged. I used Parts Express speaker gasketing tape on the speaker and the spacer. The door shuts with more authority and the interior road noise level is noticeably decreased.
The OEM door panel itself is a perfect grille, sealing against the ProAudio rubber basket trim, and allowing 100% of the output to go through the door panel with the most minor deflection.
03-22-2016, 02:53 PM
#29
Safety Car
Thread Starter
UPDATE - Rear drivers for surround sound
I never believed in delayed rear. Early versions of Pro Logic that take stereo sound and mix it to enlarge the rooms were terrible in execution. I've tried it over an over in Home Theater only to go back to 2.0 and give up on processing. What I did like were the DVD Audio discs before the format died, recorded from the beginning in 5.1. What a treat! But since none of the 2.0 to 5.1 algorithms cut the mustard at home I did not bother trying them in a car.
There were two cars that changed my mind. The first was Craig E.'s blue C6 Corvette using the JBL MS8, and the second was Gary Summer's Benz using the Alpine H800 processor. These two processors seemed to have improved the steering algo to the point where it works! My new Onkyo Home Theatre receiver also works superbly with the new Pro Logic steering algo.
So I got the 'Vette with 5.1 locations, and I got the Alpine H800 to have my first go at this. I chose the Alpine H800 because it has optical input and I can maintain only one digital to analog conversion in it. I also like that it doesn't have built in amps. Everytime a new processor came out I compared it to the Alpine, and till this day I still think it is the ultimate processor.
I'm skipping the center speaker because I don't obsess nearly as much as the rest over the vocals being dead center. Most of my music doesn't even have vocals. To do it right I would need to fit in the center of the dash a large 10" mid in a big box and a line array air motion transformer tweeter to keep up with my left and right channels. Never going to happen, and I never give up output and low distortion to get a minor soundstage improvement.
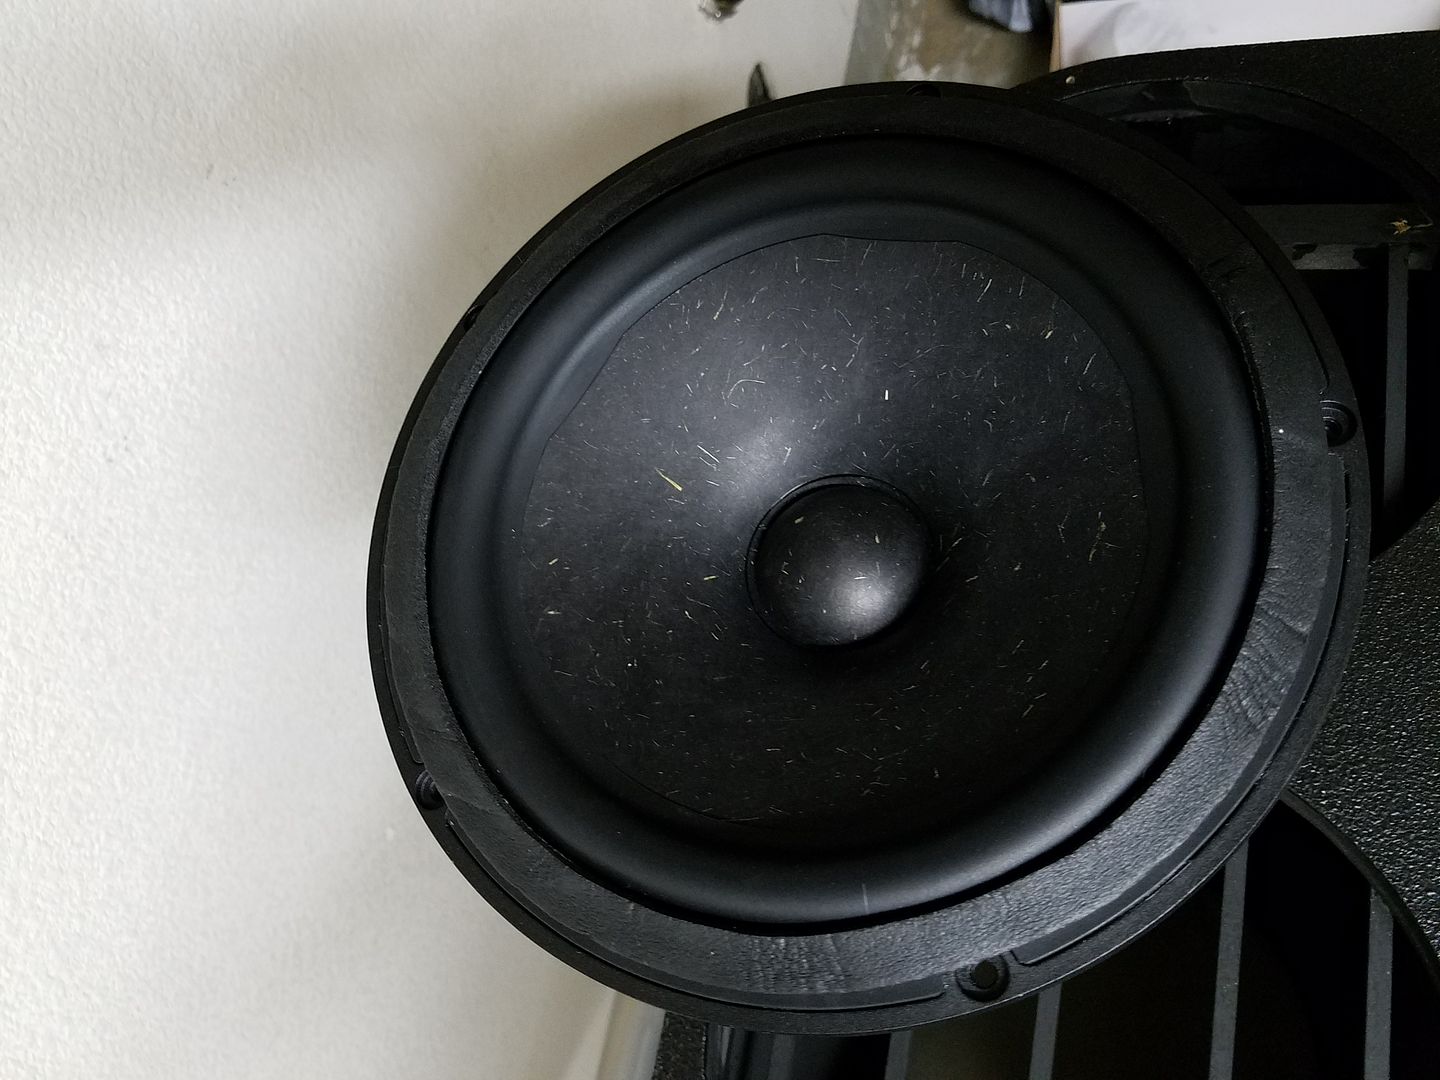
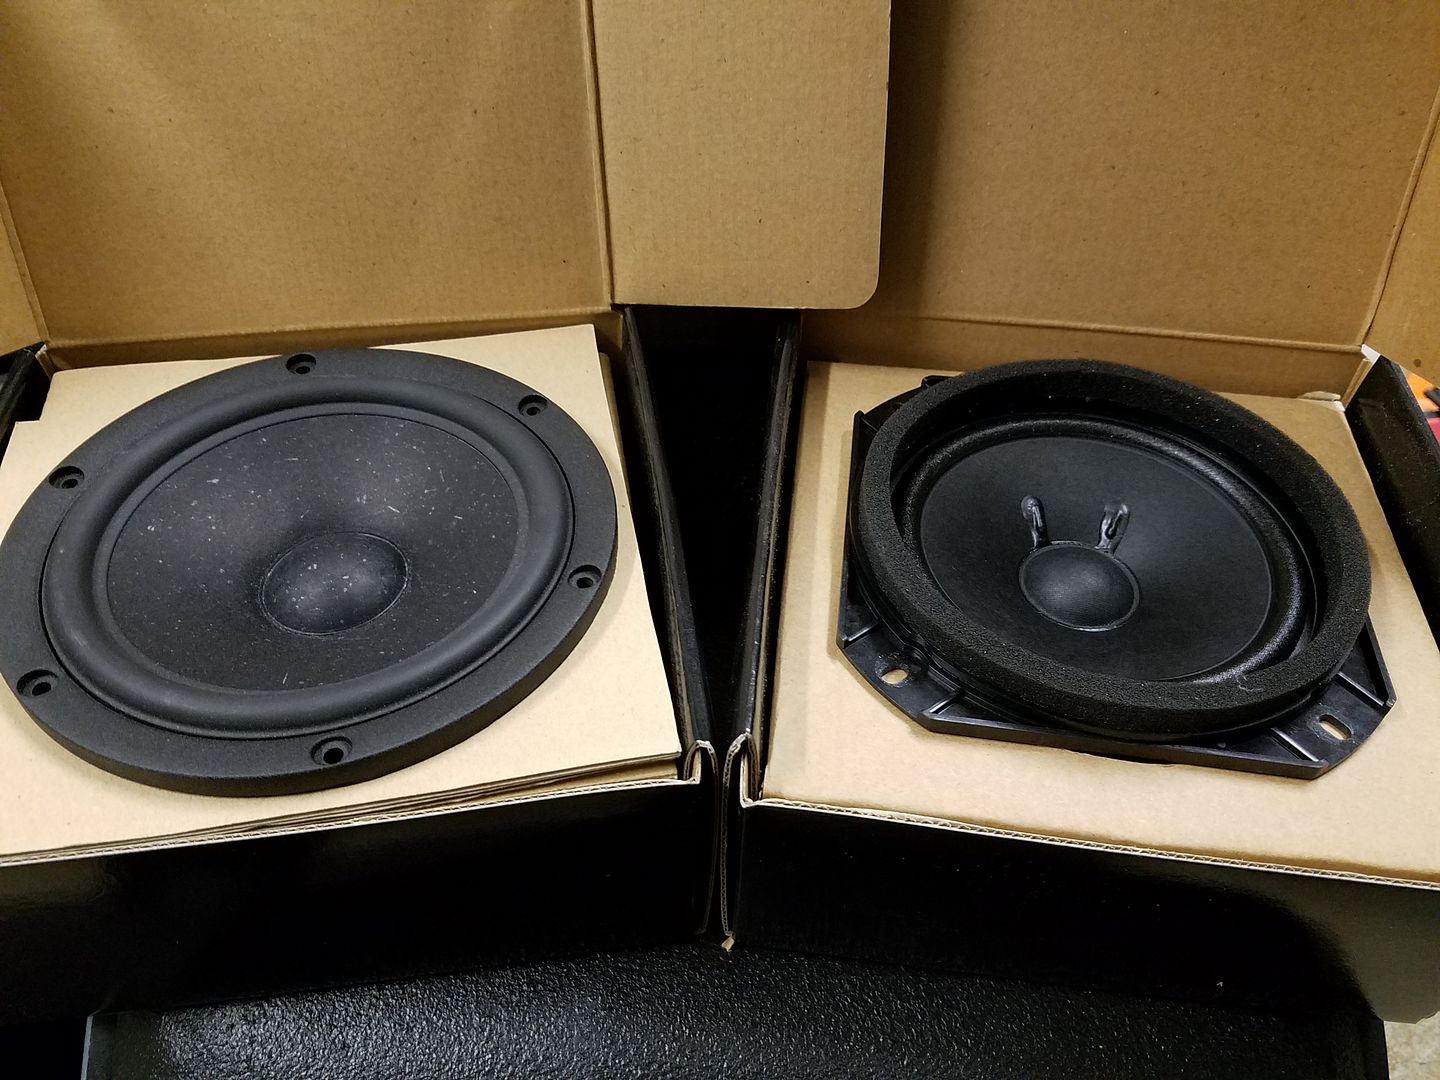
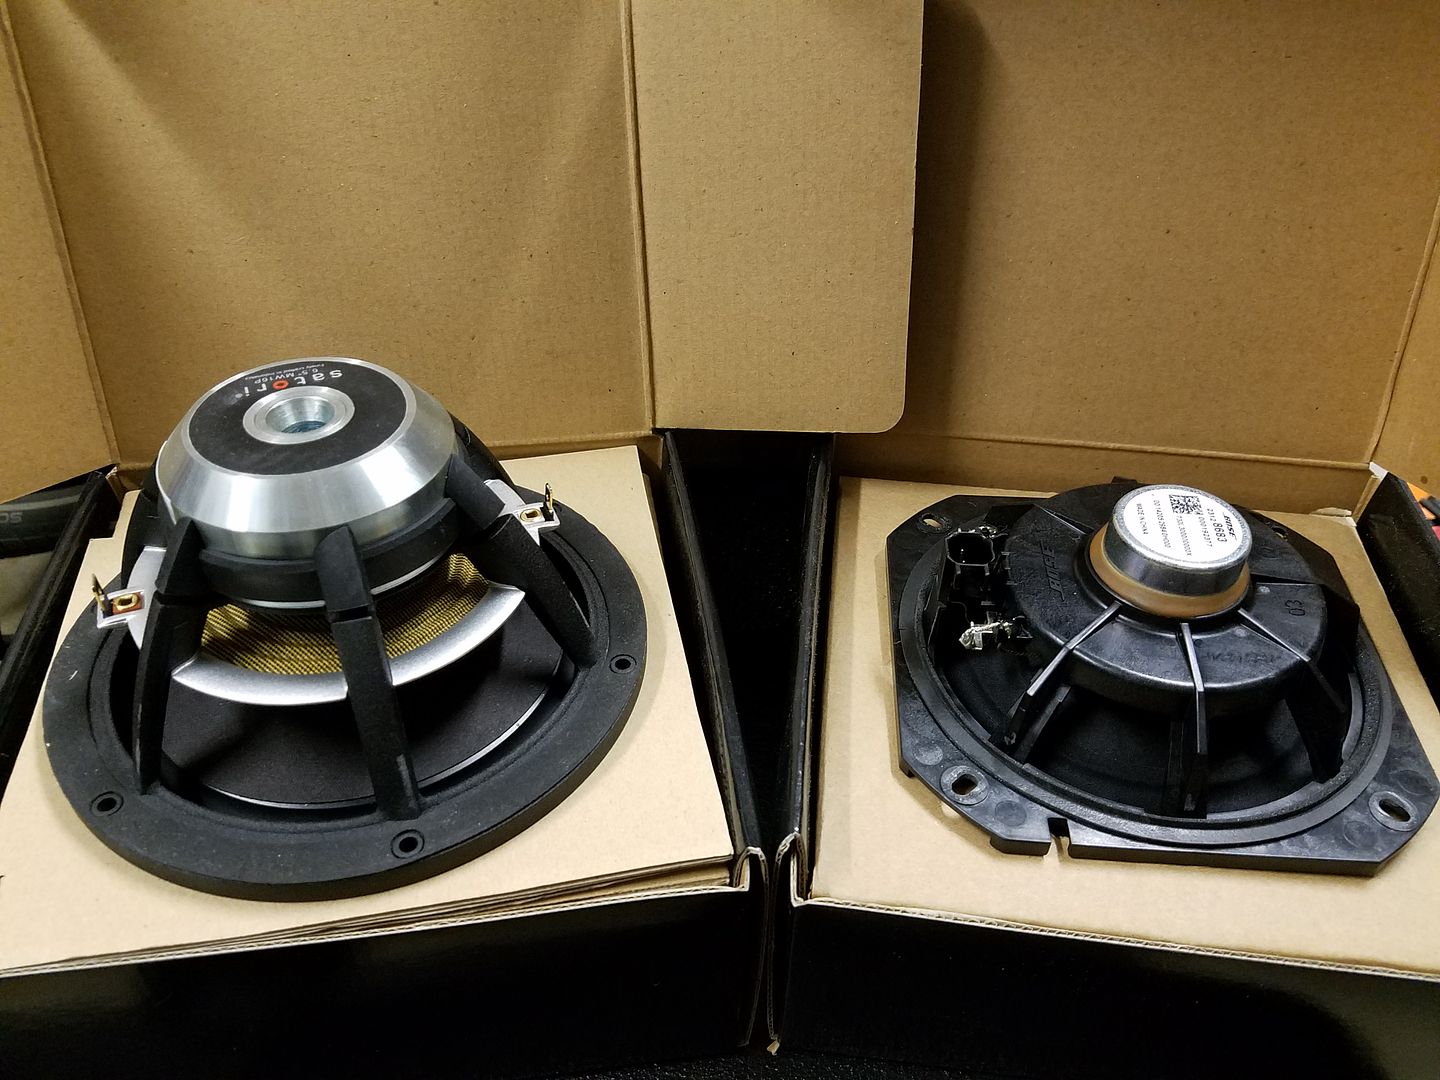
Covered in an earlier post, I'm replacing the 5.25" Bose drivers with 6.5" SB Acoustics Satori woofers. Here they are, side by side. The Satori use Neo magnets, don't be fooled by the large size compared to the Bose, they are not cheap ferrite motors, the magnets are the same technology:
Some of you scared me into not covering the flaps behind the speakers and sealing their enclosure. Good job. Scared so much that I decided to just bolt the speakers in the OEM locations without covering any of the air paths. I didn't want to have a malfunctioning airbag, or punctured ear drums on my conscience. So I just trimmed the enclosure to fit the Satori basket spokes and bolted it down. A spacer could not be used and was not needed.
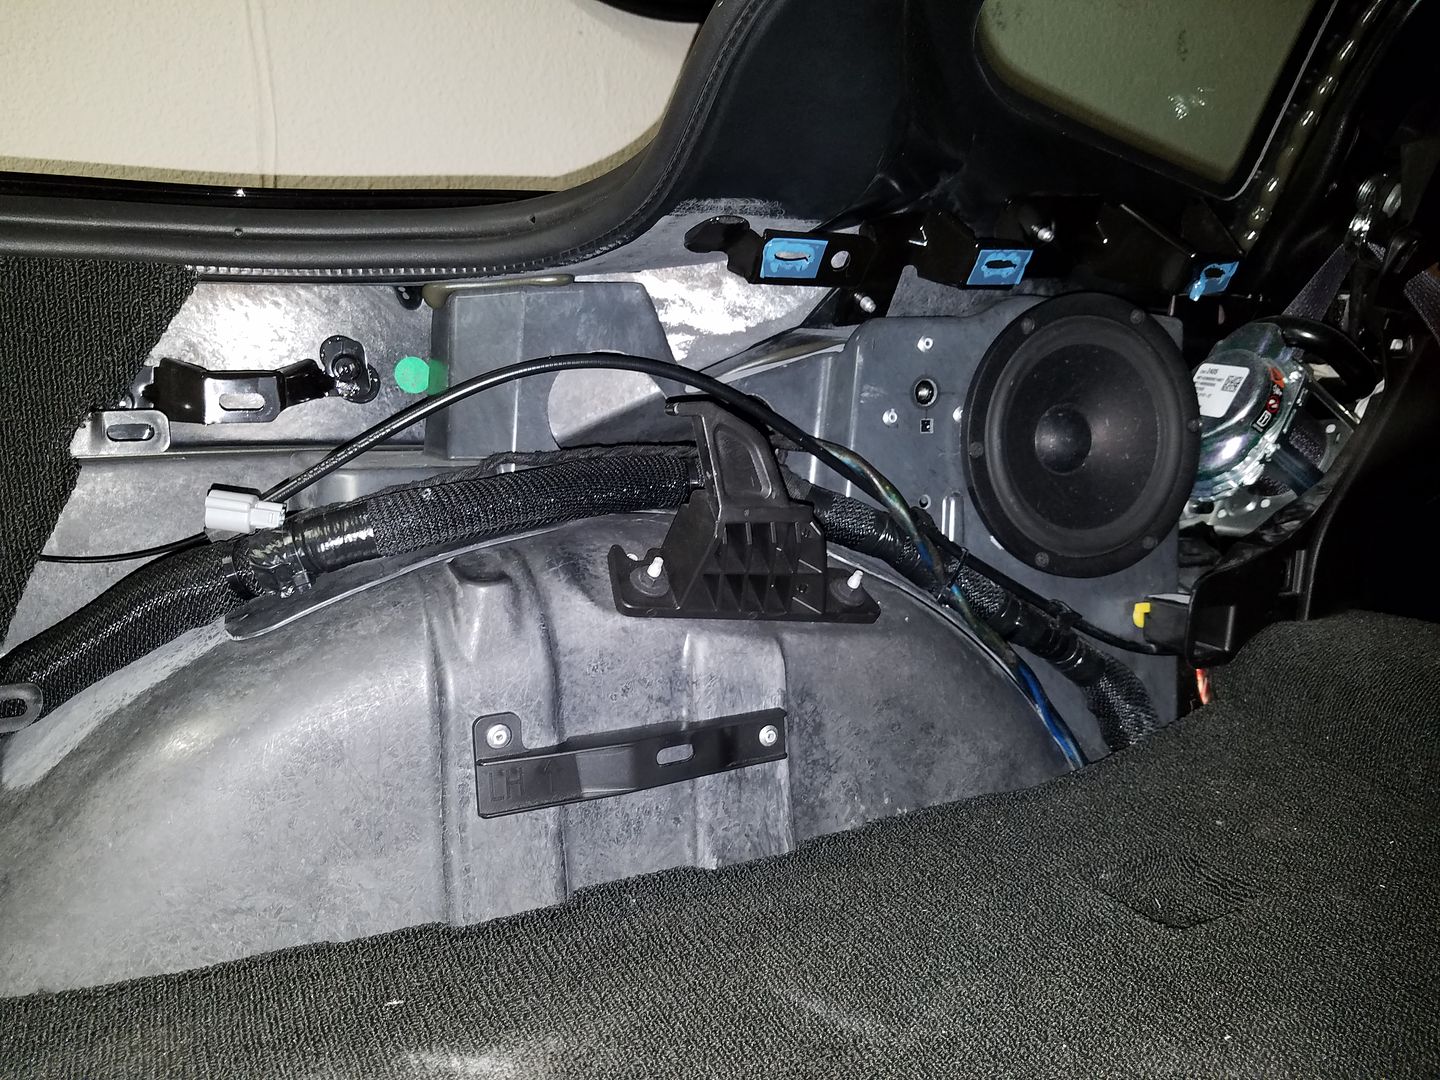
Next I had to assess whether the larger throw of the Satori would touch the plastic panels. To do so I installed the bottom trim piece but kept the top trim piece off so I can take a peak. It has about 1/3 of an inch clearance. That's why a spacer doesn't fit. Had to bolt the sucker to the enclosure directly.
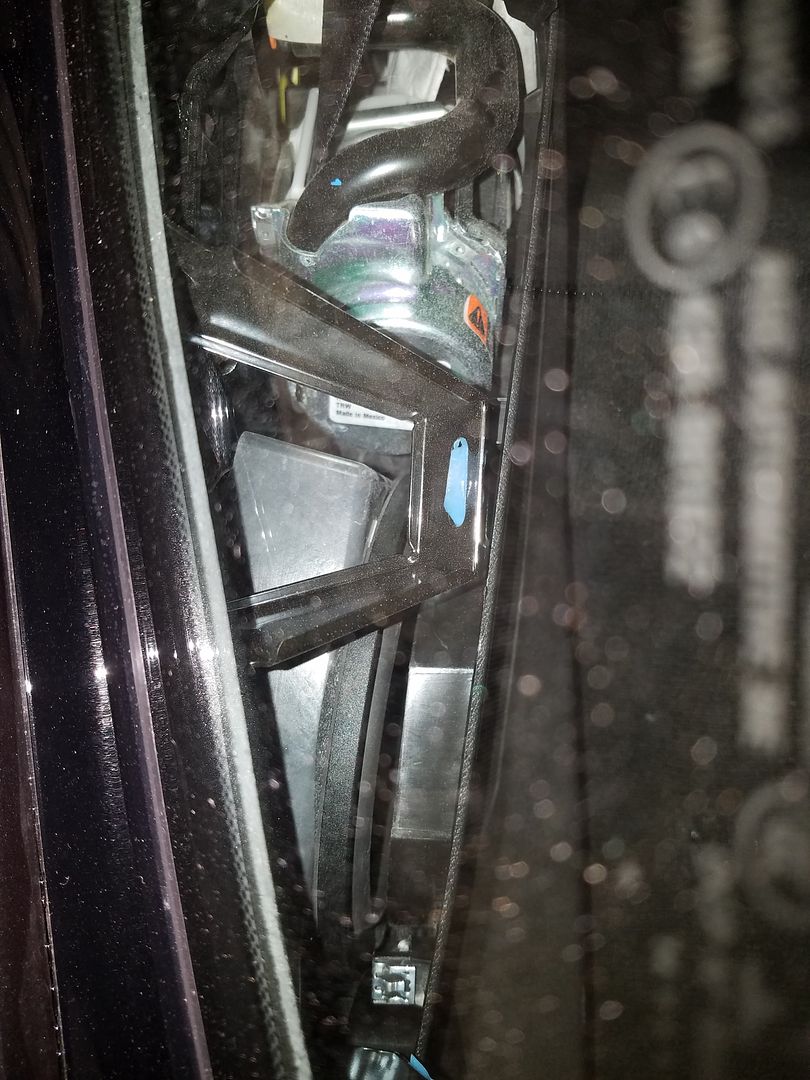
Since I can't seal the enclosure, the only way to separate the front and rear waves better is to seal the front of the speaker to the plastic panel ahead of it. The only thing I could think of was to add four layers of gasketing tape on the basket to mate with the panel.
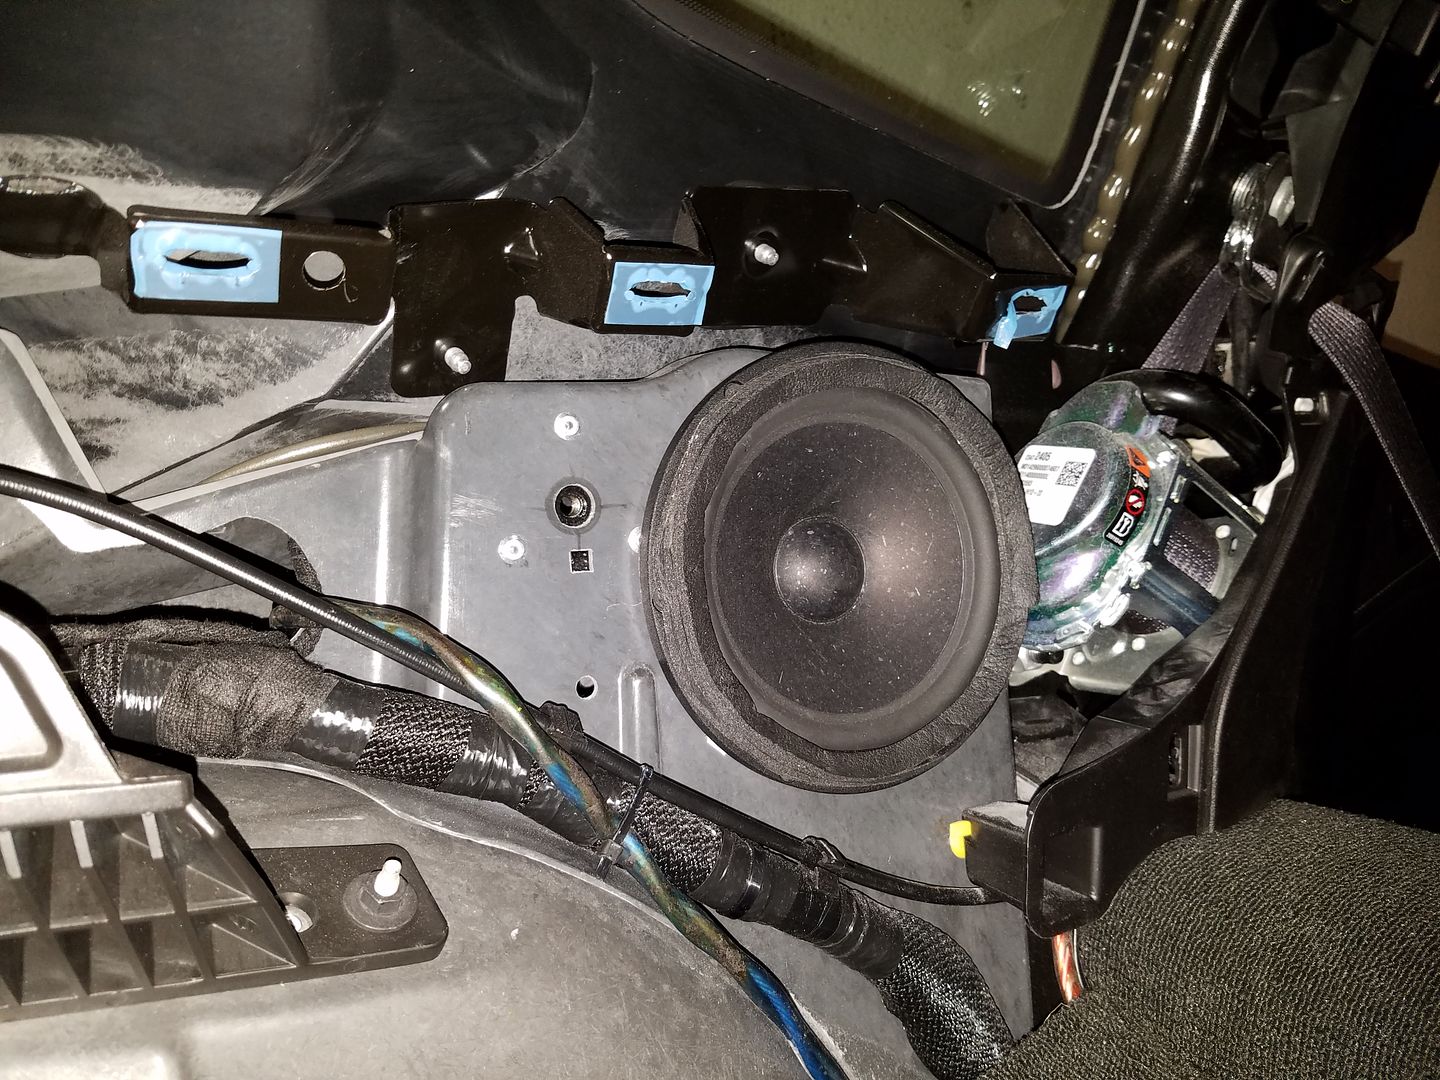
The gasketing tape fits around the original plastic round trim not on it, since the speaker is larger.
I never believed in delayed rear. Early versions of Pro Logic that take stereo sound and mix it to enlarge the rooms were terrible in execution. I've tried it over an over in Home Theater only to go back to 2.0 and give up on processing. What I did like were the DVD Audio discs before the format died, recorded from the beginning in 5.1. What a treat! But since none of the 2.0 to 5.1 algorithms cut the mustard at home I did not bother trying them in a car.
There were two cars that changed my mind. The first was Craig E.'s blue C6 Corvette using the JBL MS8, and the second was Gary Summer's Benz using the Alpine H800 processor. These two processors seemed to have improved the steering algo to the point where it works! My new Onkyo Home Theatre receiver also works superbly with the new Pro Logic steering algo.
So I got the 'Vette with 5.1 locations, and I got the Alpine H800 to have my first go at this. I chose the Alpine H800 because it has optical input and I can maintain only one digital to analog conversion in it. I also like that it doesn't have built in amps. Everytime a new processor came out I compared it to the Alpine, and till this day I still think it is the ultimate processor.
I'm skipping the center speaker because I don't obsess nearly as much as the rest over the vocals being dead center. Most of my music doesn't even have vocals. To do it right I would need to fit in the center of the dash a large 10" mid in a big box and a line array air motion transformer tweeter to keep up with my left and right channels. Never going to happen, and I never give up output and low distortion to get a minor soundstage improvement.
Covered in an earlier post, I'm replacing the 5.25" Bose drivers with 6.5" SB Acoustics Satori woofers. Here they are, side by side. The Satori use Neo magnets, don't be fooled by the large size compared to the Bose, they are not cheap ferrite motors, the magnets are the same technology:
Some of you scared me into not covering the flaps behind the speakers and sealing their enclosure. Good job. Scared so much that I decided to just bolt the speakers in the OEM locations without covering any of the air paths. I didn't want to have a malfunctioning airbag, or punctured ear drums on my conscience. So I just trimmed the enclosure to fit the Satori basket spokes and bolted it down. A spacer could not be used and was not needed.
Next I had to assess whether the larger throw of the Satori would touch the plastic panels. To do so I installed the bottom trim piece but kept the top trim piece off so I can take a peak. It has about 1/3 of an inch clearance. That's why a spacer doesn't fit. Had to bolt the sucker to the enclosure directly.
Since I can't seal the enclosure, the only way to separate the front and rear waves better is to seal the front of the speaker to the plastic panel ahead of it. The only thing I could think of was to add four layers of gasketing tape on the basket to mate with the panel.
The gasketing tape fits around the original plastic round trim not on it, since the speaker is larger.
The following users liked this post:
Speedfreaq (12-07-2017)
03-23-2016, 02:43 PM
#30
Safety Car
Thread Starter
UPDATE - tweeters install
Tweeter selection
I've chosen a pair of Aurum Cantus air striction (air motion transformers) per side to cover the upper octaves. The model number is AST25120, I got them from PE. Looks like I did good, they sold out. Here is the link:
Aurum Cantus AST25120 Aero Striction Tweeter 8 Ohm
Manufacturer's specs:
Power handling: 100 watts RMS/160 watts max
• Impedance: 8 ohms
• Frequency range: 700-30,000 Hz
• SPL: 98 dB 1W/1m
• Recommended minimum crossover frequency: 1,000 Hz
• Dimensions: Overall: 6.30" H x 3.31" W, Depth: 0.98"
I'll be using one 4 channel amplifier to power them bridged. They will receive 125 watts continuous each.
The better question is what are the ACTUAL specs. I've done some digging. Unfortunately people usually test the wider AMT from AC. While a company rebadges it and tests it, it seems to remove the felt backing. Some specs are better than the manufacturer states if you remove the felt. For example, there is no FS stated but one usually is implied as the lower bound of the frequency response, here 700hz. The FS is actually 500hz without the felt, so a 1,000hz crossover meets the rule of thumb of two times FS. Good. Some specs are not as good. It turns out the frequency response starts rolling off from 4,000 hz down if you remove the felt backing. If you keep it on it starts rolling off 2,000 hz and down. Most hobbysts also state a 1,000hz is a bit of a push at high volumes. Here are a few links if anyone is interested in research.
Harwood rebadges the AC AST but removes the felt I think:
Harwood Aero Striction question - diyAudio
This guy tests the other large AST diaphragm in a DIY motor and finds it is world class, and beat the ESS version by miles:
An information roundup for larger AMTs - AVS Forum | Home Theater Discussions And Reviews
So why use the AC AST? Simple. It is the best tweeter I've ever used and I've tried ring radiators, ribbons, the best domes, and the best planars. Here are a few I've used before:
Scan Speak Illuminator domes 3/4, 1, small and large chambers
Vifa NE
Vife ring radiator
PE planar
LCY ribbon
Boston Acoustics top of the line
Polk DB
Polk Momo top of the line
BG planars of all shapes and sizes
The smallest version of the AC AST
SB ring radiator
Seas Lotus
Airborne air motion transformer
The AC air motion transformers are miles better than the cheaper Airborne ones. The Airborne one would deform in the a-pillar when exposed to high temperatures, heck the pleats were not straight out of the box. The AC may have small irregularities but they are stout and look great and sound after a year of use. The pleats hold their shape forever. The AC also has no diaphragm resonance other than a small peak at FS, and the harmonic distortion is way better. The magnets/motors are top notch to boot.
The time domain response is the best bar none. It competes with ribbons while having low harmonic distortion in the bottom octaves like a large dome. Unlike domes, increasing the size of the diaphragm does not sacrifice top end response so you can have the best of both worlds top end like a 3/4 dome and bottom end like a 1.5" dome, and the time domain response domes can't reach throughout the working band. The only thing domes have is output density, ie. big sound from small footprints, but if you can fit a large air motion transformer it is not an issue. I'm using the largest air motion transformer AC makes in pairs.
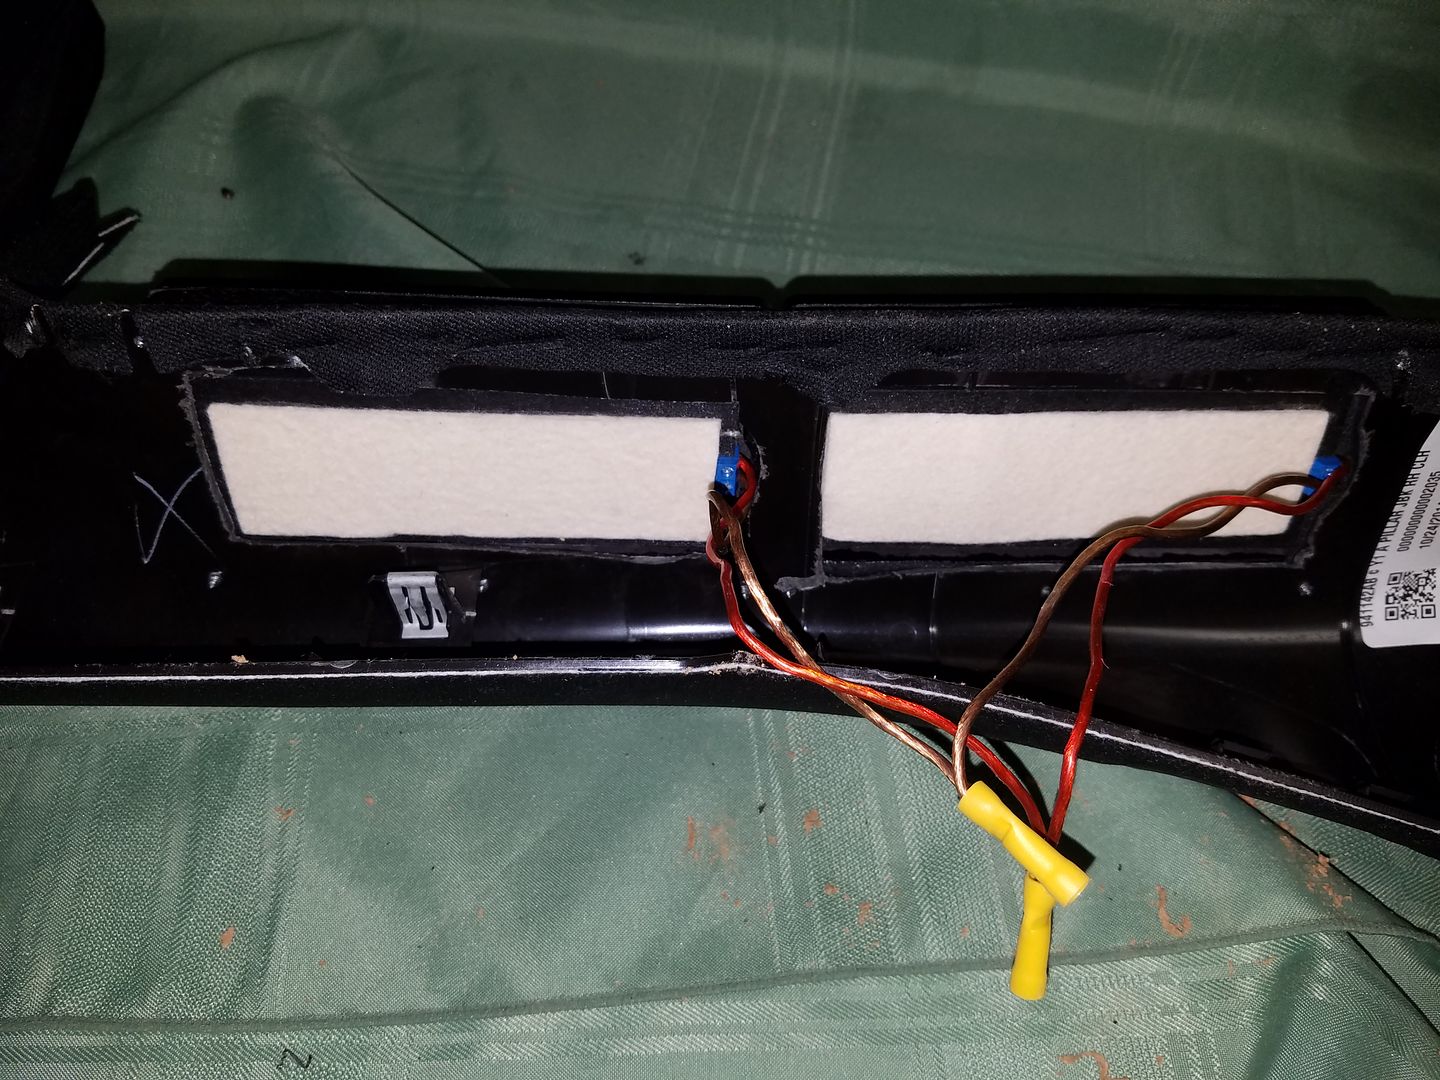
The tweeters are massive. Weighing in at 1.8 lbs each with NEO magnets and all. The faceplate is 1/4" aluminum, the motor system is made up of two AST 2560 motors! The terminals are stout. The only thing you have to be careful of is the backing foam and mesh screen on the motor ungluing themselves at which point you can glue them back on. I think they use glue lightly to service them easily and to allow diyers to remove the backing if they wish.
Install
As shown previously, the a-pillars only have a max of 1/2" depth. The tweeters are 1" deep so I made 1/2" spacers and applied Duratex to the MDF. Start with clean MDF sheet. Pre drill holes to get the jigsaw to cut all 4 corners. Use patience.

Size up the task
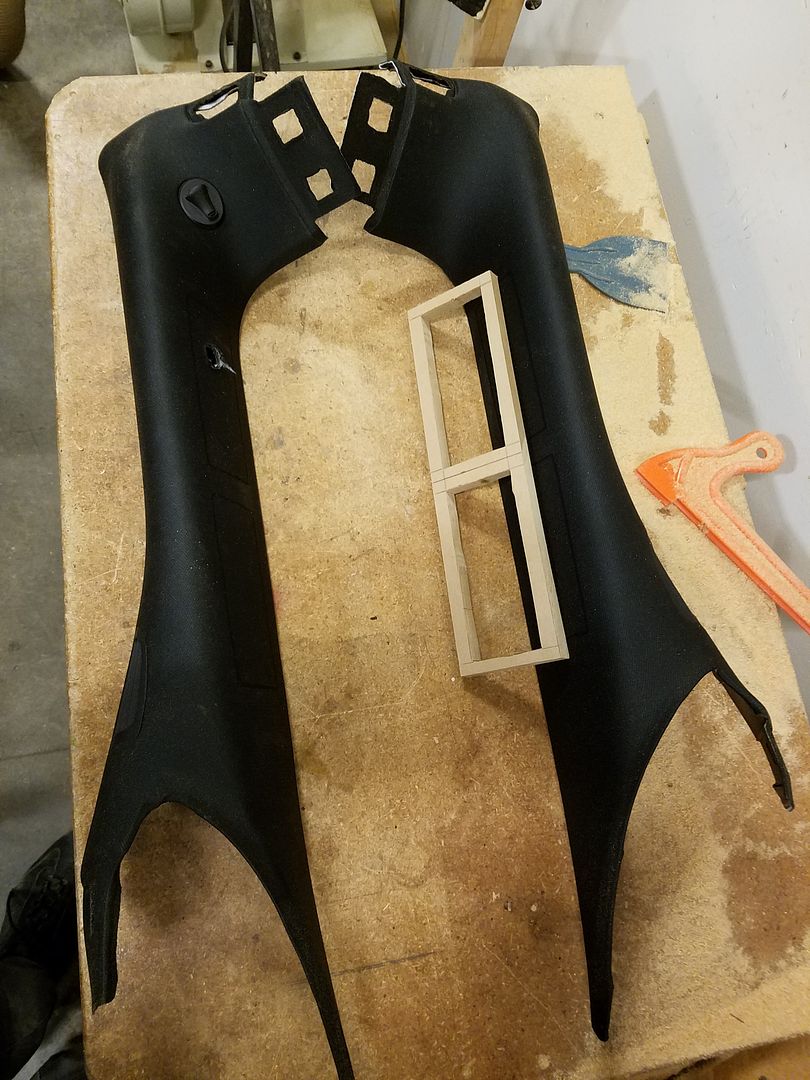
I wrapped the a-pillars in blue painters tape and made the cutouts in the plastic. Not shown because it was brutal.
Couldn't find black socket screws to match at Home Depot so I got something that works temporarily.
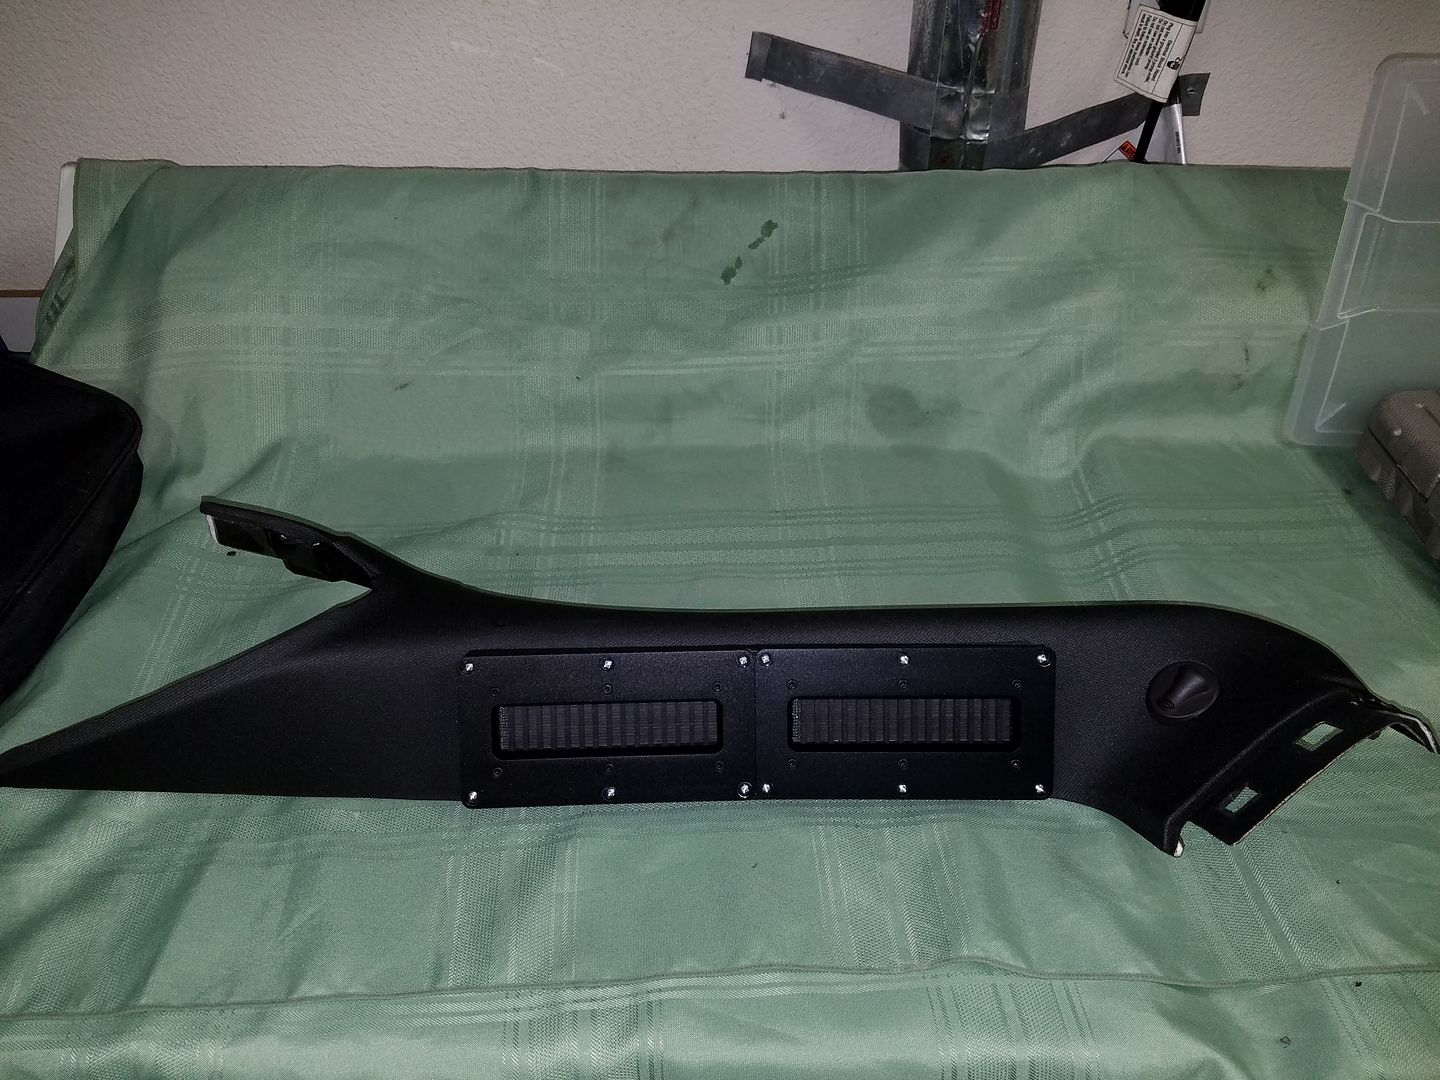
Gasketing tape all around and speakers wired in parallel:
Final pics
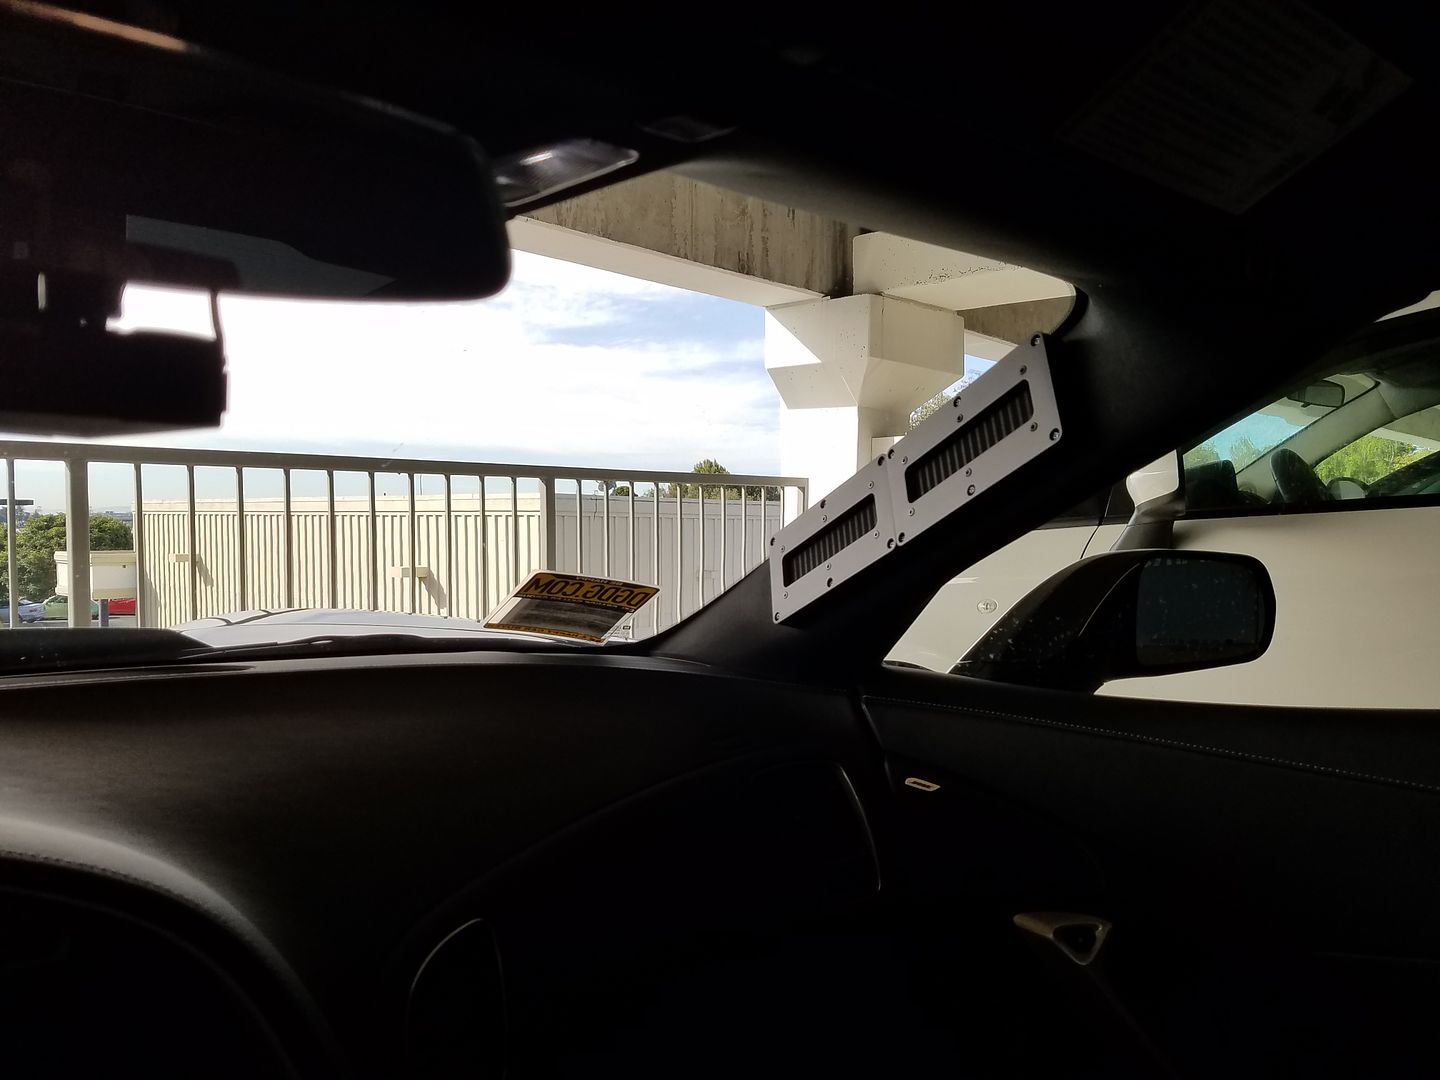
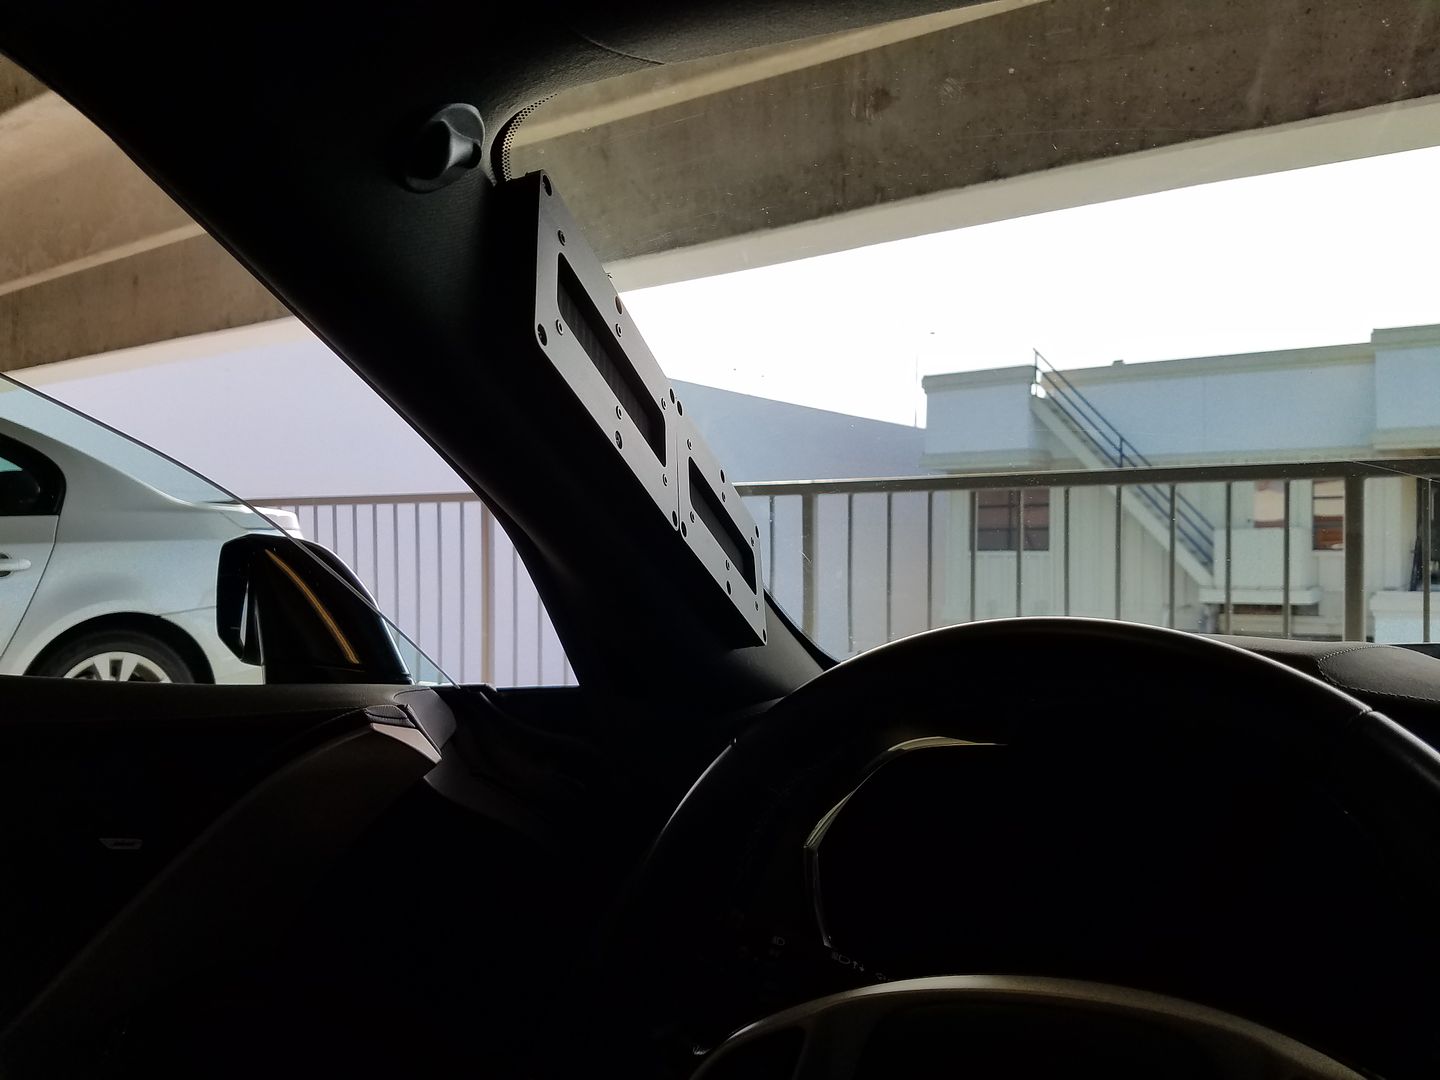
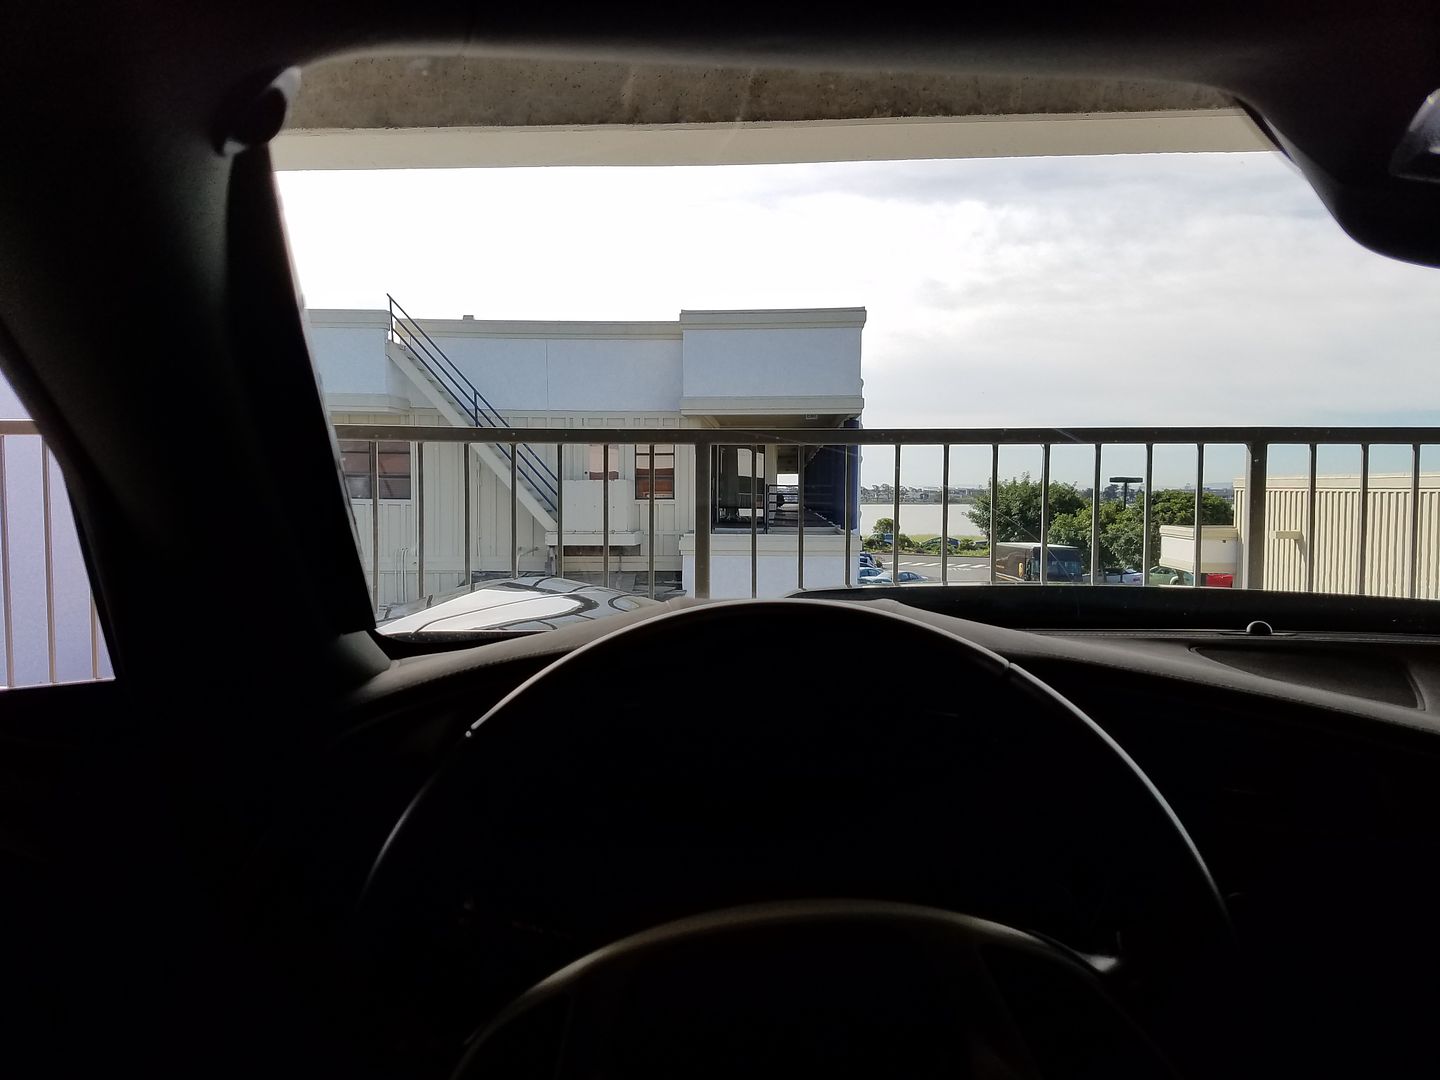
Ok, so I had to lose about 3/4" of viewing area.
Tweeter selection
I've chosen a pair of Aurum Cantus air striction (air motion transformers) per side to cover the upper octaves. The model number is AST25120, I got them from PE. Looks like I did good, they sold out. Here is the link:
Aurum Cantus AST25120 Aero Striction Tweeter 8 Ohm
Manufacturer's specs:
Power handling: 100 watts RMS/160 watts max
• Impedance: 8 ohms
• Frequency range: 700-30,000 Hz
• SPL: 98 dB 1W/1m
• Recommended minimum crossover frequency: 1,000 Hz
• Dimensions: Overall: 6.30" H x 3.31" W, Depth: 0.98"
I'll be using one 4 channel amplifier to power them bridged. They will receive 125 watts continuous each.
The better question is what are the ACTUAL specs. I've done some digging. Unfortunately people usually test the wider AMT from AC. While a company rebadges it and tests it, it seems to remove the felt backing. Some specs are better than the manufacturer states if you remove the felt. For example, there is no FS stated but one usually is implied as the lower bound of the frequency response, here 700hz. The FS is actually 500hz without the felt, so a 1,000hz crossover meets the rule of thumb of two times FS. Good. Some specs are not as good. It turns out the frequency response starts rolling off from 4,000 hz down if you remove the felt backing. If you keep it on it starts rolling off 2,000 hz and down. Most hobbysts also state a 1,000hz is a bit of a push at high volumes. Here are a few links if anyone is interested in research.
Harwood rebadges the AC AST but removes the felt I think:
Harwood Aero Striction question - diyAudio
This guy tests the other large AST diaphragm in a DIY motor and finds it is world class, and beat the ESS version by miles:
An information roundup for larger AMTs - AVS Forum | Home Theater Discussions And Reviews
So why use the AC AST? Simple. It is the best tweeter I've ever used and I've tried ring radiators, ribbons, the best domes, and the best planars. Here are a few I've used before:
Scan Speak Illuminator domes 3/4, 1, small and large chambers
Vifa NE
Vife ring radiator
PE planar
LCY ribbon
Boston Acoustics top of the line
Polk DB
Polk Momo top of the line
BG planars of all shapes and sizes
The smallest version of the AC AST
SB ring radiator
Seas Lotus
Airborne air motion transformer
The AC air motion transformers are miles better than the cheaper Airborne ones. The Airborne one would deform in the a-pillar when exposed to high temperatures, heck the pleats were not straight out of the box. The AC may have small irregularities but they are stout and look great and sound after a year of use. The pleats hold their shape forever. The AC also has no diaphragm resonance other than a small peak at FS, and the harmonic distortion is way better. The magnets/motors are top notch to boot.
The time domain response is the best bar none. It competes with ribbons while having low harmonic distortion in the bottom octaves like a large dome. Unlike domes, increasing the size of the diaphragm does not sacrifice top end response so you can have the best of both worlds top end like a 3/4 dome and bottom end like a 1.5" dome, and the time domain response domes can't reach throughout the working band. The only thing domes have is output density, ie. big sound from small footprints, but if you can fit a large air motion transformer it is not an issue. I'm using the largest air motion transformer AC makes in pairs.
The tweeters are massive. Weighing in at 1.8 lbs each with NEO magnets and all. The faceplate is 1/4" aluminum, the motor system is made up of two AST 2560 motors! The terminals are stout. The only thing you have to be careful of is the backing foam and mesh screen on the motor ungluing themselves at which point you can glue them back on. I think they use glue lightly to service them easily and to allow diyers to remove the backing if they wish.
Install
As shown previously, the a-pillars only have a max of 1/2" depth. The tweeters are 1" deep so I made 1/2" spacers and applied Duratex to the MDF. Start with clean MDF sheet. Pre drill holes to get the jigsaw to cut all 4 corners. Use patience.
Size up the task
I wrapped the a-pillars in blue painters tape and made the cutouts in the plastic. Not shown because it was brutal.
Couldn't find black socket screws to match at Home Depot so I got something that works temporarily.
Gasketing tape all around and speakers wired in parallel:
Final pics
Ok, so I had to lose about 3/4" of viewing area.
Last edited by SBC_and_a_stick; 03-23-2016 at 02:44 PM.
03-24-2016, 04:30 PM
#31
Safety Car
Thread Starter
UPDATE - controllers installed
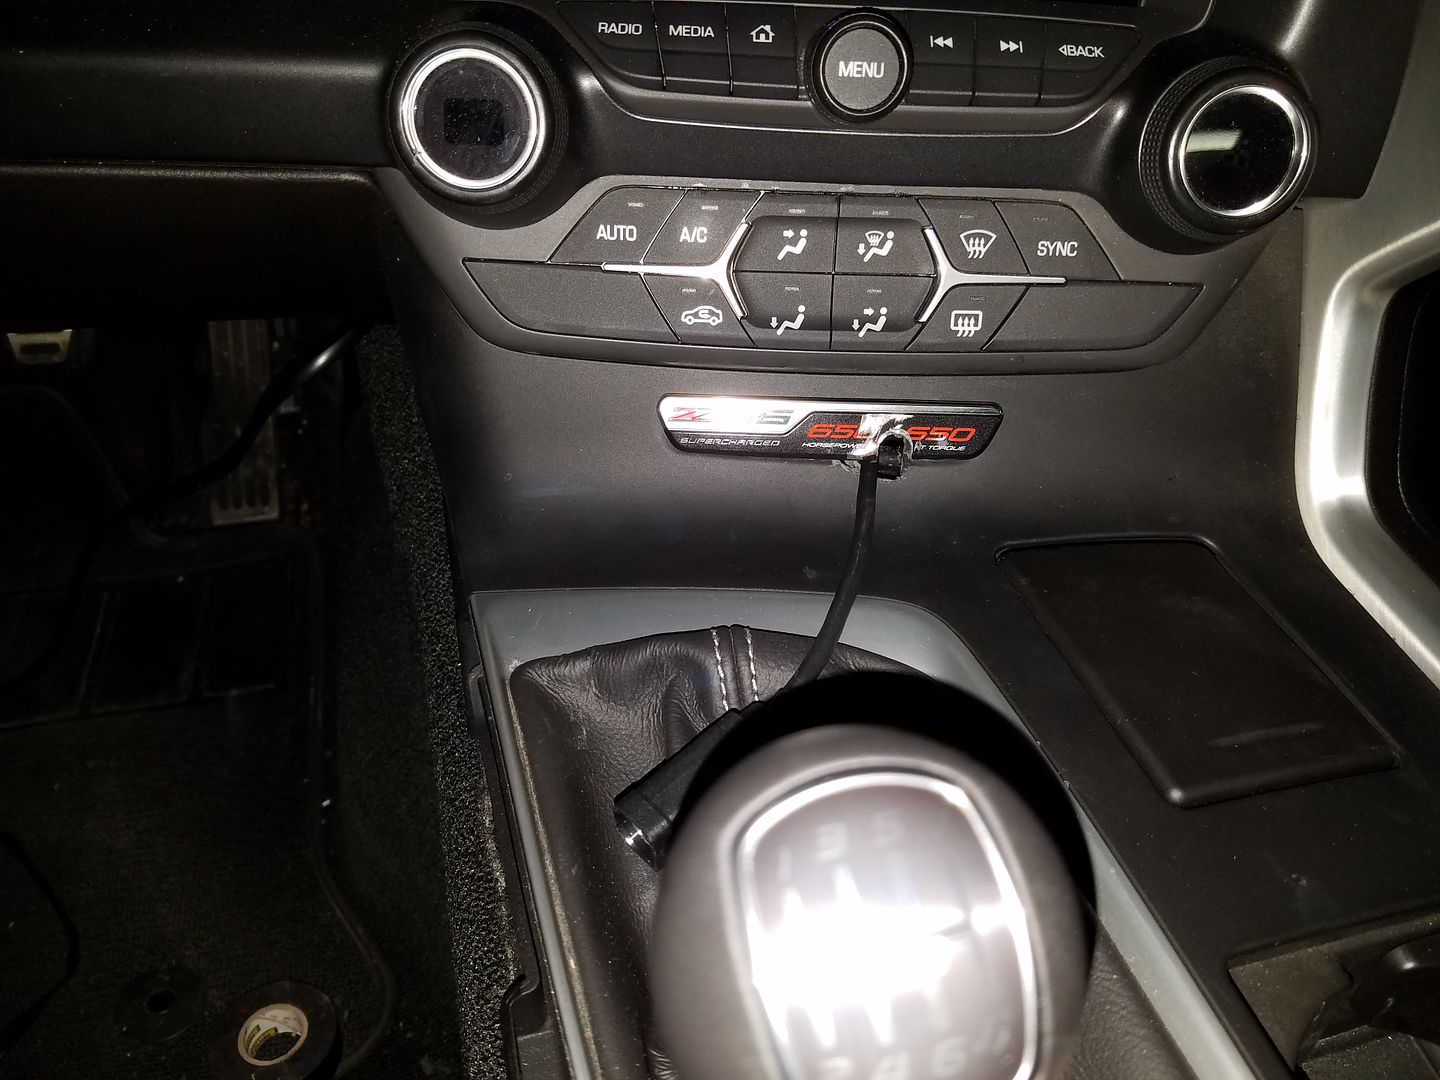
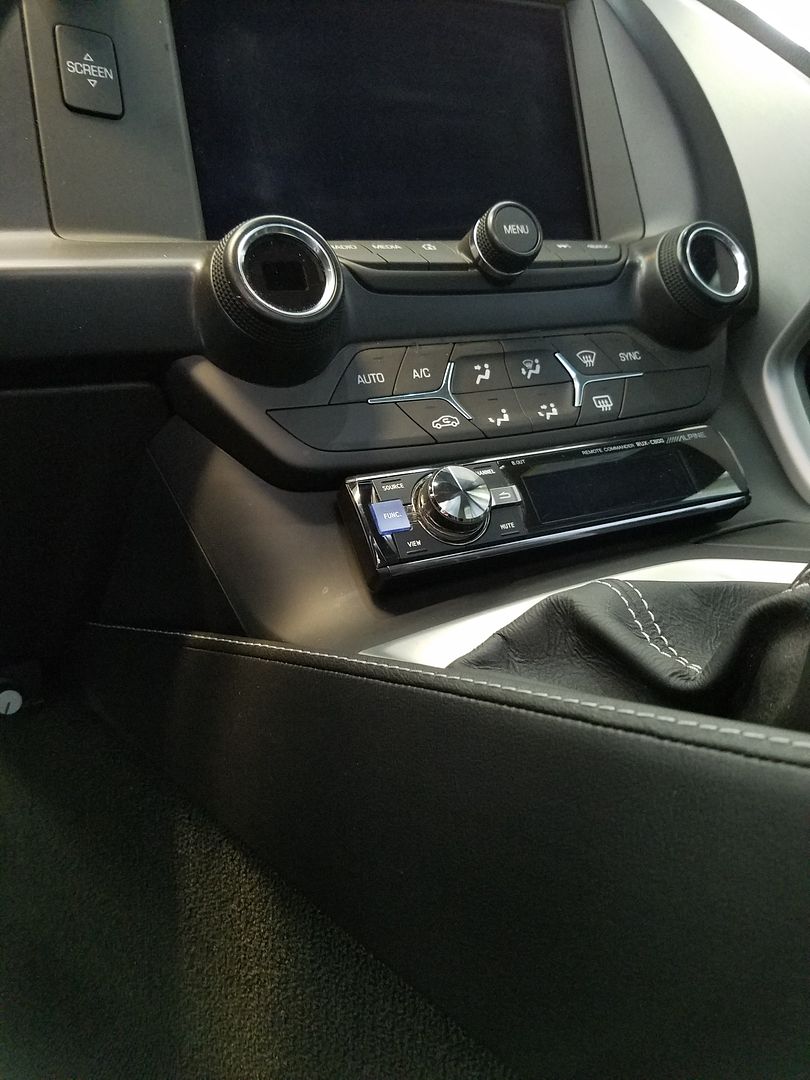
I never really liked the plaque displaying all the low slung horses. The benefits of tearing it up are then many. To start off I placed some double sticky on the back of the Alpine controller and placed it on top of the plaque. Pulling on the controller takes out the plaque out of the dash entirely. That makes for an easy to disconnect and stow away controller for parking in shady neighborhoods. The install was a breeze, just double sticky tape and drilling a couple of holes. The panel itself can be replaced fairly easily, kids nowadays add carbon fiber (finish) ones in just about every car. I like to believe I drilled away the obnoxious and made it functional!
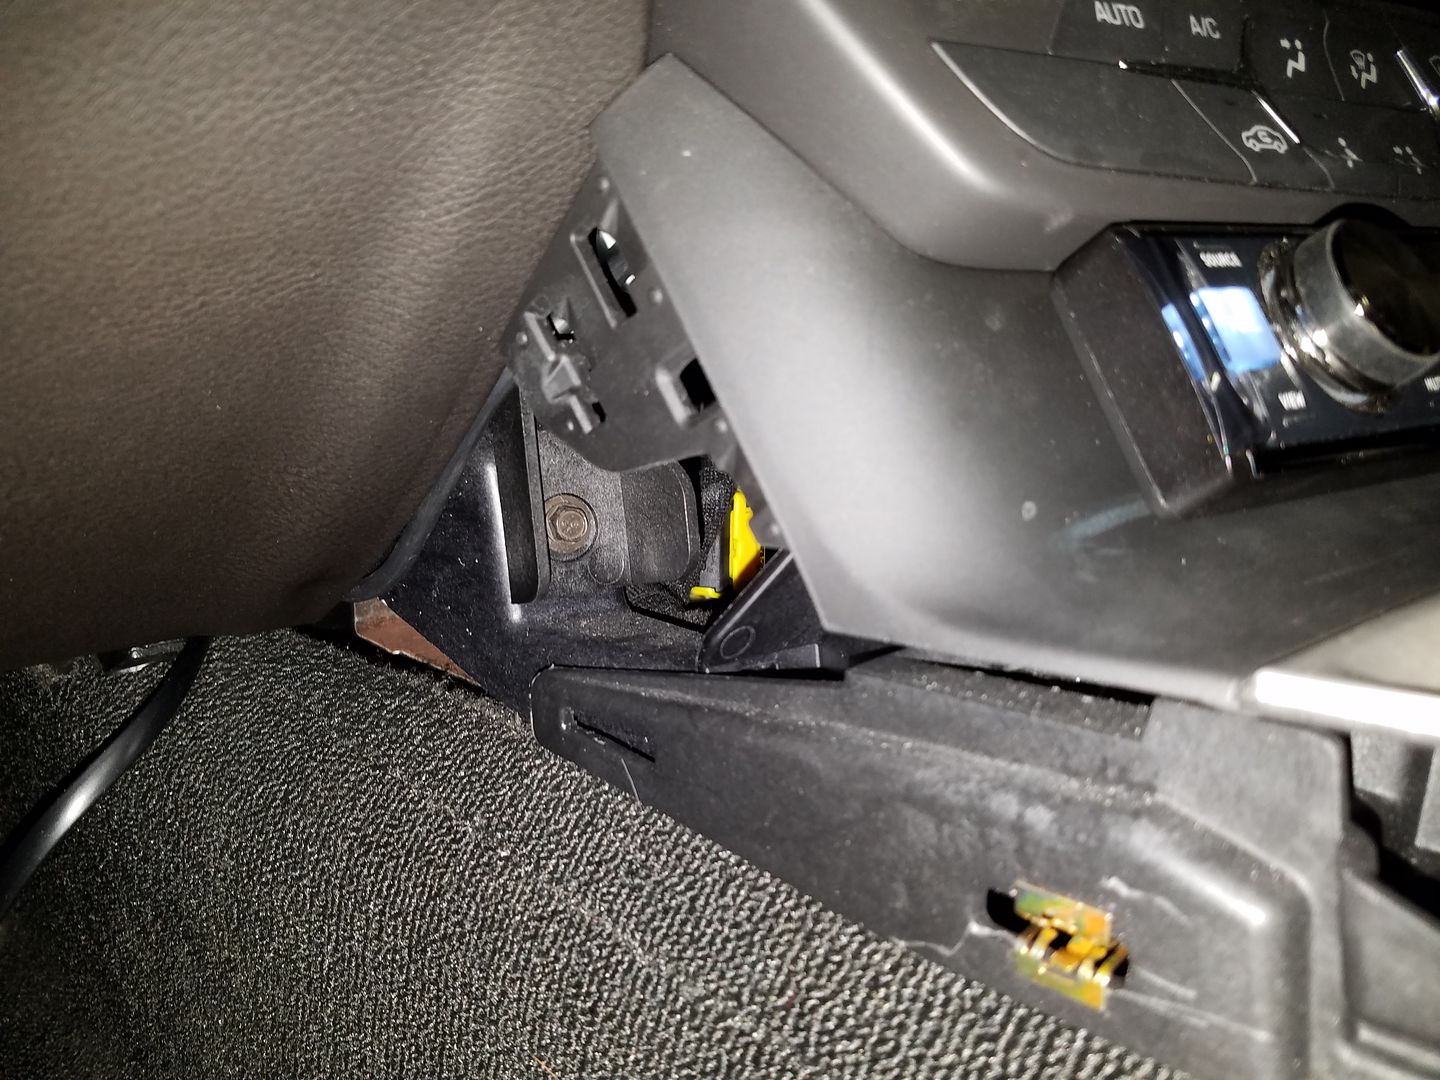
To run the wire, just disconnect two pieces of the center trim. All clips. When removing the center tunnel side trim make sure to pull towards the back of the car after the clips have been take care of. Putting it back requires that the notched end goes in the dash at the tip before the clips are pushed in firmly.
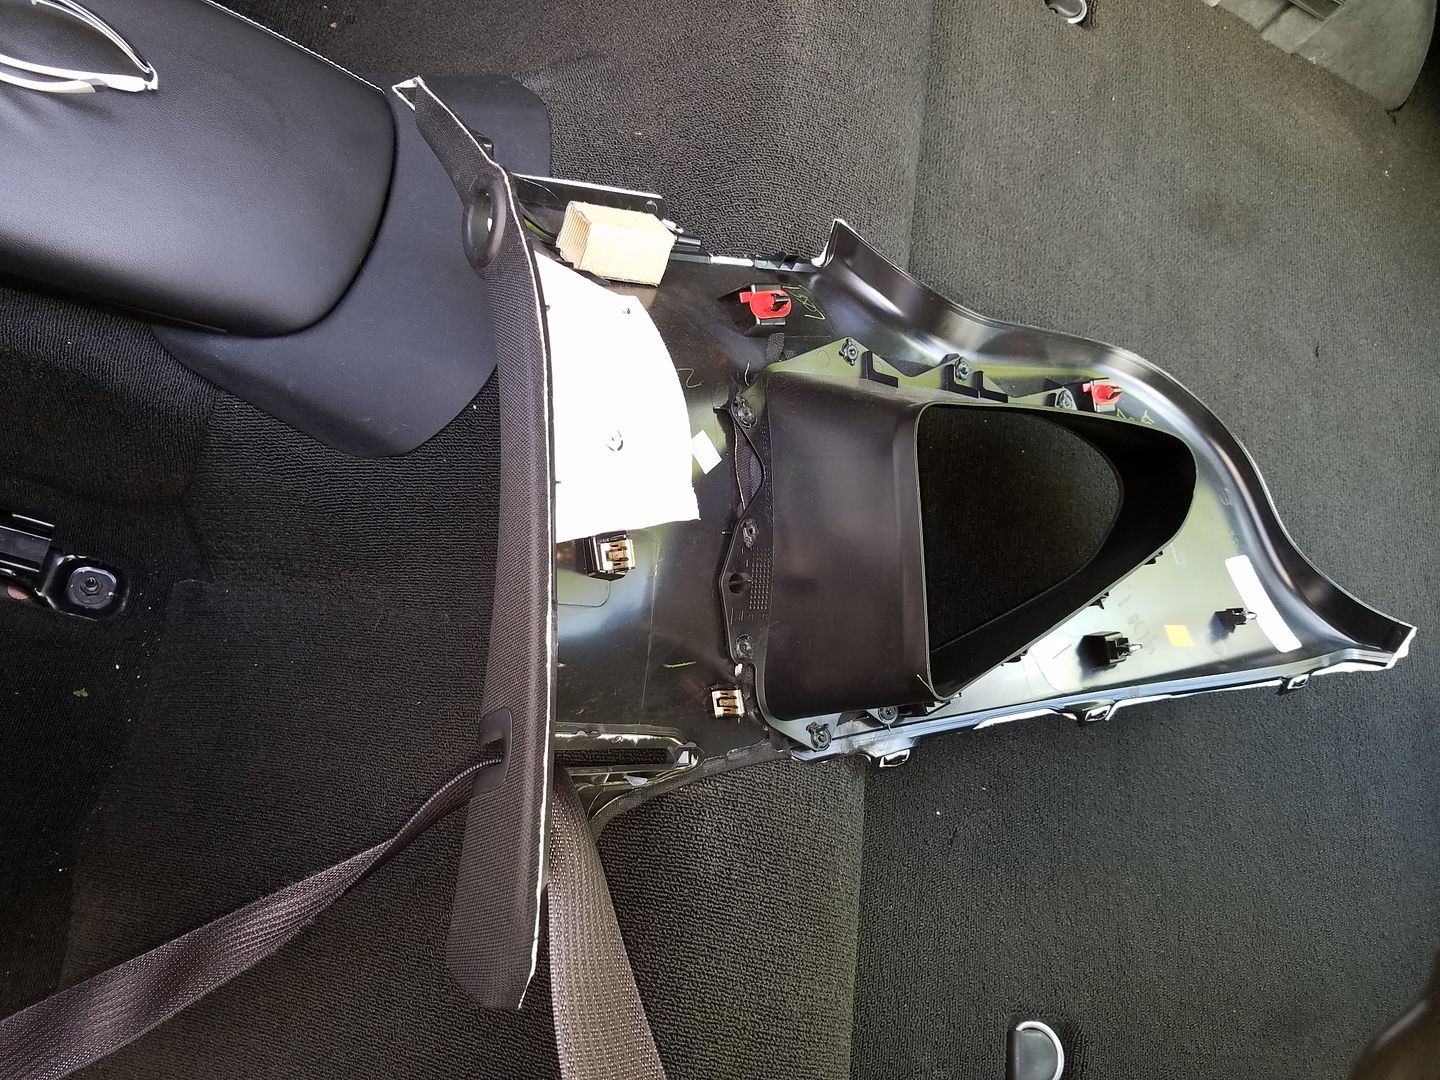
This pic shows what is behind the small triangular trim panel.
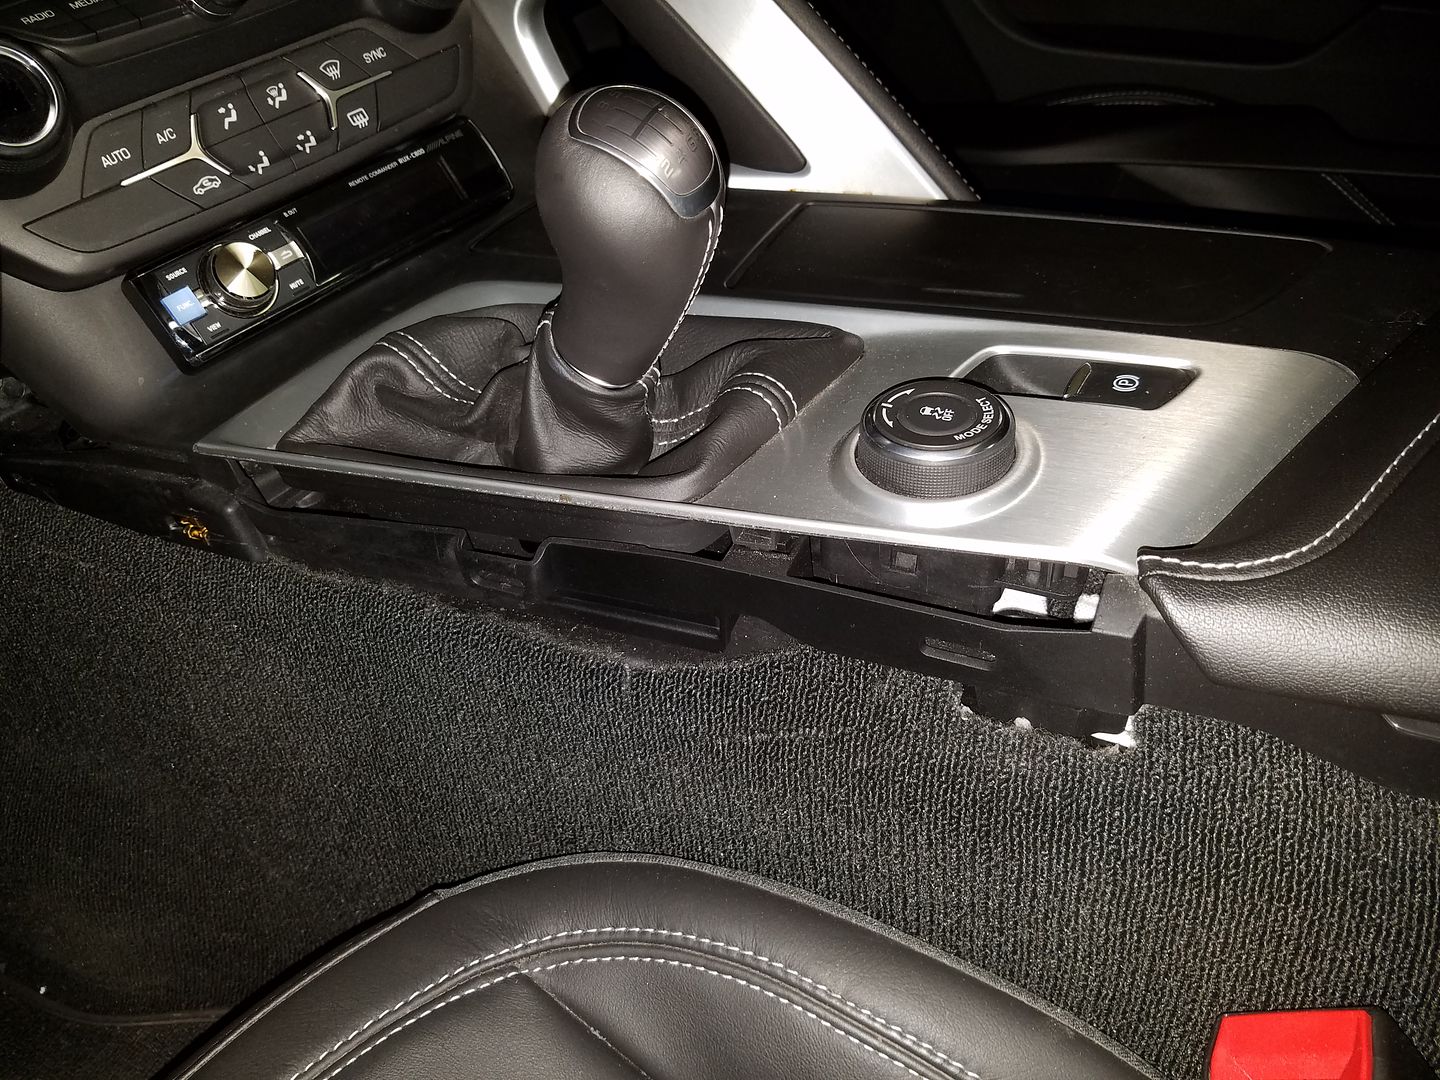
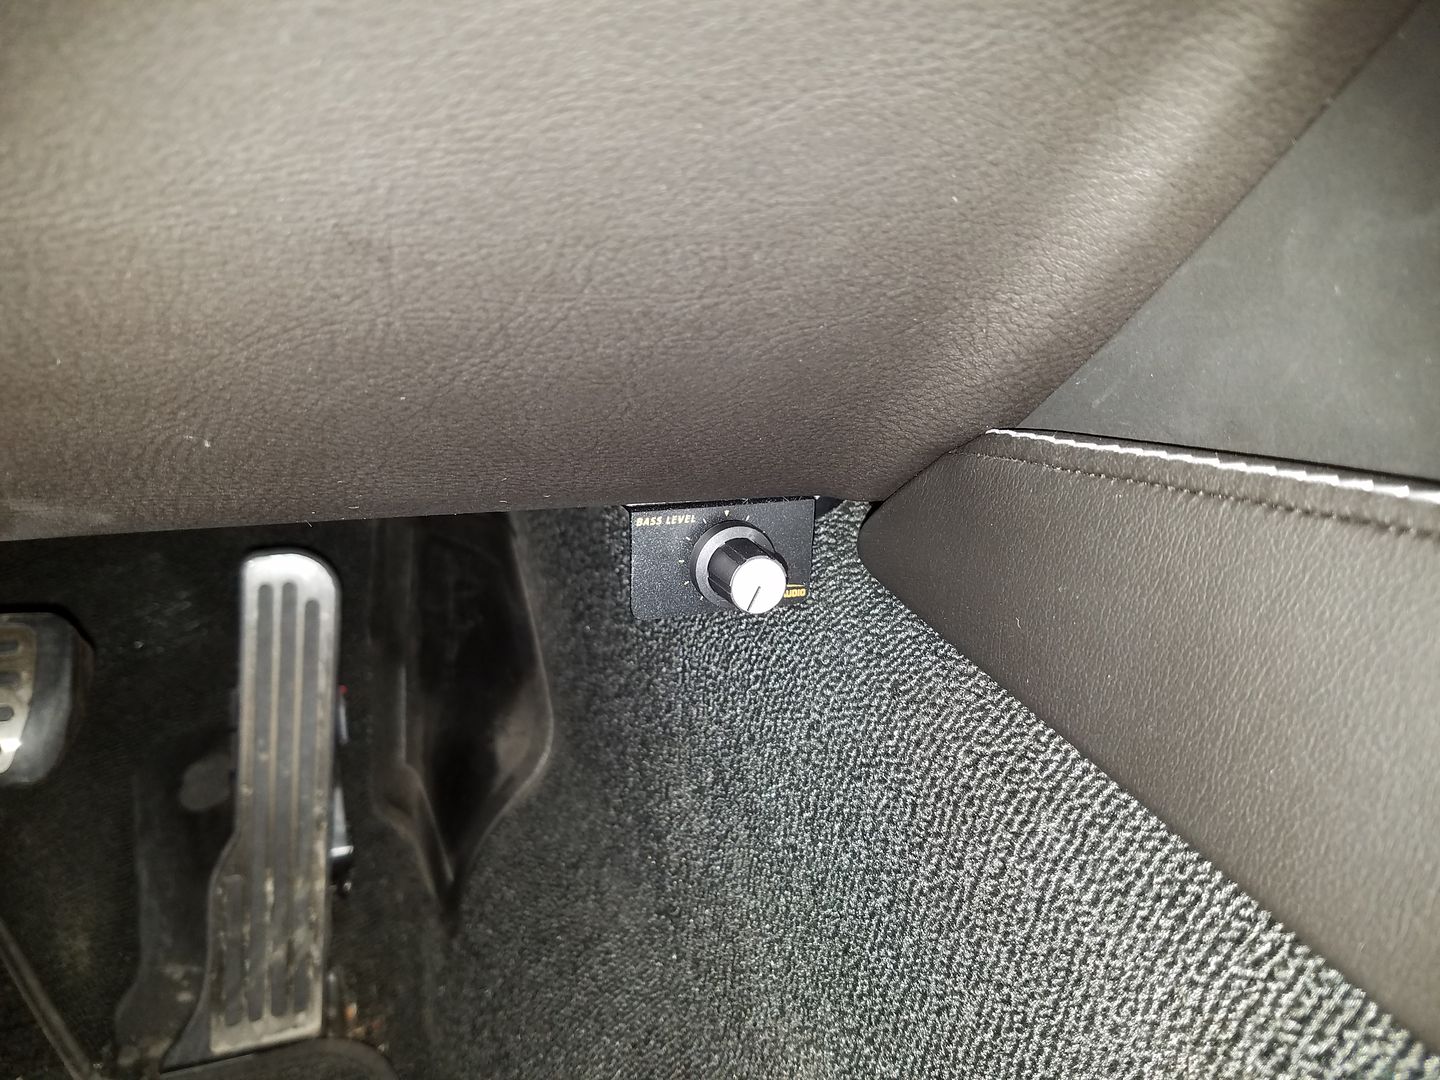
As in all my cars, the gain **** for the sub amp is a staple. Nothing like having 2,500 watts at your fingertips, yet hidden enough so no passenger has access.
Finished pic:
First impressions
As simple as this install is it has may benefits. The rotary **** volume control is as easy to access as it can be. The 12V socket can still be used. The screen view is blocked by the shifter in normal use but it's not exactly displaying much information anyway. All the playback information will be on the phone. More on this later. However the screen is not blocked in gears 2, 4, 6, and 7. So while stationary with the engine off the screen can be viewed for tuning. It may not matter much because I can pull the controller with the dash plaque on the back and hold it as a game controller for tuning.
Despite the fact that it's just held by double sticky tape the feel is firm and I can press on the buttons as hard I need to without much wiggle.
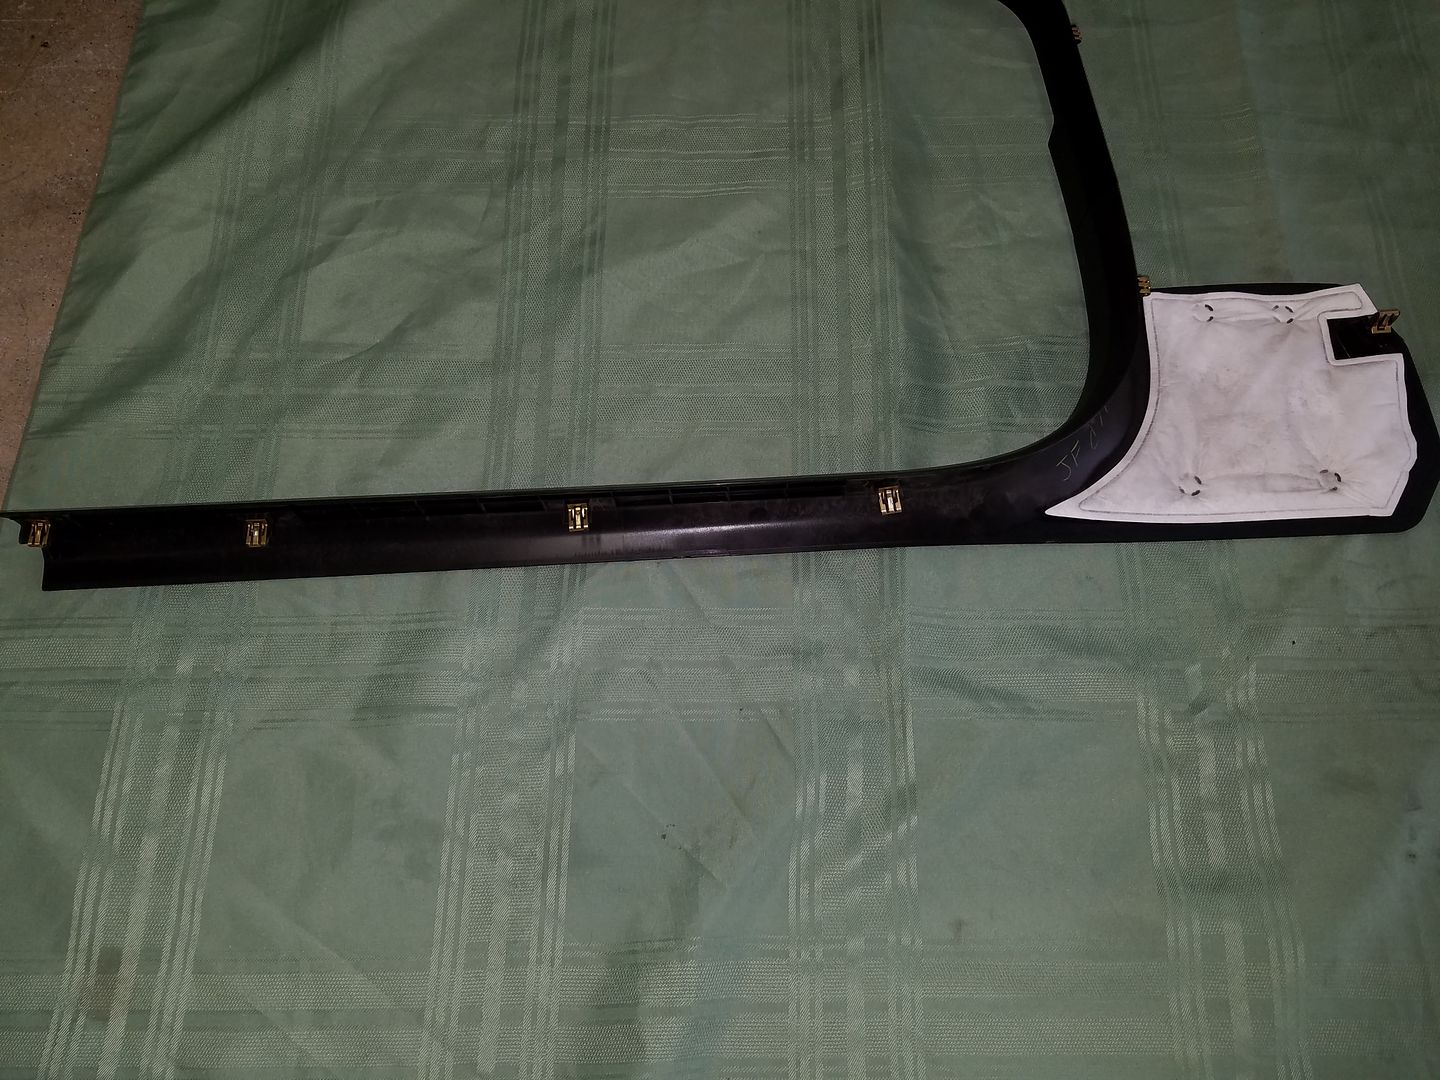
Other pics for fellow Corvette owners that want to pry
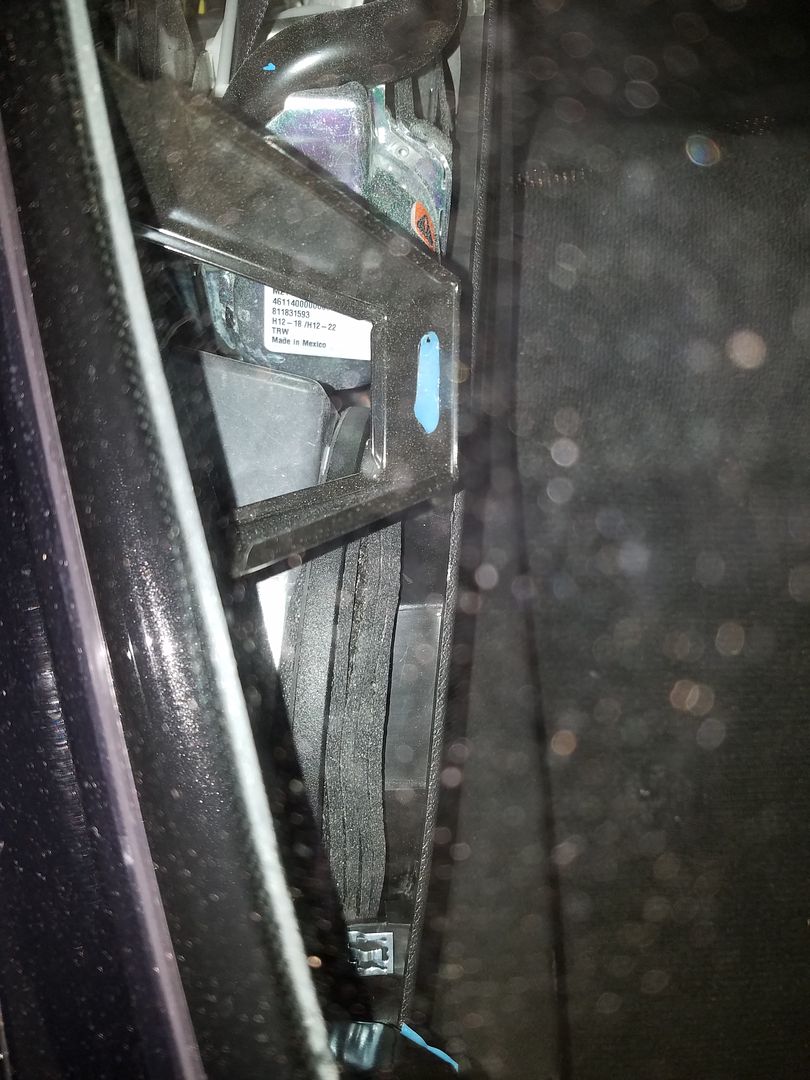
, or simply for those interested on how the car is put together. From the dash back it's all clips so there is no trick to taking off the car panels until you get to the rear speaker covers which have an obvious screw-hook.
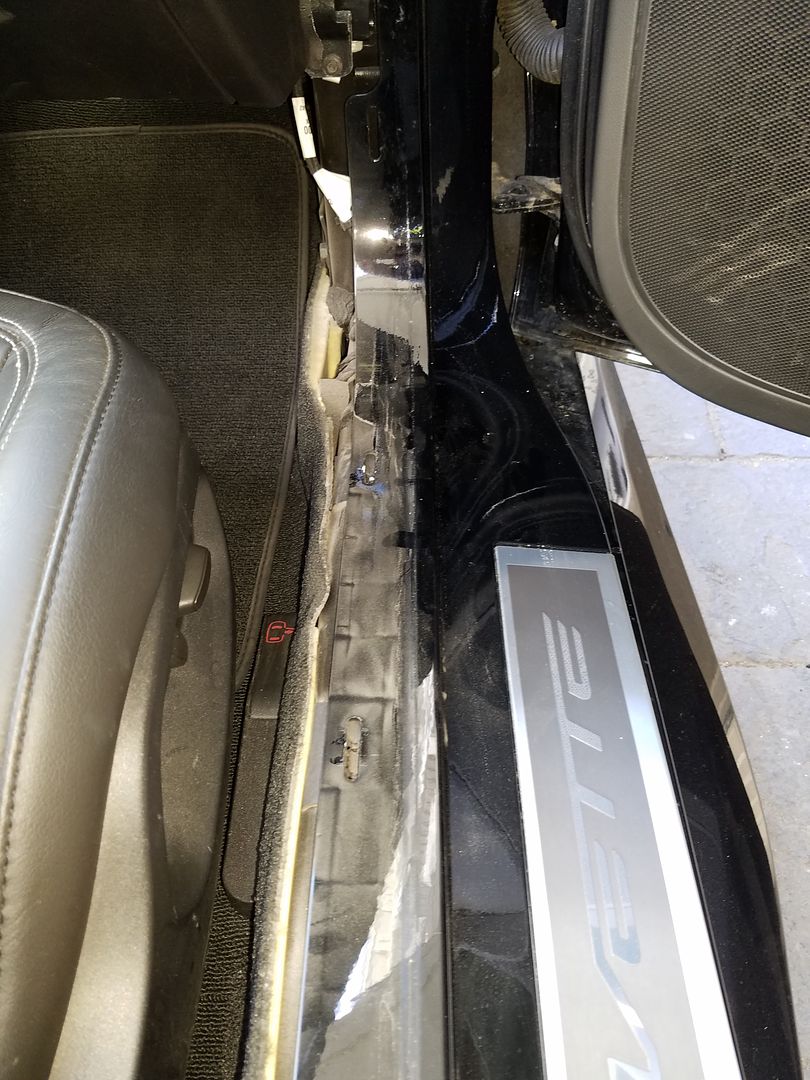
Halo cover and door sills. Zoom in to see the clips better.
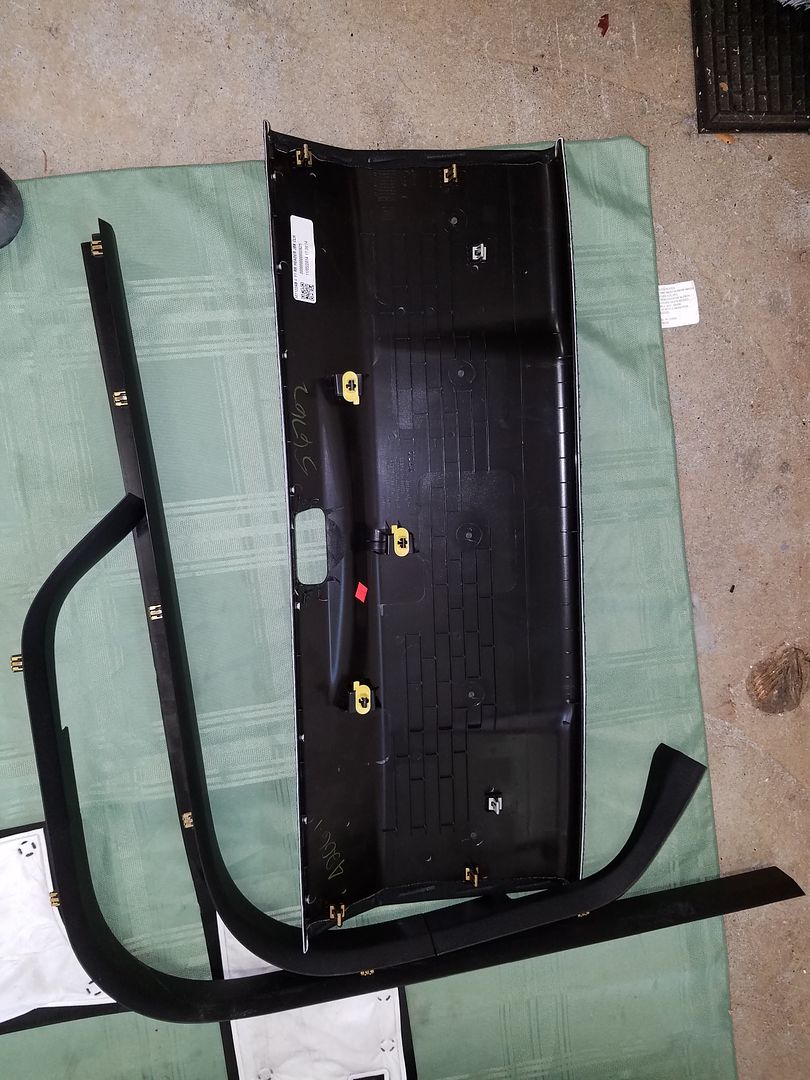
With door sills removed all you have to do is remove the two screws holding the manual door release cables to run wires. No need to remove the carpet or seats.
Be careful when removing this piece. The clips run at 90 degree angles which is always risky when prying.

All clips around the rear side windows as well. Remove the halo trim piece first and the rear speaker covers before you get to this one.
I never really liked the plaque displaying all the low slung horses. The benefits of tearing it up are then many. To start off I placed some double sticky on the back of the Alpine controller and placed it on top of the plaque. Pulling on the controller takes out the plaque out of the dash entirely. That makes for an easy to disconnect and stow away controller for parking in shady neighborhoods. The install was a breeze, just double sticky tape and drilling a couple of holes. The panel itself can be replaced fairly easily, kids nowadays add carbon fiber (finish) ones in just about every car. I like to believe I drilled away the obnoxious and made it functional!
To run the wire, just disconnect two pieces of the center trim. All clips. When removing the center tunnel side trim make sure to pull towards the back of the car after the clips have been take care of. Putting it back requires that the notched end goes in the dash at the tip before the clips are pushed in firmly.
This pic shows what is behind the small triangular trim panel.
As in all my cars, the gain **** for the sub amp is a staple. Nothing like having 2,500 watts at your fingertips, yet hidden enough so no passenger has access.
Finished pic:
First impressions
As simple as this install is it has may benefits. The rotary **** volume control is as easy to access as it can be. The 12V socket can still be used. The screen view is blocked by the shifter in normal use but it's not exactly displaying much information anyway. All the playback information will be on the phone. More on this later. However the screen is not blocked in gears 2, 4, 6, and 7. So while stationary with the engine off the screen can be viewed for tuning. It may not matter much because I can pull the controller with the dash plaque on the back and hold it as a game controller for tuning.
Despite the fact that it's just held by double sticky tape the feel is firm and I can press on the buttons as hard I need to without much wiggle.
Other pics for fellow Corvette owners that want to pry
, or simply for those interested on how the car is put together. From the dash back it's all clips so there is no trick to taking off the car panels until you get to the rear speaker covers which have an obvious screw-hook.
Halo cover and door sills. Zoom in to see the clips better.
With door sills removed all you have to do is remove the two screws holding the manual door release cables to run wires. No need to remove the carpet or seats.
Be careful when removing this piece. The clips run at 90 degree angles which is always risky when prying.
All clips around the rear side windows as well. Remove the halo trim piece first and the rear speaker covers before you get to this one.
The following users liked this post:
Speedfreaq (12-07-2017)


The following users liked this post:
SBC_and_a_stick (03-24-2016)
03-24-2016, 04:49 PM
#33
Safety Car
Thread Starter
Super. For the most part this forum is a ghostown when it comes to audio upgrades.  It must freak people out that we're adding weight but to be honest the Corvette has always had a heavy practical appeal. It's a stunning car for audio building. One of the best of all times.
It must freak people out that we're adding weight but to be honest the Corvette has always had a heavy practical appeal. It's a stunning car for audio building. One of the best of all times.
Last edited by SBC_and_a_stick; 03-24-2016 at 04:49 PM.
03-27-2016, 04:10 AM
#34
Safety Car
Thread Starter
Mixing theory with raw data
Before it all materialized in boxes at my door I modeled the Vifa subs in WinISD. Predictions not worth producing here showed an overall Qtc of .98 using the OEM provided TS specs. I was a bit upset to see the actual Qtc tested in the built box with all 8 subs mounted to it at 1.11. From this I had two questions to answer, (1) why was the Q larger than predicted, and (2) is the Q of 1.11 producing a group delay that is audible.
(1) why was the Q larger than predicted
I find that the Vifa subs always have a higher FS than stated in the white sheets and a higher Qts. When I plug in one of the specs as tested with the Woofer Tester 2 in WinISD I get a Q over 1.11. Theory matches raw data now. So the culprit is that the OEM states more respectable numbers than you get in the box. Perhaps with a bit of break in the speakers will mimic the OEM specs. In either case, here is what I found. It's rare we get 8 drivers of the same type to test!!!
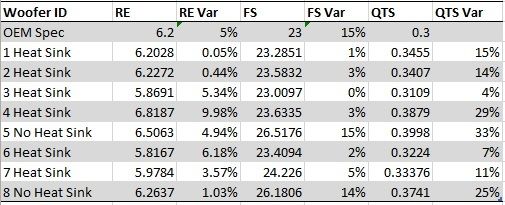
This is a quick listing of the most relevant three TS specs, resistance, resonant frequency, and Qts. In the first row I listed the OEM white sheet specs. In "Var" columns I listed the variance listed in the white sheet specs if any was listed. I find that the FS is accurate albeit with 15% variance as noted by Vifa. Only two drivers exhibit that much variance, and both are the ones without heatsink. Odd, but this is evidence there may be a larger coil in the heat sink models, lowering FS due to mass. I find that the RE varies more than Vifa states at up to 10% vs. 5%, so double! Not cool. QTS varies a lot too, and it's always larger than the spec sheet, which is why the Qtc ended up higher. Now it adds up. Whether it's due to lack of break in, Vifa using a different way to test, or something else is anyone's guess.
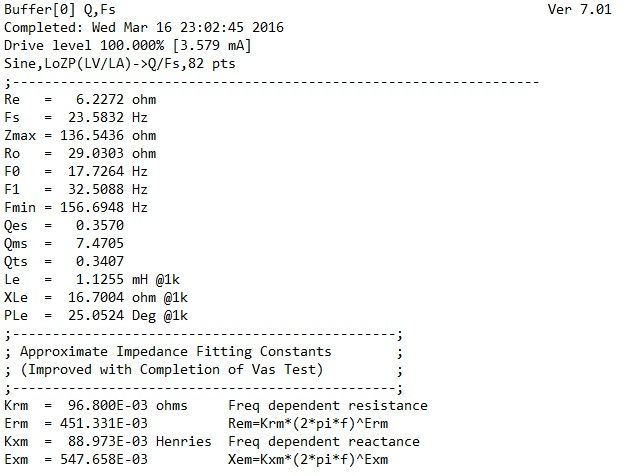
Here is an example of one full set of results. The LE is more than double what Vifa states, which is also not cool.
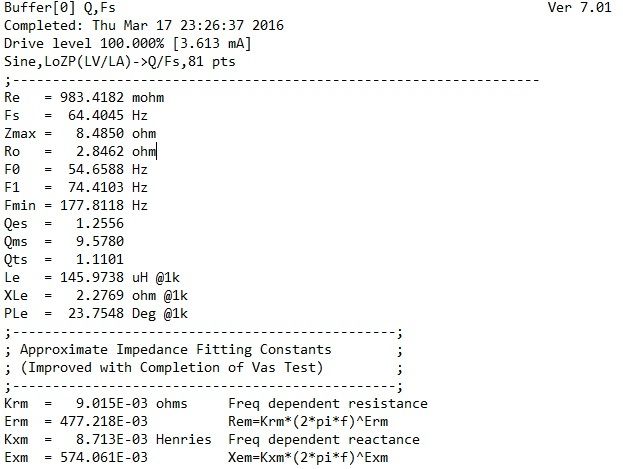
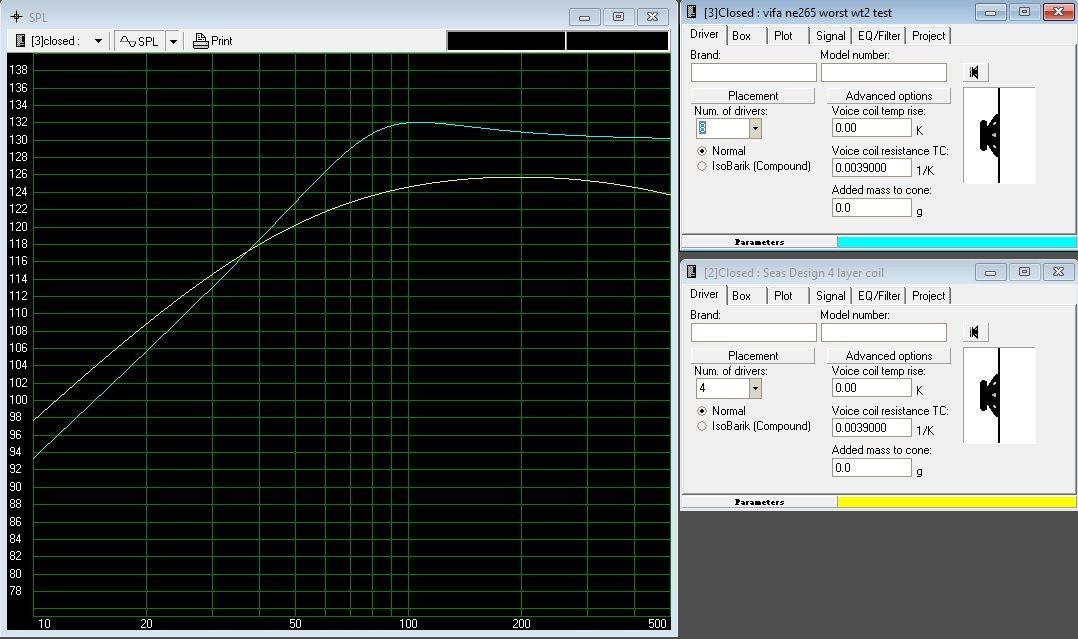
So what does it all look like if you test all 8 woofers mounted in the box with polyfill? Like this. QTC=1.11, FSC=64.4, RE=.983. So I get the 1 ohm load as expected. Q is a bit high but it is what it is. So next, let's see what implications it has.
(2) is the Q of 1.11 producing a group delay that is audible?
Folks avoid small sealed boxes presumably because they may sound "boomy" or "resonant." Whatever the subjective word choice the theory hints at group delay. Is it high with this box? More importantly, is it audible? I find that it's not even audible. I predicted group delay using the TS parameters of the worst testing Vifa sub in the stable. To assess whether the group delay is audible I use the rule of thumb that delay time in msec X frequency = <400 delay isn't audible. This is imo a much much improved rule of thumb than "20ms" or any other single number.
In blue I've plotted the maximum delay you can get away with and not have it be audible. The box I built is below that throughout the range 20hz to 200hz. The closest it gets to audible is at 80hz 4.5ms actual vs. 5ms audible. To me it looks like you really have to make a tight box to have audible group delay. It is however fairly easy to make a box too small for low midrange speakers. I know I've made a few too many small midrange boxes the resonated pretty badly!
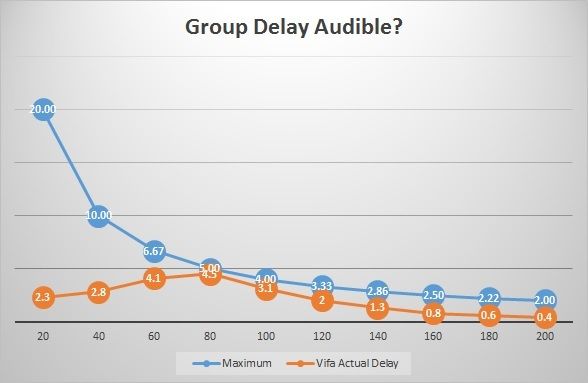
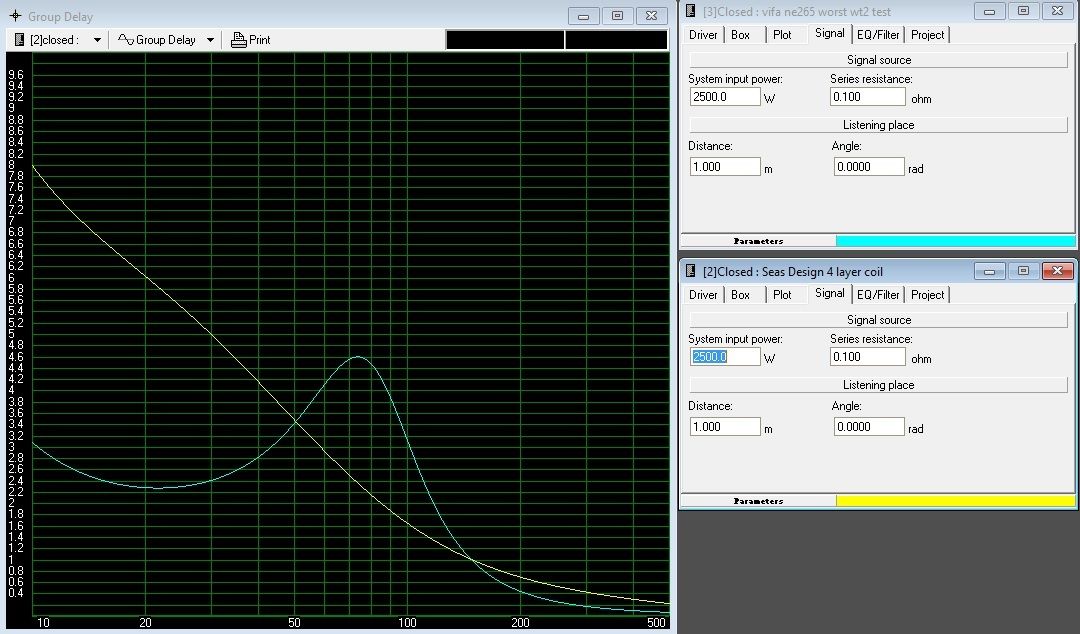
A second way to see whether the group delay is acceptable or not is to plot it vs. a system that is presumably top notch in terms of group delay. I've simulated 4 Seas 10" subs, the L26ro4y that models to a small Q of .53 in my box, which is ideal for group delay. See the comparison plot below. The Vifa arrangement has lower group delay below 50 and over 150 and it is generally comparable. We can't talk group delay without talking amplitude. Since the subwoofer will be crossed 63hz 4th order, the group delay in-band 20hz-63hz is more important than over 63hz. The Vifa system has substantially lower group delay below 50hz.
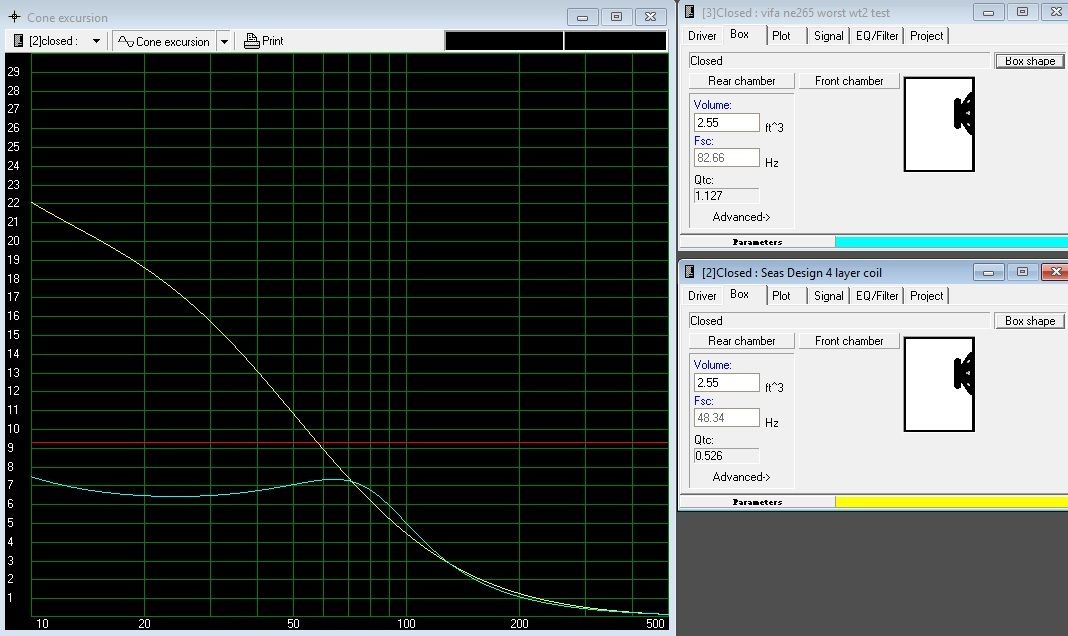
While we're at it, check out the excursion at 2,500 watts. 7.5 mm or under, well below xmax! Should be the lowest harmonic distortion systems I've ever had. Xmax is 9.3mm and xmech is 16.8mm.
SPL
Before it all materialized in boxes at my door I modeled the Vifa subs in WinISD. Predictions not worth producing here showed an overall Qtc of .98 using the OEM provided TS specs. I was a bit upset to see the actual Qtc tested in the built box with all 8 subs mounted to it at 1.11. From this I had two questions to answer, (1) why was the Q larger than predicted, and (2) is the Q of 1.11 producing a group delay that is audible.
(1) why was the Q larger than predicted
I find that the Vifa subs always have a higher FS than stated in the white sheets and a higher Qts. When I plug in one of the specs as tested with the Woofer Tester 2 in WinISD I get a Q over 1.11. Theory matches raw data now. So the culprit is that the OEM states more respectable numbers than you get in the box. Perhaps with a bit of break in the speakers will mimic the OEM specs. In either case, here is what I found. It's rare we get 8 drivers of the same type to test!!!
This is a quick listing of the most relevant three TS specs, resistance, resonant frequency, and Qts. In the first row I listed the OEM white sheet specs. In "Var" columns I listed the variance listed in the white sheet specs if any was listed. I find that the FS is accurate albeit with 15% variance as noted by Vifa. Only two drivers exhibit that much variance, and both are the ones without heatsink. Odd, but this is evidence there may be a larger coil in the heat sink models, lowering FS due to mass. I find that the RE varies more than Vifa states at up to 10% vs. 5%, so double! Not cool. QTS varies a lot too, and it's always larger than the spec sheet, which is why the Qtc ended up higher. Now it adds up. Whether it's due to lack of break in, Vifa using a different way to test, or something else is anyone's guess.
Here is an example of one full set of results. The LE is more than double what Vifa states, which is also not cool.
So what does it all look like if you test all 8 woofers mounted in the box with polyfill? Like this. QTC=1.11, FSC=64.4, RE=.983. So I get the 1 ohm load as expected. Q is a bit high but it is what it is. So next, let's see what implications it has.
(2) is the Q of 1.11 producing a group delay that is audible?
Folks avoid small sealed boxes presumably because they may sound "boomy" or "resonant." Whatever the subjective word choice the theory hints at group delay. Is it high with this box? More importantly, is it audible? I find that it's not even audible. I predicted group delay using the TS parameters of the worst testing Vifa sub in the stable. To assess whether the group delay is audible I use the rule of thumb that delay time in msec X frequency = <400 delay isn't audible. This is imo a much much improved rule of thumb than "20ms" or any other single number.
In blue I've plotted the maximum delay you can get away with and not have it be audible. The box I built is below that throughout the range 20hz to 200hz. The closest it gets to audible is at 80hz 4.5ms actual vs. 5ms audible. To me it looks like you really have to make a tight box to have audible group delay. It is however fairly easy to make a box too small for low midrange speakers. I know I've made a few too many small midrange boxes the resonated pretty badly!
A second way to see whether the group delay is acceptable or not is to plot it vs. a system that is presumably top notch in terms of group delay. I've simulated 4 Seas 10" subs, the L26ro4y that models to a small Q of .53 in my box, which is ideal for group delay. See the comparison plot below. The Vifa arrangement has lower group delay below 50 and over 150 and it is generally comparable. We can't talk group delay without talking amplitude. Since the subwoofer will be crossed 63hz 4th order, the group delay in-band 20hz-63hz is more important than over 63hz. The Vifa system has substantially lower group delay below 50hz.
While we're at it, check out the excursion at 2,500 watts. 7.5 mm or under, well below xmax! Should be the lowest harmonic distortion systems I've ever had. Xmax is 9.3mm and xmech is 16.8mm.
SPL
The following users liked this post:
bjmsam (03-18-2017)
03-29-2016, 05:00 PM
#35
Safety Car
Thread Starter
First breath of 12V
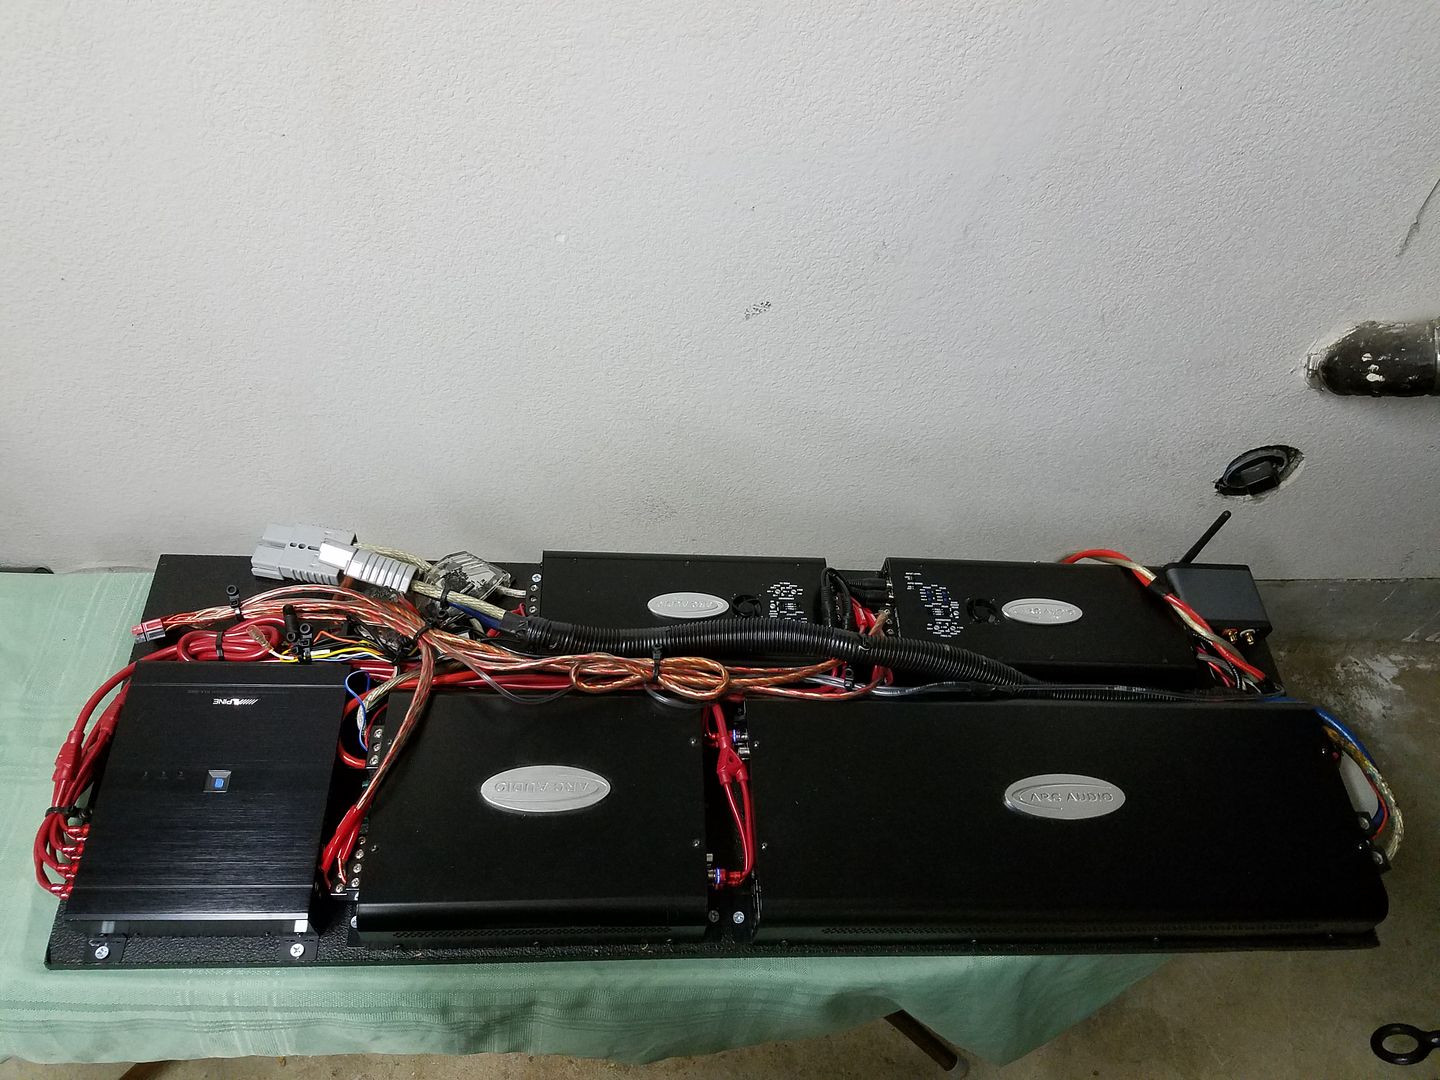
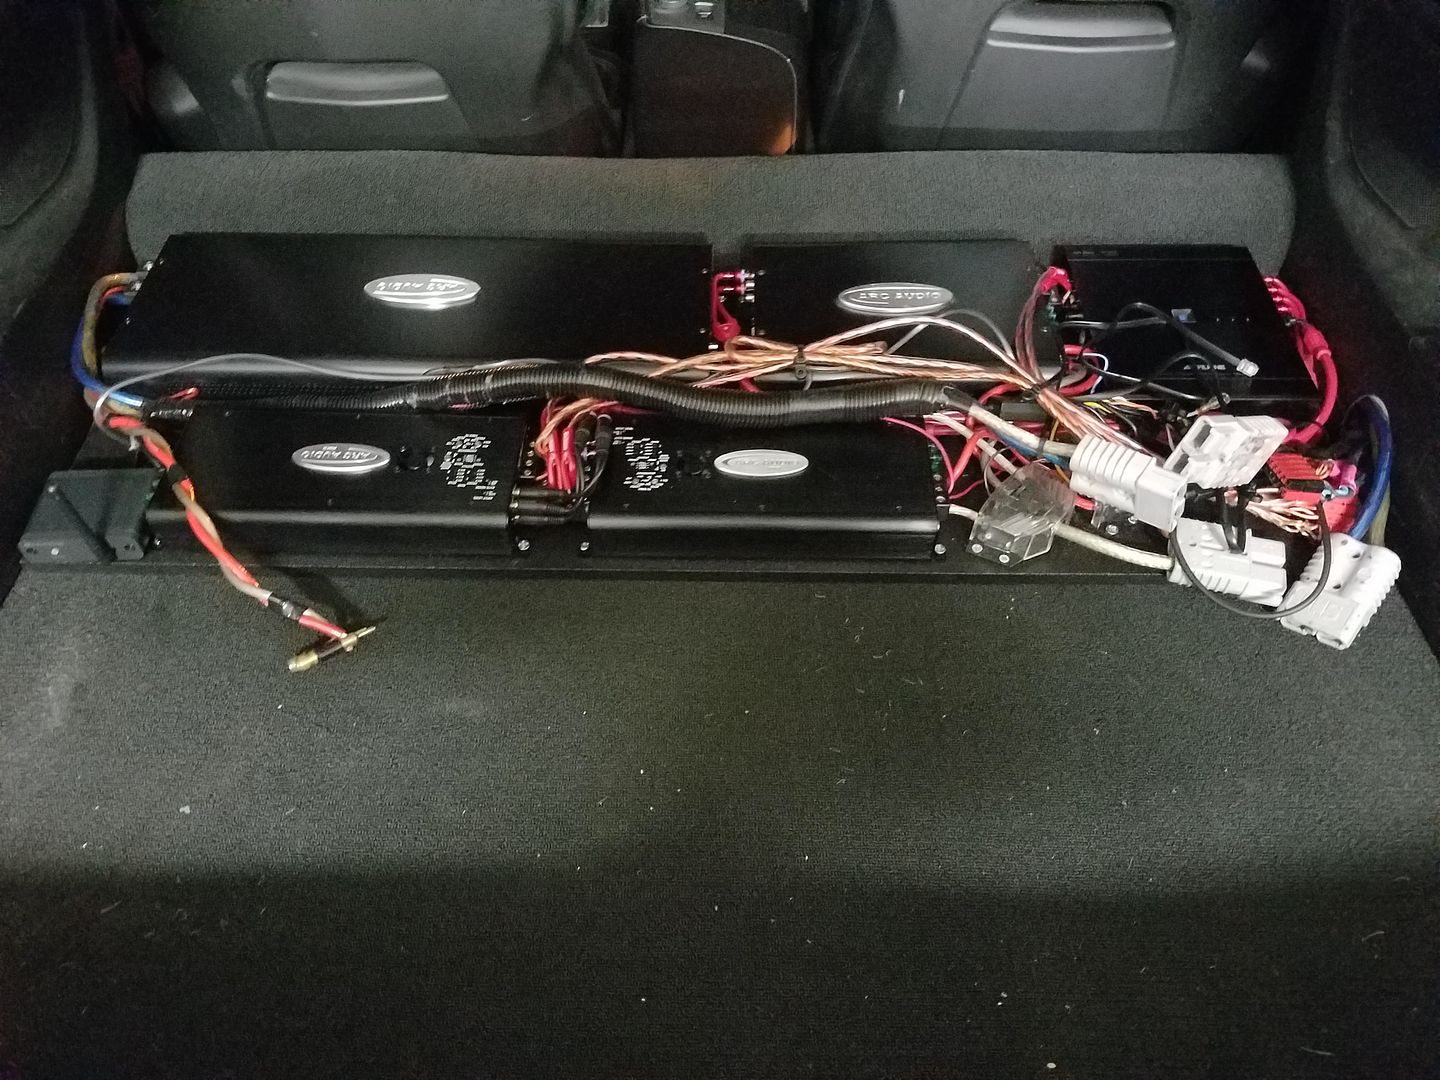
The amp rack is the final piece to the puzzle. It's a 1/2" MDF board coated in 3 layers of Duratex. I wanted an amprack that allows all components to have open air top and sides for cooling, and be light for easy removal. On the amp rack, which measures 15"x 42" I have:
*Arc Audio KS 2500.1 wired at 1 ohm for 2,500 watts @ 1% THD (powering the 8 Vifa 10" subs)
*Arc Audio KS 300.4 wired at 2 ohm for 350 watts x 2 @ 1% THD (powering the door mounted 10" B&C mids/midbass)
*Arc Audio KS 125.4 wired at 2 ohm for 250 watts x 2 @ 1% THD (powering the a-pillar mounted AMT tweeters)
*Arc Audio KS 125.4 wired at 4 ohms for 150 watts x 2 @ 1% THD (powering the 6.5 Satori drivers fullrange)
*Alpine H800 processor
*Audioengine B1 bluetooth receiver
*A 12V to 5V converter for the bluetooth receiver
*Monster Cable 300 series fan over thread power distributors
*Monster Cable 300 series RCA jacks
*Optical cable connection from BT receiver to Alpine processor
*Two Anderson Powerpole 175 AMP power quick disconnects
*Six Anderson Powerpole 30 AMP speaker wire quick disconnects
There is still some wire cleaning to be done
Digital to analog conversions
1. Sound starts off in the digital world typically in Spotify. I have it set at 320 kbps, which is the max fidelity setting. I can find 99% of what I want on Spotify and I can't tell the difference between 320 kbps and 1,440 kbps (CD quality).
2. My Samsung Galaxy S7 Edge sends it out through Bluetooth AptX encoding, remaining in the digital world. AptX compression is 352 kbps and again I can't tell the difference between it and CD quality. I've compared it to normal bluetooth (SBC) and the difference is night and day.
3. The bluetooth receiver, Audioengine B1 receives the AptX signal and decodes it. It passes it out through optical afterwards remaining in digital format.
4. The Alpine H800 receives the digital feed, applies the Pro Logic II algorithm and filters it channel by channel. The signal is converted for the first time and only time to analog for amplification and sent to the amps via RCA cables.
5. Amplifiers are ran filter less except the monoblock which has to apply a bandbass filter of 10hz HPF and 230 LPF. All signals except that of the subwoofer are in the digital domain, all active.
The idea for filtering was to run a proper Pro Logic II steering algorithm with rear speakers and 2 way front plus sub. The signal path has only one digital to analog conversion and that's in the Alpine unit using top notch DACs. The digital signal is compressed as little as possible while being wireless and easy to tune into.
Filters applied:
Sub: I wanted no subsonic but the amplifier requires a HPF. The minimum filtering the Arc amp will allow is 10hz subsonic so I'm using that. Note also that it is -3db @15hz due to the natural rolloff of the amplifier circuitry. LPF is set at 63hz 24db
Midbass: 63hz to 1,000hz 24 db
Tweeters: 1,000hz to 20,000hz
Rear: 160hz to 20,000hz
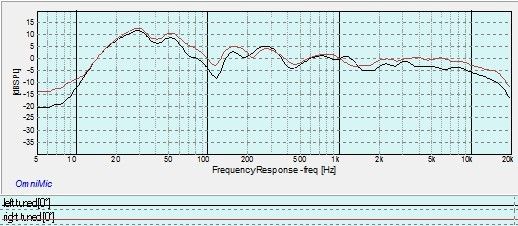
Response out of the box, passenger is red coded:

The sub digs down deep! Same output at 20hz as it has at 63hz. You have to love the way this car loads. I also venture to say that having eight subs means I'm reducing cabin nulls to a minimum.
The sub frequency response is a typical car audio dual peak at 30hz and 55hz. The 30Hz peak is higher so I could have made the box even smaller.
The midbass drivers drop like a rock below 140hz. This must be the Pro Audio nature of the driver. Even free air in a car door the bottom end is weak. Subjectively it sounds super snappy, which again indicates a sharp rolloff.
The tweeters have a progressive rolloff starting at 8khz. By 20khz, they are 20db down. Without tuning the top end was clearly not there.
1 hour tuning job
This is the first time I used the Alpine H800 and RUX so it took me a little to get to use it. It was intuitive and got a lot done at 2am to 3am!
I extended the top end response out to 18khz where it is now only 3db down. I like a progressive rolloff of the highs just not as much as it was out of the box. The most I added was 5db of boost at 20khz. There is lots left in the processor. Boosted every step under decreasing by 1db. I cut a bunch of the low midrange out because it was peaky. Everything else didn't seem to work. I couldn't fill in the midbass and I couldn't get rid of the dual sub peak. Next time.
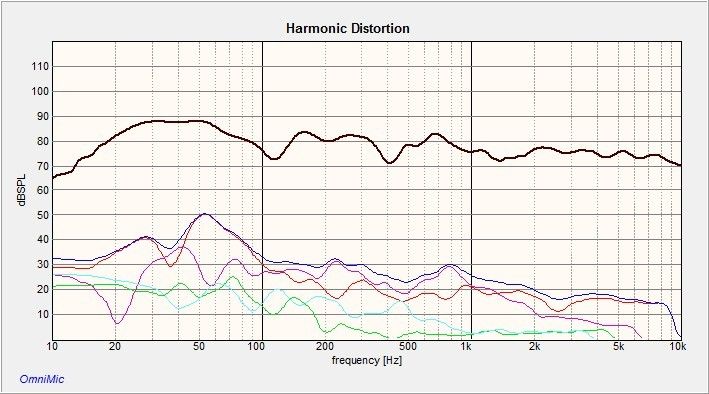
Harmonic distortion
I increased the system output until my ears could no longer tolerate it for more than 5 seconds. Ignore the SPL scale. My omnimic doesn't seem to report the proper output level, not sure why. I can't get it out of the 90db range lol. I'm guessing I was at over 110db by any weighing. This is with the tweeter crossed at 1,6hz. I forgot to test it after lowering xover to 1,000khz. As you can see harmonic distortion is nonexistant. Below .4% throughout except at 63hz where it is 1.3%. The highest distortion award goes to the midbass drivers. The B&Cs are the first to struggle, and that is right above the HPF.
The amp rack is the final piece to the puzzle. It's a 1/2" MDF board coated in 3 layers of Duratex. I wanted an amprack that allows all components to have open air top and sides for cooling, and be light for easy removal. On the amp rack, which measures 15"x 42" I have:
*Arc Audio KS 2500.1 wired at 1 ohm for 2,500 watts @ 1% THD (powering the 8 Vifa 10" subs)
*Arc Audio KS 300.4 wired at 2 ohm for 350 watts x 2 @ 1% THD (powering the door mounted 10" B&C mids/midbass)
*Arc Audio KS 125.4 wired at 2 ohm for 250 watts x 2 @ 1% THD (powering the a-pillar mounted AMT tweeters)
*Arc Audio KS 125.4 wired at 4 ohms for 150 watts x 2 @ 1% THD (powering the 6.5 Satori drivers fullrange)
*Alpine H800 processor
*Audioengine B1 bluetooth receiver
*A 12V to 5V converter for the bluetooth receiver
*Monster Cable 300 series fan over thread power distributors
*Monster Cable 300 series RCA jacks
*Optical cable connection from BT receiver to Alpine processor
*Two Anderson Powerpole 175 AMP power quick disconnects
*Six Anderson Powerpole 30 AMP speaker wire quick disconnects
There is still some wire cleaning to be done
Digital to analog conversions
1. Sound starts off in the digital world typically in Spotify. I have it set at 320 kbps, which is the max fidelity setting. I can find 99% of what I want on Spotify and I can't tell the difference between 320 kbps and 1,440 kbps (CD quality).
2. My Samsung Galaxy S7 Edge sends it out through Bluetooth AptX encoding, remaining in the digital world. AptX compression is 352 kbps and again I can't tell the difference between it and CD quality. I've compared it to normal bluetooth (SBC) and the difference is night and day.
3. The bluetooth receiver, Audioengine B1 receives the AptX signal and decodes it. It passes it out through optical afterwards remaining in digital format.
4. The Alpine H800 receives the digital feed, applies the Pro Logic II algorithm and filters it channel by channel. The signal is converted for the first time and only time to analog for amplification and sent to the amps via RCA cables.
5. Amplifiers are ran filter less except the monoblock which has to apply a bandbass filter of 10hz HPF and 230 LPF. All signals except that of the subwoofer are in the digital domain, all active.
The idea for filtering was to run a proper Pro Logic II steering algorithm with rear speakers and 2 way front plus sub. The signal path has only one digital to analog conversion and that's in the Alpine unit using top notch DACs. The digital signal is compressed as little as possible while being wireless and easy to tune into.
Filters applied:
Sub: I wanted no subsonic but the amplifier requires a HPF. The minimum filtering the Arc amp will allow is 10hz subsonic so I'm using that. Note also that it is -3db @15hz due to the natural rolloff of the amplifier circuitry. LPF is set at 63hz 24db
Midbass: 63hz to 1,000hz 24 db
Tweeters: 1,000hz to 20,000hz
Rear: 160hz to 20,000hz
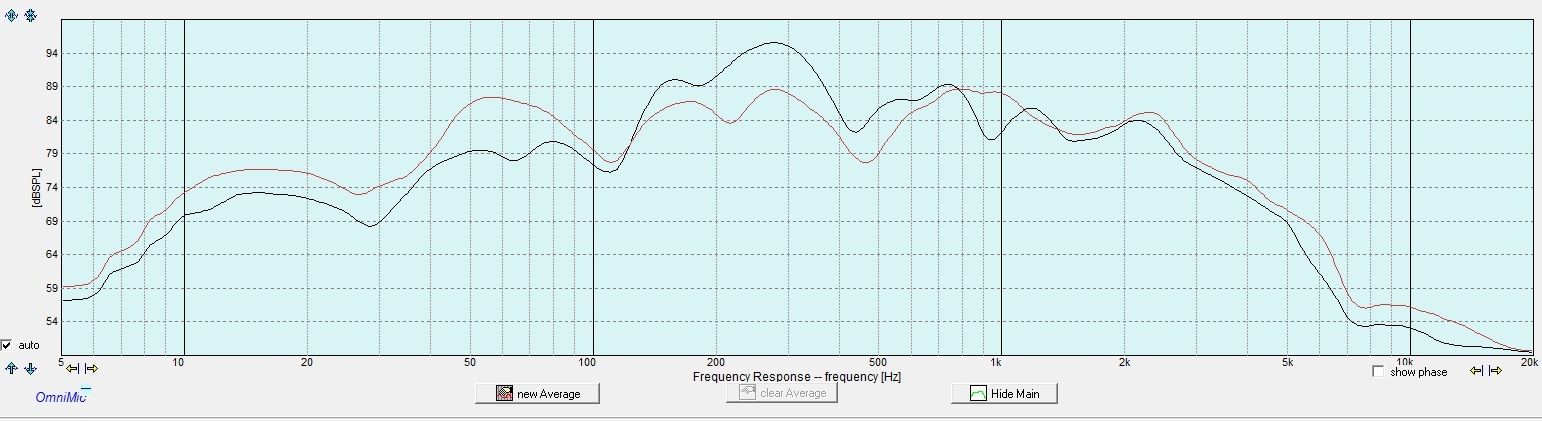
Response out of the box, passenger is red coded:
The sub digs down deep! Same output at 20hz as it has at 63hz. You have to love the way this car loads. I also venture to say that having eight subs means I'm reducing cabin nulls to a minimum.
The sub frequency response is a typical car audio dual peak at 30hz and 55hz. The 30Hz peak is higher so I could have made the box even smaller.
The midbass drivers drop like a rock below 140hz. This must be the Pro Audio nature of the driver. Even free air in a car door the bottom end is weak. Subjectively it sounds super snappy, which again indicates a sharp rolloff.
The tweeters have a progressive rolloff starting at 8khz. By 20khz, they are 20db down. Without tuning the top end was clearly not there.
1 hour tuning job
This is the first time I used the Alpine H800 and RUX so it took me a little to get to use it. It was intuitive and got a lot done at 2am to 3am!
I extended the top end response out to 18khz where it is now only 3db down. I like a progressive rolloff of the highs just not as much as it was out of the box. The most I added was 5db of boost at 20khz. There is lots left in the processor. Boosted every step under decreasing by 1db. I cut a bunch of the low midrange out because it was peaky. Everything else didn't seem to work. I couldn't fill in the midbass and I couldn't get rid of the dual sub peak. Next time.
Harmonic distortion
I increased the system output until my ears could no longer tolerate it for more than 5 seconds. Ignore the SPL scale. My omnimic doesn't seem to report the proper output level, not sure why. I can't get it out of the 90db range lol. I'm guessing I was at over 110db by any weighing. This is with the tweeter crossed at 1,6hz. I forgot to test it after lowering xover to 1,000khz. As you can see harmonic distortion is nonexistant. Below .4% throughout except at 63hz where it is 1.3%. The highest distortion award goes to the midbass drivers. The B&Cs are the first to struggle, and that is right above the HPF.
The following users liked this post:
bjmsam (03-18-2017)
03-31-2016, 06:27 PM
#36
Safety Car
Thread Starter
2 day review
Overall the Car is sounding great! It shines at playing back goa trance and deep house. I particularly wanted something that plays house well. It's got the output of a club but it's more refined, especially when it comes to lower octave quality. It's flat and easy to listen to, maintains composure at all SPL. The only two things I'm missing from my previous builds is that BG planar midrange transparency and a larger direct to radiated sound ratio in the top octaves. It's better everywhere else.
SPL
I've put on there some of my all time most demanding tracks and haven't found the limits of any of the drivers and I get the feeling I'm far from it. I back away from cranking it more once my ears get plugged after a couple of songs. With subs I can typically tell they are close to the limit because the Q goes up audibly and the low end disappears. Not so with this one. The midbass is typically easy to bottom out or to heat up the coil with continuous low midrange but these ones are very well composed. The AMT line array is not struggling with any crossover 1khz to 1.6khz that I've tried so far. Hands down the most capable sound system I've built so far.
Harmonic distortion
Inaudible as far as I can tell.
Frequency response
Needs a little work. There are obvious cuts over 100hz to 20,000hz. The sound is pleasing and easy but misses a bit of reference detail I've come to expect from my Home Theater built. I need to spend a lot more time tuning and I'm still rolling off the top end a little too much for my taste.
Midbass got 5db of boost at 110hz with 0.5Q. The improvement is obvious but I'm not quite sure I filled in the null very well. Speaker has more than enough output to handle the boost and Power is plenty.
ProLogic II effect
I've switched back between "Music" and "Movie" modes. Oddly enough I am digging the Movie mode with the Haas effect and full bandwith sound. On paper the Music mode makes more sense, but I find that the Car environment benefits greatly from a larger sound stage. Impressive.
Since I'm running the rears fullrange I presume the top end rolls off and I get the equivalent of the Pro Logic II Music mode shelf filter. So in truth, while in Movie mode I get a hybrid of the Music and Movie modes with the Haas effect but the shelf filter on to emulate absorption.
Background noise
The signal chain is background noise free from what I can tell, success! The worst offending piece here is by far the Arc mini amplifier fans, followed by the large Arc fans. This means I have to get clever with the amplifying rack cover to absorb fan noise. The rattles and vibrations ahead of the rear axle are minimal, especially the doors. This car is stout with just one layer of Dynamat Extreme on the door. However, from the rear axle back it's a bit of a mess. The trunk back especially has plenty of rattles and resonances that need to be taken care of.
Other
The Galaxy S7 phone needed two reboots so far when playing through bluetooth. For some reason it seems other apps interfere with the BT transmission and interrupt the signal. Very odd. I got this before on older Androids after a year of use when the phone got full, but never when it is new. This happens only with the car setup which is again, odd.
The Galaxy S7 seems to clip the signal at max volume output. This is also odd because I've never clipped a signal through bluetooth. Is it possible the Alpine processor input stage is clipping?
The Alpine unit has both the remote in and remove out cables labeled the same (blue/white). That is really silly from a unit of this caliber. I had to peruse DIYMA for hours to find out the top Wire is the remote out. I connected the remote in to constant 12V so I'm using the RUX Power button to turn it on and off whenever.
Boundary interference in the C7?
I believe the 120hz dip is actually a null caused by boundary interference. The distance from the door speakers to the center wall is probably 1/4 wavelength which is a recipe for cancellation. It also explains why I could not use EQ to fix the dip.

Speaker Placement 101: How to Fight Boundary Interference
If this is true, I've found the car's first major drawback.
EDIT: Almost forgot the start of the show - Push-Pull
Push-pull rocks, and I mean the force cancelling one. There is so much output with the most minimal vibration. You almost have to tell yourself it is loud enough or your ears suffer. I have had force canceling push-pull at home and in the car in the last three systems now and I swear by it being a miracle design. I am stunned almost no one uses it. I bet there are more bass shakers out there than opposed subs which is a damn shame. Push pull has changed my life haha
Overall the Car is sounding great! It shines at playing back goa trance and deep house. I particularly wanted something that plays house well. It's got the output of a club but it's more refined, especially when it comes to lower octave quality. It's flat and easy to listen to, maintains composure at all SPL. The only two things I'm missing from my previous builds is that BG planar midrange transparency and a larger direct to radiated sound ratio in the top octaves. It's better everywhere else.
SPL
I've put on there some of my all time most demanding tracks and haven't found the limits of any of the drivers and I get the feeling I'm far from it. I back away from cranking it more once my ears get plugged after a couple of songs. With subs I can typically tell they are close to the limit because the Q goes up audibly and the low end disappears. Not so with this one. The midbass is typically easy to bottom out or to heat up the coil with continuous low midrange but these ones are very well composed. The AMT line array is not struggling with any crossover 1khz to 1.6khz that I've tried so far. Hands down the most capable sound system I've built so far.
Harmonic distortion
Inaudible as far as I can tell.
Frequency response
Needs a little work. There are obvious cuts over 100hz to 20,000hz. The sound is pleasing and easy but misses a bit of reference detail I've come to expect from my Home Theater built. I need to spend a lot more time tuning and I'm still rolling off the top end a little too much for my taste.
Midbass got 5db of boost at 110hz with 0.5Q. The improvement is obvious but I'm not quite sure I filled in the null very well. Speaker has more than enough output to handle the boost and Power is plenty.
ProLogic II effect
I've switched back between "Music" and "Movie" modes. Oddly enough I am digging the Movie mode with the Haas effect and full bandwith sound. On paper the Music mode makes more sense, but I find that the Car environment benefits greatly from a larger sound stage. Impressive.
Since I'm running the rears fullrange I presume the top end rolls off and I get the equivalent of the Pro Logic II Music mode shelf filter. So in truth, while in Movie mode I get a hybrid of the Music and Movie modes with the Haas effect but the shelf filter on to emulate absorption.
Background noise
The signal chain is background noise free from what I can tell, success! The worst offending piece here is by far the Arc mini amplifier fans, followed by the large Arc fans. This means I have to get clever with the amplifying rack cover to absorb fan noise. The rattles and vibrations ahead of the rear axle are minimal, especially the doors. This car is stout with just one layer of Dynamat Extreme on the door. However, from the rear axle back it's a bit of a mess. The trunk back especially has plenty of rattles and resonances that need to be taken care of.
Other
The Galaxy S7 phone needed two reboots so far when playing through bluetooth. For some reason it seems other apps interfere with the BT transmission and interrupt the signal. Very odd. I got this before on older Androids after a year of use when the phone got full, but never when it is new. This happens only with the car setup which is again, odd.
The Galaxy S7 seems to clip the signal at max volume output. This is also odd because I've never clipped a signal through bluetooth. Is it possible the Alpine processor input stage is clipping?
The Alpine unit has both the remote in and remove out cables labeled the same (blue/white). That is really silly from a unit of this caliber. I had to peruse DIYMA for hours to find out the top Wire is the remote out. I connected the remote in to constant 12V so I'm using the RUX Power button to turn it on and off whenever.
Boundary interference in the C7?
I believe the 120hz dip is actually a null caused by boundary interference. The distance from the door speakers to the center wall is probably 1/4 wavelength which is a recipe for cancellation. It also explains why I could not use EQ to fix the dip.
Speaker Placement 101: How to Fight Boundary Interference
If this is true, I've found the car's first major drawback.
EDIT: Almost forgot the start of the show - Push-Pull
Push-pull rocks, and I mean the force cancelling one. There is so much output with the most minimal vibration. You almost have to tell yourself it is loud enough or your ears suffer. I have had force canceling push-pull at home and in the car in the last three systems now and I swear by it being a miracle design. I am stunned almost no one uses it. I bet there are more bass shakers out there than opposed subs which is a damn shame. Push pull has changed my life haha
Last edited by SBC_and_a_stick; 03-31-2016 at 07:03 PM.
04-14-2016, 04:53 PM
#37
Safety Car
Thread Starter
A note on voltage dropping
It doesn't! The Rux shows 15V stable no matter what I do with the *****. This is a little nutty.
Since the ARC are not regulated I should be getting tons of Power out of the amps.
A few reasons why I think it works:
*speakers have unusually high sensitivity. Per side output at 1 watt:
94db plus cabin gain 20hz-63hz
96db 63hz-1,000hz
101db 1,000hz up
*continuously variable Power supplies in the amps
*active crossovers
*beefy OEM alternator
*large stock battery: AC Delco 90PS 590 CCA 740 CA 100 AH
Now I should probably find a battery charger that is strong and plugs in through the battery tender port. That way I can feed it at meets by plugging it in.
UPDATE
Stock OEM Bose system
This is the frequency response I took about a year ago before I planned my system.
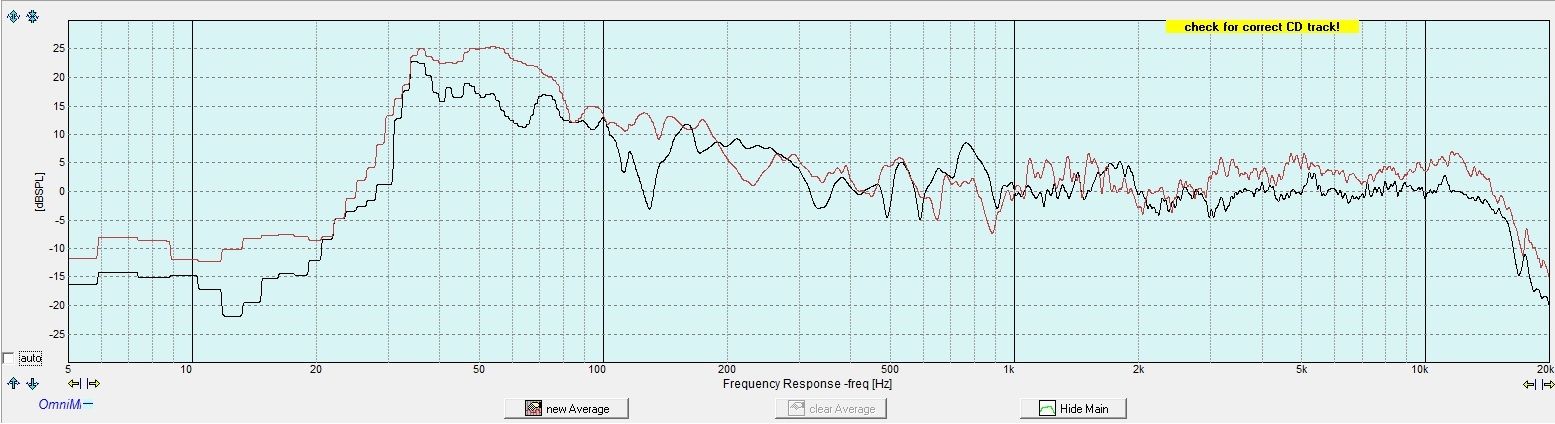
The SPL if very very limited with the stock system. As you can imagine the output is limited by the dinky 3" midrange in the doors. Harmonic distortion plots show a peak in the middle of the midrange at full volume. Output is also limited by the little amp that powers the whole system, although more power wouldn't make the 3" mid any bigger.
The top end rolls off to -15db by 20khz. The tweeters are mounted at the top of the dash firing into the windshield. At the time I thought I could do much better, but the reality is that I can't. More on this later.
Bose creates the illusion of bass by boosting the bottom octaves with a peak at 35hz followed by a sharp rolloff. Don't be too mad at Bose, many car aftermarket speakers do the same thing.
Overall, if you consider that the Bose system weighs ~25lbs this is a killer system. You get a fairly well balanced left right response +-5db around a target FR that is pleasing, proper surround sound, noise canceling, and decent output down to 30hz. You could do much worse, and I've heard many worse DIY and aftermarket systems in the past. I recommend turning the bass **** two notches down for an ideal FR if you want to keep the stock Corvette C7 Bose system (note, I don't have the optional sub).
Door mounted 10" B&C woofers natural response, no tuning
Middle midrange
There is a null at 450hz. Boosting here raises the harmonic distortion, but due to the sheer size of the woofer and the output capability it works well. Overall, I was able to get the region 200 hz to 1,000 hz to sound amazing and balanced left to right without noticeable spikes in distortion. That's why I love to use large woofers in a car for this region. With the insane amount of tuning cars require in the midrange band the low distortion of a 10" woofer is magic. The sonic signature of the B&C is what I would call flat and dull. Not exciting to say the least. Perhaps due to the damping of the cone and suspension it just does not have the transient response and micro dynamics of Hi Fi drivers. It is however very good at keeping harmonic distortion in check. High SPL mid-range is effortless and easy on the ears. This is an ideal driver for high SPL applications and hard rock.
Upper midrange
The woofer's break up is noticeable when crossed 1.6 khz 24/db. This is a driver that needs to be crossed 1 khz 24/db ideally, and no higher than 1.2 khz. I set the crossover at 1 khz 24/db and I get no sign of breakup and the response blends well with the tweeters. As you can see from the plot there is no break-up peak. It is designed to be played though the break-up which has a small peak at 2.4 khz and it is spread wide all the way through 7khz. However, I wouldn't play anything above 1.2khz in a Hi Fi application.
Midbass
This is the B&C's achilles' heal. Even if you can live with the bland and boring midrange quality to enjoy effortless high output sound, the midbass is just sub par. Notice the huge null at 120hz and the sharp roll off of both left and right woofers starting at 150hz. I compared the B&C frequency chart with the smaller 7" sibling, and I'll be damned if they looked any different. I couldn't use the 7" woofer below 100hz and this 10" plays no differently. Since it doesn't work out of the box, I used some heavy EQ to flatten the response down to 60hz. I ended up boosting 100hz and 125hz by 10db! On paper it looked fine but at high output the midbass quality was quite poor. I went ahead and did a harmonic distortion test and it was clear that the B&C harmonics were spiking. This woofer does not like to produce midbass, and you can't force it either! The Bose had a more natural response for a midbass driver, although it's tough to say if Bose applied any EQ.
There is a null on the driver's side, and possibly the passenger's side as well at 120hz. This is the car's contribution to ruining good midbass. I'll be switching to the Scan Speak woofers soon to see if I can get this region to play nice.
Overall B&C satisfaction
I'll give the B&C a passing score. It is frustrating to have below par midbass performance despite using a 10" woofer. The suspension strains quite heavily if it has to move and when it does it just doesn't have the attack in the midrange that we've come to expect from top HiFi drivers nor the smooth filling midbass. I find myself listening at high SPL just to get that extra something that B&C can give you that no other driver can or rejoice at playing through a bad recording without ear strain. But otherwise I don't think this is the SQ driver that people dream about. Despite the world class Neo motor that is at home in HiFi world, the pro-audio rugged suspension parts hold it back with lackluster reproduction.
Left and right channels tuned
This is the result of the tune job. The EQ did some heavy lifting to get this response. Notably +10 db at 100hz and 125 hz, and +12db at 16khz and 20khz. The FR is still down 15db at 20khz, just like the stock Bose system. It turns out there is no amount of tuning that can get you flat to 20khz when aiming the tweeter at the windshield in a Corvette. The top end rolloff is not noticeable to me. I can't really hear much above 16khz, nor is there a lot of material up there. The boost is high but I have more than 250 watts available on tap and over 100db output at 1 watt. The midbass boost however, is not workable. The driver audibly strains to punch out that much air with a pro audio suspension so I lowered the boost 5db and am now living with a little null in the midbass.

Harmonic distortion
This is one of the best cars I've made distortion wise. The AMT tweeters laugh at the 1khz crossover. Not even a small pickup in distortion there no matter how loud I tested. However, the B&C woofers breathe heavily with the 10db boost in the midbass, and it is audible. Left and right HD:
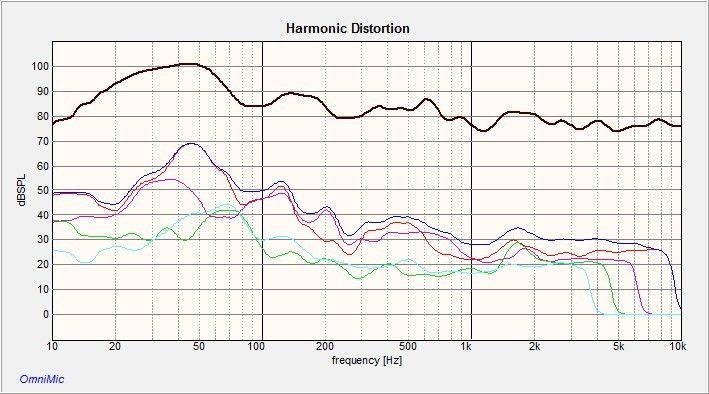
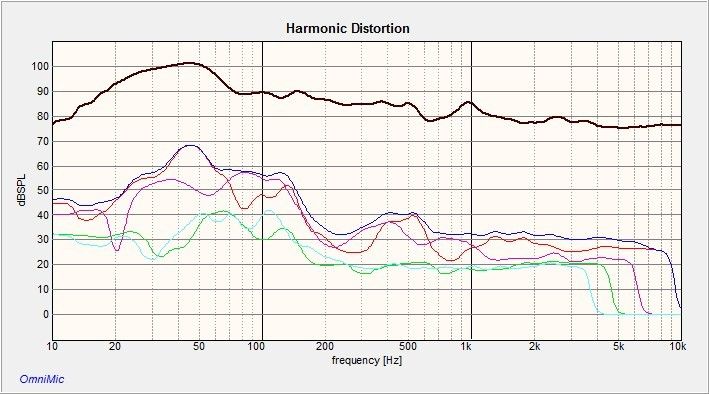
Overall FR
Summed left and right FR with sub, max volume on sub. Typically I turn it down 10db from here:
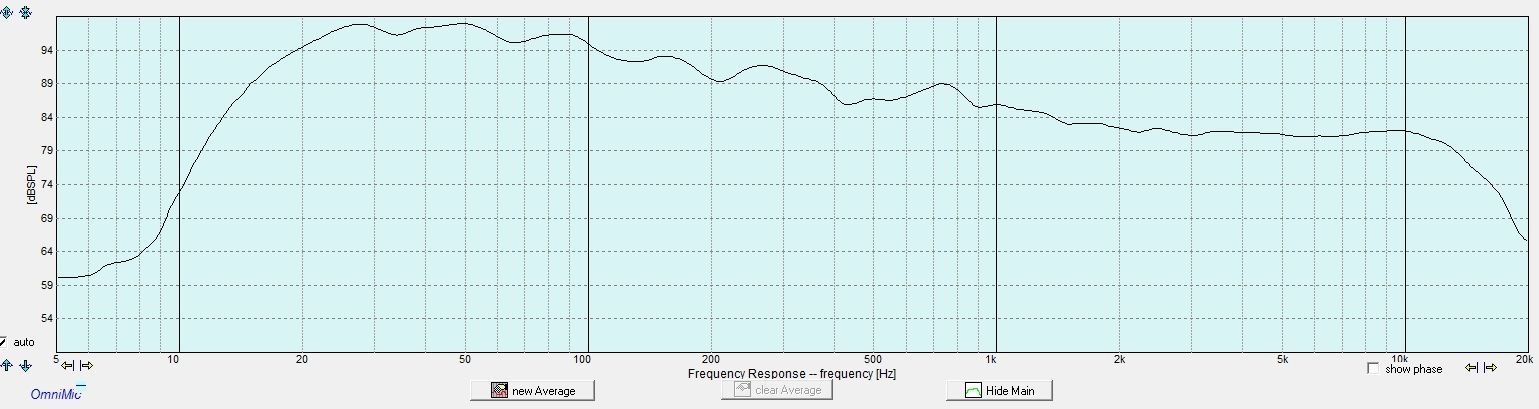
AMT review
I have nothing but good things to say. It is impressive how easy they handle the low crossover. The high midrange and upper octaves are transparent and clear. The soundstage is deep and focused with a big sound. I blame the sharp top octave drop off on the install location, but given that I was able to flatten it out with EQ without drawbacks I see no reason to change anything. The install location makes the FR about the same from any seat and any head position so the soundstage shifts very little. Aiming at the driver with AMTs changes the FR drastically. I prefer to have a small roll-off post EQ than a shifting upper octave response with head positions. I recommend not only the AC AMTs to anyone but also a similar install position given that you have a lot of wattage, EQ, and tuning skills to do it.
It doesn't! The Rux shows 15V stable no matter what I do with the *****. This is a little nutty.
Since the ARC are not regulated I should be getting tons of Power out of the amps.
A few reasons why I think it works:
*speakers have unusually high sensitivity. Per side output at 1 watt:
94db plus cabin gain 20hz-63hz
96db 63hz-1,000hz
101db 1,000hz up
*continuously variable Power supplies in the amps
*active crossovers
*beefy OEM alternator
*large stock battery: AC Delco 90PS 590 CCA 740 CA 100 AH
Now I should probably find a battery charger that is strong and plugs in through the battery tender port. That way I can feed it at meets by plugging it in.
UPDATE
Stock OEM Bose system
This is the frequency response I took about a year ago before I planned my system.
The SPL if very very limited with the stock system. As you can imagine the output is limited by the dinky 3" midrange in the doors. Harmonic distortion plots show a peak in the middle of the midrange at full volume. Output is also limited by the little amp that powers the whole system, although more power wouldn't make the 3" mid any bigger.
The top end rolls off to -15db by 20khz. The tweeters are mounted at the top of the dash firing into the windshield. At the time I thought I could do much better, but the reality is that I can't. More on this later.
Bose creates the illusion of bass by boosting the bottom octaves with a peak at 35hz followed by a sharp rolloff. Don't be too mad at Bose, many car aftermarket speakers do the same thing.
Overall, if you consider that the Bose system weighs ~25lbs this is a killer system. You get a fairly well balanced left right response +-5db around a target FR that is pleasing, proper surround sound, noise canceling, and decent output down to 30hz. You could do much worse, and I've heard many worse DIY and aftermarket systems in the past. I recommend turning the bass **** two notches down for an ideal FR if you want to keep the stock Corvette C7 Bose system (note, I don't have the optional sub).
Door mounted 10" B&C woofers natural response, no tuning
Middle midrange
There is a null at 450hz. Boosting here raises the harmonic distortion, but due to the sheer size of the woofer and the output capability it works well. Overall, I was able to get the region 200 hz to 1,000 hz to sound amazing and balanced left to right without noticeable spikes in distortion. That's why I love to use large woofers in a car for this region. With the insane amount of tuning cars require in the midrange band the low distortion of a 10" woofer is magic. The sonic signature of the B&C is what I would call flat and dull. Not exciting to say the least. Perhaps due to the damping of the cone and suspension it just does not have the transient response and micro dynamics of Hi Fi drivers. It is however very good at keeping harmonic distortion in check. High SPL mid-range is effortless and easy on the ears. This is an ideal driver for high SPL applications and hard rock.
Upper midrange
The woofer's break up is noticeable when crossed 1.6 khz 24/db. This is a driver that needs to be crossed 1 khz 24/db ideally, and no higher than 1.2 khz. I set the crossover at 1 khz 24/db and I get no sign of breakup and the response blends well with the tweeters. As you can see from the plot there is no break-up peak. It is designed to be played though the break-up which has a small peak at 2.4 khz and it is spread wide all the way through 7khz. However, I wouldn't play anything above 1.2khz in a Hi Fi application.
Midbass
This is the B&C's achilles' heal. Even if you can live with the bland and boring midrange quality to enjoy effortless high output sound, the midbass is just sub par. Notice the huge null at 120hz and the sharp roll off of both left and right woofers starting at 150hz. I compared the B&C frequency chart with the smaller 7" sibling, and I'll be damned if they looked any different. I couldn't use the 7" woofer below 100hz and this 10" plays no differently. Since it doesn't work out of the box, I used some heavy EQ to flatten the response down to 60hz. I ended up boosting 100hz and 125hz by 10db! On paper it looked fine but at high output the midbass quality was quite poor. I went ahead and did a harmonic distortion test and it was clear that the B&C harmonics were spiking. This woofer does not like to produce midbass, and you can't force it either! The Bose had a more natural response for a midbass driver, although it's tough to say if Bose applied any EQ.
There is a null on the driver's side, and possibly the passenger's side as well at 120hz. This is the car's contribution to ruining good midbass. I'll be switching to the Scan Speak woofers soon to see if I can get this region to play nice.
Overall B&C satisfaction
I'll give the B&C a passing score. It is frustrating to have below par midbass performance despite using a 10" woofer. The suspension strains quite heavily if it has to move and when it does it just doesn't have the attack in the midrange that we've come to expect from top HiFi drivers nor the smooth filling midbass. I find myself listening at high SPL just to get that extra something that B&C can give you that no other driver can or rejoice at playing through a bad recording without ear strain. But otherwise I don't think this is the SQ driver that people dream about. Despite the world class Neo motor that is at home in HiFi world, the pro-audio rugged suspension parts hold it back with lackluster reproduction.
Left and right channels tuned
This is the result of the tune job. The EQ did some heavy lifting to get this response. Notably +10 db at 100hz and 125 hz, and +12db at 16khz and 20khz. The FR is still down 15db at 20khz, just like the stock Bose system. It turns out there is no amount of tuning that can get you flat to 20khz when aiming the tweeter at the windshield in a Corvette. The top end rolloff is not noticeable to me. I can't really hear much above 16khz, nor is there a lot of material up there. The boost is high but I have more than 250 watts available on tap and over 100db output at 1 watt. The midbass boost however, is not workable. The driver audibly strains to punch out that much air with a pro audio suspension so I lowered the boost 5db and am now living with a little null in the midbass.
Harmonic distortion
This is one of the best cars I've made distortion wise. The AMT tweeters laugh at the 1khz crossover. Not even a small pickup in distortion there no matter how loud I tested. However, the B&C woofers breathe heavily with the 10db boost in the midbass, and it is audible. Left and right HD:
Overall FR
Summed left and right FR with sub, max volume on sub. Typically I turn it down 10db from here:
AMT review
I have nothing but good things to say. It is impressive how easy they handle the low crossover. The high midrange and upper octaves are transparent and clear. The soundstage is deep and focused with a big sound. I blame the sharp top octave drop off on the install location, but given that I was able to flatten it out with EQ without drawbacks I see no reason to change anything. The install location makes the FR about the same from any seat and any head position so the soundstage shifts very little. Aiming at the driver with AMTs changes the FR drastically. I prefer to have a small roll-off post EQ than a shifting upper octave response with head positions. I recommend not only the AC AMTs to anyone but also a similar install position given that you have a lot of wattage, EQ, and tuning skills to do it.
The following users liked this post:
bjmsam (03-18-2017)
04-18-2016, 01:45 PM
#38
Safety Car
Thread Starter
Battle of the 10" midbass drivers: B&C 10NW64 vs. Scan Speak 25w/8567-SE
Short story
This was a decisive win for the Scan Speak driver, enough so that this will be the last pro audio driver I will ever employ in my builds.
The Scan Speak won me over in the very first 10 seconds of play time. I just finished taking the B&C driver out and put the Scan in, we're talking about turning the system on just to check that it is fully functioning, and instantly it was all there, seamless midbass and transparent midrange. This is what I wanted all along, max SPL be damned!
With the pro audio drivers the lower octaves are a murky mess, it's all one impossible task for driver that simply was not designed to play bass. That is the biggest challenge to using pro audio drivers. Ok, I'm sure the SPL in the low octaves is all there if you EQ it in since it's a matter of xmech, but the more complex the bass passages are the more the problem stands out. I'm almost convinced that the suspension on pro-audio drivers are the downfall - designed for taking abuse and weighing as little as possible to increase sensitivity. This poses a problem for high fidelity reproduction as the transient response is just shot. Unfortunately because the cone isn't damped very well even the higher octaves suffer. I'm using B&C and pro audio interchangeably because in my view the B&Cs I'm using are the closest thing to high fidelity pro-audio driver, if there is such a thing, and one of the best out there for commercial rigs.
Install
The extra 5mm of depth compared to the B&C really pushed the limits of the available door space. In total the speaker is 105mm deep which almost touches the glass. On the passenger door, slamming the door brings the magnet in contact with the glass, I suspect this is because the second time I had the glass replaced the window motor wasn't bolted in correctly (perhaps the bolts are loose since the glass touches the door frame up top when the door is shut). The driver's side clearance is fine and slamming the door never brings the magnet in contact with the glass. Either that or GM made more room in the door on the driver's side than for the passenger by a few mm. So I put more gasketing tape on the passenger woofer and brought it up a few mm. I also put Ensolite on the motor so there is no hard impact or noise. So far so good.
The clearance with the door panel is I suspect just enough. I'm using the same 1/2" spacer made out of MDF. I noticed that the doors actually have removable grilles so I took them off for the photo shoot.
Construction
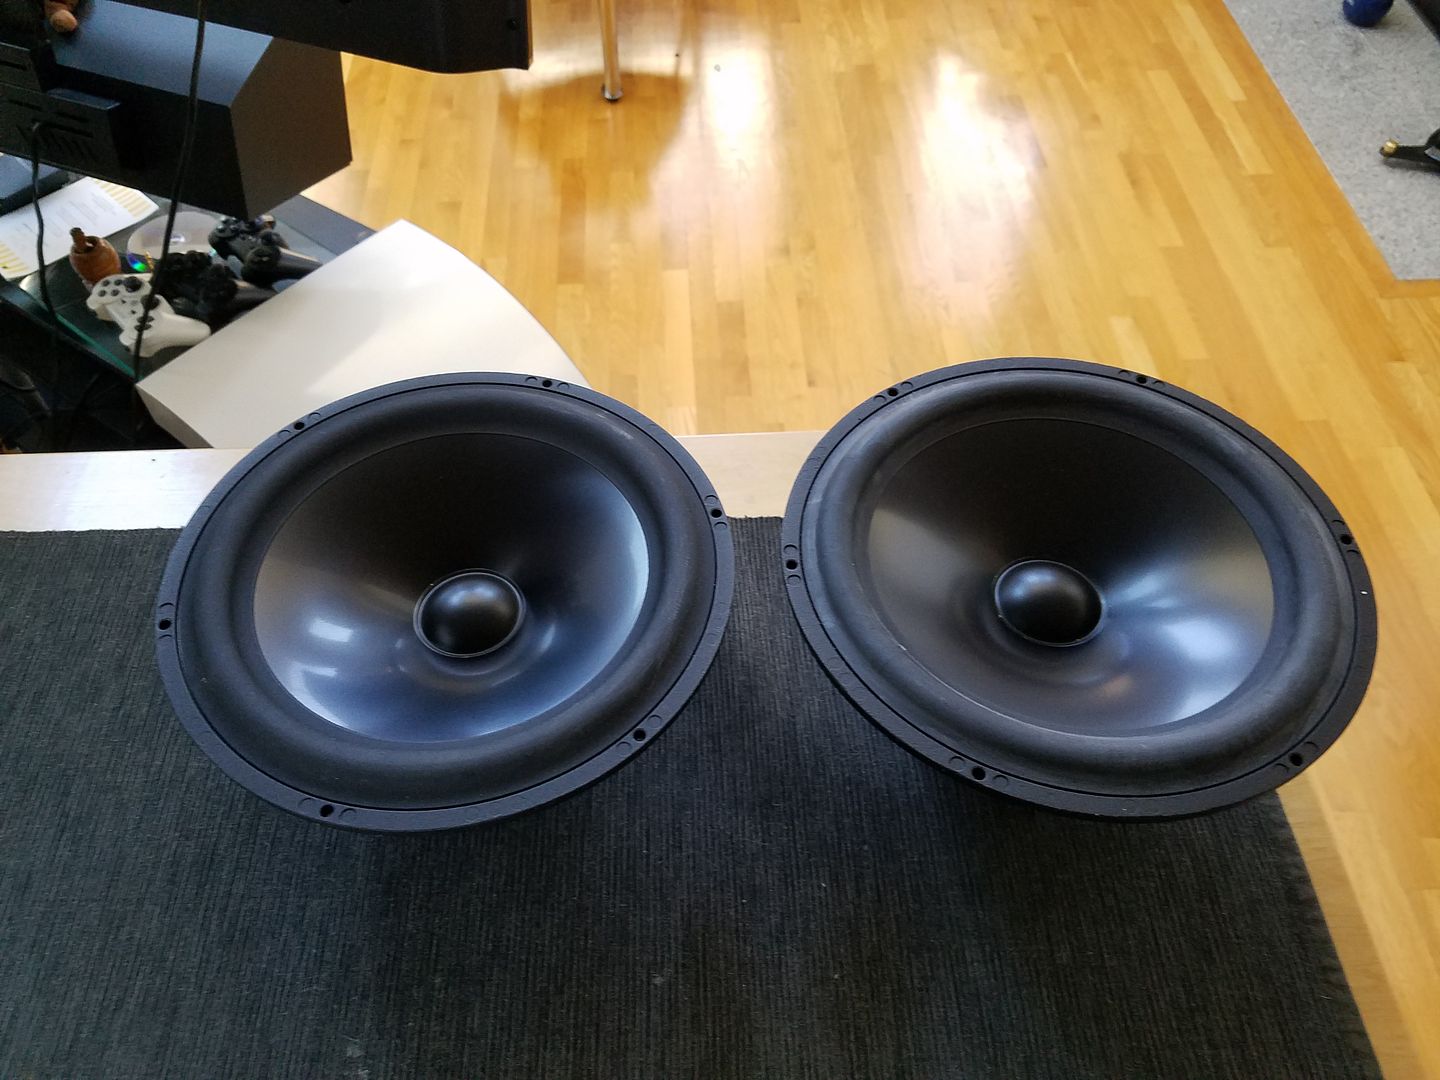
The cone is an anodized aluminum piece. Feels very strong to the touch. There are no strengthening ribs or features like I've seen in some other metal cones. The surround is typical low damping SBR rubber for Scan Speak, soft and meaty. The dust cap is fairly small because you must remember this is a 42mm voice coil. There are however 4 layers wound and the coil is nearly an inch long at 23mm.
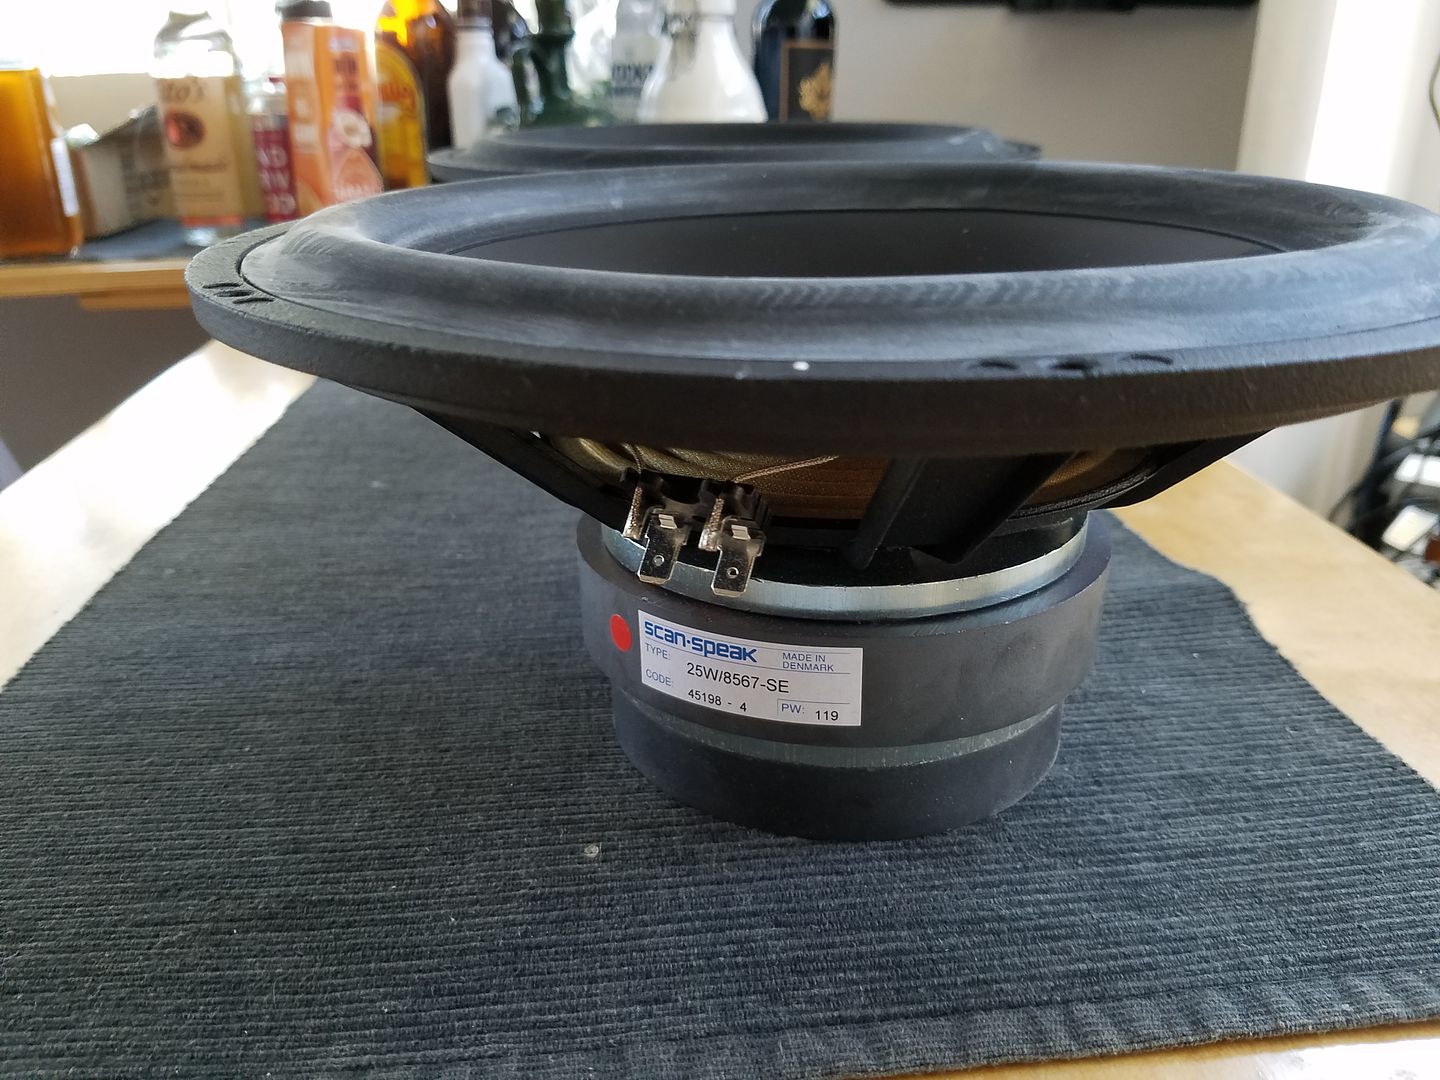
The connection posts are very basic. One bent slightly while pushing a connector in. I'd prefer a stronger one from Scan Speak. The bucking magnet increases the gap strength by 3.5% according to Scan Speak. You can also see that the top plate is larger than a standard Scan Speak Classic 10". The spider is a bit mediocre by today's standards and the venting under is a bit minimal as well. There is only so much you can do with a shallow cone/motor. A beefy Revelator would be better but also wouldn't fit so I prefer this one.
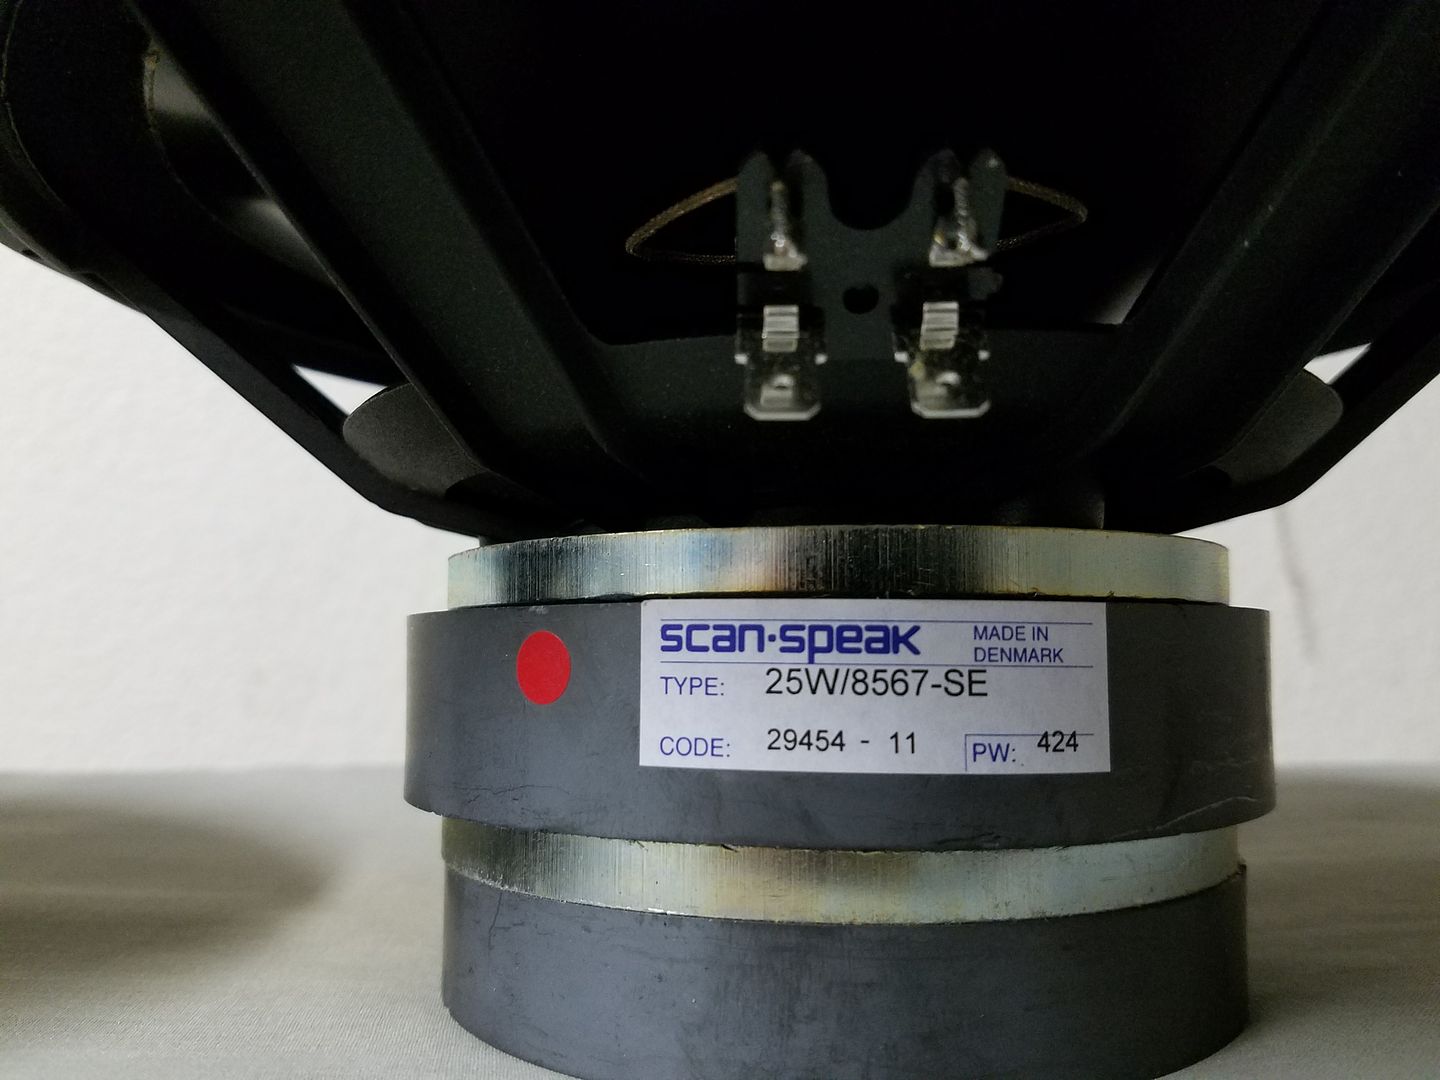
Super lucky to find a pair of these bad boys NEW on Ebay!
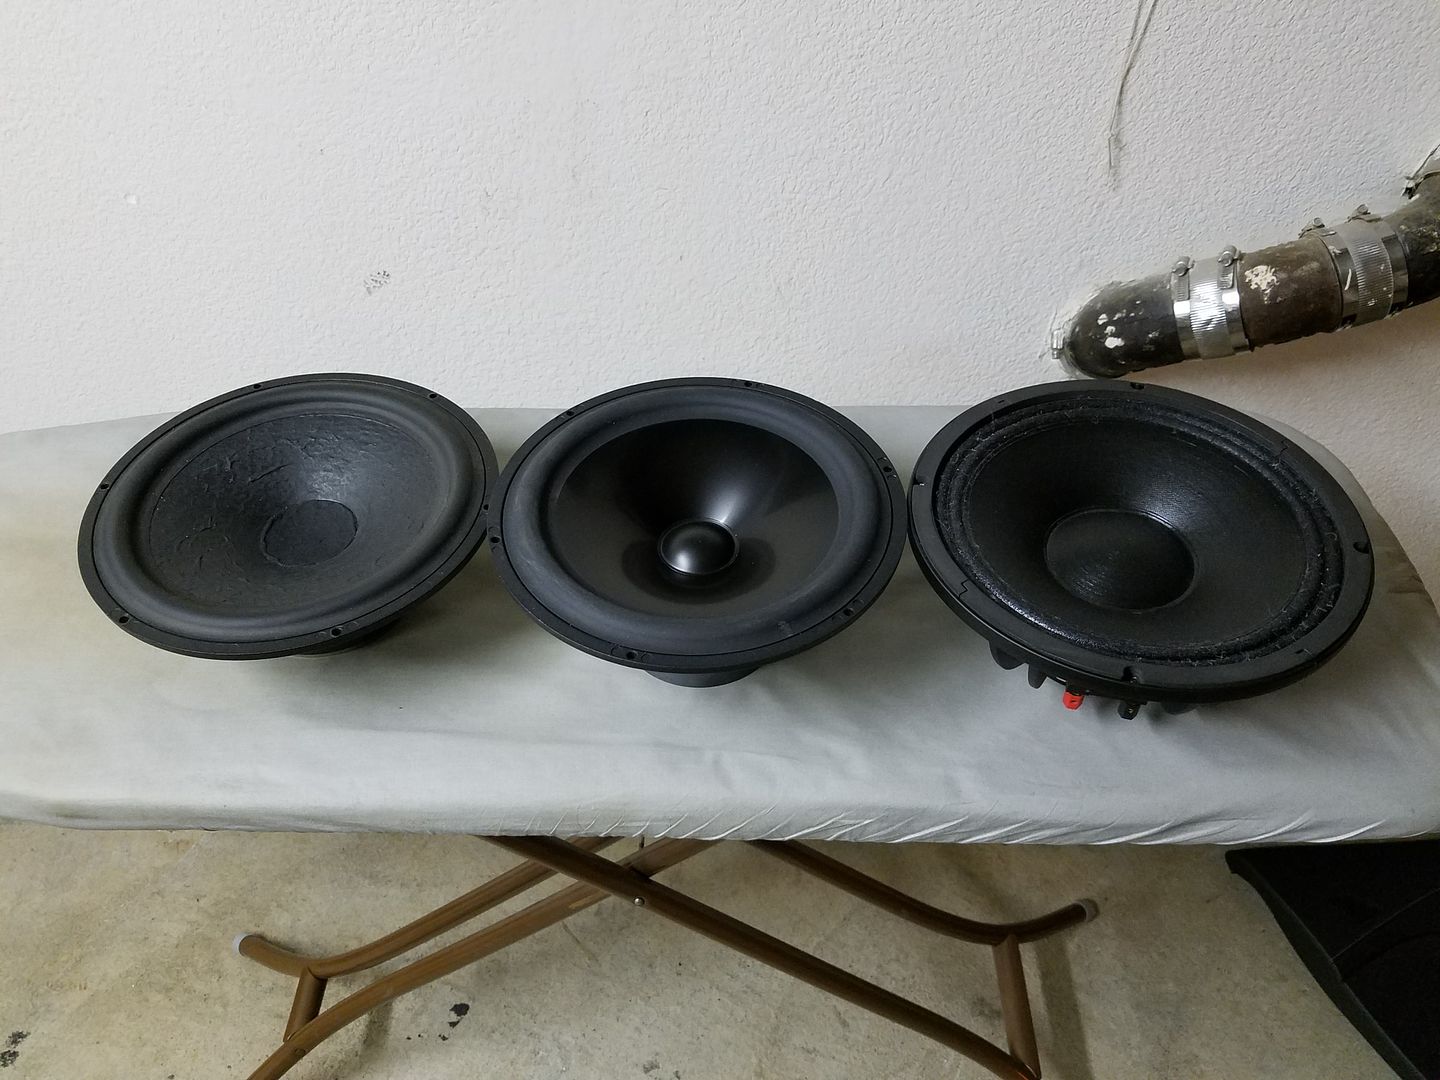
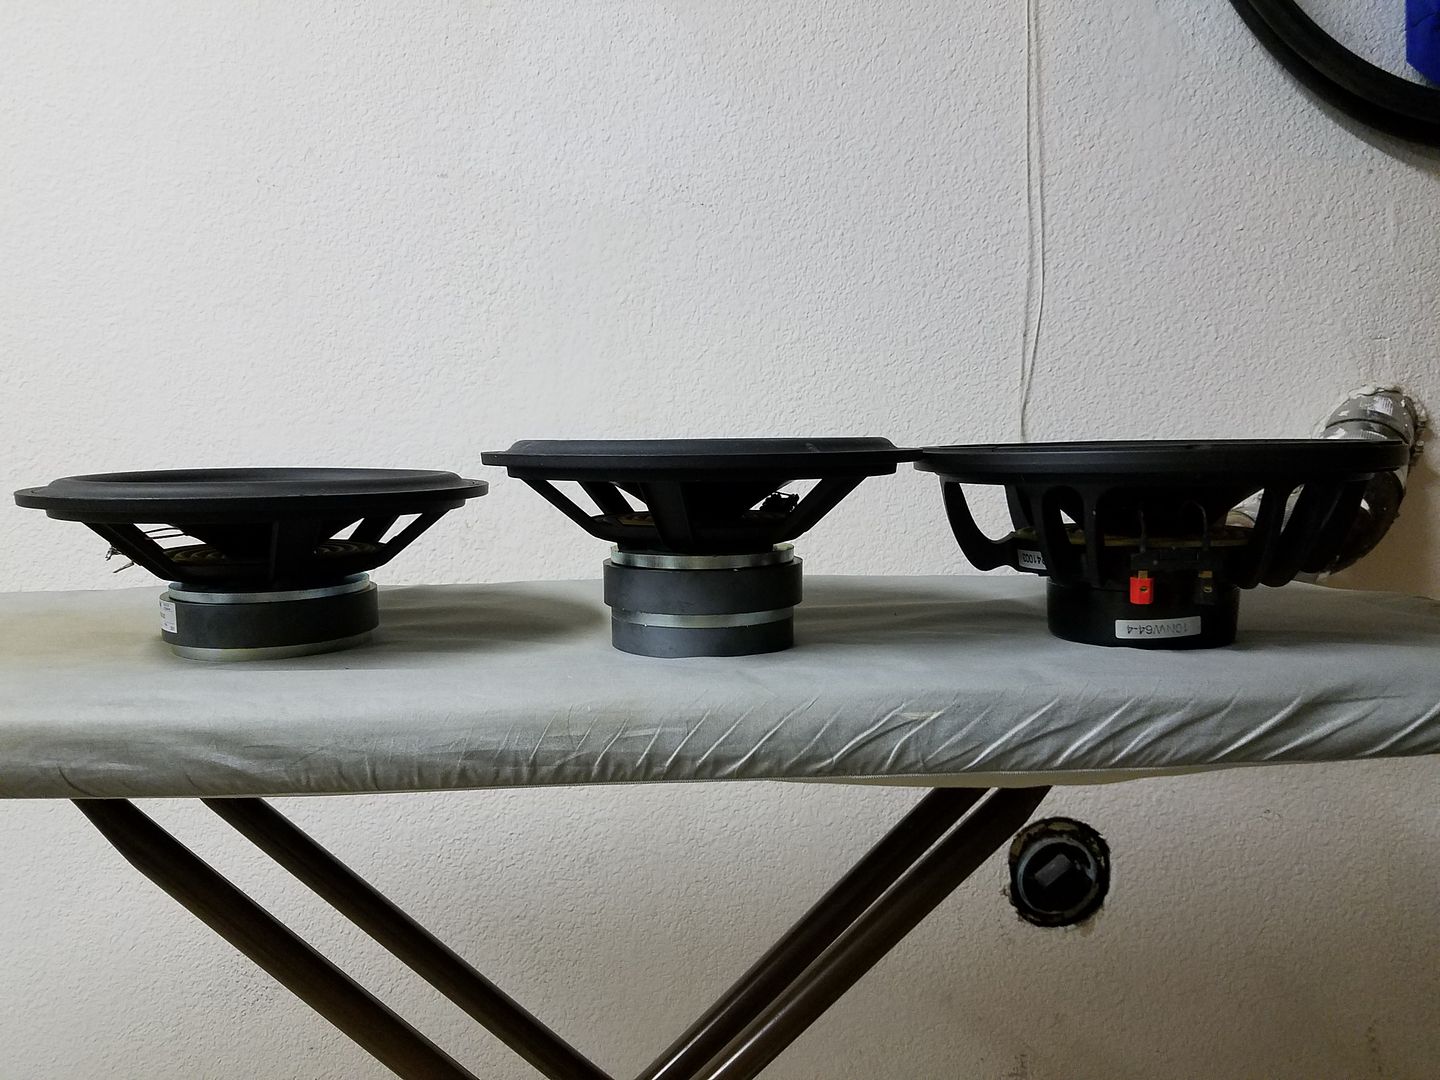
Battle of the midbass contenders. From left to right, SS Classic 25W/8565, SS Classic 25W/8567-SE, B&C 10NW64. Note the motor difference between the two SS speakers. The 8567-SE has a 8mm gap motor achieved by a bucking magnet and a thicker top plate. The coil is also longer and double in layers.
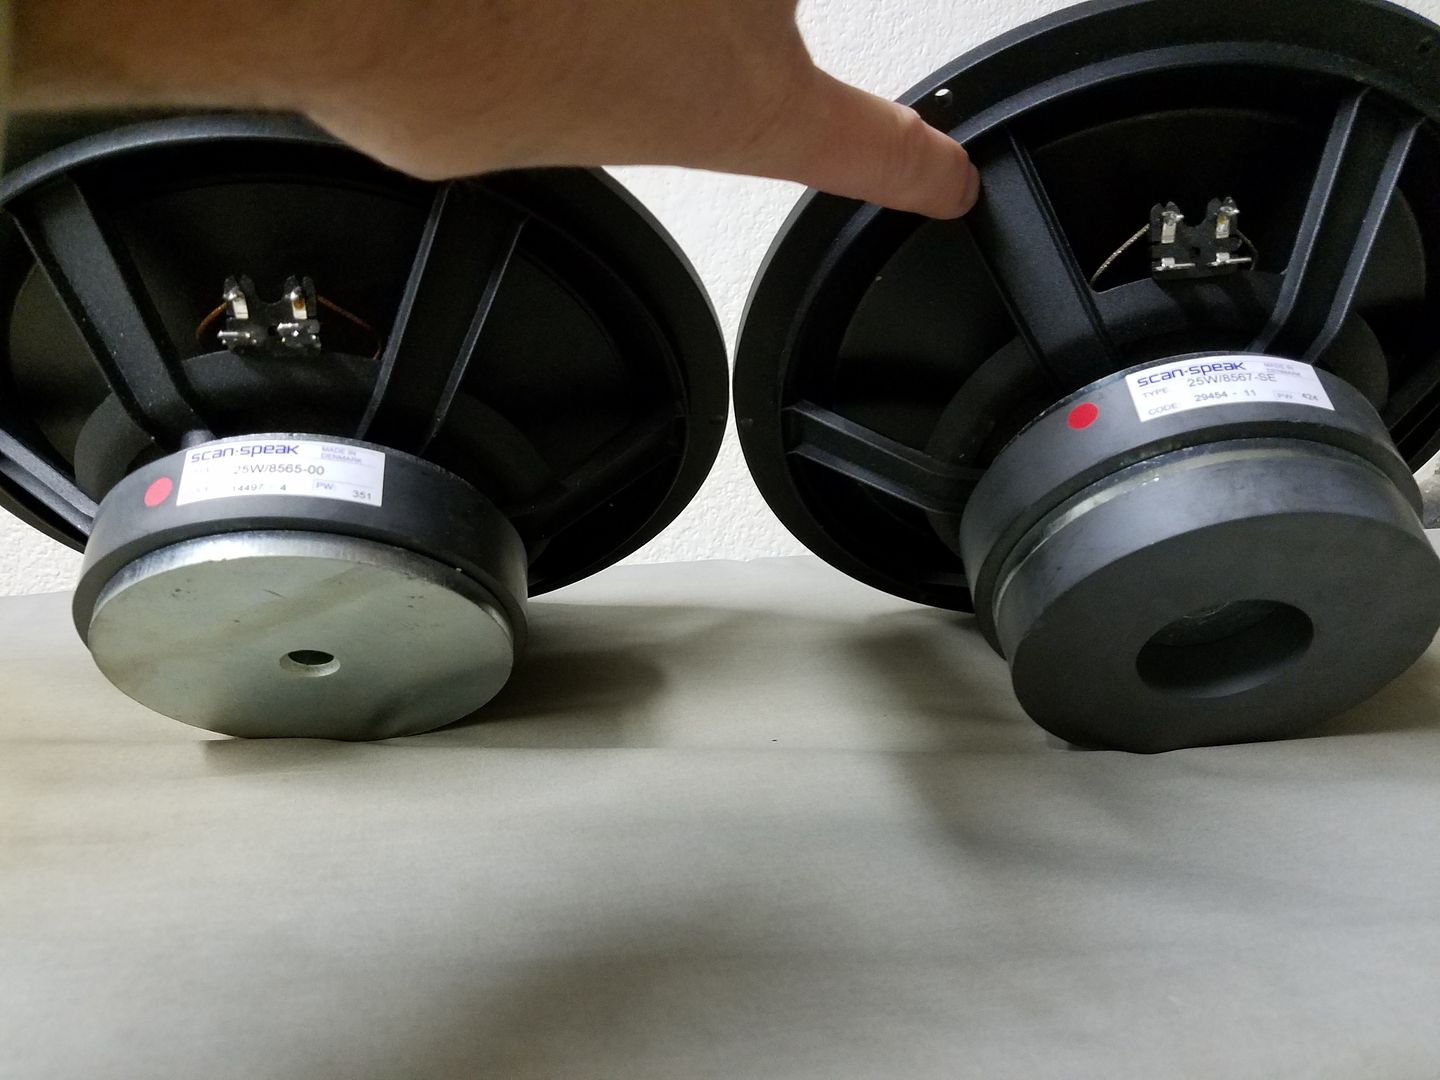
Here is a photo where I placed a quarter inch spacer under the B&C to bring them up to top mount parity. Since I'm using the same spacer in car, the speaker will just be mounted deeper in door. Under excursion, the Scan Speak also requires more top mount depth.
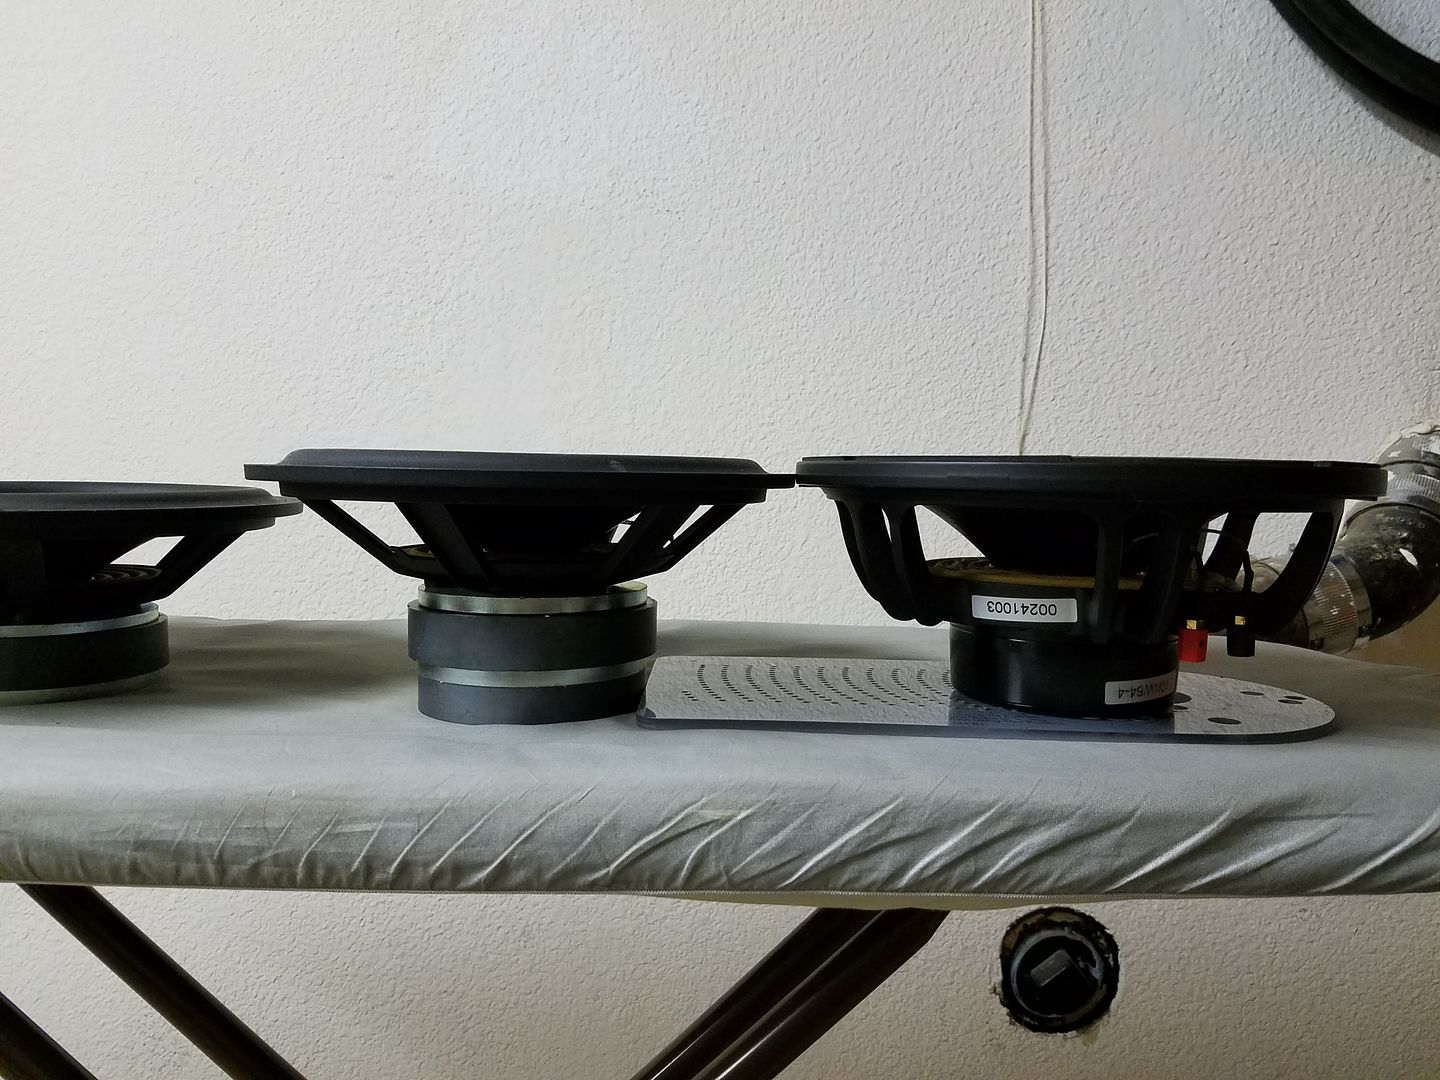

The door panel has the least clearance on the bottom. As you can see below, the bottom of the plastic panel was resting on the speaker gasket. The B&C outer diameter is 261 mm vs 255 mm for the Scan Speak. I don't think it hits the panel but I lifted the panel speaker cover a bit off the door on the bottom just to be sure.

Final install, sorry for the pic quality, this was a midnight install finish.
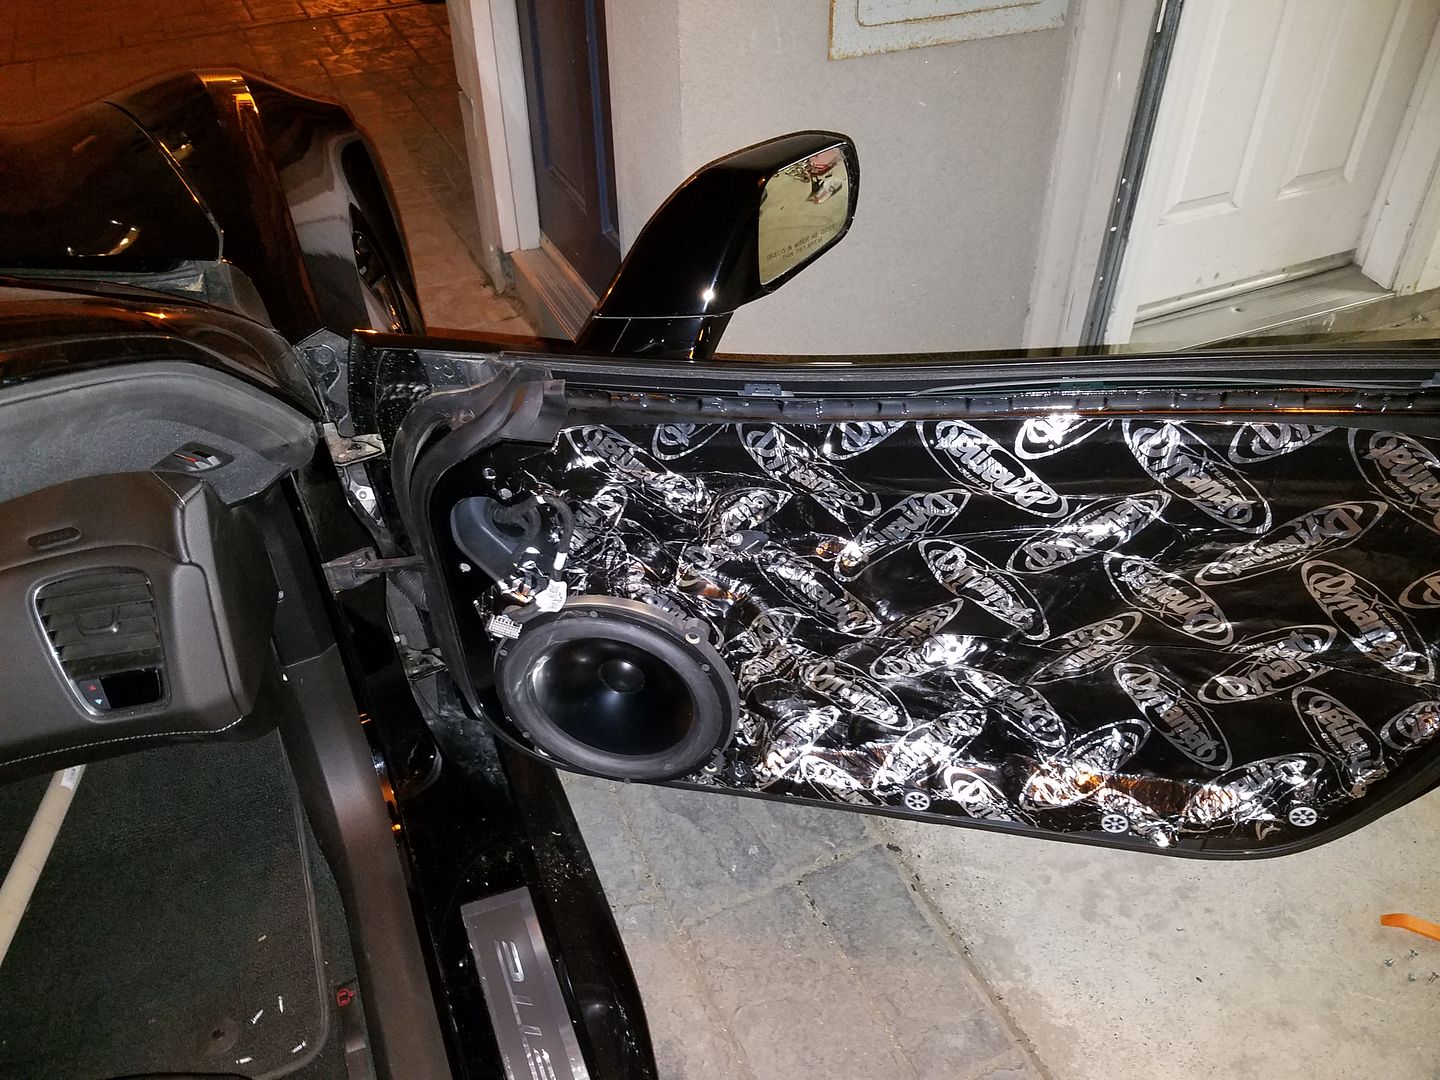
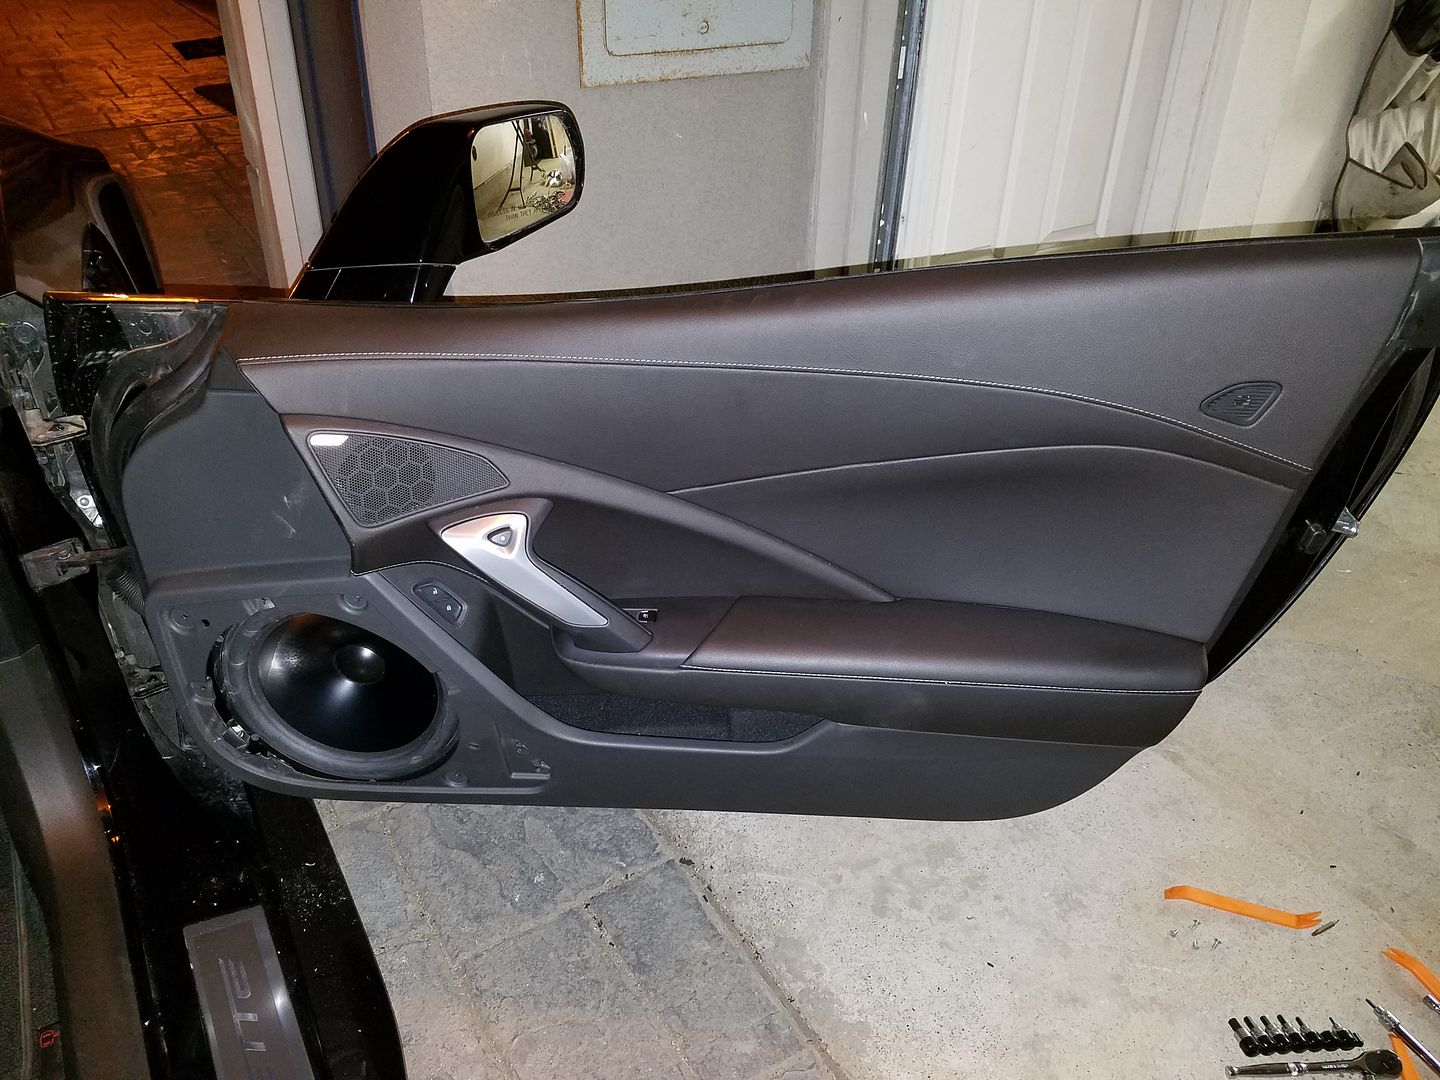
Subjective review
In the hierachy of best midbass/low midrange drivers this one ties with my all time favorite the Seas Excel W26FX001 magnesium 10." I do not believe the cone is as well damped as the Excel, but 99% there. The Excel is more of a pure piston but it also has a worse breakup as a direct consequence. Therefore I prefer the Excel in the lower octaves and the aluminum SS in the higher ones. However, the Scan Speak is closer to the Excel in resolution than any other cone I've ever heard so even in the low octaves it is simply breathtaking to listen to. The Excel has a clear advantage in throw, with a 35mm peak to peak xmech, whereas the Scan is 24mm. I would use the Excel in a 3way with a lower LPF but crossed at 1,000hz I'd say it's a tie. I believe the sensitivity on the Scan is a bit better but I could be wrong.
The Scan far surpasses B&C in clarity, transparency, low suspension noise, and everything else you could ask for from a 10" woofer except SPL/sensitivity. On poor recordings, I expected the metal cone to be a bit more shrill than the B&C, but it's just not so. It sounds better 100% of the time. I have not tested the SPL limits of the Scan Speak, but I don't want to break it since I can't replace them! There is no way the Scan reaches the same SPL, 0 chance.
I've tried some other 10"s for midbass in cars, an aluminum Vifa, and even the Peerless XXLS sub. Those were crazy times. The Scan Speak is far superior to the Vifa 10" aluminum woofer, and having heard many Dayton Reference aluminum woofers, it's a much better unit than those. Using a sub for midbass was fun, but you are much better off using the SLS that is designed to reproduce midrange.
Bottom line, the Scan Speak 25W/8567-SE is a gem. Since it's not available for purchase your best bet is the 10" Revelator or the 10" Excel magnesium for top notch reproduction. Based on the impedance curve and FR I think the Classic will sound better than the Revelator in the top octaves with no surround resonance at all!
Short story
This was a decisive win for the Scan Speak driver, enough so that this will be the last pro audio driver I will ever employ in my builds.
The Scan Speak won me over in the very first 10 seconds of play time. I just finished taking the B&C driver out and put the Scan in, we're talking about turning the system on just to check that it is fully functioning, and instantly it was all there, seamless midbass and transparent midrange. This is what I wanted all along, max SPL be damned!
With the pro audio drivers the lower octaves are a murky mess, it's all one impossible task for driver that simply was not designed to play bass. That is the biggest challenge to using pro audio drivers. Ok, I'm sure the SPL in the low octaves is all there if you EQ it in since it's a matter of xmech, but the more complex the bass passages are the more the problem stands out. I'm almost convinced that the suspension on pro-audio drivers are the downfall - designed for taking abuse and weighing as little as possible to increase sensitivity. This poses a problem for high fidelity reproduction as the transient response is just shot. Unfortunately because the cone isn't damped very well even the higher octaves suffer. I'm using B&C and pro audio interchangeably because in my view the B&Cs I'm using are the closest thing to high fidelity pro-audio driver, if there is such a thing, and one of the best out there for commercial rigs.
Install
The extra 5mm of depth compared to the B&C really pushed the limits of the available door space. In total the speaker is 105mm deep which almost touches the glass. On the passenger door, slamming the door brings the magnet in contact with the glass, I suspect this is because the second time I had the glass replaced the window motor wasn't bolted in correctly (perhaps the bolts are loose since the glass touches the door frame up top when the door is shut). The driver's side clearance is fine and slamming the door never brings the magnet in contact with the glass. Either that or GM made more room in the door on the driver's side than for the passenger by a few mm. So I put more gasketing tape on the passenger woofer and brought it up a few mm. I also put Ensolite on the motor so there is no hard impact or noise. So far so good.
The clearance with the door panel is I suspect just enough. I'm using the same 1/2" spacer made out of MDF. I noticed that the doors actually have removable grilles so I took them off for the photo shoot.
Construction
The cone is an anodized aluminum piece. Feels very strong to the touch. There are no strengthening ribs or features like I've seen in some other metal cones. The surround is typical low damping SBR rubber for Scan Speak, soft and meaty. The dust cap is fairly small because you must remember this is a 42mm voice coil. There are however 4 layers wound and the coil is nearly an inch long at 23mm.
The connection posts are very basic. One bent slightly while pushing a connector in. I'd prefer a stronger one from Scan Speak. The bucking magnet increases the gap strength by 3.5% according to Scan Speak. You can also see that the top plate is larger than a standard Scan Speak Classic 10". The spider is a bit mediocre by today's standards and the venting under is a bit minimal as well. There is only so much you can do with a shallow cone/motor. A beefy Revelator would be better but also wouldn't fit so I prefer this one.
Super lucky to find a pair of these bad boys NEW on Ebay!
Battle of the midbass contenders. From left to right, SS Classic 25W/8565, SS Classic 25W/8567-SE, B&C 10NW64. Note the motor difference between the two SS speakers. The 8567-SE has a 8mm gap motor achieved by a bucking magnet and a thicker top plate. The coil is also longer and double in layers.
Here is a photo where I placed a quarter inch spacer under the B&C to bring them up to top mount parity. Since I'm using the same spacer in car, the speaker will just be mounted deeper in door. Under excursion, the Scan Speak also requires more top mount depth.
The door panel has the least clearance on the bottom. As you can see below, the bottom of the plastic panel was resting on the speaker gasket. The B&C outer diameter is 261 mm vs 255 mm for the Scan Speak. I don't think it hits the panel but I lifted the panel speaker cover a bit off the door on the bottom just to be sure.
Final install, sorry for the pic quality, this was a midnight install finish.
Subjective review
In the hierachy of best midbass/low midrange drivers this one ties with my all time favorite the Seas Excel W26FX001 magnesium 10." I do not believe the cone is as well damped as the Excel, but 99% there. The Excel is more of a pure piston but it also has a worse breakup as a direct consequence. Therefore I prefer the Excel in the lower octaves and the aluminum SS in the higher ones. However, the Scan Speak is closer to the Excel in resolution than any other cone I've ever heard so even in the low octaves it is simply breathtaking to listen to. The Excel has a clear advantage in throw, with a 35mm peak to peak xmech, whereas the Scan is 24mm. I would use the Excel in a 3way with a lower LPF but crossed at 1,000hz I'd say it's a tie. I believe the sensitivity on the Scan is a bit better but I could be wrong.
The Scan far surpasses B&C in clarity, transparency, low suspension noise, and everything else you could ask for from a 10" woofer except SPL/sensitivity. On poor recordings, I expected the metal cone to be a bit more shrill than the B&C, but it's just not so. It sounds better 100% of the time. I have not tested the SPL limits of the Scan Speak, but I don't want to break it since I can't replace them!
There is no way the Scan reaches the same SPL, 0 chance. I've tried some other 10"s for midbass in cars, an aluminum Vifa, and even the Peerless XXLS sub. Those were crazy times. The Scan Speak is far superior to the Vifa 10" aluminum woofer, and having heard many Dayton Reference aluminum woofers, it's a much better unit than those. Using a sub for midbass was fun, but you are much better off using the SLS that is designed to reproduce midrange.
Bottom line, the Scan Speak 25W/8567-SE is a gem. Since it's not available for purchase your best bet is the 10" Revelator or the 10" Excel magnesium for top notch reproduction. Based on the impedance curve and FR I think the Classic will sound better than the Revelator in the top octaves with no surround resonance at all!
The following 2 users liked this post by SBC_and_a_stick:
Speedfreaq (12-07-2017),
Vyper340 (12-22-2016)
04-18-2016, 01:47 PM
#39
Safety Car
Thread Starter
The Scan Speak is 8 ohms so amplifier power would drop by almost half. The Arc is rated to do 180w x 2 @ 8ohms but it tests somewhere around 220 watts.
The coil is rated at 150w vs. 300w for the B&C. Unlike the B&C there is no venting under the voice coil. That sounds like a bad thing and it is the reason B&C gets a higher power rating but that venting makes noise under excursion so I'd rather not have it. Half the coil rating, but half the power going to it as well due to higher coil resistance (4 ohm vs. 8 ohm).
The inductance treatment is much better in the Scan. Tripple shorting rings in the SD1 motor: above the gap, in the gap, below the gap. B&C only has one. The coil is also smaller in the Scan which contributes to the low inductance.
The Scan has venting under the spider whereas the B&C does not. That means it should be quieter under excursion and have lower resonance but it also means it can get water damage more easily. On the other hand the cone is aluminum and therefore water proofed better than the B&C which may not be waterproofed on the inside (not sure).
Testing the Scan Speak 25W/8567-SE
Free air tests
First I fired up the WT2 to see if the coils are good. I was also curious to see the QTS and FS. Note that I did not mount the driver for the test, it was just sitting on carpet. Nonetheless, here is what I got:

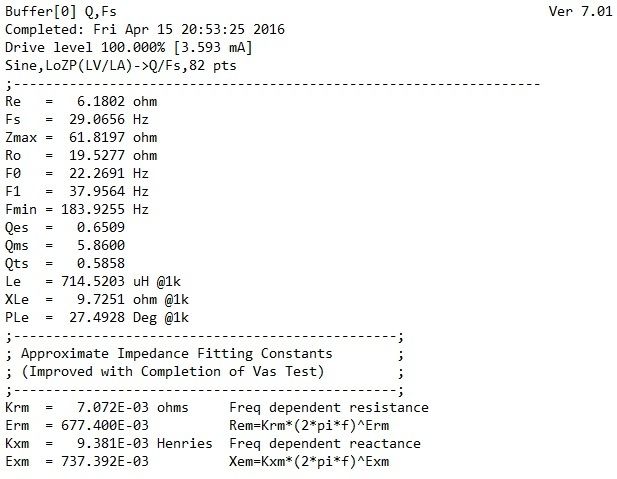
Coils are good. The FS is 28hz and 29hz. That means based on the rule of thumb I should cross them at 58hz and above. Ideal for a 63hz HPF! QTS is .51 and .58. Ideal for IB or large leaky sealed, which is what a doors is! While Scan Speak made these for Martin Logan, clearly they are designed to kick but in the Corvette. :laugh:
In-door tests
I had a few questions I wanted to answer:
1. At what frequency does the B&C surpass the Scan in sensitivity?
2. Is it true that the B&C is 8.5db more sensitive at 1 watt?
3. Can the Scan go flat to 20hz in-door?
Here are both the Scan and B&C tested on the same volume level on the Alpine H800 with all filters defeated, basically full range.
Driver side, B&C in red, Scan Speak in black
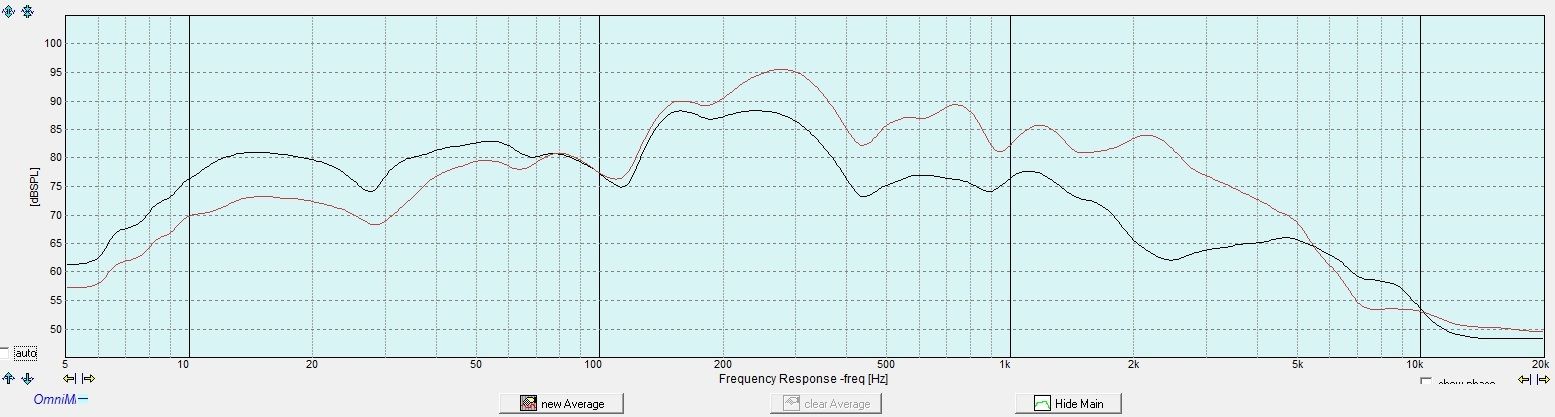
Passenger side, B&C in red, Scan Speak in black
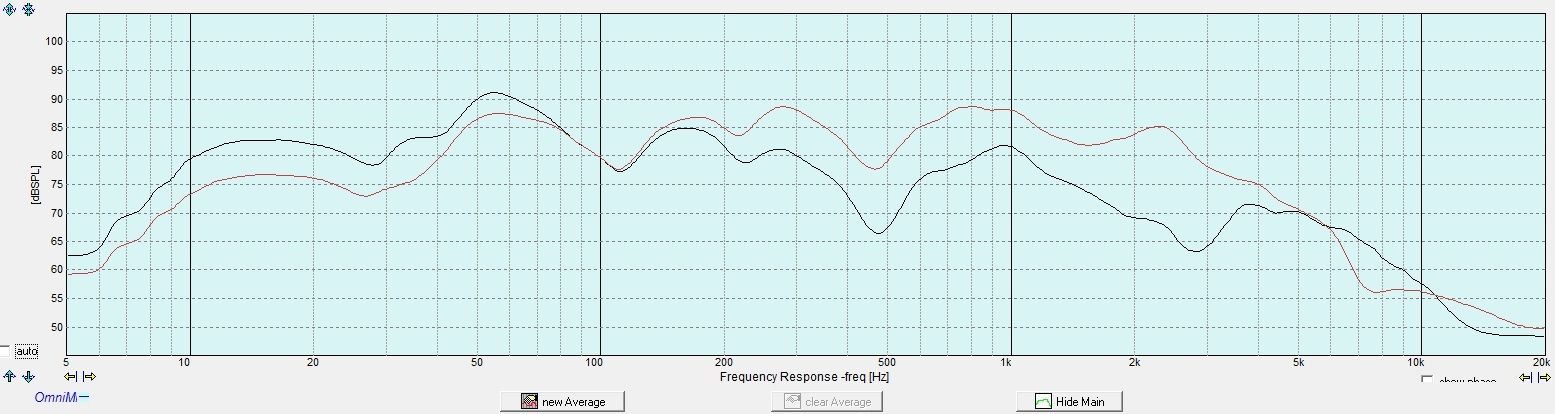
Question 1
First we have to account for the fact that the B&C is 4 ohm whereas the Scan is 8 ohm. Therefore, add 3db to the Scan Speak scale. The B&C has more output above 200hz. The Scan has more output below 200hz. That means the Scan has a considerable output advantage in the midbass. Even if I wanted more output and chose the B&C I'd have to live with less midbass output, aka a funky FR with midbass downplayed by many DB just to not bottom out the driver. So in effect, while the B&C is a higher output design in reality you can't make use of it vs. a hi fi driver because midbass output is the limiting factor for both. You have to choose a higher than 63hz crossover or choose an FR that has low midbass output to make use of the B&C's higher output. In fact, below 80hz the output is lower with the B&C even if you use EQ because you run out of power or the coil melts down before beating out the Scan Speak. This is important because it shows you can't make use of the B&Cs higher output in the top octaves without sacrificing the low crossover or a nice frequency response!
Question 2
Based on these plots I can see that at 1 watt, the B&C is about 8db more sensitive above 300hz. So you can see here that if you plan to use the 10" in door from 300hz to 1000hz that the sensitivity advantage is real. However, I don't plan on using the 10" as midrange! So this is sensitivity advantage is not really an advantage since as I shown earlier the output is limited by the distortion in the region 63hz-125hz. Basically, the B&C will bottom out first when tuned to have decent output down to 63hz before it gets to use it's sensitivity advantage. Your results may be different if your car does not have a huge drop in SPL in the midbass on the driver's side, or if your car does not have a null at 120hz, or if you desire an FR that is cut heavily in the midbass area.
Question 3
Yes, the Scan Speak has the same output at 20hz as it does at 1,000hz. Scan Speak recommends to use this driver 20hz to 1,000hz. So yes, I could run subless and still have extension down to 20hz. However... the Scans only have 12mm of throw one way. That is hardly enough to get serious SPL at 20hz!
Note also that Scan Speaks break up is very mild starting at 2,5khz or so. A 1,000hz LPF works great with this woofer. No hint of breakup. It also blends very very well with the AMT tweeters.
Harmonic distortion plots
This output shows up as 93db on the Omnimic, level 17 on the headunit. I still think my Omnimic V2 reads too low of an SPL. Not sure why. All THD below 1% except in the 63hz-125hz area where it is 2%. If the SPL is correct on the Omnimic it's really hard to get low distortion sound. Sheesh. This is the driver's side only, which looks the worst because there is more cancellation in the midbass area, and therefore more EQ to boost it. The peak at 400hz is also an EQ boost.

Time domain response as tuned for passenger side. If anyone wants/can interpret this one please do. I think I can see some domain smear around where the box has a higher group delay but it seems very tiny to me. One outstanding feature is that you cannot see any sign of ringing above 1khz, so the Scan Speak's break up is filtered out quite nicely. 60hz and below there is a bit of time domain smear but I'm not sure how much of it is audible or whether we can get away from it in a car.
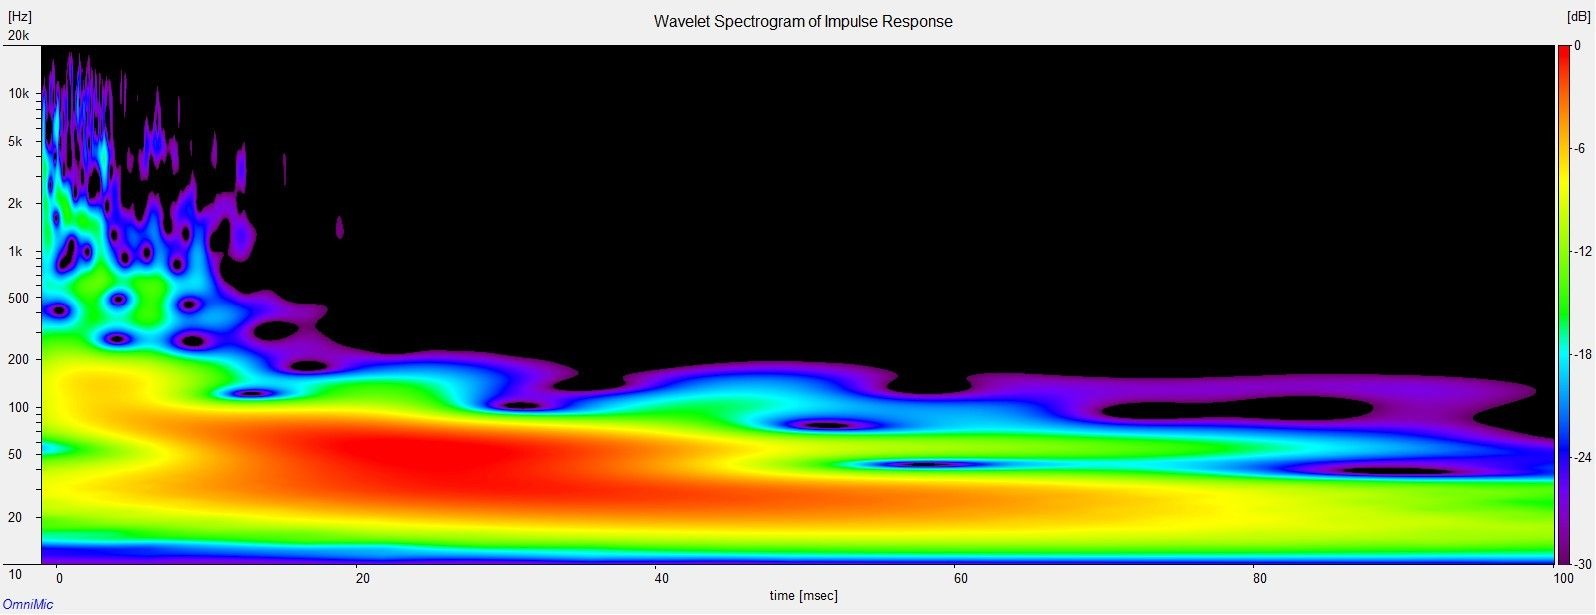
The coil is rated at 150w vs. 300w for the B&C. Unlike the B&C there is no venting under the voice coil. That sounds like a bad thing and it is the reason B&C gets a higher power rating but that venting makes noise under excursion so I'd rather not have it. Half the coil rating, but half the power going to it as well due to higher coil resistance (4 ohm vs. 8 ohm).
The inductance treatment is much better in the Scan. Tripple shorting rings in the SD1 motor: above the gap, in the gap, below the gap. B&C only has one. The coil is also smaller in the Scan which contributes to the low inductance.
The Scan has venting under the spider whereas the B&C does not. That means it should be quieter under excursion and have lower resonance but it also means it can get water damage more easily. On the other hand the cone is aluminum and therefore water proofed better than the B&C which may not be waterproofed on the inside (not sure).
Testing the Scan Speak 25W/8567-SE
Free air tests
First I fired up the WT2 to see if the coils are good. I was also curious to see the QTS and FS. Note that I did not mount the driver for the test, it was just sitting on carpet. Nonetheless, here is what I got:
Coils are good. The FS is 28hz and 29hz. That means based on the rule of thumb I should cross them at 58hz and above. Ideal for a 63hz HPF! QTS is .51 and .58. Ideal for IB or large leaky sealed, which is what a doors is! While Scan Speak made these for Martin Logan, clearly they are designed to kick but in the Corvette. :laugh:
In-door tests
I had a few questions I wanted to answer:
1. At what frequency does the B&C surpass the Scan in sensitivity?
2. Is it true that the B&C is 8.5db more sensitive at 1 watt?
3. Can the Scan go flat to 20hz in-door?
Here are both the Scan and B&C tested on the same volume level on the Alpine H800 with all filters defeated, basically full range.
Driver side, B&C in red, Scan Speak in black
Passenger side, B&C in red, Scan Speak in black
Question 1
First we have to account for the fact that the B&C is 4 ohm whereas the Scan is 8 ohm. Therefore, add 3db to the Scan Speak scale. The B&C has more output above 200hz. The Scan has more output below 200hz. That means the Scan has a considerable output advantage in the midbass. Even if I wanted more output and chose the B&C I'd have to live with less midbass output, aka a funky FR with midbass downplayed by many DB just to not bottom out the driver. So in effect, while the B&C is a higher output design in reality you can't make use of it vs. a hi fi driver because midbass output is the limiting factor for both. You have to choose a higher than 63hz crossover or choose an FR that has low midbass output to make use of the B&C's higher output. In fact, below 80hz the output is lower with the B&C even if you use EQ because you run out of power or the coil melts down before beating out the Scan Speak. This is important because it shows you can't make use of the B&Cs higher output in the top octaves without sacrificing the low crossover or a nice frequency response!
Question 2
Based on these plots I can see that at 1 watt, the B&C is about 8db more sensitive above 300hz. So you can see here that if you plan to use the 10" in door from 300hz to 1000hz that the sensitivity advantage is real. However, I don't plan on using the 10" as midrange! So this is sensitivity advantage is not really an advantage since as I shown earlier the output is limited by the distortion in the region 63hz-125hz. Basically, the B&C will bottom out first when tuned to have decent output down to 63hz before it gets to use it's sensitivity advantage. Your results may be different if your car does not have a huge drop in SPL in the midbass on the driver's side, or if your car does not have a null at 120hz, or if you desire an FR that is cut heavily in the midbass area.
Question 3
Yes, the Scan Speak has the same output at 20hz as it does at 1,000hz. Scan Speak recommends to use this driver 20hz to 1,000hz. So yes, I could run subless and still have extension down to 20hz. However... the Scans only have 12mm of throw one way. That is hardly enough to get serious SPL at 20hz!
Note also that Scan Speaks break up is very mild starting at 2,5khz or so. A 1,000hz LPF works great with this woofer. No hint of breakup. It also blends very very well with the AMT tweeters.
Harmonic distortion plots
This output shows up as 93db on the Omnimic, level 17 on the headunit. I still think my Omnimic V2 reads too low of an SPL. Not sure why. All THD below 1% except in the 63hz-125hz area where it is 2%. If the SPL is correct on the Omnimic it's really hard to get low distortion sound. Sheesh. This is the driver's side only, which looks the worst because there is more cancellation in the midbass area, and therefore more EQ to boost it. The peak at 400hz is also an EQ boost.
Time domain response as tuned for passenger side. If anyone wants/can interpret this one please do. I think I can see some domain smear around where the box has a higher group delay but it seems very tiny to me. One outstanding feature is that you cannot see any sign of ringing above 1khz, so the Scan Speak's break up is filtered out quite nicely. 60hz and below there is a bit of time domain smear but I'm not sure how much of it is audible or whether we can get away from it in a car.
The following users liked this post:
bjmsam (03-18-2017)
04-19-2016, 02:47 PM
#40
Safety Car
Thread Starter
I got some input from DIYMA on decoupling and rattle fixing. I'm posting the testing done here.
Testing theories
We've had several good jabs at quenching vibration/rattles from contributors which I'm listing here:
1. acoustic force transfers to car panels by air movement
2. mechanical force is not canceled in the box properly, box is not braced sufficiently
3. mechanical force is canceled in the box as much as it can be, no 100% force cancellation possible
Testing method
Found a parking lot where 18 wheelers pull in, commercial, and almost no one there. Downloaded an app to generate test tones: 25hz, 31hz, 40hz, 50hz, 63hz. The Pyle foam isolators came in and I used them to decouple the box. Played a test tone at a time with the car open or closed and touching the box walls to feel any vibration. The box is not mounted to the car against movement at this time.
The idea was that with the rear hatch open most of the acoustic energy does not load the panels inside and if decoupled properly there should be few if any rattles. You can see the Pyle foam isolators are so thick that the box lifts, nearly touching the hatch. It's also angled quite sharply matching the rake of the hatch.

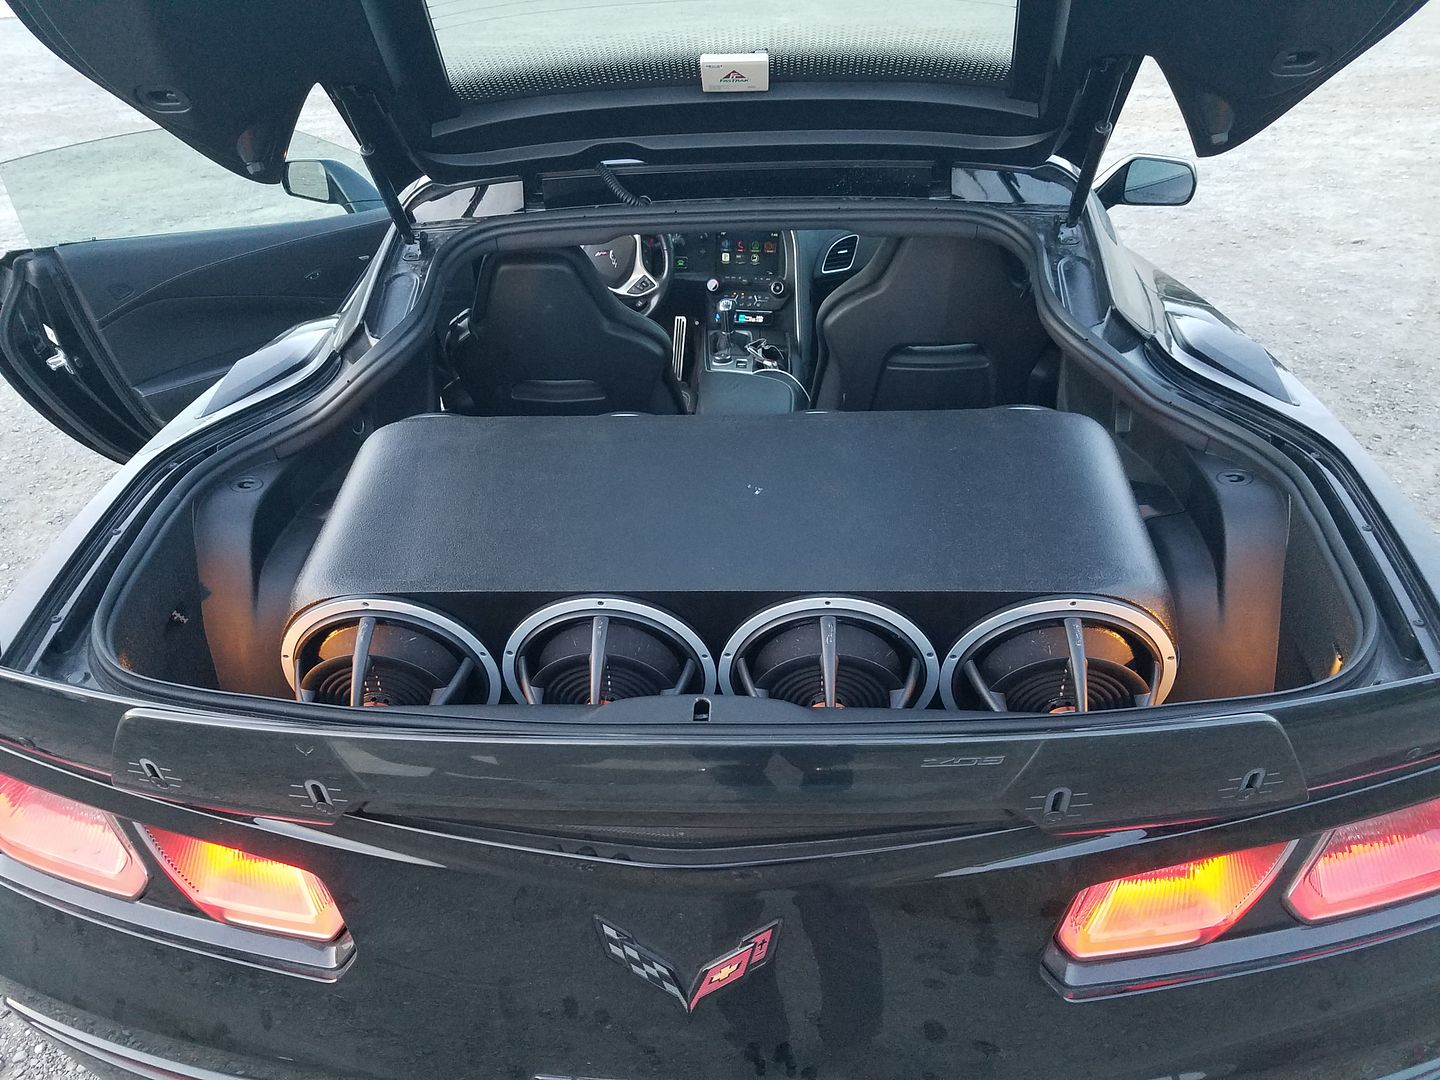
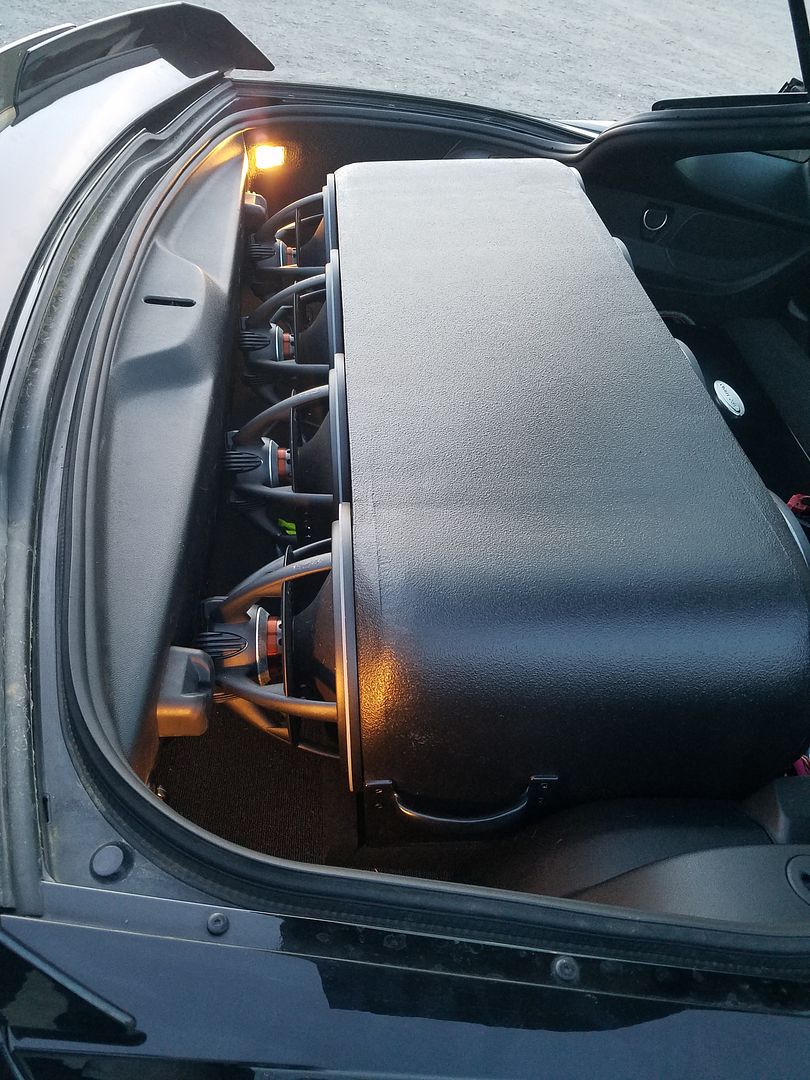
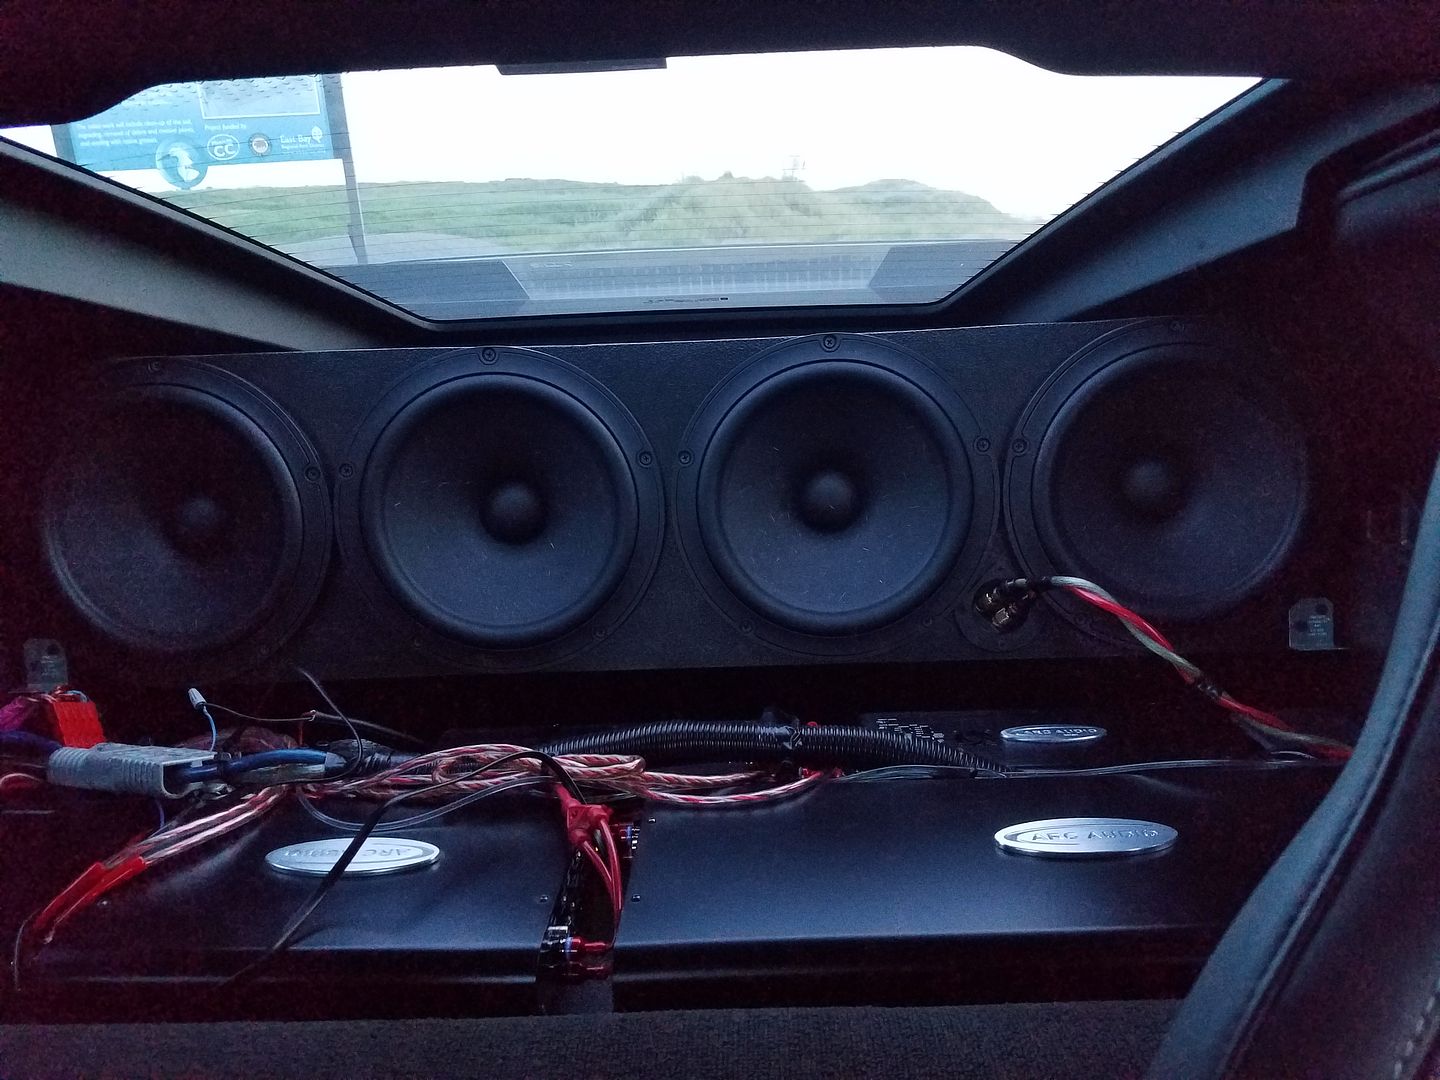
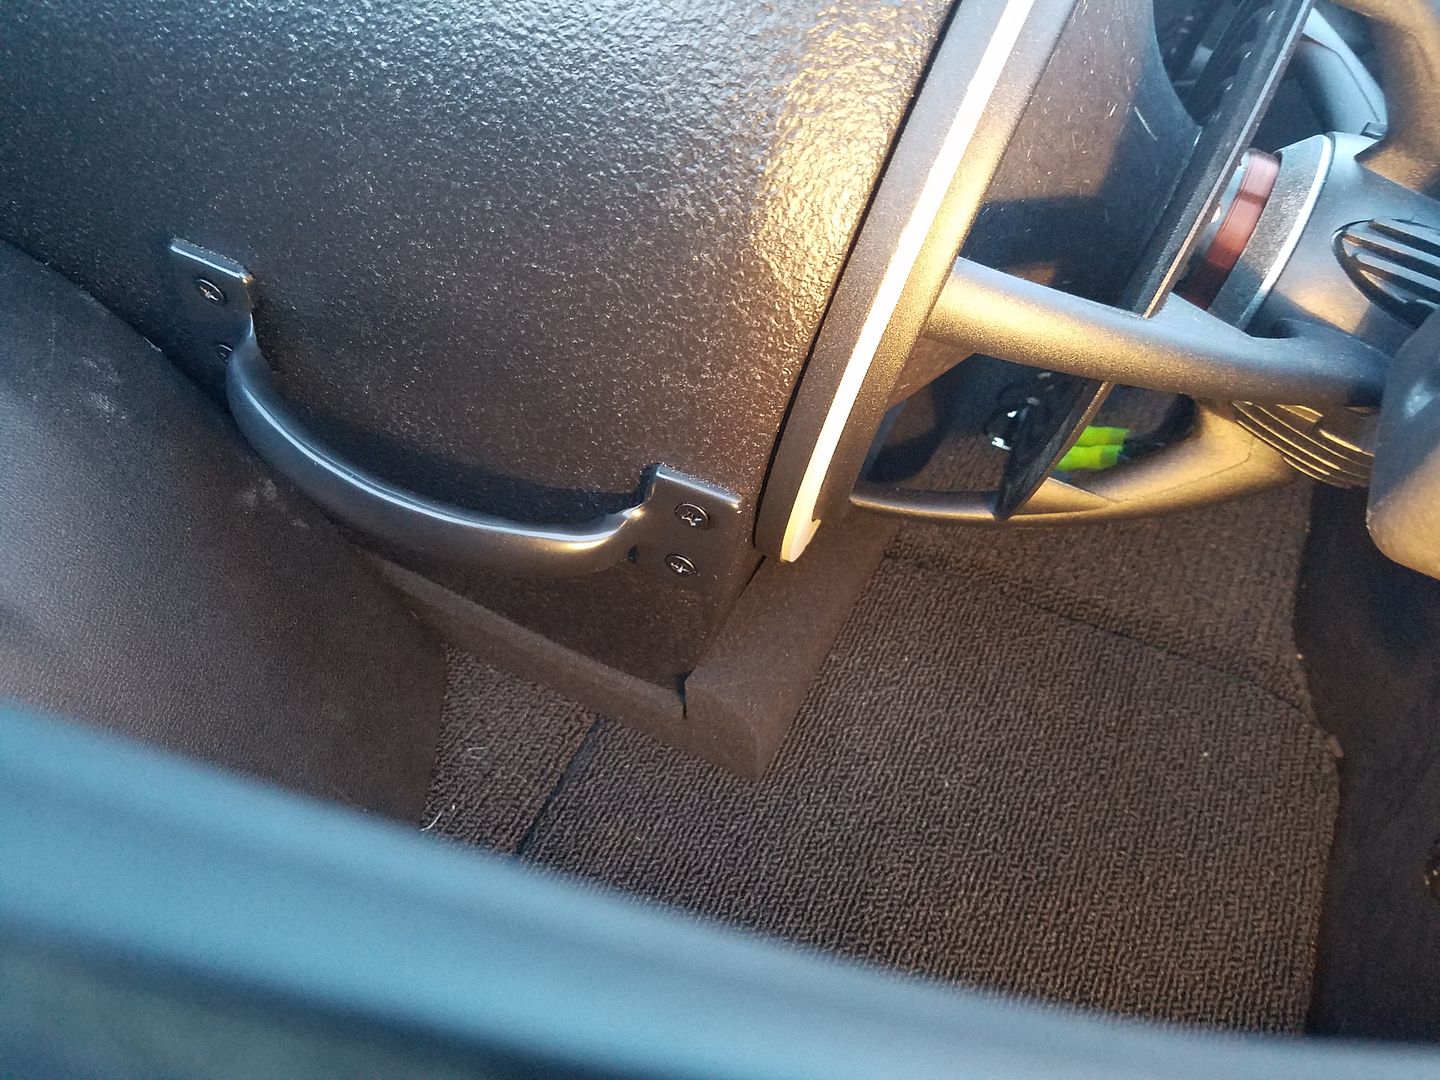
Stock photo of the Pyle foam isolators used:

Findings
I tested theory 1, that acoustic force transfers to car panels by air movement producing the rattles. I did so by playing test tones while opening the rear hatch. The majority of the rattles are reduced by opening the rear hatch, allowing the acoustic energy a path out of the car. The most rattle abatement can be done by treating the car, not the box. Walking around the car while it plays test tones with the windows up is telling. The rear tail lights, and really the whole rear bumper shakes violently. I can hear some air flaps opening and closing. The rear hatch is a mess, vibrating madly as if to blast open. No way to treat the majority of the rattles without adding weight to the car.
I tested theory 2, that the mechanical force is not canceled in the box properly, the box is not braced sufficiently. This is also true. There was considerable flex in the box on the top panel, but... 0 flex anywhere else. That means the bracing I had in there originally to deal with the force cancelation is working, the front and back baffles the subs mount to are dead. The speaker baskets are dead. The kerf, where the wood bends on top is dead. It's really just the top and I imagine by implication the bottom of the box that need bracing.
OLD bracing job:
NEW bracing job, I did this last night after testing. New bracing is unpainted:
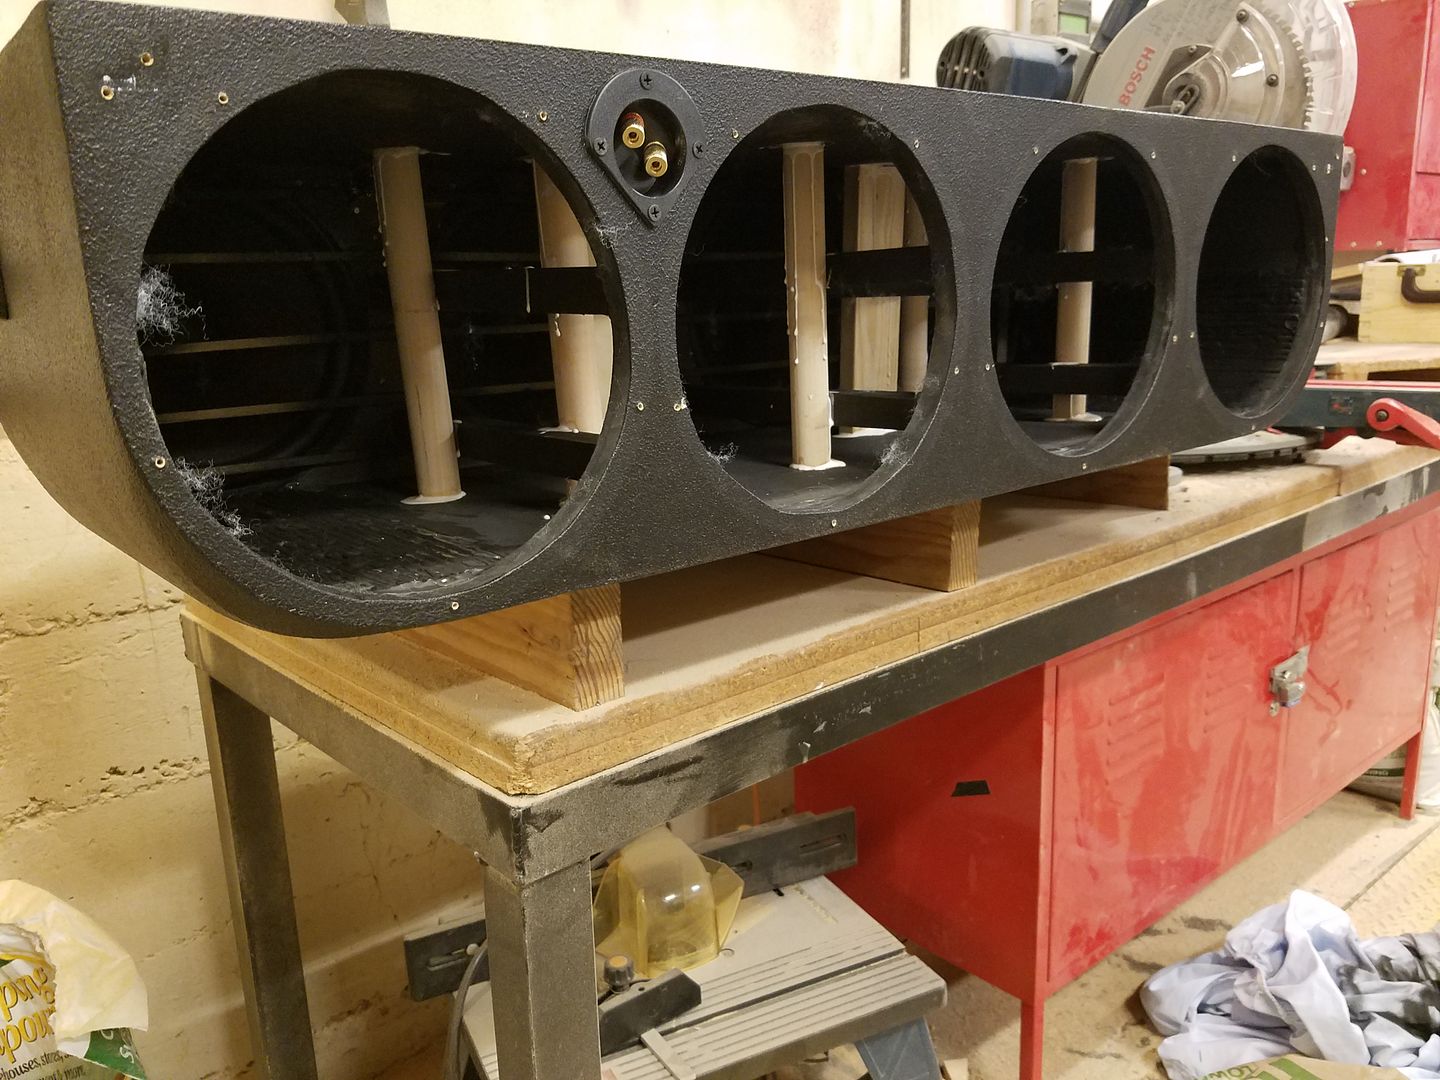
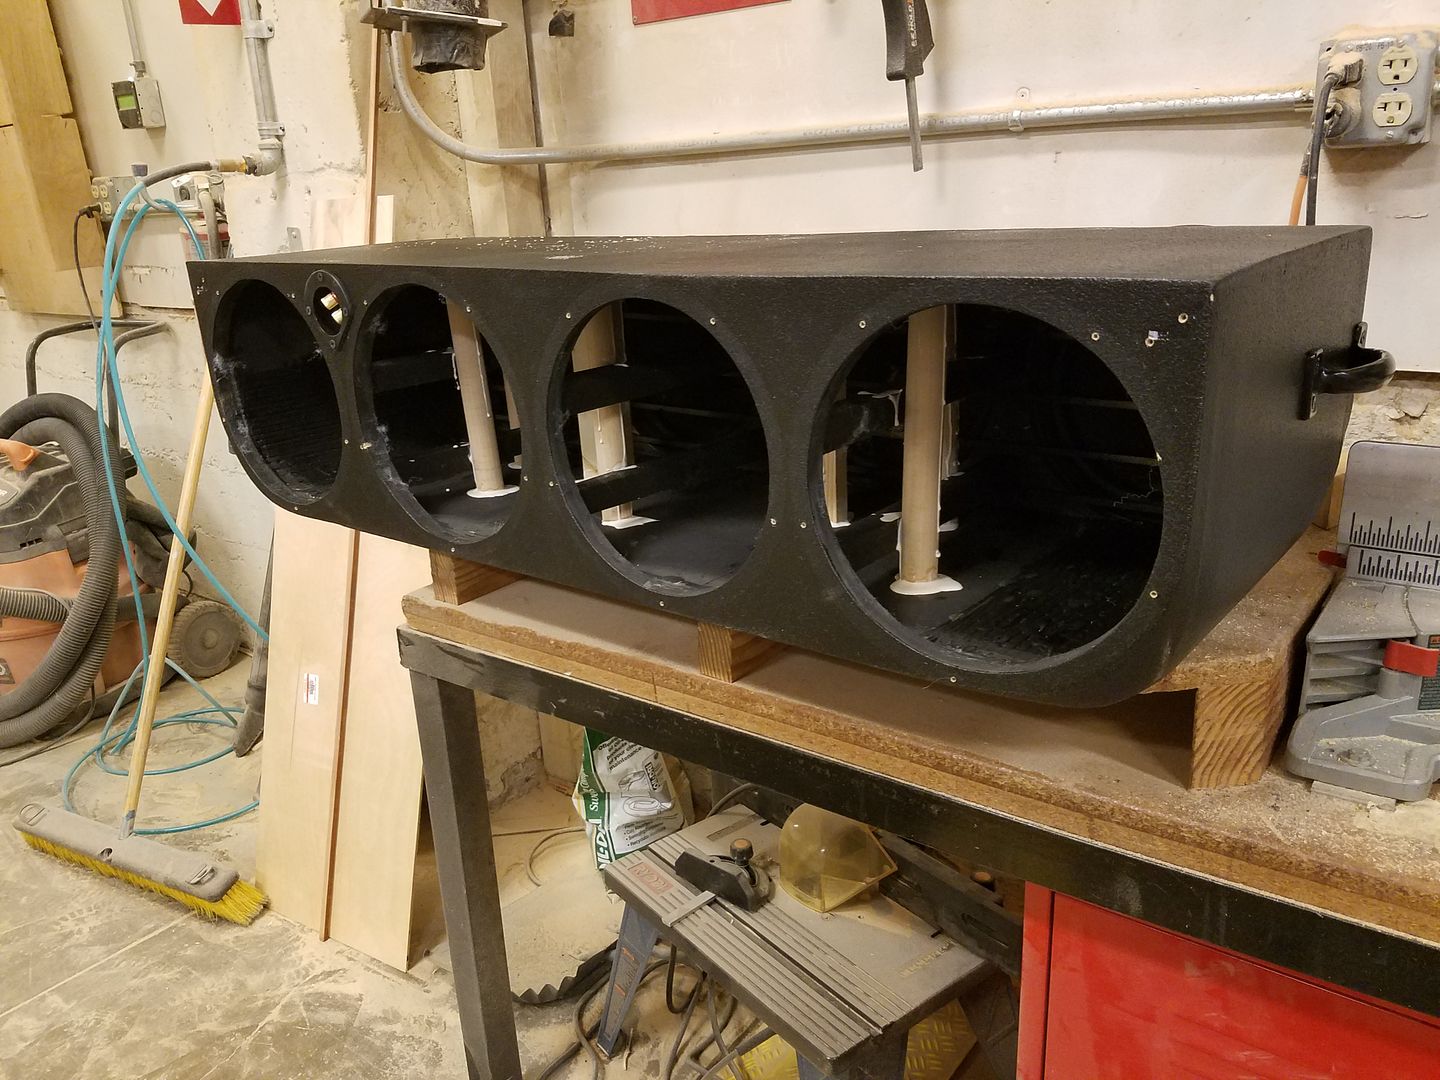
Theory 3, mechanical force is canceled in the box as much as it can be, no 100% force cancellation possible, cannot be tested because I have to test again once the glue dries.
Pyle PSI03 decoupling foam review
The foam is way to bulky to use in the car. If I use it I have no way to store the targa top in the back above the box. I'm switching to Ensolite and adding multiple layers to get desired thickness. Ensolite is 1/8" which is more appropriate for tight installs.
The foam is too resistant to compression. It's true I used two pairs, but I can hardly see any compression from an 80lb box. If I were to guess, the compression is about 9 PSI, I prefer something softer. It is good for heavy tower speakers but not much else. Presumably Ensolite is between 1.5psi and 3psi, so much softer and more adequate.
Conclusion
Rattles were the worst at 50hz and 63hz. Most rattles were produced by the car itself when faced with acoustic energy. However, even with the hatch open and the box decoupled by inches of foam there was clear transmission of mechanical vibration to the floor and structure of the car. I found the box bracing to be insufficient but mostly that the car needs some serious sound proofing. The force canceling does work, with the front baffle and speaker frames entirely dead but it does place a lot of load on the larger (42" x 14" in my install) panels which need to be well braced.
Testing theories
We've had several good jabs at quenching vibration/rattles from contributors which I'm listing here:
1. acoustic force transfers to car panels by air movement
2. mechanical force is not canceled in the box properly, box is not braced sufficiently
3. mechanical force is canceled in the box as much as it can be, no 100% force cancellation possible
Testing method
Found a parking lot where 18 wheelers pull in, commercial, and almost no one there. Downloaded an app to generate test tones: 25hz, 31hz, 40hz, 50hz, 63hz. The Pyle foam isolators came in and I used them to decouple the box. Played a test tone at a time with the car open or closed and touching the box walls to feel any vibration. The box is not mounted to the car against movement at this time.
The idea was that with the rear hatch open most of the acoustic energy does not load the panels inside and if decoupled properly there should be few if any rattles. You can see the Pyle foam isolators are so thick that the box lifts, nearly touching the hatch. It's also angled quite sharply matching the rake of the hatch.
Stock photo of the Pyle foam isolators used:
Findings
I tested theory 1, that acoustic force transfers to car panels by air movement producing the rattles. I did so by playing test tones while opening the rear hatch. The majority of the rattles are reduced by opening the rear hatch, allowing the acoustic energy a path out of the car. The most rattle abatement can be done by treating the car, not the box. Walking around the car while it plays test tones with the windows up is telling. The rear tail lights, and really the whole rear bumper shakes violently. I can hear some air flaps opening and closing. The rear hatch is a mess, vibrating madly as if to blast open. No way to treat the majority of the rattles without adding weight to the car.
I tested theory 2, that the mechanical force is not canceled in the box properly, the box is not braced sufficiently. This is also true. There was considerable flex in the box on the top panel, but... 0 flex anywhere else. That means the bracing I had in there originally to deal with the force cancelation is working, the front and back baffles the subs mount to are dead. The speaker baskets are dead. The kerf, where the wood bends on top is dead. It's really just the top and I imagine by implication the bottom of the box that need bracing.
OLD bracing job:
NEW bracing job, I did this last night after testing. New bracing is unpainted:
Theory 3, mechanical force is canceled in the box as much as it can be, no 100% force cancellation possible, cannot be tested because I have to test again once the glue dries.
Pyle PSI03 decoupling foam review
The foam is way to bulky to use in the car. If I use it I have no way to store the targa top in the back above the box. I'm switching to Ensolite and adding multiple layers to get desired thickness. Ensolite is 1/8" which is more appropriate for tight installs.
The foam is too resistant to compression. It's true I used two pairs, but I can hardly see any compression from an 80lb box. If I were to guess, the compression is about 9 PSI, I prefer something softer. It is good for heavy tower speakers but not much else. Presumably Ensolite is between 1.5psi and 3psi, so much softer and more adequate.
Conclusion
Rattles were the worst at 50hz and 63hz. Most rattles were produced by the car itself when faced with acoustic energy. However, even with the hatch open and the box decoupled by inches of foam there was clear transmission of mechanical vibration to the floor and structure of the car. I found the box bracing to be insufficient but mostly that the car needs some serious sound proofing. The force canceling does work, with the front baffle and speaker frames entirely dead but it does place a lot of load on the larger (42" x 14" in my install) panels which need to be well braced.