
2015 Corvette Z06 Z07 build log - petite speaker upgrade
 04-21-2016, 03:20 PM
#41
Safety Car

Thread Starter

Mounting system, decoupling
Decoupling
From my trials with the Pyle decoupling foam I learned that foam is more resistant to compression than I thought. Based on those observations I decided to just go with Ensolite in multiple layers to decouple the sub box and amp rack. I added 3 layers to the bottom of the sub box, and four on the amp rack. Whatever vibration is left after the force canceling sub box nets it out, should be mostly contained by the 3 layers of Ensolite between the car and the box. I measured the level the box is off a concrete floor after applying Ensolite and it is at 3/8." That means there is little compression in the Ensolite which measures 3/8" with no load. I could have used only one or two layers.
The second part of decoupling required that the system that bolts the sub box to the car transmits very little vibration. For that I decided to use rubber nut inserts for every tie down.
Mounting system
This part of the install was one of the most challenging. The mounting system to the car has to do the following for both the sub box and amp rack:
*brace against all Gs that the car generates
*removable without tools to be taken out for track days
*has to isolate the vibration from the sub box to the car
*has to isolate the vibration from the sub box to the amp rack
*shallow profile so the targa top still fits over the sub box
*no holes drilled in the car frame/panels
First I designed a brace that is less than 1/4" in height which bolts to the frame of the car using the Corvette's stock trunk anchors. It's made out of 1/8" sheet of wood reinforced with metal plates around the contact points. This allows me to use large 1/4" bolts, does not require any car modification, and adds only 1/4" to the amp rack height. It adds no height to the sub box since it connects to the front of the sub box. I used wood glue to hold the metal plates to the wood.
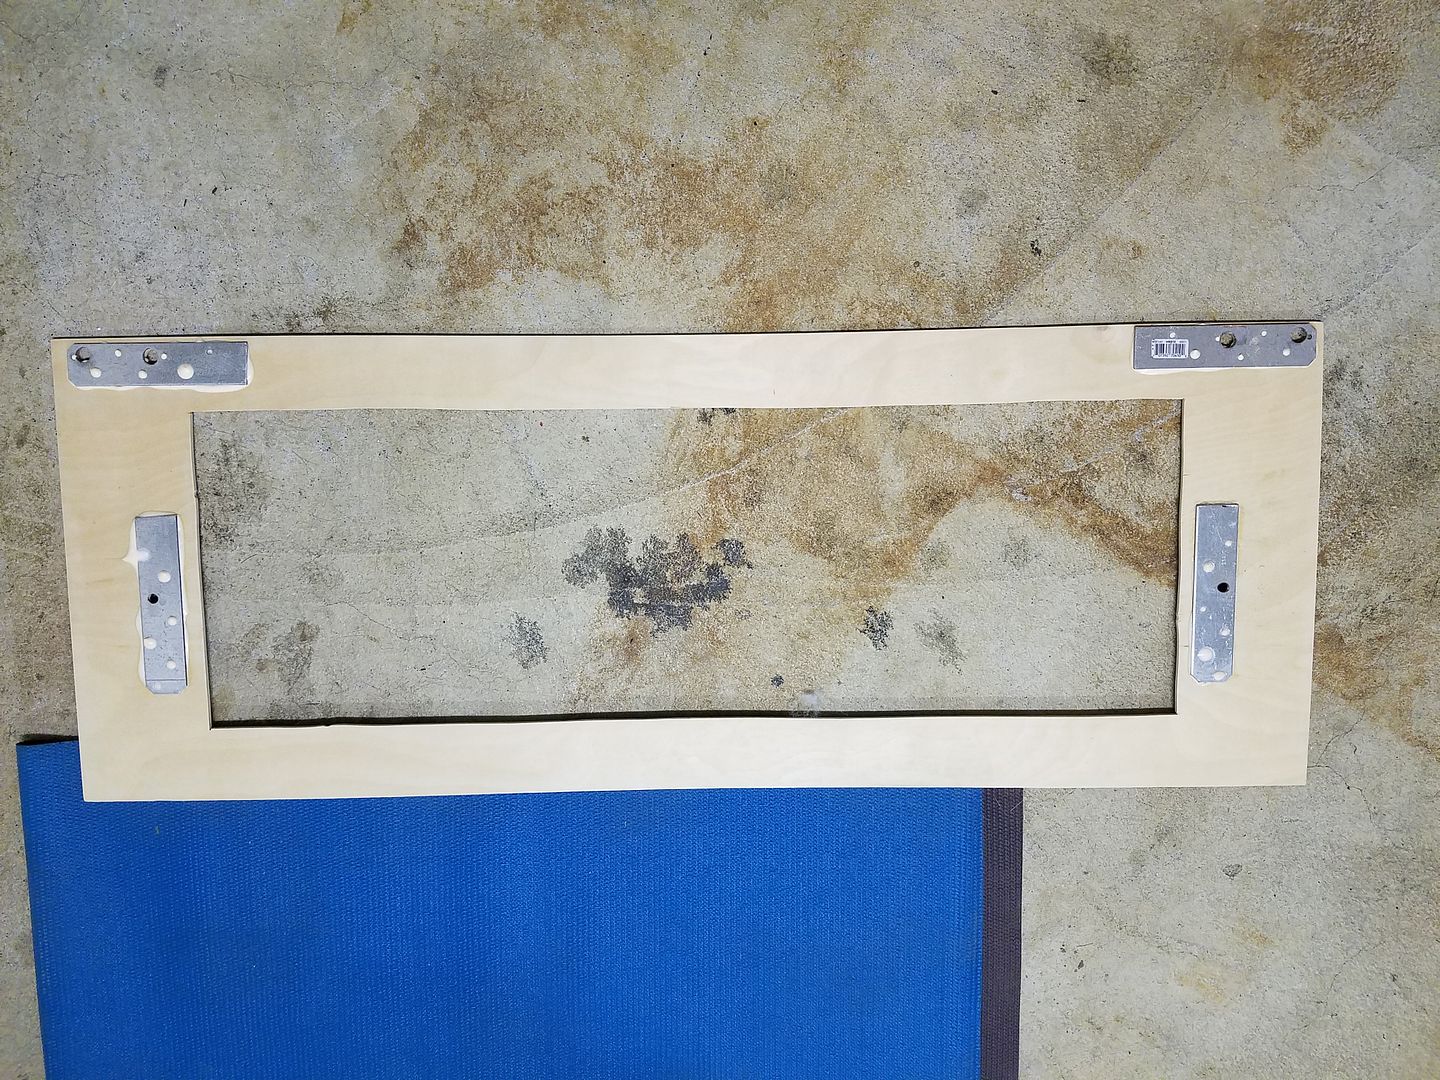
Second, I coated the brace in Duratex for waterproofing and stealth looks.
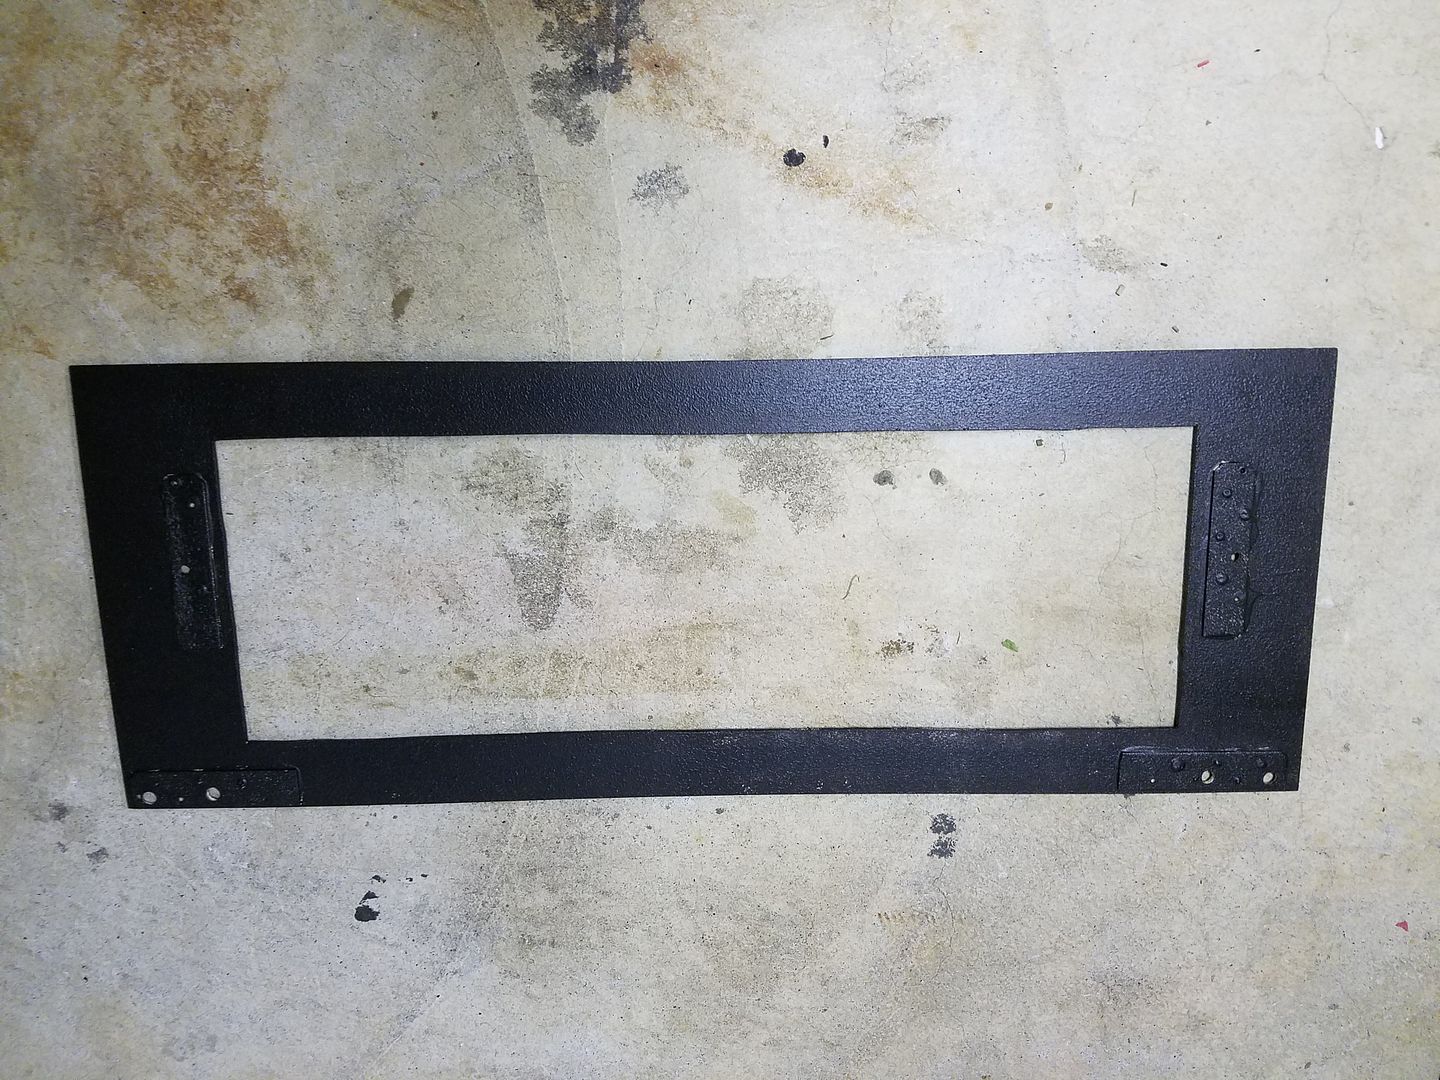
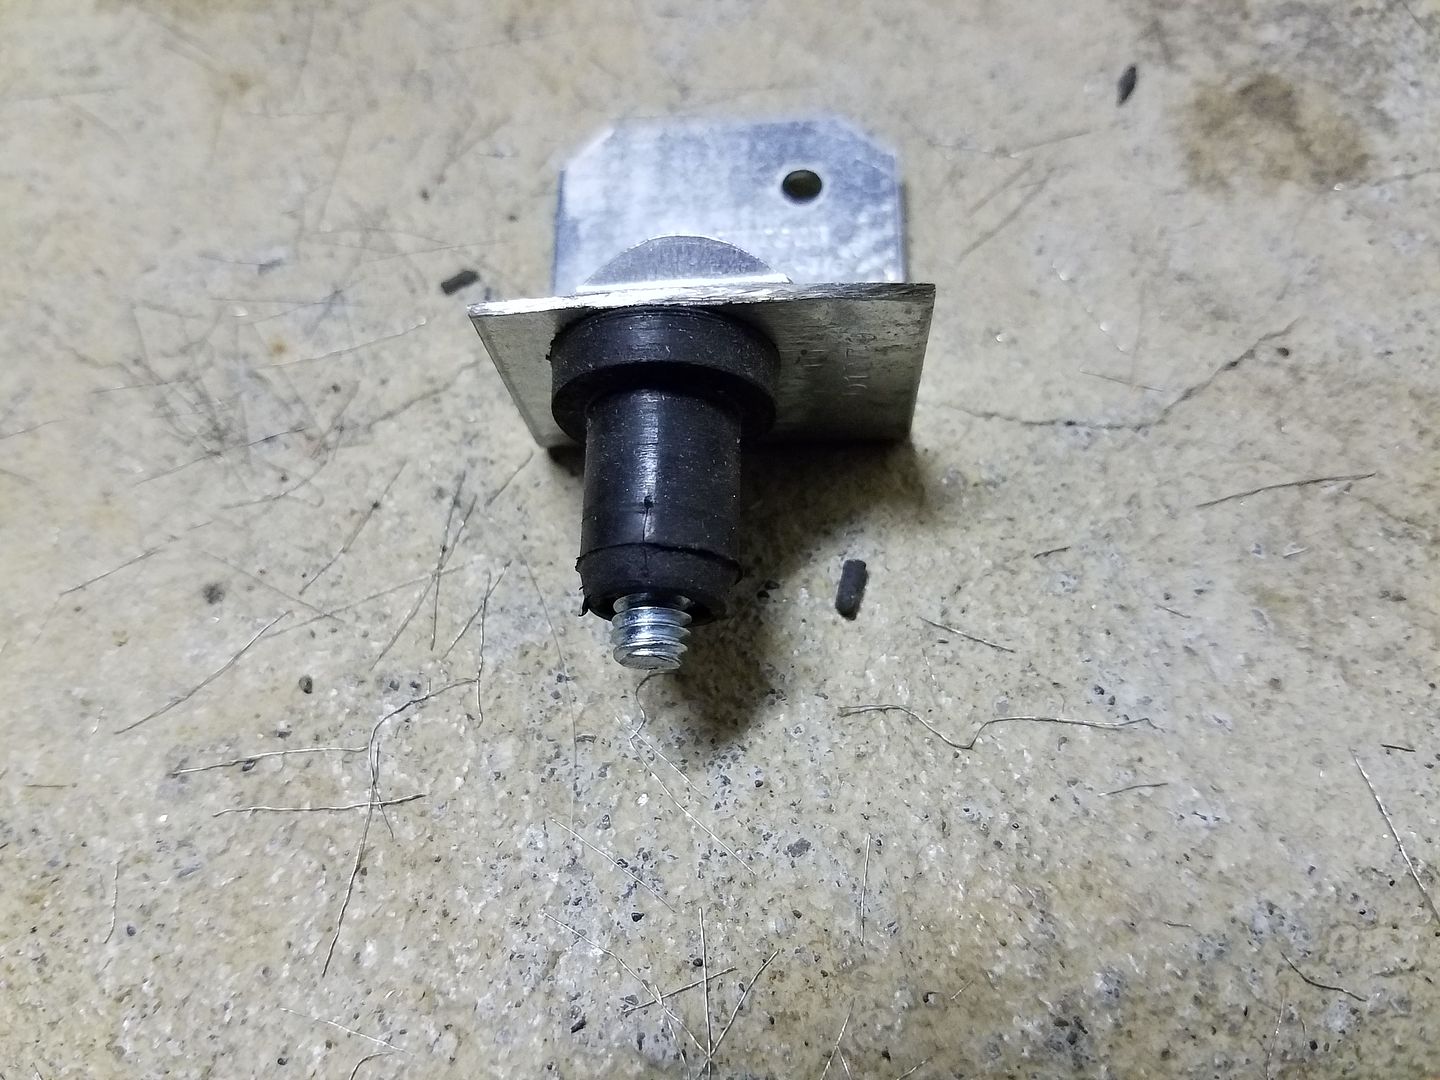
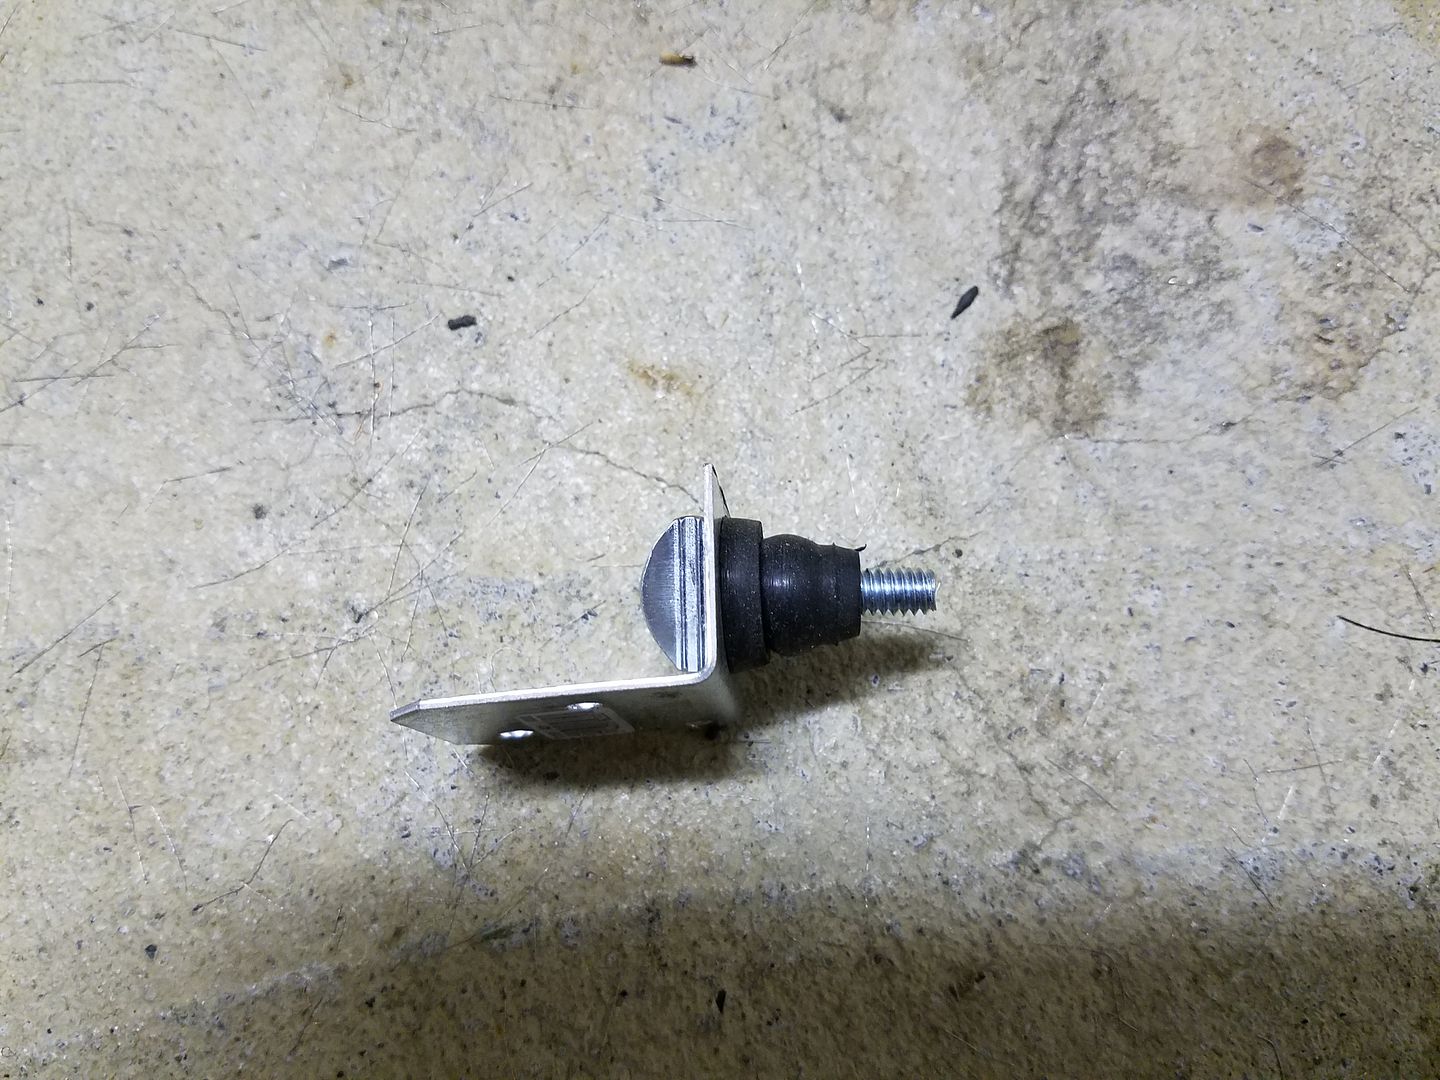
Third, I adapted some metal L-pads that would mount to the amp rack and sub box to allow the thumb-screw-rubber expansion-nut system. Here is the system:
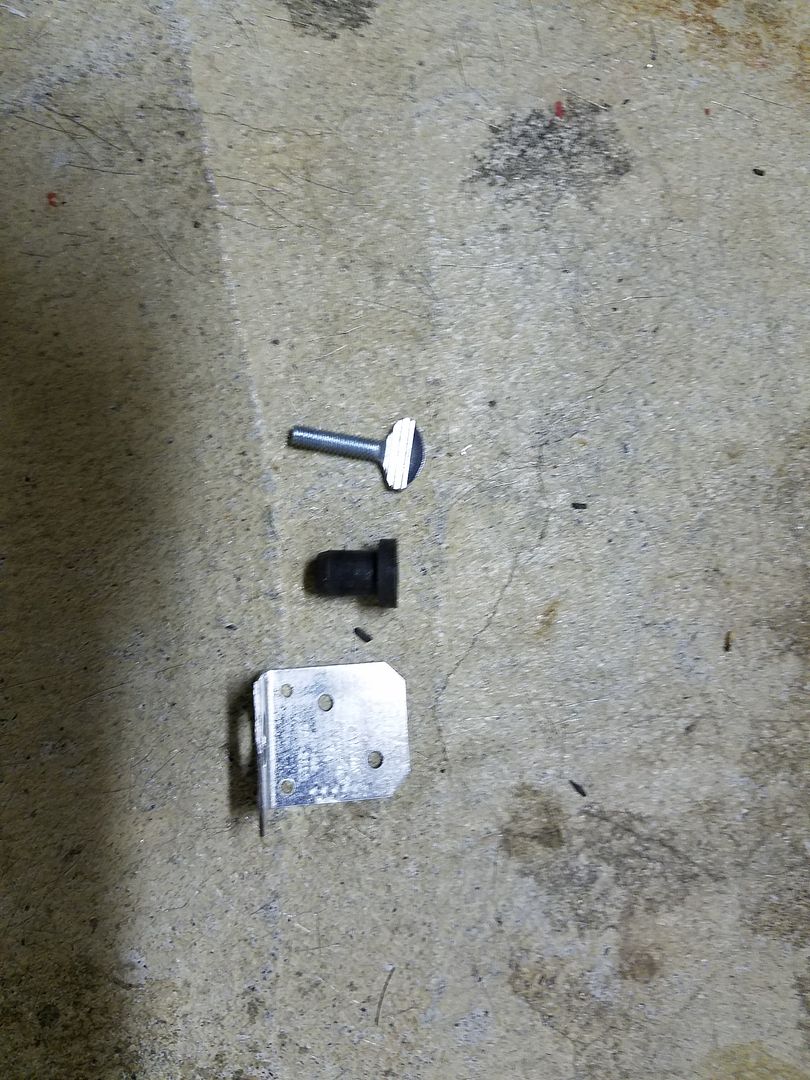
Here is how the system works. The rubber insert goes into the brace that is mounted to the car frame. This ensures there is no hard surface to hard surface contact.
The amp rack or sub box l-pad goes over the rubber insert. The rubber insert isolates vibration from the box and rack to the car. It also isolated the box and rack from eachother as vibration has to travel through both rubber nuts.
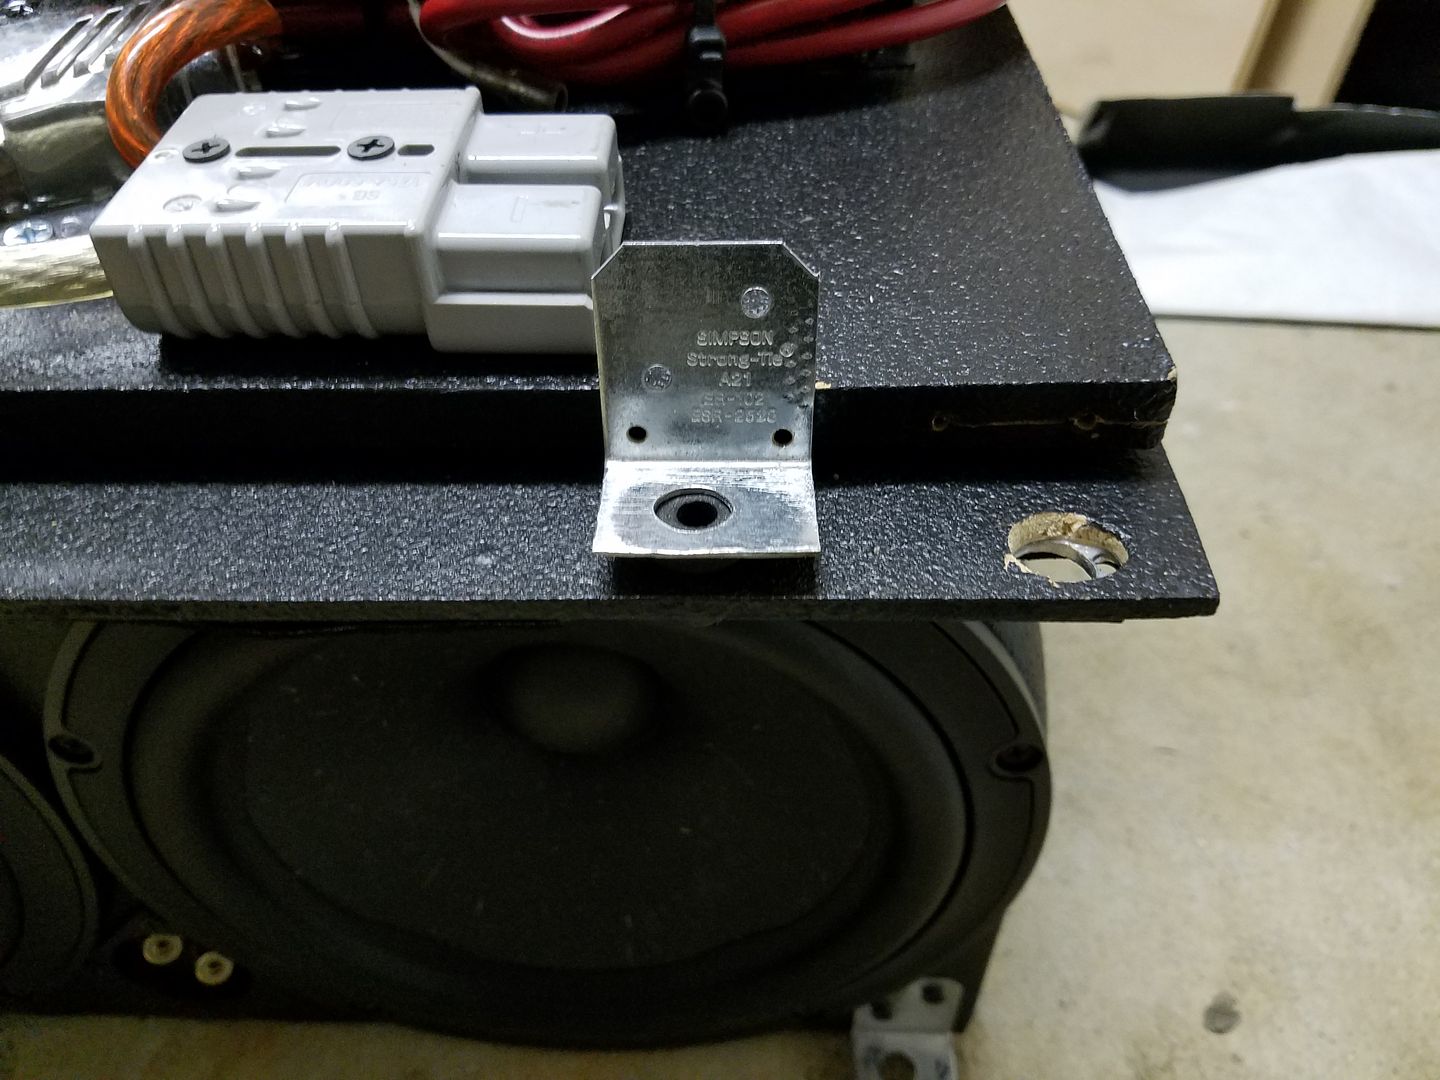
Next, thumb screws go through the whole made in the l-pad and catches into the rubber nut's insert, expanding it. This way the sub box and the amp rack can be disconnected with bare hands.
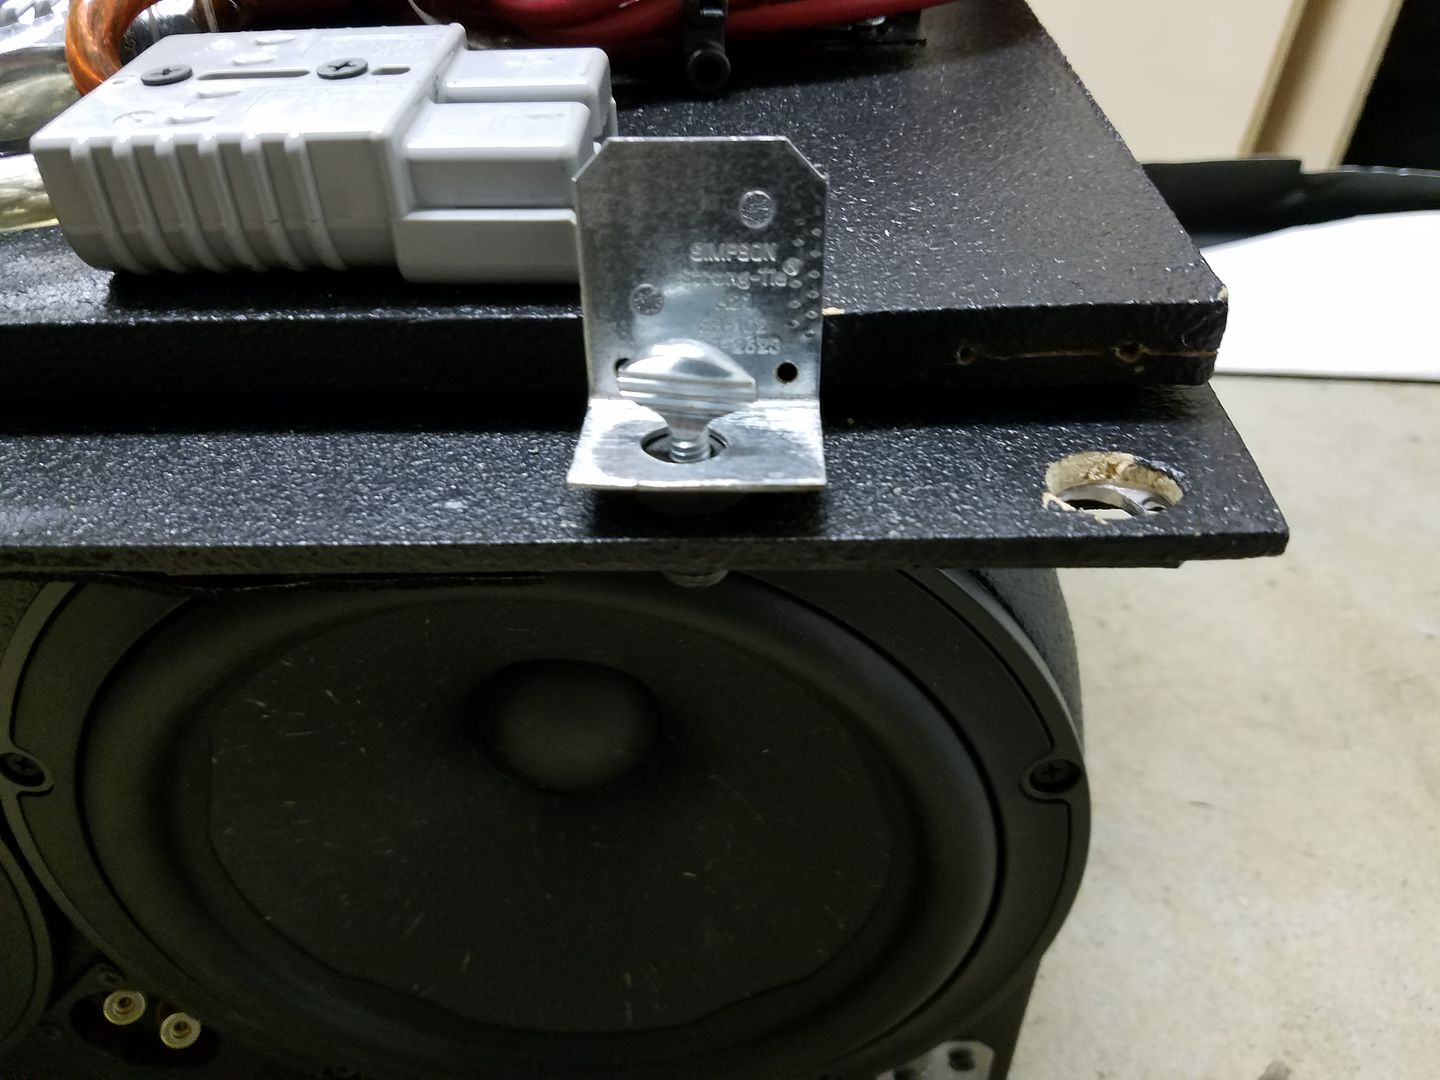
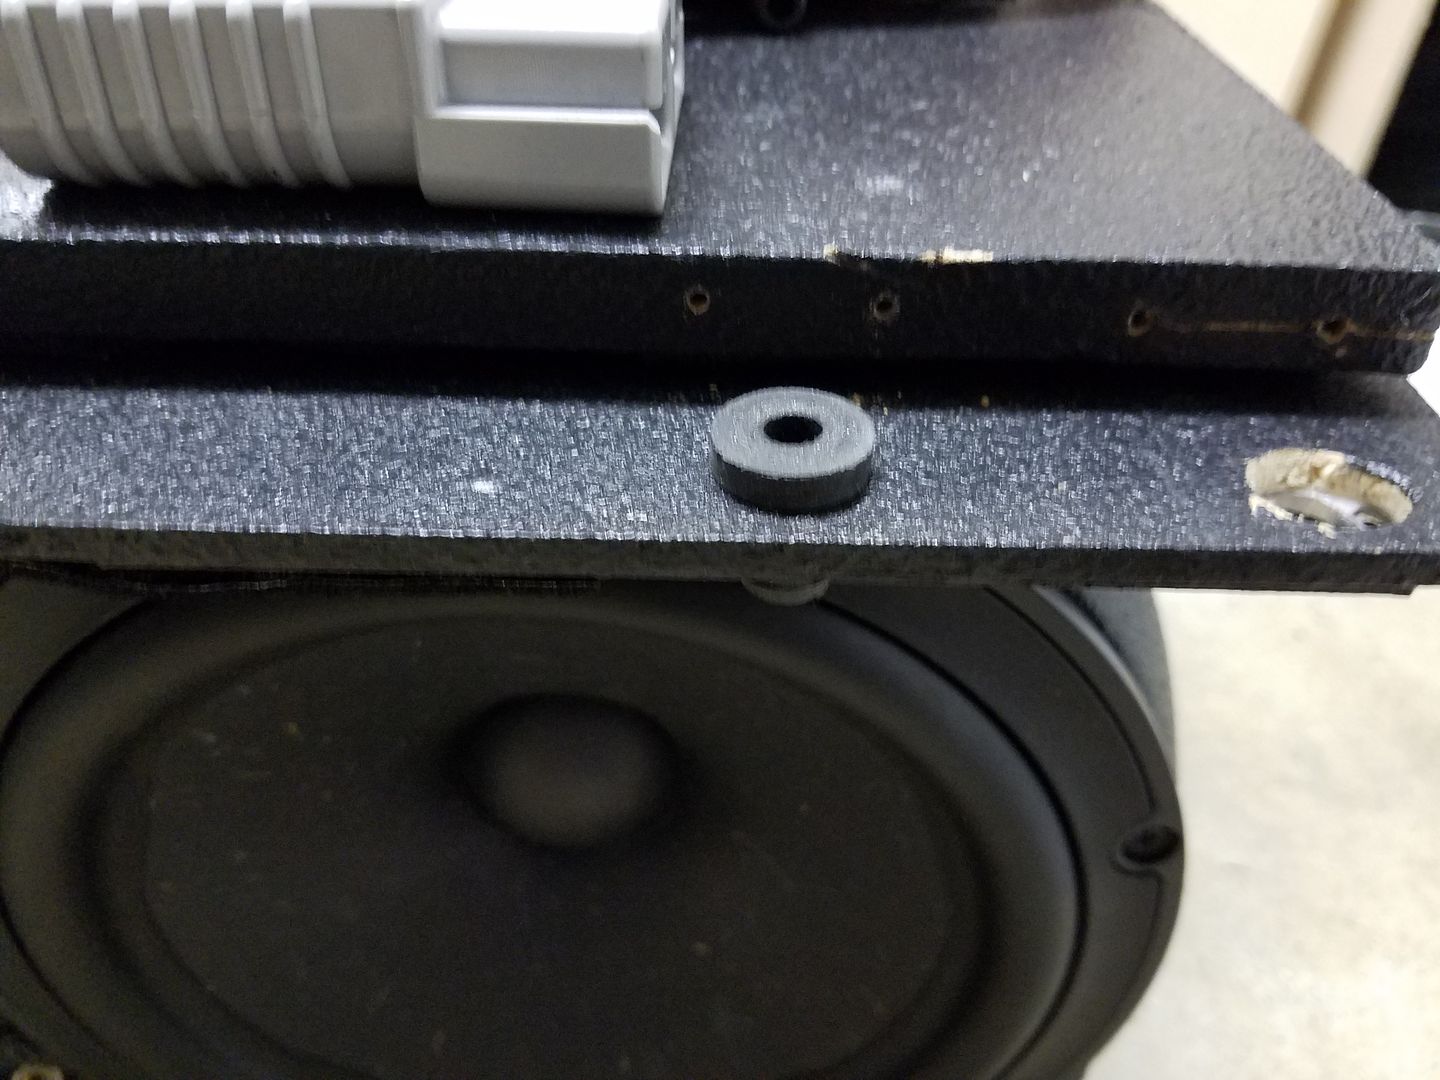
Here is a demo showing the rubber nut at rest, and then compressed.
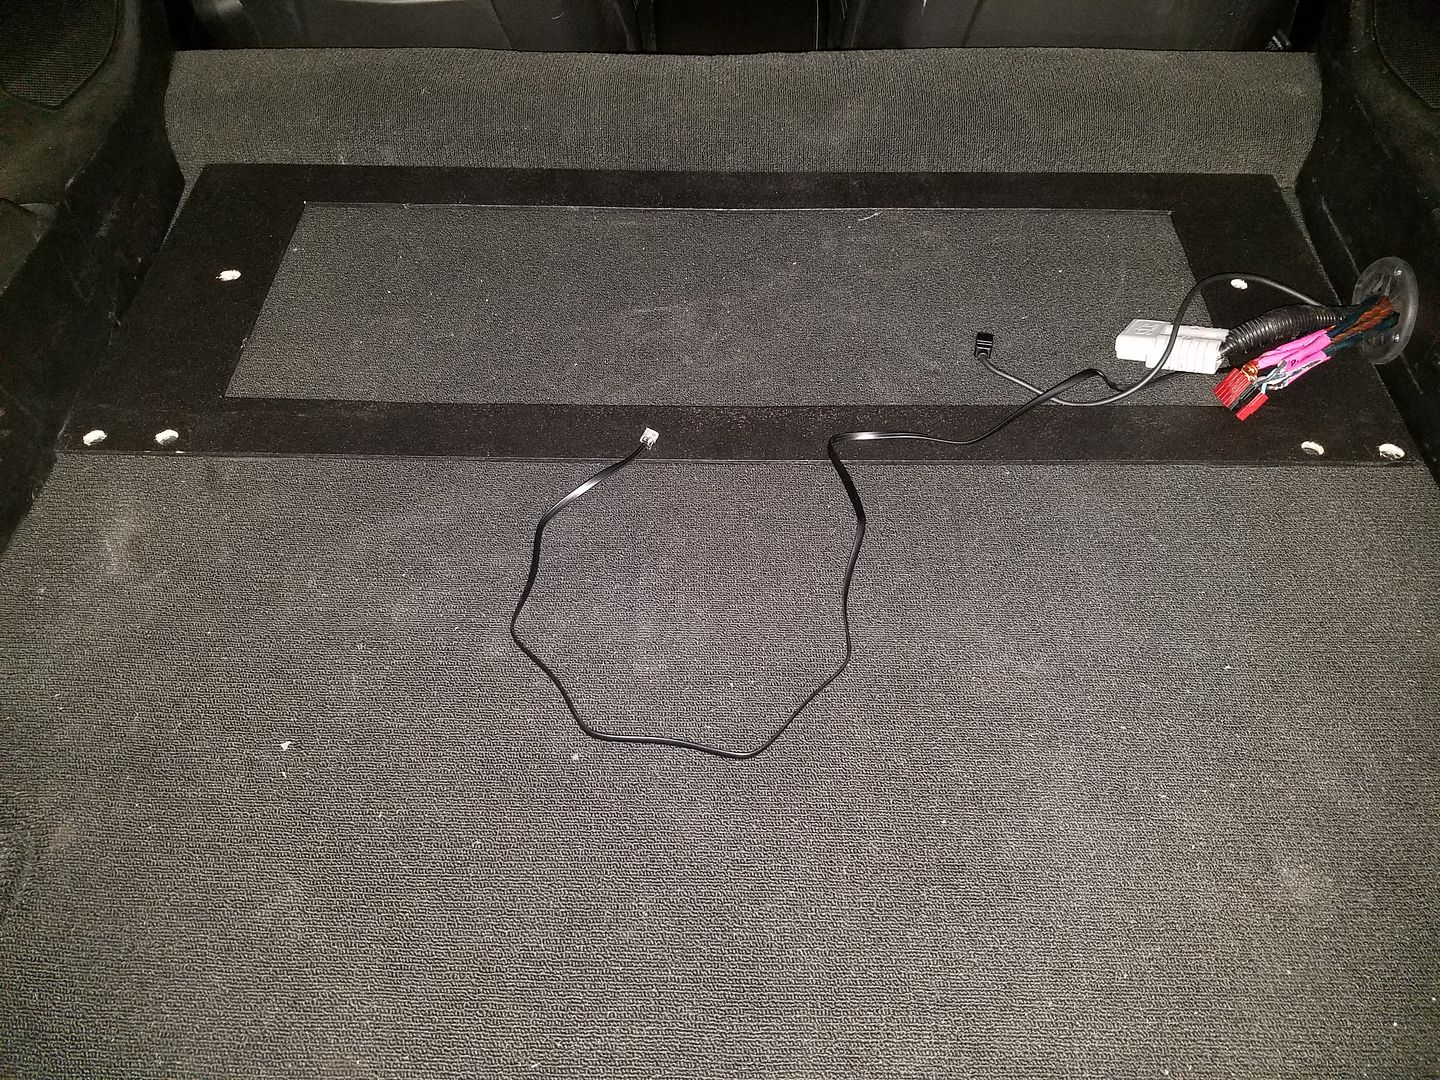
Here is the brace mounted to the car. The far bolts are the OEM floor bolts holding the brace down. Forward, the inner mounting points are for the rack, and the outters are for the sub box.
Bonus round
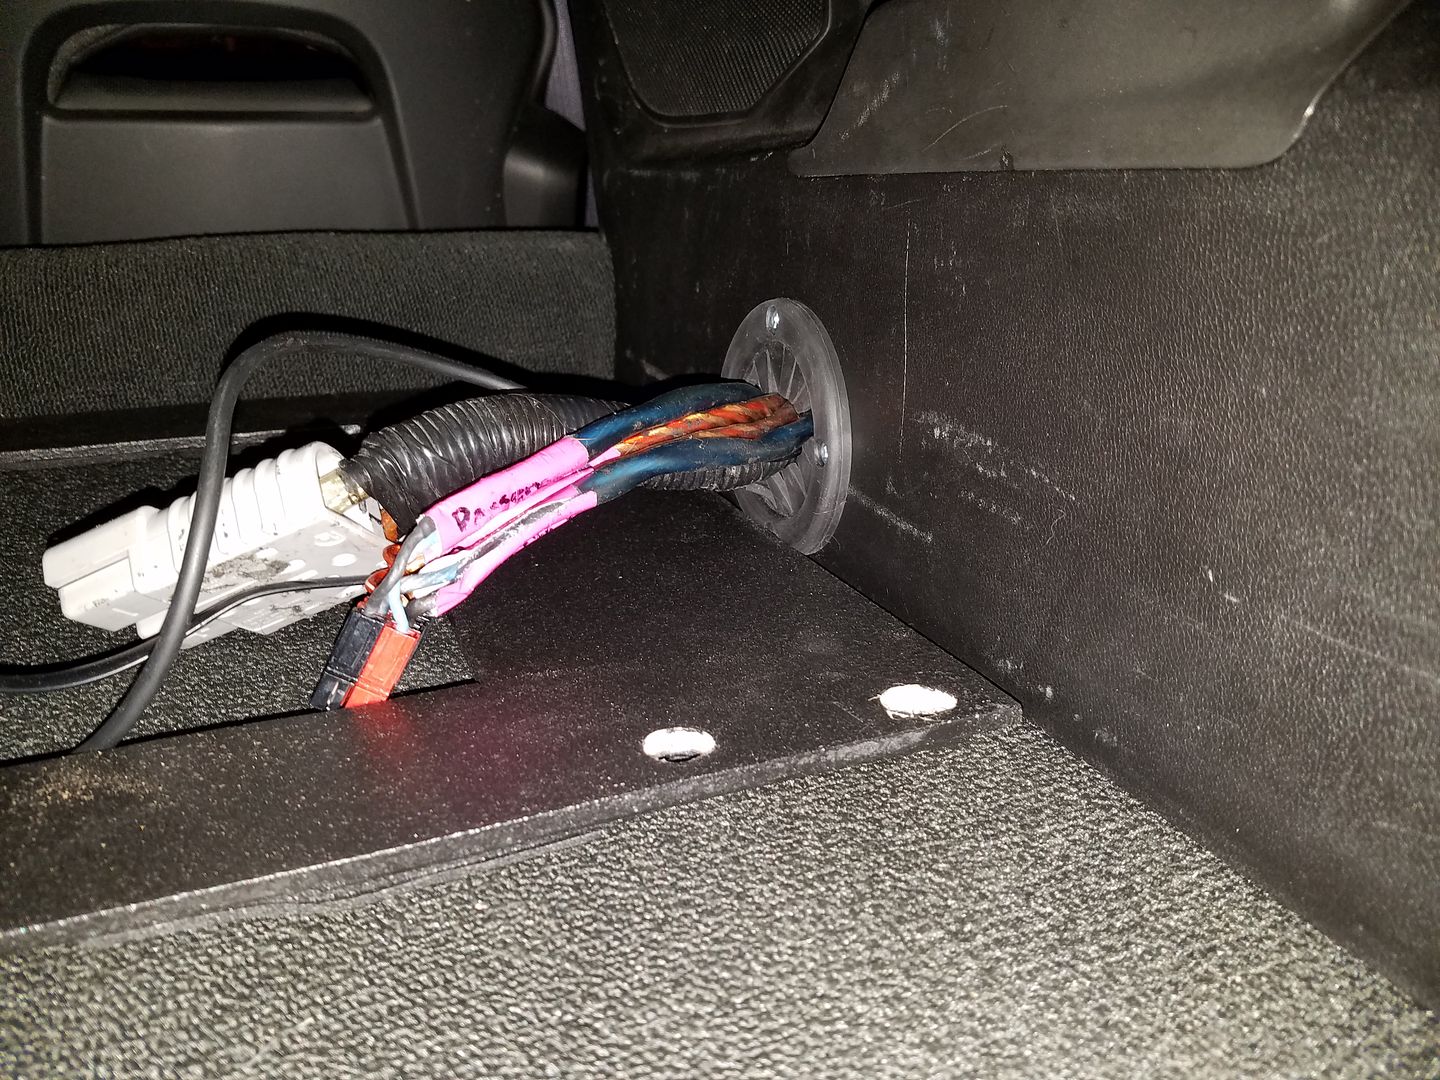
I found this 2.5" marine grade rubber grommet. The entire Anderson Powerpole for the power disconnect fits through it.
Decoupling
From my trials with the Pyle decoupling foam I learned that foam is more resistant to compression than I thought. Based on those observations I decided to just go with Ensolite in multiple layers to decouple the sub box and amp rack. I added 3 layers to the bottom of the sub box, and four on the amp rack. Whatever vibration is left after the force canceling sub box nets it out, should be mostly contained by the 3 layers of Ensolite between the car and the box. I measured the level the box is off a concrete floor after applying Ensolite and it is at 3/8." That means there is little compression in the Ensolite which measures 3/8" with no load. I could have used only one or two layers.
The second part of decoupling required that the system that bolts the sub box to the car transmits very little vibration. For that I decided to use rubber nut inserts for every tie down.
Mounting system
This part of the install was one of the most challenging. The mounting system to the car has to do the following for both the sub box and amp rack:
*brace against all Gs that the car generates
*removable without tools to be taken out for track days
*has to isolate the vibration from the sub box to the car
*has to isolate the vibration from the sub box to the amp rack
*shallow profile so the targa top still fits over the sub box
*no holes drilled in the car frame/panels
First I designed a brace that is less than 1/4" in height which bolts to the frame of the car using the Corvette's stock trunk anchors. It's made out of 1/8" sheet of wood reinforced with metal plates around the contact points. This allows me to use large 1/4" bolts, does not require any car modification, and adds only 1/4" to the amp rack height. It adds no height to the sub box since it connects to the front of the sub box. I used wood glue to hold the metal plates to the wood.
Second, I coated the brace in Duratex for waterproofing and stealth looks.
Third, I adapted some metal L-pads that would mount to the amp rack and sub box to allow the thumb-screw-rubber expansion-nut system. Here is the system:
Here is how the system works. The rubber insert goes into the brace that is mounted to the car frame. This ensures there is no hard surface to hard surface contact.
The amp rack or sub box l-pad goes over the rubber insert. The rubber insert isolates vibration from the box and rack to the car. It also isolated the box and rack from eachother as vibration has to travel through both rubber nuts.
Next, thumb screws go through the whole made in the l-pad and catches into the rubber nut's insert, expanding it. This way the sub box and the amp rack can be disconnected with bare hands.
Here is a demo showing the rubber nut at rest, and then compressed.
Here is the brace mounted to the car. The far bolts are the OEM floor bolts holding the brace down. Forward, the inner mounting points are for the rack, and the outters are for the sub box.
Bonus round
I found this 2.5" marine grade rubber grommet. The entire Anderson Powerpole for the power disconnect fits through it.
 04-26-2016, 07:04 PM
#42

Dumb question:
Is the Alpine a CD player?
Is the Alpine a CD player?
Last edited by sunsalem; 04-26-2016 at 07:04 PM.
04-26-2016, 07:10 PM
#43
Safety Car
Thread Starter
No such thing!
The Alpine H800 is just a processor (black unit on the amp rack), and the Alpine RUX C800 is the controller for the processor (single din unit mounted up front).
There are 5 analog inputs and two digital inputs. Headunits with CD-players can be connected to the Alpine processor and that is typically how folks would get a CD player with this unit. I don't have a headunit, I just use my phone as the source through bluetooth. You can also use a standalone CD player hooked up to 12V using a minijack to RCA or something better like an optical cable.
2 of the analog inputs are Ainet Alpine stuff. I believe a CD changer can go into one.
Last edited by SBC_and_a_stick; 04-26-2016 at 07:13 PM.
04-26-2016, 07:28 PM
#44
No such thing!
The Alpine H800 is just a processor (black unit on the amp rack), and the Alpine RUX C800 is the controller for the processor (single din unit mounted up front).
There are 5 analog inputs and two digital inputs. Headunits with CD-players can be connected to the Alpine processor and that is typically how folks would get a CD player with this unit. I don't have a headunit, I just use my phone as the source through bluetooth. You can also use a standalone CD player hooked up to 12V using a minijack to RCA or something better like an optical cable.
2 of the analog inputs are Ainet Alpine stuff. I believe a CD changer can go into one.
The Alpine H800 is just a processor (black unit on the amp rack), and the Alpine RUX C800 is the controller for the processor (single din unit mounted up front).
There are 5 analog inputs and two digital inputs. Headunits with CD-players can be connected to the Alpine processor and that is typically how folks would get a CD player with this unit. I don't have a headunit, I just use my phone as the source through bluetooth. You can also use a standalone CD player hooked up to 12V using a minijack to RCA or something better like an optical cable.
2 of the analog inputs are Ainet Alpine stuff. I believe a CD changer can go into one.
I need to have a CD player installed and decided probably the best spot would be in the right corner of the trunk right behind the taillight in the little nook.
Today I went to the local auto audio shop to see what they could do.
The tentative plan (at this point) is to get a player and control it with a wireless remote.
Tying into the GM "Entertainment" software suite is considered too risky (hence the remote).
Do you know of any player that possibly COULD tie into the GM software?
Last edited by sunsalem; 04-26-2016 at 07:29 PM.
04-26-2016, 07:36 PM
#45
Safety Car
Thread Starter
That's what I thought, but I had to double-check.
I need to have a CD player installed and decided probably the best spot would be in the right corner of the trunk right behind the taillight in the little nook.
Today I went to the local auto audio shop to see what they could do.
The tentative plan (at this point) is to get a player and control it with a wireless remote.
Tying into the GM "Entertainment" software suite is considered too risky (hence the remote).
Do you know of any player that possibly COULD tie into the GM software?
04-26-2016, 08:35 PM
#46
Maybe install a headunit with an optical disc drive right behind the OEM system and tie them through the AUX. That way you have CD info displayed up front and control.
All I really need is Volume and Track Control.
My local guys tell me no one really makes CD Changers anymore (don't know why)...it's all single play now and unfortunately will make stopping to change disks while on a trip a pain in the rear.
Oh well, the price of being a dinosaur.
 05-16-2016, 02:33 PM
#47
Safety Car
Thread Starter
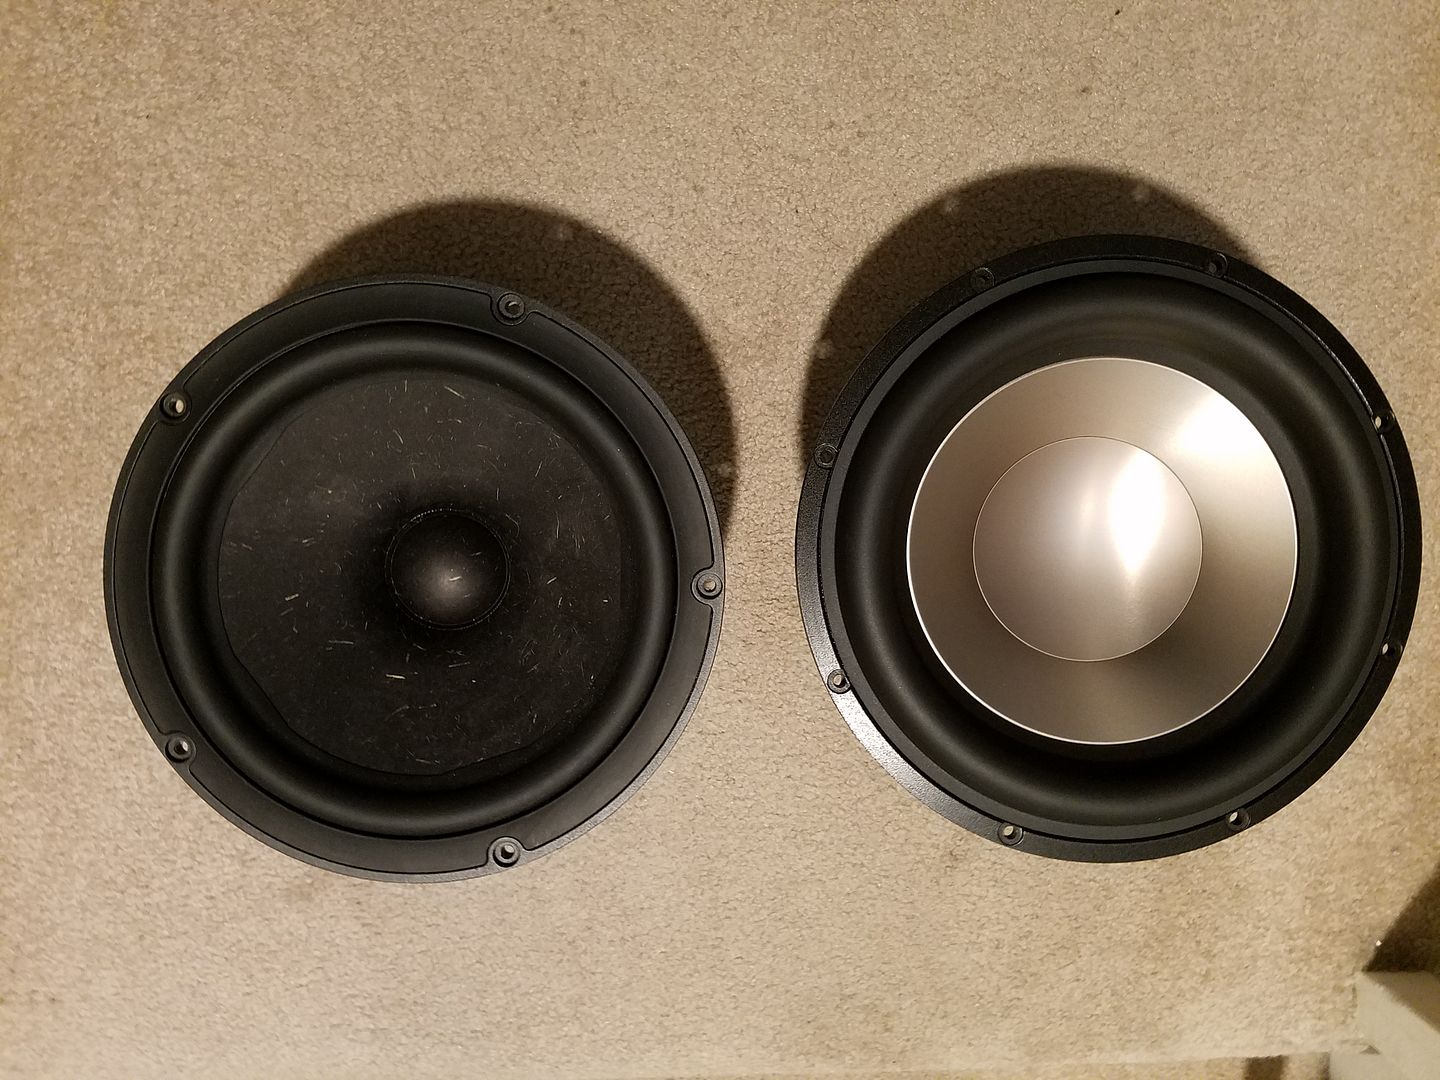
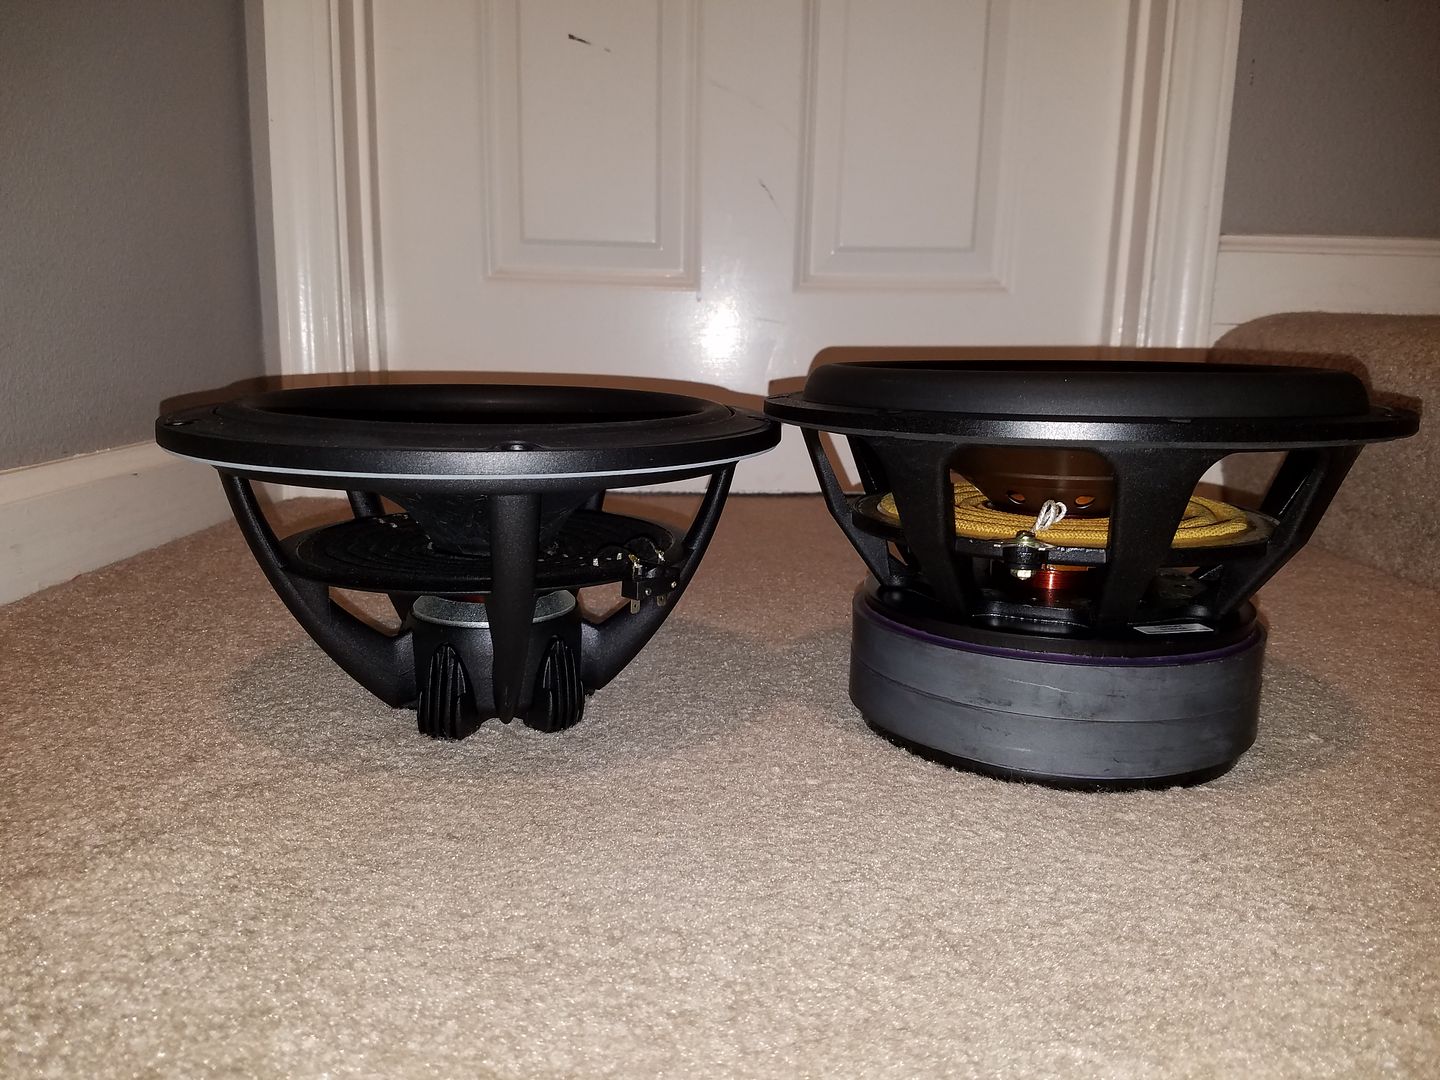
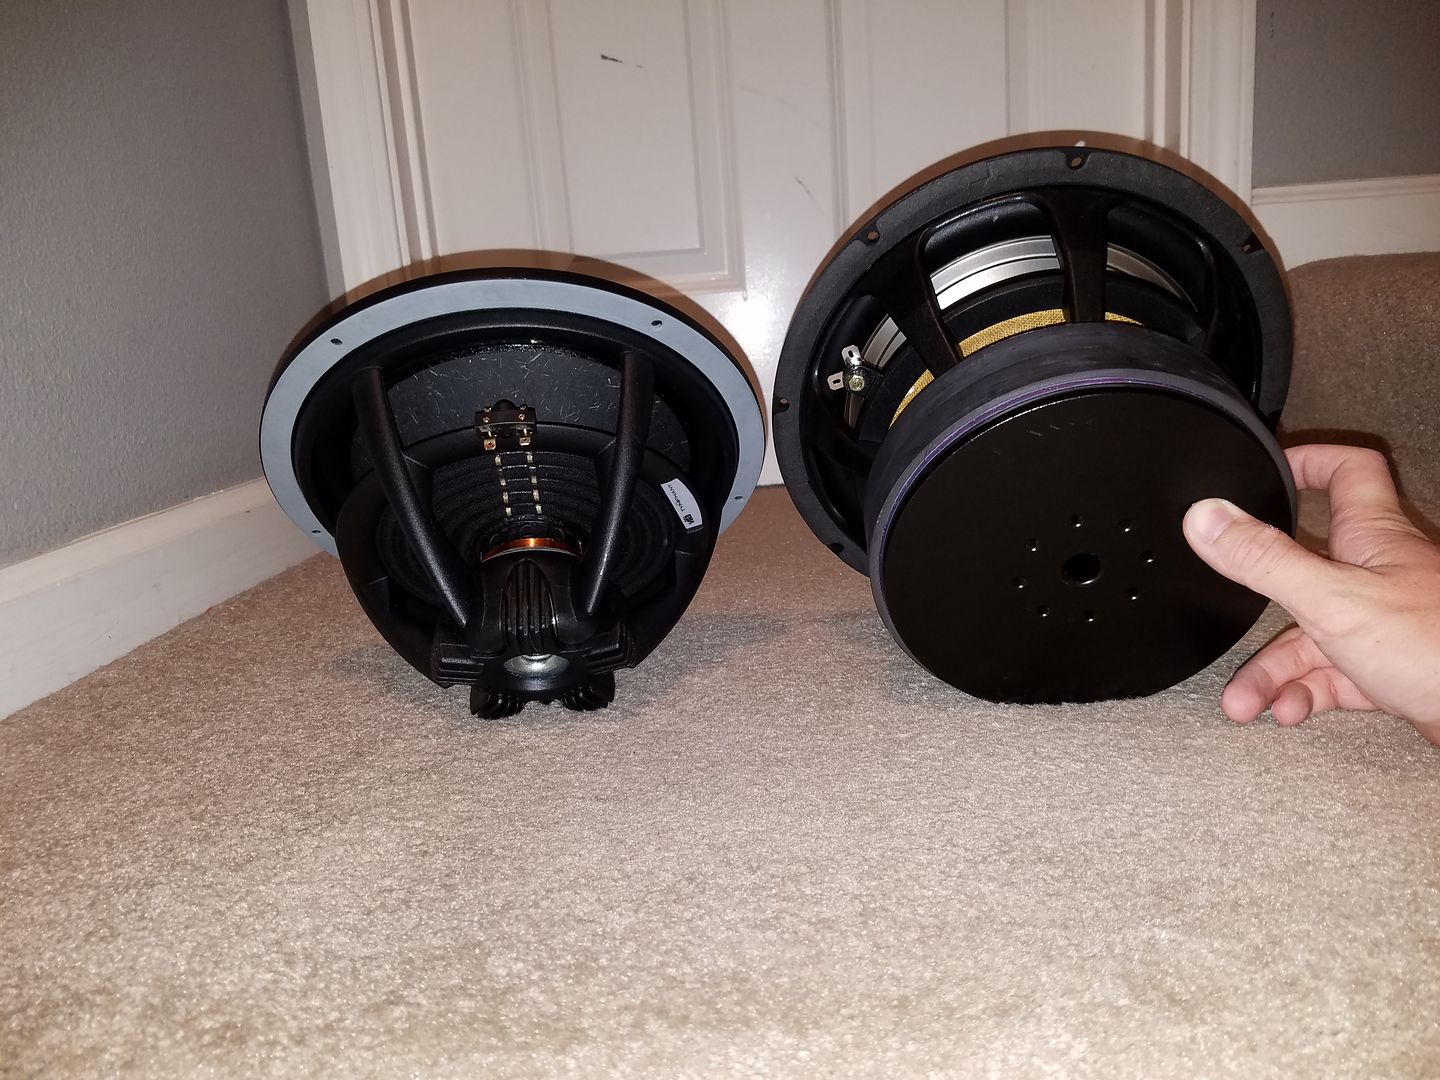
Trying out a different set of subwoofers to see if I can get a bit of improvement in sound quality and a bit more output in the lowest frequencies while I'm at it.
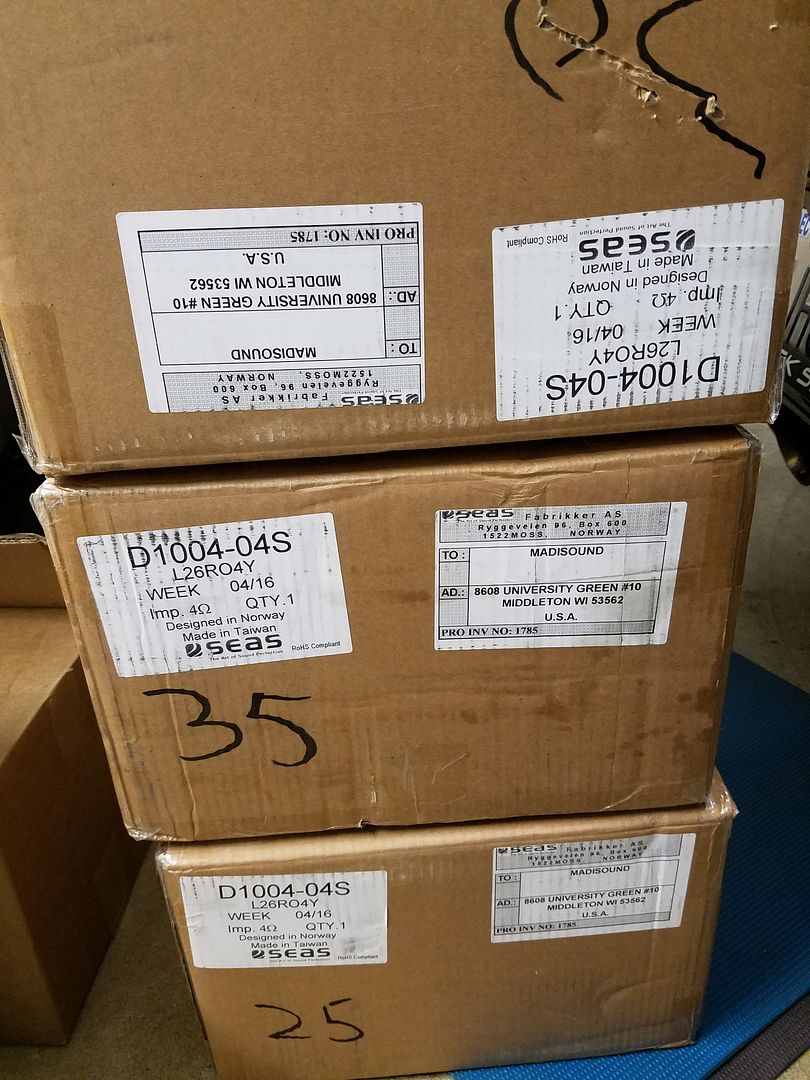
Replacing 8 Vifa NE 10" subwoofers with 4 Seas Design 10" subwoofers
Side by side comparison with the incumbent:
Based on the input I received thus far on several forums, this solution seemed like the best remedy.
*predicted QTC=.56 (not taking into account any polyfill), a decrease from 1.07 (as tested with Vifas in the box)
*predicted SPL change: increase of 3db @ 20hz, equal output @35hz, lower output above that.
*lowers the resonant frequency of the system as a whole
*6 times increase in suspension stiffness to deal with small box air pressure
*30% increase in motor strength to deal with small box air pressure
*half the drivers but with a substantial increase in Xmax, xmech, and higher thermal resistance, allowing a doubling of airspace per speaker with no loss of large signal performance
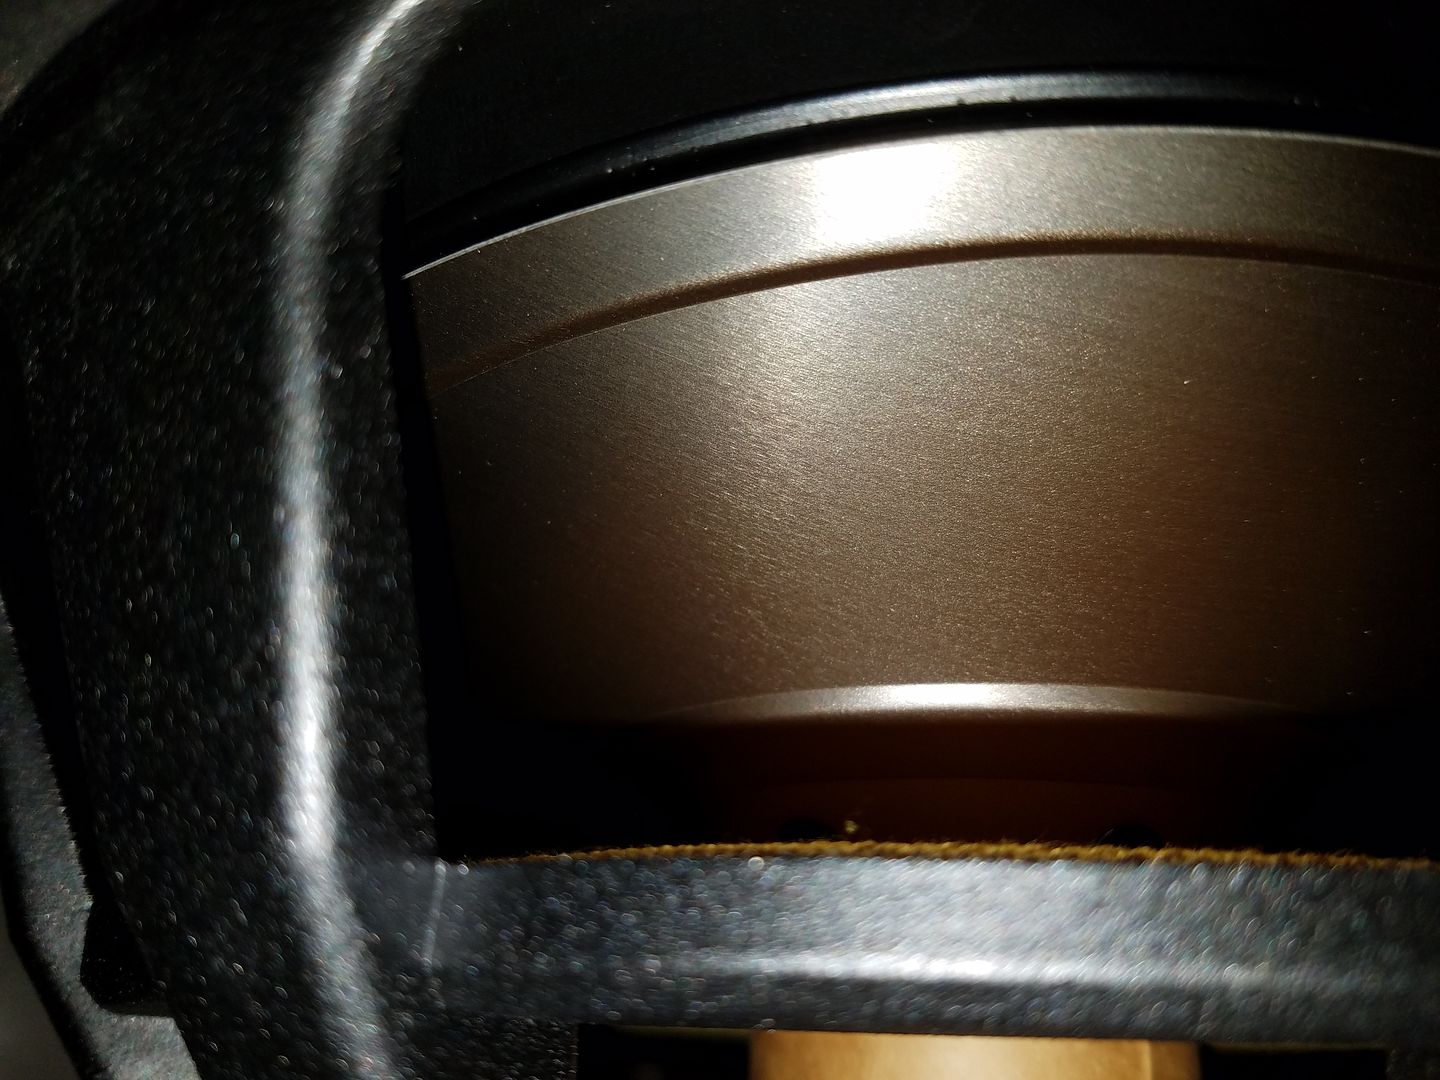
My initial inspection of the Seas drivers shows a stout driver indeed! Applying a bit of pressure on the cone edge does not result in visible cone deformation. The Seas have various ribs to increase geometrical stiffness, and a very pronounced cone lip to increase strength. The spider is also noticeably stiffer to the touch, and seems to get progressively stiffer with distance from the coil. Most of the stiffness increase vs. Vifa seems to be from the considerably stiffer surround. The amount of magnet mass/volume is shocking. Equally impressive is the basket to SD ratio, Seas squeezes in a larger cone for nearly the same footprint.
Replacing 8 Vifa NE 10" subwoofers with 4 Seas Design 10" subwoofers
Side by side comparison with the incumbent:
Based on the input I received thus far on several forums, this solution seemed like the best remedy.
*predicted QTC=.56 (not taking into account any polyfill), a decrease from 1.07 (as tested with Vifas in the box)
*predicted SPL change: increase of 3db @ 20hz, equal output @35hz, lower output above that.
*lowers the resonant frequency of the system as a whole
*6 times increase in suspension stiffness to deal with small box air pressure
*30% increase in motor strength to deal with small box air pressure
*half the drivers but with a substantial increase in Xmax, xmech, and higher thermal resistance, allowing a doubling of airspace per speaker with no loss of large signal performance
My initial inspection of the Seas drivers shows a stout driver indeed! Applying a bit of pressure on the cone edge does not result in visible cone deformation. The Seas have various ribs to increase geometrical stiffness, and a very pronounced cone lip to increase strength. The spider is also noticeably stiffer to the touch, and seems to get progressively stiffer with distance from the coil. Most of the stiffness increase vs. Vifa seems to be from the considerably stiffer surround. The amount of magnet mass/volume is shocking. Equally impressive is the basket to SD ratio, Seas squeezes in a larger cone for nearly the same footprint.
Last edited by SBC_and_a_stick; 05-16-2016 at 02:34 PM.
05-20-2016, 02:20 PM
#48
Safety Car
Thread Starter
Update on H800 combo with standalone Bluetooth receiver
Here are a few things that were hard to diagnose but now that I did, makes this system a well oiled machine.
1. Digital clipping
Symptom: at high volume I could hear a clipping like noise affecting the entire signal.
Early diagnosis: the Galaxy S7 phone would clip at max volume, even though it sent a full digital signal through bluetooth. To remedy I sent the digital signal out one click down on the phone's volume. It didn't always work, but seemed to work instantly on a particular song.
Current diagnosis: It was not the Galaxy S7 signal that was clipping. I've checked this by connecting to my home theater system and sending max output. No clippling. What is really driving the noise is the subwoofer firing right into the bluetooth receiver antenna in the car. By lowering the volume, the output of the sub is lowered and the antenna starts receiving the phone's transmission uninterrupted.
The remedy: Trying out the 4 Seas subs, so I'll mount them in the center of the box, away from the bluetooth receiver antenna.
2. Dead Car battery
Symptom: The original Car battery died after 1.5 years of use.
Early diagnosis: I thought the car wash guys killed the battery, and then the battery never recovered properly.
Current diagnosis: Parasitic drain from the H800. The H800 does not turn off entirely when keeping the source button pressed on the RUX to turn the processor off. The amps shut off, the Alpine H800 has all the lights off, but it is still on!! The proof was the following. Processor heatsink temperature was not ambient when turning the car on in the morning but 120*F. The sucker was on all night building heat, and killing my battery. After one weekend, even the mighty Odyssey AGM battery died.
The remedy: First remedy failed. Instead of powering my bluetooth receiver with constant 12V, I powered it with the H800's remote out 12V. Didn't work. Second remedy failed as well. Instead of powering my bluetooth receiver with 12V remote out from the Alpine I installed a proper relay. Both of these remedies failed because it wasn't the Bluetooth receiver's draw that was killing the battery, although the relay helped, the Power savings were a drop in the bucket. The third remedy worked. I changed the H800's remote in to a switched 12V source. FYI fuse #37 in the trunk is a switched 12V fuse for the in-car cigarette lighter. It is not the same as the trunk port which is always hot.
So how does it work?
The bluetooth receiver is media only. This never occurred to me but you can't take calls using a standalone bluetooth receiver. I thought I would be able to using my phone mic but no go. So I'm trying to use my OEM system for the calls and the Alpine setup for playing music. However, my Chevy Bluetooth won't connect anymore. Not sure why. Currently I have no way to answer calls in the car...legally.
The Audioengine B1 bluetooth receiver connects instantly. Since the H800 now turns on with accessory Power the phone connects instantly as long as my bluetooth is turned on in the phone. I just press play and drive.
There are no turn on thumps.
There are no turn off thumps.
There is no background noise.
Sound quality is excellent with Spotify's 320kbps and APTx Bluetooth. Forget about CDs and USBs, this is the best way to wire in your music.
05-23-2016, 02:32 PM
#49
Safety Car
Thread Starter
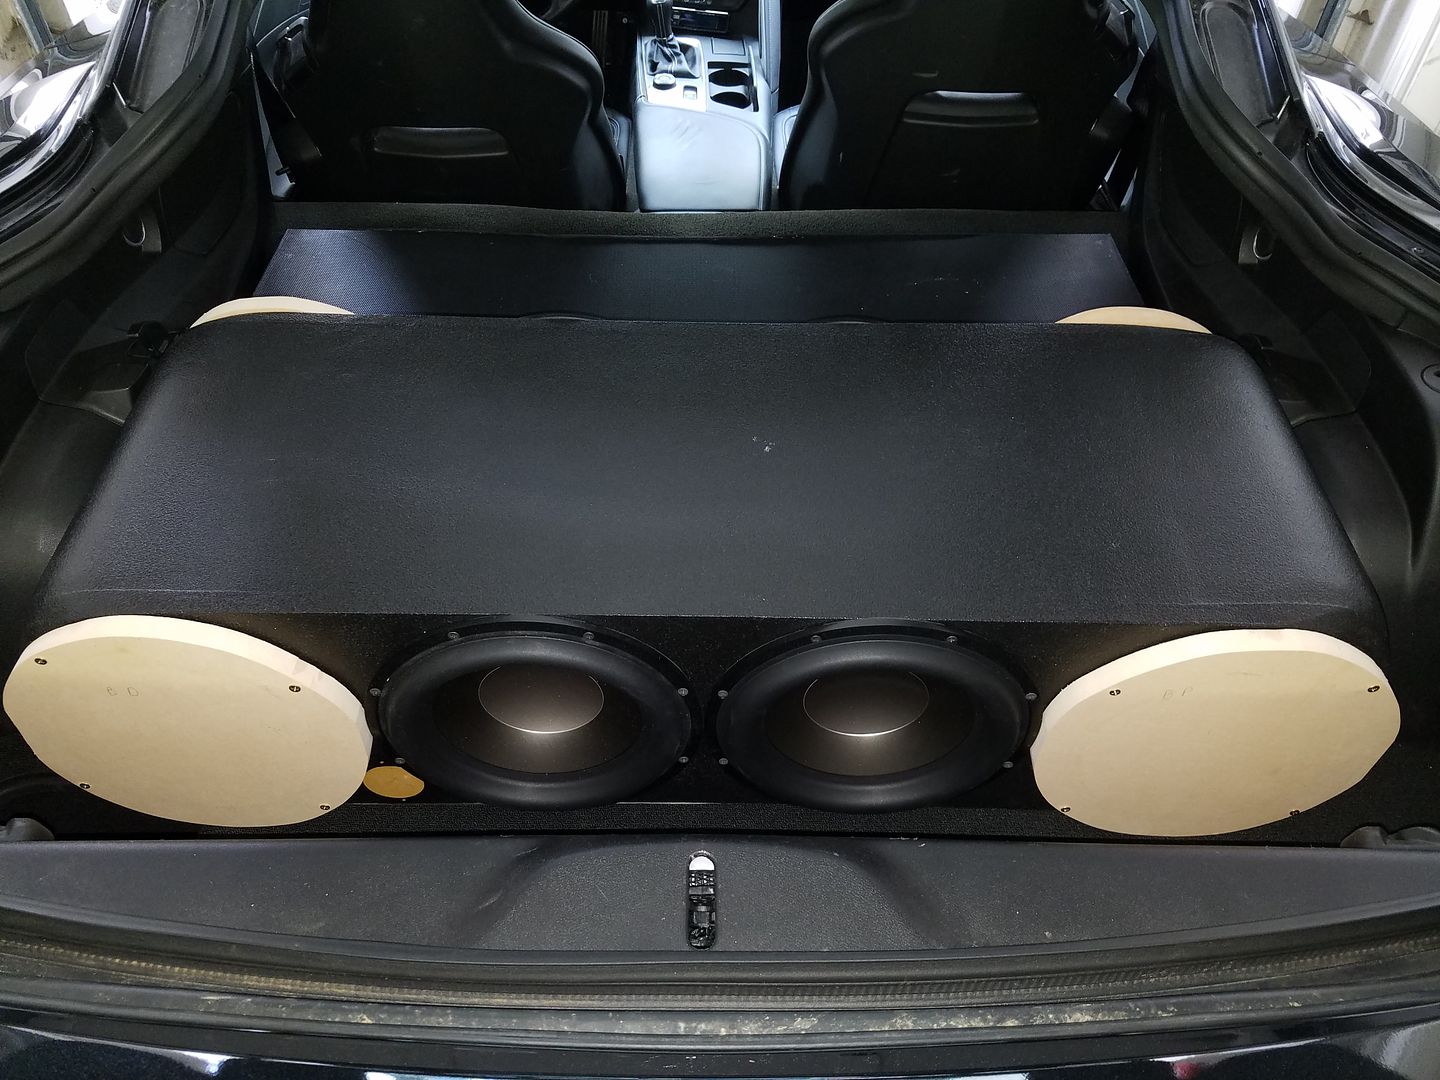
8 Vifa NE 10" vs. 4 Seas LROY 10" subwoofer death match first impressions
The unanimous one person jury decision is that the Seas dual opposed combo of 4 is the new king. I only needed a minute of auditioning to figure this one out. It combines all the qualities of my favorite subwoofer installations I've done: the output of 3 12" Idmax in infinite baffle, the vibration free operation of the Tymphany LAT700, the profound low octave output of the 12" Vifa NEs in infinite baffle, and the dead-quiet excusion that we've come to expect of proper HI FI drivers.
First, some photos. Techshop was missing some parts from their hand held router. It turns out that they are giving up on finding replacement parts and they are decommissioning it! Crazy. That's the only tool I know how to use to make speaker baffles proper, so I turned to the jigsaw and made some temporary block off plates while I figure out what to do tool wise.
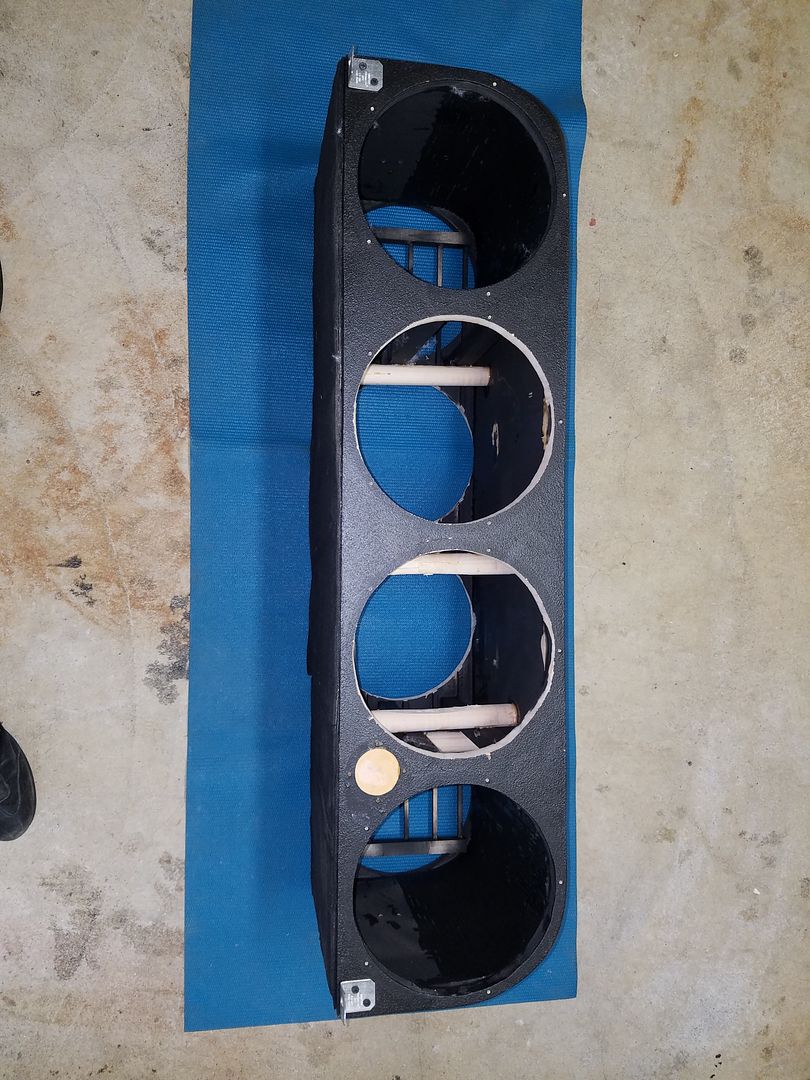
While the Seas have a cutout only 1 mm larger than the Vifas, I had to chop off quite a bit of material to make them fit. Odd. The motors are massive, so I removed the magnet rubber booth to get more room and box space. I trimmed some of the bracing, and had to even remove vertical rods. Terminal plates were blocked off because the outer OD of the speaker was much too large to accept the previous location.
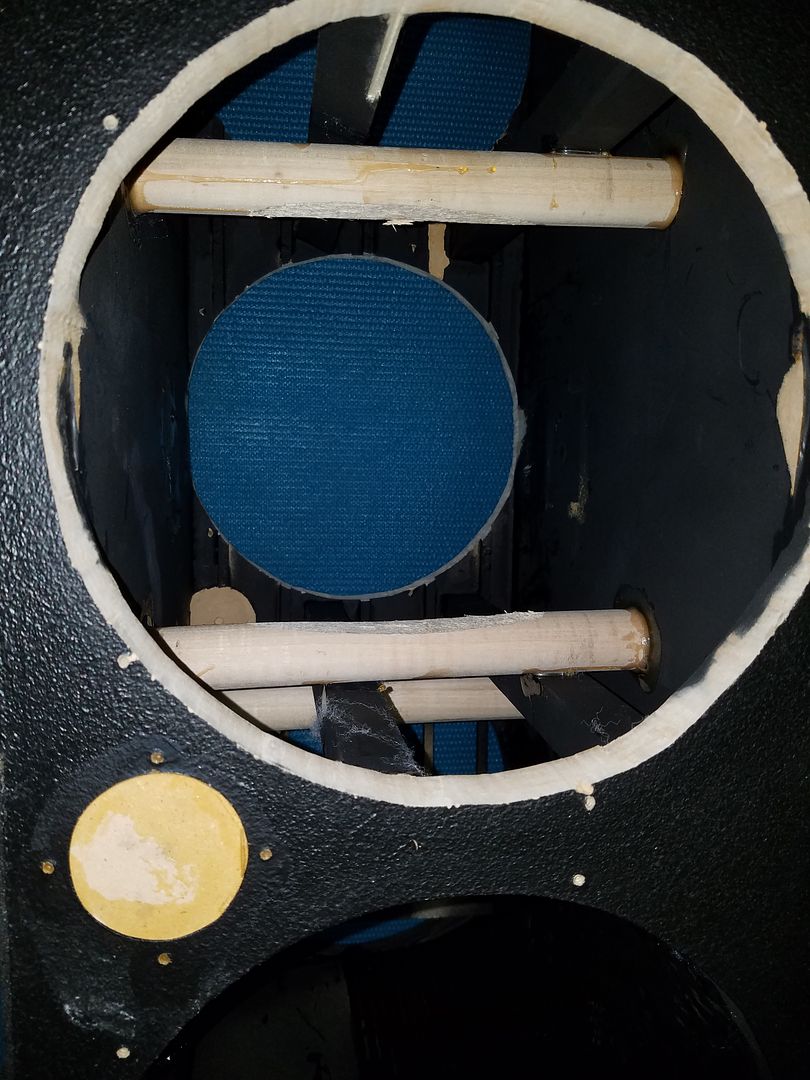
Front baffle with two of the holes plugged off and the terminal cup relocated. I prefer drywall screws to machine screws and t-nuts. They seem to hold well so I don't see the need for something stronger atm. The woofers weigh 22lbs each and offer 8 screw holes.
I made one big change on the back baffle. Instead of inverting the subwoofers I mounted them with the magnets inboard. The person to be blamed for the decision is t3sn4f2 (on DIYMA). He rightly noted that if there are any suspension and motor asymetries that the acoustic push-pull rectifies, the force cancelling push-pull will not function to the degree of those nonlinearities. Basically, 2nd order distortion canceling came at the price of some vibration cancelling. I decided vibration canceling is more important to me. This time around the force cancelling is most effective, but there is no acoustic push-pull anymore. There is a second loss with this arrangement, smaller net box size. All 4 motors are now in the box taking up room and the motors are giant! So the final Q is going to be higher than the anticipated .56. There is also a second gain with this arrangement, less resonance and suspension noise, to the degree that there would be any with the Seas inverted. Linkwitz says they work noise free in dipole but who knows.
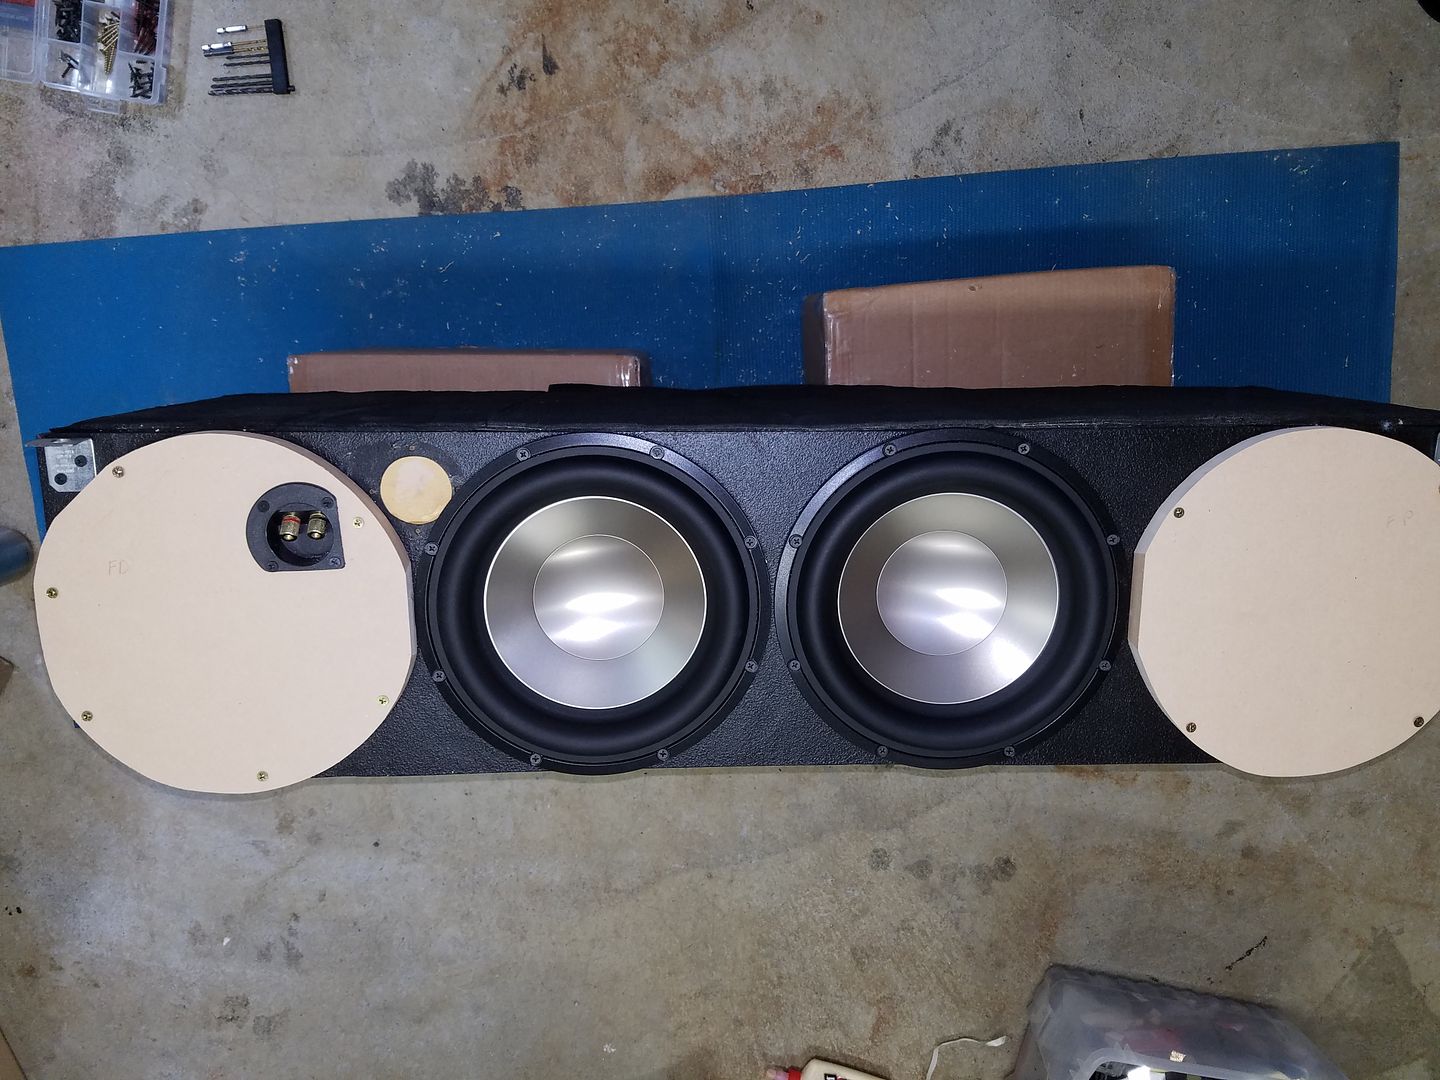
You can also see the finished amp rack cover on the left. Stealthy black metal cover with Ensolite padding on the inside.
Impressions
The box now sounds acoustically dead, except for the subsonic output. There is no apparent buzzing or resonance of a high frequency nature. Just what you'd expect from a stout subwoofer box and non-resonant drivers. The resonant frequency of the system showed at 48hz on the Woofer Tester 2, a large decrease from the 65hz I was previously getting with the Vifas. The QTC was much higher than the anticipated .56, at .65 but I believe these subwoofers need a lot of break-in. The TS parameters deviated quite a lot from the white sheets so I will test again after break-in. In either case, a massive improvement from the 1.07 QTC I was getting with the Vifas after break in.
The speaker linearity is vastly improved! This is what I was hoping for. Regardless of the frequency or SPL level the subwoofers play back the original signal with no sign of stress. I hold the belief that it is the stiff suspension structure of the subwoofer that it is to be thanked. So no more boxy sound or hints of re-radiation. I suppose we'll never be able to figure out whether it was the lower Q or the stiffer suspension that offers the large improvement over the Vifas, but in either case, mission achieved. Perhaps they are the same thing.
The low octave output is outstanding. My best guess is that it deviates from a flat FR, with a rising output towards 20hz side. To my ear it's definitely bottom heavy, but not at all unlikable. I might NOT EQ it down and enjoy the prodigious output down low.
I've tried 63hz low pass and 71 hz low pass. I like them both.
Now I have to figure out what to do with $2,000 worth of Vifa NEs I have laying around. :o But I am really happy I pulled the trigger on these Seas. I learned a valuable lesson working with small sealed subwoofer boxes. The low damping soft surrounds of woofers designed for large sealed/vented alignments do not work well in a small box. This is a despicable application where only purpose built monster subs like the Seas belong. So I might hang on to the Vifas for a dipole application in home theater or large sealed box, but I'll never throw then in a high Q alignment again. Lesson learned.
The unanimous one person jury decision is that the Seas dual opposed combo of 4 is the new king. I only needed a minute of auditioning to figure this one out. It combines all the qualities of my favorite subwoofer installations I've done: the output of 3 12" Idmax in infinite baffle, the vibration free operation of the Tymphany LAT700, the profound low octave output of the 12" Vifa NEs in infinite baffle, and the dead-quiet excusion that we've come to expect of proper HI FI drivers.
First, some photos. Techshop was missing some parts from their hand held router. It turns out that they are giving up on finding replacement parts and they are decommissioning it! Crazy. That's the only tool I know how to use to make speaker baffles proper, so I turned to the jigsaw and made some temporary block off plates while I figure out what to do tool wise.
While the Seas have a cutout only 1 mm larger than the Vifas, I had to chop off quite a bit of material to make them fit. Odd. The motors are massive, so I removed the magnet rubber booth to get more room and box space. I trimmed some of the bracing, and had to even remove vertical rods. Terminal plates were blocked off because the outer OD of the speaker was much too large to accept the previous location.
Front baffle with two of the holes plugged off and the terminal cup relocated. I prefer drywall screws to machine screws and t-nuts. They seem to hold well so I don't see the need for something stronger atm. The woofers weigh 22lbs each and offer 8 screw holes.
I made one big change on the back baffle. Instead of inverting the subwoofers I mounted them with the magnets inboard. The person to be blamed for the decision is t3sn4f2 (on DIYMA).
He rightly noted that if there are any suspension and motor asymetries that the acoustic push-pull rectifies, the force cancelling push-pull will not function to the degree of those nonlinearities. Basically, 2nd order distortion canceling came at the price of some vibration cancelling. I decided vibration canceling is more important to me. This time around the force cancelling is most effective, but there is no acoustic push-pull anymore. There is a second loss with this arrangement, smaller net box size. All 4 motors are now in the box taking up room and the motors are giant! So the final Q is going to be higher than the anticipated .56. There is also a second gain with this arrangement, less resonance and suspension noise, to the degree that there would be any with the Seas inverted. Linkwitz says they work noise free in dipole but who knows.You can also see the finished amp rack cover on the left. Stealthy black metal cover with Ensolite padding on the inside.
Impressions
The box now sounds acoustically dead, except for the subsonic output. There is no apparent buzzing or resonance of a high frequency nature. Just what you'd expect from a stout subwoofer box and non-resonant drivers. The resonant frequency of the system showed at 48hz on the Woofer Tester 2, a large decrease from the 65hz I was previously getting with the Vifas. The QTC was much higher than the anticipated .56, at .65 but I believe these subwoofers need a lot of break-in. The TS parameters deviated quite a lot from the white sheets so I will test again after break-in. In either case, a massive improvement from the 1.07 QTC I was getting with the Vifas after break in.
The speaker linearity is vastly improved! This is what I was hoping for. Regardless of the frequency or SPL level the subwoofers play back the original signal with no sign of stress. I hold the belief that it is the stiff suspension structure of the subwoofer that it is to be thanked. So no more boxy sound or hints of re-radiation. I suppose we'll never be able to figure out whether it was the lower Q or the stiffer suspension that offers the large improvement over the Vifas, but in either case, mission achieved. Perhaps they are the same thing.
The low octave output is outstanding. My best guess is that it deviates from a flat FR, with a rising output towards 20hz side. To my ear it's definitely bottom heavy, but not at all unlikable. I might NOT EQ it down and enjoy the prodigious output down low.
I've tried 63hz low pass and 71 hz low pass. I like them both.
Now I have to figure out what to do with $2,000 worth of Vifa NEs I have laying around. :o But I am really happy I pulled the trigger on these Seas. I learned a valuable lesson working with small sealed subwoofer boxes. The low damping soft surrounds of woofers designed for large sealed/vented alignments do not work well in a small box. This is a despicable application where only purpose built monster subs like the Seas belong. So I might hang on to the Vifas for a dipole application in home theater or large sealed box, but I'll never throw then in a high Q alignment again. Lesson learned.
06-01-2016, 03:23 PM
#50
Safety Car
Thread Starter
In-car testing of Seas subs
By testing the frequency response and THD with the Omnimic I found a few interesting bits:
1. The FR is bottom heavy, with a pronounced peak in the 20hz-30hz range.
2. At high output the 25hz peak subsides, possibly because of higher QTC with excursion.
3. -3db point is now 14hz instead of 18hz with the Vifas.
4. Same output at 63hz as it is at 18hz. Compare this to Vifas where 63hz output was the same as 20hz.
5. Total harmonic distortion remains below 5% even at 110db, well below audible limits even at 20hz.
6. The sub has higher 2nd order than 3rd order distortion, which is typically accepted as a more pleasing distortion profile.
7. Usable bandwidth is large, at least 14hz to 150hz with minimal EQ.
8. No bothersome nulls or peaks in the response.
9. Window down response has lower SPL in the range up to 30hz, higher SPL up to 55hz, and the same over that. The impression that windows down is louder must be because we are more sensitive to 30hz-55hz range and there is usually more material there on tracks.
The graphs:
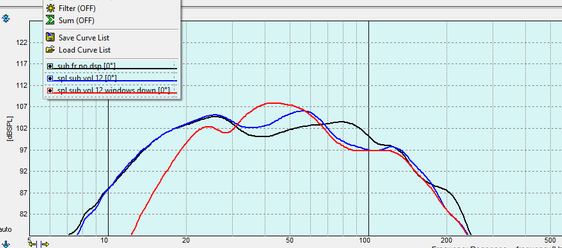
The black plot is a summed frequency response across multiple mic positions in the driver seat. This is the best guess as to the true response.
The blue plot is just one mic position in front of me. Windows are up.
The red plot is just one mic position in front of me. Windows are down. Compare this one to blue where the windows are up but the position is the same. Odd right? Same behavior showed up in my old car with the convertible top down. My guess is that windows down is easier for the subs to move air so the SPL goes up, but then at the lowest frequencies there is cancellation so the SPL drops sharply.
Harmonic distortion plots
Volume -22db on processor, amp gain 1/2, processor gain maxed out +15db, 100db fundamental, THD less than 1.75% throughout
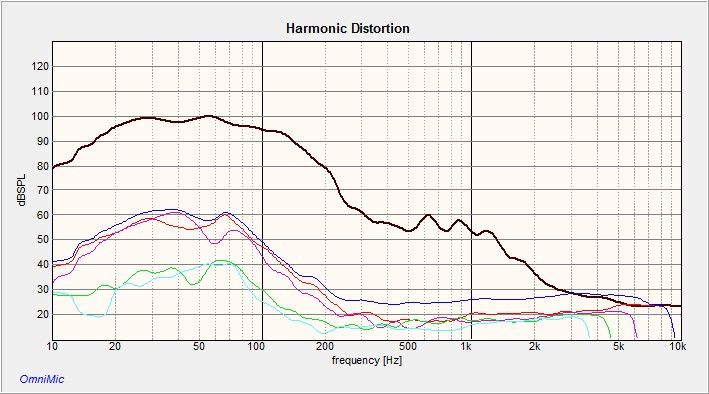
Volume -17db on processor, amp gain 1/2, processor gain maxed out +15db, 104db fundamental, THD less than 1.75% throughout
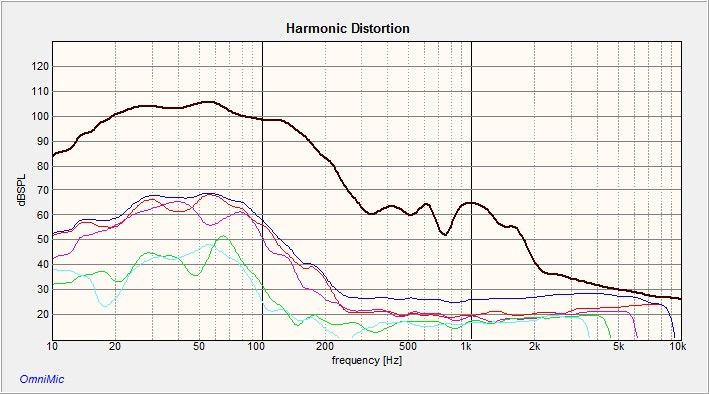
Volume -12db on processor, amp gain 1/2, processor gain maxed out +15db, 104db fundamental, THD less than 2.5% throughout, lowered mic sensitivity because it was clipping, maybe that's why fundamental didn't change
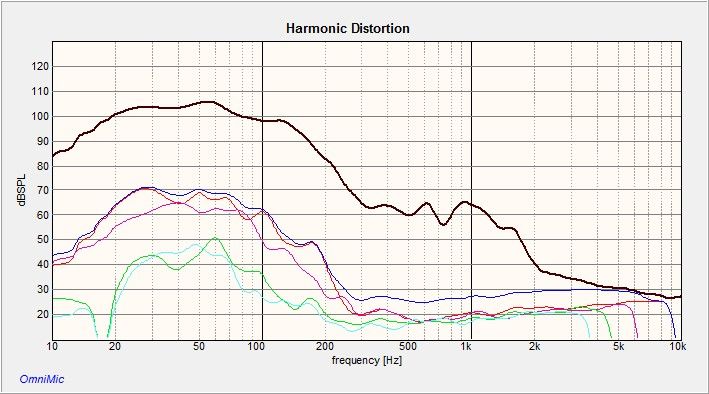
Volume -9db on processor, amp gain 1/2, processor gain maxed out +15db, 108db fundamental, THD less than 3.5% throughout, kept low mic sensitivity
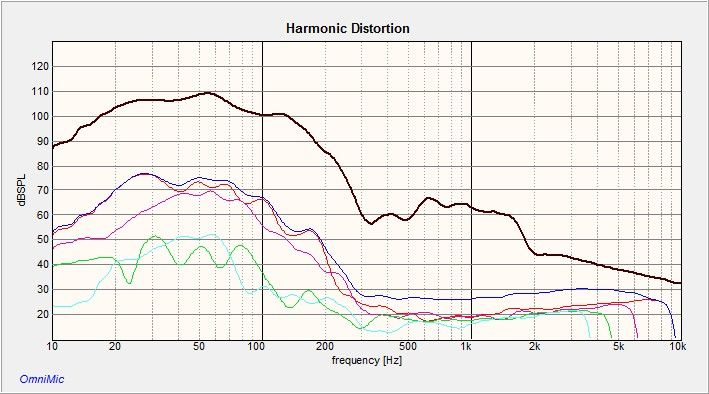
Volume -6db on processor, amp gain 1/2, processor gain maxed out +15db, 110db fundamental, THD less than 4.5% throughout, kept low mic sensitivity
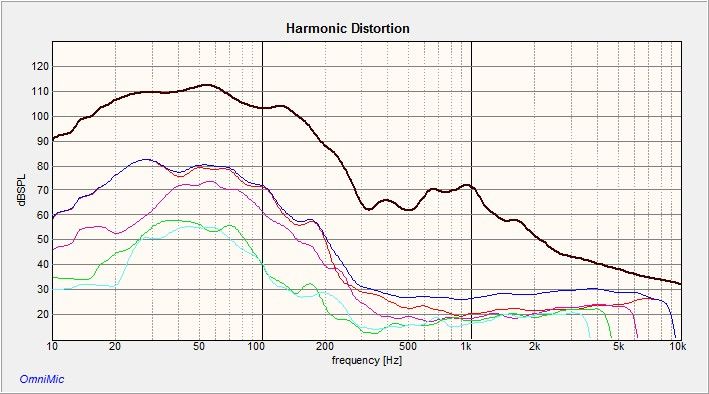
The Vifas were showing a rather larger peak in THD around 50hz, the Seas do not. I was far more comfortable testing the Seas at high output. The results are very good. THD is well below audible thresholds even at outputs I never attempt with music and the FR is flat to well below 20hz. Most importantly they sound better to my ears on every material compared to the Vifas.
By testing the frequency response and THD with the Omnimic I found a few interesting bits:
1. The FR is bottom heavy, with a pronounced peak in the 20hz-30hz range.
2. At high output the 25hz peak subsides, possibly because of higher QTC with excursion.
3. -3db point is now 14hz instead of 18hz with the Vifas.
4. Same output at 63hz as it is at 18hz. Compare this to Vifas where 63hz output was the same as 20hz.
5. Total harmonic distortion remains below 5% even at 110db, well below audible limits even at 20hz.
6. The sub has higher 2nd order than 3rd order distortion, which is typically accepted as a more pleasing distortion profile.
7. Usable bandwidth is large, at least 14hz to 150hz with minimal EQ.
8. No bothersome nulls or peaks in the response.
9. Window down response has lower SPL in the range up to 30hz, higher SPL up to 55hz, and the same over that. The impression that windows down is louder must be because we are more sensitive to 30hz-55hz range and there is usually more material there on tracks.
The graphs:
The black plot is a summed frequency response across multiple mic positions in the driver seat. This is the best guess as to the true response.
The blue plot is just one mic position in front of me. Windows are up.
The red plot is just one mic position in front of me. Windows are down. Compare this one to blue where the windows are up but the position is the same. Odd right? Same behavior showed up in my old car with the convertible top down. My guess is that windows down is easier for the subs to move air so the SPL goes up, but then at the lowest frequencies there is cancellation so the SPL drops sharply.
Harmonic distortion plots
Volume -22db on processor, amp gain 1/2, processor gain maxed out +15db, 100db fundamental, THD less than 1.75% throughout
Volume -17db on processor, amp gain 1/2, processor gain maxed out +15db, 104db fundamental, THD less than 1.75% throughout
Volume -12db on processor, amp gain 1/2, processor gain maxed out +15db, 104db fundamental, THD less than 2.5% throughout, lowered mic sensitivity because it was clipping, maybe that's why fundamental didn't change
Volume -9db on processor, amp gain 1/2, processor gain maxed out +15db, 108db fundamental, THD less than 3.5% throughout, kept low mic sensitivity
Volume -6db on processor, amp gain 1/2, processor gain maxed out +15db, 110db fundamental, THD less than 4.5% throughout, kept low mic sensitivity
The Vifas were showing a rather larger peak in THD around 50hz, the Seas do not. I was far more comfortable testing the Seas at high output. The results are very good. THD is well below audible thresholds even at outputs I never attempt with music and the FR is flat to well below 20hz. Most importantly they sound better to my ears on every material compared to the Vifas.
06-14-2016, 04:12 PM
#51
Safety Car
Thread Starter
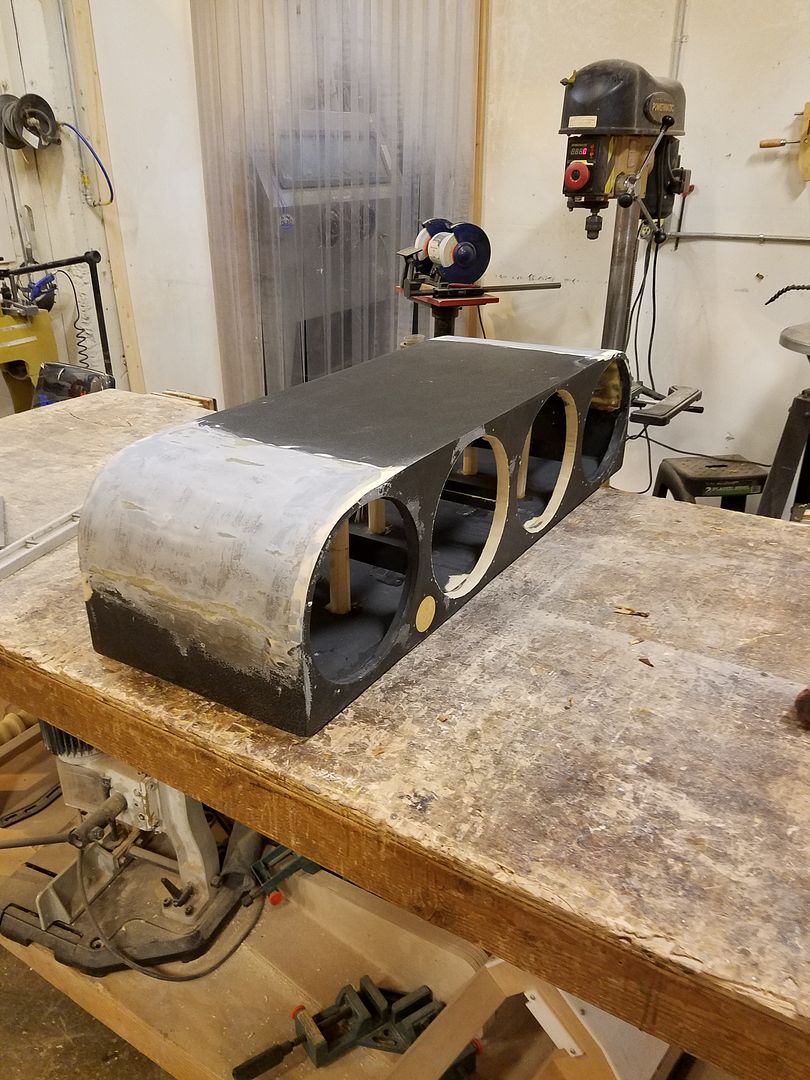
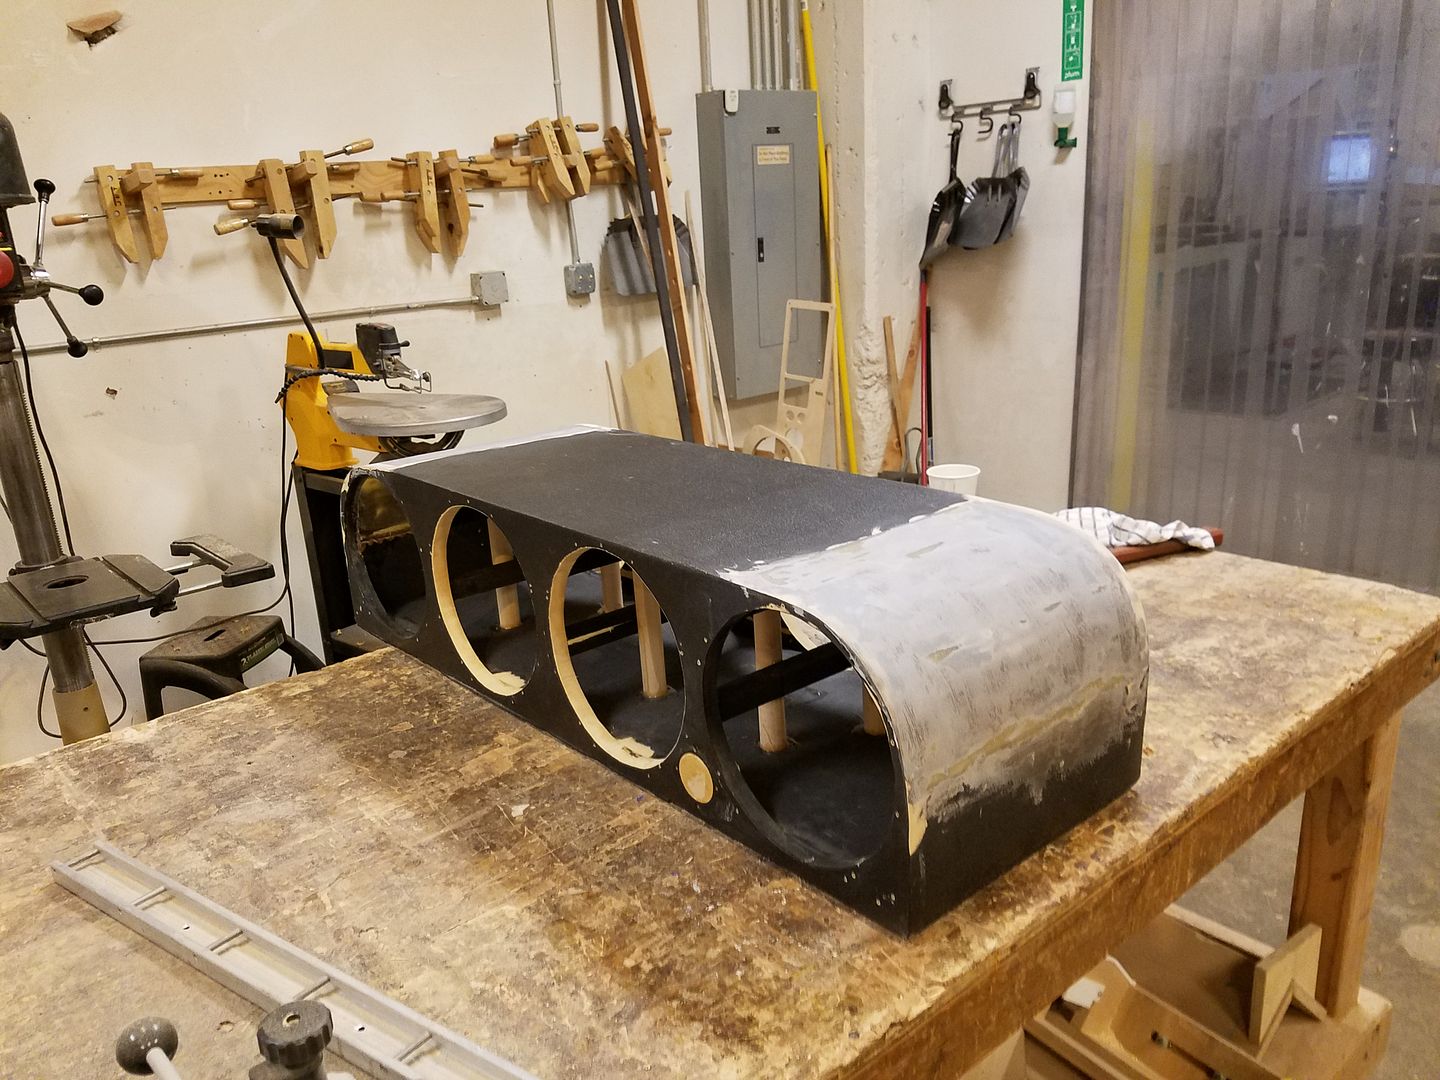
Rebuilding the sub box
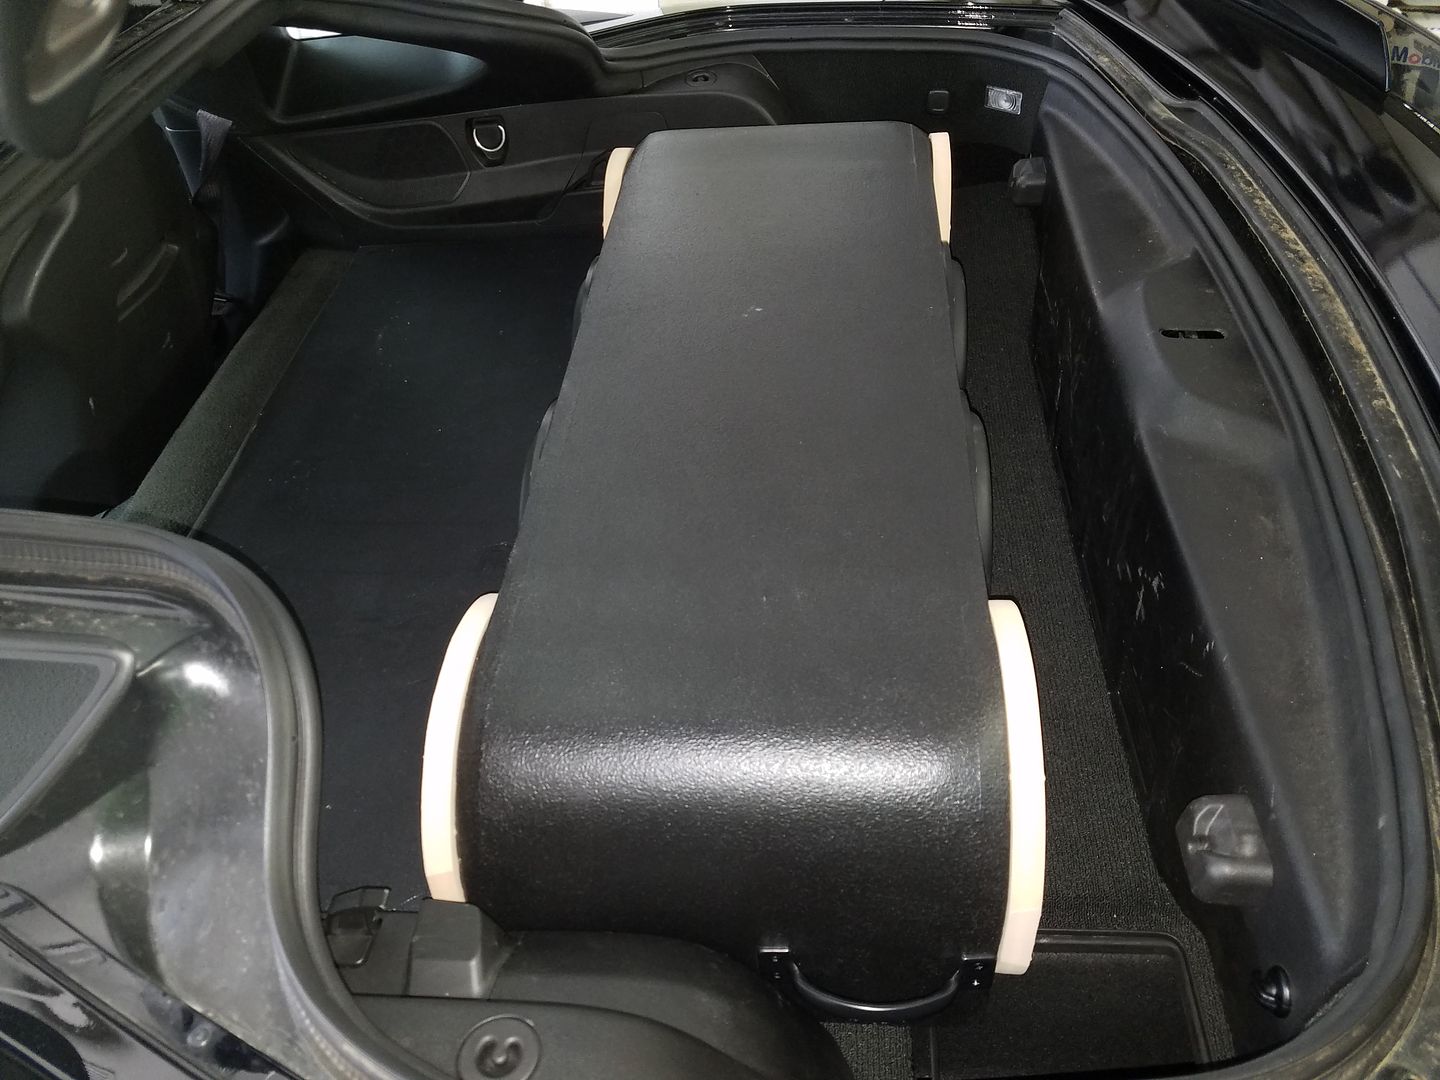
I decided to make some rather intensive tweaks to the subwoofer box. The kerf ended up a bit too round and therefore the targa top had trouble fitting over the box in the trunk. It got worse after I added Ensolite to the bottom of the box for extra decoupling.
Remedy: get rid of kerf and replace with something more low profile.
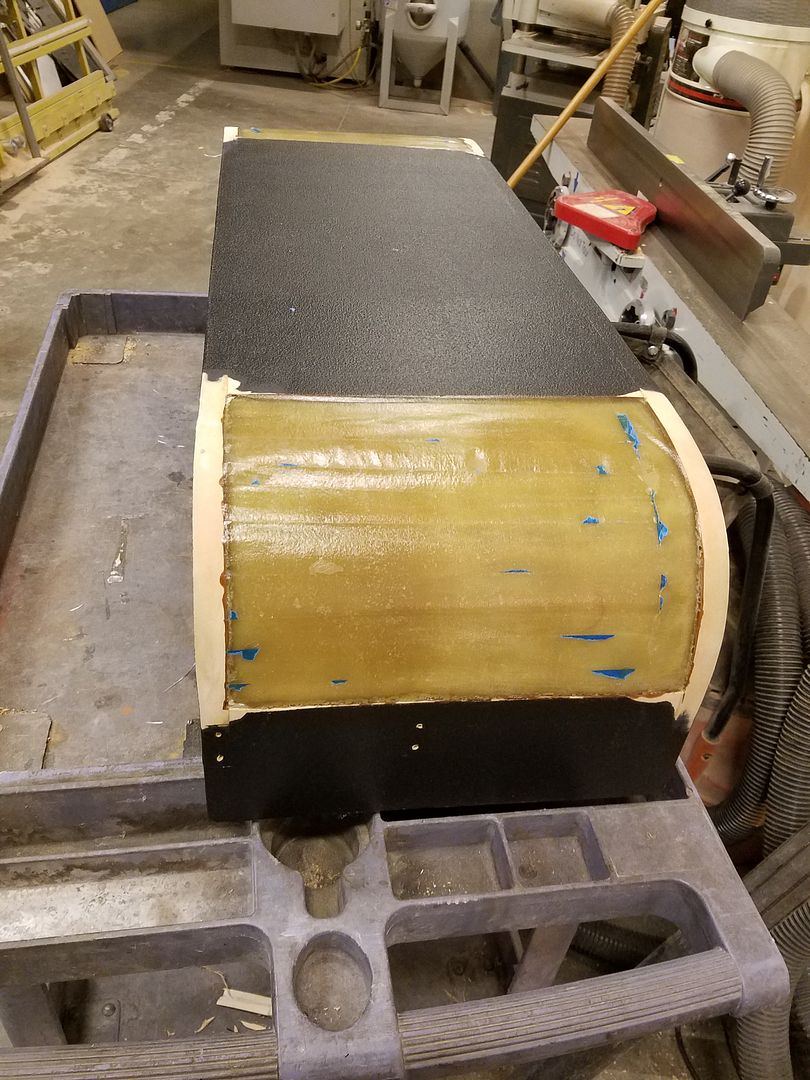
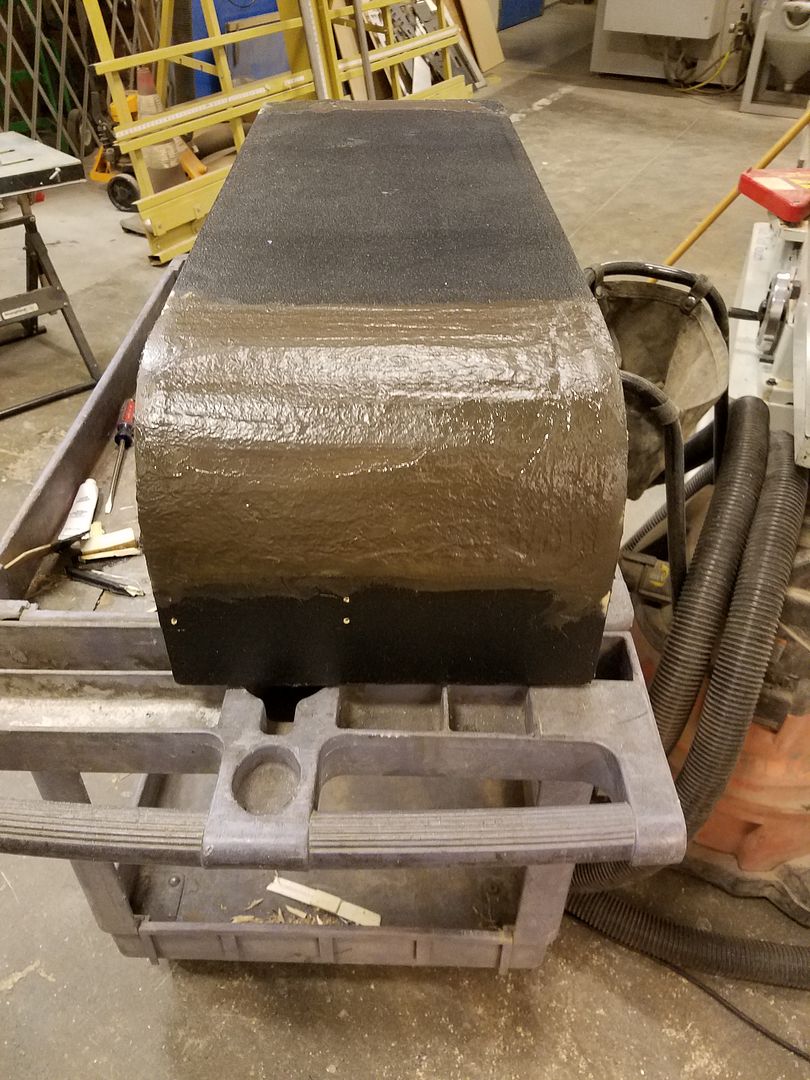
Since I'm redoing it I figured I might as well do it right and choose fiberglass for the curved sides. Fiberglass is strong when molded into curved shapes.
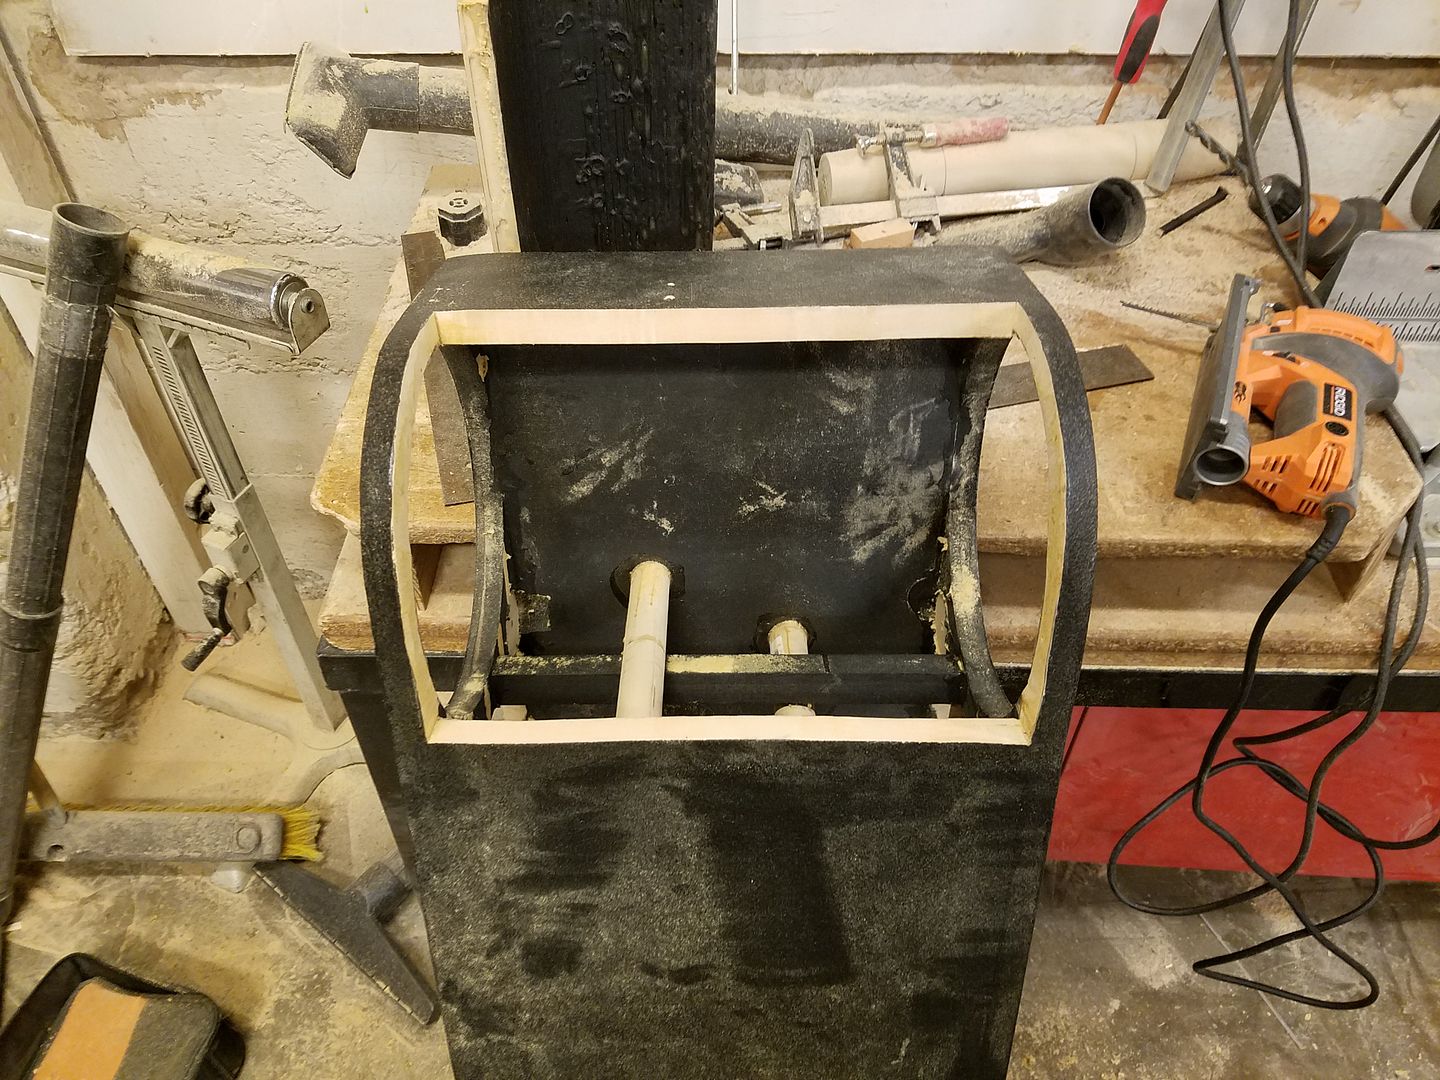
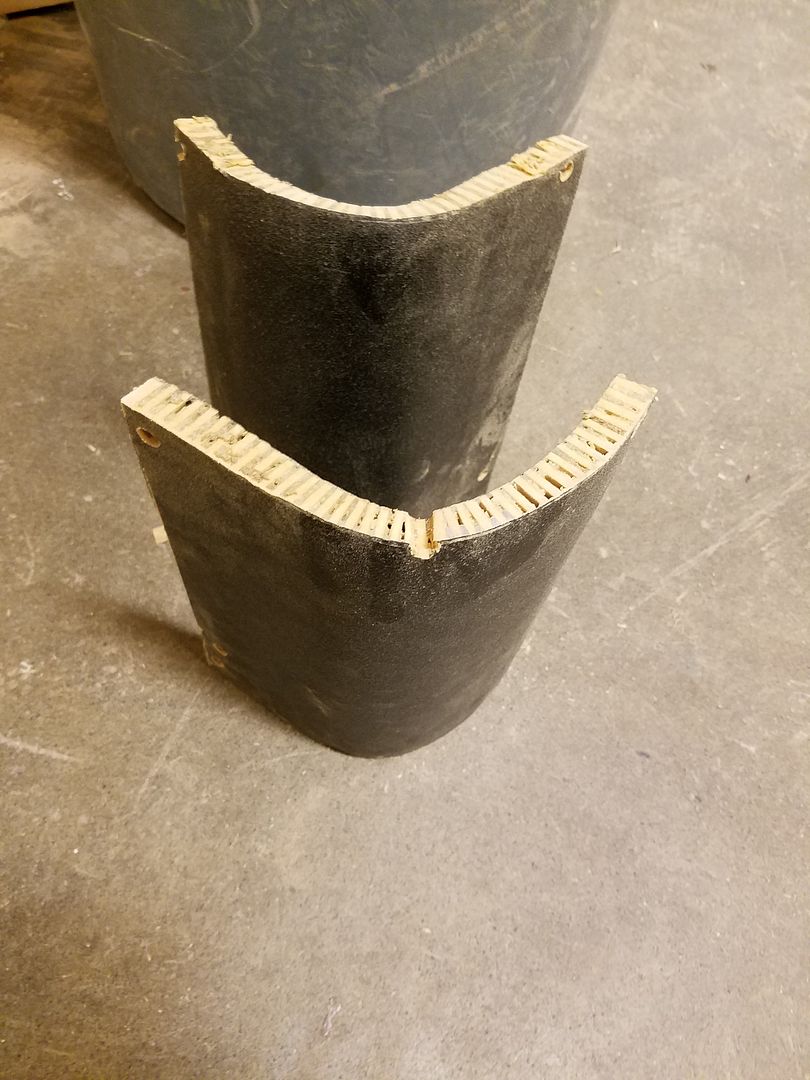
I'm hoping that no box room will be lost since the fiberglass is thinner than the 3/4 MDF. It feels good to remove all that glue too. Didn't feel to good about having 3 bottles of glue in those kerfs. Did not exactly define top notch construction. The kerfs did however feel very strong. I was surprised they had so much structural rigidity.
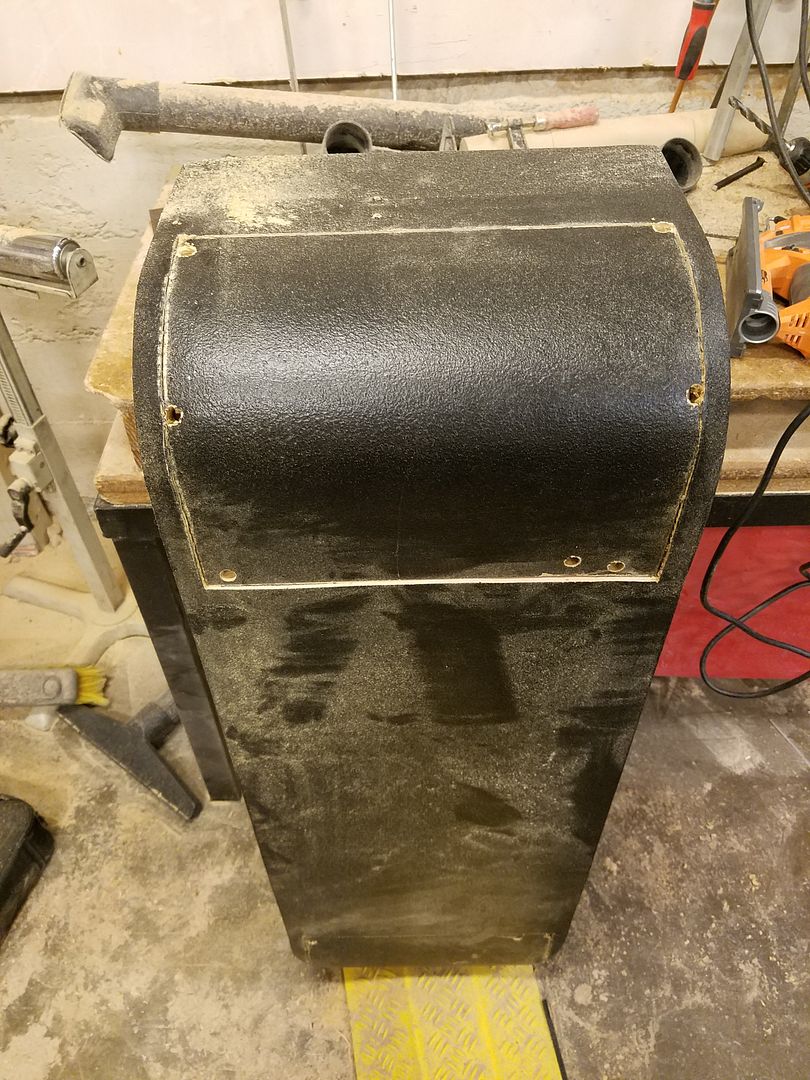
Here is how the fiberglass looks cured. It's about 1/4" inch. I lost bout 1/4" to make the box more low profile, but gained at least 1/4" inch because the glass is thinner than the MDF. The box room has increased, box stiffness is higher, and the targa top fits over it, success!
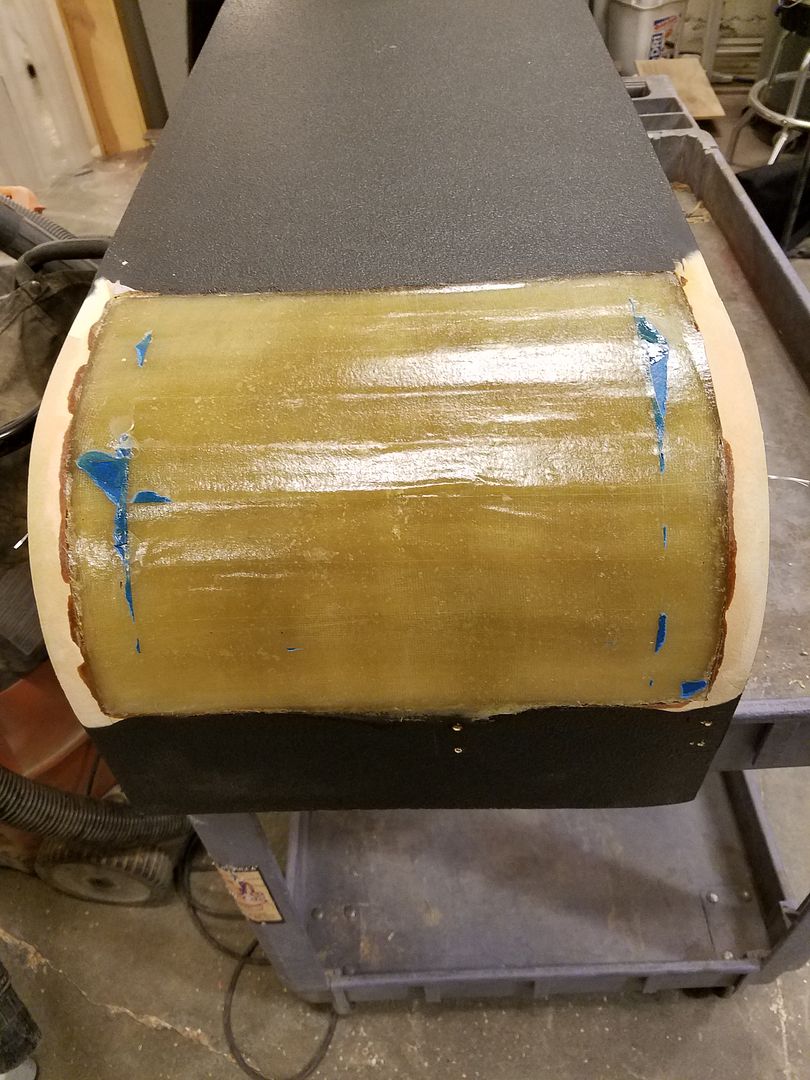
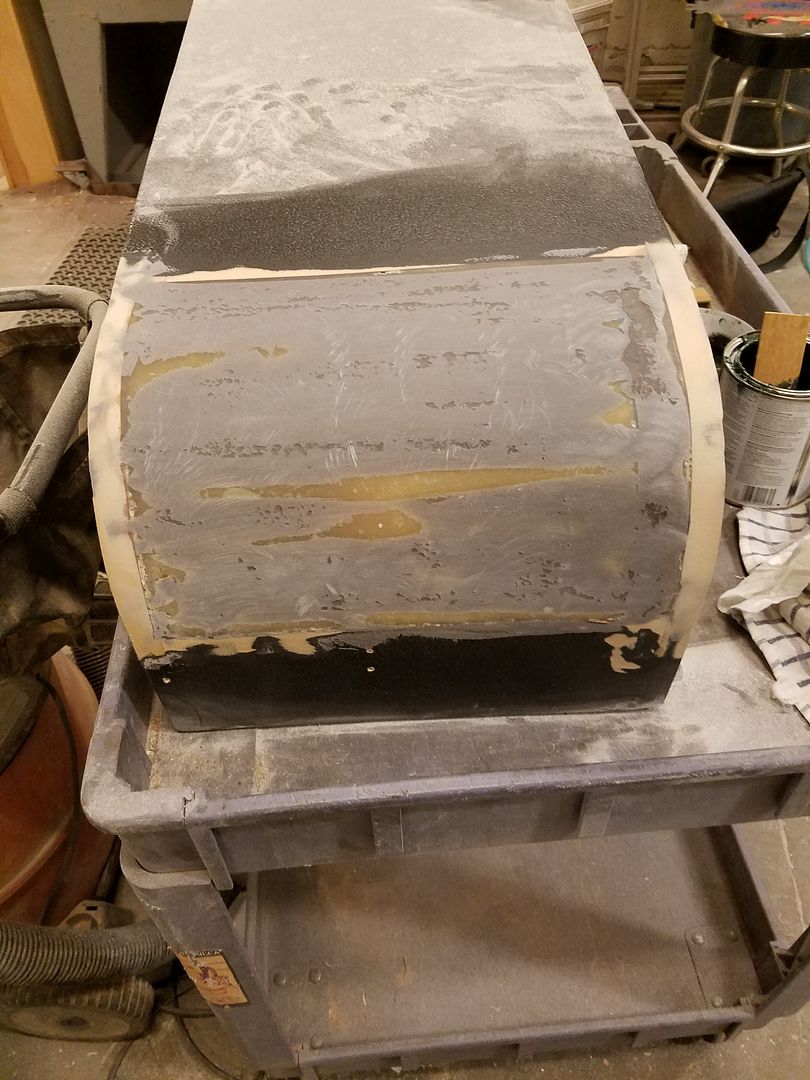
Like I said, the tape makes for uneven surface. Don't use it to give shape to your creation.
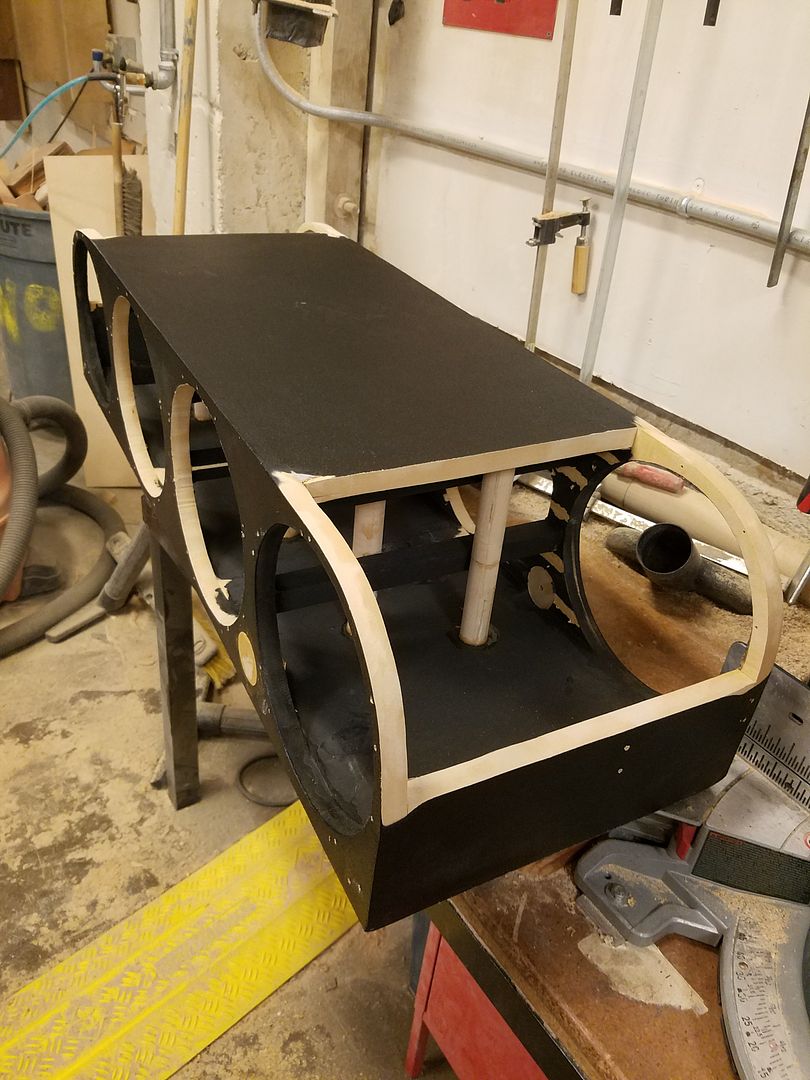
Found some scrap wood I can use as an applicator for the fiber reinforced body filler and cut it into four pieces.
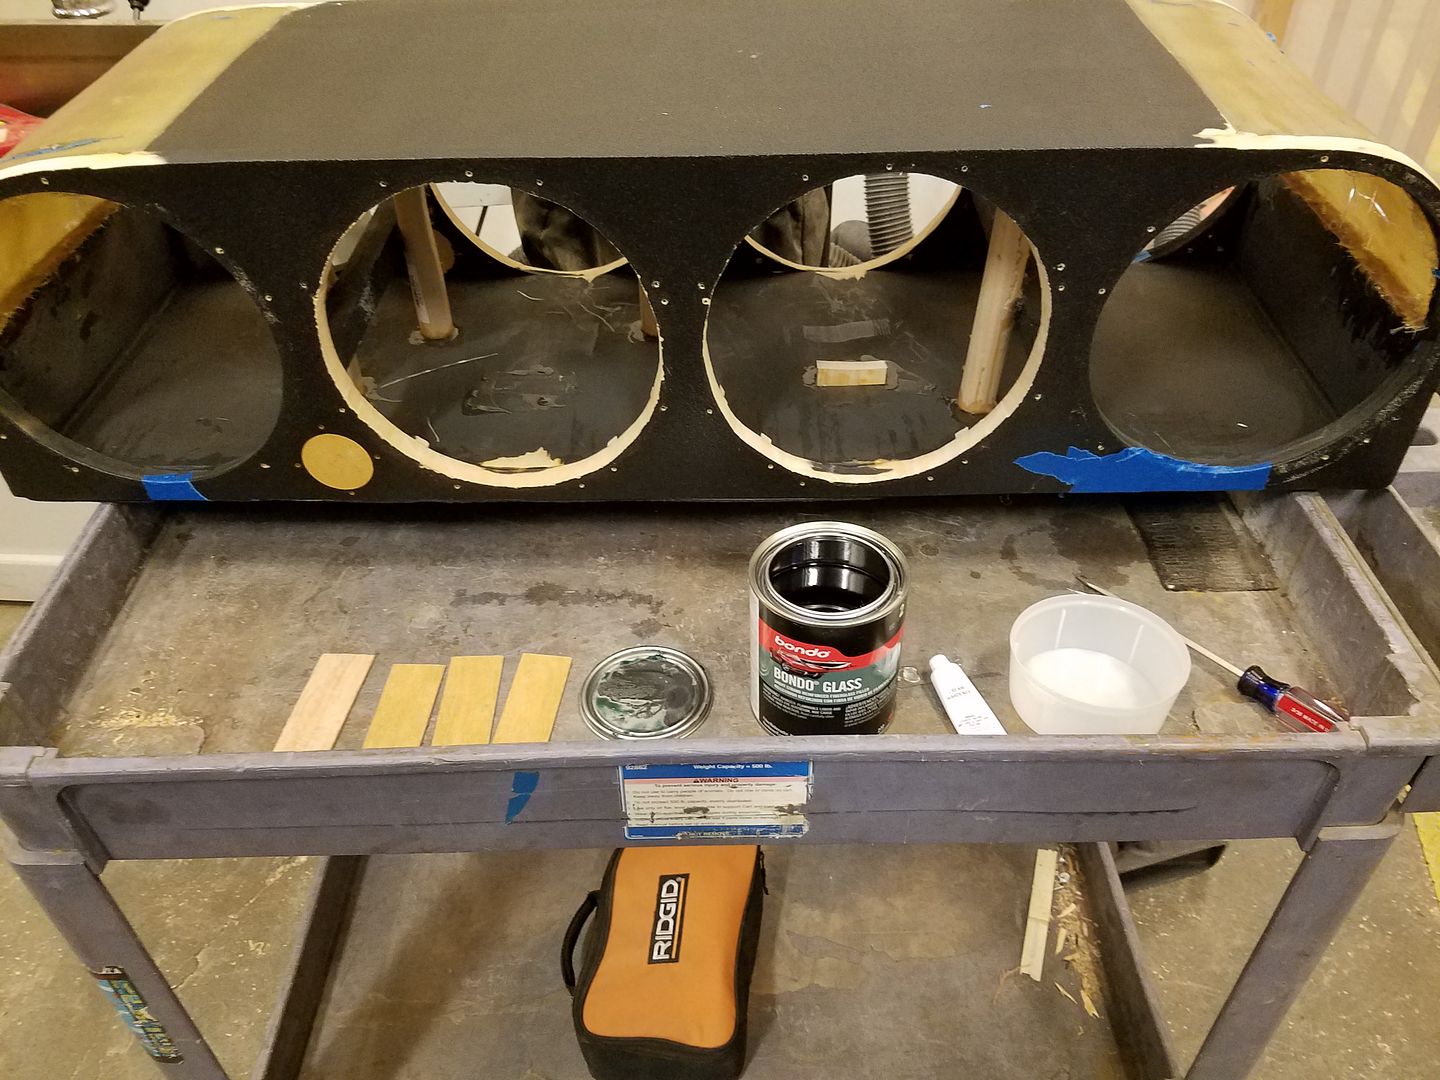
I tried to apply filler over the whole surface as even as I could.
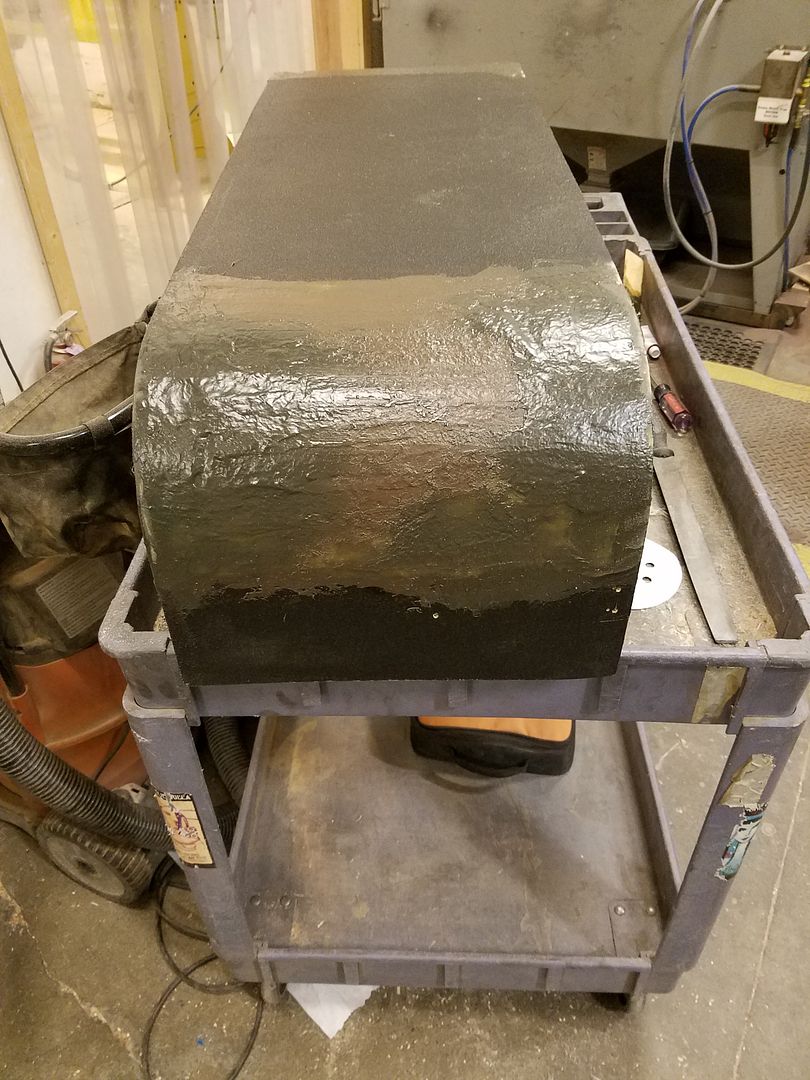
Rough sanding. I try to sand it as soon as it gets hard to the touch. If I wait too long this stuff becomes tough as nails and I have to use three times as many sand paper cartridges. I used an orbital sander with 40 grit paper. The tool is dangerous, when the paper's backing stops being sticky the paper just flies off in a random direction. Luckily it was late, there were no casualties.
Sanding left 1/4" body filler at most, as recommended on the box. Should hold up fine.
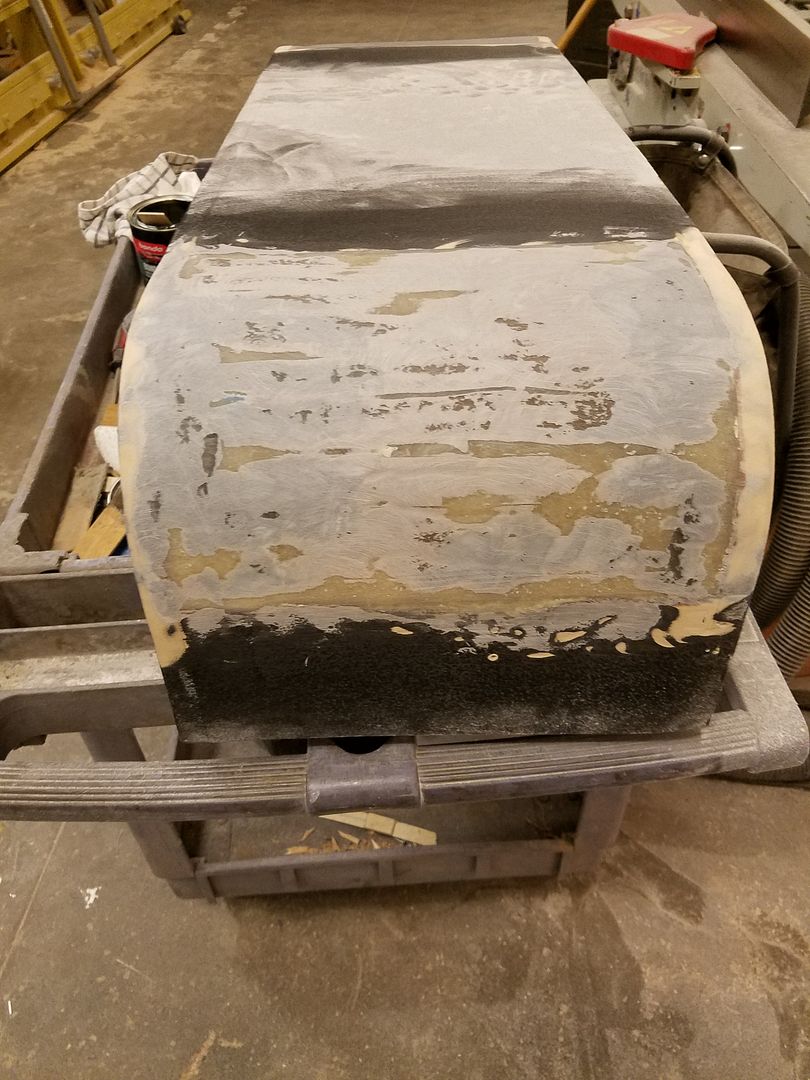
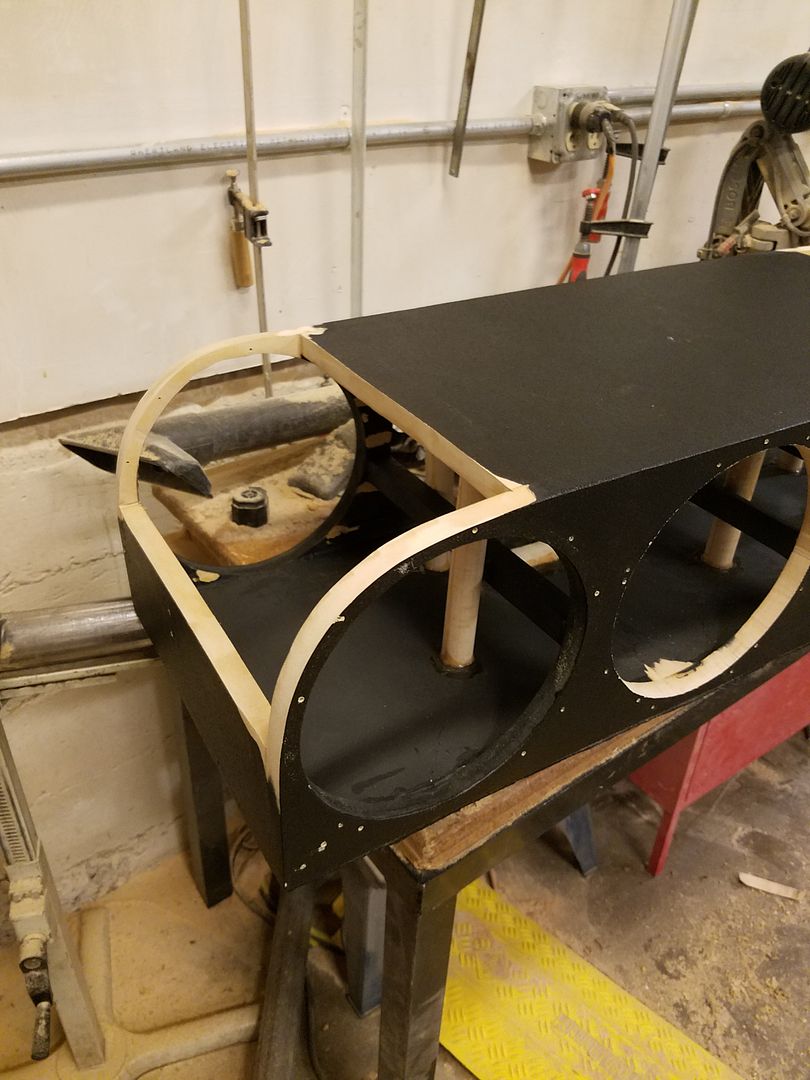
Did a second round for fine sanding.
Used the orbital sander with 120 grit this time.
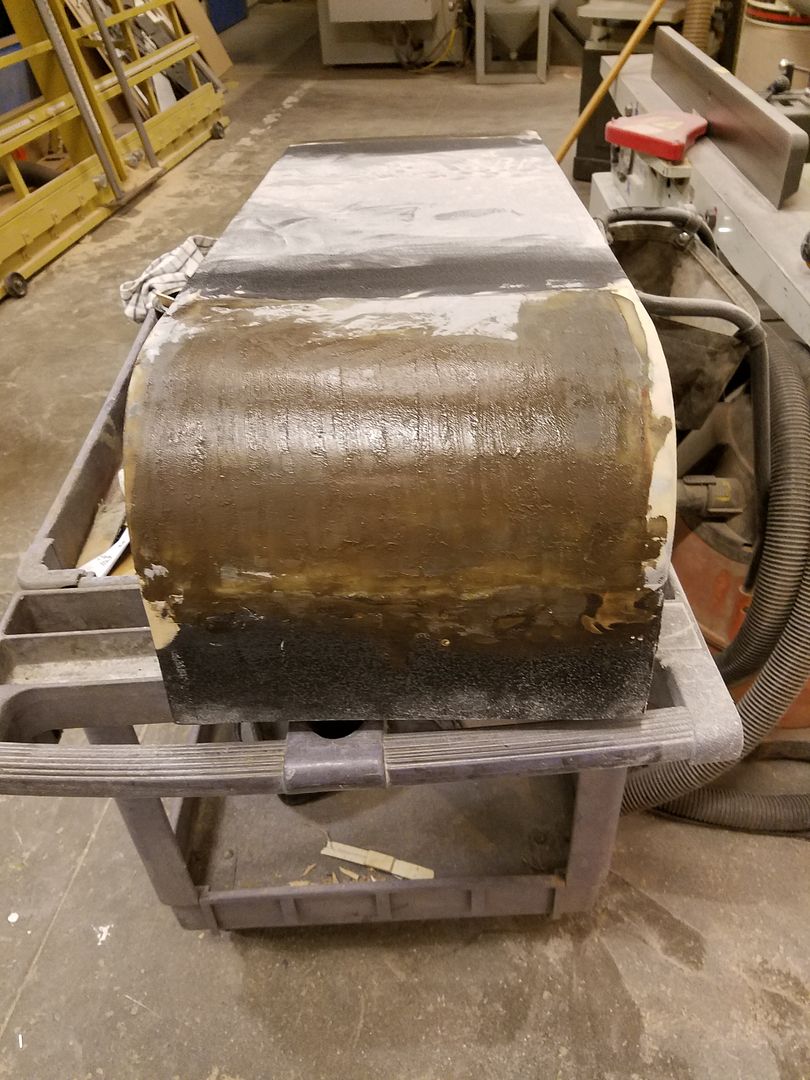
Good enough for government work, or rather Duratex. For a smooth finish I'd go for a third round of sanding.
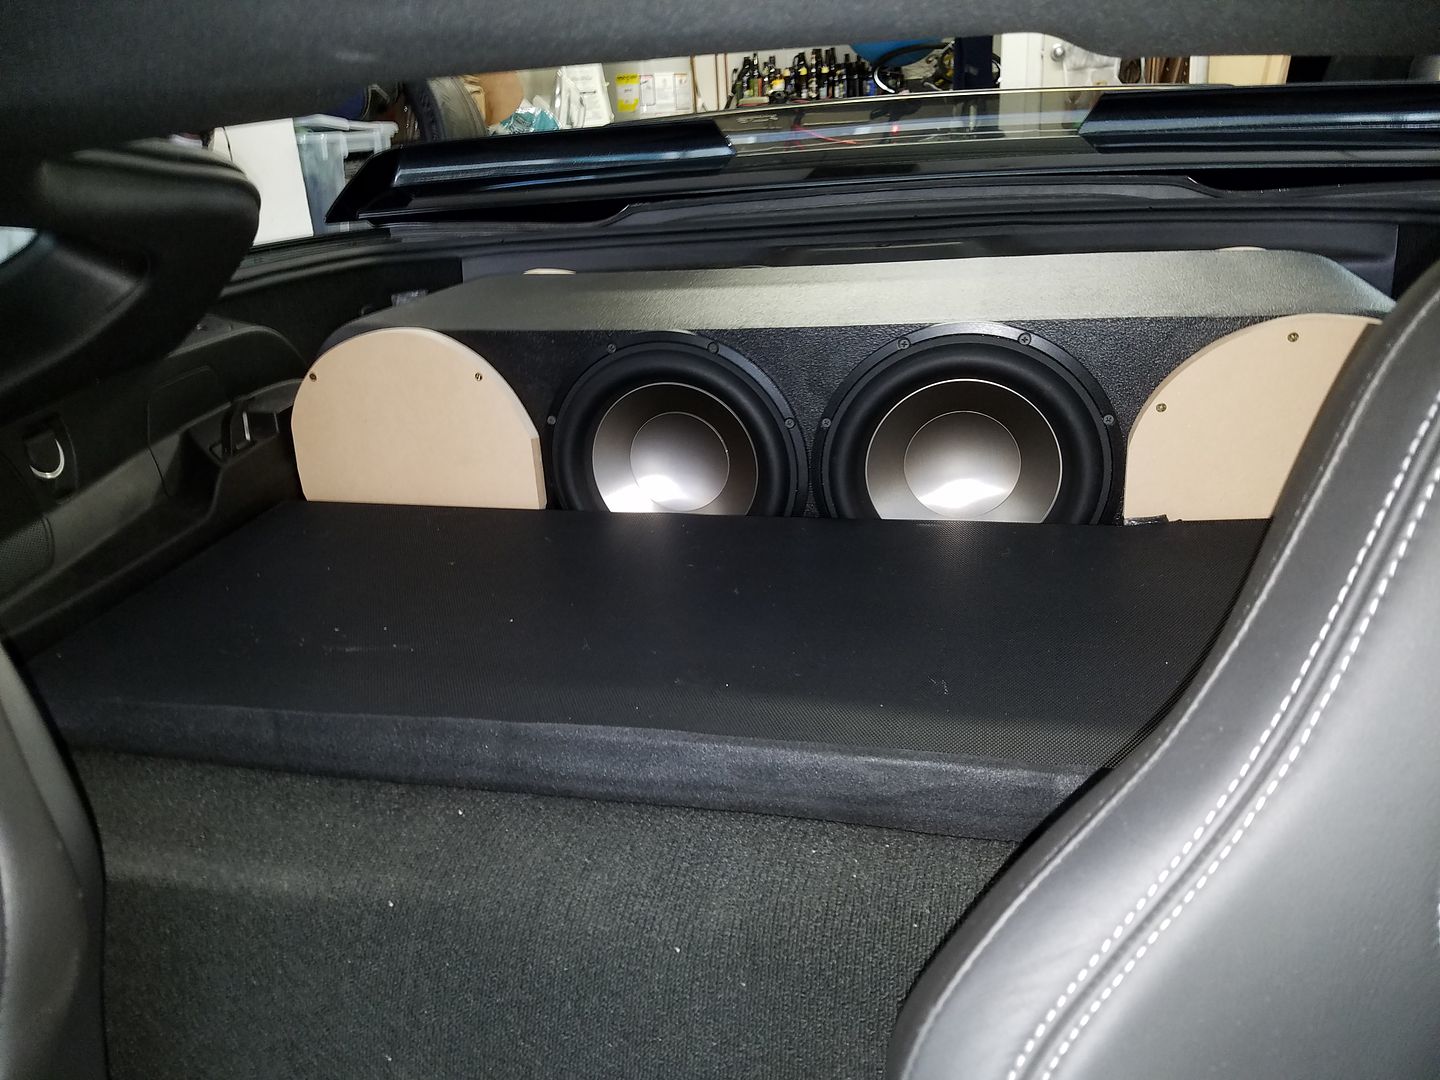
Next, beauty panels to cover up those extra holes and give the subs a bit of protection from loose trunk cargo.
I decided to make some rather intensive tweaks to the subwoofer box. The kerf ended up a bit too round and therefore the targa top had trouble fitting over the box in the trunk. It got worse after I added Ensolite to the bottom of the box for extra decoupling.
Remedy: get rid of kerf and replace with something more low profile.
Since I'm redoing it I figured I might as well do it right and choose fiberglass for the curved sides. Fiberglass is strong when molded into curved shapes.
I'm hoping that no box room will be lost since the fiberglass is thinner than the 3/4 MDF. It feels good to remove all that glue too. Didn't feel to good about having 3 bottles of glue in those kerfs. Did not exactly define top notch construction. The kerfs did however feel very strong. I was surprised they had so much structural rigidity.
Here is how the fiberglass looks cured. It's about 1/4" inch. I lost bout 1/4" to make the box more low profile, but gained at least 1/4" inch because the glass is thinner than the MDF. The box room has increased, box stiffness is higher, and the targa top fits over it, success!
Like I said, the tape makes for uneven surface. Don't use it to give shape to your creation.
Found some scrap wood I can use as an applicator for the fiber reinforced body filler and cut it into four pieces.
I tried to apply filler over the whole surface as even as I could.
Rough sanding. I try to sand it as soon as it gets hard to the touch. If I wait too long this stuff becomes tough as nails and I have to use three times as many sand paper cartridges. I used an orbital sander with 40 grit paper. The tool is dangerous, when the paper's backing stops being sticky the paper just flies off in a random direction. Luckily it was late, there were no casualties.
Sanding left 1/4" body filler at most, as recommended on the box. Should hold up fine.
Did a second round for fine sanding.
Used the orbital sander with 120 grit this time.
Good enough for government work, or rather Duratex. For a smooth finish I'd go for a third round of sanding.
Next, beauty panels to cover up those extra holes and give the subs a bit of protection from loose trunk cargo.
12-22-2016, 01:46 PM
#52
Instructor


Great write up!!
Now I just need to find out what the options are in the convertible for the rear behind seat speakers. Not sure of size.
Now I just need to find out what the options are in the convertible for the rear behind seat speakers. Not sure of size.
Last edited by Vyper340; 12-24-2016 at 09:20 AM.
12-23-2016, 10:46 PM
#53
Tech Contributor
 01-05-2017, 07:34 PM
#55
Safety Car
Thread Starter
I'm using 6.5" speakers in the back. With a bit of creativity you can do the same. The trick is to find speakers with a small inner diameter. There is plenty of depth but very little space between the plastic panel and speaker.
01-15-2017, 05:57 PM
#56


Wow. I carefully read through each post and studied each picture. Your attention to detail and sound knowledge is impressive. I've always bungled through my installs. Buying a new car means I get to try again. But for me, it's always a crap shoot of how the system will sound in the end. My C6 system is unsatisfying. Spent a lot of money on what I believe would be good. You've given me new things to look at and educate myself on. So my question is, how is your sound? The highs? Clear sound? Is it satisfying? Best write up ever! Thank you....
01-19-2017, 02:39 PM
#57
Safety Car
Thread Starter
Wow. I carefully read through each post and studied each picture. Your attention to detail and sound knowledge is impressive. I've always bungled through my installs. Buying a new car means I get to try again. But for me, it's always a crap shoot of how the system will sound in the end. My C6 system is unsatisfying. Spent a lot of money on what I believe would be good. You've given me new things to look at and educate myself on. So my question is, how is your sound? The highs? Clear sound? Is it satisfying? Best write up ever! Thank you....
Then there is a lot of detail. I use all metal cones/diaphragms (except the full range rear surround) which have great transient response. This results in a sound reproduction that is transparent unlike in the case where folks use low damped paper and poly speakers that have have malleable diaphragms. This also limits 2nd order distortion which is prevalent is soft cone speakers. The downside of metal speakers is that they have narrow bandwidths and release stored energy in huge breakups. I circumvent this by picking the best metal speakers there are. The 10" woofers have smaller breakups than most soft coned speakers, this was the top of the line Scan Speak driver and won many awards. The tweeters are similarly the widest bandwidth metal drivers on the market, with low distortion down to 1,000khz. Then I use high quality filtering in the Alpine unit to limit ringing even further.
The third defining feature is the lack of vibration. Because the subwoofer design is push-pull the car pressurizes with subsonic frequencies but doesn't rattle the car or your body. At times you can easily plug up your ears because it's hard to know what too loud is loud until your ears give up. The normal cues aren't there. You can still feel the bass in your chest and your ear and nose hairs are dancing from the air pressure generated but your butt no longer feels it!
The following users liked this post:
Speedfreaq (12-07-2017)
12-10-2017, 08:02 AM
#58
"A Huge challenge..." to remove the rest with your fingers? I was pulling like hell from the top left corner of the drivers door and it appeared as if I was bending the door panel by creases forming in the upper interior leather / vinyl so I stopped. Without tools, any other tips for getting this bitch of a panel off?
Door layout
I'm going to dedicate the next few posts to show what I found by taking apart the door panels. I'm listing the space available for speakers and the strengths and weaknesses I see. Overall, this is the best door of all car doors I've seen! It's an utter waste to keep the OEM system as there is so much potential.
First I'm going to post a 3rd party picture of the panel from the outside. Mine is all black so it's hard to see what's going on.
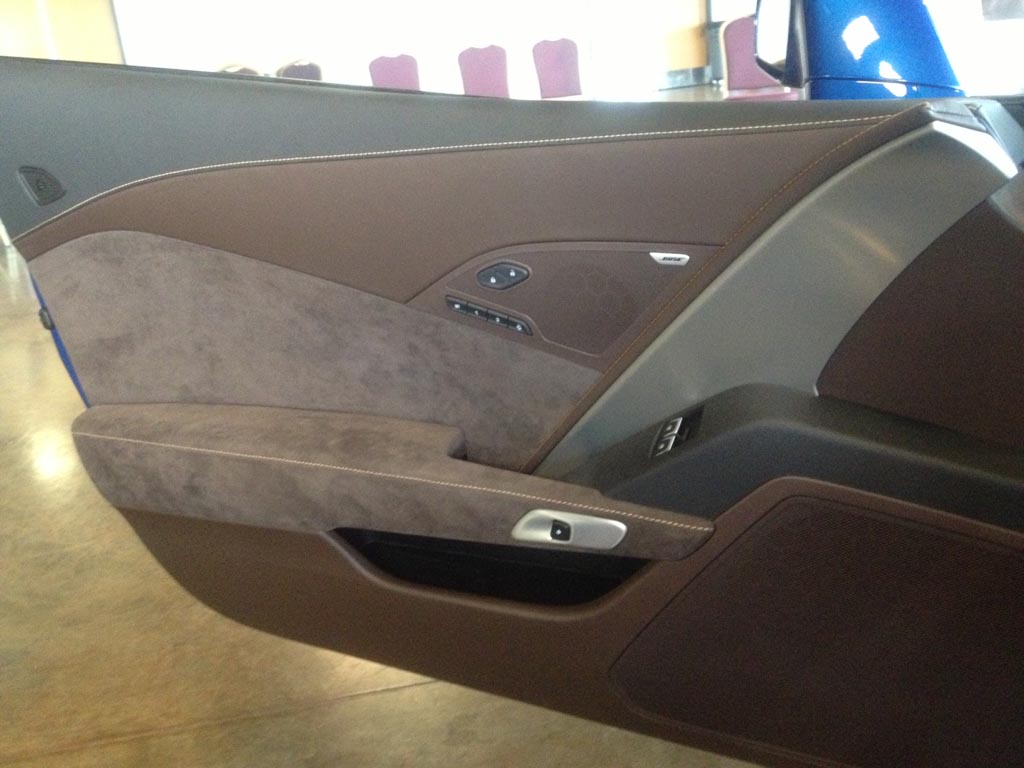
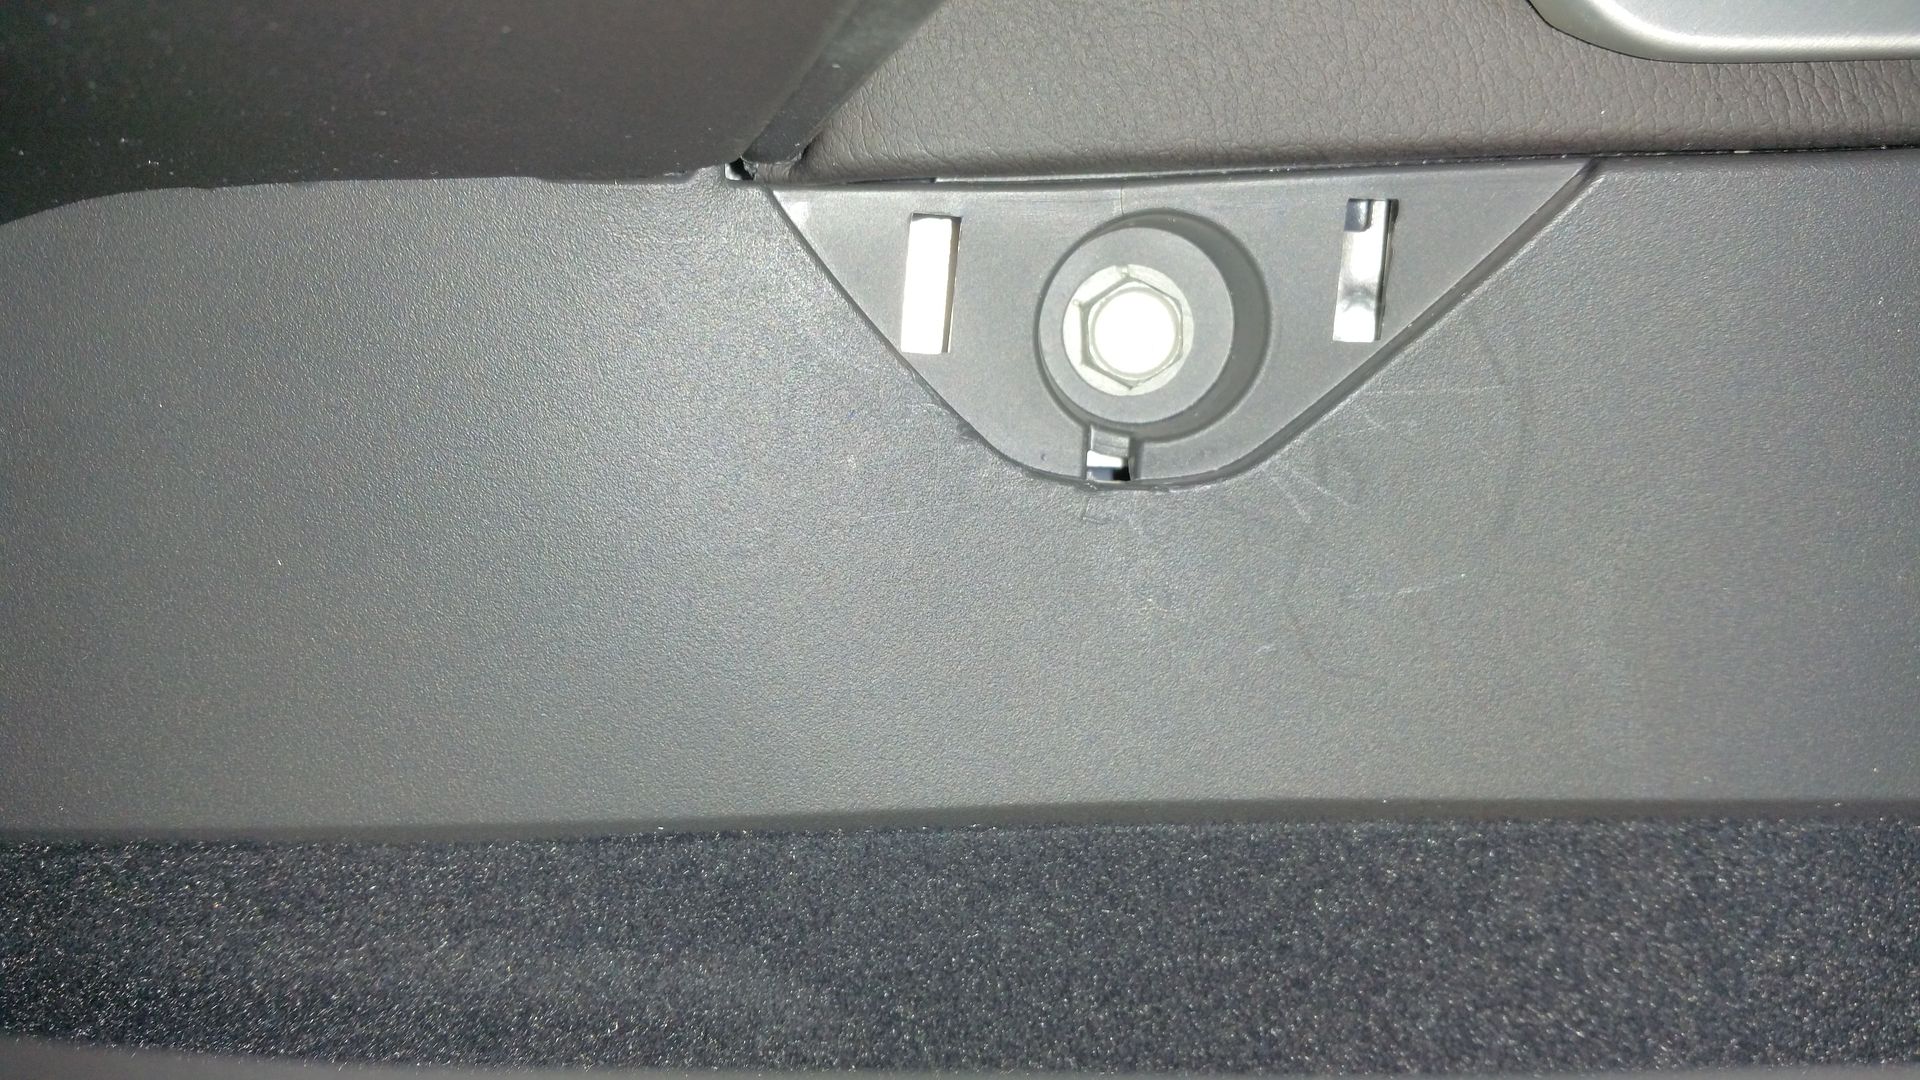
The panel (on the driver side) is held on by two bolts at the top, two bolts at the bottom, and some push-pins. Unlike the push-pins you'd find on a Honda for example, these suckers hold on much better. The door is about to break at the time they release. No joke.
Here is another DIY to augment mine with some nice photos to boot:
HOW TO: Image Lights C7 specific - Corvette Forum
I am writing this from an audio enthusiast perspective so here it goes.
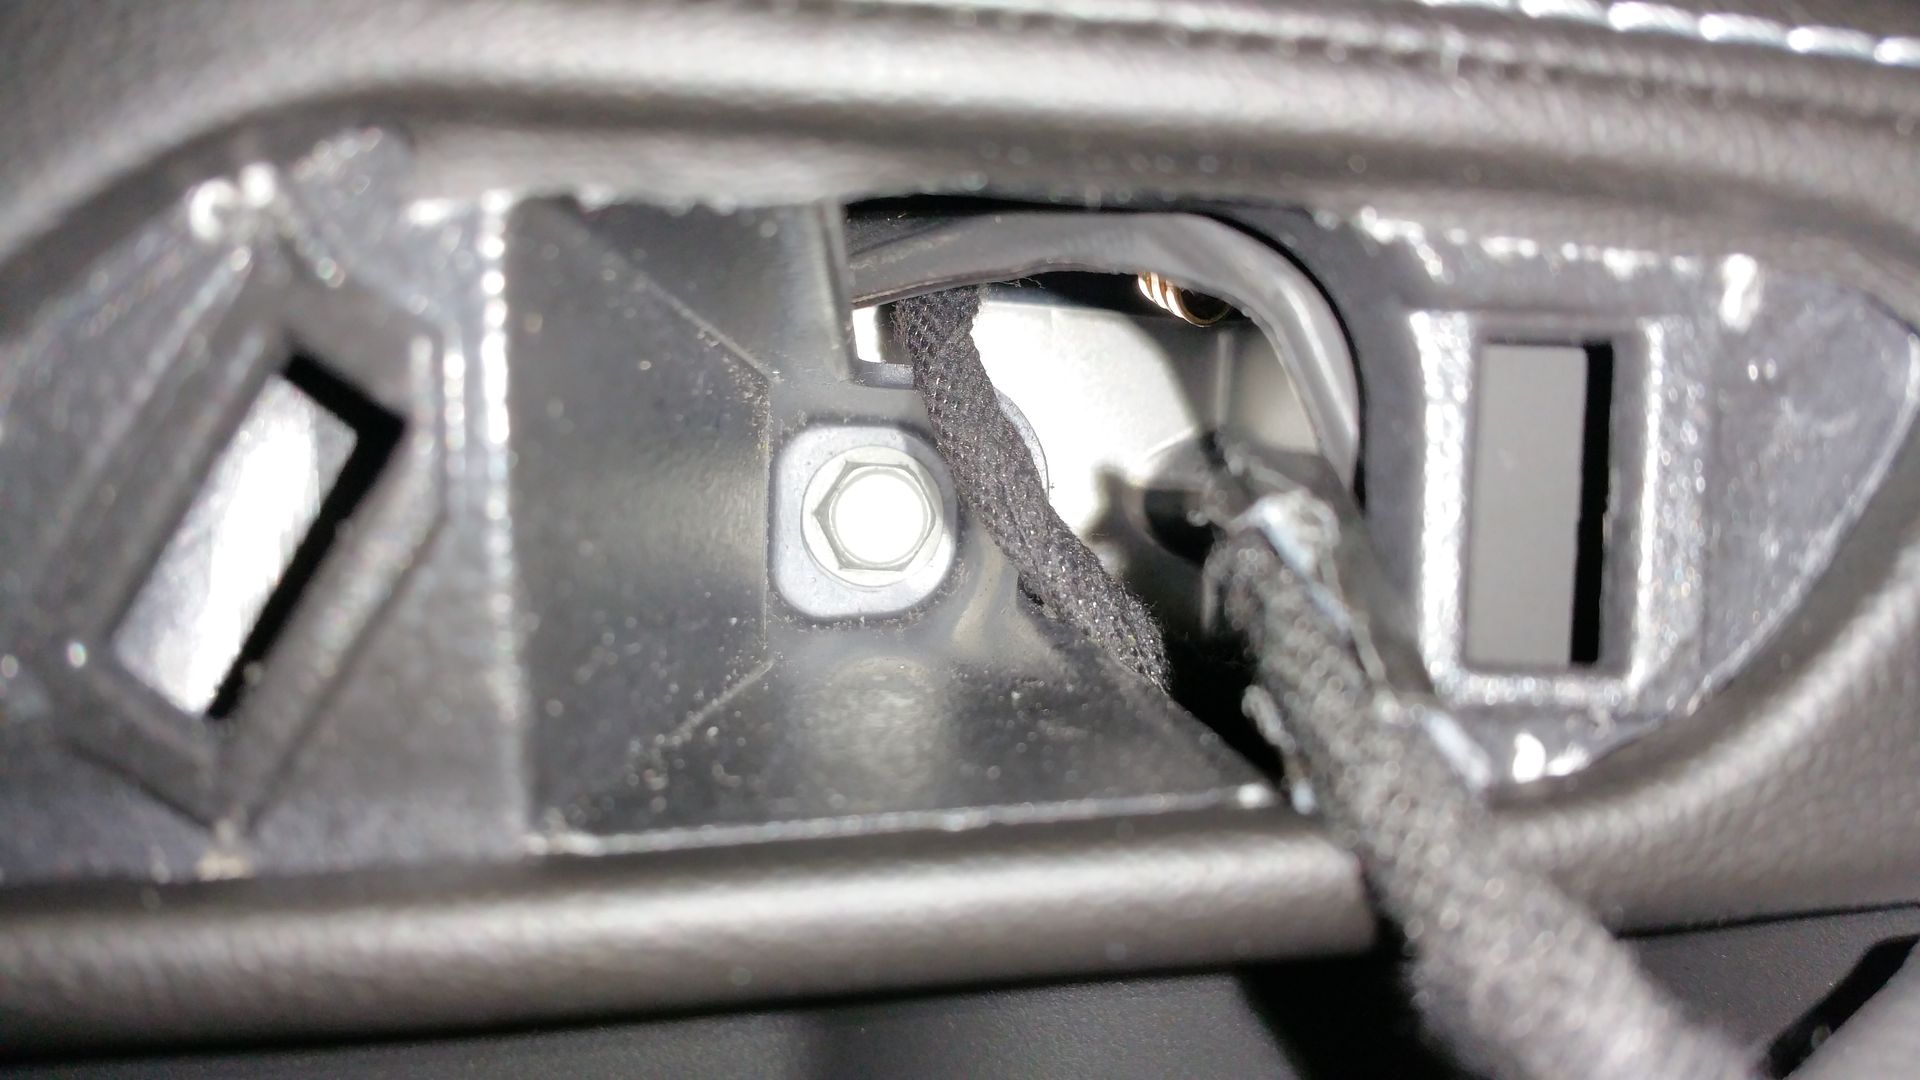
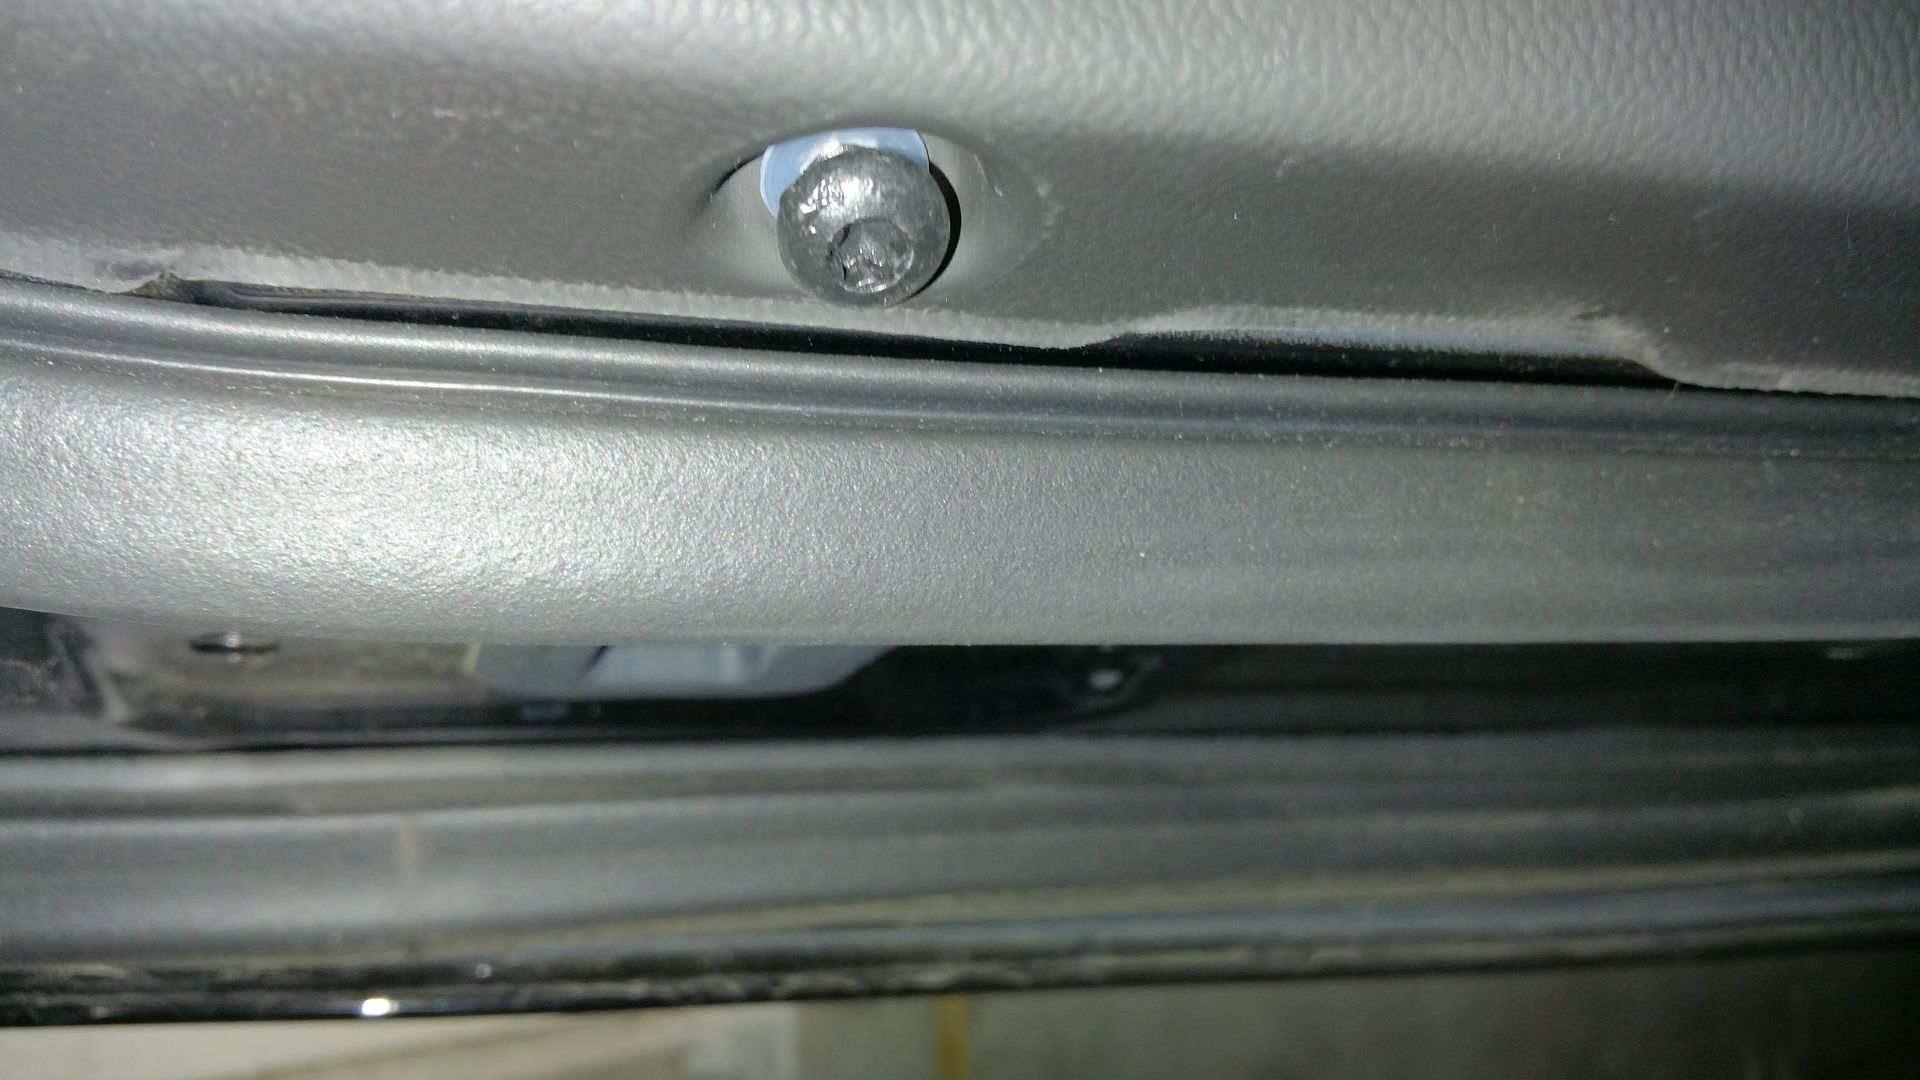
I. Gone is the manual door latch. This is great news! Mechanical door latches usually require rods which resonate easily with speaker output. This sucker is all electrical. There is the risk that the button will vibrate but I haven't seen that happen yet in this car. The one button that opens the door is popped off to reveal a screw. There is also no motor in the door! The motors are mounted onboard the car. Again one less thing that can rattle is taken out of the equation. The second benefit is that there is more room in the door and therefore we have a larger speaker box. The bigger the better.
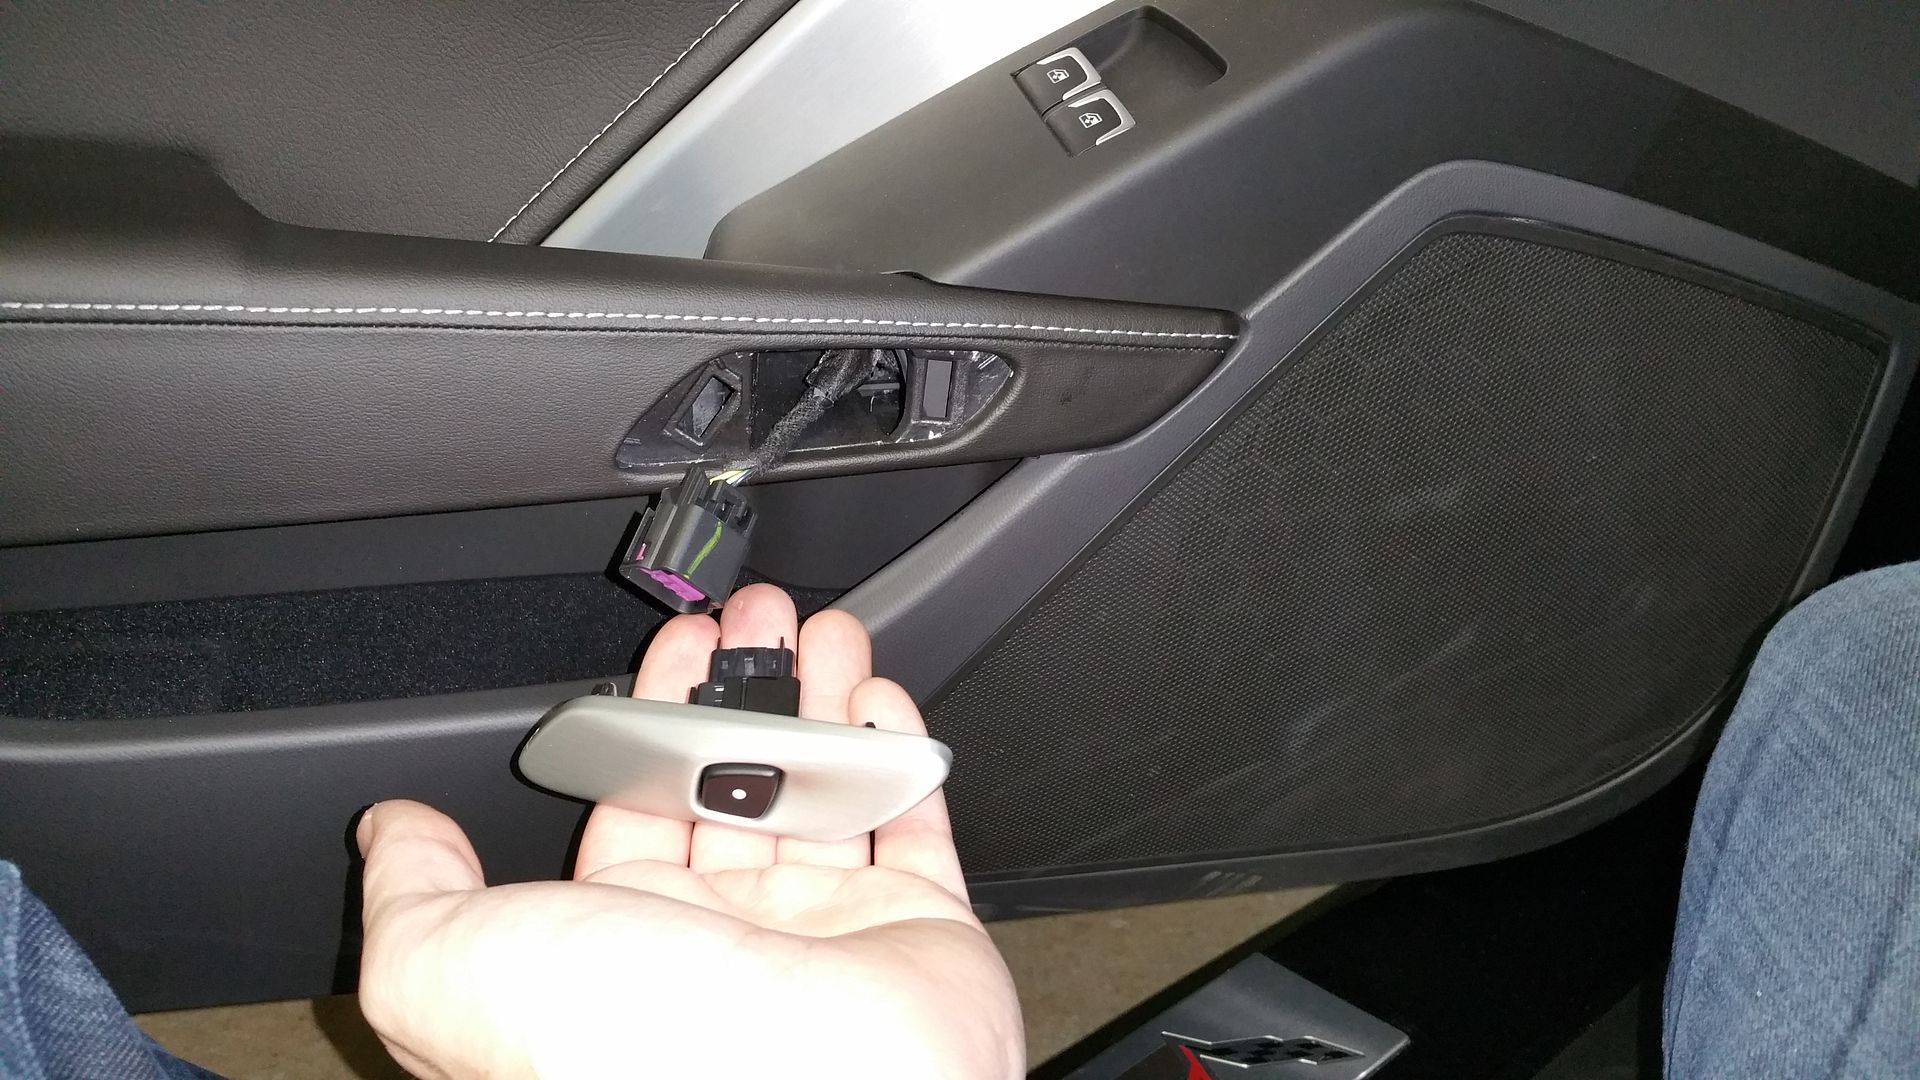
The screw behind the button:
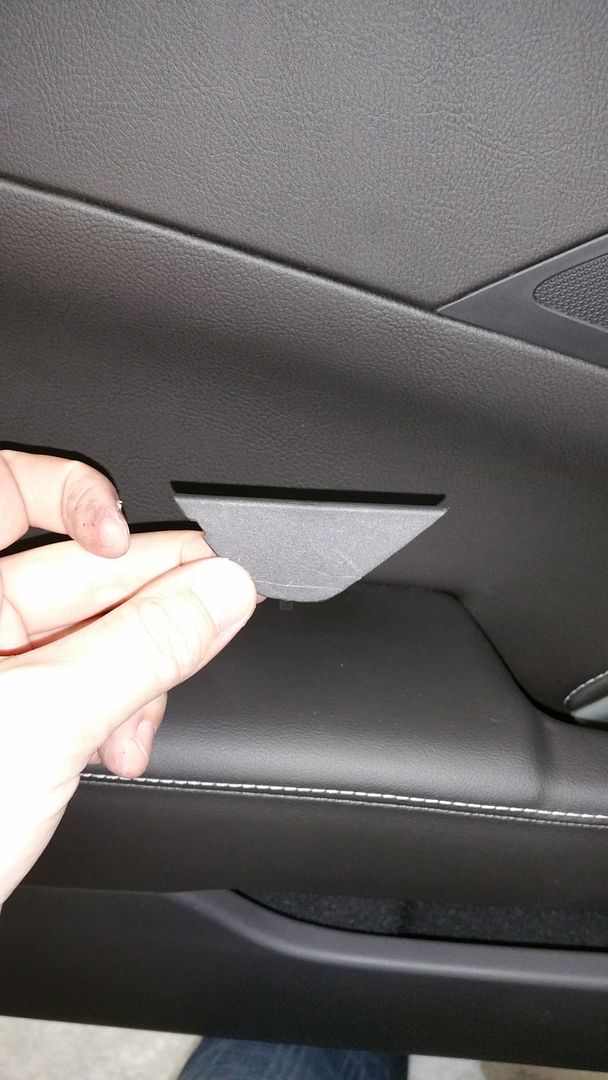
There is a triangular beauty panel that hides the second top screw here:

2. The bottom two screws are found in the small dimples of the door. This is a welcome addition if you load the door with too much dynamat, ensolite, or the like. My last car only had clips and I had a tough time putting the door panel back on and keeping it there.
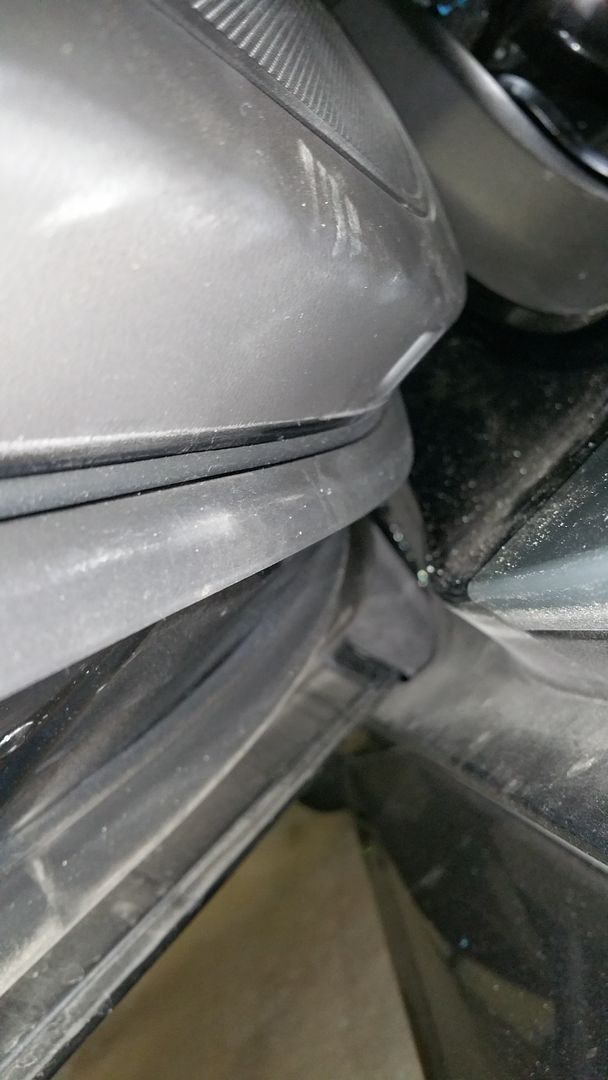
I used my fingers to pull the rest of the door off which was a huge challenge. I didn't want to scratch the paint or panel.
I'm going to dedicate the next few posts to show what I found by taking apart the door panels. I'm listing the space available for speakers and the strengths and weaknesses I see. Overall, this is the best door of all car doors I've seen! It's an utter waste to keep the OEM system as there is so much potential.
First I'm going to post a 3rd party picture of the panel from the outside. Mine is all black so it's hard to see what's going on.
The panel (on the driver side) is held on by two bolts at the top, two bolts at the bottom, and some push-pins. Unlike the push-pins you'd find on a Honda for example, these suckers hold on much better. The door is about to break at the time they release. No joke.
Here is another DIY to augment mine with some nice photos to boot:
HOW TO: Image Lights C7 specific - Corvette Forum
I am writing this from an audio enthusiast perspective so here it goes.
I. Gone is the manual door latch. This is great news! Mechanical door latches usually require rods which resonate easily with speaker output. This sucker is all electrical. There is the risk that the button will vibrate but I haven't seen that happen yet in this car. The one button that opens the door is popped off to reveal a screw. There is also no motor in the door! The motors are mounted onboard the car. Again one less thing that can rattle is taken out of the equation. The second benefit is that there is more room in the door and therefore we have a larger speaker box. The bigger the better.
The screw behind the button:
There is a triangular beauty panel that hides the second top screw here:
2. The bottom two screws are found in the small dimples of the door. This is a welcome addition if you load the door with too much dynamat, ensolite, or the like. My last car only had clips and I had a tough time putting the door panel back on and keeping it there.
I used my fingers to pull the rest of the door off which was a huge challenge. I didn't want to scratch the paint or panel.
12-10-2017, 12:29 PM
#59
Melting Slicks


"A Huge challenge..." to remove the rest with your fingers? I was pulling like hell from the top left corner of the drivers door and it appeared as if I was bending the door panel by creases forming in the upper interior leather / vinyl so I stopped. Without tools, any other tips for getting this bitch of a panel off?
Very simple to remove the panels with the right tool. They sell them at the local AutoZone / etc. here too.
The following users liked this post:
Speedfreaq (12-10-2017)
12-10-2017, 12:34 PM
#60
Good call. That, along with the pictures above to show the locations of the trim clips, should do the trick.
Do yourself and you hands a favor and get a set of these:
https://www.amazon.com/ABN-Upholster...qid=1512926795
Very simple to remove the panels with the right tool. They sell them at the local AutoZone / etc. here too.
https://www.amazon.com/ABN-Upholster...qid=1512926795
Very simple to remove the panels with the right tool. They sell them at the local AutoZone / etc. here too.