
Poor steering compliance and bushings - Pictures included
 09-08-2007, 02:46 PM
#1
Team Owner

Thread Starter
I've always thought the steering feel was poor on my C5 but in all the magazine articles I've read about they felt the same way about steering feel so I just thought it was a characteristic of the car. I went into the C5 from an FD RX7 which had fantastic steering so the degrade in quality I took to be normal.
Well its gotten worse and after my last HPDE the car would float from lane to lane on input changes.
I brought it home and went on vacation for a week. Just pulled it apart and I've always thought I had bushing issues but this time took pics.
I checked the hub and bearing, no problems, tight and no movement at all.
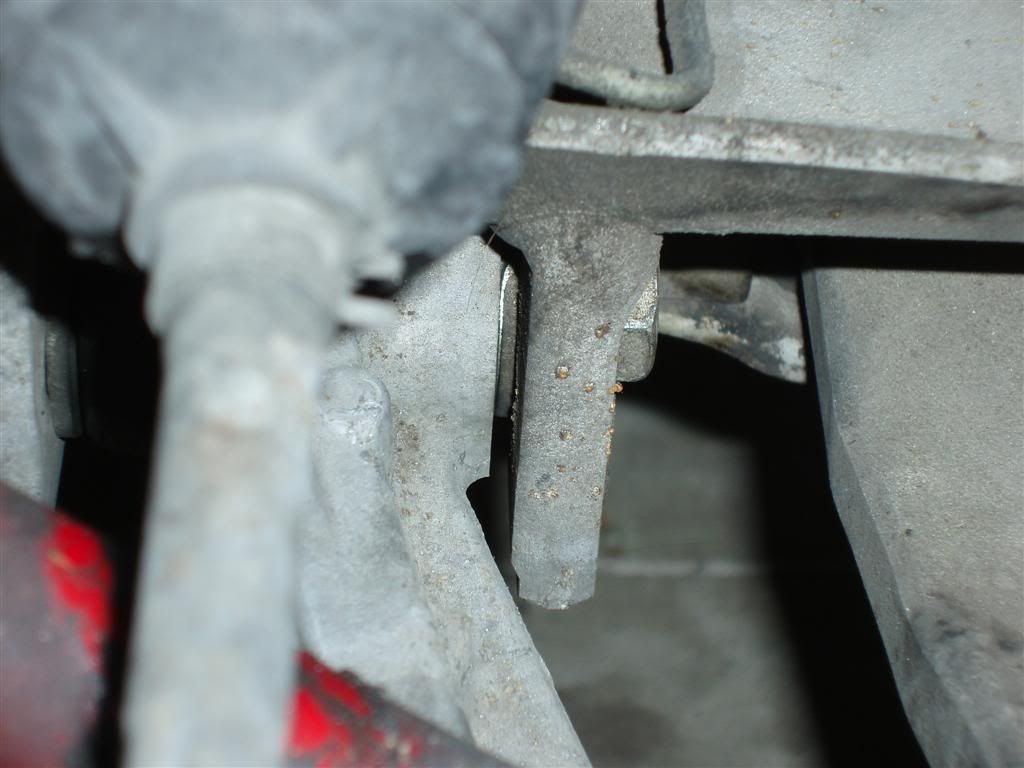
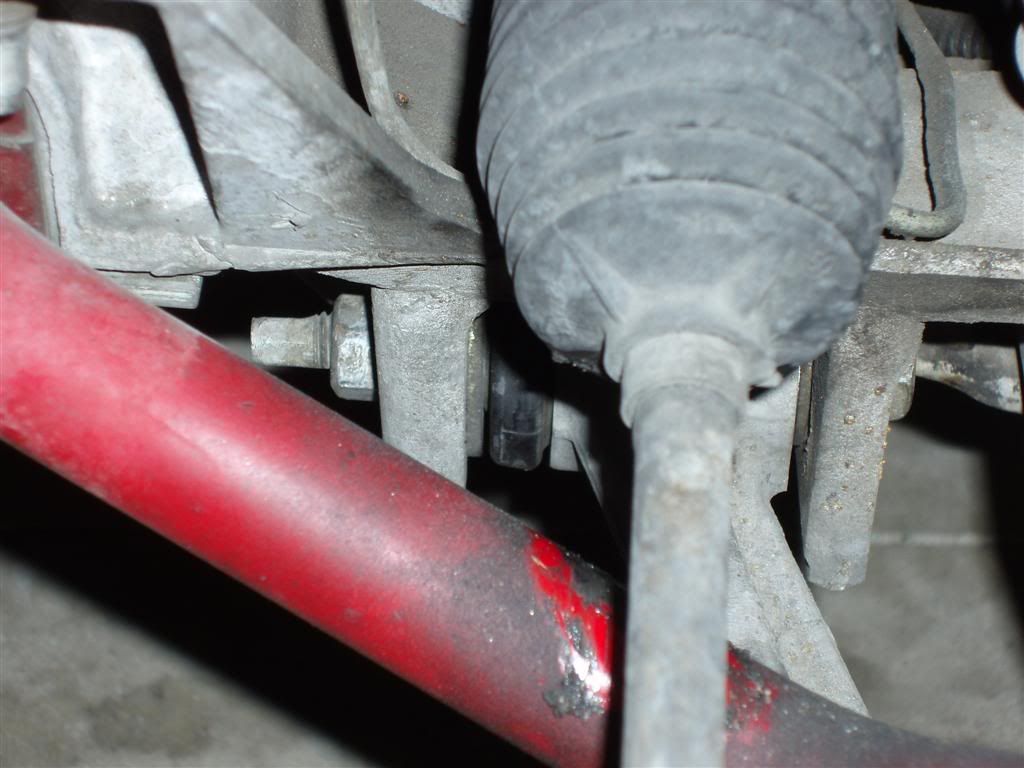
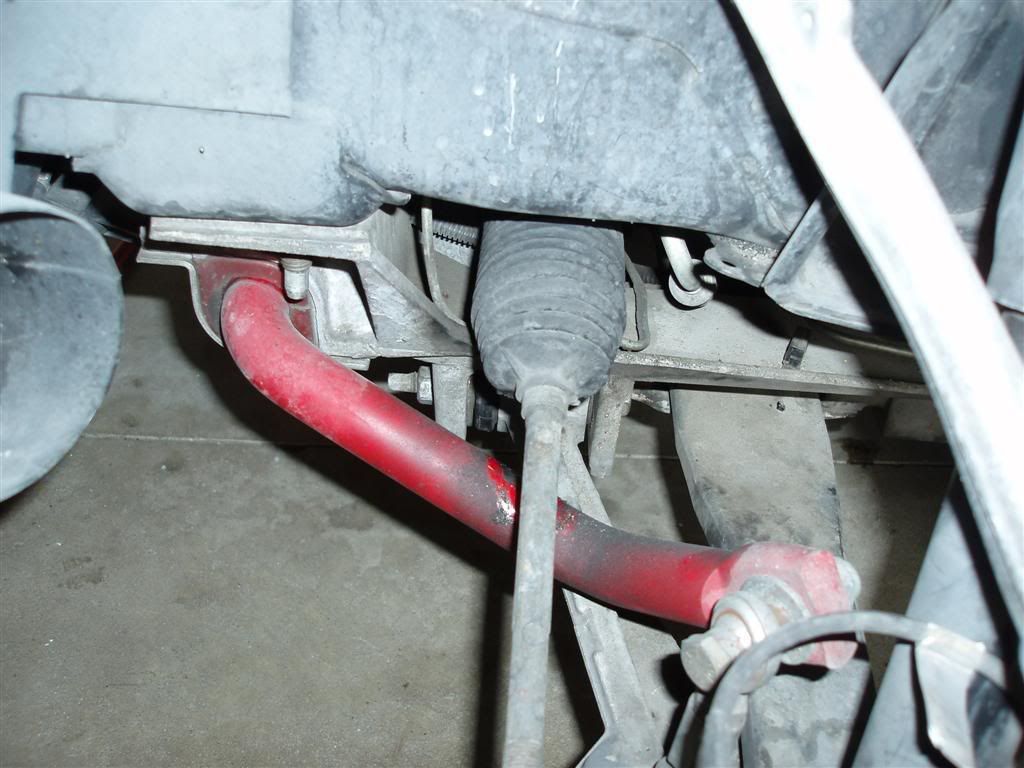
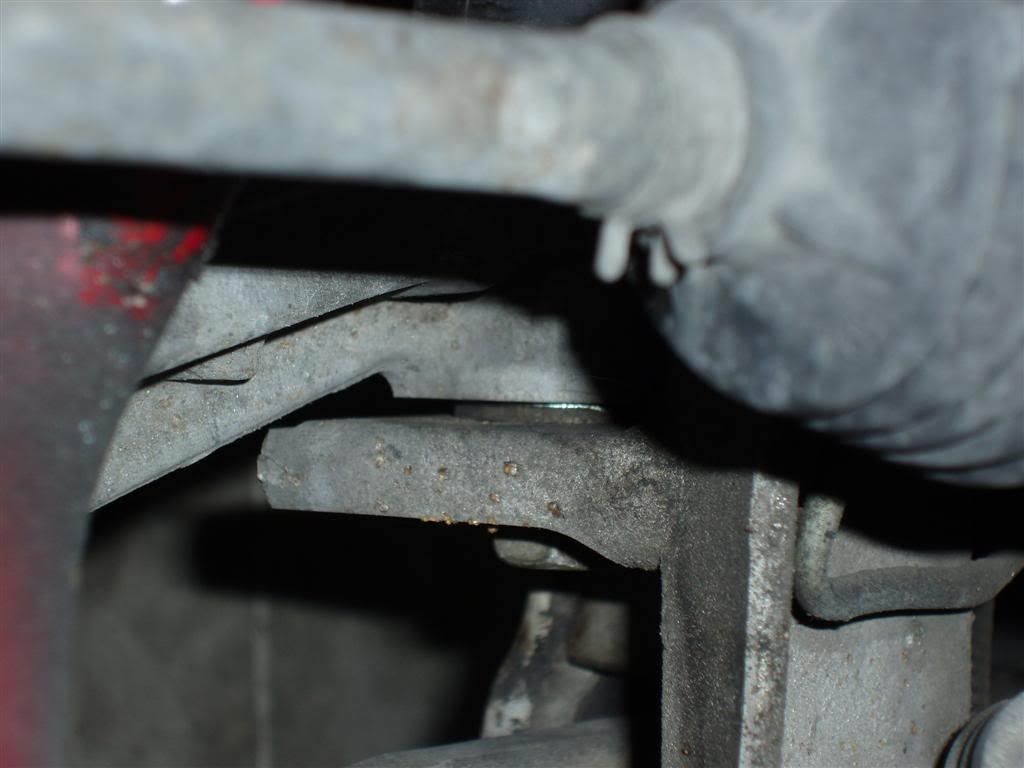
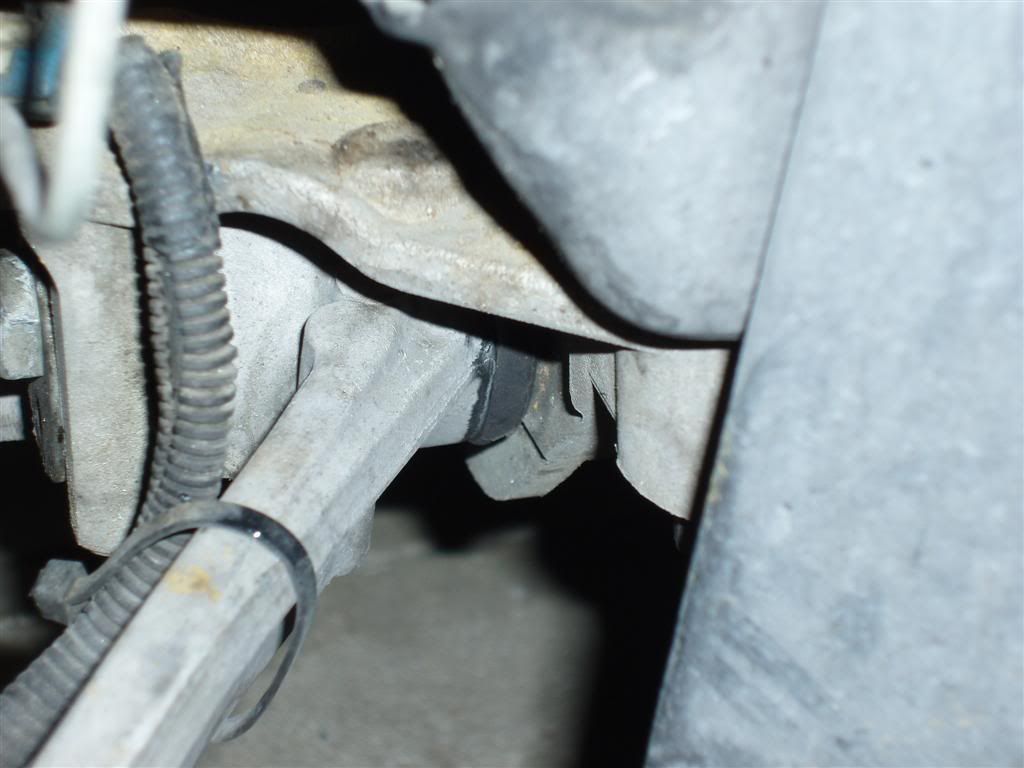
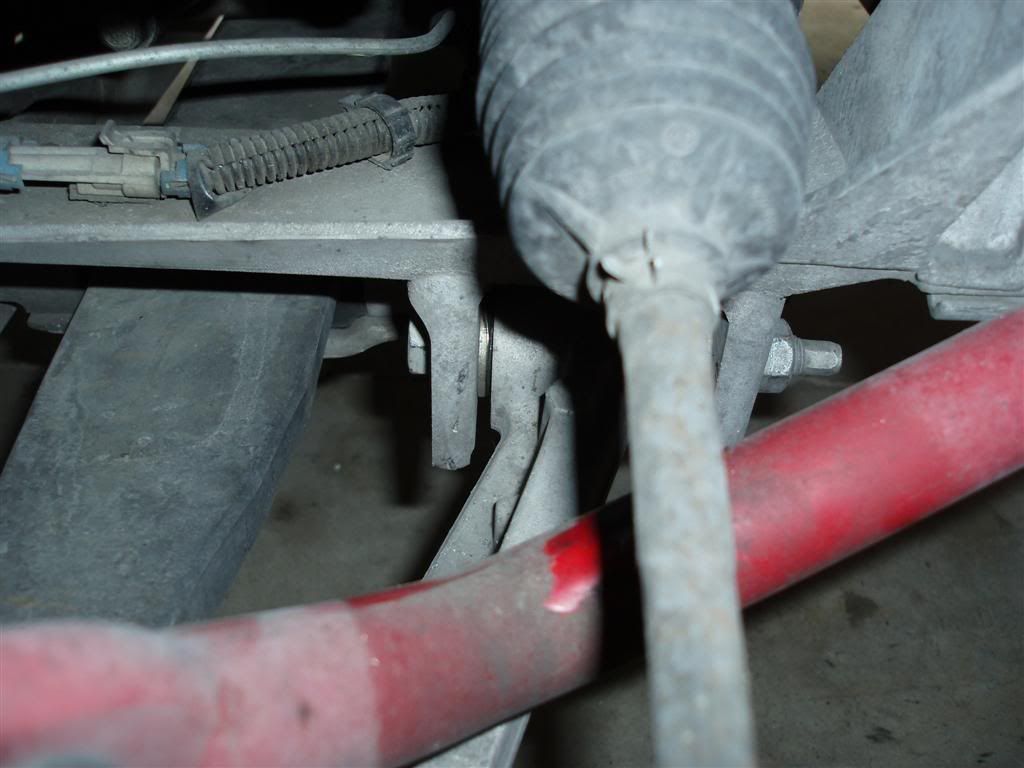
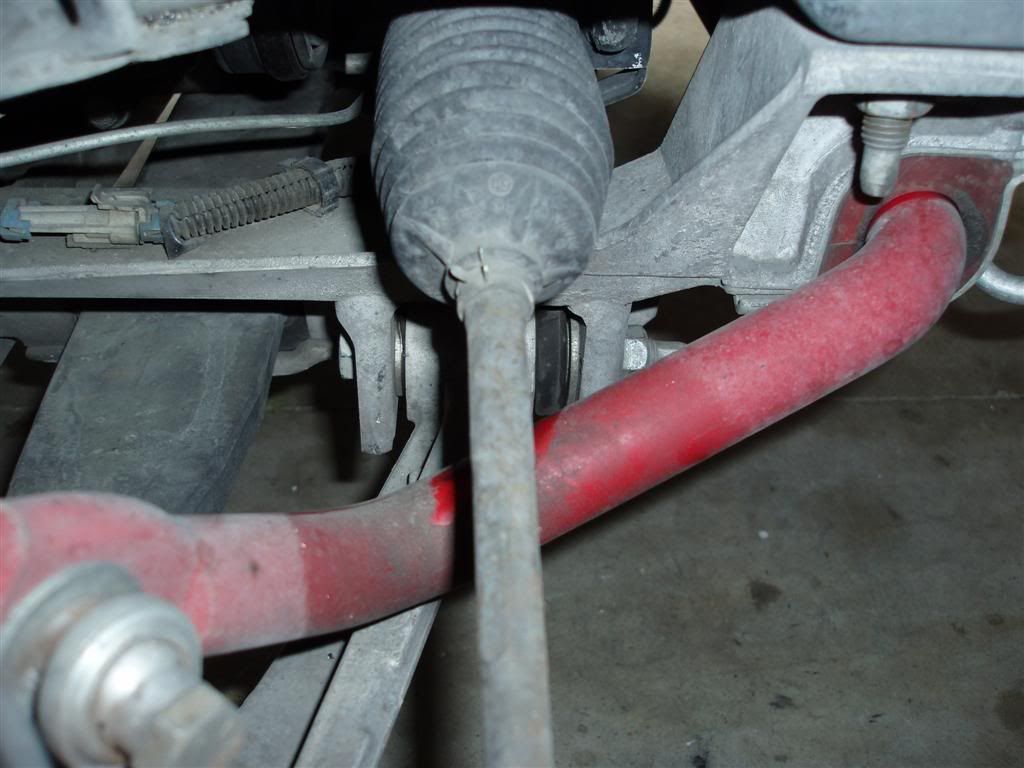
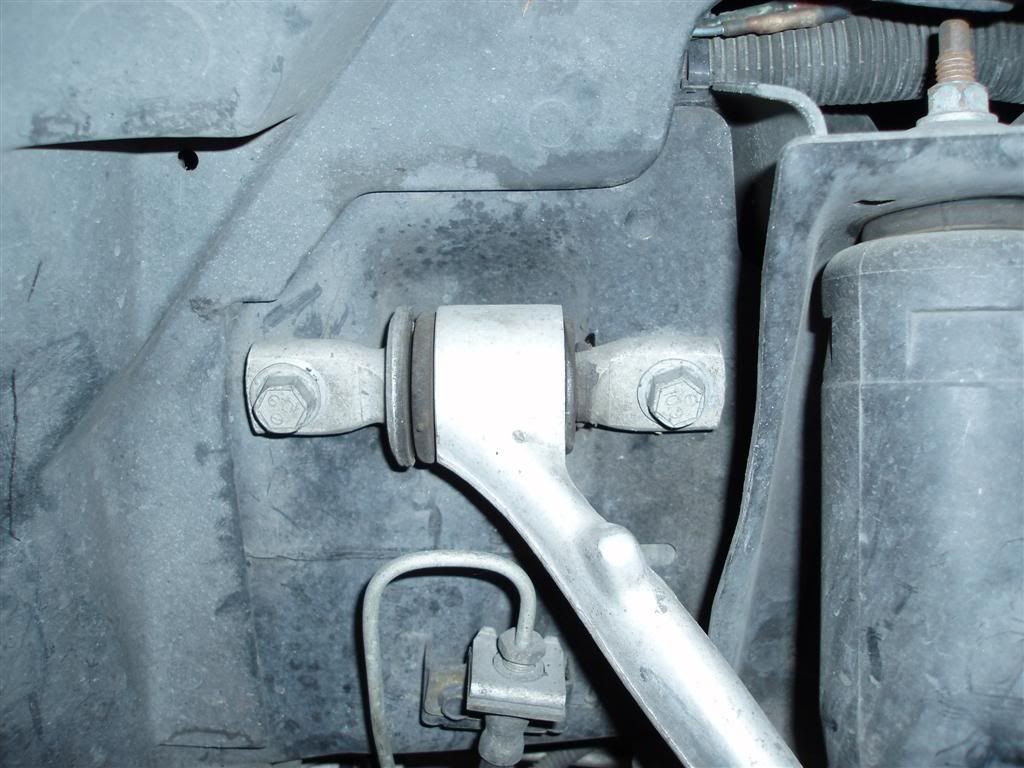
Do these look bad? If they are supposed to be symmetrical then I have problems Looks like they may have pushed out a bit.
An example of how it feels is switching lanes at 70-80mph you get this floating "Buick" front end feeling and there is at least 10 degree's of movement in the wheel before it reacts one way or the other.
Everything else looks/felt fine. Please take a look at the pics and comment. If they are bad I was going to go with the VBP bushings and a camber kit to lock in the alignment.
I did notice on the passenger side I was 6psi higher in air pressure, even after cooling down and driving home leading me to believe the alignment was really out but after a 120 mile drive at 80mph the front tires look great on both sides.
Pics, there are alot of them:


Thanks!
[edit]
After looking at the pics which are in better light than me eyeing them in the garage it looks like some of the bushings, especially a few of the lowers are brand new. I bought the car with 80k on it and have done 12 HPDE's with it...maybe they were on the way out and I just finished them off.
Well its gotten worse and after my last HPDE the car would float from lane to lane on input changes.
I brought it home and went on vacation for a week. Just pulled it apart and I've always thought I had bushing issues but this time took pics.
I checked the hub and bearing, no problems, tight and no movement at all.
Do these look bad? If they are supposed to be symmetrical then I have problems
Looks like they may have pushed out a bit. An example of how it feels is switching lanes at 70-80mph you get this floating "Buick" front end feeling and there is at least 10 degree's of movement in the wheel before it reacts one way or the other.
Everything else looks/felt fine. Please take a look at the pics and comment. If they are bad I was going to go with the VBP bushings and a camber kit to lock in the alignment.
I did notice on the passenger side I was 6psi higher in air pressure, even after cooling down and driving home leading me to believe the alignment was really out but after a 120 mile drive at 80mph the front tires look great on both sides.
Pics, there are alot of them:
Thanks!
[edit]
After looking at the pics which are in better light than me eyeing them in the garage it looks like some of the bushings, especially a few of the lowers are brand new. I bought the car with 80k on it and have done 12 HPDE's with it...maybe they were on the way out and I just finished them off.
Last edited by NoOne; 09-08-2007 at 02:51 PM.
 09-08-2007, 04:38 PM
#2
Team Owner
Member Since: Feb 2001
Location: Making my carbon footprint as BIG as possible
Posts: 23,731
Likes: 0
Received 0 Likes
on
0 Posts
Cruise-In III Veteran
Cruise-In IV Veteran
St. Jude '03-'04-'05-'06

Yup...time to replace them. Order up some VBP poly bushings... 
09-08-2007, 05:14 PM
#3
Team Owner
Thread Starter
Thats what I thought but wanted to be sure.
At least this will fix it for good.
So who has done this themselves? I've taken apart plenty of IFS suspensions but wonder what can I leave connected to do the pressing?
I have already talked to a local machine shop, I'm going to pull it apart and have them press them.
Who's camber kit should I get? Just to make sure I am understanding, a camber kill will LOCK the alignment I get in place, correct?
This is more of a manual alignment, put a shim in, take a shim out type deal?
Anything else I should do while I'm at it?
Who's camber kit is reasonable and works well? Not looking for anything that will get me more movement than stock, I just want to keep the alignment I have for more than 5 miles
Thanks
09-08-2007, 11:13 PM
#4
Tech Contributor
Member Since: Oct 1999
Location: Charlotte, NC (formerly Endicott, NY)
Posts: 40,078
Received 8,918 Likes
on
5,327 Posts
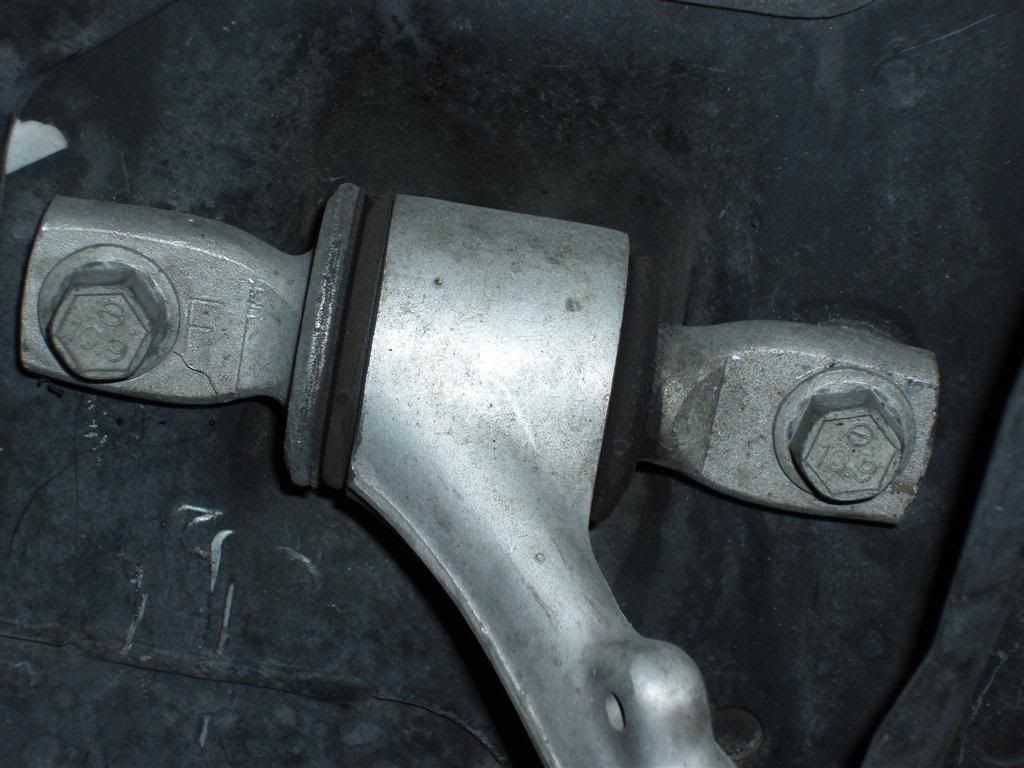
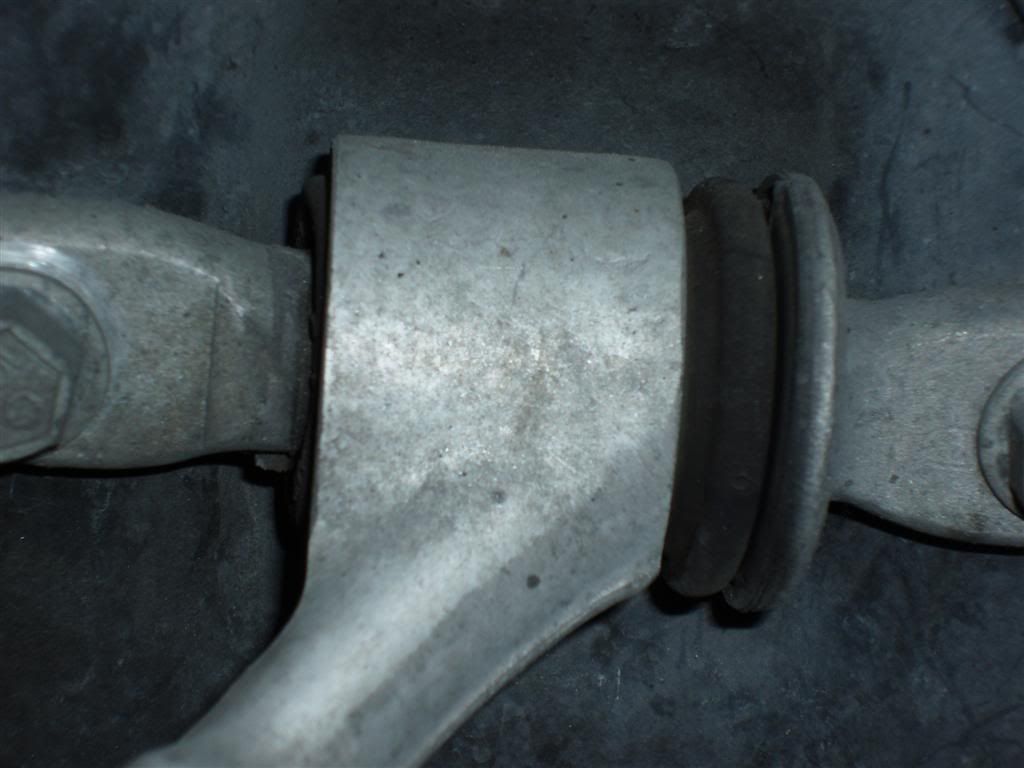
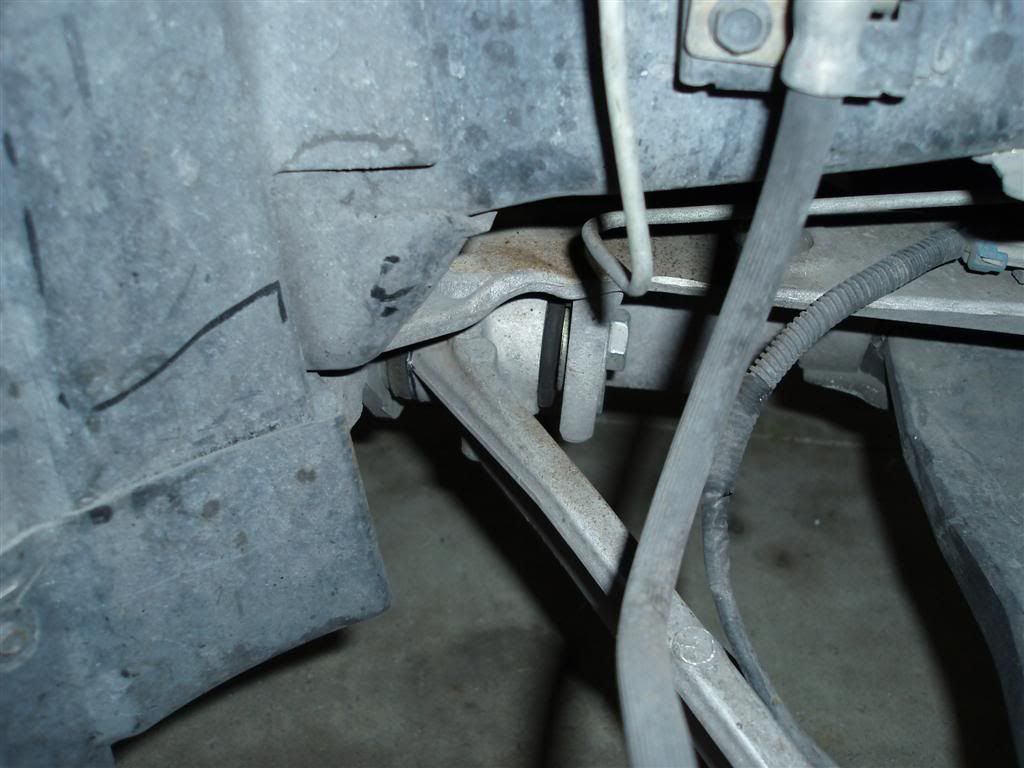
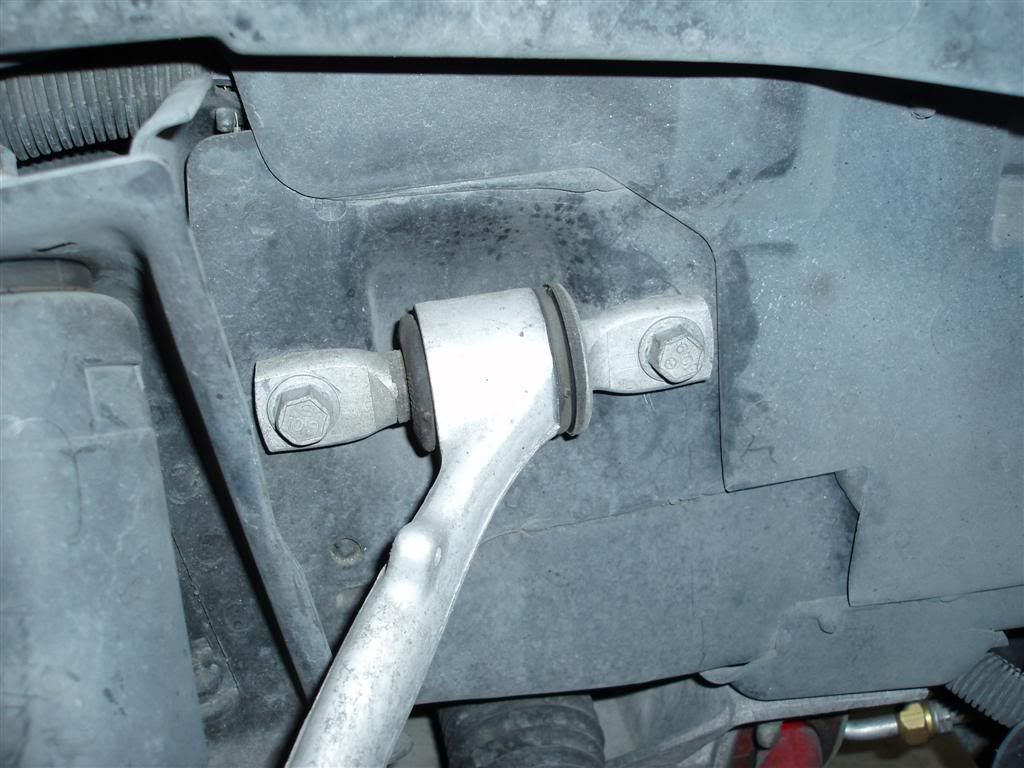
From the pics I think they are OK. I have seen much worse. I think you are looking in the wrong place for your problem. What are your current alignment readings? The bushings are not symmetrical. When the bushings go bad the LCAs usually push back on the bushing and impact the cradle.
I have never experienced floaty steering on a C5 or C6 Vette. The ones I have driven have gone where I pointed them when I turned the wheel. It takes some force to turn the wheel from straight ahead when at speed but that is probably due to the large positive caster the cars run and the fact that steering boost drops off as speed increases.
Here are some pictures of the control arms on my 10 month old at the time Z06 with 18K highway miles on it plus a picture of a brand new upper control arm.


Other than being dirtier after 4 more years and 20K hard miles (including several thou track miles) the bushings look the same. By the time I had 6 years of HPDEs/autocrosses and 24K hard miles on my 97 the LCAs had pushed back and were rubbing the cradle and I couldn't get the wheels to align.
Bill
I have never experienced floaty steering on a C5 or C6 Vette. The ones I have driven have gone where I pointed them when I turned the wheel. It takes some force to turn the wheel from straight ahead when at speed but that is probably due to the large positive caster the cars run and the fact that steering boost drops off as speed increases.
Here are some pictures of the control arms on my 10 month old at the time Z06 with 18K highway miles on it plus a picture of a brand new upper control arm.
Other than being dirtier after 4 more years and 20K hard miles (including several thou track miles) the bushings look the same. By the time I had 6 years of HPDEs/autocrosses and 24K hard miles on my 97 the LCAs had pushed back and were rubbing the cradle and I couldn't get the wheels to align.
Bill
Last edited by Bill Dearborn; 09-08-2007 at 11:19 PM.
 09-09-2007, 08:28 AM
#6
Safety Car


if they are doing that on the road it would make for some unpredictable moments!

I also agree with Bill the bushings don't look all that bad....... check the cradle for wear marks.

 09-09-2007, 09:10 AM
#7
Team Owner
Thread Starter
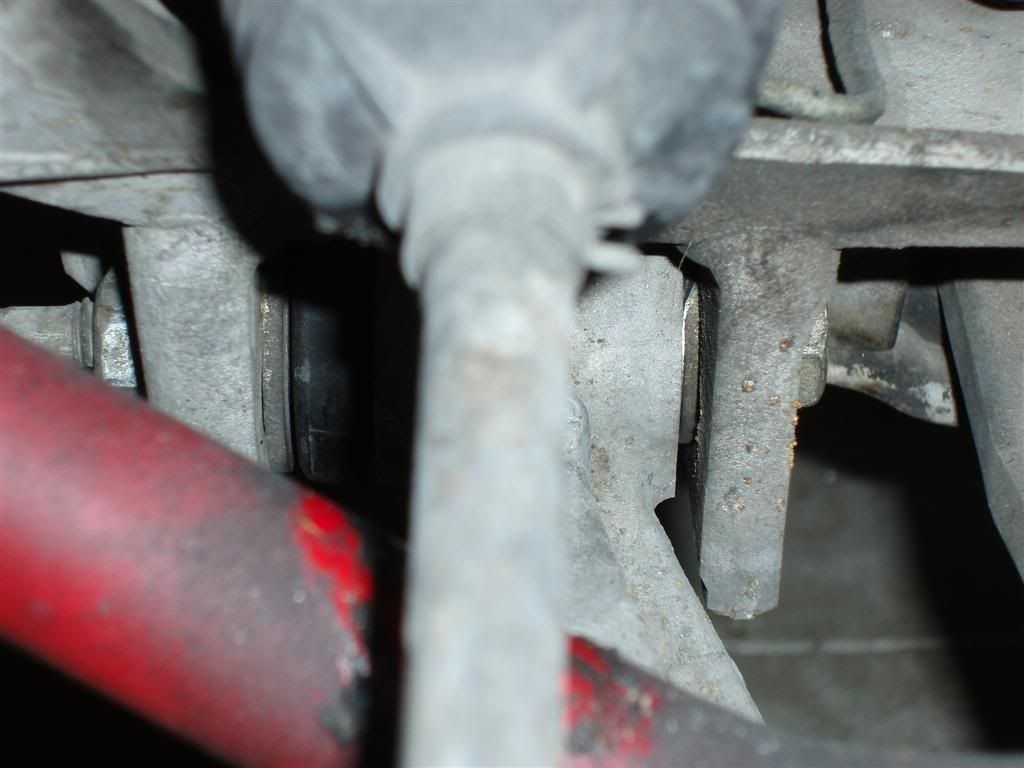
Even the 2 uppers that look pushed out?
If they are not symmetrical then that the lowers do not look bad at all but the uppers do look pushed out in at least 2 pics.
Where on the cradle should I look?
I have not had the alignment checked since I had it set last year and I'm sure its moved.
I might try to get a video camera then, drive it down a straight line and put the camera in front of the wheel so you can see how much wheel movement I need in order to get the car to turn.
I did look at the tie rod/stay bar part and it looks just like the boot itself is coming in contact, there was no paint missing from the bar or other witness marks.
Has anyone here driven a C5 and a C6? My buddies C6 steers instantly, no lag and feels much more precise, they are not even close to being the same car steering wise. Are they that different?
I had someone else drive the car at the track last time, not a C5 driver but even he commented on how how play there was in the wheel and how early you had to turn in. This is even at low speeds.
Assuming I skip the bushings and get the alignment set/checked. If I order a camber kit and have the car aligned and the kit installed then if I still do need the bushings so long as I put the shims back in the same do I need to re-align the car?
Its the end of the year and I have one more event to run. I want to spend my money once if possible.
I'll disassemble the brakes and everything today to get some better shots.
Take a look at the two upper control arm bushings again, especially the last pic, those look to be pushed out.
Tie rod ends are fine, everything else seems fine in the suspension that I could see.
The mileage of the car as it sits today is 92K.
Thanks
Last edited by NoOne; 09-09-2007 at 09:13 AM.
09-09-2007, 09:39 AM
#8
Safety Car
Eric, Mine has 90,000 also and has looked similar since i bought it wit 24,000. The pictures of Bills when new look very similar, I do remember Bills original problem with his 97 and seem to remember seing pictures then of some ones with very obvious wear on the lower control arms at the back wher it would move back under hard braking, the wear marks would show if the bushings were real bad. if your tearing down I'd say you would not be unhappy with the results of putting in poly from VB the poly does add precision to the car! as far as making it ride harder or noisier I haven't doen it in a C5 vette however it was a real nice addition in my Fiero (long time ago) if your going to add camber plates it's cheaper to do it all at once!
09-09-2007, 10:26 AM
#9
Team Owner
Thread Starter
I've thought of the poly's for a long time.
One of the guys who is instructing at our next HPDE just put poly's on his C5 and said it took away all the numbness in the steering and made it far more precise. I wish I would have had him drive my car now since he had just done the switch.
Its not a tough job and in the grand scheme of things pretty cheap for the performance improvement.
I thankfully can take all the control arms to work and get them pressed for me so that is another big reason I'd do it, all I need to do is disassemble and re-assemble.
Who sells a reasonable camber kit? I'm not looking to go with any extreme race setup so anything that allows the stock range of movement would be fine.
Some more info if this would help make any sense of it.
On the street the car was always what I'd consider fine. On the track it always felt ok, not great, but ok. I'd notice in a few corners especially very tight right handers coming out of a S curve that no matter how much steering I dialed into the right the car took the same path.
If if I oversteered the corner the car would not get upset and take the same line, I mean even if I cranked WAY too much wheel to the point where the AH should have taken over it just kept on its line so it seemed like the force of the tires was overcoming the force of the steering which unless there is some compliance I don't think should ever happen. The car should have understeered and back end come around.
On the straight away at Grattan which does not seem particularly bumpy the car would seem loose. I'd come up onto the straight and hold 3rd gear until I get the car into a proper line towards the inside grass, back on the gas and into 4th. Once into 4th I'd come across the track and to the outside. Around 120-135 the car would get very bouncy and felt floaty.
The track doesn't seem bumpy there at all. Braking hard would require some steering input, just enough to make you plan a bit more for the turn in to the right.
After doing that sequence the last time I cracked a rotor on the drivers side. I pulled in and the pulsation went away under 40. I checked the car out, could not find a problem and went back out.
Now nearing every just 100mph and the car got floaty and upset. The pulsation came back over 40mph so I did crack it, just not enough to really be noticeable at low speeds.
I drove the car home and in a straight line it was OK but any hard acceleration or lane changes caused the front to float and again I had a good 10 degree's or more of wheel movement before I had any change in direction.
I can feel the wheel is mushy in those first 10-15 degree's. The car is also mushy under hard braking.
I checked the hub/bearing but again I'll check it today with the brakes off but there was no movement.
09-09-2007, 11:04 AM
#10
Safety Car
two things to look for, wheel bearing (hubs) run out .005 max at top stud. next check ball joints for play .125 verticle movement max when supporting the lower control arm
Document ID# 666982
2002 Chevrolet Corvette
--------------------------------------------------------------------------------
Wheel Bearings Diagnosis
Tools Required
J 8001 Dial Indicator
The following procedure describes how to inspect the wheel bearing/hub for excessive looseness. If you are inspecting the wheel bearing/hub for excessive runout, refer to Hub/Axle Flange and Wheel Stud Runout Inspection in Vibration Diagnosis and Correction.
Raise and support the vehicle. Refer to Lifting and Jacking the Vehicle in General Information.
Important
If you are inspecting the FRONT wheel bearing/hub, support the front of the vehicle by the lower control arms in order to load the lower ball joint.
Mount and secure the J 8001 to a stand.
Ensure that the J 8001 contacts the vertical surface of the wheel as close as possible to the top wheel stud.
Push and pull on the TOP of the tire.
Inspect the total movement indicated by the J 8001 .
If the measurement exceeds 0.127 mm (0.005 in), replace the wheel bearing/hub. Refer to Wheel Bearing/Hub Replacement - Front in Front Suspension.
--------------------------------------------------------------------------------
Document ID# 666982
2002 Chevrolet Corvette
--------------------------------------------------------------------------------
Document ID# 666982
2002 Chevrolet Corvette
--------------------------------------------------------------------------------
Wheel Bearings Diagnosis
Tools Required
J 8001 Dial Indicator
The following procedure describes how to inspect the wheel bearing/hub for excessive looseness. If you are inspecting the wheel bearing/hub for excessive runout, refer to Hub/Axle Flange and Wheel Stud Runout Inspection in Vibration Diagnosis and Correction.
Raise and support the vehicle. Refer to Lifting and Jacking the Vehicle in General Information.
Important
If you are inspecting the FRONT wheel bearing/hub, support the front of the vehicle by the lower control arms in order to load the lower ball joint.
Mount and secure the J 8001 to a stand.
Ensure that the J 8001 contacts the vertical surface of the wheel as close as possible to the top wheel stud.
Push and pull on the TOP of the tire.
Inspect the total movement indicated by the J 8001 .
If the measurement exceeds 0.127 mm (0.005 in), replace the wheel bearing/hub. Refer to Wheel Bearing/Hub Replacement - Front in Front Suspension.
--------------------------------------------------------------------------------
Document ID# 666982
2002 Chevrolet Corvette
--------------------------------------------------------------------------------
Last edited by ErnieN85; 09-09-2007 at 11:10 AM.
09-09-2007, 01:28 PM
#11
Premium Supporting Vendor
In my several years of tracking my 02 Z06, I have found that the a-arms move around a lot. In general, my lower front a-arms tend to slide aft over the course of a season. As they move, I was very surprised to see how much of an impact there is on the alignment. As the lower a-arm slides aft, caster will go down and toe will go in (a lot). If you are not regularly checking your alignment, you may find it is way out of whack.
In SCCA T1 class, I can only use stock or GM T1 a-arms, which have slightly stiffer rubber bushings. Even with the T1 a-arms, I still generally replace my a-arms every season.
If my car was just a track day car, I'd probably look at other options such as poly bushings that I suspect will hold up better over time.
__________________


C66 Racing #66 NASA ST2, SCCA T2
AMSOIL Dealer (Forum Vendor)
AMSOIL Ordering Information (Retail sales using reference #1206638 benefit the forum.)
AMSOIL Preferred Customer Program (Members buy at Wholesale - a savings of about 25%)
AMSOIL Catalog
C66 Racing #66 NASA ST2, SCCA T2
AMSOIL Dealer (Forum Vendor)
AMSOIL Ordering Information (Retail sales using reference #1206638 benefit the forum.)
AMSOIL Preferred Customer Program (Members buy at Wholesale - a savings of about 25%)
AMSOIL Catalog
09-09-2007, 01:59 PM
#12
Team Owner
Thread Starter
I've heard the poly graphite VBP's don't ruin the ride nor do they squeak.
For the amount I drive the car I can live with them. If the improvement in handling is as good as they say, plus it gets rid of the problem and the guess work then it'll be worth it.
For the amount I drive the car I can live with them. If the improvement in handling is as good as they say, plus it gets rid of the problem and the guess work then it'll be worth it.
09-10-2007, 03:31 PM
#13
Racer

Member Since: Jul 2005
Location: Atl Ga
Posts: 269
Likes: 0
Received 0 Likes
on
0 Posts

I just did the VB&P poly install. Made a huge difference in my car. Car always felt a little vague even with the coilovers. Now the thing feels like a go-cart. Don't let anyone tell you it is particularly easy though. Its a good days work and damn messy if you are using the sawzall/torch method. 
09-10-2007, 04:05 PM
#14
Team Owner
Member Since: Mar 2001
Location: Virginia Beach
Posts: 25,889
Likes: 0
Received 5 Likes
on
5 Posts
CI 3-5-6-7-8 Veteran

After running VIR Grand East w/ Mazdadrivers over Father's Day weekend my front lower bushing finally gave out. It didn't help that I was running 315/17 V710's on 17x11s up front 
I took the plunge and spend the extra money to have the full VB&P kit installed. It was the first mod I've paid to have done due to the involvement of the install and not having the time. Had them done locally by local member Greg Koteski (Roadrace65), he runs Gregory Performance on the side and has done a bunch of installs. He uses a special grease and spiral grooves the bushing to retain grease when installing.
My car does squeek over very large dips, but other than that it's quiet under almost all driving situations. It's much firmer and handling feel is like a go-kart. On track w/ Mazdadrivers again the weekend before last the car was a joy to drive.
Also, check your tie rod and toe rod ends. The oem ones have plastic internals which can/will loosen up and deform over time. I have replaced mine w/ VB&P Heavy Duty units. They are all metal inside and have a zerk fitting to grease every now and then.
Hope you get to the bottom of it... FWIW those bushings look poor to me. The fact that you cannot see rubber on the back side of the front lower arms means they've moved forward.
09-10-2007, 06:25 PM
#15
Melting Slicks

Member Since: Sep 2003
Location: If you don't weigh in you don't wrestle Road America
Posts: 3,031
Likes: 0
Received 73 Likes
on
54 Posts
I've installed 3 sets of the VB&P bushings and I definatly wouldn't say the install is easy, but it's not too bad. I think the worse part is the removal of the old bushings.
The upper bushings you have to cut the ends off so you can press them out. This may not sound hard but when you are trying to cut through aluminum and rubber it makes it tough. I use a Sawzall and have someone spray silicone spray on the blade so it cuts easier. I can't imagine how people cut through with a hacksaw. The lowers pretty much just press out. Once the bushings are out it's easy to assemble.
Once you have the bushings done I really don't think you need a camber kit. Just mark the ecentrics after the alignment and you will know if your alignment moved and be able to put them back. I marked the ecentrics on 3 cars that are tracked once a month after the install and so far none of them have moved. The nice thing about the bushings is that you know that your alignment specs will stay where you put them.
I had one friend that used to wear out the last 1" of tread on the outside of his LF tire with -2.5 camber, once we changed the bushings you can literally see the tire is wearing closer to 3" due to the firmness of the bushings.
VB&P polys are the way to go
09-10-2007, 07:05 PM
#16
Team Owner
Thread Starter
Thanks for the info.
I ended up ordering the DRM bushings instead of VBP. They are the same bushings except the DRM's you reuse the metal inserts.
For the cost and the fact I get the pressing in/out done for free I went with the DRM setup.
I also talked to Gary at Hardbar and ordered his camber kit along with the stud kit.
Gary sold me on the easy adjust ability and the idea of running 2 setups, one for track, one for street. Having the ability to change it in the garage without having to get it re-aligned was a big selling point.
I wasn't familiar with this but I'll mention it since it sounded like such a good idea. I asked Gary for a half way point between street and track for an alignment. He said I'm far better off running a dedicated alignment but that gets pricey since I can't do my own alignments.
He suggested aligning the car with washers and the stud kit in the front. I'll get the car aligned for the track and have the toe set. I'll put those washers in a bag and mark the tie rod. Then I'll have it aligned for the street and have the toe set, again marking the tie rod.
So now when I do the brakes I throw on the track washer setup, crank the tie rod to its track position and head out, then vice versa when I get home.
I will look into the VBP tie rod ends and check mine out.
I'm not sure who I talked to at DRM but they and Gary were more than helpful.
DRM did tell me the camber kit wasn't necessarily a must have but they said they crank the hell out of their bolts to get them to stick. In a shop where you can replace something if it goes wrong that made sense but for me I'd prefer the safety of the camber kit to get the same results, plus it offers simplistic adjust ability at home.
Now I'm excited to get this all setup and see how it does.
Last edited by NoOne; 09-10-2007 at 07:08 PM.
09-10-2007, 07:55 PM
#17
Le Mans Master

Member Since: Feb 2000
Location: Bedford NH
Posts: 5,708
Likes: 0
Received 1 Like
on
1 Post
Cruise-In II Veteran
Thanks for the biz, the kit went out today. I remove the inner sleeves of the OE bushings by heating the inner steel sleeves with a common propane torch and then just push it out. Once the rubber is not under compression, it just comes out with a screwdriver. After that the urethane kit goes in pretty easily, but use lots of grease.