

 02-20-2015, 05:51 PM
Last edit by: IB Advertising
See related guides and technical advice from our community experts:
Browse all: Exterior How-Tos
- Corvette Best and Worst Value Modifications
Important information to help you understand your Corvette.
Browse all: Exterior How-Tos

C5 Track Car \ HPDE Conversion: What I have learned!
08-21-2009, 07:26 PM
#1
Terminal Vette Addict

Thread Starter
Ok, after several attempts... blunders… and LOT$ of wasted money. This is what I have learned so far, and hopefully it saves others money in the process. Of course it’s just my opinions, please do not flame. I am just tired of spending money, and I wish I had read something like this before I started my track car modding obsession. It also helped to know that it would become a track car. Originally I went with the idea of just modded to “look fast and be cool”. One auto cross, I had to try HPDE. One HPDE and I’m an addict... and this addiction makes heroine and crack look cheap once you get the speed addiction to keep going faster and faster on a Road Course. Thank goodness for the Corvette Forum! Each thing I did I read extensively about, but sometimes the perspective they give is not one for the track. You find what works on the street vs. track is not the same. Pretty cross drill and slotted rotors is a great example of this!
I would like to take to opportunity to make a couple of acknowledgements and thank you's after its been dozens of hours in modifying and writing this and hundreds of hours f-cking with my car :-) Thank you to my kids for putting up with this obsession, it does take a few nice weekend afternoons away from family time. Thank you to Tony aka AJG1915 for the use of his lift, garage, tools, general knowledge and putting up with my bad sense of humor. And to all those on the forum who's shared insight and knowledge made my screwed up projects and blunders easier to fix with a few hours of advanced searches from time to time. Hopefully this article is a give back to the rest of the community.
The Commentary below is NOT suggested to be done in any particular order as "do mods in this order". It was done as I thought of parts and stuff.
At the very end, I make my suggestion on the order of Mods... and why.
These are the parts I found work best, why, where to get them… and some commentary to go with. Also you can read this one of two ways, beginning to end for an idea of what you are getting yourself into, or as a reference set up by section when you are "ready" to do a certain mod, upgrade or repair its a one stop spot to learn before you make the same mistakes myself and the dozens of other persons posting and experiences have helped contribute to.
Oh, and for the record make sure to see the books section, for under $20 the title GOING FASTER! Mastering the Art of Race Driving is the best high performance dollar for dollar mod you will spend.
And check back often, this is a work in progress. It is updated at least weekly and in the "season" might be updated as much as daily. Yes, I have no life. J/K Oh, and if you do not "wrench" your own car, you need to learn how. Your car will require a crap load more maintenance once you decide to HPDE and if you pay for others to do the work, I hope you are a CEO of your own company.
FIRST TIME to HPDE? Thinking this will be a hobby? Here is an article for all 1st timers to read, form the perspective of an instructor... after a fatal crash at Road Atlanta in August 2015. It may help you understand whats important as you start planning your $$$ on where you are going to spend it for the car. Safety first, speed second. (http://www.motorsport-safety.org/med...t-road-atlanta)
Since the most commonly track supped up C5 Corvette tends to be the Z06 and FRC, then coupes (rarely Verts) you might want to check out any basic OEM Z06 type FAQ question in this very nicely put together thread from a fellow sadist MAJ Z06 on the CF: (http://forums.corvetteforum.com/c5-z...tions-faq.html).. Once you get your basic OEM Z06 questions answered this thread takes your car to the next trackable level.
Quick reference page for all C5 Weights, Measures, Ratios and other technical #'s: (http://forums.corvetteforum.com/c5-g...ngths-etc.html)
Other Quick Reference Items thanks to David Farmer:
C5 Trouble Codes: (https://dl.dropbox.com/u/1634366/c5-dtc.pdf)
C5 Fuse Layout: (https://dl.dropbox.com/u/1634366/c5-fuse.pdf)
C5 Complete Parts List: (https://dl.dropbox.com/u/1634366/C5-PartsManual.pdf)
C5 Torque Specs: (https://dl.dropbox.com/u/1634366/C5torque.pdf)
C6 Trouble Codes: (https://dl.dropbox.com/u/1634366/C6-DTC.PDF)
C6 Automatic Torque Specs: (https://dl.dropbox.com/u/1634366/C6-Torque-Auto.PDF)
C6 Manual Torque Specs: (https://dl.dropbox.com/u/1634366/C6-Torque-Manual.PDF)
C6Z06 Torque Specs: (https://dl.dropbox.com/u/1634366/C6Z06-Torque.pdf)
C5 Prodcution Numbers and Production Facts: (http://www.vettefacts.com/C5)
Lastly, it was put to me by one person "who am I to make all these comments?" Answer: I'm a no one. A nobody. I'm not a pro racer. I'm not some sponsored guy with a mechanic and pit crew. I'm Joe Blow HPDE. I'm some guy who works in his driveway on jackstands with substandard tools, no air compressor and has zero formal training in automotive repair. Thank god for Harbor Freight making my tools cheap & the Corvette Forum as a resource to help me through my projects... oh and to Band Aids for covering all the bleeding knuckles
I'm a doctor if you must know my day gig, usually getting yelled at by my office manager making updates on this between patients visits. THAT'S WHY I WROTE THIS! The pro's aren't reading this, they have people they pay to do it for them. I wrote this from the lay person for the lay person who like me is learning on the fly. My commentary should be taken with a grain of salt, just like any opinions out there. But, I have no axes to grind. I'm not a vendor competing with another vendor saying "mine is better" and I'm doing this for free without any influences of vendor money. You get real commentary from both my own experiences, others I know and the combined wisdom of the CF forum all boiled down into one spot without having to search for hours to find answers. Or more commonly having an issue in a build project, it goes awry.. then research AFTER the problem has occurred to find out what you SHOULD have done. This hopefully is a PRE-project resource so you can do it right and prepped the first time.
Jacking Pucks, Frame Savers & Jacks:
First for those new to working on their own C5, read this jacking safety & how to thread: (http://forums.corvetteforum.com/c5-g...ting-pads.html)
I start this several page book with this section for one reason, don't assume that everyone reading this is experienced. Don't assume that everyone reading this has owned their car for years. Don't assume that everyone reading this even owns a wrench. You will need 4 Jack Pucks before you ever start doing an HPDE. These go into the oval shaped slots under the car near the front and rear of each door. They are a must. I am adding this section first because I see way too many people trying to lift their car on jacks without them and damage their fiberglass. Plus the pucks make it very easy to have the car sit firmly and SAFELY on the jack. 3 places to get them:
How to use a Jack Puck to lift a C5 on YouTube Video:
(
) - use them
(
) - make your own these guys are a hoot
-Elite Engineering for $60 Shipped set of 4 - (http://www.eliteengineeringusa.com/jacking-pads.html) I like these because they have a "tread" on the bottom so they stick the the rubber jack plates easily. Also the smaller "t" on top makes it easy to pull them out. the larger T pucks can **** you off when you turn them you swear in a circle 10 times and they don't come out. Oh, and did I mention them come in red and blue :-)
-CustomCorvetteAccessories sells them $80 for a set + SH (http://www.customcorvetteaccessories...kingpucks.html). These are square which have some advantages, but I have to say I like the round style better and the EE ones cost less.
-Katech Performance has them for $20 each + SH, and these are truly nice with rubber top and bottoms, and the T releases quite well. They are a bit tall though, and for slammed low cars not so easy to get under like the EE ones. Only comes in blue anodized with black rubber. (http://store.katechengines.com/jacking-puck-p68.aspx)
I have a set of both the EE and Katech ones. One for my garage tool box, and one for my "track side tool box" so I do not have to think when leaving for en event "did I pack those?"
Frame Rocker Savers are a nice thing to add for very low car to avoid speed bumps tear up your cars body panels. Also in a pinch you can actual jack the car up off these points, or jack the car up form the pucks and then rest the car on a wood stack of blocks etc on these. Either way, a nice addition to the underside of the car for both street safety to your underside and jacking at the track in a hurry. i have tried a few, and right now for the $$ I like the Elite Engineering ones. (http://www.eliteengineeringusa.com/Rocker_Savers.html) for $60 shipped its a nice piece. See some of the other sections here, because i recommend many of the EE parts, and you might be able to swing a deal for ordering several items at once. When installing, DO NOT try to follow the rocker panels! Install your pucks first, put the rails up to the pucks. Move them now 1/8" or more away form the pucks. Then two sided tape. See if the pucks will drop freely in this position, if not move a bit and redo. Mine were marked wrong driver/passenger so make sure that when they are up neither side of the rocker savers sit on or touch actual body panels. If they do, switch sides. Also I saw that they once in the "right spot" were a bit too far into the vehicle and didn't sit well for my liking. I wanted more frame under them. So I took one puck and traced the circle into the piece, then took a Dremmel and the tile cutting drill bit, put them in a vice and went to town. I made the cut outs a true circle not an ellipse and this allowed them to sit more solidly for my car under the frame and not so they stuck out 1/8" past the edge. Next mark your hole in the middle first, pre-drill the hole with a small bit and then follow up with the self taping screws. I have sat the entire weight of my car on wood blocks right on these black plastic strips with no cares about my cars safety. nice thing is that since they are solid plastic and TOUGH to cut up... no ScReaChing when they hit like aluminum. No color changing after being scuffed up. Until another product comes along better than this, its the only one I like. I had aluminum ones, I switched recently to these.
Ramps:
Rhino Ramps $40 ( ) you can usually also buy these at Pepboys. Good for backing up easily with the rear wheels, and then you can jack up the fronts. For the fronts if your car is low these might not work without using a 2x6" plank to step up to the ramp. Nice thing is these are cheap, and its a great way to put the car up on 2 jacks, and then lower the car on the ramps. You can use 4 of these for setting up and changing your sway bars as well in this manner.
Race Ramps $139 ( ) for the 56" version for the truly low. Race Ramps are light, strong and easy to use. Check out all the other products they have including alignment pedestals & wheel cribs.
Homemade Wood Ramps for about $60 with How To Video on YouTube:
Part 1 (
)
Part 2 (
)
Jacks & Stands:
Harbor Freight Race Jack 3000lb Aluminum $99 but $60 with coupon(http://www.harborfreight.com/automot...ack-91039.html) is the cheap entry level jack of choice for both light weight, ease of use and low profile to the ground. If the 3000lb line makes you nervous step up to the Harbor Freight Low Profile Jack 4000lb Aluminum $139 when on sale (http://www.harborfreight.com/automot...ack-92782.html) be warned though you do hear of issues with these jacks failing now and again from improper factory hydrolic bleeds. So keep your operating instructions and if it acts funny, bleed it. Use jack Stands for safety.
Tire Rack Race Jack $169 (http://www.tirerack.com/accessories/detail.jsp?ID=67) good and lasting quality. Just not as cheap as the Harbor Freights. If you need stand also the Tire Rack Race Jack & Stand Combo $219 (http://www.tirerack.com/accessories/detail.jsp?ID=68) is a nice deal.
If you want an alternative to the usual jack stand, and you are putting the car up and leaving the wheel on, here is a great alternative from Race Ramps (http://www.raceramps.com/wheelcribs.html)
How to Jack up your C5 rear end with a homemade Lifting Pad on YouTube:
(
)
Shifter:
Get rid of that sloppy P.O.S. stock manual C5 shifter - the whole box! Throw it away!
Get the C6Z06 upgrade. It replaces the ENTIRE shifter mechanism, and its a easy install for anyone with a tool box. No real experience or skills needed, just read the walk through on the website. One thing you do need is a torques head for the retaining bolts so read the walk through before you start the project & you can get it at Napa, etc for like $5. Buy the shifter kit from GMpartshouse (http://www.gmpartshouse.com/c5partslist.html) part# c6z06shifter for $195 (Gene Culley rocks, all OEM GM vette C5/6 new parts cheap here). Wholly crap is the stock C5 shifter awful & long in shifts! I felt like a was busting my knuckles on the HVAC unit in the stock config! The stock C5 is sloppy, and you will miss 3rd most commonly on fast shifts from 2 to 3 which if you dont catchyourself and let out the clutch into the wrong shift you can damage the syncros fast and cause $$$$ damage to your driveline. This change out = perfect and predictable shifts = lower lap times, less transmission damage from missed shifts to the wrong gear = less synchro damage & safer driving. Just do it! Gene, where's my kick back! Haha!
If you really want to make it sublime - MGW (http://www.mgwltd.com/corvette.shtml) top end conversion which will make your throws very very short, needs a bit more Umpf, but perfectly finds 3rd, ZERO slop or rocking. I put my MGW in (30% reduction one) in my car March 2010. Its weird, I kinda miss the "wiggle wiggle" in neutral to make sure you are there. This is gone, 100% gone. It is amazing how accurate this thing is, especially in the push up from 2 to 3 = it just glides and goes true. 3 to 4 is just a wrist flick. Now reverse... It find true, but you are POSITIVE you are in 5th when you put it there. So positive, you always let out the clutch with trepidation in reverse... every time. On the track the shifter gives you confidence, until it doesn't. I was downshifting (heel toe) into the Karoseul (Neurenberg Corner) on Shenandoah at Summit Point and went form 4th to 3rd - the quick shift and I missed 3rd and cant find it grind it. Besides that one issue, the shifter gets less weird feelign with each lap. You still "want" to push it left and right, but don;t have to. That's the probelm, its so close in the gears that you "over shift" until you are used to it. I got Pocono coming up which while a really easy track, you do shift 2-3-4 often, and I'm confident after your 2nd weekend on the track the MGW will be second nature and I will wonder how I survived without it.
Why are theses issues, well I like putting my hand on the shifter and "knowing" from the position alone what gear I'm in without thinking... you can't do that with the MGW. Maybe a 15% or 25% instead of a 30% would allow that crap what I'm used to OEM feel? After a season on the MGW now, Im totally fine with the 30%, it was a sharp learning curve but well worth the time invested. How can you live without at least the C6 Z06 kit upgrade when fast shifting on the track I do not know! For the $$ these are the single best mod you can do for your driving performance in the car on driver feel is the C6Z kit. The MGW is not necesary, but the Z06 kit is mandatory of you Autox/HPDE. If you retain the use of your C6 **** with your MGW kit, I highly suggest that you BLUE locktite in the torque screw that holds the handle on. The tighter box and shifter creates a ton of vibration in the shifter and my screw loosen up 2x before I locktite it.
Disable the CAGS or Computer Aided Gear Shifting (http://www.corvettegarage.com/produc...-corvette.html or http://www.corvettesofhouston.com/pr...products_id=62) ASAP either with a hard plug shown in the link or an engine PCM tune. The CAGS is the annoying option that keeps the EPA numbers better buy forcing shifts from 1 to 4. On the track this is a deadly pain in the ****! Get rid of itASAP! If the shifts still feel too notchy, aka hard to push into each gear, the AntiVenom Mod (http://forums.corvetteforum.com/c5-g...-done.html)you can research on the forum will make the shifting easier for about $5 in washers and some elbow grease. Be wary to NOT over shim or the shifter gets so sloppy it wont hold the gears under higher RPMs.
Traction Control Settings was a suggested quick early comment to make. This is the: ON / OFF / COMPETITIVE MODE settings. Suggested use for new drivers on their first weekend is leave all the nanny's ON, meaning let the car babysit your poor skills. Your stock C5 is way more car than any new driver can handle, and on street tires the rear end will want to come out easy since the normal street tires typically aren't grippy. ESPECIALLY in run flats! FULL ON for your first event or two until you understand the basics of car control for saftey. Crashing = bad FYI. After Event #2 going to competitive mode is a good idea, since the car drives itself less, you can "feel" the car better and learn the ins and outs now of "race driving" during your time around the track. You should never do this though until you feel comfortable and not nervous driving the track in HPDE. Once you are a solid intermediate you might want to carefully experiment with traction control full off which will allow you to start hell toeing, trail braking etc and learning the advanced stuff. If the track is wet, leave competitive mode on, always. Don't trust these things on a wet track unless you are a advanced and experienced driver. Those back wheels break loose FAST and if you don't know how to recover you are a goner. Some early C5's have no Competitive mode. The 1999 to 2001 I think it is you have to be FULLY stopped and hold the button in for 10 secs to get the display to change over. From 2002 to 2004 I believe you can just make these changes on the fly without being completely stopped. Don't get cocky, use it until you know you know that you will be safe.
Tunnel Plate & Oil Catch Can & Radiator Screen:
Elite Engineering plate with thermal pad stiffens your body flex which is so common a complaint from race driers of the C5 chasis especially over a hill in a turn. The stock plate is about 1/32" think and you can flex it with your hand. The EE plate is thick, light & cuts ALOT of heat out of the center tunnel (http://www.eliteengineeringusa.com/C5Products.html). It is suggested you do the Tunnel Plate at the same time as the exhaust mods, since you have to pull the pipes out to install this. Two birds, one stone. Some people also get stainless steel bolts to replace the OEM ones that hold the plate in while there, but its not necessary. The Elite Engineering catch can (several colors red makes your car faster of course) fixes the LS1 blow by in the higher RPM, I also recommend changing the PCV valve from the variable floater to the fix orifice type (Part# 12572717) which further reduced caught oil blow by. Oil blows by the cyliders of the LS1 and some years (200 / 2001 ?) it can be quite excessive. Use a zip tie to secure in the updated PCV valve which is a direct replacement for the OEM variable one and make sure its tight. The old rubber tubing tends to not hold in the new valve very well and can push out under pressure later. This results in the 1/2 to 1 quart we all know about the engine eats per oil change. You will easily consume 1/2 to 1 quart of oil at a weekend HPDE event on these motors without a Catch Can / PCV mod. Also the oil is IN the vacuuum line which then re-enters the intake manifold gunking up your valves, etc. This mod will keep your heads way cleaner. Procedure here: (http://www.conceptualpolymer.com/PCV...eplacement.htm) for changing out the PCV. Both Elite Engineering pieces are top quality, perfect bolt on, easy to use… I can’t say enough about them. Make sure you follow the plumbing directions for your motor. There is a difference set of lines for different LS1 and Ls6 motors. The PCV valve is in a different lcoation entirely relative to the can by motor and year of car. Double check or you can back pressure the vacum line and create froath in your oil. Make sure you DUMP the waste oil from this can when the engine is COLD at least every oil change for street / autocross use and have it empty fresh before a HPDE event. When you use the EE catch can, I suggest that you use heater hose clamps on the lines you add and not band clamps etc. They hold better and are easier to put on and off int eh future. A picture of what that looks like is here (http://www.chevsofthe40s.com/images_...mal/432645.jpg). You can also get a catch can from Chip over at CCA (http://www.customcorvetteaccessories...lcatchcan.html) if you are going for pretty and want it in Chrome etc, but the EE can I think is a bit easier to dump since the whole bottom screws off. Either can is fine though, and both vendors are CF supporters!
It doesn’t also hurt if you run the car hot and hard for long period of time to get a breather for the oil cap, East Coast Supercharger makes a very nice one but does cause a small impression on the hood liner after the hood is closed (http://www.eastcoastsupercharging.co..._breather.html). Sorry only comes in one color.
Oh, and you might want to try the "Seaform Green" trick at least once a year to keep your intake and heads clean. Do this before an oil change, since you will need to dump you oil right after. Search the forum for this trick, and have your camera ready for the smoke plumes. From eHowTo (http://www.ehow.com/way_5848602_sea-...treatment.html) a basic write up for general explanation. here are a few CF write ups on this topic:
(http://forums.corvetteforum.com/c5-g...in-action.html) (http://forums.corvetteforum.com/c5-t...-included.html)
(http://forums.corvetteforum.com/c5-t...yes-or-no.html)
(http://forums.corvetteforum.com/c5-t...-any-harm.html)
It's not a bad idea to get the EliteEngineering under car radiator screen as well (http://www.eliteengineeringusa.com/C...or_screen.html) its thick, beefy and feels solid. Perfect fitment, and curved to match the dimensions of the area. I originally just make a quick one outa chicken coupe fence screen from home depot for about $3 (http://www.homedepot.com/webapp/wcs/...0051&langId=-1). If you hit the track you get tons of left over vulcanized rubber flying up into your radiator. This stuff melts in there (not to mention road debris like sticks and twigs) and the more crap you get in there the less efficient your car cools. Even just on the street you can all sort of stuff sucked up under the shroud and it gets stuck in your radiator fins making its efficieny drop dramatcially. Its a cheap nice way to avoid power washing your radiator all the time if you actually drive the car and not garage it all day. If you call Elite Engineering to order, rather than via online, you can often arrange a small deal for all the items at once. They are a good supporting vendor of the CF.
Headers & Exhaust:
The change from the short cast irons not only saves weight and height under the hood of the car, but the larger primaries and wider pipping allows the car to exhaust and breath better. This opens up tremendously the mid range HP and Torque. While I do not always believe the HP claims on the headers, I do believe that the torque and HP curve shifts allowing more available mids which is the sweet spot in road racing since you want to avoid the redline region which tears up your engine and heats up the car. Once I cross 2800-3000 RPM you really will feel the difference. And the power is very available now where that same power band didn't open up to me like that in the stock set up until after 4500-4800 by gear. BIG difference having that power earlier at lower RPM, especially when using the motor to pull yourself out of a corner. Down side of Long tubes, you will hear the car coming 4 blocks away further than you did before, especially once you hit 3000 RPM. When ordering up your headers do not do this online, call. I suggest if you are ever going to do a oil cooler, do it at the same time. You adapter block for the oil cooler on the engine will be blocked forever by the longtubes. Making you have to pull them off (ahem) again with all the aggravation and labor that comes with it to do the AN lines for the oil cooler. Both at once, save time and sweat.
American Racing Headers (http://americanracingheaders.com/C5_Catalog.htm) all the way, get them Jet-Hot (http://www.jet-hot.com/coatings/) coated to cut your engine temps down ALOT under the hood as well as to reduce corrosion! I prefer coatings over say header wraps (http://www.summitracing.com/search/p...e/exhaust-wrap) to reduce temps, some people do both. But don't be surprised that if they coatings get wet, or cool to fast if it cracks and flakes off. THe more heat can be contained from teh combustion, and FORCED out the exhaust, the less heat will remain under the hood near your motor, oil, etc. Lower temps means more HP, and better longevity of the engine and the other parts under the hood. Heat is your enemy in racing. Well worth the investment on anything that reduces heat, ie. Oil coolers, etc
LG Motorsports also now makes a pretty well received and reviews Long tube set up (with and without cats) found here: (http://www.lgmotorsports.com/index.php?cPath=342_278). Why long tubes? Simple, range and torque. You need to make sure they are the right ones for your cars engine, the primaries come in different internal diameter widths as well. For example the ARH come in 1-3/4" or 1-7/8" primaries and your choice of 3" x 3" or 3" x 2-1/2" Catted or non Catted X-pipe systems. This is a $1500 - $1900 investment for headers and an X-pipe, so take your time to do it right. I have Jet Hot coated ARH in the 1-7/8" primary and have been very happy except for one primary had the coating come off. They have a warranty which would fix it for FREE in 2 years, but I do not have the time to pull the header off the car. Ship it. Wait for it to get back and reinstall mid season.
Cats or no Cats? Simple. Do you have an interest of keeping this a street car? No Cats = No street Legal. In reading I have heard that the ARH hi-flow cats only rob you of 2 RWHP anyhow. So don't worry about it. Also, don't forget the x-pipe WILL make a big different. The OEM H-pipe only has a tiny little hole between the 2 sections, this creates issues with exhaust standardization. Having the much larger cross over x-pipe lets the even and odd sides of the motor equalize pressure much better making the exhaust of the engine more efficient. You will get a throttle let off gurgle though. Personally I love that sound, makes the car sound mean!
Make sure you get boot covers (http://www.corvettegarage.com/produc...2-and-ls6.html) for your plugs if you get long tubes. THIS IS A MUST or you'll melt your wires with long tube headers and short out your electrical system. They are not easy to install because you really need the car lifted up (http://www.americanracingheaders.com...stallSheet.htm) and its best to buy these at a place like Carlisle Corvette, MidAmerica, etc where they will install them in like 30 min for about $100 bucks! Worth it, trust me! Pain to get them in if you arent equiped. High flow x-pipe and cats also from AR. Several CF vendors sell them; look for a group buy for the best deals. It’s hard to install the headers yourself, you will need a lift or be able to put the car on stands a good 18” off the ground. The rear exhaust is so subjective! I like the Corsa, but others will argue they like the sound of another like Borla. I think the Borla drone is a bit obnoxious, but my buddy loves it. Honestly the rear choice once you are into the high end after market vendors is more about an esthetic difference than performance since all the high flow mufflers are about the same in HP draw.
Head & Cam vs Forced Air:
Simple explanation => Head&Cam natural aspiration for HPDE & Forced for 1/4 mile or car shows
In my experience I have found the most successful guys down the road eventually went with a forged big cube motor that was natural aspirated but now you’re talking money. In the short term, a decent head & cam swap will create more than enough HP for all but the most extreme racers. I will admit, the forced set up are really cool and menacing looking though, espeically at a car show! Also DO NOT get more HP than you can control! In the beginning your driving skill can't even get the car to perform at 50% of its potential. Do nothing to increase to massive horse power until you are such a kick *** driver that you are now trying to shave .01 seconds off your lap times! Horse Power does not = fast in HPDE, learning to enter - navigate - exit corners is the way to go fast! Fast = Seat Time NOT HP.
In the begining spend your money on seat time and/or a reputable drivers school before you do on expensive motor upgrades! I know a guy in a old stock drive train Scirocco from Volkswagen (RTR - Porsche Club) that will drive circles on HPDE around a new guy in a C6 Z06. Skill, not HP wins in the end. HP only matter in the straights, you make and lose time in the corners. It’s all about exit speed baby! Nitrous is NEVER for HPDE, just � miles.
For a quick education on some of these quick topics I found a nice FAQ here at Dragon Performance Engineering which covers Cams, RWHP vs SAE HP, etc. (http://www.dragonrace.com/techinfomain.htm)
As far as cylinder heads go, the jury is in. Right now everyone seems to agree that the Trick Flow CNC (http://www.trickflow.com/egnsearch.a...=KeywordSearch) make the most reliable power and best mid range available torque. But they are BIG $$$ when you do all involved (http://www.eastcoastsupercharging.com/CamandHeads.html)! You can do other heads for a lot less money, but you will leave a few HP on the table. As far as Cams go, there is tons of debate on this one! Eveyone has a different theory and different favor cam. If you are using a local tuner, you might want to see what they use 99% of the time because this combo is the one they have the most experience tuning and thus you will get a more reliable result. Don't forget that the bigger the HP you get out of a cam, the less driveable it gets. If you Dual purpose the car, remember this. If you cold start and street drive it in 38 degree weather remember this. BIG cams that offer BIG power will idle rough and need more time to warm up, and be less street friendly. ECS, Texas Speed, LG, DPSE, Callaway, Katech, Cartech, EnglandGreen, Vengence, etc. all make good to great quality cams... spend a boat lod of time on this topic BEFORE you buy and install!!! Remember the cam for a N/A and a Forced Air system will vary alot! Forced Air wants lower compression (close to or below stock near 9:1 is ideal) vs. a N/A cam deisnged for big #s which typically want high compression 12:1 or better. Do not decide to just start buying heads, cams, etc upgrades without knowing what you are doing or you can waste a ton of money and posibly build the wrong set up. Worse damage your motor. Damaged or blown motor = big money = end of your car for many and a posting in the "C5 Parts for Sale / Wanted" section of everything you can get rid of.
Before you decide, "oh I'll just do it myself" please look at posts on the CF like this one. (http://forums.corvetteforum.com/c5-t...s-of-pics.html) Which nicely detail the amount of time, effort and problems that can occur. You really need to be in it for the long haul when you decide to do it all yourself. And if you decide to go for a pro to build it, RESEARCH it. Don't just buy an engine from this guy your brothers sister's husbands cousin knows in the town over who has a "wicked ride". And don't go cheap. If you build a motor for big HP, it will never be stronger than its single weakest part. A small cheap part that fails can cost you an entire motor on the track in about 3 seconds flat.
Choosing a Cam:
When you choose a Cam remember a few things: 1) Hp vs low End Torque 2) Street Manners 3) Maintenance
Also remember that very aggressive big lobe cams (.600+) need those heavy duty special double springs which can cost $300+ for the set, not to mention the retainers, etc to go with them. All in all $600 - $900 just in springs etc. is not cheap, now add to this thought process that you will need to REPLACE all the springs on a high lift cam every two years it starts to add up in your racing budget. Not to mention that you need special tools and a full weekend to pull the heads, clean them, refresh them, reinstall them... the head and cam package you bought might cost you about $600 - $1200 every two years to maintain depending the the quality parts you buy and if you do the labor yourself or not. For example on the LG Cam page (http://www.lgmotorsports.com/catalog...oducts_id=1509) the GX1 and down are not too bad, but once you hit the GX2 you start to hit .595 and .608 (intake/exhaust) and by the GX3 cam which pulls like a monster after 1800 rpm, you are at .600/.610 and this cam will eat your springs in 2 years even if you do not run the motor all that much based on sheer tension and compression at this lift. Do not just plan for power, but for finances and whether you can do the work yourself or afford to pay someone to. Also do not forget that these big cam motors will require more routine maintenance than a stocker LS1 or LS6 cam will.
For drag racing its all about HP on the dyno, big lift big lobe top HP is all that matters.
For road racing corner speed is the most important, you want torque as you exit the corners which means higher exit speeds.
Texas Speed makes a cam called the V2 Torquer with stats of: 232/234 .595/.598 with a 112 (http://texas-speed.com/shop/item.asp...d=898&catid=15)
LG MotorSports makes a good came in the similar range: G5X1 228/232 .588/.574 with 112/114 & G5X2 232/240 .595/.608 with 112/114 (http://www.lgmotorsports.com/catalog...oducts_id=1509)
Again be warned once you cross the dreaded .600 mark the car starts to become less streetable and more race track only car. Street manners and cold idle can get poor. AND once again be warned that as you cross .600 on your way to .650 you need to start changing out your heads springs on a regular basis form the high amount of pre-load even when the car is at rest and not on the track. This means more regular maintenance and if you cant do this yourself more money. Once you cross .650 you are changing springs once ever year. Think about this in your decision. I would rather give up 10 RWHP to spend $1000 less a year and spend more time driving, less time fixing IMHO. But I do HPDE. In wheel to wheel competition for $$ racing you don't win without pushing the envelope and spending the big bucks.
Out of the BOX LS Race Motor:
Looking for a LS Platform, out of the box ready to race motor without having to worry about building one from scratch? And all the costs, research and fear of reliability? Replacing a motor you already blew up? Trying to do it on a budget? one way is to buy a GMPP CT 525 carb motor and then have a race engine shop install a 3 or 4 stage dry sump system. these motors make 525 HP and 470 torque and would likely make a bit more dry sumped. There is also an factory EFI version 525. These motors are the ones developed for the ASA racing series and are tried and true race team motors, used in the events to level the playing field so ALL teams ahve the same motor and same engine costs. (http://www.superchevy.com/technical/...e/viewall.html) They use the ASA 525 lift cam, which is easy on the valve train yet makes for a good torquey motor for road race that need not be twisted much over 6500. You would likely have about motor is about $7000 to $8500 by how well you shop, and $11,000 in a dry sumped version of these motors. This would be a cheap motor option as you could run it a couple years, sell used and buy another to replace down the road. Some have used these in the Trans Am 2 cars. You can get an all forged dry sump road race LS3 from $15-16k to start and a fully forged and built to the gills LS# could be up to 25k just for the motor.
The motor GMPP part#19271821 for the CT525 - link: (http://store.chevroletperformance.co...-19271821--%3E)
Belts and Tensioner:
This is simple. Belts under heavy load will take more stress, spin faster at higher RPMs and fail faster when you road race. I HIGHLY recommend if you have not changed your 2 belts since you bought the car, you change them prior to road racing. A belt failure will have not only expensive repairs on the track, but could also cost you your car or your life. If you read the forum, the posts abound on the wonderful properties of Gator Belts. I will tell you my personal experience with them, don't get them. First off they are not a perfect size OEM fit and this can be difficult to get the right one (3 different sizes are sold by various parts stores that are within a cm of each other) and its a bitch to get them right. Next I cut one in half on my car, luckily it was on a test drive over my buddies house. Unless you get crazy on race quality expensive as heck belts, the OEM GM belts are fine. I suggest talking to Gene at GMPartshouse.com for these OEMs unless your local dealer will price match their great prices. Now, the stock LS1 belt tensioner = crap! I have heard of LS1 C5 cars having belts jump off the pulley at high RPMs. This was supposed to be mildly addressed after I thin kthe 2002 models to be a "bit" better but IMHO the stock C5 tensioner sucks. The one sold by Katech Performance is the best I found, and it unbeatable right now at the price (http://store.katechengines.com/bille...sioner-p3.aspx) of $120 + SH. OOO did I mention it also comes in colors! I got a red one which matches my catch can :-) Did you all know Red goes faster! No? It does :-) Oh, make sure you use a torque wrench on this thing at least a few times a season. The bolt to hold it in place is 40 ft/lb, the bolt on the Belt wheel is 25ft/lbs. Regardless of whats recommended this is what you need to keep it in place.
Pedals:
This is a quick conversation. Corvette pedals suck. First your feet slip off them when they are dry, and when wet in your driving shoes (ie. Piloti) its even worse. I also lost a high speed turn (and my life + car) becasue in the rain I was heel towing the car and slipped off the brake. Talk about adrenaline! Oh, and its hard to heel toe the C5 because the brake and gas line up so poorly both in height and distance. The ceap, easy and very pretty solution: Race Pedals. Once again, thanks to Chip at CCA for making a very affordable and easy to install solution. The CCA Billet Race Pedals in the Pyramid Grid Configuration (http://www.customcorvetteaccessories...ingpedals.html) for $160 is money well spent. Not only will you never slip off the brake or clutch again, but the gas pedal is oversized towads the brake. This closer surface makes the dreaded to learn and master heel / toe manuever so much easier to learn (http://www.edmunds.com/ownership/how...2/article.html). A good video which makes it easier to understand by seeing is here (
). FYI never learn this manuever on the track unless you like dying and transmission work. Someone else taught me the best place to learn this: Clover Leaf on / off ramps. Just keep taking the colver leaf over and over and over again. Every time you are on your way down the ramp you can practice. Then climb up, pick up speed and do it again. Over and over. After 60 minutes (and a state trooper asking if you are reallly lost) you will have it down.
PLEASE PM me good links, information update, parts you see that are new, reviews, etc so i can constantly add to and improve this reference!
I would like to take to opportunity to make a couple of acknowledgements and thank you's after its been dozens of hours in modifying and writing this and hundreds of hours f-cking with my car :-) Thank you to my kids for putting up with this obsession, it does take a few nice weekend afternoons away from family time. Thank you to Tony aka AJG1915 for the use of his lift, garage, tools, general knowledge and putting up with my bad sense of humor. And to all those on the forum who's shared insight and knowledge made my screwed up projects and blunders easier to fix with a few hours of advanced searches from time to time. Hopefully this article is a give back to the rest of the community.
We are officially a "STICKY" on May 26th, 2010!
The Commentary below is NOT suggested to be done in any particular order as "do mods in this order". It was done as I thought of parts and stuff.
At the very end, I make my suggestion on the order of Mods... and why.
These are the parts I found work best, why, where to get them… and some commentary to go with. Also you can read this one of two ways, beginning to end for an idea of what you are getting yourself into, or as a reference set up by section when you are "ready" to do a certain mod, upgrade or repair its a one stop spot to learn before you make the same mistakes myself and the dozens of other persons posting and experiences have helped contribute to.
Oh, and for the record make sure to see the books section, for under $20 the title GOING FASTER! Mastering the Art of Race Driving is the best high performance dollar for dollar mod you will spend.
And check back often, this is a work in progress. It is updated at least weekly and in the "season" might be updated as much as daily. Yes, I have no life. J/K
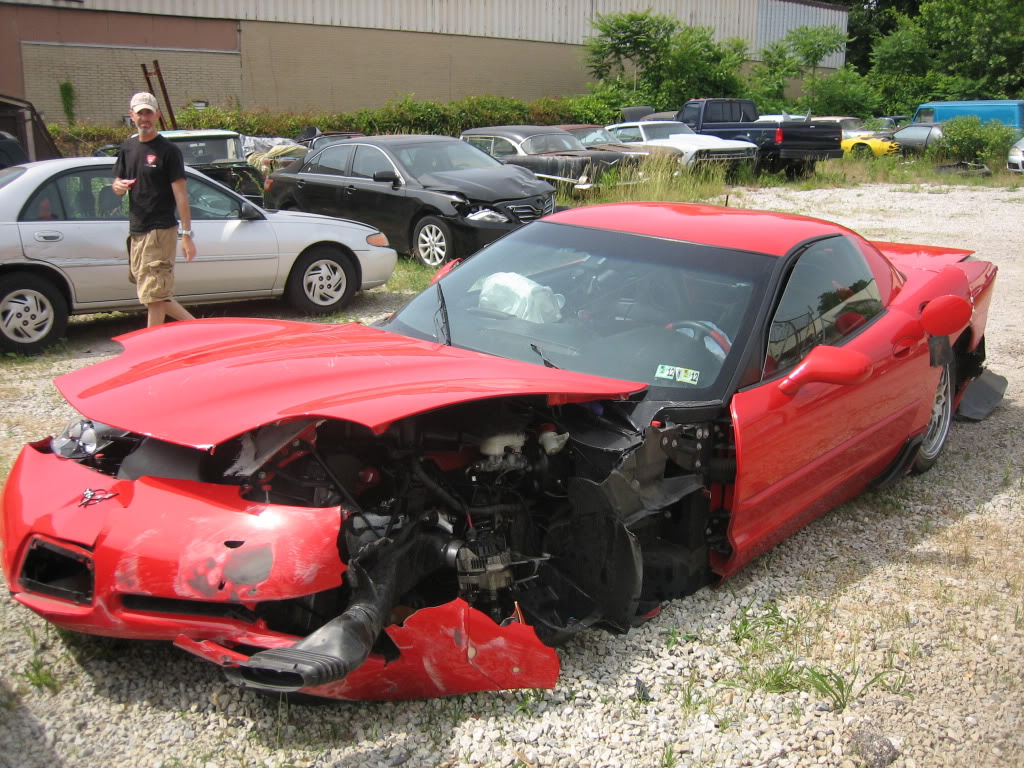
Oh, and if you do not "wrench" your own car, you need to learn how. Your car will require a crap load more maintenance once you decide to HPDE and if you pay for others to do the work, I hope you are a CEO of your own company.REST IN PIECES: #99 June 4th, 2011
Hundreds of hours modding. Thousands of dollars invested. Paperweight.
Hundreds of hours modding. Thousands of dollars invested. Paperweight.
FIRST TIME to HPDE? Thinking this will be a hobby? Here is an article for all 1st timers to read, form the perspective of an instructor... after a fatal crash at Road Atlanta in August 2015. It may help you understand whats important as you start planning your $$$ on where you are going to spend it for the car. Safety first, speed second. (http://www.motorsport-safety.org/med...t-road-atlanta)
Since the most commonly track supped up C5 Corvette tends to be the Z06 and FRC, then coupes (rarely Verts) you might want to check out any basic OEM Z06 type FAQ question in this very nicely put together thread from a fellow sadist MAJ Z06 on the CF: (http://forums.corvetteforum.com/c5-z...tions-faq.html).. Once you get your basic OEM Z06 questions answered this thread takes your car to the next trackable level.
Quick reference page for all C5 Weights, Measures, Ratios and other technical #'s: (http://forums.corvetteforum.com/c5-g...ngths-etc.html)
Other Quick Reference Items thanks to David Farmer:
C5 Trouble Codes: (https://dl.dropbox.com/u/1634366/c5-dtc.pdf)
C5 Fuse Layout: (https://dl.dropbox.com/u/1634366/c5-fuse.pdf)
C5 Complete Parts List: (https://dl.dropbox.com/u/1634366/C5-PartsManual.pdf)
C5 Torque Specs: (https://dl.dropbox.com/u/1634366/C5torque.pdf)
C6 Trouble Codes: (https://dl.dropbox.com/u/1634366/C6-DTC.PDF)
C6 Automatic Torque Specs: (https://dl.dropbox.com/u/1634366/C6-Torque-Auto.PDF)
C6 Manual Torque Specs: (https://dl.dropbox.com/u/1634366/C6-Torque-Manual.PDF)
C6Z06 Torque Specs: (https://dl.dropbox.com/u/1634366/C6Z06-Torque.pdf)
C5 Prodcution Numbers and Production Facts: (http://www.vettefacts.com/C5)
Lastly, it was put to me by one person "who am I to make all these comments?" Answer: I'm a no one. A nobody. I'm not a pro racer. I'm not some sponsored guy with a mechanic and pit crew. I'm Joe Blow HPDE. I'm some guy who works in his driveway on jackstands with substandard tools, no air compressor and has zero formal training in automotive repair. Thank god for Harbor Freight making my tools cheap & the Corvette Forum as a resource to help me through my projects... oh and to Band Aids for covering all the bleeding knuckles
I'm a doctor if you must know my day gig, usually getting yelled at by my office manager making updates on this between patients visits. THAT'S WHY I WROTE THIS! The pro's aren't reading this, they have people they pay to do it for them. I wrote this from the lay person for the lay person who like me is learning on the fly. My commentary should be taken with a grain of salt, just like any opinions out there. But, I have no axes to grind. I'm not a vendor competing with another vendor saying "mine is better" and I'm doing this for free without any influences of vendor money. You get real commentary from both my own experiences, others I know and the combined wisdom of the CF forum all boiled down into one spot without having to search for hours to find answers. Or more commonly having an issue in a build project, it goes awry.. then research AFTER the problem has occurred to find out what you SHOULD have done. This hopefully is a PRE-project resource so you can do it right and prepped the first time.
*** Standard Disclaimer: I assume no responsibility for any damage ***
*** Your results may vary based on your Car Modifications & Stupidity ***
*** Your results may vary based on your Car Modifications & Stupidity ***
Jacking Pucks, Frame Savers & Jacks:
First for those new to working on their own C5, read this jacking safety & how to thread: (http://forums.corvetteforum.com/c5-g...ting-pads.html)
I start this several page book with this section for one reason, don't assume that everyone reading this is experienced. Don't assume that everyone reading this has owned their car for years. Don't assume that everyone reading this even owns a wrench. You will need 4 Jack Pucks before you ever start doing an HPDE. These go into the oval shaped slots under the car near the front and rear of each door. They are a must. I am adding this section first because I see way too many people trying to lift their car on jacks without them and damage their fiberglass. Plus the pucks make it very easy to have the car sit firmly and SAFELY on the jack. 3 places to get them:
How to use a Jack Puck to lift a C5 on YouTube Video:
(
(
-Elite Engineering for $60 Shipped set of 4 - (http://www.eliteengineeringusa.com/jacking-pads.html) I like these because they have a "tread" on the bottom so they stick the the rubber jack plates easily. Also the smaller "t" on top makes it easy to pull them out. the larger T pucks can **** you off when you turn them you swear in a circle 10 times and they don't come out. Oh, and did I mention them come in red and blue :-)
-CustomCorvetteAccessories sells them $80 for a set + SH (http://www.customcorvetteaccessories...kingpucks.html). These are square which have some advantages, but I have to say I like the round style better and the EE ones cost less.
-Katech Performance has them for $20 each + SH, and these are truly nice with rubber top and bottoms, and the T releases quite well. They are a bit tall though, and for slammed low cars not so easy to get under like the EE ones. Only comes in blue anodized with black rubber. (http://store.katechengines.com/jacking-puck-p68.aspx)
I have a set of both the EE and Katech ones. One for my garage tool box, and one for my "track side tool box" so I do not have to think when leaving for en event "did I pack those?"
Frame Rocker Savers are a nice thing to add for very low car to avoid speed bumps tear up your cars body panels. Also in a pinch you can actual jack the car up off these points, or jack the car up form the pucks and then rest the car on a wood stack of blocks etc on these. Either way, a nice addition to the underside of the car for both street safety to your underside and jacking at the track in a hurry. i have tried a few, and right now for the $$ I like the Elite Engineering ones. (http://www.eliteengineeringusa.com/Rocker_Savers.html) for $60 shipped its a nice piece. See some of the other sections here, because i recommend many of the EE parts, and you might be able to swing a deal for ordering several items at once. When installing, DO NOT try to follow the rocker panels! Install your pucks first, put the rails up to the pucks. Move them now 1/8" or more away form the pucks. Then two sided tape. See if the pucks will drop freely in this position, if not move a bit and redo. Mine were marked wrong driver/passenger so make sure that when they are up neither side of the rocker savers sit on or touch actual body panels. If they do, switch sides. Also I saw that they once in the "right spot" were a bit too far into the vehicle and didn't sit well for my liking. I wanted more frame under them. So I took one puck and traced the circle into the piece, then took a Dremmel and the tile cutting drill bit, put them in a vice and went to town. I made the cut outs a true circle not an ellipse and this allowed them to sit more solidly for my car under the frame and not so they stuck out 1/8" past the edge. Next mark your hole in the middle first, pre-drill the hole with a small bit and then follow up with the self taping screws. I have sat the entire weight of my car on wood blocks right on these black plastic strips with no cares about my cars safety. nice thing is that since they are solid plastic and TOUGH to cut up... no ScReaChing when they hit like aluminum. No color changing after being scuffed up. Until another product comes along better than this, its the only one I like. I had aluminum ones, I switched recently to these.
Ramps:
Rhino Ramps $40 ( ) you can usually also buy these at Pepboys. Good for backing up easily with the rear wheels, and then you can jack up the fronts. For the fronts if your car is low these might not work without using a 2x6" plank to step up to the ramp. Nice thing is these are cheap, and its a great way to put the car up on 2 jacks, and then lower the car on the ramps. You can use 4 of these for setting up and changing your sway bars as well in this manner.
Race Ramps $139 ( ) for the 56" version for the truly low. Race Ramps are light, strong and easy to use. Check out all the other products they have including alignment pedestals & wheel cribs.
Homemade Wood Ramps for about $60 with How To Video on YouTube:
Part 1 (
Part 2 (
Jacks & Stands:
Harbor Freight Race Jack 3000lb Aluminum $99 but $60 with coupon(http://www.harborfreight.com/automot...ack-91039.html) is the cheap entry level jack of choice for both light weight, ease of use and low profile to the ground. If the 3000lb line makes you nervous step up to the Harbor Freight Low Profile Jack 4000lb Aluminum $139 when on sale (http://www.harborfreight.com/automot...ack-92782.html) be warned though you do hear of issues with these jacks failing now and again from improper factory hydrolic bleeds. So keep your operating instructions and if it acts funny, bleed it. Use jack Stands for safety.
Tire Rack Race Jack $169 (http://www.tirerack.com/accessories/detail.jsp?ID=67) good and lasting quality. Just not as cheap as the Harbor Freights. If you need stand also the Tire Rack Race Jack & Stand Combo $219 (http://www.tirerack.com/accessories/detail.jsp?ID=68) is a nice deal.
If you want an alternative to the usual jack stand, and you are putting the car up and leaving the wheel on, here is a great alternative from Race Ramps (http://www.raceramps.com/wheelcribs.html)
How to Jack up your C5 rear end with a homemade Lifting Pad on YouTube:
(
Shifter:
Get rid of that sloppy P.O.S. stock manual C5 shifter - the whole box! Throw it away!
Get the C6Z06 upgrade. It replaces the ENTIRE shifter mechanism, and its a easy install for anyone with a tool box. No real experience or skills needed, just read the walk through on the website. One thing you do need is a torques head for the retaining bolts so read the walk through before you start the project & you can get it at Napa, etc for like $5. Buy the shifter kit from GMpartshouse (http://www.gmpartshouse.com/c5partslist.html) part# c6z06shifter for $195 (Gene Culley rocks, all OEM GM vette C5/6 new parts cheap here). Wholly crap is the stock C5 shifter awful & long in shifts! I felt like a was busting my knuckles on the HVAC unit in the stock config! The stock C5 is sloppy, and you will miss 3rd most commonly on fast shifts from 2 to 3 which if you dont catchyourself and let out the clutch into the wrong shift you can damage the syncros fast and cause $$$$ damage to your driveline. This change out = perfect and predictable shifts = lower lap times, less transmission damage from missed shifts to the wrong gear = less synchro damage & safer driving. Just do it! Gene, where's my kick back! Haha!
If you really want to make it sublime - MGW (http://www.mgwltd.com/corvette.shtml) top end conversion which will make your throws very very short, needs a bit more Umpf, but perfectly finds 3rd, ZERO slop or rocking. I put my MGW in (30% reduction one) in my car March 2010. Its weird, I kinda miss the "wiggle wiggle" in neutral to make sure you are there. This is gone, 100% gone. It is amazing how accurate this thing is, especially in the push up from 2 to 3 = it just glides and goes true. 3 to 4 is just a wrist flick. Now reverse... It find true, but you are POSITIVE you are in 5th when you put it there. So positive, you always let out the clutch with trepidation in reverse... every time. On the track the shifter gives you confidence, until it doesn't. I was downshifting (heel toe) into the Karoseul (Neurenberg Corner) on Shenandoah at Summit Point and went form 4th to 3rd - the quick shift and I missed 3rd and cant find it grind it. Besides that one issue, the shifter gets less weird feelign with each lap. You still "want" to push it left and right, but don;t have to. That's the probelm, its so close in the gears that you "over shift" until you are used to it. I got Pocono coming up which while a really easy track, you do shift 2-3-4 often, and I'm confident after your 2nd weekend on the track the MGW will be second nature and I will wonder how I survived without it.
Why are theses issues, well I like putting my hand on the shifter and "knowing" from the position alone what gear I'm in without thinking... you can't do that with the MGW. Maybe a 15% or 25% instead of a 30% would allow that crap what I'm used to OEM feel? After a season on the MGW now, Im totally fine with the 30%, it was a sharp learning curve but well worth the time invested. How can you live without at least the C6 Z06 kit upgrade when fast shifting on the track I do not know! For the $$ these are the single best mod you can do for your driving performance in the car on driver feel is the C6Z kit. The MGW is not necesary, but the Z06 kit is mandatory of you Autox/HPDE. If you retain the use of your C6 **** with your MGW kit, I highly suggest that you BLUE locktite in the torque screw that holds the handle on. The tighter box and shifter creates a ton of vibration in the shifter and my screw loosen up 2x before I locktite it.
Disable the CAGS or Computer Aided Gear Shifting (http://www.corvettegarage.com/produc...-corvette.html or http://www.corvettesofhouston.com/pr...products_id=62) ASAP either with a hard plug shown in the link or an engine PCM tune. The CAGS is the annoying option that keeps the EPA numbers better buy forcing shifts from 1 to 4. On the track this is a deadly pain in the ****! Get rid of itASAP! If the shifts still feel too notchy, aka hard to push into each gear, the AntiVenom Mod (http://forums.corvetteforum.com/c5-g...-done.html)you can research on the forum will make the shifting easier for about $5 in washers and some elbow grease. Be wary to NOT over shim or the shifter gets so sloppy it wont hold the gears under higher RPMs.
Traction Control Settings was a suggested quick early comment to make. This is the: ON / OFF / COMPETITIVE MODE settings. Suggested use for new drivers on their first weekend is leave all the nanny's ON, meaning let the car babysit your poor skills. Your stock C5 is way more car than any new driver can handle, and on street tires the rear end will want to come out easy since the normal street tires typically aren't grippy. ESPECIALLY in run flats! FULL ON for your first event or two until you understand the basics of car control for saftey. Crashing = bad FYI. After Event #2 going to competitive mode is a good idea, since the car drives itself less, you can "feel" the car better and learn the ins and outs now of "race driving" during your time around the track. You should never do this though until you feel comfortable and not nervous driving the track in HPDE. Once you are a solid intermediate you might want to carefully experiment with traction control full off which will allow you to start hell toeing, trail braking etc and learning the advanced stuff. If the track is wet, leave competitive mode on, always. Don't trust these things on a wet track unless you are a advanced and experienced driver. Those back wheels break loose FAST and if you don't know how to recover you are a goner. Some early C5's have no Competitive mode. The 1999 to 2001 I think it is you have to be FULLY stopped and hold the button in for 10 secs to get the display to change over. From 2002 to 2004 I believe you can just make these changes on the fly without being completely stopped. Don't get cocky, use it until you know you know that you will be safe.
Tunnel Plate & Oil Catch Can & Radiator Screen:
Elite Engineering plate with thermal pad stiffens your body flex which is so common a complaint from race driers of the C5 chasis especially over a hill in a turn. The stock plate is about 1/32" think and you can flex it with your hand. The EE plate is thick, light & cuts ALOT of heat out of the center tunnel (http://www.eliteengineeringusa.com/C5Products.html). It is suggested you do the Tunnel Plate at the same time as the exhaust mods, since you have to pull the pipes out to install this. Two birds, one stone. Some people also get stainless steel bolts to replace the OEM ones that hold the plate in while there, but its not necessary. The Elite Engineering catch can (several colors red makes your car faster of course) fixes the LS1 blow by in the higher RPM, I also recommend changing the PCV valve from the variable floater to the fix orifice type (Part# 12572717) which further reduced caught oil blow by. Oil blows by the cyliders of the LS1 and some years (200 / 2001 ?) it can be quite excessive. Use a zip tie to secure in the updated PCV valve which is a direct replacement for the OEM variable one and make sure its tight. The old rubber tubing tends to not hold in the new valve very well and can push out under pressure later. This results in the 1/2 to 1 quart we all know about the engine eats per oil change. You will easily consume 1/2 to 1 quart of oil at a weekend HPDE event on these motors without a Catch Can / PCV mod. Also the oil is IN the vacuuum line which then re-enters the intake manifold gunking up your valves, etc. This mod will keep your heads way cleaner. Procedure here: (http://www.conceptualpolymer.com/PCV...eplacement.htm) for changing out the PCV. Both Elite Engineering pieces are top quality, perfect bolt on, easy to use… I can’t say enough about them. Make sure you follow the plumbing directions for your motor. There is a difference set of lines for different LS1 and Ls6 motors. The PCV valve is in a different lcoation entirely relative to the can by motor and year of car. Double check or you can back pressure the vacum line and create froath in your oil. Make sure you DUMP the waste oil from this can when the engine is COLD at least every oil change for street / autocross use and have it empty fresh before a HPDE event. When you use the EE catch can, I suggest that you use heater hose clamps on the lines you add and not band clamps etc. They hold better and are easier to put on and off int eh future. A picture of what that looks like is here (http://www.chevsofthe40s.com/images_...mal/432645.jpg). You can also get a catch can from Chip over at CCA (http://www.customcorvetteaccessories...lcatchcan.html) if you are going for pretty and want it in Chrome etc, but the EE can I think is a bit easier to dump since the whole bottom screws off. Either can is fine though, and both vendors are CF supporters!
It doesn’t also hurt if you run the car hot and hard for long period of time to get a breather for the oil cap, East Coast Supercharger makes a very nice one but does cause a small impression on the hood liner after the hood is closed (http://www.eastcoastsupercharging.co..._breather.html). Sorry only comes in one color.
Oh, and you might want to try the "Seaform Green" trick at least once a year to keep your intake and heads clean. Do this before an oil change, since you will need to dump you oil right after. Search the forum for this trick, and have your camera ready for the smoke plumes. From eHowTo (http://www.ehow.com/way_5848602_sea-...treatment.html) a basic write up for general explanation. here are a few CF write ups on this topic:
(http://forums.corvetteforum.com/c5-g...in-action.html) (http://forums.corvetteforum.com/c5-t...-included.html)
(http://forums.corvetteforum.com/c5-t...yes-or-no.html)
(http://forums.corvetteforum.com/c5-t...-any-harm.html)
It's not a bad idea to get the EliteEngineering under car radiator screen as well (http://www.eliteengineeringusa.com/C...or_screen.html) its thick, beefy and feels solid. Perfect fitment, and curved to match the dimensions of the area. I originally just make a quick one outa chicken coupe fence screen from home depot for about $3 (http://www.homedepot.com/webapp/wcs/...0051&langId=-1). If you hit the track you get tons of left over vulcanized rubber flying up into your radiator. This stuff melts in there (not to mention road debris like sticks and twigs) and the more crap you get in there the less efficient your car cools. Even just on the street you can all sort of stuff sucked up under the shroud and it gets stuck in your radiator fins making its efficieny drop dramatcially. Its a cheap nice way to avoid power washing your radiator all the time if you actually drive the car and not garage it all day. If you call Elite Engineering to order, rather than via online, you can often arrange a small deal for all the items at once. They are a good supporting vendor of the CF.
Headers & Exhaust:
The change from the short cast irons not only saves weight and height under the hood of the car, but the larger primaries and wider pipping allows the car to exhaust and breath better. This opens up tremendously the mid range HP and Torque. While I do not always believe the HP claims on the headers, I do believe that the torque and HP curve shifts allowing more available mids which is the sweet spot in road racing since you want to avoid the redline region which tears up your engine and heats up the car. Once I cross 2800-3000 RPM you really will feel the difference. And the power is very available now where that same power band didn't open up to me like that in the stock set up until after 4500-4800 by gear. BIG difference having that power earlier at lower RPM, especially when using the motor to pull yourself out of a corner. Down side of Long tubes, you will hear the car coming 4 blocks away further than you did before, especially once you hit 3000 RPM. When ordering up your headers do not do this online, call. I suggest if you are ever going to do a oil cooler, do it at the same time. You adapter block for the oil cooler on the engine will be blocked forever by the longtubes. Making you have to pull them off (ahem) again with all the aggravation and labor that comes with it to do the AN lines for the oil cooler. Both at once, save time and sweat.
American Racing Headers (http://americanracingheaders.com/C5_Catalog.htm) all the way, get them Jet-Hot (http://www.jet-hot.com/coatings/) coated to cut your engine temps down ALOT under the hood as well as to reduce corrosion! I prefer coatings over say header wraps (http://www.summitracing.com/search/p...e/exhaust-wrap) to reduce temps, some people do both. But don't be surprised that if they coatings get wet, or cool to fast if it cracks and flakes off. THe more heat can be contained from teh combustion, and FORCED out the exhaust, the less heat will remain under the hood near your motor, oil, etc. Lower temps means more HP, and better longevity of the engine and the other parts under the hood. Heat is your enemy in racing. Well worth the investment on anything that reduces heat, ie. Oil coolers, etc
LG Motorsports also now makes a pretty well received and reviews Long tube set up (with and without cats) found here: (http://www.lgmotorsports.com/index.php?cPath=342_278). Why long tubes? Simple, range and torque. You need to make sure they are the right ones for your cars engine, the primaries come in different internal diameter widths as well. For example the ARH come in 1-3/4" or 1-7/8" primaries and your choice of 3" x 3" or 3" x 2-1/2" Catted or non Catted X-pipe systems. This is a $1500 - $1900 investment for headers and an X-pipe, so take your time to do it right. I have Jet Hot coated ARH in the 1-7/8" primary and have been very happy except for one primary had the coating come off. They have a warranty which would fix it for FREE in 2 years, but I do not have the time to pull the header off the car. Ship it. Wait for it to get back and reinstall mid season.
Cats or no Cats? Simple. Do you have an interest of keeping this a street car? No Cats = No street Legal. In reading I have heard that the ARH hi-flow cats only rob you of 2 RWHP anyhow. So don't worry about it. Also, don't forget the x-pipe WILL make a big different. The OEM H-pipe only has a tiny little hole between the 2 sections, this creates issues with exhaust standardization. Having the much larger cross over x-pipe lets the even and odd sides of the motor equalize pressure much better making the exhaust of the engine more efficient. You will get a throttle let off gurgle though. Personally I love that sound, makes the car sound mean!
Make sure you get boot covers (http://www.corvettegarage.com/produc...2-and-ls6.html) for your plugs if you get long tubes. THIS IS A MUST or you'll melt your wires with long tube headers and short out your electrical system. They are not easy to install because you really need the car lifted up (http://www.americanracingheaders.com...stallSheet.htm) and its best to buy these at a place like Carlisle Corvette, MidAmerica, etc where they will install them in like 30 min for about $100 bucks! Worth it, trust me! Pain to get them in if you arent equiped. High flow x-pipe and cats also from AR. Several CF vendors sell them; look for a group buy for the best deals. It’s hard to install the headers yourself, you will need a lift or be able to put the car on stands a good 18” off the ground. The rear exhaust is so subjective! I like the Corsa, but others will argue they like the sound of another like Borla. I think the Borla drone is a bit obnoxious, but my buddy loves it. Honestly the rear choice once you are into the high end after market vendors is more about an esthetic difference than performance since all the high flow mufflers are about the same in HP draw.
Head & Cam vs Forced Air:
Simple explanation => Head&Cam natural aspiration for HPDE & Forced for 1/4 mile or car shows
In my experience I have found the most successful guys down the road eventually went with a forged big cube motor that was natural aspirated but now you’re talking money. In the short term, a decent head & cam swap will create more than enough HP for all but the most extreme racers. I will admit, the forced set up are really cool and menacing looking though, espeically at a car show! Also DO NOT get more HP than you can control! In the beginning your driving skill can't even get the car to perform at 50% of its potential. Do nothing to increase to massive horse power until you are such a kick *** driver that you are now trying to shave .01 seconds off your lap times! Horse Power does not = fast in HPDE, learning to enter - navigate - exit corners is the way to go fast! Fast = Seat Time NOT HP.
On the track there is a simple phrase: MEH = Money + Ego + Horsepower 
A true story, detailed below in the track insurance section will explain this dilemma.
A true story, detailed below in the track insurance section will explain this dilemma.
In the begining spend your money on seat time and/or a reputable drivers school before you do on expensive motor upgrades! I know a guy in a old stock drive train Scirocco from Volkswagen (RTR - Porsche Club) that will drive circles on HPDE around a new guy in a C6 Z06. Skill, not HP wins in the end. HP only matter in the straights, you make and lose time in the corners. It’s all about exit speed baby! Nitrous is NEVER for HPDE, just � miles.
For a quick education on some of these quick topics I found a nice FAQ here at Dragon Performance Engineering which covers Cams, RWHP vs SAE HP, etc. (http://www.dragonrace.com/techinfomain.htm)
As far as cylinder heads go, the jury is in. Right now everyone seems to agree that the Trick Flow CNC (http://www.trickflow.com/egnsearch.a...=KeywordSearch) make the most reliable power and best mid range available torque. But they are BIG $$$ when you do all involved (http://www.eastcoastsupercharging.com/CamandHeads.html)! You can do other heads for a lot less money, but you will leave a few HP on the table. As far as Cams go, there is tons of debate on this one! Eveyone has a different theory and different favor cam. If you are using a local tuner, you might want to see what they use 99% of the time because this combo is the one they have the most experience tuning and thus you will get a more reliable result. Don't forget that the bigger the HP you get out of a cam, the less driveable it gets. If you Dual purpose the car, remember this. If you cold start and street drive it in 38 degree weather remember this. BIG cams that offer BIG power will idle rough and need more time to warm up, and be less street friendly. ECS, Texas Speed, LG, DPSE, Callaway, Katech, Cartech, EnglandGreen, Vengence, etc. all make good to great quality cams... spend a boat lod of time on this topic BEFORE you buy and install!!! Remember the cam for a N/A and a Forced Air system will vary alot! Forced Air wants lower compression (close to or below stock near 9:1 is ideal) vs. a N/A cam deisnged for big #s which typically want high compression 12:1 or better. Do not decide to just start buying heads, cams, etc upgrades without knowing what you are doing or you can waste a ton of money and posibly build the wrong set up. Worse damage your motor. Damaged or blown motor = big money = end of your car for many and a posting in the "C5 Parts for Sale / Wanted" section of everything you can get rid of.
Before you decide, "oh I'll just do it myself" please look at posts on the CF like this one. (http://forums.corvetteforum.com/c5-t...s-of-pics.html) Which nicely detail the amount of time, effort and problems that can occur. You really need to be in it for the long haul when you decide to do it all yourself. And if you decide to go for a pro to build it, RESEARCH it. Don't just buy an engine from this guy your brothers sister's husbands cousin knows in the town over who has a "wicked ride". And don't go cheap. If you build a motor for big HP, it will never be stronger than its single weakest part. A small cheap part that fails can cost you an entire motor on the track in about 3 seconds flat.
Choosing a Cam:
When you choose a Cam remember a few things: 1) Hp vs low End Torque 2) Street Manners 3) Maintenance
Also remember that very aggressive big lobe cams (.600+) need those heavy duty special double springs which can cost $300+ for the set, not to mention the retainers, etc to go with them. All in all $600 - $900 just in springs etc. is not cheap, now add to this thought process that you will need to REPLACE all the springs on a high lift cam every two years it starts to add up in your racing budget. Not to mention that you need special tools and a full weekend to pull the heads, clean them, refresh them, reinstall them... the head and cam package you bought might cost you about $600 - $1200 every two years to maintain depending the the quality parts you buy and if you do the labor yourself or not. For example on the LG Cam page (http://www.lgmotorsports.com/catalog...oducts_id=1509) the GX1 and down are not too bad, but once you hit the GX2 you start to hit .595 and .608 (intake/exhaust) and by the GX3 cam which pulls like a monster after 1800 rpm, you are at .600/.610 and this cam will eat your springs in 2 years even if you do not run the motor all that much based on sheer tension and compression at this lift. Do not just plan for power, but for finances and whether you can do the work yourself or afford to pay someone to. Also do not forget that these big cam motors will require more routine maintenance than a stocker LS1 or LS6 cam will.
For drag racing its all about HP on the dyno, big lift big lobe top HP is all that matters.
For road racing corner speed is the most important, you want torque as you exit the corners which means higher exit speeds.
Texas Speed makes a cam called the V2 Torquer with stats of: 232/234 .595/.598 with a 112 (http://texas-speed.com/shop/item.asp...d=898&catid=15)
LG MotorSports makes a good came in the similar range: G5X1 228/232 .588/.574 with 112/114 & G5X2 232/240 .595/.608 with 112/114 (http://www.lgmotorsports.com/catalog...oducts_id=1509)
Again be warned once you cross the dreaded .600 mark the car starts to become less streetable and more race track only car. Street manners and cold idle can get poor. AND once again be warned that as you cross .600 on your way to .650 you need to start changing out your heads springs on a regular basis form the high amount of pre-load even when the car is at rest and not on the track. This means more regular maintenance and if you cant do this yourself more money. Once you cross .650 you are changing springs once ever year. Think about this in your decision. I would rather give up 10 RWHP to spend $1000 less a year and spend more time driving, less time fixing IMHO. But I do HPDE. In wheel to wheel competition for $$ racing you don't win without pushing the envelope and spending the big bucks.
Out of the BOX LS Race Motor:
Looking for a LS Platform, out of the box ready to race motor without having to worry about building one from scratch? And all the costs, research and fear of reliability? Replacing a motor you already blew up? Trying to do it on a budget? one way is to buy a GMPP CT 525 carb motor and then have a race engine shop install a 3 or 4 stage dry sump system. these motors make 525 HP and 470 torque and would likely make a bit more dry sumped. There is also an factory EFI version 525. These motors are the ones developed for the ASA racing series and are tried and true race team motors, used in the events to level the playing field so ALL teams ahve the same motor and same engine costs. (http://www.superchevy.com/technical/...e/viewall.html) They use the ASA 525 lift cam, which is easy on the valve train yet makes for a good torquey motor for road race that need not be twisted much over 6500. You would likely have about motor is about $7000 to $8500 by how well you shop, and $11,000 in a dry sumped version of these motors. This would be a cheap motor option as you could run it a couple years, sell used and buy another to replace down the road. Some have used these in the Trans Am 2 cars. You can get an all forged dry sump road race LS3 from $15-16k to start and a fully forged and built to the gills LS# could be up to 25k just for the motor.
The motor GMPP part#19271821 for the CT525 - link: (http://store.chevroletperformance.co...-19271821--%3E)
Belts and Tensioner:
This is simple. Belts under heavy load will take more stress, spin faster at higher RPMs and fail faster when you road race. I HIGHLY recommend if you have not changed your 2 belts since you bought the car, you change them prior to road racing. A belt failure will have not only expensive repairs on the track, but could also cost you your car or your life. If you read the forum, the posts abound on the wonderful properties of Gator Belts. I will tell you my personal experience with them, don't get them. First off they are not a perfect size OEM fit and this can be difficult to get the right one (3 different sizes are sold by various parts stores that are within a cm of each other) and its a bitch to get them right. Next I cut one in half on my car, luckily it was on a test drive over my buddies house. Unless you get crazy on race quality expensive as heck belts, the OEM GM belts are fine. I suggest talking to Gene at GMPartshouse.com for these OEMs unless your local dealer will price match their great prices. Now, the stock LS1 belt tensioner = crap! I have heard of LS1 C5 cars having belts jump off the pulley at high RPMs. This was supposed to be mildly addressed after I thin kthe 2002 models to be a "bit" better but IMHO the stock C5 tensioner sucks. The one sold by Katech Performance is the best I found, and it unbeatable right now at the price (http://store.katechengines.com/bille...sioner-p3.aspx) of $120 + SH. OOO did I mention it also comes in colors! I got a red one which matches my catch can :-) Did you all know Red goes faster! No? It does :-) Oh, make sure you use a torque wrench on this thing at least a few times a season. The bolt to hold it in place is 40 ft/lb, the bolt on the Belt wheel is 25ft/lbs. Regardless of whats recommended this is what you need to keep it in place.
Pedals:
This is a quick conversation. Corvette pedals suck. First your feet slip off them when they are dry, and when wet in your driving shoes (ie. Piloti) its even worse. I also lost a high speed turn (and my life + car) becasue in the rain I was heel towing the car and slipped off the brake. Talk about adrenaline! Oh, and its hard to heel toe the C5 because the brake and gas line up so poorly both in height and distance. The ceap, easy and very pretty solution: Race Pedals. Once again, thanks to Chip at CCA for making a very affordable and easy to install solution. The CCA Billet Race Pedals in the Pyramid Grid Configuration (http://www.customcorvetteaccessories...ingpedals.html) for $160 is money well spent. Not only will you never slip off the brake or clutch again, but the gas pedal is oversized towads the brake. This closer surface makes the dreaded to learn and master heel / toe manuever so much easier to learn (http://www.edmunds.com/ownership/how...2/article.html). A good video which makes it easier to understand by seeing is here (
Last edited by Zenak; 08-05-2015 at 07:59 AM.

The following 8 users liked this post by Zenak:
72greg (01-01-2020),
AngryJ (08-27-2021),
c5golfguy (11-22-2018),
j.fet (10-25-2018),
JustMyMagination (12-08-2019),
and 3 others liked this post.
08-21-2009, 07:27 PM
#2
Terminal Vette Addict
Thread Starter
Suspension:
- or as I call it the single best bang for your buck to improve your performance... If you want to go faster in corners, besides stickier tires nothing will make the time come down as fast as a quick suspension upgrade. Read carefully this could cost you from $1000 to $10,000 or more depending on what you want to do and your piggy bank limits.
If you are doing one or two HPDE a year or an AutoX now and then, nothing wrong with the stock suspension. The cheapest upgrade when you get serious is a Z06 stock leaf spring set up (lots of em used on CF / Gene at GMPartshouse.com) & Hotchkis Sway Bars (http://www.hotchkis.net/search.html?...mitForm=Search) with their Grease Fit Adjustable Endlinks (prices change all over/used CF) with Bilstein Sports Shocks (http://www.allshocks.com/bilstein/ht...year='1999') (ebay pricing best apx $325 + SH or used on CF). Problem with all leaf spring set ups Corvettes included = wheel hop on big bumps, not a problem on the track however which is toally flat. This could be a big problem on the hi-way if you tighten up the suspension as much as you can get on this new after market install. (If you live in Detroit you want Coilovers, ever see those potholes? Could swallow a whale) For the money, you can buy a used setup like this (springs, bars, shocks and links) for $1000-$1400 on the Forum used or better. You want a set up with low mileage on the shocks, BUT the links / sway bars and springs are not as important when it comes to mileage so as long as they mechanically sound. Make sure you grease the HELL outa the poly blocks on the bars, if the grease goes dry the sway bar will not twist in the rubber/poly blocks. If it binds it can and will significantly reduces your cars ability to "lean" into the turns without corner lift. This can also lead to premature & excessive wear on other components of the suspension like the end links and tie rods. To eliminate the added rear suspension "bump" the tighter suspension will have on the potholes, change out the tie rod ends with the LGMotorSports Bump Steer Kit (http://www.lgmotorsports.com/catalog...oducts_id=1767). You only need one set for the rears, this is never a big problem in the front.
Here is a nice CF thread about seeing if your current suspension settings are doing what you think or not, how to check and discussion on what that means: (http://forums.corvetteforum.com/auto...-homework.html)
Want a super custom Sway set up? Then an adjustable blade setup is in your future, but its $$ and takes a lot of work to keep it running correctly. The ends of the sway bar rotate at the drivers settings. This way you can have either a flat side under load or more of a I-beam kinda load on it. A huge difference can bee seen on the settings. This is more of a tube chassis setup than a OEM car though. You can find the genesis blade sway system here (http://www.hrpworld.com/index.cfm?tp...action=product) but its more of a ridiculously hardcore step up and not really HPDE. Raetech makes the for Porsches and Vipers, Vette set up coming (http://www.raetech.com/Suspension/Blades.php).
If you are going to be an AutoX or Road Racer that RESTRICTS you from having coil overs, and you don't mind spending oooodels of $$$ for the best money has to offer on Shocks alone, you might want to upgrade to the Koni 3013 (http://www.koniracing.com/rr30.cfm), the Penske 7500 (http://www.penskeshocks.com/Sports_C...500_Series.php), or the inverted Pfadts (http://www.pfadtracing.com/catalog/p...products_id/74). All will run you $$ 2-4x more than the Bilsteins Sports are are also much harder to find used on the forum, but these all have slightly faster rebound rates which means more precise handling especially under load in corners and when the road isn't perfectly smooth. Its a huge leap of $$ though for a small increase in performance over the Bilsteins so this is a suggestion on for those of you going for broke on the track \ AutoX and are not allowed to use adjustable coilovers which far outperform the leaf spring/shock OEM setup on Vettes IMHO.
If you are going to do A LOTof track time and thats why you are building this car, just shell out the $$ the first time and go for the coilovers and pfatty Pfadt sway bars apx $3k for total set up in parts (check weekly deals in the C5 parts for sale section by vendor specials, many local guys install these cheap if you buy from them directly) if you buy directly from Pfadt (http://www.pfadtracing.com/catalog/p...products_id/34) As for the Pfadt sway bars there is a lot to know before you do this upgrade. First if you are buying used Pfadt sway Pfadt Competition bars, the "version 1" bars place the endlinks exactly under where the brake ducts will be and will rub the endlinks into the brake ducting eventually putting a hole in the duct and leaking air making the duct less effective (see this section in the brake write up in this thread). The later versions of the Pfadt bars have address this and they are now friendly with all duct systems inclding the DRMs. Next is the set up of these bars. While I love the bars, shame on Pfadt for not having better and clearer install instructions. Pay attention: while you use the stock C clamp from the OEM sway bars to attach the Pfadt poly bushings, the stock OEM C clamp is bad for these bars. Yes you heard me, and anyone who has these is nodding up and down right now. The Pfadt poly blocks for the pfatty bars if TOO BIG for the stock OEM clamp. Simple fact. No matter how much grease you place on these the OEM C Clamp once tightened and bolted down over compresses the sway arm and binds it. Which means no twisting of the sway bar, and the entire reason for the upgrade is moot. This binding will them increase strain on the endlinks (I actually popped one stripping it and Pfadt kindly replaced it for free); it will also strain the tie rods and ball joints more on full suspension loading. Ok so now what? I still highly recommend these bars. Pfadt needs to add a simple fix, 4 washers per bar. You will need to find 8 total washers (4 each) and place them between the C clamp and the frame when bolting the sway bar on. This will push the clamp out 1/8" away from the cahsis and thus gives the poly breathing room. The poly will now not over compress and wil not bind the bar! Thanks Tony for teaching me this after I destroyed an endlink form the bindign problem. Pfadt needs to add this into their instructions, and put 8 washers in their kits. DO NOT install this bar without doing this mod, I warned you.
Be careful buying used PFADT coil overs used, there is a lot to know. Pfadt makes "versions" of their products and when the new one comes out to fix the prior isues, you are kinda on your own from the issues in your version. Love the products, but hate this fact. If you do buy them used and they have the old Clevis Style mounts, get the new cup version mounts prior to installing. Factor the cup style mount upgrades into your price when buying used however, its not a cheap upgrade (http://www.pfadtracing.com/catalog/p...roducts_id/139). Make the hole in your trunk deck a good 2.5” big & round if you get teh Pfadt coilovers so you can easily get your fingers down in there to adjust the dampening. You can leave the hole about an inch circle if you use an 3mm alen key to adjust the dampening on the Pfadt coilovers, and LEAVE OFF the control *****. I did a larger hole and left them off. I found metal press in caps to seal the holes when done form Home Depot for like $3 bucks for the set. With the Pfadts I prefer about 12/14 on a new "fast" track in the dry on the 16 point adjustments on the Pfadt. On a very technical track, I like 12/13 which makes the harder corners a bit more neutral for me personally and then i can work form there. It’s a nice setup. If you keep oversteering, drop the rear down some. If you understeer adjust the front some. In the Rain I also soften both front and rear if I have the time to 10/12. Autocrossing is a very different set up. You want the opposite really in rebound stiffness. Autocrossing start at 14/12 on a fast Corvette set up style track. On a very technical course SCCA style with lots of twists and turns, maybe 13/10 or even 12/9 maybe in your early run and see how it feels. This is assuming the Pfadt bars as well in the middle setting of stiffness.
To adjust the fronts, the easiest thing to do is just jack up the car and then reach over the wheel. You could just barely squeeze your fingers in, but it’s easier than going through the top and moving the reservoir each time. Stick your ear all up in there and listen quietly for the "click". No sense doing what I did if you race it a lot which is do the hotchkis/blistein then up convert again. Pfadt kit also totally removes both leaf springs. Also the stock endlinks on the older C5 Vettes are plastic and give too much play I think up through 2000, the newer C5s 2001+ went to full metal. Both do not allow you to adjust the heights of them though like the Pfadts, Hotchkis & GM T1 endlinks do. The Pfadts & T1 are more adjustable than the Hotchkis. Pfadts and T1 are beefier, and there have been instances of Pfadt endlink failures, usually from bar binding that is addressed in this write up. Adjusting the endlinks lets you 50:50 the car for PROPER corner wheel race weight balancing. The GM performance T1 set up is not too bad, but unless you are running SCCA etc which require specific parts for a class, makes there are matched aftermarkets out there to their bars.
PFADT has new for Spring 2011 the new remote reservoir / adjustable BOA (Ball On Axis) upper shock mount system coilovers specifically for racing application. A Video of these can be seen here: (
/PfadtRaceEngineering?feature=mhum#p/a/u/1/az_Iof7_LEc) and they are on their website here: (http://www.pfadtracing.com/catalog/p...roducts_id/233) This is one of the only remote reservoir systems besides the Ktech. These are fully adjustable and rebuildable for easy long term use. Start up costs are high on a system like this apx. $4900 / same price as the Ktech Motons reviewed below. I have no experience with anyone using them as of this posting, here is the first link I saw with this system set up with some install hints (http://forums.corvetteforum.com/auto...t-install.html)
PFADT has goneout of business as of January 2014!!!! So these bad boys are now only available used!!!!
LG Motorsports has a really nice new GT2 Coil Over setup now (since Sept 09) (http://www.lgmotorsports.com/catalog...oducts_id=2176) & a review here (http://forums.corvetteforum.com/c5-g...rs-review.html), which is very similar to the Pfadt kit except for the upper mounting mechanism in the rear (there is a bit of friction between Pfadt & LG) and the LG is a very pretty anodized red! The one thing that is different on this kit that jumps out is the fexible shaft adjusters for the coils. You do NOT have to go through the trunk cutting a hole like the Pfadts to set them! This alone makes the kit more desireable than the Pfadts IMHO. Much easier, I tried them on the display at Carlisle 2009 (where I won the AutoX *cough cough* and was pictured on the middle right - tiny pic - of page 65 of the February 2010 Issue of Corvette Enthusiast http://editions.amospublishing.com/K...spx?d=20100201). LG says they "may" be making an aftermarket kit so you can attach these to other kits in the future, but for right now its only on their kit. If it was up to me to buy coil overs TODAY, I would pick the LG GT2 set up over Pfadts for the flexible shaft alone no other factors included. I think they are easier to use, less hassel to install, no choppign your body if that scares you.
QA1 for years has been the leader in C2/C3 coil over upgrades, and just recently (end of 2009) released a coil over kit for the C5. (http://www.qa1.net/qa1_motorsports/d...te%20C5-C6.pdf) I like that you can select on this brands spring rates, its 24 point adjustable which IMHO is just overkill. You do not need that much adjustment. They also make a Drag Racing valved setup, and to my knowledge is the only Coil over brand specifically making a package for that market. From a CF Member (armycop) - The springs I chose are all 650lbs tension, since I'm running a square 18" setup and the car's near 50/50 weight distribution would provide a neutral platform to start from. The coilovers come in four boxes, and you have to put them together. The instructions provided aren't heavy on detailed photos, but the write-up is easy to follow. Getting the bushings into the shock tops was the hardest part, but some soap and water and a press or vise helps alot. Once assembled, you have to remove the stock transverse springs and associated hardware, which if you are decent with a wrench isn't a problem. getting the stock shock out, however, can be an issue if you've never turned a wrench on the lower retaining bolts (12mm). Installing the coilovers is an exercise in patience and alcohol tolerance! The issue is clearance; that is, the clearance between the upper a-arms and springs is tight-too tight in my case. Jacking up the entire a-arm assembly to imitate weight on the suspension allowed me to pry the coilovers into place. Once loose, however, the upper a-arms rest against the springs. keeping tension on the assembly was the only way I was able to get them bolted into place. You use the original hardware to install them, BTW. A quick trip around the block to get them to settle, and you're all done! Except for the adjustments....that's a science in itself! The first gen set that I have are single adjustable, with 18 settings for each. QA1 techs recommend a 4-6 setting when tooling around town; they don't offer advice for on-track settings though, because each driver is unique. Since I'm on tracks throughout the North Central US and mostly Michigan, and I'm a larger-than-average human with like passengers, I run the shock preload in the upper ranges, 12-16 area depending on track. I have found that stiffer front settings, running a square setup, offer the best neutral balance in midcorner and outcorner acceleration. The coils are also height-adjustable, and the kit includes two adjustment wrenches as well. I drop the overall car height 1 3/4 inches at each corner, which provides plenty of clearance on the fenders and makes the car very stable. On the street with street tires I run the stock heights. Preload and height changes can be done with the car on the pavement; you just have to contort to get into the wheel well.
Doug Rippie MotorSports (DRM) now makes their own special C5 Coilover kit as well (http://dougrippie.com/?p=439). I have not seen it, driven in it or experienced it. But... if its anything like the rest of the DRM stuff, his **** just works! Installs well, and has little to no problems. My concern with these after driving them is they are very stiff, and the C6 Z06 I ran them in - they were not adjustable. Its a large improvement over stock, but not a good setup for doing adjustment for wet/dry and different tracks. Additionally having them so stiff makes them a poor choice for the street with the bumps etc being felt on everything in this stiff setup. For the $$$ I would go adjustable LG.
If you are a price is no OBJECT! I want the BEST! Then right now IMHO the Moton's sold by Katech performance are the bees knees. (http://store.katechengines.com/moton...ocks-p160.aspx) HUGE remote reservoirs allow you to control each corner from under the hood the the car. Easily rebuildable if spring rates need changing for different tracks. At just under $5000 after taxes and shipping though this is a major investment. These come stock on the Katech ClubSport C6 cars. If you never raced a Katech built car on the track driven by a competent driver... I'm sad for you. These package built cars are as close as you get to an outa the box C6 street legal track car, second only to the Pratt and Miller cars. But the price tag will sticker shock you for both of these brands. For those shouting Lingenfelter, they make cars go fast... but I have yet to see one outa the box as a road race track car like the other 2.
JRZ makes a coilover kit for the Vette now, better know for their ricer and tuner car setups. Some Porsche's use them as well. SpeedMercahnts Makes the only Corvette custom kit out there I know using their parts: (http://www.speedmerchants.ca/collections/jrz).
Eibach one of the best know spring manufacturer's in aftermarket suspension makes a kit now with Callaway for their Callaway vehicles. You can now as of 2010 buy them as an aftermarket for any Vette 1997+ (http://performance-suspension.eibach...i_pro_callaway).
NOTE = I did the Z06/Hotchkis/Bilstein set up the first time before I knew I was going to be a racing addict. I went with the less $$ route the first time and spent more in the long run doing this upgrade twice. Not to mention labor and busted knuckles twice, don’t make my mistake. Go with the more aggressive camber settings though once you set up any suspension upgrade/Mod, stock will just not do. Dealers suck at this FYI.
Don’t over lower the car unless you live in the salt flats! I love my front frame rail saver wheels from custom corvette accessories (http://www.customcorvetteaccessories...fattdaddy.html). Thanks Chip. While you’re there, get jacking pucks if you don’t already… much easier on your car when you are constantly monkeying for events. Harbor Freight makes a great inexpensive low profile race jack, and there are always coupons for them in Auto Week, Corvette magazine, etc. Front chin splitters add great down force, but good luck with them anywhere but the track if your car is lowered.
BUSHINGS! Do the bushings ASAP! Even after my hubs were done, I still have way to much play in the upper control & lower arms under heavy load making the Camber/toe settings a bit silly to discuss! Its taking out all my camber! (see video
) I looked around and talked to several folks on the track, Vette Brake Products (VBP) (http://www.vbandp.com/SearchResult.aspx?CategoryID=396)makes a nice cheap kit (it was $269 @ Carlisle's Vette Show in 2009) and after using the PFADT set up I think its the prefered setup for ease of use and long term replacement. At first inspection the Pfadt kit looked like the way to go but after a miserable installation (http://www.pfadtracing.com/catalog/product_info.php/cPath/23_29/products_id/43) I have changed my tune. There is a write up on Pfadt vs VBP and the Poly sticking problems here on CF (http://forums.corvetteforum.com/autocrossing-and-roadracing/2286227-my-experiences-with-pfadt-vs-vb-and-p-c5-bushings-8.html#post1574028634)
Apparently there is a "tolerance" in the C5 manufactering process for the internal diameter (ID) of the control arms. This means that the ID can vary in some cases by a good few 1/100ths of an inch. In a rubber bushing, this is not a problem. Rubber is very maliable, but in the HARD and RIGID world of poly, this is a different story. The VBP bushings for some spots are two piece poly, so then the ID is too small the poly will compress and have some space to go into. The Pfadts are one piece and have no place to go once compressed, and therefore squish out the edges. A new snap ring was needed to hold it all together that didn't come with the kit as well. In the installation, (Thanks Tony!!) we had to use a nut and bolt to compress the poly bushing into the ID of the arm even after using the hydrolic press just to get it small enough to install it for the rears. Then remove the bolt after it was 1/4" into the brackets and use a BIG hammer and hydrolic jack to push the poly shod arms into the rest of the rear brackets. The first one took 1/2 a day to get in, the second one once we figured out the trick only about an hour to get into the bracket with 2 people. Tony has done several VBP before, and he said its much easier than the Pfadt poly kit.
Pfadt Poly Kit After install issues = After a 3 day HPDE in Spring 2010 on my new kick *** set up, I was very disappointed. While the poly made the car handle much more accurate and predictable, by the 3rd day 3 or the 4 upper polys had the retaining clips pop off the bar and the retaining washers then pushed out off the poly on the Pfadt kit. I have taken pictures and will be sending them to Pfadt to see whats up? Have them posted here on my CarDomain.com (http://www.cardomain.com/ride/3117424) which I only use honestly to post pics of parts to sell. From the onset Tony & I were concerned because the grooves were very shallow for the retaining clips. Now small road debris is embedded into the grease between the poly and the side washers which is a concern on rubbing. My experiences so far on the Pfadt Poly kit have been problematic at best. Even if a fix is sent to me from Pfadt at no charge like in the past, its the labor time I just don't have now that I have events 2 to 3 weekends a month. That's why we did all the labor in the winter in Tony's Garage! I think the fix would have to be taking the 4 front upper control arm Pfadt bushings and - cutting - them in half. Making sure you create a 1/8" space between the 2 halves by removing some material BEFORE pressing them in. This way under load the bushings have room to expand in the middle of the upper control arms. Since the Poly has a place to go it will not push off the retaining clips. These were a very poor design as sold IMHO. One upper bushing pushed about 1/8" wider and the other side is right were it should be. I now will have to pull them out, cut and shave and then repress in. When do you find the time to do this mid season?
The issue with exact internal diameter on control arms is a larger concern for say the spherical's from PFADT, that are amazing to look at, and are true hard core racing application, you can read about a recent write up of them here for comparison to the polys. (http://forums.corvetteforum.com/auto...post1571816669) but my big concern is that i bet there is a decent amount of ID honing (grinding) that will be needed to install these on about 50% of the cars out there and the do-it-yourselfer might not all the tools and equipment. In fact to be honest we probably should have honed the ID in the arms to make Pfadt polys work in easier for the rears. Also the Spherical Kits are for TRACK ONLY applications, click heavy and do not like potholes. Energy Suspension also makes a decent kit (and its red for those who care) which sells from SummitRacing.com but from talking to people its a great upgrade for a good street / 1/4 mile car but is not much better than OEM after a few pressure/heat cycles on the road courses. The hard part of doing bushings is not picking the kit... it is pulling the arms, pressing out the old ones, drilling the zerk fittings, getting in the new ones, them making the darn things fit with the harder polys back onto the car. Beer helps this process FYI. Beer and patience. So when you do all this work, and you make sure its perfect with the measure 4x and cut once approach... then it doesn't hold up on a track day its frustrating to say the least.
Poly Bushing Swap "How To" on CF with very nice pictures, and a step by step here: (http://forums.corvetteforum.com/auto...-pictures.html)
I highly suggest you add Zerk fittings (grease fitting sites) while there (I did), Im hoping the Pfadt Poly Bushings with the grooves in them that claim to be self lubing live up to their promise. Also had the arms media blasted and clear coated to make the dust come off easier after track days. The zerk fittings are drilled in grease fittings to you can put a grease gun to pressure squeeze grease into the poly bushings on a regular basis. If you are going to do a poly kit, why not do the drilling of the control arms for zerk fittings while there why not?! These are grease fittings that allow you to regrease the bushings before each event in like 5 minutes for the whole car. If the bushings get "dry" they dont move up and down as quick and the hotter they get the worse the "binding" becomes. "Binding" means the control arms will not pivot up and downas the shocks/springs/coil overs were designed to. This means the wheels will not react as fast to the road surface and you will lose grip and responsiveness. I have heard of binding issues with the polys after dirt and grime gets in there makeing the poly upgrade much less effective. The grease fittings allow me to press high temp grease (marine grade grease or Mobile 1 Synthetic grease that looks like cherry soft serve ice cream in the tube) into the poly regularly and keep them from causing binding \ premature wear issues (the one & only big complaint you hear on poly). My advice is if you do Zerk the control arms, you put 90 degree elbow fittings in the upper rears, its a bitch to get your grease gun on mine that are just stright nipples. When i rebuild them next I will swap the fitting for a 90 up there. When you feel how solid they are over OEM, you instantly get a lot more confidence. And FYI, DO NOT go too nuts spending time and $$ getting your perfect alignment and 50:50 corner weighting done only to then do the bushings after. Once your bushings are done, the whole car will need resetting up. If you pay a shop to do the work on this one its about 6-10 hours of labor easy to swap put the 8 control arms. You can buy a cheap bushing / ball joint press on ebay for the DIY crowd.
CF C5 Poly Bushing Install and Issues Thread (http://forums.corvetteforum.com/auto...s-learned.html)
Spherical Bearings:
Once your car makes its way into a TRACK only car and leaves the street completely and you are looking for the next thing to spend gobs of $ on, Sperical bearings are the mac daddy of control arm jewerly. ZERO play, amazing and firm response time. Makes the ride very rough, hence not suggested at all for street use.
Pfadt: (http://store.pfadtracing.com/corvett...el-frame-cars/)
Corvette Solid Spherical Bearing Kit - Steel Frame cars $1,890 SKU: 1110220
LG: (http://www.lgmotorsports.com/product...oducts_id=1981)
LG Motorsports Mono Ball Control Arm Kit Item# 1981 $1,795.95
DRM: (http://dougrippie.com/products/c5c6-...-arm-bushings/)
C5/C6 Corvette Mono-ball Zero Deflection Control Arm Bushings $2695
Tikt: (german) (http://www.tikt.de/wp/?page_id=223)
Price for the complete set TIKT performance uniball bearing for all eight wishbones without the bearings for the damper mount!
€ 1990 - including 19% VAT. Uniball shock mount with 2 bearings € 249, - including 19% VAT.
As for the tie rod ends for front (http://www.vbandp.com/SearchResult.aspx?CategoryID=396) and rear (http://www.vbandp.com/SearchResult.aspx?CategoryID=397), you can not go wrong with the Vette Brake Products (VBP) heavy duty units. Make sure you also order the polycovers for them (2 sets for full car) which will keep crap out of them and make them last longer / also resist heat better to avoid dry rot from heat/oil. Since the ends are stiffer they will also hold your track camber/toes setting better & have a limited lifetime guarentee! I used a speed clip for the special nuts the tie rod ends came with, and not a cotter pin. So if I need to get in and out of them later its easier. Oh yeah, its got its own nut and the OEM will not work.
When it comes to the ball joints, RockAuto.com is the way to go. Moog K6537 (lower) and Raybestos 5001128 (upper) you will need 4 of each. These are FAR more durable than the OEM ones, and while pressing out the bushings its a good idea to do these too. The Moog also besides having 2x thicker cups on them to keep debris out and cut down on heat transfer are the only ones I found with a grease fitting for long lasting lubrication and less prone to failure from grease dry out. You can wait for the OEM to fail or be proactive and do it all at once and not waste a track day when they do. Pfadt also sells a major improvement over stock for these (http://www.pfadtracing.com/catalog/p...roducts_id/129), but at this time (Fall 2009) only 1/2 the kit is avilable for sale which is the lowers. As of this update (12/09) there is no plan to make an upper. Personally I saw the Pfadt lowers, and dont get me wrong they are really pretty to behold, but the Moog are a tried and true product and while looking more industrial I think they are going to take the beating better and will cost less in the process. Plus I like the Moog's built in Zerk fittings that let me regrease tehm between events for better operation, and less binding = longer life. The Pfadt are only about $30 more each over the others at Rock auto. I have no experience with them though installed, and I do not know of any write ups on the Pfadt ball joints. If you got them, please PM me so I can add info here.
HEAT PROTECT your tierod ends & ball joints - lower more than upper. The #1 reason for ball joint and tie rod end failure = heat! I recently melted through my updated suspension part boot covers in two events in Spring 2010. My Jerry Rigged setup to protect them wasn't enough. Here are a list of some ideas to protect the suspension parts from the heat of the rotors:
1.) Header wrap and safety wire - you can get the wrap about anywhere
2.) Quantum makes a shiled kit that installs at the same time as their brake ducts (http://store.quantummotorsports.com/...products_id=85)
3.) Soup Cans cut up and tied around the ball joint / tie rod
4.) Heat Sleeve industrial Material (http://www.firesleeveandtape.com/) and catalog here (http://www.siliconefiresleeve.com/Si...eveCatalog.pdf)
5.) Cool Mat instead of Header wrap: (http://www.koolmat.com/new.shtml) or even better their balljoint and tierod kit on the same page pictured here (http://www.koolmat.com/images/ball-joint-kit.jpg) and some Corvette Specific stuff here (http://www.koolmat.com/corvette.shtml)
See CF Threads on this topic here:
http://forums.corvetteforum.com/auto...e-rod-end.html
http://forums.corvetteforum.com/auto...at-shield.html
Safety Wire Kit from Summit Racing: http://www.summitracing.com/parts/CMB-17-0026/
Header Wrap from Summit Racing (15 feet @ 1800F plenty): http://www.summitracing.com/parts/DEI-010129/
Header Wrap Ties instead of safety wire form Summit: http://www.summitracing.com/parts/LNG-47840/
Performace Alignment Guide - Toe Camber Caster:
You need to understand what the hell these 3 terms means before you read any further. Read here first:
http://www.tirerack.com/tires/tirete...e.jsp?techid=4
http://www.stockcarracing.com/tipstr...tup/index.html
http://www.ozebiz.com.au/racetech/theory/align.html
http://www.anewtoronto.com/wheel%20alignment.html
What is this all about? It is a simple concept of your alignment, and how it affects how the car will stick to/hug the track. Im makes a HUGE difference in performance. I will tell you that if you saw the Pfadt youtube video (
) even on a brand new C6 Z06 the stock bushings allow SO much deflection that spending a huge amount of time on this toe - caster- camber arguement is irrelevant. You can set what ever you want but in turn load the stretch will give you about 2 degree point changes. So, whats the point. If your car is an older C5 with many moons on it, the rubber is already starting to degrade and this gets even more irrelevant. Once you upgrade to VBP \ Pfadt's poly kit or even better sphericals for a true race only car, now you are cooking with gas.
Now, you have to ask yourself, "what kind of racer am I?" Are you trying to shave every last second off your lap time to qualify for the Rolex 24 and need every last inch that your car can give you? Or are you like me trying to find a happy medium between tire cost and better performance. Assuming you alreay read the links above, I will go on. You can put a pretty hefty amoumt of camber into your wheels without significant tire wear. Infact tires like Toyo RA-1, Proxies, R888, Hoosier A6 & R6 actually are designed and prefer a few degrees of negative camber. The negative camber allows the tires in a straight line to kick out a few degrees on the bottom like this: // \\ but in a corner under load the tire will not sit flatter. This allows better grip in turns, which means more traction and higher cornering speeds. (Short Version). Your tires will hold a decent amount of camber without significant changes on the inner edge of a tire so as long as you do not add too much toe change in the configuration. Once you start increaing tow, aggressive camber settings will eat tires fast. Therefore I like good negative camber in my fronts, less in the rear and minimal toe changes. This way I sacrafice some of my straight line correction for better cornering and better tire wear. Make sense? Too much of these changes in the wrong suspension or tires will cause severe tire assymetrical wear and posibly quick inner cording of expensive tires.
I would like to give you all a quick reference guide can be found at Pfadts Website (http://www.pfadtracing.com/blog/wp-c...-alignment.pdf) with some nice basic starting points to mess with once you start tweaking your suspension. Remember though these settings are dependant partically on your choice of leaf spring vs coil overs, street vs racing tire, etc. The car can do a whole lot more on modified suspension and race tires than stock supession and run flats. FYI Run flats are a scary way to learn HPDE, trust me I know I did it for a whole seaon till they were as bald as Mr. Cleans head.
Ride Height is another concern, which needs to be SET BEFORE you do the alignment. Measure to the inside center top of the wheel well, exact aboce the center of the wheel hub. Ground to body height should have a small rake of about 3/4" to 1 1/8" to make 50:50 weighting easier on the suspension later (http://grassrootsmotorsports.com/art...orner-weights/). I run at 26 3/4" front and 27 1/2" rear, many people also will have the driver side set LOWER in height by 1/8" to 1/2". Please note that ride height as well as camber, caster and toe are VERY VERY subjective. Its in the same arguement sphere as which oil to use and why. Note the lower the ride the more necesary aftermarket suspension becomes or the angle geometry of the spindles start getting severely affected. Additionally, the lower the ride the more likely you will scuff your front frame rails and or bumper. Lower cars have a better center of gravity and better aerodynamics and drag however. Its all a trade off. Any time you lower your car, even on stock suspenion / bolts you must INSTANTLY get your alignment fixed! Make sure you can clear 2 fingers between the tire and the outer wheel well, or expect problems later.
With that said, on a STOCK C5 suspension, 2.0 to 2.5 front is about the max Camber you can get & 1.0 to 1.5 is about the rear max without shimming the upper control arms. After you pass 2 degrees of negative camber, the law of diminishing returns comes in to play with more and more camber needed for less adn less gain, and greater and greater premature tire losses. *NOTE* Do your race alignment assuming YOU are in the seat. Does your car ever race without you??? This means you want dead weight in your drivers seat! Im apx 180 lbs, put that much weight in the seat for better results. If you will have an instructor EVERY time put about 180 to 200 lbs in each seat BEOFRE alignment is done.. or simply sit there and read a book for 3 hours (with a friend if needed in the other seat). I also recommend exactly 50% (1/2)tank of gas. This will be a middle setting then for when the tank is either more or less full.
For the newbie dual purpose street / track HPDE car with NON slicks a good place to start (rubber bushings and street tires):
======> Camber, Caster, Toe
Front:==> -1.6, 8.0, 0 Height at Mid Fender: 27 3/8
Rear: ==> -1.0, N/A, -1/8" Height at Mid Fender: 27 7/8
More Aggressive (Poly Bushings & R-Comps) - Track Car as much or more than street
======> Camber, Caster, Toe
Front:==> -1.9 (left) & -1.8 (right), 7.5, 0 Height at Mid Fender: 27 (FYI this will scrape your Cats on steep driveways = be careful)
Rear: ==> -1.1 (left) & -1.0 (right), N/A, -1/16" Height at Mid Fender: 27 1/2 - 27 3/4 (Differences occur when you drop weight in front)
* asymmetric camber is because most tracks are run clockwise and this accounts for the increased loading on the left side a bit more for more even L v R tire wear and easier rotating and flipping of tires.
If you want to learn how to do your OWN alignment you can read a great thread here with links to all sorts of useful tools, settings, setups, etc. (http://forums.corvetteforum.com/auto...ich-tools.html) and a few quick links:
Hardbar Alignment Tool is great: (http://hardbarusa.com/hardbar/produc...products_id=44)
**** ===> DavidFarmer on the CF has a GREAT guide (new link): (https://dl.dropboxusercontent.com/u/1634366/align.pdf)
And have an accurate and good tape measure, laser level or 4" level, builders square & a flat level spot makes it easier to perform your calculations and get the job done faster. Oh, a four post lift is always best :-)
Inexpensive slip plates for doing your own alignment can be found here: (http://www.prdonline.com/osc/catalog...products_id=79)
My starting points above is a good dual purpose setting with a nice trade off in corner handling, good tire wear, and minimal "lane grabbing" which is quick corrections on minimal steering input. You would be amazed at how diferent these tiny weeny settings affect your performance! Get a good laser alignment done. I do NOT recommened your stealership for this. The techs there do not understand the fine balance of ride height and performance. They are used to only OEM settings, and this is a easy thing to do. You really need to goto a performance shop. It doesn't have to be Corvette based, but this does help. Ask local Road Racers and HPDE junkies where they get their suspension tuned at. A proper lowering with corner weighting (trying to get the car close to 50:50 front rear and 25% per tire) with a decent race alignment will tkae a few hours to get right the first time. Make sure you get the whole car DONE beforeyou do this. Any changes you make in parts, rims etc will make your alignment change a lot. Expect to pay about $350 to $500 for a full race weighting and alignment. So plan well.
Once you start getting more aggressive on your alignment settings you can push to -2.5 to -3.0 front and -1.5 to -2.0 rear. Caster start about the same in all configurations from all my reading with 6.5 (Slick) to 8.5 (Run Flat) in the front being the ideal range and not much affect between the two unless you are really a pro in this regards. Toe can change in advanced settings from 0 to -1/8" by desired effect in the front and from -1/8" to -3/16" in the rear.
*NOTE* You really want to make all your corrections in the lower suspension, not by unbolting and rebolting the front upper control arms often for shims on the OEM setup. The Bolts on the front upper control arms are screwed into nuts which are attached to the frame. If the frame nuts strip or god forbid COME OFF you have a world of hurt correcting this. PLEASE make sure you follow the suggested torque specs on the upper control arms when you mess with those bolts. DO not use an impact gun which will strip or damamge the attachemnts. Torque wrench and be careful only. Make sure if you take off the upper control arms you keep an eye on washers that GM uses to OEM factory shim your alignment. There may or may not be a washer at each hole, and the washers might be different in each hole, so becareful to label and not lose thwe washers if you do the front upper arms. If you are going to mess with the upper control arms for your alignment, a stud kit is HIGHLY recommended with "U" shims. You can get the stud kit from Hardbar (http://hardbarusa.com/hardbar/produc...products_id=42) this will allow you to switch form street to track quick without the amount of risk to damage the OEM bolts do on upper arm shim adjusters.
Both Hardbar (http://hardbarusa.com/hardbar/produc...products_id=56) & Pfadt (http://www.pfadtracing.com/catalog/p...products_id/44) make "Camber Kits". These typically include fixed camber plates, as well as U shims for the control arms in the front making it "easier" to move from one camber setting to another. Downside is that you have to affect the Tow on each set up back and forth. its not as easy as it sounds in the ads, but with some practice its not bad. Nice thing is that you can set some pretty aggressive camber settings above -3.5 for really aggressive Hoosier settings, etc. A write up on how these work with suggestions to make it easier can be found here: (http://forums.corvetteforum.com/auto...ho-has-it.html)
Good Threads can be found on CF on this topic here:
http://forums.corvetteforum.com/auto...-too-much.html
http://forums.corvetteforum.com/auto...alignment.html
Having a problem getting the suspension to feel just right? Not sure what to do? Adjust toe? Camber? Change spring compression? Air pressure issue? This website has a nice Q & A check box system, that after you fill in all the boxes it will tell you what your doing wrong with suggestions on how to correct it.
Turn Zero Dynamics Analysis Tool - Automated tool for troubleshooting handling problems:
(http://www.turnzero.com/technical_re...mics_assistant)
Brakes Basics:
First you must get rid of those OE lines if you are going to be racing the car often. Get a good pair of Stainless Steel braided lines, do not skimp. Stoptech, Brembo, Wilwood, etc. are all fine products for lines, but the Wilwood ones allow you to turn the lines even after being attached which makes caliper on/off much easier later without moving lines around. Motul 600, Super Blue, etc is your fluid choice. I found the best deal on Motul 600 from http://corollasport.com/rbf600.html if you buy by the case after shipped to your door its $16 each. You will need a case. Flush your system before each event, it’s cheap life insurance (see bleeding fluid section later on). Normal brake fluid = boil over = expansion = no pressure on your pedal when your hydraulics fail = no predictable stop = death. To flush your system WAY faster without helpers, I cannot say enough about Speed Bleeders! (http://www.speedbleeder.com/) Get the stainless steel ones! And order 5, not 4. There is a small chance of failure (rare but happens), and for the extra few bucks, it’s not a bad idea to keep one in your race tool box for emergencies. I can do my brake bleeding on my car solo under an hour on all four at lunch at an HPDE no sweat.
A great location for the GM parts list for C5 & C6 stock OEM brakes can be found here: (http://www.ls1tech.com/forums/suspen...mber-list.html)
OEM Caliper Rebuild & Maintenance \\ Stainless Steel Front Brake Pistons from DRM
You might want to eventually change out the stock oem Aluminum pistons in the Vette OEM calipers to Stainless Steel Pistons with the DRM kit (http://www.dougrippie.com/), the race pads make a lot of heat (way way more then an OEM or street compound). As the pad gets thinner the heat will also transfer more and more into the pistons and the aluminum OEM pistons send all that heat QUICK into your fluid causing boil over. Boil over fluid means fluid expansion, so when you step on the pedal you do not get the same hydrolic pressure and thus greater pedal travel and pressure to achieve the same stopping power you had with far less effort earlier in the day. The DRM S/S ones will not, he has them for C5 & C6, C6 Z06 and right now to my knowledge he is the only one selling this setup. You will need to buy a rebuild kit while you are there for the piston rings and the other tid bits. Its a FRONT set up only for the piston change out. No rears. While there just do the front and rear rebuilds all at once. DRM sells a caliper rebuild kit for about $40 a corner. It includes the piston seals, the piston boots, new bolts to the slides, and caliper grease. ASAP on this project soak the piston seals in the brake fluid while you are working, it will make install easier later. On a table, with the bleeder screw TIGHT, put a rubber tip air spray tip form your air compressor hose into the hole where the brake line was on the caliper; have a 1/2" board in the caliper to "catch" the piston, and then PUFF the air. The piston will shoot out and hit the board HARD. Be warned this could be dangerous. Use a dental tool (the pick they use to clean your teeth) or other to get the new seals out, careful not to scratch the aluminum. Now take one of your soaking rings out and gentle place it in the same grove you took the seal just out of. Careful that it is in 100% all the way around so you can feel it flush with your finger. Dip the pistons in the same brake fluid you plan on using once done do not use the fluid it comes with to lube it so you dont contaminate. Now place the boot on the piston, let it sit into the piston. Now STRETCH the boot down until it pulls out of the spot it clicks into the pitson, pull the boot about 3/4" of an inch past the end of the piston (leave about 1/4 - 1/2" of the boot still on the piston) and then get the boot INTO the caliper groove by squeezing the boot into an oval. Place the bottom in the groove first, and then work it around. You might need a small flat screw driver to work in the last bit. With the piston still out spin the caliper boot to make sure that its IN there. Now gently place the piston in the caliper and apply light and STRAIGHT pressure into the bore. Some racers decided that since the boots will burn off or catch fire to just not use them anyway, especially since the older ones after heat damage occurs get hard and can create piston drag. Its a subjective argument here, up to you. The Fronts with the DRMs slide in easy by hand with some 'umpf', the rear rebuild you will need a 6" C clamp to press those bad boys in (http://www.homedepot.com/h_d1/N-5yc1...atalogId=10053) but be careful putting it IN the bore of the piston if its not perfectly straight it will try to go in cocked and then you will have a bitch getting it out even with the air compressor. It took several tries to get the piston in with the 6" C-style clamp. Try a bar clamp instead (http://www.homedepot.com/h_d1/N-5yc1...atalogId=10053), its easier to make the piston line up with it and it was about 2 minutes to get the piston in using it versus about 10 with a traditional screw style one (not to mention cursing and retrying several times). DON"T forget to have the boots in the caliper correctly prior to the piston going in, the boot will NOT atttach to the caliper otherwise. Once the piston is fully depressed the boot seal will just pop into the piston on its own. Had to learn this the hard way, which is why I save you time now. If you just want to do the seals, and not the pistons you can get a local rebuild kit if you call around: Centric Front Brake Caliper Repair Kit Part Number: CE143.62036 Manufacturer Number: 143.62036. The kits come with new seals for the caliper pins, but the pins are not included & should be replaced with the rebuild as well. The bolts that go INTO the pins does come with the front kit. These are the guide pins that the caliper slides on, and only use the good Permatex 24110 Ultra Disc Green Brake Caliper Lube (http://the-auto-alley.amazonwebstore...B000HBNV6W.htm) with heat range from -40�F to +400�F, I like the 8oz brush top so your fingers stay cleaner and less is wasted; often available at PepBoys in small single use or 1oz squeeze green tubes. Your other better option for the pin lube is Permatex 24115 Ultra Disc Brake Caliper Lube Hi-Temp Silicone (http://www.stockwiseauto.com/Permate...source=froogle) with a heat range of -65F to 550F which is better for racing application but far less available. The more you got (8oz vs 1oz), the more likely you are to be liberal in your application. After several events the guide pins can (even with good lube) wear slightly and increase the rate of spread and pad taper. You might want to be safe and do the pins at the same time, Delco Part # 179-2009 (http://www.google.com/products?q=Del...N&hl=en&tab=wf) & GM Part # 12530697 (http://www.google.com/products?hl=en...8&sa=N&tab=wf0) and the Pin seals if you ever need these separately are GM Part # 12530703 (http://www.google.com/products?hl=en...-8&sa=N&tab=wf) & Delco Part # 179-2008 (http://www.google.com/products?q=Del...008&hl=en&aq=f).
Great thing to do at the same time as the SS brake lines since the calipers are off anyhow. Install video here (http://dougrippie.com/?p=425) of pistons, trust me when I saw this makes it look way easier than it really is :-P
To upgrade to C6 Calipers and then do the pistons in them (since the C6 is an exact fit and beefier / cools better) you need some part numbers. If you are replacing calipers for spread issues, its silly not to move up the the C6 kit. Down side is that if you ave loving your Z06 Red Calipers, these are base metal color. But on the bright side, no powder coating = less heat. FL GM# 88964164 & Delco# 172-2297 // FR GM# 88964165 // RL GM# 88955504 // RR GM# 88955505 (not 100% on these part numbers working on the full set)
Brake Bias Spring from DRM
While there you might want to think about brake bias springs as well (http://dougrippie.com/?p=404), they install on the portioning block of the 1997 - 2000 C5's before the portioning unit was added directly to the ABS module in 2001. You will need a 13mm and a 19mm flare wrench & 19mm socket (shallow). 13mm for the 4 lines and 19mm to get at the spring. You MUST get the block out to do this (its the weird thing under the brake reservoir that four hard lines go into). I would first do the 4 caliper rebuilds and the SS lines. Thus, you have FULLY drained the system. If not use the same toy you use to suck out the clutch reservoir with I explained in other posts to empty the reservoir, otherwise once the block is out it will start to drip out. Its not a bad idea to place a ziplock bag under the lines once the block is out to catch further drips, the rag will soak up otherwise and brake fluid is nasty stuff on paint. Put a rag under the portion block because it will drip a lot once the lines are off. Be careful to NOT round the line nuts. You may need a short 13mm wrench to get the back right one off, there isn't a lot of room in there. Once the block is out, but a rag around it in a bench vice, and the 19mm flare will loose it up to get at the spring. HAND remove the piece SLOWLY with the other thumb PUSHING down on it. Better yet, use a 19mm shallow socket with a paper towel shoved into it so when the last thread is out the part has no place to go, you will feel a PUSH and then its in the socket, carefully remove the socket now so the spring doesn't go flying. If not once the last thread if backed off the thing will BOINNNG into the air and you will be looking for parts. Of course this did not happen to me so I now explain this to you :-) Swap the spring easy, make sure the small tan piece is in the aluminum cap still for the spring to seat into. You can if you like take out the valve while you are there to inspect it, just be careful it goes back into the unit the same way it came out. To reinstall the tougher spring you will need the same swallow 19mm socket stuffed 75% with a piece of rag/towel so you can put the cap into it. You need to press it down hard to get it in and threaded. DO NOT cross thread, and do not over tighten its aluminum and will strip easy. You will do it easy like this, its a cluster poo to try and hand get it started. You will then fill the system and bleed it totally. You will get a code I think 1427 & 1428 i think. You will know when the active handling and ABS are not on your DIC are disabled and you then say "oh crap" now what did I do wrong. Its the brake portioning system sending the code, also the ABS ACH etc will all disable after the swap. To check if its the portioning block repull the side plug out of the recently reassembled block and see if the code clears. Bleed the whole system well, preferably with a Tech II abs bleed. Keep the plug out, drive the car a bit. Then do a fast rebleed again. Replug the wire, and walla hopefully like us the codes cleared out and all air is not outta the portioning block. Why do all this? By adding slightly more rear brake bias you can effectively remove some of the strain on the front calipers and thus the front pads will work a tad less hard and the rears will help your front pads get less hot and last longer. It also stops the nose dive some older C5s make and will keep you outa the ABS easier making it easier to threshold brake on your ABS system. Its a nice fix for the older style brake systems without having to do a total rebuild and replace of the setup. Now, this is what you do to get here, but here is the problems after. I have read several threads on this Mod, and so far I'm the only one who had this issue. Not sure if they sent me the wrong spring (there are 3 to order) and thats what caused this... but this mod wasted a full weekend of track time for me. 10 minutes into Lightning at NJMSP I felt my left side rear letting off too slow when trail braking, suddenly in my next corner the ACH went on in the exit just after apex. Next corner the same thing. Then on the next straight the ABS went on when I know it shouldn't have. Came into the hot pit, and I could hear a drag on a left side caliper. Went into paddock, and it was clearly the left rear. Bled it, went back to same issue. Took it apart, and assumed that since it was ONLY the left rear my recent caliper rebuild was the cause, the piston was a bitch to get in, so I blamed the tight seal. Crap I needed a caliper! Drove an hour each way to Tony's since he always has spare parts :-) and get a used OEM rear set. Ran back to the track, swamped it in. Drove the paddock with some hard braking. Felt fine. Yeah I thought! Next AM went out into the first session, and wouldn't you know same problem! Paddock showed me same caliper. So now its not the caliper. Hmmm, line? spring? Either way I was done. Long story short, got a new line form Randy at DRM who shipped it out ASAP. It wasn't the line. Changed the spring back to OEM and the problem went away. Again I do not know if I just got a bum spring, it felt realllly hard to compress. I think it was so tight that it was applying constant pedal pressure on the rear, and that meant it couldn't let go. I will avoid this mod for now, since I do not want to waste another track day. My advice is if you try this Mod, and many CF users seem successful with it, you do it well in advance of a track day. Do it without other mods going on. And heat up the brakes hard somewhere to test it. Don't waste 2 days on the track like I did over this one.
Big Brake Kits
BIG BRAKE KITS? You do NOT need a big brake kit (aka BBK) until you are a super driver! The stock C5 calipers do just fine, they DO need better pads. Buy decent pads early in your carrer, but the time you move from begginer to intermediate you will be braking VERY deep adn the OEM pads will fail and kill you. Z06 OEM pads are ok for a tad bit longer. Ultimately the pads do a lot more than the BBK will for the needs you have in teh begining at far less $$$ invested. BBK looks super cool at the car show, but is just over kill for most people’s skill level for a long long time. Spend the $3000 at Bondurant, etc. for race school instead of a brembo set up. The Race school will make you brake far better than a BBK will. Remember BBkits will require knowing if your wheels will fit over them. This happens a lot! Many BBK will not fit easily under 17's & 18’s unless you custom order special BBK friend version of those rims. Custom rims will cost you big $$$, and know WHICH BBK you want before you order the custom rims. Make sure its a comapny like CCW that guarentees their offsets for your set up so you dont get stuck with unreturnable rims that dont fit your set up! BBK pads also will cost more, don’t forget this. Bigg pads = more material = higher cost to produce and sell. Some BBK do not have a lot of choices for pads on them either, so do your homework first. And don’t forget, more pistons do not always mean stops better. AP Racing, Stop Tech, Brembo, Wilwood, Baer, etc. all make BBKs. Ask others what their success and pitfalls are first before you shop. I found personally that the Baer rotors, pads, etc stunk on the track and fail fast = Crack the rotors and are a waste for HPDE. Here is a great install page on how to install a Brembo BBK (http://www.southerncarparts.com/corv...ion-ex-45.html).
Very promising BBK & now T1 legal AP Racing kit (as of Summer 2010) offered from Hardbar and Essex Brakes. Its $2600 for the front setup with rotors, calipers and brackets (pads extra) and offers SS anti-knockback pistons, no boots, TRUE floating and heat sensitive rotors... just a kick *** looking kit for the $$. Gary is a friend to the Forum and gives excellent service. For a look at the kit specs (http://www.essexparts.com/shop/compe...0-caliper.html) and for a CF thread on them (http://forums.corvetteforum.com/auto...brake-kit.html) to purchase (http://hardbarusa.com/hardbar/index.php?cPath=21_36). I'm waiting to get reviews to post here as well. I'm even considering this kit as the OEM brakes are really starting to **** me off this season, with way too much time spent on the track in the paddock messing with them.
Here's a great webpage on how to select / understand brake parts & pads and information for HPDE, Solo, etc.
http://www.essexparts.com/learning-c...ose-brake-pads
A Rotors \ Pads & Bedding Discussion \ Explanation with a Excellent Video:
Part 1: Bedding (http://www.essexparts.com/learning-center/Bed-in)
Part 2: Swapping between Track & Street Setups (http://www.essexparts.com/learning-c.../swapping_pads)
Braided Brake Lines:
Please throw out your stock C5 brake lines ASAP as soon you you think you are going to be doing this on a regular basis. The stock lines are probably old on your C5 and the rubber on them not only cracks and fails, but the extreme heat of your fluid on a race track will allow these lines to swell ever so slightly robbing you of brake pedal pressure. Braided lines keep the lines from swelling, and failure is less likely. You still need to replace even the best lines though every few seasons... even when there are no problems. Ounce of prevention. Remember a ruptured line on the track = no brake pressure = death.
DRM Lines: (http://dougrippie.com/?p=434) just good stuff that works for $140 + SH order all your DRM stuff at one time to save on shipping while there including the brake bias spring (1997-2000 cars), front steel pistons for OEM brakes to reduce fluid heat, Quantum Plastic Ducts with the Quantum Kit, and rebuild kits for your brake pistons if your boots and seals are in need of a do over. This brake line kit DRM sells is make by Goodridge,(http://www.goodridge.net/webapp/wcs/...es_-1_64_10551) comes with a copper compression washer which goes between the supplied adapter and the caliper special for DRM. These do away with the Banjo type fittings on the Caliper side. They also are much easier to position to avoid kinks before tightening into place so the line is not under stress and then you can tighten it. (need 11mm and 13mm wrench for this) Make sure though if you add this set of lines to tighten the caliper side of the line regularly since this style of line can loosen up from vibration.
A & A Corvette: Sells the G-Stop Goodridge setup with the OEM style Banjo fitting at the calipers. (http://www.aacorvette.com/performanc...&products_id=1)
Wilwood: Flexlines Front (http://www.wilwood.com/LineKits/Line...temno=220-8176)
Wilwood: Flexlines Rear (http://www.wilwood.com/LineKits/Line...temno=220-8072)
Russell: From Southern Car Parts (http://www.southerncarparts.com/corv...nes-p-491.html) & On sale in 2010 from Eastcoast Performance in CF thread (http://forums.corvetteforum.com/c5-p...in-2010-a.html)
The longer lines go in the rear, smaller ones in the front. Even though this sounds counter intuitive. This accounts for the drop length needed in the rear due to the leaf spring designed suspension. If you moved to coil overs, you don't need lines this long.
If you do NOT want braided, and instead a solid metal tubing, avoid steel lines that tend to be difficult to work with and kink often. Use a copper/zinc alloy solid tubing. Check out this site: (http://www.fedhillusa.com/) and their specialty tool on how to make your own perfect fit end flares in about 30 secs (mms://205.178.152.122/1210413/video4.wmv). Advantage of solid tubing is they will hold much high pressures and will not ever expand the way flexible rubber with braided lines can. Downside is that I can easily swing my cailpers all over the place when working in that tight space (ie rotor change) and you can't do this as easily with solid tubing.
Brake Master Upgrades & ABS module Issues:
First off the stock C5 & C5 Z06 have the same master, so don't "upgrade" to the Z06 one its not better. Next if your car is a 1997 - 2000 you probably have the portioning block under the master. PITA to mess with this setup. After 2001 they put the portioning right on the ABS block set up, much easier. Less lines, and cleaner to work around. Easier to do the system. If you have a total failure of the ABS and need to replace it, you might want to think about going to the newer system on an older C5 at the same time instead of working around your older version portioning system.
If you like me feel that the stock Brake Master isn't cutting it, menaing that after a few times on teh track even a brand new OEM master have too much pedal travel for your liking before full engagement. If you want to increase your total system volume of fluid so the fluid stays cooler. If you want more piston pressure at the pedal translating into harder pressure on teh rotors, then you need an upgraded master.
DRM: (http://dougrippie.com/?p=428) its a modified OEM unit with piston changes and bigger reservoir, people who have them seem very happy.
Willwood http://www.wilwood.com/MasterCylinde...inderList.aspx)
Did your ABS final give up and fail? Before you spend a fortune on a new one try ABSFixer.com (http://www.absfixer.com/catalog/index.php) they are experts at repairing the C5 7 C6 ABS modules, and its a fraction of the cost of buying one new. They guarantee its fixed or its free. If you HPDE long enough, and get into your ABS... it will fail eventually.
Brake Pads:
This is a highly contested topic. Just look at the debates on CF, here are the need to know about each pad type below. Again before you invest in a BBK get good race pads and see how they fit your needs. BBK don't just start off as more $$ but pads for them tend to cost more as well, and the choice of compounds and vender choices decreases over OEM a lot by brand you choose. How far to use the race pad until they are done? Lou at LG posted this once, and here it is from his mouth:
There is a thermal isolator the last 1.5mm of any race worthy pad. Its not a pad compound, so it lacks the performance of the regular compound that you just got done using. People often bring up heat as an issue as the pad wears- Yes, that is an issue, however, not for most on here. The issue is that the thermal barrier will not stop the car like the compound that was glued to it. Throw them in the garbage with .125 left.
HAWK HPS/HP+ when doing track events on a road course is a bad Idea for all but newbie beginers. Good for autocross where they will get hot, but not HOT. If you only are going to do one HPDE a year, or you just want to "try" an HPDE, these are good enough budget minded pads that you can continue using on the street with moderate dusting and easy on your rotors. On a road course once you start to brake deep these do not like extreme heat, and I had a set of fronts glaze on my headed into turn one off the Pocono Nascar Bowl at Pocono North Track and had about zero pad. Stood on the pedal, and the car finally slowed. Almost had to run through the end cones, barely made my late apex. I learned initially on these in my Green begininer run groups, since I was already using them as a street/autocross pad. Once you are solo skill level in the entry HPDE groups and want to move into the lower level Blue and intermediate groups, I suggest you pack these up for street use.
Hawk DTC60 & DTC70 (www.tirerack.com) are decent pads as well & are the most common i find out there, but consensus on these is they are a bit less rotor friendly & can create grooving compared to the Carbotech/Cobalts.. oh yeah and dust heavy... The DTC70 has too much bite for many guys I know on Hoosiers, and they will tend to lock up your ABS in the front a little too often making threshold braking manually (without ABS) a bit trying at times. Consistent feel through all temp ranges and more budget friendly than some other pads companies however. DTC60 seems to be an excellent compount for a more budget minded HPDE guy with a need for good inital bite, but not too much. THey modulate well and are not going to get into the ABS as fast as the 70s will. If you like a good initial bite, but prefer to shave time trail braking a DTC70/DTC60 Front\Rear split is not a bad idea as an entry into true race pads for the novice right off Tire Rack. They both have the exact same temperature range, so its about the bite. 70 front and 60 rear is a common set up. My bud JimZ06 runs DTC70 in the front and HP+ rear as a cost savings measure, and since the rears don't get that hot the range isn't as important as in the front.
Hawk HT-10 are a very little used pad I find. Many people who try them like the DTC-60 and DTC-70 better, and the relative price is not too far off for the high temp pads. The cold bite isn't bad making this a decent "drive to the track pad" but they squeal like your are watching Deliverance. High dust pad, wears quick when over their heat range. Might be ok for the novice to intermediate, but in advanced I would goto DTC-60/70 if you like Hawks. Never tried them personally, going on other write ups and conversations from friends.
Hawk DTC-30 are an interesting track pad. It has the widest range from cold to hot. Fully capable to heats higher than the Blue \ HT-10 but allows for just as cold as a regular street pad, making this also a great drive to the track pad. Might be a great auto cross pad for this reason as well. Never used them personally, and there is ZERO on them on the CF for write ups. If you try them please do a write up for me.
Hawk Blue 9012 are very commonly used pads for all sorts of motor sports, and probably one of the most used SCCA pads out there. They have high torque & initial bite, and are VERY corrosive. The BMW guys use these pads... often. Use compressed air ASAP after you cool down and wash it off everything ASAP. The dust will eat paint and coatings off rims over night if wet and sitting at the track for a 3 day weekend. Also the Blue's run out of heat range at about 1000 degrees, which when tortured on a 3000lb+ setup is not too crazy to achieve.
Nice chart on Hawk Pad Temperature Ranges, this will explain a lot of why certain pads FAIL from heat, and when to expect it. (http://www.andrew-racing.com/compoun...on%20chart.pdf) and also push the case for front ducts again.
Good deal on all Hawk pads from a CF Vendor here: (http://forums.corvetteforum.com/auto...d-special.html)
Carbotech XP8 are to soft for a Corvette C5. When i was too fast for the Hawk HPS\HP+, I was told to try Carbotech XP8 at “my skill level”. So I listen. Loved them at first. Great intial and consistent bite (not too much, so thresholding was easy to achieve) and very very easy to modualte. Bad news, the XP8 I find just burn off WAY too fast in the front, it seems that the XP8 don’t work well in cars over 2400lbs is why! Found that out after I burned though a few bucks way too fast. Wish I had something like this to read and learn that! Wasted money again! Once I started talking about the XP8 failures I got better advice. Do not always trust the guy selling you the stuff to know what works for YOUR car, it might be good in the BMW \ Miata but a C5 is different. One thing I do like about ALL the Carbotech pads is that they glue\heat impregnate them to the metal backing plate. This means that once the pad gets low enough that they aren't good enough for road courses, you can use the last 1/8"+ for auto cross events only. This way you can get them almost down to the last 1/16" or so before throwing them away and truly get your money out of them. I save all my "almost done" pads in a box specifically for the SCCA autocross summer series. Don't chuck pads just because there is too little for HPDE, if you don't autocross give them to a friend who does.
Carbotech XP10 front/XP10 rear seem to be run more often on the forum here (the prices do not vary much at all vendor to vendor, I think it’s set by the company as fixed pricing). Even the XP10\XP8 set up isn't bad since a slightly less aggressive compound in the rear will allow you to trail brake better, and since the 10s take all the stopping power the 8s in the rear should not burn too fast in this set up but I have not tried it personally. However with this said, I would suggest the XP10/XP8 set up only as a beginner level HPDE driver and I'm sure for autocross this would be an excellent set up far surpassing the Hawk HP series. Once you hit Intermediate this set up will not work out.
CarboTech XP12/XP10 front & rear will be the next set up I try when I return to this company. I hear that the XP12\XP12 set up isn't that easy to trail brake into. And the 12s have a much higher initial bite than the XP10s do, so be aware of your braking style and what type of "feel" you like before choosing a pad at random and wasting money and being unhappy. Some people say that the XP10 is already too much pad, I say until I try it I don't know :-) The XP12 do burn off faster than XP10 however, so you have to figure out which is more important... 0.5sec a lap or buying pads more often?
CarboTech XP16The second compound to be released in 2011 from Carbotech. I have NO REVIEWS on these from anyone / myself yet.. so here is the company press release on them. It is a step up from the highly successful XP12 compound. The XP16™ leads the highly touted XP™ series line of compounds from Carbotech. With an extremely, and we mean extremely high initial bite, torque and fade resistance than compound XP12™. XP16™ is a world leading friction compound that is unmatched as a Ceramic racing compound, with a temperature range of 250�F to 2000�F+. Carbotech XP16™ still has outstanding release and modulation that has made all other Carbotech compounds so successful. The XP16™ is the most rotor aggressive compound Carbotech makes, but compared to it's competition the XP16™ is still very rotor friendly and contains 100% non-corrosive dust. XP16™ is recommended only for expert/very advanced drivers. XP16™ is found to be most affective on race cars weighing 3,000lbs or more using R-Compound tires only. Ideal for sprint use only in classes such as T1, T2, H1, GT1, GT2, GT3, GT, GS, DP, P1, P2, etc… Not recommended for use as a daily driven street pad due to possible elevated levels of dust and noise.
CarboTech XP20 The first compound to be released in 2011 from Carbotech. I have NO REVIEWS on these from anyone / myself yet.. there is no info even on their website on this yet! its the "Enduro" line pad. Designed for endurance racing for long lasting bite and wear in single events. HPDE guys who I have heard second hand who like them like they last and last, but the rumor so far is they are not very rotor friendly.. on the same magnitude of the Hawk HT-70, or worse. When I get more I'll add more, message me if you find a review on them soon.
Why does the pad materials stick so well to backing plate, NRS technology: (http://www.nrsbrakes.com/)
Find Carbotech Pad info: (http://www.ctbrakes.com/) and on the CF member: CarbotechDanny or carbotech adam
Cobalt Friction CSR pads are a newer compound, used to be called the GTS pad. This pad is a Autocross /Aggressive street / beginner green group HPDE pad only. DO not use this pad for actually braking deep racing for eh same reasons above on the Hawk HP series pads. With only a top temp of 1000F they will glaze quick.
Cobalt Friction XR2 (cheapest @ http://performanceafx.com) is a great setup but costs much more than the Carbotechs, Talk to Robert he was very knowledgeable & a good guy on the Forums. In my first use of the XR2/XR2 setup (new at track & bedded them there) @ Pocono North Clockwise in Sept 2009 with R-comps (8 sessions = 4 hours / top speed front straight about 138mph) I used up about 35% (outside) & 30% (inside) pads of the fronts and about 15% of the rears (wore equally). The XR2 in the front tended to taper pretty pronouced too compared to the carbotechs IMHO. These are a intermediate to advance level pad and can be used for street tires, R-comps and slicks, however serious racers will prefer the XR1 pad. I brake hard and late. I found the XR2 initial bit a bit alarming at first for my taste and driving style.. they will lock you up and ABS you in a hurry if you do not modulate very very well. I think the Carbotechs had a much cleaner initial bite PERSONALLY and modulated easier. It took a good full day to get a true threshold brake mastered on these pads, and once you do I have to say they are predictable and stop you fast. The XR2 were very rotor friendly, no scores or cracking at all (until the mysterious rivets pop out see below). The XR2's I will also recommend that you buy 2 sets of fronts to 1 set of rears. The Rears really do wear nicely and evenly. After a few events my fronts are almost shot, but the rears still have 50% of the meat on them, and typically the second 50% of a pad wears slower. Originally I thought this is a good value IMHO to get 2:1 on pads. Here's the problem with the XR2 that you don't know until you run them to the end. Rivets! Carbotechs and Performance Friction glue and embed the pad directly to the backing plate, but not Cobalt Friction! They RIVET the pad compound to the backer. Since the pads were down to about 3/16 in the front I pulled them from Road Courses and saved them for an AutoX. Here's what happen, somewhere between 3/16 and 1/8" the rivets will press out of the pad material and start to score up your rotors! Not good! Since you don't know this until your rotors start getting f'd up. And I like using my almost dead pads for AutoX since I really do not need all that much material... and my life isn't resting on it quite as much. 70-85% Road = last 20% to the auto cross. So far this means I get every last 1/32" out of these expensive pads. Cobalt Friction's rivets ROB me of almost 1/8" - 3/16" of the pad. IMHO thats BS. It makes you through away essentially 25% of the pad material, so they now become a poor value. Not to mention rotor damage suddenly without warning when the rivets pop. So final note: XR2 good for the guy on a time trial that will go from Fresh Pad to throw out after one event. Good for those with unlimited funds. XR2 bad value for the budget minded Road Racing HPDE guy using the left over pads for other purposes. Sucks because once I got used to them, I loved them. Oh, and before I forget when the dust from these get very wet on the track wash it off fast. VERY corrosive and hard to get off my aluminum rims and the dust ate through some of the powder coating I put on the center hats of my CCW classics. Needless to say Im pissed. Its almost as corrosive as a Hawk Blue when it gets wet and sits.
Cobalt Friction XR1 pads are very similar to the XR2 in so much as the rivet design, no real need to bed them just put in and go, rotor friendly until the rivets, dust similar, corrosion similar, etc. Difference is the XR1 is a much more "serious" pad compound for the hardcore serious racer. These are Hoosier level pads only, not for street pads or R-comp guys like the XR2 is. This is an advance tack day pad only, and until you are shaving tenths, don't bother on this one.
Performance Friction - PFC01 First tested these in May 2010 at Pocono North Track. PFC 01 pads front and rear. On the forum contact "michael@mbsbrakes" he is a CF Vendor and has the best prices there are for these hands down by far, I looked, and you can PM hit for a price quote. I like the fact that the pad compound material is physically embedded THRU the center of the metal backing plate, only pad so far I have seen that does this. 3 holes in the plate and the material is glued and heat embedded right into it, very cool. This means no rivets like the XR2 Cobalt Friction and you can literally run the PFC01 almost to the metal safely at non HPDE events like AutoCross, unlike the XR2 which you lose the last 1/8" - 3/16" to rivets and just throw away expensive pad compound. Also very good street maners. They do not squeal like the Carbotechs & Cobalt Frictions do on the street. The XR2 do not grab well when cold on the street, these do relatively well considering. And the Dust is less than both of the other brands also on the street. Verdict: Mixed reviews on the track. i was testing these the same day as JimZ06 was testing the PFC99 and we had the same issues talking it over at lunch. First, they get your rotors HOT. Way hot. I literally melted the remaining piston rubber protectors to the point they turned to white ash. Both front rotors have the appearance of a 33 RPM record now, fine circles in the Eccentric rotors I am running and they are new. Jim and I never saw this rotor pattern before. They have what I would call an inconsistent bite. In a FAST straight, I have to all but stand on the pedal to get them to slow the car down and its easy to stay outa the ABS. I do however feel a bit spoiled now after coming from the XR2 directly to these, where the pad... not extreme foot pressure, did the work. In the middle speed straights you tend to then again want to apply that same overly firm pedal pressure you needed to slow the car in the straight. This is a mistake. When in the 40-60+ MPH range they do bite with moderate pressure all of a sudden, and then you get into the ABS without warning sometimes. I found that I needed to use varying amounts of pedal pressure for each turn, which was a pain to get your brain to learn. Seeing as other compounds in the past I had a similar pedal feel in all turns and bit was consistent regardless of speed or heat. These pads also seemed to take longer than an average set to bed in. IN most cases I will (if able) street bed prior to trailer loading and then first 2-3 laps take it easier letting them heat slow. Then run em hard for about 15 minutes. Then let them cool. In the case of these pads the pads felt like the did well on the first few laps but got worse with heatup and needed more and more pressure to stop me in the straight which meant I had to brake earlier than in the past with other pads on the same stretch. After 2 sessions and getting a bit annoyed, they started to grip again with less pressure than the first 2 sessions... still hand to stand on them way more than the XP8/10 or XR2 though. After a full day on these pads I got used to them, and they weren't too bad. But then the extreme heat on them cracked a rotor with only 4 track days on it while cooling in the pits. My wife forgot to roll the car after it came in. Changed both fronts to be safe. Also melted the **** outa the fresh poly covers on the tie rods from VBP that were just fine after 3 days at Summit on XR2. I have 3 sets of these pads and I will use them up, but I really like the feel of heavy initial bite. If you are looking for a pad thats all foot pressure, and stays outa the ABS 100% in the hard braking straights this is your pad. If you like to brake super late and let the pad to the work, then this aint your pad. Don't use these pads without cooling ducts. I can't imagine the heat issues without ducts, everything I reported is with my quantum kit. After more use and some thought, don't street bed these. They really need to be run hot. I think some of the issues with the pad edges cracking was they are too soft cold. What does this mean? Not a great drive to the track pad already in. I think these will do best and last longer if you put them in AT the track for the first time. A few quick brake checks on them for a quick bed, and then heat em up good on a short session with a cool down after.
Performance Friction - PFC99 The older tried and true PF compound, and sometimes easy to find cheap in a group buy on the CF. JimZ06 had a similar set of complaints on braking inconsistency and foot pedal pressure that I did on the PFC01. Almost the exact same story. However they tended to run with less heat and no grooving. Not much less heat however, he also split a Cryostop (eccentric with -cry on end of model number) front rotor in pit cool down. These did not cause the record like grooving to the rotors that the PFC01 did either. Jim said he liked them, again after taking a full day to adjust to them, but did comment for the money have would much rather be on the DTC70 Hawks for the greater initial bite and better consistency in both fast and slow settings..
Performance Friction - PFC97 Discontinued product, but still out there if you look. The favorite pad of the Panos cars for a long time since they have no ABS and these pads are a predictable stopper with no initial bit to speak of which makes it racer easy to avoid lock up and flat spotting. You NEED to ride the brake \ drag the brake your first lap. These have almost ZERO bite until they hit operating temp. They also last forever.
Carbone Lorraine - CL RC6 I have ZERO personal experience on these, so here is a place to buy them (http://www.essexparts.com/brake-pads/cl-brakes) and here is a CF write up on them comparing them with both PFC01 and XP10/8 setups (http://forums.corvetteforum.com/auto...c6-review.html) My understanding is they run a tad more expensive than both it is compared against, but once again no personal knowledge. Here is a longer thread on them on CF (http://forums.corvetteforum.com/auto...rake-pads.html).
Carbone Lorraine - CL RC8 Here is again the site to look up the details on the pads. (http://www.essexparts.com/brake-pads/cl-brakes) Gary's new AP Racing kit (from HardbarUSA.com)which is T1 Legal also uses these pads. It turns out that the pads for the new Kit are actually cheaper than the C5 OEM pads which is quite amazing. Im hoping to get a set of these and test them out in the near future. If you see a post on these let me know.
Raybestos ST-38 "B" slightly lower mu than ST-42. Wear still not as good as ST41. Good performance over broad temperature range with minimal rotor wear.Successful in a broad range of racing series. Use in dirt where you want less bite than ST-41/ST-43. No personal experience with these again.
Raybestos - ST41 I'm looking for reviews on all these Raybestos pads, they are typically used as a front pad. "A" the best high energy input racing material available from Raybestos. Extremely successful in all the top three NASCAR series Raced by the 2002 NASCAR Champion Tony Stewart. Maintains high mu level at extremely high temperatures without sacrificing good wear - both pad and rotor. Needs some heat to work well. No personal experience. ST41 I hear is the most common of this series used for HPDE with ST42 in the rear.
Raybestos - ST42 Often used as rear pads with the ST41 as front pads. "J" lower mu than ST-41 and ST-43. Extremely stable average and in stop output over a wide temperature range. Has been very successful when used on the rear brakes in conjunction with the ST41 on the front. Best high-temperature wear of all their materials. No personal experience with these again.
Raybestos - ST43 Friction level and wear rate between ST-41 and ST-42. Stability is not quite as good as 42 but better than 41. Excellent open wheel formula. No personal experience on these. No personal experience with these again.
Raybestos - ST44 High friction material, slightly less aggressive than ST-41. No personal experience with these again.
Raybestos - ST45 Lower friction level than the ST-47. Could be used as a great rear to compliment the ST-47 compound. No personal experience with these again.
Raybestos - ST47 Has the highest friction and torque available to date. It has been engineered for long-lasting extreme heat situations and maximum rotor life. If you are looking for the most advanced-performing road race brake pad, that will simply out perform all the rest, this is it. No personal experience with these again.
EBC - Yellow R1793 Dual Purpose Pads No personal experience. Here are two threads.
(http://forums.corvetteforum.com/auto...pose-pads.html)
(http://forums.corvetteforum.com/auto...ff-dm1793.html)
EBC - Blue please email or message me with the link or reviews to a CF thread.
There are a lot of debates on rotor friendliness, heat, grooving… and it seems VERY subjective to braking style and rotor material. Bedding makes a difference on pad and rotor life as well. Some people say new rotors = use old pads. New pads = use old rotors. I'm not sure if I buy this, but its the wives tale out there.
All of these race pads need a proper set in or don’t work as well. They will all (except the Hawk HP) squeal cold & don’t grip cold. So if that bothers you esthetically, swap pads at the track to streets before heading home. All race pads will make dust, lots of dust. Some of it can be corrosive so wash up the rims etc when you get home. Invest in a caliper / brake piston spreader, its a Pepboys item for like $10 bucks. It will save you damaged calipers and swearing. Use that nice green heat resistant caliper lube on the two pins in the floating caliper liberally; it is often sold in single use tear open packets to ensure trouble free calipers that won’t seize up on extreme racing heat. Make sure you clean off really good the old nasty grease usually with brake dust all in it first before recoating.
Brake Pad Spacers \ Heat Shields
Lastly, as mentioned earlier its great to get down as low as you can safely on racing brake pads to save $$ on an already expensive HPDE hobby. One of the problems people do not think about is a concept of "piston wobble". As the brake piston pushes out of the cylinder and gets further and further out on less and less pad the piston has less cylinder to sit in and it can "wobble". Additionally the pads as they get thinner also have less protective heat material from the rotors and heat transfer happens quicker and quicker. The solution is a Adamantium! No seriously its Titanium! The only one I have found so far is from TIS or Titanium Speed Braking, they sell 0.5mm spacer / heat shield in OEM pad size (http://tispeed.com/index.php?main_pa...products_id=94). They are perfectly cut in the C5 oem pad size, careful sharp edges. I'm trying to get them to create a second setup to add once I pass 50% pad thickness to help shim the pad thicker and keep the pistons further back in the cylinders, right now I'm thinking 2mm per pad is a good size to do this, maybe 2.5mm. They sell spacers for all major aftermarket BBK as well: Brembo, etc so this is a great option for all Corvette racers looking to keep their pads and fluid cooler and avoid piston wobble!
My results so far is first you need a good drill bit and a wiss metal cutter (http://www.homedepot.com/Tools-Hardw...atalogId=10053). The backing plates of the pads usually have "nub" on the pads. The spacers are flat! Hence out of the box these will NOT go into your calipers with pads. Don't think you can do this at the track, makes ure you test these at home with these mods. You need to mark the nubs on the backing plate of the brake pads (red lipstick on them and then press against the Ti spacer for a perfect transfer) and then you can perfectly drill out with a 1/4" carbide drill bit so they can sit flush. I went one step further because I also use them on my HP+ street pads, and then cut out a 90 degree corner out of the backing plates because the PFC01, carbotech, HP+, etc. all have slightly different locations of their nubs. This allowed me to swap the spacers back and forth easier without having to constantly redrill. I checked for the future, and with the cut outs (like a pizza slice shape form the hole drilled) it will also match up now with these cuts for the carbotechs, etc. I am going to take pics of them for TiSpeed to see if i can get the thicker 2mm spacers to come with these reliefs already pre-cut to save time and sharp edges. Also, how in the world will I cut a 2.5mm or thicker piece of titanium is beyond me. It was hard enough cutting the .5mm ones. Worked great on keeping the fluid boil down and the pedal feels firmer longer when you start to torture the brakes. Nice easy upgrade with these steps.
I'm talking to them to make sure when the create a 2.5 mm (1/8") spacer that it will be inexpensive and be PRE-cut for the common "nubs" on C5 pads. (June 2010). TO cut down the costs of the extra spacer for push back, we are thinking Stainless instead of titanium which will cut the thicker spacer down in half. Just put it between the piston and the titanium spacer for maximum effectiveness.
- or as I call it the single best bang for your buck to improve your performance... If you want to go faster in corners, besides stickier tires nothing will make the time come down as fast as a quick suspension upgrade. Read carefully this could cost you from $1000 to $10,000 or more depending on what you want to do and your piggy bank limits.
If you are doing one or two HPDE a year or an AutoX now and then, nothing wrong with the stock suspension. The cheapest upgrade when you get serious is a Z06 stock leaf spring set up (lots of em used on CF / Gene at GMPartshouse.com) & Hotchkis Sway Bars (http://www.hotchkis.net/search.html?...mitForm=Search) with their Grease Fit Adjustable Endlinks (prices change all over/used CF) with Bilstein Sports Shocks (http://www.allshocks.com/bilstein/ht...year='1999') (ebay pricing best apx $325 + SH or used on CF). Problem with all leaf spring set ups Corvettes included = wheel hop on big bumps, not a problem on the track however which is toally flat. This could be a big problem on the hi-way if you tighten up the suspension as much as you can get on this new after market install. (If you live in Detroit you want Coilovers, ever see those potholes? Could swallow a whale) For the money, you can buy a used setup like this (springs, bars, shocks and links) for $1000-$1400 on the Forum used or better. You want a set up with low mileage on the shocks, BUT the links / sway bars and springs are not as important when it comes to mileage so as long as they mechanically sound. Make sure you grease the HELL outa the poly blocks on the bars, if the grease goes dry the sway bar will not twist in the rubber/poly blocks. If it binds it can and will significantly reduces your cars ability to "lean" into the turns without corner lift. This can also lead to premature & excessive wear on other components of the suspension like the end links and tie rods. To eliminate the added rear suspension "bump" the tighter suspension will have on the potholes, change out the tie rod ends with the LGMotorSports Bump Steer Kit (http://www.lgmotorsports.com/catalog...oducts_id=1767). You only need one set for the rears, this is never a big problem in the front.
Here is a nice CF thread about seeing if your current suspension settings are doing what you think or not, how to check and discussion on what that means: (http://forums.corvetteforum.com/auto...-homework.html)
Want a super custom Sway set up? Then an adjustable blade setup is in your future, but its $$ and takes a lot of work to keep it running correctly. The ends of the sway bar rotate at the drivers settings. This way you can have either a flat side under load or more of a I-beam kinda load on it. A huge difference can bee seen on the settings. This is more of a tube chassis setup than a OEM car though. You can find the genesis blade sway system here (http://www.hrpworld.com/index.cfm?tp...action=product) but its more of a ridiculously hardcore step up and not really HPDE. Raetech makes the for Porsches and Vipers, Vette set up coming (http://www.raetech.com/Suspension/Blades.php).
If you are going to be an AutoX or Road Racer that RESTRICTS you from having coil overs, and you don't mind spending oooodels of $$$ for the best money has to offer on Shocks alone, you might want to upgrade to the Koni 3013 (http://www.koniracing.com/rr30.cfm), the Penske 7500 (http://www.penskeshocks.com/Sports_C...500_Series.php), or the inverted Pfadts (http://www.pfadtracing.com/catalog/p...products_id/74). All will run you $$ 2-4x more than the Bilsteins Sports are are also much harder to find used on the forum, but these all have slightly faster rebound rates which means more precise handling especially under load in corners and when the road isn't perfectly smooth. Its a huge leap of $$ though for a small increase in performance over the Bilsteins so this is a suggestion on for those of you going for broke on the track \ AutoX and are not allowed to use adjustable coilovers which far outperform the leaf spring/shock OEM setup on Vettes IMHO.
If you are going to do A LOTof track time and thats why you are building this car, just shell out the $$ the first time and go for the coilovers and pfatty Pfadt sway bars apx $3k for total set up in parts (check weekly deals in the C5 parts for sale section by vendor specials, many local guys install these cheap if you buy from them directly) if you buy directly from Pfadt (http://www.pfadtracing.com/catalog/p...products_id/34) As for the Pfadt sway bars there is a lot to know before you do this upgrade. First if you are buying used Pfadt sway Pfadt Competition bars, the "version 1" bars place the endlinks exactly under where the brake ducts will be and will rub the endlinks into the brake ducting eventually putting a hole in the duct and leaking air making the duct less effective (see this section in the brake write up in this thread). The later versions of the Pfadt bars have address this and they are now friendly with all duct systems inclding the DRMs. Next is the set up of these bars. While I love the bars, shame on Pfadt for not having better and clearer install instructions. Pay attention: while you use the stock C clamp from the OEM sway bars to attach the Pfadt poly bushings, the stock OEM C clamp is bad for these bars. Yes you heard me, and anyone who has these is nodding up and down right now. The Pfadt poly blocks for the pfatty bars if TOO BIG for the stock OEM clamp. Simple fact. No matter how much grease you place on these the OEM C Clamp once tightened and bolted down over compresses the sway arm and binds it. Which means no twisting of the sway bar, and the entire reason for the upgrade is moot. This binding will them increase strain on the endlinks (I actually popped one stripping it and Pfadt kindly replaced it for free); it will also strain the tie rods and ball joints more on full suspension loading. Ok so now what? I still highly recommend these bars. Pfadt needs to add a simple fix, 4 washers per bar. You will need to find 8 total washers (4 each) and place them between the C clamp and the frame when bolting the sway bar on. This will push the clamp out 1/8" away from the cahsis and thus gives the poly breathing room. The poly will now not over compress and wil not bind the bar! Thanks Tony for teaching me this after I destroyed an endlink form the bindign problem. Pfadt needs to add this into their instructions, and put 8 washers in their kits. DO NOT install this bar without doing this mod, I warned you.
Be careful buying used PFADT coil overs used, there is a lot to know. Pfadt makes "versions" of their products and when the new one comes out to fix the prior isues, you are kinda on your own from the issues in your version. Love the products, but hate this fact. If you do buy them used and they have the old Clevis Style mounts, get the new cup version mounts prior to installing. Factor the cup style mount upgrades into your price when buying used however, its not a cheap upgrade (http://www.pfadtracing.com/catalog/p...roducts_id/139). Make the hole in your trunk deck a good 2.5” big & round if you get teh Pfadt coilovers so you can easily get your fingers down in there to adjust the dampening. You can leave the hole about an inch circle if you use an 3mm alen key to adjust the dampening on the Pfadt coilovers, and LEAVE OFF the control *****. I did a larger hole and left them off. I found metal press in caps to seal the holes when done form Home Depot for like $3 bucks for the set. With the Pfadts I prefer about 12/14 on a new "fast" track in the dry on the 16 point adjustments on the Pfadt. On a very technical track, I like 12/13 which makes the harder corners a bit more neutral for me personally and then i can work form there. It’s a nice setup. If you keep oversteering, drop the rear down some. If you understeer adjust the front some. In the Rain I also soften both front and rear if I have the time to 10/12. Autocrossing is a very different set up. You want the opposite really in rebound stiffness. Autocrossing start at 14/12 on a fast Corvette set up style track. On a very technical course SCCA style with lots of twists and turns, maybe 13/10 or even 12/9 maybe in your early run and see how it feels. This is assuming the Pfadt bars as well in the middle setting of stiffness.
To adjust the fronts, the easiest thing to do is just jack up the car and then reach over the wheel. You could just barely squeeze your fingers in, but it’s easier than going through the top and moving the reservoir each time. Stick your ear all up in there and listen quietly for the "click". No sense doing what I did if you race it a lot which is do the hotchkis/blistein then up convert again. Pfadt kit also totally removes both leaf springs. Also the stock endlinks on the older C5 Vettes are plastic and give too much play I think up through 2000, the newer C5s 2001+ went to full metal. Both do not allow you to adjust the heights of them though like the Pfadts, Hotchkis & GM T1 endlinks do. The Pfadts & T1 are more adjustable than the Hotchkis. Pfadts and T1 are beefier, and there have been instances of Pfadt endlink failures, usually from bar binding that is addressed in this write up. Adjusting the endlinks lets you 50:50 the car for PROPER corner wheel race weight balancing. The GM performance T1 set up is not too bad, but unless you are running SCCA etc which require specific parts for a class, makes there are matched aftermarkets out there to their bars.
PFADT has new for Spring 2011 the new remote reservoir / adjustable BOA (Ball On Axis) upper shock mount system coilovers specifically for racing application. A Video of these can be seen here: (
PFADT has goneout of business as of January 2014!!!! So these bad boys are now only available used!!!!
LG Motorsports has a really nice new GT2 Coil Over setup now (since Sept 09) (http://www.lgmotorsports.com/catalog...oducts_id=2176) & a review here (http://forums.corvetteforum.com/c5-g...rs-review.html), which is very similar to the Pfadt kit except for the upper mounting mechanism in the rear (there is a bit of friction between Pfadt & LG) and the LG is a very pretty anodized red! The one thing that is different on this kit that jumps out is the fexible shaft adjusters for the coils. You do NOT have to go through the trunk cutting a hole like the Pfadts to set them! This alone makes the kit more desireable than the Pfadts IMHO. Much easier, I tried them on the display at Carlisle 2009 (where I won the AutoX *cough cough* and was pictured on the middle right - tiny pic - of page 65 of the February 2010 Issue of Corvette Enthusiast http://editions.amospublishing.com/K...spx?d=20100201). LG says they "may" be making an aftermarket kit so you can attach these to other kits in the future, but for right now its only on their kit. If it was up to me to buy coil overs TODAY, I would pick the LG GT2 set up over Pfadts for the flexible shaft alone no other factors included. I think they are easier to use, less hassel to install, no choppign your body if that scares you.
QA1 for years has been the leader in C2/C3 coil over upgrades, and just recently (end of 2009) released a coil over kit for the C5. (http://www.qa1.net/qa1_motorsports/d...te%20C5-C6.pdf) I like that you can select on this brands spring rates, its 24 point adjustable which IMHO is just overkill. You do not need that much adjustment. They also make a Drag Racing valved setup, and to my knowledge is the only Coil over brand specifically making a package for that market. From a CF Member (armycop) - The springs I chose are all 650lbs tension, since I'm running a square 18" setup and the car's near 50/50 weight distribution would provide a neutral platform to start from. The coilovers come in four boxes, and you have to put them together. The instructions provided aren't heavy on detailed photos, but the write-up is easy to follow. Getting the bushings into the shock tops was the hardest part, but some soap and water and a press or vise helps alot. Once assembled, you have to remove the stock transverse springs and associated hardware, which if you are decent with a wrench isn't a problem. getting the stock shock out, however, can be an issue if you've never turned a wrench on the lower retaining bolts (12mm). Installing the coilovers is an exercise in patience and alcohol tolerance! The issue is clearance; that is, the clearance between the upper a-arms and springs is tight-too tight in my case. Jacking up the entire a-arm assembly to imitate weight on the suspension allowed me to pry the coilovers into place. Once loose, however, the upper a-arms rest against the springs. keeping tension on the assembly was the only way I was able to get them bolted into place. You use the original hardware to install them, BTW. A quick trip around the block to get them to settle, and you're all done! Except for the adjustments....that's a science in itself! The first gen set that I have are single adjustable, with 18 settings for each. QA1 techs recommend a 4-6 setting when tooling around town; they don't offer advice for on-track settings though, because each driver is unique. Since I'm on tracks throughout the North Central US and mostly Michigan, and I'm a larger-than-average human with like passengers, I run the shock preload in the upper ranges, 12-16 area depending on track. I have found that stiffer front settings, running a square setup, offer the best neutral balance in midcorner and outcorner acceleration. The coils are also height-adjustable, and the kit includes two adjustment wrenches as well. I drop the overall car height 1 3/4 inches at each corner, which provides plenty of clearance on the fenders and makes the car very stable. On the street with street tires I run the stock heights. Preload and height changes can be done with the car on the pavement; you just have to contort to get into the wheel well.
Doug Rippie MotorSports (DRM) now makes their own special C5 Coilover kit as well (http://dougrippie.com/?p=439). I have not seen it, driven in it or experienced it. But... if its anything like the rest of the DRM stuff, his **** just works! Installs well, and has little to no problems. My concern with these after driving them is they are very stiff, and the C6 Z06 I ran them in - they were not adjustable. Its a large improvement over stock, but not a good setup for doing adjustment for wet/dry and different tracks. Additionally having them so stiff makes them a poor choice for the street with the bumps etc being felt on everything in this stiff setup. For the $$$ I would go adjustable LG.
If you are a price is no OBJECT! I want the BEST! Then right now IMHO the Moton's sold by Katech performance are the bees knees. (http://store.katechengines.com/moton...ocks-p160.aspx) HUGE remote reservoirs allow you to control each corner from under the hood the the car. Easily rebuildable if spring rates need changing for different tracks. At just under $5000 after taxes and shipping though this is a major investment. These come stock on the Katech ClubSport C6 cars. If you never raced a Katech built car on the track driven by a competent driver... I'm sad for you. These package built cars are as close as you get to an outa the box C6 street legal track car, second only to the Pratt and Miller cars. But the price tag will sticker shock you for both of these brands. For those shouting Lingenfelter, they make cars go fast... but I have yet to see one outa the box as a road race track car like the other 2.
JRZ makes a coilover kit for the Vette now, better know for their ricer and tuner car setups. Some Porsche's use them as well. SpeedMercahnts Makes the only Corvette custom kit out there I know using their parts: (http://www.speedmerchants.ca/collections/jrz).
Eibach one of the best know spring manufacturer's in aftermarket suspension makes a kit now with Callaway for their Callaway vehicles. You can now as of 2010 buy them as an aftermarket for any Vette 1997+ (http://performance-suspension.eibach...i_pro_callaway).
NOTE = I did the Z06/Hotchkis/Bilstein set up the first time before I knew I was going to be a racing addict. I went with the less $$ route the first time and spent more in the long run doing this upgrade twice. Not to mention labor and busted knuckles twice, don’t make my mistake. Go with the more aggressive camber settings though once you set up any suspension upgrade/Mod, stock will just not do. Dealers suck at this FYI.
Don’t over lower the car unless you live in the salt flats! I love my front frame rail saver wheels from custom corvette accessories (http://www.customcorvetteaccessories...fattdaddy.html). Thanks Chip. While you’re there, get jacking pucks if you don’t already… much easier on your car when you are constantly monkeying for events. Harbor Freight makes a great inexpensive low profile race jack, and there are always coupons for them in Auto Week, Corvette magazine, etc. Front chin splitters add great down force, but good luck with them anywhere but the track if your car is lowered.
BUSHINGS! Do the bushings ASAP! Even after my hubs were done, I still have way to much play in the upper control & lower arms under heavy load making the Camber/toe settings a bit silly to discuss! Its taking out all my camber! (see video
Apparently there is a "tolerance" in the C5 manufactering process for the internal diameter (ID) of the control arms. This means that the ID can vary in some cases by a good few 1/100ths of an inch. In a rubber bushing, this is not a problem. Rubber is very maliable, but in the HARD and RIGID world of poly, this is a different story. The VBP bushings for some spots are two piece poly, so then the ID is too small the poly will compress and have some space to go into. The Pfadts are one piece and have no place to go once compressed, and therefore squish out the edges. A new snap ring was needed to hold it all together that didn't come with the kit as well. In the installation, (Thanks Tony!!) we had to use a nut and bolt to compress the poly bushing into the ID of the arm even after using the hydrolic press just to get it small enough to install it for the rears. Then remove the bolt after it was 1/4" into the brackets and use a BIG hammer and hydrolic jack to push the poly shod arms into the rest of the rear brackets. The first one took 1/2 a day to get in, the second one once we figured out the trick only about an hour to get into the bracket with 2 people. Tony has done several VBP before, and he said its much easier than the Pfadt poly kit.
Pfadt Poly Kit After install issues = After a 3 day HPDE in Spring 2010 on my new kick *** set up, I was very disappointed. While the poly made the car handle much more accurate and predictable, by the 3rd day 3 or the 4 upper polys had the retaining clips pop off the bar and the retaining washers then pushed out off the poly on the Pfadt kit. I have taken pictures and will be sending them to Pfadt to see whats up? Have them posted here on my CarDomain.com (http://www.cardomain.com/ride/3117424) which I only use honestly to post pics of parts to sell. From the onset Tony & I were concerned because the grooves were very shallow for the retaining clips. Now small road debris is embedded into the grease between the poly and the side washers which is a concern on rubbing. My experiences so far on the Pfadt Poly kit have been problematic at best. Even if a fix is sent to me from Pfadt at no charge like in the past, its the labor time I just don't have now that I have events 2 to 3 weekends a month. That's why we did all the labor in the winter in Tony's Garage! I think the fix would have to be taking the 4 front upper control arm Pfadt bushings and - cutting - them in half. Making sure you create a 1/8" space between the 2 halves by removing some material BEFORE pressing them in. This way under load the bushings have room to expand in the middle of the upper control arms. Since the Poly has a place to go it will not push off the retaining clips. These were a very poor design as sold IMHO. One upper bushing pushed about 1/8" wider and the other side is right were it should be. I now will have to pull them out, cut and shave and then repress in. When do you find the time to do this mid season?
The issue with exact internal diameter on control arms is a larger concern for say the spherical's from PFADT, that are amazing to look at, and are true hard core racing application, you can read about a recent write up of them here for comparison to the polys. (http://forums.corvetteforum.com/auto...post1571816669) but my big concern is that i bet there is a decent amount of ID honing (grinding) that will be needed to install these on about 50% of the cars out there and the do-it-yourselfer might not all the tools and equipment. In fact to be honest we probably should have honed the ID in the arms to make Pfadt polys work in easier for the rears. Also the Spherical Kits are for TRACK ONLY applications, click heavy and do not like potholes. Energy Suspension also makes a decent kit (and its red for those who care) which sells from SummitRacing.com but from talking to people its a great upgrade for a good street / 1/4 mile car but is not much better than OEM after a few pressure/heat cycles on the road courses. The hard part of doing bushings is not picking the kit... it is pulling the arms, pressing out the old ones, drilling the zerk fittings, getting in the new ones, them making the darn things fit with the harder polys back onto the car. Beer helps this process FYI. Beer and patience. So when you do all this work, and you make sure its perfect with the measure 4x and cut once approach... then it doesn't hold up on a track day its frustrating to say the least.
Poly Bushing Swap "How To" on CF with very nice pictures, and a step by step here: (http://forums.corvetteforum.com/auto...-pictures.html)
I highly suggest you add Zerk fittings (grease fitting sites) while there (I did), Im hoping the Pfadt Poly Bushings with the grooves in them that claim to be self lubing live up to their promise. Also had the arms media blasted and clear coated to make the dust come off easier after track days. The zerk fittings are drilled in grease fittings to you can put a grease gun to pressure squeeze grease into the poly bushings on a regular basis. If you are going to do a poly kit, why not do the drilling of the control arms for zerk fittings while there why not?! These are grease fittings that allow you to regrease the bushings before each event in like 5 minutes for the whole car. If the bushings get "dry" they dont move up and down as quick and the hotter they get the worse the "binding" becomes. "Binding" means the control arms will not pivot up and downas the shocks/springs/coil overs were designed to. This means the wheels will not react as fast to the road surface and you will lose grip and responsiveness. I have heard of binding issues with the polys after dirt and grime gets in there makeing the poly upgrade much less effective. The grease fittings allow me to press high temp grease (marine grade grease or Mobile 1 Synthetic grease that looks like cherry soft serve ice cream in the tube) into the poly regularly and keep them from causing binding \ premature wear issues (the one & only big complaint you hear on poly). My advice is if you do Zerk the control arms, you put 90 degree elbow fittings in the upper rears, its a bitch to get your grease gun on mine that are just stright nipples. When i rebuild them next I will swap the fitting for a 90 up there. When you feel how solid they are over OEM, you instantly get a lot more confidence. And FYI, DO NOT go too nuts spending time and $$ getting your perfect alignment and 50:50 corner weighting done only to then do the bushings after. Once your bushings are done, the whole car will need resetting up. If you pay a shop to do the work on this one its about 6-10 hours of labor easy to swap put the 8 control arms. You can buy a cheap bushing / ball joint press on ebay for the DIY crowd.
CF C5 Poly Bushing Install and Issues Thread (http://forums.corvetteforum.com/auto...s-learned.html)
Spherical Bearings:
Once your car makes its way into a TRACK only car and leaves the street completely and you are looking for the next thing to spend gobs of $ on, Sperical bearings are the mac daddy of control arm jewerly. ZERO play, amazing and firm response time. Makes the ride very rough, hence not suggested at all for street use.
Pfadt: (http://store.pfadtracing.com/corvett...el-frame-cars/)
Corvette Solid Spherical Bearing Kit - Steel Frame cars $1,890 SKU: 1110220
LG: (http://www.lgmotorsports.com/product...oducts_id=1981)
LG Motorsports Mono Ball Control Arm Kit Item# 1981 $1,795.95
DRM: (http://dougrippie.com/products/c5c6-...-arm-bushings/)
C5/C6 Corvette Mono-ball Zero Deflection Control Arm Bushings $2695
Tikt: (german) (http://www.tikt.de/wp/?page_id=223)
Price for the complete set TIKT performance uniball bearing for all eight wishbones without the bearings for the damper mount!
€ 1990 - including 19% VAT. Uniball shock mount with 2 bearings € 249, - including 19% VAT.
As for the tie rod ends for front (http://www.vbandp.com/SearchResult.aspx?CategoryID=396) and rear (http://www.vbandp.com/SearchResult.aspx?CategoryID=397), you can not go wrong with the Vette Brake Products (VBP) heavy duty units. Make sure you also order the polycovers for them (2 sets for full car) which will keep crap out of them and make them last longer / also resist heat better to avoid dry rot from heat/oil. Since the ends are stiffer they will also hold your track camber/toes setting better & have a limited lifetime guarentee! I used a speed clip for the special nuts the tie rod ends came with, and not a cotter pin. So if I need to get in and out of them later its easier. Oh yeah, its got its own nut and the OEM will not work.
When it comes to the ball joints, RockAuto.com is the way to go. Moog K6537 (lower) and Raybestos 5001128 (upper) you will need 4 of each. These are FAR more durable than the OEM ones, and while pressing out the bushings its a good idea to do these too. The Moog also besides having 2x thicker cups on them to keep debris out and cut down on heat transfer are the only ones I found with a grease fitting for long lasting lubrication and less prone to failure from grease dry out. You can wait for the OEM to fail or be proactive and do it all at once and not waste a track day when they do. Pfadt also sells a major improvement over stock for these (http://www.pfadtracing.com/catalog/p...roducts_id/129), but at this time (Fall 2009) only 1/2 the kit is avilable for sale which is the lowers. As of this update (12/09) there is no plan to make an upper. Personally I saw the Pfadt lowers, and dont get me wrong they are really pretty to behold, but the Moog are a tried and true product and while looking more industrial I think they are going to take the beating better and will cost less in the process. Plus I like the Moog's built in Zerk fittings that let me regrease tehm between events for better operation, and less binding = longer life. The Pfadt are only about $30 more each over the others at Rock auto. I have no experience with them though installed, and I do not know of any write ups on the Pfadt ball joints. If you got them, please PM me so I can add info here.
HEAT PROTECT your tierod ends & ball joints - lower more than upper. The #1 reason for ball joint and tie rod end failure = heat! I recently melted through my updated suspension part boot covers in two events in Spring 2010. My Jerry Rigged setup to protect them wasn't enough. Here are a list of some ideas to protect the suspension parts from the heat of the rotors:
1.) Header wrap and safety wire - you can get the wrap about anywhere
2.) Quantum makes a shiled kit that installs at the same time as their brake ducts (http://store.quantummotorsports.com/...products_id=85)
3.) Soup Cans cut up and tied around the ball joint / tie rod
4.) Heat Sleeve industrial Material (http://www.firesleeveandtape.com/) and catalog here (http://www.siliconefiresleeve.com/Si...eveCatalog.pdf)
5.) Cool Mat instead of Header wrap: (http://www.koolmat.com/new.shtml) or even better their balljoint and tierod kit on the same page pictured here (http://www.koolmat.com/images/ball-joint-kit.jpg) and some Corvette Specific stuff here (http://www.koolmat.com/corvette.shtml)
See CF Threads on this topic here:
http://forums.corvetteforum.com/auto...e-rod-end.html
http://forums.corvetteforum.com/auto...at-shield.html
Safety Wire Kit from Summit Racing: http://www.summitracing.com/parts/CMB-17-0026/
Header Wrap from Summit Racing (15 feet @ 1800F plenty): http://www.summitracing.com/parts/DEI-010129/
Header Wrap Ties instead of safety wire form Summit: http://www.summitracing.com/parts/LNG-47840/
Performace Alignment Guide - Toe Camber Caster:
You need to understand what the hell these 3 terms means before you read any further. Read here first:
http://www.tirerack.com/tires/tirete...e.jsp?techid=4
http://www.stockcarracing.com/tipstr...tup/index.html
http://www.ozebiz.com.au/racetech/theory/align.html
http://www.anewtoronto.com/wheel%20alignment.html
What is this all about? It is a simple concept of your alignment, and how it affects how the car will stick to/hug the track. Im makes a HUGE difference in performance. I will tell you that if you saw the Pfadt youtube video (
Now, you have to ask yourself, "what kind of racer am I?" Are you trying to shave every last second off your lap time to qualify for the Rolex 24 and need every last inch that your car can give you? Or are you like me trying to find a happy medium between tire cost and better performance. Assuming you alreay read the links above, I will go on. You can put a pretty hefty amoumt of camber into your wheels without significant tire wear. Infact tires like Toyo RA-1, Proxies, R888, Hoosier A6 & R6 actually are designed and prefer a few degrees of negative camber. The negative camber allows the tires in a straight line to kick out a few degrees on the bottom like this: // \\ but in a corner under load the tire will not sit flatter. This allows better grip in turns, which means more traction and higher cornering speeds. (Short Version). Your tires will hold a decent amount of camber without significant changes on the inner edge of a tire so as long as you do not add too much toe change in the configuration. Once you start increaing tow, aggressive camber settings will eat tires fast. Therefore I like good negative camber in my fronts, less in the rear and minimal toe changes. This way I sacrafice some of my straight line correction for better cornering and better tire wear. Make sense? Too much of these changes in the wrong suspension or tires will cause severe tire assymetrical wear and posibly quick inner cording of expensive tires.
I would like to give you all a quick reference guide can be found at Pfadts Website (http://www.pfadtracing.com/blog/wp-c...-alignment.pdf) with some nice basic starting points to mess with once you start tweaking your suspension. Remember though these settings are dependant partically on your choice of leaf spring vs coil overs, street vs racing tire, etc. The car can do a whole lot more on modified suspension and race tires than stock supession and run flats. FYI Run flats are a scary way to learn HPDE, trust me I know I did it for a whole seaon till they were as bald as Mr. Cleans head.
Ride Height is another concern, which needs to be SET BEFORE you do the alignment. Measure to the inside center top of the wheel well, exact aboce the center of the wheel hub. Ground to body height should have a small rake of about 3/4" to 1 1/8" to make 50:50 weighting easier on the suspension later (http://grassrootsmotorsports.com/art...orner-weights/). I run at 26 3/4" front and 27 1/2" rear, many people also will have the driver side set LOWER in height by 1/8" to 1/2". Please note that ride height as well as camber, caster and toe are VERY VERY subjective. Its in the same arguement sphere as which oil to use and why. Note the lower the ride the more necesary aftermarket suspension becomes or the angle geometry of the spindles start getting severely affected. Additionally, the lower the ride the more likely you will scuff your front frame rails and or bumper. Lower cars have a better center of gravity and better aerodynamics and drag however. Its all a trade off. Any time you lower your car, even on stock suspenion / bolts you must INSTANTLY get your alignment fixed! Make sure you can clear 2 fingers between the tire and the outer wheel well, or expect problems later.
With that said, on a STOCK C5 suspension, 2.0 to 2.5 front is about the max Camber you can get & 1.0 to 1.5 is about the rear max without shimming the upper control arms. After you pass 2 degrees of negative camber, the law of diminishing returns comes in to play with more and more camber needed for less adn less gain, and greater and greater premature tire losses. *NOTE* Do your race alignment assuming YOU are in the seat. Does your car ever race without you??? This means you want dead weight in your drivers seat! Im apx 180 lbs, put that much weight in the seat for better results. If you will have an instructor EVERY time put about 180 to 200 lbs in each seat BEOFRE alignment is done.. or simply sit there and read a book for 3 hours (with a friend if needed in the other seat). I also recommend exactly 50% (1/2)tank of gas. This will be a middle setting then for when the tank is either more or less full.
For the newbie dual purpose street / track HPDE car with NON slicks a good place to start (rubber bushings and street tires):
======> Camber, Caster, Toe
Front:==> -1.6, 8.0, 0 Height at Mid Fender: 27 3/8
Rear: ==> -1.0, N/A, -1/8" Height at Mid Fender: 27 7/8
More Aggressive (Poly Bushings & R-Comps) - Track Car as much or more than street
======> Camber, Caster, Toe
Front:==> -1.9 (left) & -1.8 (right), 7.5, 0 Height at Mid Fender: 27 (FYI this will scrape your Cats on steep driveways = be careful)
Rear: ==> -1.1 (left) & -1.0 (right), N/A, -1/16" Height at Mid Fender: 27 1/2 - 27 3/4 (Differences occur when you drop weight in front)
* asymmetric camber is because most tracks are run clockwise and this accounts for the increased loading on the left side a bit more for more even L v R tire wear and easier rotating and flipping of tires.
If you want to learn how to do your OWN alignment you can read a great thread here with links to all sorts of useful tools, settings, setups, etc. (http://forums.corvetteforum.com/auto...ich-tools.html) and a few quick links:
Hardbar Alignment Tool is great: (http://hardbarusa.com/hardbar/produc...products_id=44)
**** ===> DavidFarmer on the CF has a GREAT guide (new link): (https://dl.dropboxusercontent.com/u/1634366/align.pdf)
And have an accurate and good tape measure, laser level or 4" level, builders square & a flat level spot makes it easier to perform your calculations and get the job done faster. Oh, a four post lift is always best :-)
Inexpensive slip plates for doing your own alignment can be found here: (http://www.prdonline.com/osc/catalog...products_id=79)
My starting points above is a good dual purpose setting with a nice trade off in corner handling, good tire wear, and minimal "lane grabbing" which is quick corrections on minimal steering input. You would be amazed at how diferent these tiny weeny settings affect your performance! Get a good laser alignment done. I do NOT recommened your stealership for this. The techs there do not understand the fine balance of ride height and performance. They are used to only OEM settings, and this is a easy thing to do. You really need to goto a performance shop. It doesn't have to be Corvette based, but this does help. Ask local Road Racers and HPDE junkies where they get their suspension tuned at. A proper lowering with corner weighting (trying to get the car close to 50:50 front rear and 25% per tire) with a decent race alignment will tkae a few hours to get right the first time. Make sure you get the whole car DONE beforeyou do this. Any changes you make in parts, rims etc will make your alignment change a lot. Expect to pay about $350 to $500 for a full race weighting and alignment. So plan well.
Once you start getting more aggressive on your alignment settings you can push to -2.5 to -3.0 front and -1.5 to -2.0 rear. Caster start about the same in all configurations from all my reading with 6.5 (Slick) to 8.5 (Run Flat) in the front being the ideal range and not much affect between the two unless you are really a pro in this regards. Toe can change in advanced settings from 0 to -1/8" by desired effect in the front and from -1/8" to -3/16" in the rear.
*NOTE* You really want to make all your corrections in the lower suspension, not by unbolting and rebolting the front upper control arms often for shims on the OEM setup. The Bolts on the front upper control arms are screwed into nuts which are attached to the frame. If the frame nuts strip or god forbid COME OFF you have a world of hurt correcting this. PLEASE make sure you follow the suggested torque specs on the upper control arms when you mess with those bolts. DO not use an impact gun which will strip or damamge the attachemnts. Torque wrench and be careful only. Make sure if you take off the upper control arms you keep an eye on washers that GM uses to OEM factory shim your alignment. There may or may not be a washer at each hole, and the washers might be different in each hole, so becareful to label and not lose thwe washers if you do the front upper arms. If you are going to mess with the upper control arms for your alignment, a stud kit is HIGHLY recommended with "U" shims. You can get the stud kit from Hardbar (http://hardbarusa.com/hardbar/produc...products_id=42) this will allow you to switch form street to track quick without the amount of risk to damage the OEM bolts do on upper arm shim adjusters.
Both Hardbar (http://hardbarusa.com/hardbar/produc...products_id=56) & Pfadt (http://www.pfadtracing.com/catalog/p...products_id/44) make "Camber Kits". These typically include fixed camber plates, as well as U shims for the control arms in the front making it "easier" to move from one camber setting to another. Downside is that you have to affect the Tow on each set up back and forth. its not as easy as it sounds in the ads, but with some practice its not bad. Nice thing is that you can set some pretty aggressive camber settings above -3.5 for really aggressive Hoosier settings, etc. A write up on how these work with suggestions to make it easier can be found here: (http://forums.corvetteforum.com/auto...ho-has-it.html)
Good Threads can be found on CF on this topic here:
http://forums.corvetteforum.com/auto...-too-much.html
http://forums.corvetteforum.com/auto...alignment.html
Having a problem getting the suspension to feel just right? Not sure what to do? Adjust toe? Camber? Change spring compression? Air pressure issue? This website has a nice Q & A check box system, that after you fill in all the boxes it will tell you what your doing wrong with suggestions on how to correct it.
Turn Zero Dynamics Analysis Tool - Automated tool for troubleshooting handling problems:
(http://www.turnzero.com/technical_re...mics_assistant)
Brakes Basics:
First you must get rid of those OE lines if you are going to be racing the car often. Get a good pair of Stainless Steel braided lines, do not skimp. Stoptech, Brembo, Wilwood, etc. are all fine products for lines, but the Wilwood ones allow you to turn the lines even after being attached which makes caliper on/off much easier later without moving lines around. Motul 600, Super Blue, etc is your fluid choice. I found the best deal on Motul 600 from http://corollasport.com/rbf600.html if you buy by the case after shipped to your door its $16 each. You will need a case. Flush your system before each event, it’s cheap life insurance (see bleeding fluid section later on). Normal brake fluid = boil over = expansion = no pressure on your pedal when your hydraulics fail = no predictable stop = death. To flush your system WAY faster without helpers, I cannot say enough about Speed Bleeders! (http://www.speedbleeder.com/) Get the stainless steel ones! And order 5, not 4. There is a small chance of failure (rare but happens), and for the extra few bucks, it’s not a bad idea to keep one in your race tool box for emergencies. I can do my brake bleeding on my car solo under an hour on all four at lunch at an HPDE no sweat.
A great location for the GM parts list for C5 & C6 stock OEM brakes can be found here: (http://www.ls1tech.com/forums/suspen...mber-list.html)
OEM Caliper Rebuild & Maintenance \\ Stainless Steel Front Brake Pistons from DRM
You might want to eventually change out the stock oem Aluminum pistons in the Vette OEM calipers to Stainless Steel Pistons with the DRM kit (http://www.dougrippie.com/), the race pads make a lot of heat (way way more then an OEM or street compound). As the pad gets thinner the heat will also transfer more and more into the pistons and the aluminum OEM pistons send all that heat QUICK into your fluid causing boil over. Boil over fluid means fluid expansion, so when you step on the pedal you do not get the same hydrolic pressure and thus greater pedal travel and pressure to achieve the same stopping power you had with far less effort earlier in the day. The DRM S/S ones will not, he has them for C5 & C6, C6 Z06 and right now to my knowledge he is the only one selling this setup. You will need to buy a rebuild kit while you are there for the piston rings and the other tid bits. Its a FRONT set up only for the piston change out. No rears. While there just do the front and rear rebuilds all at once. DRM sells a caliper rebuild kit for about $40 a corner. It includes the piston seals, the piston boots, new bolts to the slides, and caliper grease. ASAP on this project soak the piston seals in the brake fluid while you are working, it will make install easier later. On a table, with the bleeder screw TIGHT, put a rubber tip air spray tip form your air compressor hose into the hole where the brake line was on the caliper; have a 1/2" board in the caliper to "catch" the piston, and then PUFF the air. The piston will shoot out and hit the board HARD. Be warned this could be dangerous. Use a dental tool (the pick they use to clean your teeth) or other to get the new seals out, careful not to scratch the aluminum. Now take one of your soaking rings out and gentle place it in the same grove you took the seal just out of. Careful that it is in 100% all the way around so you can feel it flush with your finger. Dip the pistons in the same brake fluid you plan on using once done do not use the fluid it comes with to lube it so you dont contaminate. Now place the boot on the piston, let it sit into the piston. Now STRETCH the boot down until it pulls out of the spot it clicks into the pitson, pull the boot about 3/4" of an inch past the end of the piston (leave about 1/4 - 1/2" of the boot still on the piston) and then get the boot INTO the caliper groove by squeezing the boot into an oval. Place the bottom in the groove first, and then work it around. You might need a small flat screw driver to work in the last bit. With the piston still out spin the caliper boot to make sure that its IN there. Now gently place the piston in the caliper and apply light and STRAIGHT pressure into the bore. Some racers decided that since the boots will burn off or catch fire to just not use them anyway, especially since the older ones after heat damage occurs get hard and can create piston drag. Its a subjective argument here, up to you. The Fronts with the DRMs slide in easy by hand with some 'umpf', the rear rebuild you will need a 6" C clamp to press those bad boys in (http://www.homedepot.com/h_d1/N-5yc1...atalogId=10053) but be careful putting it IN the bore of the piston if its not perfectly straight it will try to go in cocked and then you will have a bitch getting it out even with the air compressor. It took several tries to get the piston in with the 6" C-style clamp. Try a bar clamp instead (http://www.homedepot.com/h_d1/N-5yc1...atalogId=10053), its easier to make the piston line up with it and it was about 2 minutes to get the piston in using it versus about 10 with a traditional screw style one (not to mention cursing and retrying several times). DON"T forget to have the boots in the caliper correctly prior to the piston going in, the boot will NOT atttach to the caliper otherwise. Once the piston is fully depressed the boot seal will just pop into the piston on its own. Had to learn this the hard way, which is why I save you time now. If you just want to do the seals, and not the pistons you can get a local rebuild kit if you call around: Centric Front Brake Caliper Repair Kit Part Number: CE143.62036 Manufacturer Number: 143.62036. The kits come with new seals for the caliper pins, but the pins are not included & should be replaced with the rebuild as well. The bolts that go INTO the pins does come with the front kit. These are the guide pins that the caliper slides on, and only use the good Permatex 24110 Ultra Disc Green Brake Caliper Lube (http://the-auto-alley.amazonwebstore...B000HBNV6W.htm) with heat range from -40�F to +400�F, I like the 8oz brush top so your fingers stay cleaner and less is wasted; often available at PepBoys in small single use or 1oz squeeze green tubes. Your other better option for the pin lube is Permatex 24115 Ultra Disc Brake Caliper Lube Hi-Temp Silicone (http://www.stockwiseauto.com/Permate...source=froogle) with a heat range of -65F to 550F which is better for racing application but far less available. The more you got (8oz vs 1oz), the more likely you are to be liberal in your application. After several events the guide pins can (even with good lube) wear slightly and increase the rate of spread and pad taper. You might want to be safe and do the pins at the same time, Delco Part # 179-2009 (http://www.google.com/products?q=Del...N&hl=en&tab=wf) & GM Part # 12530697 (http://www.google.com/products?hl=en...8&sa=N&tab=wf0) and the Pin seals if you ever need these separately are GM Part # 12530703 (http://www.google.com/products?hl=en...-8&sa=N&tab=wf) & Delco Part # 179-2008 (http://www.google.com/products?q=Del...008&hl=en&aq=f).
Great thing to do at the same time as the SS brake lines since the calipers are off anyhow. Install video here (http://dougrippie.com/?p=425) of pistons, trust me when I saw this makes it look way easier than it really is :-P
To upgrade to C6 Calipers and then do the pistons in them (since the C6 is an exact fit and beefier / cools better) you need some part numbers. If you are replacing calipers for spread issues, its silly not to move up the the C6 kit. Down side is that if you ave loving your Z06 Red Calipers, these are base metal color. But on the bright side, no powder coating = less heat. FL GM# 88964164 & Delco# 172-2297 // FR GM# 88964165 // RL GM# 88955504 // RR GM# 88955505 (not 100% on these part numbers working on the full set)
Brake Bias Spring from DRM
While there you might want to think about brake bias springs as well (http://dougrippie.com/?p=404), they install on the portioning block of the 1997 - 2000 C5's before the portioning unit was added directly to the ABS module in 2001. You will need a 13mm and a 19mm flare wrench & 19mm socket (shallow). 13mm for the 4 lines and 19mm to get at the spring. You MUST get the block out to do this (its the weird thing under the brake reservoir that four hard lines go into). I would first do the 4 caliper rebuilds and the SS lines. Thus, you have FULLY drained the system. If not use the same toy you use to suck out the clutch reservoir with I explained in other posts to empty the reservoir, otherwise once the block is out it will start to drip out. Its not a bad idea to place a ziplock bag under the lines once the block is out to catch further drips, the rag will soak up otherwise and brake fluid is nasty stuff on paint. Put a rag under the portion block because it will drip a lot once the lines are off. Be careful to NOT round the line nuts. You may need a short 13mm wrench to get the back right one off, there isn't a lot of room in there. Once the block is out, but a rag around it in a bench vice, and the 19mm flare will loose it up to get at the spring. HAND remove the piece SLOWLY with the other thumb PUSHING down on it. Better yet, use a 19mm shallow socket with a paper towel shoved into it so when the last thread is out the part has no place to go, you will feel a PUSH and then its in the socket, carefully remove the socket now so the spring doesn't go flying. If not once the last thread if backed off the thing will BOINNNG into the air and you will be looking for parts. Of course this did not happen to me so I now explain this to you :-) Swap the spring easy, make sure the small tan piece is in the aluminum cap still for the spring to seat into. You can if you like take out the valve while you are there to inspect it, just be careful it goes back into the unit the same way it came out. To reinstall the tougher spring you will need the same swallow 19mm socket stuffed 75% with a piece of rag/towel so you can put the cap into it. You need to press it down hard to get it in and threaded. DO NOT cross thread, and do not over tighten its aluminum and will strip easy. You will do it easy like this, its a cluster poo to try and hand get it started. You will then fill the system and bleed it totally. You will get a code I think 1427 & 1428 i think. You will know when the active handling and ABS are not on your DIC are disabled and you then say "oh crap" now what did I do wrong. Its the brake portioning system sending the code, also the ABS ACH etc will all disable after the swap. To check if its the portioning block repull the side plug out of the recently reassembled block and see if the code clears. Bleed the whole system well, preferably with a Tech II abs bleed. Keep the plug out, drive the car a bit. Then do a fast rebleed again. Replug the wire, and walla hopefully like us the codes cleared out and all air is not outta the portioning block. Why do all this? By adding slightly more rear brake bias you can effectively remove some of the strain on the front calipers and thus the front pads will work a tad less hard and the rears will help your front pads get less hot and last longer. It also stops the nose dive some older C5s make and will keep you outa the ABS easier making it easier to threshold brake on your ABS system. Its a nice fix for the older style brake systems without having to do a total rebuild and replace of the setup. Now, this is what you do to get here, but here is the problems after. I have read several threads on this Mod, and so far I'm the only one who had this issue. Not sure if they sent me the wrong spring (there are 3 to order) and thats what caused this... but this mod wasted a full weekend of track time for me. 10 minutes into Lightning at NJMSP I felt my left side rear letting off too slow when trail braking, suddenly in my next corner the ACH went on in the exit just after apex. Next corner the same thing. Then on the next straight the ABS went on when I know it shouldn't have. Came into the hot pit, and I could hear a drag on a left side caliper. Went into paddock, and it was clearly the left rear. Bled it, went back to same issue. Took it apart, and assumed that since it was ONLY the left rear my recent caliper rebuild was the cause, the piston was a bitch to get in, so I blamed the tight seal. Crap I needed a caliper! Drove an hour each way to Tony's since he always has spare parts :-) and get a used OEM rear set. Ran back to the track, swamped it in. Drove the paddock with some hard braking. Felt fine. Yeah I thought! Next AM went out into the first session, and wouldn't you know same problem! Paddock showed me same caliper. So now its not the caliper. Hmmm, line? spring? Either way I was done. Long story short, got a new line form Randy at DRM who shipped it out ASAP. It wasn't the line. Changed the spring back to OEM and the problem went away. Again I do not know if I just got a bum spring, it felt realllly hard to compress. I think it was so tight that it was applying constant pedal pressure on the rear, and that meant it couldn't let go. I will avoid this mod for now, since I do not want to waste another track day. My advice is if you try this Mod, and many CF users seem successful with it, you do it well in advance of a track day. Do it without other mods going on. And heat up the brakes hard somewhere to test it. Don't waste 2 days on the track like I did over this one.
Big Brake Kits
BIG BRAKE KITS? You do NOT need a big brake kit (aka BBK) until you are a super driver! The stock C5 calipers do just fine, they DO need better pads. Buy decent pads early in your carrer, but the time you move from begginer to intermediate you will be braking VERY deep adn the OEM pads will fail and kill you. Z06 OEM pads are ok for a tad bit longer. Ultimately the pads do a lot more than the BBK will for the needs you have in teh begining at far less $$$ invested. BBK looks super cool at the car show, but is just over kill for most people’s skill level for a long long time. Spend the $3000 at Bondurant, etc. for race school instead of a brembo set up. The Race school will make you brake far better than a BBK will. Remember BBkits will require knowing if your wheels will fit over them. This happens a lot! Many BBK will not fit easily under 17's & 18’s unless you custom order special BBK friend version of those rims. Custom rims will cost you big $$$, and know WHICH BBK you want before you order the custom rims. Make sure its a comapny like CCW that guarentees their offsets for your set up so you dont get stuck with unreturnable rims that dont fit your set up! BBK pads also will cost more, don’t forget this. Bigg pads = more material = higher cost to produce and sell. Some BBK do not have a lot of choices for pads on them either, so do your homework first. And don’t forget, more pistons do not always mean stops better. AP Racing, Stop Tech, Brembo, Wilwood, Baer, etc. all make BBKs. Ask others what their success and pitfalls are first before you shop. I found personally that the Baer rotors, pads, etc stunk on the track and fail fast = Crack the rotors and are a waste for HPDE. Here is a great install page on how to install a Brembo BBK (http://www.southerncarparts.com/corv...ion-ex-45.html).
Very promising BBK & now T1 legal AP Racing kit (as of Summer 2010) offered from Hardbar and Essex Brakes. Its $2600 for the front setup with rotors, calipers and brackets (pads extra) and offers SS anti-knockback pistons, no boots, TRUE floating and heat sensitive rotors... just a kick *** looking kit for the $$. Gary is a friend to the Forum and gives excellent service. For a look at the kit specs (http://www.essexparts.com/shop/compe...0-caliper.html) and for a CF thread on them (http://forums.corvetteforum.com/auto...brake-kit.html) to purchase (http://hardbarusa.com/hardbar/index.php?cPath=21_36). I'm waiting to get reviews to post here as well. I'm even considering this kit as the OEM brakes are really starting to **** me off this season, with way too much time spent on the track in the paddock messing with them.
Here's a great webpage on how to select / understand brake parts & pads and information for HPDE, Solo, etc.
http://www.essexparts.com/learning-c...ose-brake-pads
A Rotors \ Pads & Bedding Discussion \ Explanation with a Excellent Video:
Part 1: Bedding (http://www.essexparts.com/learning-center/Bed-in)
Part 2: Swapping between Track & Street Setups (http://www.essexparts.com/learning-c.../swapping_pads)
Braided Brake Lines:
Please throw out your stock C5 brake lines ASAP as soon you you think you are going to be doing this on a regular basis. The stock lines are probably old on your C5 and the rubber on them not only cracks and fails, but the extreme heat of your fluid on a race track will allow these lines to swell ever so slightly robbing you of brake pedal pressure. Braided lines keep the lines from swelling, and failure is less likely. You still need to replace even the best lines though every few seasons... even when there are no problems. Ounce of prevention. Remember a ruptured line on the track = no brake pressure = death.
DRM Lines: (http://dougrippie.com/?p=434) just good stuff that works for $140 + SH order all your DRM stuff at one time to save on shipping while there including the brake bias spring (1997-2000 cars), front steel pistons for OEM brakes to reduce fluid heat, Quantum Plastic Ducts with the Quantum Kit, and rebuild kits for your brake pistons if your boots and seals are in need of a do over. This brake line kit DRM sells is make by Goodridge,(http://www.goodridge.net/webapp/wcs/...es_-1_64_10551) comes with a copper compression washer which goes between the supplied adapter and the caliper special for DRM. These do away with the Banjo type fittings on the Caliper side. They also are much easier to position to avoid kinks before tightening into place so the line is not under stress and then you can tighten it. (need 11mm and 13mm wrench for this) Make sure though if you add this set of lines to tighten the caliper side of the line regularly since this style of line can loosen up from vibration.
A & A Corvette: Sells the G-Stop Goodridge setup with the OEM style Banjo fitting at the calipers. (http://www.aacorvette.com/performanc...&products_id=1)
Wilwood: Flexlines Front (http://www.wilwood.com/LineKits/Line...temno=220-8176)
Wilwood: Flexlines Rear (http://www.wilwood.com/LineKits/Line...temno=220-8072)
Russell: From Southern Car Parts (http://www.southerncarparts.com/corv...nes-p-491.html) & On sale in 2010 from Eastcoast Performance in CF thread (http://forums.corvetteforum.com/c5-p...in-2010-a.html)
The longer lines go in the rear, smaller ones in the front. Even though this sounds counter intuitive. This accounts for the drop length needed in the rear due to the leaf spring designed suspension. If you moved to coil overs, you don't need lines this long.
If you do NOT want braided, and instead a solid metal tubing, avoid steel lines that tend to be difficult to work with and kink often. Use a copper/zinc alloy solid tubing. Check out this site: (http://www.fedhillusa.com/) and their specialty tool on how to make your own perfect fit end flares in about 30 secs (mms://205.178.152.122/1210413/video4.wmv). Advantage of solid tubing is they will hold much high pressures and will not ever expand the way flexible rubber with braided lines can. Downside is that I can easily swing my cailpers all over the place when working in that tight space (ie rotor change) and you can't do this as easily with solid tubing.
Brake Master Upgrades & ABS module Issues:
First off the stock C5 & C5 Z06 have the same master, so don't "upgrade" to the Z06 one its not better. Next if your car is a 1997 - 2000 you probably have the portioning block under the master. PITA to mess with this setup. After 2001 they put the portioning right on the ABS block set up, much easier. Less lines, and cleaner to work around. Easier to do the system. If you have a total failure of the ABS and need to replace it, you might want to think about going to the newer system on an older C5 at the same time instead of working around your older version portioning system.
If you like me feel that the stock Brake Master isn't cutting it, menaing that after a few times on teh track even a brand new OEM master have too much pedal travel for your liking before full engagement. If you want to increase your total system volume of fluid so the fluid stays cooler. If you want more piston pressure at the pedal translating into harder pressure on teh rotors, then you need an upgraded master.
DRM: (http://dougrippie.com/?p=428) its a modified OEM unit with piston changes and bigger reservoir, people who have them seem very happy.
Willwood
http://www.wilwood.com/MasterCylinde...inderList.aspx)Did your ABS final give up and fail? Before you spend a fortune on a new one try ABSFixer.com (http://www.absfixer.com/catalog/index.php) they are experts at repairing the C5 7 C6 ABS modules, and its a fraction of the cost of buying one new. They guarantee its fixed or its free. If you HPDE long enough, and get into your ABS... it will fail eventually.
Brake Pads:
This is a highly contested topic. Just look at the debates on CF, here are the need to know about each pad type below. Again before you invest in a BBK get good race pads and see how they fit your needs. BBK don't just start off as more $$ but pads for them tend to cost more as well, and the choice of compounds and vender choices decreases over OEM a lot by brand you choose. How far to use the race pad until they are done? Lou at LG posted this once, and here it is from his mouth:
There is a thermal isolator the last 1.5mm of any race worthy pad. Its not a pad compound, so it lacks the performance of the regular compound that you just got done using. People often bring up heat as an issue as the pad wears- Yes, that is an issue, however, not for most on here. The issue is that the thermal barrier will not stop the car like the compound that was glued to it. Throw them in the garbage with .125 left.
HAWK HPS/HP+ when doing track events on a road course is a bad Idea for all but newbie beginers. Good for autocross where they will get hot, but not HOT. If you only are going to do one HPDE a year, or you just want to "try" an HPDE, these are good enough budget minded pads that you can continue using on the street with moderate dusting and easy on your rotors. On a road course once you start to brake deep these do not like extreme heat, and I had a set of fronts glaze on my headed into turn one off the Pocono Nascar Bowl at Pocono North Track and had about zero pad. Stood on the pedal, and the car finally slowed. Almost had to run through the end cones, barely made my late apex. I learned initially on these in my Green begininer run groups, since I was already using them as a street/autocross pad. Once you are solo skill level in the entry HPDE groups and want to move into the lower level Blue and intermediate groups, I suggest you pack these up for street use.
Hawk DTC60 & DTC70 (www.tirerack.com) are decent pads as well & are the most common i find out there, but consensus on these is they are a bit less rotor friendly & can create grooving compared to the Carbotech/Cobalts.. oh yeah and dust heavy... The DTC70 has too much bite for many guys I know on Hoosiers, and they will tend to lock up your ABS in the front a little too often making threshold braking manually (without ABS) a bit trying at times. Consistent feel through all temp ranges and more budget friendly than some other pads companies however. DTC60 seems to be an excellent compount for a more budget minded HPDE guy with a need for good inital bite, but not too much. THey modulate well and are not going to get into the ABS as fast as the 70s will. If you like a good initial bite, but prefer to shave time trail braking a DTC70/DTC60 Front\Rear split is not a bad idea as an entry into true race pads for the novice right off Tire Rack. They both have the exact same temperature range, so its about the bite. 70 front and 60 rear is a common set up. My bud JimZ06 runs DTC70 in the front and HP+ rear as a cost savings measure, and since the rears don't get that hot the range isn't as important as in the front.
Hawk HT-10 are a very little used pad I find. Many people who try them like the DTC-60 and DTC-70 better, and the relative price is not too far off for the high temp pads. The cold bite isn't bad making this a decent "drive to the track pad" but they squeal like your are watching Deliverance. High dust pad, wears quick when over their heat range. Might be ok for the novice to intermediate, but in advanced I would goto DTC-60/70 if you like Hawks. Never tried them personally, going on other write ups and conversations from friends.
Hawk DTC-30 are an interesting track pad. It has the widest range from cold to hot. Fully capable to heats higher than the Blue \ HT-10 but allows for just as cold as a regular street pad, making this also a great drive to the track pad. Might be a great auto cross pad for this reason as well. Never used them personally, and there is ZERO on them on the CF for write ups. If you try them please do a write up for me.
Hawk Blue 9012 are very commonly used pads for all sorts of motor sports, and probably one of the most used SCCA pads out there. They have high torque & initial bite, and are VERY corrosive. The BMW guys use these pads... often. Use compressed air ASAP after you cool down and wash it off everything ASAP. The dust will eat paint and coatings off rims over night if wet and sitting at the track for a 3 day weekend. Also the Blue's run out of heat range at about 1000 degrees, which when tortured on a 3000lb+ setup is not too crazy to achieve.
Nice chart on Hawk Pad Temperature Ranges, this will explain a lot of why certain pads FAIL from heat, and when to expect it. (http://www.andrew-racing.com/compoun...on%20chart.pdf) and also push the case for front ducts again.
Good deal on all Hawk pads from a CF Vendor here: (http://forums.corvetteforum.com/auto...d-special.html)
Carbotech XP8 are to soft for a Corvette C5. When i was too fast for the Hawk HPS\HP+, I was told to try Carbotech XP8 at “my skill level”. So I listen. Loved them at first. Great intial and consistent bite (not too much, so thresholding was easy to achieve) and very very easy to modualte. Bad news, the XP8 I find just burn off WAY too fast in the front, it seems that the XP8 don’t work well in cars over 2400lbs is why! Found that out after I burned though a few bucks way too fast. Wish I had something like this to read and learn that! Wasted money again! Once I started talking about the XP8 failures I got better advice. Do not always trust the guy selling you the stuff to know what works for YOUR car, it might be good in the BMW \ Miata but a C5 is different. One thing I do like about ALL the Carbotech pads is that they glue\heat impregnate them to the metal backing plate. This means that once the pad gets low enough that they aren't good enough for road courses, you can use the last 1/8"+ for auto cross events only. This way you can get them almost down to the last 1/16" or so before throwing them away and truly get your money out of them. I save all my "almost done" pads in a box specifically for the SCCA autocross summer series. Don't chuck pads just because there is too little for HPDE, if you don't autocross give them to a friend who does.
Carbotech XP10 front/XP10 rear seem to be run more often on the forum here (the prices do not vary much at all vendor to vendor, I think it’s set by the company as fixed pricing). Even the XP10\XP8 set up isn't bad since a slightly less aggressive compound in the rear will allow you to trail brake better, and since the 10s take all the stopping power the 8s in the rear should not burn too fast in this set up but I have not tried it personally. However with this said, I would suggest the XP10/XP8 set up only as a beginner level HPDE driver and I'm sure for autocross this would be an excellent set up far surpassing the Hawk HP series. Once you hit Intermediate this set up will not work out.
CarboTech XP12/XP10 front & rear will be the next set up I try when I return to this company. I hear that the XP12\XP12 set up isn't that easy to trail brake into. And the 12s have a much higher initial bite than the XP10s do, so be aware of your braking style and what type of "feel" you like before choosing a pad at random and wasting money and being unhappy. Some people say that the XP10 is already too much pad, I say until I try it I don't know :-) The XP12 do burn off faster than XP10 however, so you have to figure out which is more important... 0.5sec a lap or buying pads more often?
CarboTech XP16The second compound to be released in 2011 from Carbotech. I have NO REVIEWS on these from anyone / myself yet.. so here is the company press release on them. It is a step up from the highly successful XP12 compound. The XP16™ leads the highly touted XP™ series line of compounds from Carbotech. With an extremely, and we mean extremely high initial bite, torque and fade resistance than compound XP12™. XP16™ is a world leading friction compound that is unmatched as a Ceramic racing compound, with a temperature range of 250�F to 2000�F+. Carbotech XP16™ still has outstanding release and modulation that has made all other Carbotech compounds so successful. The XP16™ is the most rotor aggressive compound Carbotech makes, but compared to it's competition the XP16™ is still very rotor friendly and contains 100% non-corrosive dust. XP16™ is recommended only for expert/very advanced drivers. XP16™ is found to be most affective on race cars weighing 3,000lbs or more using R-Compound tires only. Ideal for sprint use only in classes such as T1, T2, H1, GT1, GT2, GT3, GT, GS, DP, P1, P2, etc… Not recommended for use as a daily driven street pad due to possible elevated levels of dust and noise.
CarboTech XP20 The first compound to be released in 2011 from Carbotech. I have NO REVIEWS on these from anyone / myself yet.. there is no info even on their website on this yet! its the "Enduro" line pad. Designed for endurance racing for long lasting bite and wear in single events. HPDE guys who I have heard second hand who like them like they last and last, but the rumor so far is they are not very rotor friendly.. on the same magnitude of the Hawk HT-70, or worse. When I get more I'll add more, message me if you find a review on them soon.
Why does the pad materials stick so well to backing plate, NRS technology: (http://www.nrsbrakes.com/)
Find Carbotech Pad info: (http://www.ctbrakes.com/) and on the CF member: CarbotechDanny or carbotech adam
Cobalt Friction CSR pads are a newer compound, used to be called the GTS pad. This pad is a Autocross /Aggressive street / beginner green group HPDE pad only. DO not use this pad for actually braking deep racing for eh same reasons above on the Hawk HP series pads. With only a top temp of 1000F they will glaze quick.
Cobalt Friction XR2 (cheapest @ http://performanceafx.com) is a great setup but costs much more than the Carbotechs, Talk to Robert he was very knowledgeable & a good guy on the Forums. In my first use of the XR2/XR2 setup (new at track & bedded them there) @ Pocono North Clockwise in Sept 2009 with R-comps (8 sessions = 4 hours / top speed front straight about 138mph) I used up about 35% (outside) & 30% (inside) pads of the fronts and about 15% of the rears (wore equally). The XR2 in the front tended to taper pretty pronouced too compared to the carbotechs IMHO. These are a intermediate to advance level pad and can be used for street tires, R-comps and slicks, however serious racers will prefer the XR1 pad. I brake hard and late. I found the XR2 initial bit a bit alarming at first for my taste and driving style.. they will lock you up and ABS you in a hurry if you do not modulate very very well. I think the Carbotechs had a much cleaner initial bite PERSONALLY and modulated easier. It took a good full day to get a true threshold brake mastered on these pads, and once you do I have to say they are predictable and stop you fast. The XR2 were very rotor friendly, no scores or cracking at all (until the mysterious rivets pop out see below). The XR2's I will also recommend that you buy 2 sets of fronts to 1 set of rears. The Rears really do wear nicely and evenly. After a few events my fronts are almost shot, but the rears still have 50% of the meat on them, and typically the second 50% of a pad wears slower. Originally I thought this is a good value IMHO to get 2:1 on pads. Here's the problem with the XR2 that you don't know until you run them to the end. Rivets! Carbotechs and Performance Friction glue and embed the pad directly to the backing plate, but not Cobalt Friction! They RIVET the pad compound to the backer. Since the pads were down to about 3/16 in the front I pulled them from Road Courses and saved them for an AutoX. Here's what happen, somewhere between 3/16 and 1/8" the rivets will press out of the pad material and start to score up your rotors! Not good! Since you don't know this until your rotors start getting f'd up. And I like using my almost dead pads for AutoX since I really do not need all that much material... and my life isn't resting on it quite as much. 70-85% Road = last 20% to the auto cross. So far this means I get every last 1/32" out of these expensive pads. Cobalt Friction's rivets ROB me of almost 1/8" - 3/16" of the pad. IMHO thats BS. It makes you through away essentially 25% of the pad material, so they now become a poor value. Not to mention rotor damage suddenly without warning when the rivets pop. So final note: XR2 good for the guy on a time trial that will go from Fresh Pad to throw out after one event. Good for those with unlimited funds. XR2 bad value for the budget minded Road Racing HPDE guy using the left over pads for other purposes. Sucks because once I got used to them, I loved them. Oh, and before I forget when the dust from these get very wet on the track wash it off fast. VERY corrosive and hard to get off my aluminum rims and the dust ate through some of the powder coating I put on the center hats of my CCW classics. Needless to say Im pissed. Its almost as corrosive as a Hawk Blue when it gets wet and sits.
Cobalt Friction XR1 pads are very similar to the XR2 in so much as the rivet design, no real need to bed them just put in and go, rotor friendly until the rivets, dust similar, corrosion similar, etc. Difference is the XR1 is a much more "serious" pad compound for the hardcore serious racer. These are Hoosier level pads only, not for street pads or R-comp guys like the XR2 is. This is an advance tack day pad only, and until you are shaving tenths, don't bother on this one.
Performance Friction - PFC01 First tested these in May 2010 at Pocono North Track. PFC 01 pads front and rear. On the forum contact "michael@mbsbrakes" he is a CF Vendor and has the best prices there are for these hands down by far, I looked, and you can PM hit for a price quote. I like the fact that the pad compound material is physically embedded THRU the center of the metal backing plate, only pad so far I have seen that does this. 3 holes in the plate and the material is glued and heat embedded right into it, very cool. This means no rivets like the XR2 Cobalt Friction and you can literally run the PFC01 almost to the metal safely at non HPDE events like AutoCross, unlike the XR2 which you lose the last 1/8" - 3/16" to rivets and just throw away expensive pad compound. Also very good street maners. They do not squeal like the Carbotechs & Cobalt Frictions do on the street. The XR2 do not grab well when cold on the street, these do relatively well considering. And the Dust is less than both of the other brands also on the street. Verdict: Mixed reviews on the track. i was testing these the same day as JimZ06 was testing the PFC99 and we had the same issues talking it over at lunch. First, they get your rotors HOT. Way hot. I literally melted the remaining piston rubber protectors to the point they turned to white ash. Both front rotors have the appearance of a 33 RPM record now, fine circles in the Eccentric rotors I am running and they are new. Jim and I never saw this rotor pattern before. They have what I would call an inconsistent bite. In a FAST straight, I have to all but stand on the pedal to get them to slow the car down and its easy to stay outa the ABS. I do however feel a bit spoiled now after coming from the XR2 directly to these, where the pad... not extreme foot pressure, did the work. In the middle speed straights you tend to then again want to apply that same overly firm pedal pressure you needed to slow the car in the straight. This is a mistake. When in the 40-60+ MPH range they do bite with moderate pressure all of a sudden, and then you get into the ABS without warning sometimes. I found that I needed to use varying amounts of pedal pressure for each turn, which was a pain to get your brain to learn. Seeing as other compounds in the past I had a similar pedal feel in all turns and bit was consistent regardless of speed or heat. These pads also seemed to take longer than an average set to bed in. IN most cases I will (if able) street bed prior to trailer loading and then first 2-3 laps take it easier letting them heat slow. Then run em hard for about 15 minutes. Then let them cool. In the case of these pads the pads felt like the did well on the first few laps but got worse with heatup and needed more and more pressure to stop me in the straight which meant I had to brake earlier than in the past with other pads on the same stretch. After 2 sessions and getting a bit annoyed, they started to grip again with less pressure than the first 2 sessions... still hand to stand on them way more than the XP8/10 or XR2 though. After a full day on these pads I got used to them, and they weren't too bad. But then the extreme heat on them cracked a rotor with only 4 track days on it while cooling in the pits. My wife forgot to roll the car after it came in. Changed both fronts to be safe. Also melted the **** outa the fresh poly covers on the tie rods from VBP that were just fine after 3 days at Summit on XR2. I have 3 sets of these pads and I will use them up, but I really like the feel of heavy initial bite. If you are looking for a pad thats all foot pressure, and stays outa the ABS 100% in the hard braking straights this is your pad. If you like to brake super late and let the pad to the work, then this aint your pad. Don't use these pads without cooling ducts. I can't imagine the heat issues without ducts, everything I reported is with my quantum kit. After more use and some thought, don't street bed these. They really need to be run hot. I think some of the issues with the pad edges cracking was they are too soft cold. What does this mean? Not a great drive to the track pad already in. I think these will do best and last longer if you put them in AT the track for the first time. A few quick brake checks on them for a quick bed, and then heat em up good on a short session with a cool down after.
Performance Friction - PFC99 The older tried and true PF compound, and sometimes easy to find cheap in a group buy on the CF. JimZ06 had a similar set of complaints on braking inconsistency and foot pedal pressure that I did on the PFC01. Almost the exact same story. However they tended to run with less heat and no grooving. Not much less heat however, he also split a Cryostop (eccentric with -cry on end of model number) front rotor in pit cool down. These did not cause the record like grooving to the rotors that the PFC01 did either. Jim said he liked them, again after taking a full day to adjust to them, but did comment for the money have would much rather be on the DTC70 Hawks for the greater initial bite and better consistency in both fast and slow settings..
Performance Friction - PFC97 Discontinued product, but still out there if you look. The favorite pad of the Panos cars for a long time since they have no ABS and these pads are a predictable stopper with no initial bit to speak of which makes it racer easy to avoid lock up and flat spotting. You NEED to ride the brake \ drag the brake your first lap. These have almost ZERO bite until they hit operating temp. They also last forever.
Carbone Lorraine - CL RC6 I have ZERO personal experience on these, so here is a place to buy them (http://www.essexparts.com/brake-pads/cl-brakes) and here is a CF write up on them comparing them with both PFC01 and XP10/8 setups (http://forums.corvetteforum.com/auto...c6-review.html) My understanding is they run a tad more expensive than both it is compared against, but once again no personal knowledge. Here is a longer thread on them on CF (http://forums.corvetteforum.com/auto...rake-pads.html).
Carbone Lorraine - CL RC8 Here is again the site to look up the details on the pads. (http://www.essexparts.com/brake-pads/cl-brakes) Gary's new AP Racing kit (from HardbarUSA.com)which is T1 Legal also uses these pads. It turns out that the pads for the new Kit are actually cheaper than the C5 OEM pads which is quite amazing. Im hoping to get a set of these and test them out in the near future. If you see a post on these let me know.
Raybestos ST-38 "B" slightly lower mu than ST-42. Wear still not as good as ST41. Good performance over broad temperature range with minimal rotor wear.Successful in a broad range of racing series. Use in dirt where you want less bite than ST-41/ST-43. No personal experience with these again.
Raybestos - ST41 I'm looking for reviews on all these Raybestos pads, they are typically used as a front pad. "A" the best high energy input racing material available from Raybestos. Extremely successful in all the top three NASCAR series Raced by the 2002 NASCAR Champion Tony Stewart. Maintains high mu level at extremely high temperatures without sacrificing good wear - both pad and rotor. Needs some heat to work well. No personal experience. ST41 I hear is the most common of this series used for HPDE with ST42 in the rear.
Raybestos - ST42 Often used as rear pads with the ST41 as front pads. "J" lower mu than ST-41 and ST-43. Extremely stable average and in stop output over a wide temperature range. Has been very successful when used on the rear brakes in conjunction with the ST41 on the front. Best high-temperature wear of all their materials. No personal experience with these again.
Raybestos - ST43 Friction level and wear rate between ST-41 and ST-42. Stability is not quite as good as 42 but better than 41. Excellent open wheel formula. No personal experience on these. No personal experience with these again.
Raybestos - ST44 High friction material, slightly less aggressive than ST-41. No personal experience with these again.
Raybestos - ST45 Lower friction level than the ST-47. Could be used as a great rear to compliment the ST-47 compound. No personal experience with these again.
Raybestos - ST47 Has the highest friction and torque available to date. It has been engineered for long-lasting extreme heat situations and maximum rotor life. If you are looking for the most advanced-performing road race brake pad, that will simply out perform all the rest, this is it. No personal experience with these again.
EBC - Yellow R1793 Dual Purpose Pads No personal experience. Here are two threads.
(http://forums.corvetteforum.com/auto...pose-pads.html)
(http://forums.corvetteforum.com/auto...ff-dm1793.html)
EBC - Blue please email or message me with the link or reviews to a CF thread.
There are a lot of debates on rotor friendliness, heat, grooving… and it seems VERY subjective to braking style and rotor material. Bedding makes a difference on pad and rotor life as well. Some people say new rotors = use old pads. New pads = use old rotors. I'm not sure if I buy this, but its the wives tale out there.
All of these race pads need a proper set in or don’t work as well. They will all (except the Hawk HP) squeal cold & don’t grip cold. So if that bothers you esthetically, swap pads at the track to streets before heading home. All race pads will make dust, lots of dust. Some of it can be corrosive so wash up the rims etc when you get home. Invest in a caliper / brake piston spreader, its a Pepboys item for like $10 bucks. It will save you damaged calipers and swearing. Use that nice green heat resistant caliper lube on the two pins in the floating caliper liberally; it is often sold in single use tear open packets to ensure trouble free calipers that won’t seize up on extreme racing heat. Make sure you clean off really good the old nasty grease usually with brake dust all in it first before recoating.
Brake Pad Spacers \ Heat Shields
Lastly, as mentioned earlier its great to get down as low as you can safely on racing brake pads to save $$ on an already expensive HPDE hobby. One of the problems people do not think about is a concept of "piston wobble". As the brake piston pushes out of the cylinder and gets further and further out on less and less pad the piston has less cylinder to sit in and it can "wobble". Additionally the pads as they get thinner also have less protective heat material from the rotors and heat transfer happens quicker and quicker. The solution is a Adamantium! No seriously its Titanium! The only one I have found so far is from TIS or Titanium Speed Braking, they sell 0.5mm spacer / heat shield in OEM pad size (http://tispeed.com/index.php?main_pa...products_id=94). They are perfectly cut in the C5 oem pad size, careful sharp edges. I'm trying to get them to create a second setup to add once I pass 50% pad thickness to help shim the pad thicker and keep the pistons further back in the cylinders, right now I'm thinking 2mm per pad is a good size to do this, maybe 2.5mm. They sell spacers for all major aftermarket BBK as well: Brembo, etc so this is a great option for all Corvette racers looking to keep their pads and fluid cooler and avoid piston wobble!
My results so far is first you need a good drill bit and a wiss metal cutter (http://www.homedepot.com/Tools-Hardw...atalogId=10053). The backing plates of the pads usually have "nub" on the pads. The spacers are flat! Hence out of the box these will NOT go into your calipers with pads. Don't think you can do this at the track, makes ure you test these at home with these mods. You need to mark the nubs on the backing plate of the brake pads (red lipstick on them and then press against the Ti spacer for a perfect transfer) and then you can perfectly drill out with a 1/4" carbide drill bit so they can sit flush. I went one step further because I also use them on my HP+ street pads, and then cut out a 90 degree corner out of the backing plates because the PFC01, carbotech, HP+, etc. all have slightly different locations of their nubs. This allowed me to swap the spacers back and forth easier without having to constantly redrill. I checked for the future, and with the cut outs (like a pizza slice shape form the hole drilled) it will also match up now with these cuts for the carbotechs, etc. I am going to take pics of them for TiSpeed to see if i can get the thicker 2mm spacers to come with these reliefs already pre-cut to save time and sharp edges. Also, how in the world will I cut a 2.5mm or thicker piece of titanium is beyond me. It was hard enough cutting the .5mm ones. Worked great on keeping the fluid boil down and the pedal feels firmer longer when you start to torture the brakes. Nice easy upgrade with these steps.
I'm talking to them to make sure when the create a 2.5 mm (1/8") spacer that it will be inexpensive and be PRE-cut for the common "nubs" on C5 pads. (June 2010). TO cut down the costs of the extra spacer for push back, we are thinking Stainless instead of titanium which will cut the thicker spacer down in half. Just put it between the piston and the titanium spacer for maximum effectiveness.
Last edited by Zenak; 03-31-2014 at 02:20 PM.
The following 5 users liked this post by Zenak:
AngryJ (08-27-2021),
c5golfguy (11-22-2018),
j.fet (10-25-2018),
NoradIV (08-15-2018),
Old School (05-02-2022)
08-21-2009, 07:27 PM
#3
Terminal Vette Addict
Thread Starter
Brake Rotors:
First to understand the brake Rotor, its dynamics, bedding, steel types what it does etc a great stop to check out is here: (http://www.racecars360.com/Corvette_...ke_Rotors.html)
Another Rotors \ Pads & Bedding Discussion \ Explanation with a Excellent Video:
Part 1: Bedding (http://www.essexparts.com/learning-center/Bed-in)
Part 2: Swapping between Track & Street Setups (http://www.essexparts.com/learning-c.../swapping_pads)
After destroying a “pretty” pair of rotors, I went with Napa. You can get them quick and easy everywhere. They do not rust (too bad), hold up well and resist warp. Rotors get more and more deposable as you go faster and faster and brake deeper and deeper. The sold rotors will hold up longer, and will resist the cracking & splitting the best. I tried the "pretty" Baer set up (+1/+2), and I have seen others that did. We all agree = REALLY pretty at car shows = horrendous for HPDE with race pads!!! Especially on race pads that eat them up, I even had a split that made my fronts like like a pizza being sliced up. Expensive rotors are just that expensive. Napa Part# Fronts: 86700 & 86701 // Rears: 86702 & 86703. You can also go to Rockauto.com (http://www.rockauto.com/catalog/x,ca...,parttype,1896) for cheap rotors that hold up well, the discussion on CF all say the best ones there are the Centric Rotors (Part# 12062059, 12062060, 12062061, 12062062). I love the centric Rotors! They are painted ALL OVER! Everything but the firepath is in black. Not just the foward hat, but in the veins and the rear areas as well. You will oxidize in the firepath if the car sits and its damp, but you will get ZERO rust anywhere else. Great bargin disposable rotors the Centrics. Google up "Rockauto Discount Code" prior to buying, there are always 5% codes so shipped for 4 rotors on a C5 with discount was $181.63 shipped. You Can't beat that. Tirerack sells the Centric Rotors as well, but also now sell a Cryogenically treated version from Cryo-Stop (http://www.tirerack.com/brakes/brake...ar=&perfCode=S) it is exactly the SAME as the Centrics - part number and all - except these the part nubmer ends in -cry. For the extra $4 not a bad deal to get cryo rotors. So you can save $$ at RockAuto & Tire Rack, but in a pinch Napa is a quick grag and go... same as the OEM AC Delco in a different box... just make sure they didn't swap the cheap chinese imported ones on you that are failing lately. Alwaysw have an extra set of rotos already in teh garage, and if you trailer to an HPDE.. bring them. Nothing worse than losing a full track day to a split rotor. You can swap a rotor in under an hour, the hardest part is breaking free the bolts that hold the caliper on (you will need an impact gun if they were torqued right to 125lbs). After that its a snap.
A nice inexpensive 2 piece set up does exist to save weight and such, but it’s not cheap getting set up and no guarantees that they will last longer or brake better. Performanceafx.com has a custom 2 piece set up that isn’t too bad in $$$ and he is a really helpful guy the link is here: (http://performanceafx.com/store/index.php?cPath=24_32) and its a relatively inexpensive option. He has a nice package deal for an AP racing caliper set up to match the rotors, same guy who sells the XR2 pads cheap.
LG Motorsports Introduced a true floating 2 piece Rotor for the Corvette in January 2011. See their CF Thread here (http://forums.corvetteforum.com/c6-z...ce-rotors.html) and on their website here (http://www.lgmotorsports.com/catalog...oducts_id=2266) but currently only available for the C6 Z06 \ GS as of the time of this posting.
Disc Brakes Australia (DBA) also makes a nice rotor 2 piece set up and you can get the center hat annodized in Red\Black\Blue (http://www.knsbrakes.com/searchResults.php?cat_id=9) is a supporting CF vendor who carries them often on specials posted. Regarlesss of what color you buy the heat will eventually cook the center hats to a metallic purple \ pinkish hue. You can get he centers powder coated if you want color all the time. But that doesnt make you any faster and dissipates the heat a bit slower (unless its red because we all know red is faster). The DBA rears are always one piece. The reviews on DBA rotors are mixed on their durability on the track. I have read from loave to hate. I have never seen anyone give a thumbs up to the Baer Kit for track use other than 1/4 mile, oh thats if you actually are fast I mean.
If you ever need to rebuild your two piece rotors, here's a great link to a nice walk through on that process: (http://www.zeckhausen.com/Brembo/Rotor_Replacement.htm)
LG Motorsports has a nice Explanation of why a floating 2 piece is a good idea on the CF here:
(http://forums.corvetteforum.com/auto...-tech-tip.html)
I also suggest when you put the bolts back in to hold the caliper on to use "no seize lubricant" or somethign like that. Without an impact / air gun those bolts get hard as heck to get out once you race one time and the heat just locks those SOBs in there tight! I suggest that if you decide to make this your hobby, you get an impact gun early in your hobby. LongAcre is the way to go for realiable and cheap (http://www.saferacer.com/longacre-pi...productid=2061). In order to get your impact gun on an easier angle to get these bolts out I recommend the Harbor Freight Swivel Metric Impact 1/2" Socket Set (http://www.harborfreight.com/7-piece...set-94516.html). There are always 20% coupons online if you Google for anyone one item. I recommend against the use of blue Locktite as recommended on these bolts at the dealer when they go back in, you will need those rotors off often and the Locktite just increases the cursing factor. Locktite is a good idea for the guy taking it to the dealer who has the same rotor on for 9 years since the Sunday driver only puts on 2,000 miles a year and can't check his own oil. If you tech your own car before each event, this is not necessary.
One last piece of advice, when you get to the paddock after heating up the rotors to over 1000 degrees. You all of a sudden park the car. And then it sits to cool. The section of the rotor firepath that is NEXT to the caliper/pads can not cool as well as the rest of the sitting rotor which is exposed to the air. Do yourself a favor to save the life of your solid rotors... push the the car a few inches. Meaning, after the car has sat for about 5-10 minutes, push the car in neutral about 6-8" on the ground foward or back... allowing the rotors to rotate just enough that the rotor path next the the caliper gets to move to a fresh air location and thus cool even with the rest of the rotor. If the rotor cools too assymetric they will warp and spider crack faster. Its a no brainer 5 sec thing to do and will save $$ and aggravation later. I hate swapping rotors between sessions and rebuilding a two piece rotor ring is easily an entire lunch break or more even with help.
Since Adamantium and Unobtanium do not exist, in the real world the next best thing it Titanium! Well they make rotors in stock C5 size in this rare and expensive metal at over $1k per rotor! Find them here at Red Devil Brakes (http://www.reddevilbrakes.com/page/page/898389.htm). So far never new anyone with them, if you got them let me know so I can add something here! I contacted them for info on brake pad spacers / heat shields in teh OEM C5 Size. Waiting to hear back.
Brake Ducts - Front Brake Cooling:
I am on my second kit. My first kit was a “fire path” kit (http://www.eastcoastsupercharging.co...uct%20Kit.html), meaning the air cooled directly on the inside path where the pads directly heat the rotors. This kit is a bit of a pain to install because you have to remove the hub to do it. You have to remove the bracket between the hub and the spindle to do it as well. This kit requires the DRM plastic brake ducts which you can either buy as part of this kit or order the set up seperately from DRM and ECS. I found this great on my Hawk HP pads & for a � mile car it probably works very well also on autocross since its only for short burst and the speeds never get too nuts. Road racing simply tortures the brakes like nothing else ever will. late braking on race pads creats heat cycles that can exceed 1200 - 1400 F degrees! When I went to real race pads (XP8) for HPDE the first time which heated the rotors up more & an hour session can torture the rotors, I found that the asymmetric cooling (inside of rotor cooled direct on this kit) cracked the outside of the rotor and left the insides unscathed. This then created warping and I got brake pulsing. Rotors were shot.
LG Motorsports also makes a hub based kit (http://www.lgmotorsports.com/catalog...oducts_id=1938) centered again around the DRM ducts like ECS does. It does a little better job of air diversion than the ECS one as I saw them on display at Carlisle in 2009.
For road racing I recommend the Quantum Motorsports Kit (http://store.quantummotorsports.com/...nq78lbb0bc1kn7), this sends the air into the HUB. This kit does NOT require the hub to be removed to install which makes it much easier to do for a newbie racer. You can buy both the road race kit and the plastic front brake ducts from them. While there I recommend for very little extra $$ to get the balljoint/tierod heat protection kit. It installs with the same bolts form the duct kit = two birds with one stone at same time. See the install of this kit briefly on SKF hubs here: (http://www.cardomain.com/ride/3117424/1). Pics of the installed kit here (http://i88.photobucket.com/albums/k1...s/brake1-w.jpg) and here (http://i88.photobucket.com/albums/k1...s/brake2-w.jpg) This accomplishes 2 things: cools the hub for hopefully better hub / bearing life (see later section) and since the air then leaves thru the veins of the rotors out to the circumference it cools both the inner and outer firepaths equally. This means less asymmetrically rotor cooling and cracking and hopefully less likely to warp. I personally think that once you leave the Hawk HPs / HP+ and move on to a real racing compound you are insane to do this without cooling ducts. With is whether you are in OEM calipers or a BBK. Ducts are a necessary thing! Make sure when you are bedding new brake pads you tape blue painters tape and COVER the intake of the duct purposely to get the pads hot faster for quicker bedding and more reliable compound transfer of race pads.
Rear ducts aren’t necessary (but look cool). 70% of your braking is on the fronts, the rotors and pads there will get abused WAY more and fail WAY more. Cool the front, no worries on the rears. If your wheels are wide, there is no room for rear ducts anyhow. PLUS if you eventually need a rear diff/trans cooler set up like the DRM kit... you need the space those ducts fill for the coolers. FYI it took a lot of fussing to get the Quantum kit just right, and still having issues making it perfect. Sigh, at least Im not rubbing on hard turns anymore and hearing metal on metal! Make sure when your kit comes its not lacking the little boomerang spacer that lines up the width of the metal spacer between the hub and the spindle. My first kit was, they told me you didn't "need it" on the phone. Trust me it never sat right until I got it. Still happy with the effort.
Honestly the quantum kit is the easiest to install, requires no HUB removal, aims the air the best, is the cheapest AND has an integrated ball joint / tierod heat shield setup. No brainer. On this item, Quantum is the hands down winner.
FYI the OLDer version of the Pfadt pfatty bars interferes with the DRM plastic front ducts by pushing the endlinks in the front underside of the DRM ducts where it meets the hose - duct causing rubs and a small air leak eventually. Pfadt has fixed this issue on their bars for 2009 and on. If you have a Gen I Pfadt Kit ( I do ) I solved the problem with duct tape. Lots of it. I wrapped the heck out of ducts in tape, and the rubbing only chews into the tape. Down side is that every two weekends i have to rewrap the tape on the ducts. Bright side, I'm not chewing up the hoses on the ducts like I did the first season I ran this combo.
Recently (Summer 2011) Quantum just came out for a new kit for the C6 to put brake ducts into the factory fog light position, bolt on without modification. This location "should" bring in a larger and faster volume of air, with less twists and turns in teh duct work to achieve it = better cooling. Look at the CF thread on them here: http://forums.corvetteforum.com/auto...ng-inlets.html
Home Made Brake Duct Spindles Pics / Template here: http://forums.corvetteforum.com/auto...dle-ducts.html
Brake Bleeding & Brake Fluid:
Ok if you race you will need to have some basic knowledge of bleeding brakes. Firs there is NO required GM order in brake bleeding. many people will tell you that you MUST do the farthest one first (Passenger rear) but the GM Tech 2 ABS bleed program actually does the order as: DR, PR, RF, DF as the order in fact.
You will need a catch bottle for the fluid, and there are several that exist. The quickie one from Pepboys works great for me since it comes with a magnet that holds it onto the rotor for me so the tube doesn't flop around and I just use one of a million empty H20 bottle lying on the garbage for instant waste and chuck. Personally I like the Motive Catch Bottle Best (http://www.jscspeed.com/catalog/Univ..._Bleeders.html) since the hose stretches easy onto the nipple of the bleeder, it self seals when not in use to avoid spilling fluid, and it comes with a nice metal wire than you can wrap around your hub studs to hang the bottle for easy bleeding. Comes in a two pack, and you will use both trust me. Power bleeders form companies like Motive (http://www.jscspeed.com/catalog/Univ..._Bleeders.html) work great, but then you need to find a way to get them to work on the GM brake reservoir since the universal does such a crappy job. Many people will use an extra cap they buy dealer / GmPartsHouse, then drill a small hole and put in a barbed copper connector for a tight seal on the hose. You can buy these parts at most Lowe's & Home Depots to make your own custom fit cap to make sure you have zero pressure leaks when you start pumping up the fluid to "push" it through when you open the release nipple on the caliper.
Personally I like Speedbleeders which replaces the OEM bleeder screws and allows you to solo bleed a caliper without air getting back in (http://www.speedbleeder.com/) & I blieve the item#SB1010S for the standard C5 OEM brakes in Stainless. If you buy speed bleeders here are a few suggetions with your order:
1.) buy AT LEAST 5 of them, not 4 on your initial order so you can always have one back up ready with thread sealant dried on it should one not be cooperating. ONLY buy the Stainless ones if you plan to race the Vette.
2.) buy extra thread sealant with your order, AND if you decide to race... several rubber toppers that seal the nipple from gunk getting in. The rubber toppers form the heat will get hard and crack. You will need to swap new rubber toppers on the bleeders about every 3-4 HPDE weekends. Buy a dozen of these toppers extra with your first order and then again the winter before each season.
3.) Keep both the extra sealant and your extra bleeder in your "quick tool box" along with a 11mm to open bleed them, and a 15mm (hex bolt) & 16mm (the spinning black thing that most people use a vice grip to hold) to lock and unlock the bolts holding your pads in. Also keep a tube of the green hi-temp caliper goo with this kit, I regoo every time I put in new race pads. Keep your bleeder catch bottle with this kit as well.
4.) Yes they need a bit more torque than you think, and they will from time to time "ooze" at the threads. I only turn the bleeder open about 30 degrees, just enough to let out the fluid, open too much and risk air getting in. if one starts to ooze too much, swap it with your already to go one with new thread stuff. See spares are nice! Some people use teflon tape to make sure the threads are sealed, I do not trust it with the extreme heat of racing pads.
All in all, I love my SpeedBleeders. Call to order, do not do it via web, make sure you get the right parts selected as I hear many stories of wrong orders and causing issues. I can do a 4 corner bleed solo on the track easily by myself over a lunch brake at an HPDE. That and a clutch fluid swap. And dont be cheap on the Motul! Bleed until the color clearly changes in your waste tube, not just "3 pumps" a corner. Clear fresh waste fluid means you got fresh in the whole caliper. Don't be cheap $1.00 of fluid and risk your life! And it never hurts to have a friend with a Tech 2 unit from GM to do an ABS bleed once a year as well :-) you would be amazed how one little air bubble in the ABS system will mess up your pedal feel.
Towing, Trailers & "Hidden" Trailer Hitches:
If you start to make HPDE your hobby, you will NOT want to drive your car to the track. In the beginning level groups you will. You will not go very fast, not beat your brakes too hard and not (hopefully) wreck your car. In fact in the few years I have done this I have never seen a intro level group car crash or become inoperable now that I think of it! After a while though you will start to beat your car like a red headed step child! making the car move and perform to the "limit" of its capabilities on the track. Once you hit this point you will need to start assuming that one day it will break. Also, you can't exactly pack in the trunk tools, extra rain tires, and other supplies for your racing event.
Want to tow your gear behind your Corvette? Here is a great CF article on installing a "hidden trailer hitch" on your C5. You can then tow behind you a nice little trailer for your extra tires and supplies. (http://forums.corvetteforum.com/c6-z...ler-hitch.html) The hitch will exit between your exhaust pipes, be careful these will not work with Callaway Double D's, Corsa GTR, and a few other exhaust options. You need to have space between the 2 sets of pipes for this to work. Not many companies sell a small trailer good for this use, and often I see some crazy custom application trailers made out of smaller trailers that were designed from front wheel cheap car trailers.
If you plan on towing the car ON a trailer, well now you enter a whole new level of needs, wants and expenses. First weight is king! Several companies sell lightweight open trailers, Featherlite is the best known (http://www.fthr.com/car-trailer/). Aluminum Trailer is another popular option (http://www.aluminumtrailer.com/). Less weight means you need less truck to pull it, and less gas used to get there and back ultimately saving you $$ in the process. Pick your trailer well, you need one that will get LOW enough to the group or have ramps low enough to get your on the ground without tearing up your car in the process! Aluminum is the way to go, but the costs are outrageous for the budget racer. Closed trailers even when aluminum tend to weigh a lot and will need a bigger rig, if not a dually or a diesel to pull them effectively. before you call this a "trailer queen" remember you will want race pads, and race pads only work when hot. Its easy to "race prep" the car with your slicks, race pads etc at home when you have time and load it on the trailer then to get to the track at 5 am and start doing this after driving there. In the rain.
Most of us will get a steel open flat trailer. You have two basic types: full bed (deck) and wheel frame (open center). Full beds are SOLID flat sheet trailers that will protect the bottom of your car from road debris, but its not important on a race car like a show car since you expect the car to get f'd up on the track. Wheel frame trailers have just 2 ramps the wheels sit on and are OPEN in the middle thus saving a lot of towing weight. This is also nice because the trailer acts like a service platform to do oil changes, etc on the car. Weight? Wheel trailers are about 1400 lbs and Flats are about 1800 lbs. Not a huge difference, but don't forget your towing capacity of your car and the tongue weight. What is tongue weight? You need to know what your hitch is rated to, its the amount of weight your trailer hitch can actually and directly support, read up on the details here: (http://auto.howstuffworks.com/auto-p...gue-weight.htm).
I have a trailer from Sweet River Trailers (http://www.sweetriverstrailers.com/index.html) and its a Flat Deck Full Bed style with a hydraulic lift on it. See my car on the tilt trailer here: (http://www.cardomain.com/ride/3117424/1) Instead of bulky and noisy ramps that pull out (and in bounces you hear them rattle) the trailer TILTS upwards allowing a nice easy angle for the Corvette to dive up onto no matter how low to the group! Another company making a tilt trailer like this is Kaufman but I haven't tried it personally (http://www.kaufmantrailers.com/heavy...iler-p307.html). This is a great compromise for price to value, and you can find trailers like this locally all over the country. I have a hand / manual hydraulic so no matter whats going on the thing will work. Electronics invite issues and when I need to load the car 500 miles away I don't want to deal with mechanical failures. Also ramp style trailers require you to have the trailer hooked up to the vehicle when yo load it, otherwise the weight of the car on the ramps will make the hitch side of the trailer just jump off the group! On a tilt style hydraulic trailer you can LOAD WITHOUT HITCHING! It's so easy and neat, once I saw this i will never go back to a pull out ramp style. Make sure you buy a trailer that at the very least the driver side wheel covers detach. You will need to open the giant door of your car, and if you have a wheel cover there you can't open the door to get in and get out. Also make sure it will Gross Vehicle Weight (GVW) way more than you need 5000 is the minimum I recommend. Oh and a quick shout out to my local trailer place (http://www.cargotrailersales.com/) which has all my stuff when I need it quick!
I use a electrical winch so I can just pull the car up to the ramps, attach the winch, and hit a button. Perfect and easy load every time without headaches. This is especially important in a total failure. If your engine is dead, how do you plan on "driving" onto the trailer? If you crash the car, how do you plan on getting it home or driving it onto the trailer? This is all simple with an electrical winch. Get one rated at more than you need, the Vette is about 3000 lbs, get one rated at 5000 if you can so you could one day help your buddy haul his broke down sedan home. I don't use a tow hook on the front of the car, I use a Towing Web Bridle (http://www.autohaulersupply.com/inde..._detail&p=5158) which i can very quickly and easily install in the frame locations you use for the jack pucks. One end goes in each, and then I attach the center of this bridle to the winch. WALLA just click the button and the car is being pulled up by the frame with no risk of damage to anything. You can also use this in the event you need to pull your car off a track with no tow hook FYI. I do NOT run the winch off the truck, I instead use a deep cycle marine battery that only needs charging about 1 - 2 times per season. You can get one of these at any boat place and a battery box to mount it to the deck of your trailer for about $90 battery and $10 box. Make sure you have a plan on how to attach the wires to the battery before you leave the shop :-) Don't forget the wire shrink wrap while you are there and the connectors. Bolt this box and battery down with big washers so the plastic box won't brake free on the hi-way.
Ok so you got a ramp style trailer and you now can't get the bottom of the car to clear the angle it needs to get up the deck? There is only one good solution, RaceRamps: (http://www.raceramps.com/trailerramps.html).
Ok you got the trailer, you even have extender ramps... how do you tie it down? Most people will use the standard yellow straps and I found the best place to buy them cheap is (http://www.autohaulersupply.com) Auto Hauler Supply. The concept is simple, you buy a long yellow strap with a hook on one end, and put it over the control arms of the car. You attach a 2" ratchet hook (http://www.autohaulersupply.com/inde..._detail&p=4566) to the other end and click these onto a ring on the trailer. Preferably crossing them so the car has less chance sliding side to side on the trailer (left car to right trailer and visa versa). If you want a bit fancier you can use wheel straps (http://www.autohaulersupply.com/inde...uct_list&c=263) but this require you to have D rings (two) per wheel and it might mean modifying your trailer or having it ordered special for this purpose.
BEST: Corvette specific tie down straps! (http://www.autohaulersupply.com/inde..._detail&p=5206) these have a T hook in them that will go into your C5 Vette frame in the same whole and the same way a jacking puck will! You can now very easily ratchet the straps criss cross style in about 30 seconds a strap! Get the 10 footer and cut if you need rather than ordering too small. Remember if you cut the strap, use a blow torch and weld the ends so they don't fray on you for safety. If you already have straps and still want to go into the frame locations you can just use this hook (http://www.autohaulersupply.com/inde..._detail&p=5019) and run the straps through it instead of the control arms.
Tow Ball. One detail on this, don't use less ball than you need. Don't get a ball and hitch that rated too close to your weight, your car and your life may depend on this. Spend $50 bucks and get a solid one rated for well over what you need! I suggest a Class 3 hitch or better, but thats just me. Spend the money on crap that won't rust, it's only a few bucks more you cheap skate! Your hauling a VETTE not a paddle boat!
Make sure you buy a universal coupler lock from Gorilla, so your trailer doesn't wander off. It's a few bucks, but cheap insurance against theft. (http://store.cargotrailersales.com/c...p?ITEM=0710006) Its universal and locks like a U bike lock into and around the couple making it nearly impossible for a thief to get a ball into your trailer. Just don't lose the key's or neither will you! When ordering the trailer, don't forget that the rims, tires, brake pads etc are all available in stock vs upgrades. Like your car these upgrades will make your life easier and more efficient later.
Digital Brake Booster. Whats this you ask? Your car trailer has an electrical braking system in it which will attach to the 7 prong outlet that also controls your trailers lights etc. Here is a quick article on the types and differences of trailer braking systems (http://www.aa1car.com/library/trailer_brakes.htm). Even if your vehicle has a tow package and a hitch OEM the stock brake assist system only applies the brakes, it doesn't modulate them well all the time for down hills etc. The digital brake booster controls give you read outs and errors in your system, remind you when the trailer is attached or not. And have a manual over ride, so if the trailer starts to shimmy, especially down hill when the trailer might try to push the car, you can manually apply the trailer brakes WITHOUT braking the car. This is nice because the trailer will slow down pulling away from the hitch and pull it tight again thus even down hill you can pull the trailer and walla... no more shimmy! (http://store.cargotrailersales.com/c...ollers+Digital)
A tongue box (http://www.toolboxes4less.com/trailer-tongue-boxes.html) is a nice touch to add to your trailer so all your towing crap can be locked up with your trailer. Its also nice because you can keep emergency oil, brake fluid and brake pads / rotors with you at all times. A breaker bar, torque wrench and 19mm socket isn't a bad idea either. Don;t forget to buy the wheel chucks so the trailer won't roll away! And a board is a nice idea to have to put under the crank so the front of the trailer won't sink into hot asphalt.
Enclosed trailers are great because its like your garage away from home. Tools, Tires, Fluids, beer... they can all come with you. This is a much costlier approach both in start up cost, bigger vehicles to tow them, and fuel costs from the added weight. You can even buy "stackers" so you can bring 2 Vettes with you on one trailer on top of each other! Nice for working on the car in a pinch as well. Some come with solar panels, retractable awnings, stereo systems... sky's the limit!
As with all trailer's I suggest checking Craigslist.com for local used ones before you shop new. Remember the costs of tires, brakes etc though when you buy one. Adds are they might need replacing when its a used one.
Last edited by Zenak; 02-07-2013 at 04:18 PM.
08-21-2009, 07:28 PM
#4
Terminal Vette Addict
Thread Starter
Rims & Tires:
Again this is a very very subjective moment. Form vs Function. CCW & Fiske make great racing rims and both sponsor the CF. There are many more out there, these seem to be the most common I have seen. Get 3 piece rims, not solid blocks. Why? If you damage a rim, you can take it apart, and rebuild it for a fraction of the cost of replacing it! You will ding up a rim if you do this long enough. Trust me. Remember light is best, and more spokes are better than less spokes for this purpose of racing. Just remember a few things. Corvettes come in a staggered wheels sizes for C5 (17/18) and have wider rears than fronts. If you get lets say 18x10 all around (called a box or square set up), you can order 5 rims and have a mounted spare for failures you can put anywhere. If you are not symmetric in rim/tire sizes you need more extra rim\wheels in a failure for front/rear. Nothing worse than a rim\tire failure on the track to send you home way early. Also make sure you do NOT use the fancy chrome lug nuts on your rims. Heat expands them, and they crack and strip easy. Not good. Also try not to have a wheel lock nut at the track, its a bitch taking the car apart over and over with a wheel lock! Try either the OEM Z06 steel nuts (with the plastic nut covers) these are solid and will not fail on the track or get a lightweight aluminum racing nut (http://www.jscspeed.com/catalog/Univ..._Lug_Nuts.html) the annozied colors are cool, but from experience the impact gun messes up the color on them the first use. Stick to plain colors for the track, and the colors for street and show rims. Lastly invest in a decent torque wrench. A quick and cheap one is at Harbor Freight (http://www.harborfreight.com/1-2-hal...rench-239.html) which is usually $25 but often on sale for $20, and don't forget your 20% off coupon for one item per order! Make sure its the 1/2" kind, and always use an impact socket for the lugs even without the impact gun so it wont round off your nuts. Stock size is 19mm FYI. Getting them off with a breaker bar is the best bet (http://www.harborfreight.com/1-2-hal...bar-30395.html) without an impact gun. See the bottom of the thread for the tools section where items like this are discussed in more detail.
The bigger the rim, wider the tire… the more expensive it gets to rubber them. The wider the tires the less choices in rubber you have to fit it. I’m on big rears, and my choices for tires isn’t that great (or cheap) as a result. ** Run flats sucks *** ** They get hot, they are heavy, and their side walls are too stiff to race on. In fact the one dry hot day I tried runcraps on the track I felt they were very dangerous as they greased over quick and it felt like in the corners I was on banana peels! Nitto, Toyo, Kuhomo, Hoosiers, etc are all fine tires. This is also a vast opinion difference. Also consider if you run dry or wet? If you have Hoosier slicks (R6/A6) on as your only set up, and it rains… Now what? You can’t rain drive without risking your life on slicks. So you spent all this time and money for a HPDE event that you cannot even drive in? Do not get slicks until you are a kick *** driver & can trailer 2 sets of shoes with you. Learn on street tires, not even r-comps. Streets will slide a bit and bark a lot. This allows you to learn car control in a slide, and teaches you track humility.
When choosing non-oem rims and tire combos remember that on the track its not pretty that counts, but grip and unspring weight aka Unsprung Mass.
A vehicle's total weight is the sum of all of its parts and affects its ability to accelerate, brake and corner. Reducing the total weight will enhance the vehicle's performance because less weight needs to be controlled and therefore, less energy is required. Unsprung weight is the weight under the springs which moves up and down as the vehicle rides over uneven roads and leans in the corners. Reducing unsprung weight allows the springs and shock absorbers to be more effective in controlling the suspension's movement. This is a totally different term than a vehicle's rotational weight which includes all parts that spin including everything in the vehicle's driveline from the engine's crankshaft to its wheels and tires. This affects the energy required to change speed as the vehicle accelerates and brakes. As you would guess, reducing the weight of any of these rotating components will enhance the vehicle's performance because less energy will be required to increase or decrease their speed.
Ding up your expensive aluminum wheels? Road rash is no biggie, you can fix that yourself with enough hours and elbow grease. You will have to dismount the tire though and then remount. See a DIY thread on CF here (http://forums.corvetteforum.com/c5-g...lips-pics.html) In many cases it might be worth it to pay someone to do it if you earn enough $$ per hour, its not worth the time and purchase of tools. Warp or dent the rim so it wobbles? Crack the aluminum? Best place I have found to fix it is here: (http://www.wheelcollision.com/) It can cost you between $125 and $280 a rim to fix after all is said and done with dimount, fix, remount, balance. But if its expensive enough its worth it. Nice thing about 3 piece rims (ie CCW Classic) is if you trash a inner/outer badly enough you can just REORDER that shell you need for a fraction of the price of a whole new rim!
Tire Pressure Sensors? Did you know Z06 don't even come with them! They are there so the run flat guys know the car is "running on flats". Personally I like them even though I don't "need them" since one of my CCW wheels the center seam started to leak at Watkins Glenn 2 years ago and the TPS alerted me to it ASAP. You can remove them on the C5 without issues, on the C6 you can't especially on the C6 Z06 withotu driving the system crazy and disabling your car. Youtube Video here on how to rebuild a C5 sensor when they get weird, usually because the battery is dead (
). The TPS tool in the C5 is a cheap donut shaped magnet best found on Google shopping or Amazon for cheap, don't get ripped off on the GM tool (http://www.google.com/products?q=tire+pressure+monitoring+system+magnet&hl=en&aq=0) about $30 shipped. Procedure to use here at page bottom (http://www.corvetteguys.com/corvette-tpms-tool.html)
Here is a link to the C6 TPS tool: (http://www.corvetteguys.com/corvette-tpms-tool.html) & How to Use
CF Video on How to use it (http://forums.corvetteforum.com/c6-t...ms-videos.html)
When racing it is BEST to use DRY air and preferably nitrogen. Wet air is more likely to act as a heat sink and EXPAND in the tire giving greater fluxes in tire pressure. Using the cheap $.25 fill up machines at a gas station is the best way to make this mistake. Nitrogen is a more stable gas, different sized molecule, etc and also has less heat/expansion issues than compressed air. (http://auto.howstuffworks.com/question594.htm) Costco uses JUST Nitrogen for cars, and their guys will give you a fill for $5 cash tip no questions asked if you pull up, you might have to let them sit in your car and take a cell phone picture each time for their FB page You can get a cheap 5 gallon air can at Harbor Freight (http://www.harborfreight.com/5-gallo...ank-65594.html) and also fill it at Costco While you are there for back up nitrogen on the track when you might need to add the second am after a day of bleeding for temps.
If you do it super correct you VACUUM out the air first or what's called "square tire" method. Seen here: (http://forums.corvetteforum.com/auto...y-air-etc.html)
Nice write up on CF about Wheel & Tire Technical Notes: (http://forums.corvetteforum.com/auto...ech-notes.html)
I have been asked often lately about the TSW Nurburing Rims for a square 18x10.5 setup, I know nothing personally, but here is a nice thread about them: (http://forums.corvetteforum.com/auto...post1580715133)
OEM Tire Sizes & Wider Tires on OEM rims
Need to Calculate a Rim Offset: http://forums.corvetteforum.com/tire_rim_calculator.php
Below is a list of the OEM tires sizes for C5 & C6 cars (for comparison). Remember even on stock RIM wider tires = larger contact patch = better grip = better handling = faster lap times. Rule of thumb is you can "usually" bump the tire 20mm wider than the stock OEM size without issue. ie. 245 to 265 is fine. When you bump 30mm it is very tire brand and model dependant, and the type of sidewall starts becoming mroe of a concern. Once you hit 40mm over you run the risk of severe roll over and failure. Don't do it. it's not safe. Remember you need to the the height ratio the same on tires as well, so if you change the front form say 45 to 35 you need to change the rear wall height from 40 to 30 as well. If you do not do this you will **** off your active handling often.
*TO recap = 10mm width duh why you askin?!, 20mm almost always safe, 30 maybe but check by manufacturer with others, 40+ never or die :-)
C5 Stock 97 - 04 - GY Eagle F1 GS
Front: 245/45-17 on 17x8.5 rim / offset: 58mm / most common bump: 265/40 easy to find stock ZO6 Sizes
Rear: 275/40-18 on 18x9.5 rim / offset: 68mm / most common bump: 295/35 easy to find stock ZO6 Sizes
Weight OEM: 19.2 lbs, front; 21.4 lbs, rear - 97-99 OEM wagon
Weight OEM: 22.0 lbs, front; 29.0 lbs, rear - 97-99 OEM wagon
Weight OEM: 17.0 lbs, front; 19.5 lbs rear - 97-00 OEM magnesium
Weight OEM: 17.5 lbs, front; 19.5 lbs, rear - 97-00 OEM magnesium
Weight OEM: 18.08 lbs, front; 20.06 rear - 00 OEM standard, thin spoke, high polish
Weight OEM: 17.0 lbs, front; 20.0 lbs, rear - 00 OEM standard, thin spoke, painted, no sensors or centercaps
Weight OEM: 16.0 lbs, front; 20.0 lbs, rear - 01 OEM standard high polish
Weight: 24.0 lbs, 18x10.5 - 00+ FACTORY REPRODUCTION high polish
Weight: 23.0 lbs, front; 26.0 lbs, rear - Z06 chrome FACTORY REPRODUCTION (C5 OEM Size)
C5 Z06 01-04 - GY Eagle F1 SC
Front: 265/40-17 on 17x9.5 rim / 54 mm offset, 7.2" backspace (182.88mm) / most common bump: 275 or 285 (might rub brake ducts at wheel lock)
Rear: 295/35-18 on 18x10.5 rim / 58 mm offset, 7.9" backspace (200.66mm) / most common bump: 305 or 315 (no you won't rub fenders till >335)
Weight OEM Rim: 19.6 lbs, front; 21.4 lbs, rear - 01 Z06 forged will clear some BBK
Weight OEM Rim: 19.2 lbs, front; 21.0 lbs, rear - 02-04 Z06 cast/spun will clear some BBK
Weight: 20.3 lbs, front; 20.7 lbs, rear - SPEEDLINE will clear BBK
Weight: 19.0 lbs front; 20.0 lbs rear - TSW Nurburgring (http://forums.corvetteforum.com/c5-p...group-buy.html) 17x9 +50mm & 18x10.5 +60mm clears BBK
Weight: 28.0 lbs, front; 32.0 lbs, rear - Z06 chrome FACTORY REPRODUCTION (Z06 Size)
Weight: 23.5 lbs, front; 24.5 lbs, rear - Z06 Motorsports FACTORY REPRODUCTION (Z06 Size), polished
Weight OEM Z06 Open Lugnuts: 1.5 oz *** prefered FYI over the Chrome Acorn style w\ wheel lock nuts which can heat crack fail or strip from on/off often
C6 Stock 05 -
Front: 245/40/18 / offset: +56 mm
Rear: 285/35/19 / offset: +79 mm
C6 Z06 06 -
Front: 275/35/18 on 18 x 9.5 Rims / Offset: +40mm & Back Spacing:6.82” (173.35mm)
Rear: 325/30/19 on 19x12 Rims / Offset: +59mm & Back Spacing:8.82” (224.09mm)
C6 Grandsport & Carbon Edition 10 - (same as C6 Z06)
Front: 275/35/18
Rear: 325/30/19
C6 ZR1 09 -
Front: 285/30ZR1
Rear: 335/25ZR20
Question: Will a Stock C6 rim set up fit on a C5. Answer: Yes. But if you lower the C5 enough you might need a rear wheel spacer to prevent inner fender rubs. And you might not have the wheel inside the wheel wells, they might stick out past the body a tad which can increase your road rash if you like lighting up your rear tires.
Street Tire Run Flat: (all runflat OEM tires are bad for HDPE & Tracks)
Michelin: Pilot Sport (PS) - Do not melt / grease as quick as F1's but will get hard after 2-3 heat cycles. Side walls are too stiff for loading the front tires in turns and will create massive understeer on enterance and then the back end will get slick and then oversteer on the turn exit. Nothing nice to say about run flats. Do not let them get above 34lbs hot. Check Michelin Prices here (http://www.rims4less.com/)
Michelin: Pilot Sport 2 (PS2) - same as above, just happens a bit slower in the process. You get a few more minutes on them before they go bad. Cold temp 28/26 and hot 35/33 same for PS.
Goodyear: F1 (EMT) - Just a god awful tire on the track. When they get too hot they will grease over bad and you might as well be on ice skates at that point. The stiffest sidewall imaginable and they are the OEM choice GM tire for the C5. Starting pressure on these is 26/24 and then hot pressures on the track get to about 34/32. Do not exceed these temps or you will have melted drips of tire running down the side of the tread. They make a good left over drifting tire, take your buddies used run flats for free. Mount them for a run day of learning how to drift.
Most Common Rim for Racing in a C5/C6:
Speedlines (Look like hte stock Zo6, speically made for GM) Tried and True in Stock Z06 Sizes (Rear) you can run an 18" square set up. Vendor on CF here for $1000 for the set (http://forums.corvetteforum.com/c5-p...heels-f-s.html).
CCW
FISKE
Street Tire Recommendations: (red denoted a great choice wet & dry if you can get the size)
Nitto: NT05 -for the price great value, good turn in. Good even wear, easy to throttle steer for a street tire. Predictable. Do not get hard after a few heat cycles like many street tires will. Sticky for a street tire. like 28 cold and 34 hot for a starting spot.
Nitto: 555 (not 555R or 555R2) - I have heard very mixed reviews on this tire, probably the only Nitto that doesn't get regularly good reviews from drivers.
Nitto: Motivo - New for Winter 2012, no one I know has tried them. (http://forums.corvetteforum.com/misc...5&prx_t=294466) Message me if You have.
Firestone: Firehawk Wide Oval -Great Tire Rack street/HPDE tire with good wet performance use
Hankook: Ventus V12 Evo K110 - Good for both wet and dry consistently, but not cold, no CCW widths. These tires in the dry keep heating up all day with regular air and need to be bled all day until they finally level out and stop expanding after about 3 sessions. They do not like pressure, and 36lbs makes the tire change from pretty decent to ****ty in a hurry. I like 35 front pressure MAX, and 33-34 rear. You can very consistently drift the car through a corner on these settings. They will need a slow heat cycle or they will grease, first time on track take it easy about 4-6 laps sadly in dry if new. Good turn in, and less power oversteer than the PS or PS2. Again be warned, stay under 36 lbs at 37 lbs they grease and get completely unmanageable and I dropped a wheel off.
Michelin: Pilot Sport Cup (PSC) - OEM choice on many Porsches, ZR1 and Katech cars
Kumho: Ecsta XS (best) or MX or SPT by budget. Great cheap AutoX and street tire combo, decent wet use as well. Consistent from cold to hot with traction and doesn't grease in right pressure range at all.
Kumho: Ecsta V700 -great track wet use tire, needs to be shaved for dry use, good DD street use
BF Goodrich: KD Dry use tire mostly, very poor in wet
BF Goodrich: KDW Wet version of the above tire, noisy for the street but similar in grip and wear to a PS2. CF members seem to say they are relatively grippy in wet and dry, but once they get really hot you can overdrive them quickly. I think this is true though of all street tires. Easy to find, many sizes, good value tire.
Bridgestone: Potenza RE11 - no personal experience, but they have good reviews so far in C6 sizes. Not too noisy on street, good grip for those looking to "hook up" on the rear wheels. No reviews I can find so far that address them on the AutoX or Road Circuits yet. Initial reviews sound good, and price is very reasonable.
Dunlop: Direzza DZ101 Funny these are used buy so many tuner car owners, but rarely on Vettes. Comparable to price with the RE11 but when compared the RE11 do better. Interestingly when you look at the TireRack scores on this tire, it scores well in the survey BUT not so good in the "would you buy it again" section. (http://www.tirerack.com/tires/tires....ireMake=Dunlop) Almost zero reviews on the forum, in fact if you search for the tire you only find it for sale never discussed.
R-Comp:
Toyo: RA1 -comes in the CCW widths, pretty good in wet for the first few weekends then looses the water channels and becomes a dry only tire. I ran these pressures wrong at first, try 39-40 lbs hot in the front and 36-37 rear. Toyo recommends from their website that these like 37-42 lbs for a car in the C5 weight. At 42 they slide corners front. Under 36 they roll the fronts for bad premature wear on the outsides. Rear above 38lbs you start getting power oversteer exiting corners. On full tread, not so hot dry track friendly and really do much better shaved. Full tread tends to be a bit slippery on the preferred hot temps, once they hit the shaved amount they stick great and wear much slower int eh 2nd 50% than the first 50%. They prefer high Camber (btwn 2.5 and 5.0) so if you have an aggressive street set up in the just under 2.0 range expect excessive outer lip wear. Good tire to buy off some other guy who heat cycled them already for a time trial etc and wants to be new for each event. Its cheaper for the tires this way, but the mount and remount costs get expensive too. Operating Temperature RA1: 160�F to 220�F Check prices here (http://www.treadepot.com/sizes/ra1.html). There is a little circle on the outside tire wall that is designed to match up with the location of the tire valve for easier balancing, make sure to remind your installer. CF Forum Vendor often with Deals on RA1: http://forums.corvetteforum.com/auto...uper-deal.html
Toyo: R888 -like dry better than wet, Toyo says they like to start at high pressure for a C5 weight like 34/36lbs and hot at 42-45lbs, this isn't too great in practice. Less grippy than the 555RII & the RA1. Recommended pressures to start: 32/30.5 to end up 38/36. While they are recommended to be "Hot & High Pressure" mine and others experience is they slide too much after 38lbs. hot in rear & understeer too much above 40lbs in the fronts. Do better as well after they have lost 30-50% of the tread life & second half burns away slower, but do not suffer the sliding of new tread depth like the RA-1. I think its a slightly stiffer rubber compound is why, hence less sticky. The least "sticky/grippy" of the 2 Toyo offerings. Can quite often be found as cheap used discards from time attack cars or time trial cars where DOT tires are required. Check Prices Here (http://www.treadepot.com/sizes/r888.html) There is a little circle on the outside tire wall that is designed to match up with the location of the tire valve for easier balancing, make sure to remind your installer. CF Vendor with Deals often on R888: http://forums.corvetteforum.com/auto...w-pricing.html
Nitto: NT01 -is a DOT legal R-comp HPDE designed tire, better in dry than wet. Not in CCW sizes... yet :-) you are seeing theses more and more often on cars running Z06 stock rims for both god grip and cost effectiveness in the stock Z06 rim sizes. They are also very street tire friendly and the wear on the street is pretty decent if not raced on.
Nitto: 555R -is a DOT legal drag radial - Not a HPDE road race tire, side walls too thin.
Nitto: 555RII -is a great choice for Road Racing, great dry and not bad wet with decent tread. Very sticky both at full depth and at shaved depth. Consistent feel all the way to the cords. A must try tire if it comes in your sizes for R-Comps. Not in CCW widths yet. Are in Z06 stock widths.
Nitto: NT05R -is a DOT legal drag radial (pressure cold 32lbs F / 30lbs R - they like to run hot at 40lbs) - Dry use
Falken: Azenis RT-615 -good street tire, but when you push them they get "greasy" fast = not good
Kumho: Victoracer V700 -only in 16" & 17" though great tire (seam issues you can read about here http://forums.corvetteforum.com/auto...s-do-this.html) Have not tried myself but have not heard good stuff, so far have heard about difficulties with pressure, fast & unreliable wear. Have not heard anyone I know who liked them.
Pirelli: PZero Corsa R -good tire if you don't have a price issue, you can buy two for one anything else
Nice thread on the R888 vs 555R2 - Short version Same rubber compound since Toyo & Nitto are the same company (http://forums.corvetteforum.com/c6-f...omparison.html)
Track Slicks:
Hooser: A6 - hands down the better of the 2 Hoosiers, better when new, heat cycles more evenly, don't last long but you will run faster on these than on the R6. Great if you are "racing" vs HPDE.. Starting cold pressures are 21-24 F 20-23 R with hot pressures 30-32 F, 26-28R & operating temps: Hoosier A6 120-140 degrees.
Hoosier: R6 - last much longer than the A6, but starts getting hard & performance wanes with repetitive heat cycles. Won't get you the A6 times, but for HPDE a much better $$ value if .6 secs doesn't matter. operating Temps: Hoosier R6 125-145 degrees
Goodyear: GT
Michelin: Slicks S8D(medium) Front & the S9D (medium) Rear - Stick very nice once they heat cycle. Takes a bit longer to heat cycle these than the GY GT. Start very low cold near 22 lb, and let them heat up. Many people complain they are difficult to mount on rims, and the bead takes a long time to set up on them. Speculation is because they have such a steep camber requirement (F -3 to -4 & R -1 to -2).
Kumho: Victoracer V710 Have no personal experience with these, nor do I have any close friends I have seen out on these. (http://www.tirerack.com/tires/tires....del=ECSTA+V710) They have grooves in them so they are technically DOT legal slicks, but I would hate to get caught in the wet with V710's if the tread was anything but brandy new. My understanding is they are less sticky than their Hoosier counter parts and you will run slower, which for HPDE is not a big deal - big deal if you are time competition however. They grip poorly until the get HOT, and the tread life is a bit longer than the Hoosier which is nice since this is thus a cheaper tire that lasts longer. Operating Temp: Kumho 710 110-170 degrees
BF Goodrich: G-Force R1 (http://www.bfgoodrichtires.com/tire-...force-r1-tires) I have no experience on these, and they are priced nice at (http://www.discounttiredirect.com/di...35&ar=30&rd=18) Discount Tire Direct for my big rear 335's. Can anyone PM me a review on these vs Hoosiers? I want to try them but want others experience with them first.
You will need a pyrometer to check your tire temps until you get the operating temp correct (differs by tire see manufacturer recommendation) also you will need to adjust pressure and camber settings until you can achieve a 10-15F difference with the outside colder than the tires inside. Pyrometers come in contact and infrared/laser models, Longacre makes a contact one for about $140 give or take. A good investment because well running tires last longer so this $140 investment will save you THOU$ANDS in the long run on tread wear.
Learn how to control understeer & oversteer (http://ask.cars.com/2007/04/whats_the_diffe_1.html) at least pretty good before moving to R-comps or better. Video of what that difference between the two looks like here (
). R-comps too early will give you false confidence. Slicks do not bark! They hold like a train on rails, but when they lose grip you are really screwed! Without the skills to correct your error without panicking… you will die. Dying isn’t fun... or cheap on the car! You should try if you can to learn car control on a skid pad (http://www.ehow.com/facts_5011622_what-skid-pad.html) which is a circle you can drive in on wet flat asphault and learn how to control both understeer and oversteer by gettign fast and faster in a circle until your tires hit the limit of adhesion. Here is a video of a C6 Z06 on a skid pad: (
)
Used Tires? I’ll tell you my personal experience with used. I got my CCW classics. They looked great with tires on them. Tires were great to look at. It was a show car set up, and barely used. Problem was I didn’t read the date code on the tires. They were OLD. First HPDE on them, the caulk seals started to go, the tires went hard and started to split / dry rot. I had to fix a small inside lip warp on one with correct a wobble only felt after 120+ mph... etc. In the long run it cost me as much or more even to go used. AND let’s not forget the aggravation. Not saying all deals go like this… but something to think about.
Mini Tub & Mud Guards \ Debris Guards:
Also know after about 315 in the rear (depending on offset), you will probably have to remove the Z06 rear ducts or get rubs. Max tire size before mini-tub usually 335 depending on offsets & they will stick out though; get the APSIS guards to solve this problem. (http://www.apsisusa.com/C5%20Corvett...le%20index.htm), you can see them on my car in the CarDomain pics I have posted. If you want to replace and paint an entire rear quarter to make it a more factory finished wide body look in the rear, Lewis Five MotorSports makes a superb quality kit. (http://www.lewisfivemotorsports.com/index.html) LG Motorsports I hear at this time (9/09) is also working on a flare rear quater and ACP has a widebody kit as well. On the track your car will kick up a LOT of debris, especially small rocks and pebbles and bits of vulcanized rubber off race tires. If you do NOT use a guard, etc expect to slowly over time tear up your rear quarter panels from debris hitting the paint.
LPE MiniTub Kit: http://www.corvettegarage.com/produc...-corvette.html
LPE MiniTub Install Thread: http://forums.corvetteforum.com/c5-f...tallation.html
How to MiniTub a C5: http://teamzr1.com/tubC5.html
C5 DIY MiniTub: http://www.c5forum.com/cgi-bin/ultim...ic/1/3309.html
* Note * For the purpose of Road racing a C5 you will never need to exceed a 335, so MiniTubing is not required in 99% of the cases, ever regardless of how hard core you become. MiniTubing is typically a Drag Racing option for AS BIG AS they get in the rear. However this may not be the case for all wheel/rim offset combos. Talk to your custom wheel dealer before you buy to make sure you do not need to do this.
Air Pressure Gauge:
MANDATORY you will need a good tire pressure gauge with a bleeder valve (http://www.saferacer.com/longacre-ti...?productid=648) I like this one from LongAcre (all great racing stuff) with the big glow face so you can see it in rain and at 5am during prep time. Don't get cheap get a LongAcre! THe local car parts gauge is crap & they are inacurrate especially with hot air int he tires! Figure out your cold temps by bleeding air all day to get it jsut right and then recording the air temp after they cool down. SO next morning (day 2 of event) you can start your tires on these pressures you learned the day before. This will vary by tire type and size/car/suspension set up. You can ask someone in a similar set up as a starting reference, but you need to check ASAP as soon as you jump outa the car in the paddocks! Here is a great tire pressure guide for Hoosiers A6/R6 (https://www.hoosiertire.com/Tctips.htm).
Hubs, Bearings & Spindles:
Again there is some debate on this here. One thing that there is NO debate on is that the stock OEM when you bought your car Hub is junk. No you can't "just replace the bearings", the HUB\bearing comes as one single part. GM even admit this and changed the design later to fix the short comings. You cannot change the bearings alone; you need a full new hub each time. You will start killing Hubs in this hobby quickly, especially if you spin out. You will need an impact gun to do this efficiently and a T55 torx bit to get the 3 bolts that hold the hub to the spindle out. Some people use blue lock-tite on these after, but I dont think its necessary and will just make it that much harder to get the torx bolts out after the heat does a number on it.
You can get an aftermarket at Autozone, Pepboys, etc which is as good if not better in some cases (search forum) than the OEM. Timkin is the way to go for aftermarket on the cheap, with OEM and Timkin arguably the same product but for less money. Autozone (part #513139 front @ $155 & part #512153 rear @ $127) routinely stocks the Timkins since they are also used on Caddys and a few other GM cars as well. Make sure it is labeled "Made in the USA"! Avoid the cheap Chinese made hubs. Don't buy any other cheap OEM but Timkens is the general forum wisdom. But everyone agrees, eventually you will get sick of replacing regular style HUBs and go for the SKF. SKF you might notice is one of those stickers you see on the side of many Nascar and other Pro Race cars. Its because they make their hubs and bearings as well. Its a completely different design than the OEM style hub designed to take much more heat, abuse and lateral loads. Pfadt (http://www.pfadtracing.com) and Hardbar (http://hardbarusa.com) both sell them cheap @ $380 but Hardbar is way cheaper on shipping (flat rate shipping ground for entire order!). The SKF unit also makes all the hubs exactly the same for front and rear = same part! OEM are different units entirely for front/rear which means ordering 2 different parts (2 front & 2 rear). Why does this matter? BACKUPS! You can buy one SKF hub as a back up and take it with you to an event, and it fits anywhere in an emergency fix over a lunch failure with your buddies track side! The OEM hubs will fail in a lateral slide easy, the SKF are more durable in a lateral car slide especially if you hit dirt (*cough* turn 7 on lightning *cough*) so after I failed my OEMs I went to SKF. All SKF bearings are manufactered for a company called Vansteel (http://www.vansteel.com/), no matter who sold you the SKF for racing apps on a C5/C6 Vansteel is the direct buyer and reseller. Recently Phoenix Performance put the SKF hubs on sale to CF members for $350 + SH (http://forums.corvetteforum.com/auto...-for-sale.html).
A walk through on the C5 Front and Rear Hub replacement with pics can be found here by Jake: (http://www.jakelatham.com/c5/misc/) its a GREAT walk through in word doc format!
I have tried the hub bolt kit from Hardbar to replace the torque head OEM hub bolts while you are there for an additional $35 a wheel. It replaces the silly OEM torque bolt design with nice 12 point bolts that you can grip and remove easier/torque down better after install. I found that while they might make a nice change on the fronts, the rear bolt heads stick out too far and get in the way. Couldnt get a wrench on the Harbar ones while the Hub is on the car. I think its a well made & well thoguht out kits but it didn't work so well for me. The kit also comes with a better nut for the ball joint. The OEM nut (especially in the rears) tends to spin when you go to take it apart, this after market kit eliminates that to a small degree and makes you swear less. You may need a spreader for the ball joints, but the drop & hammer tap trick works well for me. CF has some nice already posted walk thrus on these topics, you will need to make sure you have the right size socket for the rear hubs before you start... it’s not a common tool box size. Read your CF walk through linked to above and plan your tools before you jack up the car.
When you super crazy and want to make your car the most insane track car that money can buy, LG Motorsports makes an insane $3000 Drop Spindle to replace the factory OEM drop spindle to allow for proper lowering of the car without changing the GM Engineered suspension geometry. The other great thing about an after market like this is you can change the wheel hubs without removing the lower ball joint / Control arm like you do with OEM. See the Cf Announcement of this product here: (http://forums.corvetteforum.com/auto...-in-stock.html) and on their website here (http://www.lgmotorsports.com/catalog...oducts_id=1937). While these are super awesome and neat, I suggest you do about every other Mod you plan first, since this is so pricey for what you get.
Aerokits, Front Splitters & Rear Wings - Downforce:
RK Sport - Makes several C5 Body kits for Aerodynamics (http://www.rksport.com/main/catalog.asp?mdid=3) I especially love the rear bumper on this car (http://www.rksport.com/main/part_det...mdid=3&catid=4) which has very nice fucntional air channels but they say you NEED to use their exhaust. I'm looking into it. I love this rear end! You can get their stuff sometimes cheaper here (http://www.ilovebodykits.com/product...t_Canards.html)
ACP - Advanced Composite Products - Makes probably one of the best after market body parts you can buy for the C5. Especialy their rear rear wing is amazing. Problem is $$$. Not cheap stuff. (http://www.acproducts.us/corvetteracebod.htm)
Mecham Designs - (http://www.mechamperformance.com/d_docs/p_c5.html) Threads abound on the CF about poor fit and the need for a lot of fancy body work to make this line up properly.
LG MotorSports - GT2 Wing (http://www.lgmotorsports.com/catalog...oducts_id=2153) and Street Sport Wing (http://www.lgmotorsports.com/catalog...oducts_id=1874)
ACI / American Custom Industries - Rear Wings, Side Skirts and Lipped Bumpers (http://www.acivette.com/aci0005f5.htm), excellent quality fit.
Caravaggio Corvette - Website (http://www.caravaggiocorvettes.com/#/exterior) & Catalogue (http://70.86.152.70/~caravagg/pdfs/C5_Exterior.pdf) which is also the makers of the bolt in C5 fiberglass race seats direct to factory OEM seat tracks. They also make a CONVERTIBLE hard top, not a bad idea for the Vert racer, and a nice rear wing / front canards.
Breathless Performance Wing - Both fixed and ADJUSTABLE while moving (http://www.breathlessperformance.com...productId=1130)
CF Vendor Front Lip in Black matte Fiberglass / CF (http://forums.corvetteforum.com/c5-p...ront-lips.html)
Newer Used Rear Wing for Good Price in 2013: Kognition (http://www.kognitiondesign.com/)
CF Thread here o it's use and angles and height settings: (http://forums.corvetteforum.com/auto...ion-wings.html)
Thread on Mounting Rear Wings to a C5Z deck (trunk): (http://forums.corvetteforum.com/auto...periences.html)
Is your rear bumper of the C5 acting as a parachute? Some say yes, others say no. Here is a 2 piece rear race bumper air diffuser kit that requires cutting up the bumper but allows that trapped air an easy way to get out: (http://www.ecrater.com/product.php?pid=4597779)
Nice Aerokit install thread on CF: (http://forums.corvetteforum.com/auto...o-project.html)
AirDams \ Front Splitters \ Spoilers:
The main function of a front wing, is to create downforce that enhances the grip of the front tires. This aids turning ability in fast corners normally above 60 MPH and can amount to up to 25-30% of total downforce, depending on the configuration. Why a front air splitter at the nose? Well in addition to downforce, Bernoulli's Principle states that as the speed of a moving fluid INcreases, the pressure within the fluid DEcreases. What this means simply put is by splitting the air, and thus increasing the velocity of the air as it goes above the car, it will also lower the pressue UNDER the car and thus in short creating a vacuum effect under the body of the vehicle as the pressure above and below are now different. Similar concept but in reverse to how a wing applies lift to an aircraft. There is always debate on what angle a front nose splitter should be set to as well as what engle the rear wing should be set to. Small changes especially in the rear wing can has large implications on both downforce and drag applications, and this can change by track type and air conditions even if you really want to be technical.
Physics and wind tunnel testing tells us that for a front air damn \ nose splitter to be effective BUT not create its own drag in the process it should be about 1" above the ground but no more than 2". Too close to the ground creates drag, too high as well, the sweet spot is about 1". As its name implies a front spoiler's purpose is to "spoil" the fast, smooth, low-drag airflow coming off the roof. By sticking up into the airflow, a spoiler causes the airflow to detach and separate, reducing its velocity and creating a pressure rise that decreases the rear lift tendencies. Although a rear spoiler primarily adds downforce, in some situations it can also decrease drag, depending on the spoiler's height, angle, and length of extension off the deck. The more vertical the spoiler's angle,the more the downforce at the price of increased drag. Exact results vary per vehicle and can only be determined by cut-and-try testing, but some studies suggest that the most down force is achieved with a spoiler height that's about 8 percent of the car's wheelbase. That means about 8.36 inches for the 104.5-inch C5 wheelbase. For any drag decrease, the spoiler height will usually have to be less than 1 inch, but up to 2 inches there is usually no drag penalty. Most important property of the splitter - STIFFNESS! A flimsy splitter with drop in height as the pressures increase and will eventually hit the ground pulling under the car and tearing to shreds!
There are obviously many levels and examples to consider when it comes to a front splitter / diffuser. And yes, each platform is very different. Having a tunnel system for the air to go above and below the splitter is the way most teams run. In general the closer to the ground our splitters are there is a "plunger" effect. Where the car is less likely to want to buck around in turns. And of course you are controlling the amount of air going under the car which can have a buffeting effect. Also drag if you are not running an undertray. An ideal setup is a two tunnel system, where you have a tunnel increasing at angle and width at the cars mid section thru to the rear diffuser. And a second tunnel above the undertray that is pulling air from the engine bay thru to the rear of the car. In this situation, a side dump exhaust is optimum because you are no longer introducing compressed exhaust in the region that you really need a vacuum effect. While this sounds great, many drivers will just the curbing at corners and this could destroy an expensive splitter... a 3" height is a good height if you are a curb hopper, but no higher.
Often the next question is then: What angle should the splitter be at? The front downforce created by the splitter has more to do with the length of the lip (numbers above in inches for the C5) than how far it extends under the car. Since the splitter gets its downforce due to there being a high static pressure area on top (created by the airdam) and a low static pressure underneath. The addition of the splitter actually increases static pressure behind the airdam and under most of the front of the car's underside...but it still creates overall front downforce due to the lip. To answer the actual question though it is best if the splitter is parallel to the ground, but a couple of degrees up or down does not matter overly much. Too much either way will create drag and or rip it off.
Rear Wings:
It stands to reason that if you turn a wing-like shape upside down with the flat surface on top and the curve on the bottom, it will work the opposite way it does on an airplane--it should generate downforce. Done right, upside-down, rear-mounted wings can generate huge amounts of downforce, but unless the wing is integrated into the vehicle's over all body-shape (as on classic Dodge Daytonas and Plymouth Superbirds),there's usually a big drag penalty. However, even though a bulky wing may reduce ultimate top speed, it increases a car's cornering ability so much that overall lap times are dramatically lowered. The problem is implementation. There are literally thousands of potential airfoil shapes, and the wing's interaction with the rest of the body is extremely complex. You cannot just take a generic wing, turn it upside down, haphazardly mount it, and expect it to work. Yet if the wing truly is effective, it can seriously unbalance the car, actually unloading the front tires. At a minimum, a huge cowcatcher-style front spoiler is usually needed to regain balance. Bearing this in mind, there are several things to consider when planning a wing. Thicker and/or more highly cambered shapes generally generate more downforce, but also more drag. On any given wing design, mounting the wing at a lower angle of attack (flatter) has less drag, but is also not as effective. A steeper angle (with the rear higher than the front)yields more down force, but also more drag. Adding a small 90-degree wicker or "Gurney flap" to the rear edge of an existing wing can add downforce with little drag penalty, and varying height wickers can serve as a fine-tuning aid for different tracks and conditions. Vertical side plates at each end of the wing keep air from spilling over the sides,sometimes increasing the wing's effectiveness as much as 30 percent.There are also multi-angle and multi-element wings, which are good if wing size is limited by class rules, as is often the case. If you click the link above to the breathless active aero rear wing, the full package kit from a stock C5 shaved 3 full seconds off a lap time. From what I have read on a C5 with a average wing it has been found that the optimum angle for the rear spoiler is between 55 and 60 degrees from horizontal, depending on the type of racetrack. The longer and faster the track, the less spoiler angle used to run. If people have other information to share, please do and PM me with your data to share with the group.
Here are some nice webpages on Aerodynamics, downforce and drag:
(http://www.hotrod.com/techarticles/b...s/viewall.html)
(http://www.hotrod.com/techarticles/b...#ixzz2e8RLFBkb)
(http://www.rapid-racer.com/aerodynamic-upgrades.php)
Protecting your Paint from Track Debris:
Many people also use painters tape and / or shelf paper to protect the panels, bumper, etc.
Kinda like this: (http://i29.tinypic.com/2qwczz7.jpg) or (http://i151.photobucket.com/albums/s...y/PICT0251.jpg) or (http://i151.photobucket.com/albums/s...reary/tape.jpg)
CF Thread on this Topic for Racing Here: http://forums.corvetteforum.com/auto...ters-tape.html
CF Thread on this Topic for Racing Here: http://forums.corvetteforum.com/auto...ters-tape.html
Other Adhesive products out there for paint protection at track:
Gaffers Tape: http://en.wikipedia.org/wiki/Gaffer_tapeRoad Wrap: http://www.buyroadwrap.com/
Griots Garage: http://www.griotsgarage.com/product/...rrivals&page=1
3M Clear bra: http://solutions.3m.com/wps/portal/3...rotection/Film
How to Install YouTube Video:
I personally use Mirror Covers from C5 Creations (http://www.c5creations.com/c5.php), and leave them in the car after the track. Bought them at Carlisle for $25 for the pair. Takes like 1 minute each mirror, and I do it in the paddocks after tech. i use a mini flat head screw driver that I bent the end with a pliers to get it tucked in BEHIND the mirror.
A front bumper mask can also be purchased form C5 Creations (http://www.c5creations.com/c5.php) which is a very think mesh and air gets thru pretty easily for the show queens that want to try one day at HPDE. It snaps on in about 5 minutes or less once you get the knack, and I have seen it used only once at the track. Might increase your engine temps though with decreaed ventiallation.
If you want to protect the front of the car to look snazzy, and you clearly know this is a one time event for you.. but want your car to never get a ding. Oh and you don't care about money... Speed Lingerie (http://www.speedlingerie.com/corvette-C5.html). FYI the music on their website is cheezy and maddening in about 3 secs. These are high end, color matched leather products and the front bumper protector is over $500. I have only EVER seen these at NCM events. *cough cough* Need I say more?
Again this is a very very subjective moment. Form vs Function. CCW & Fiske make great racing rims and both sponsor the CF. There are many more out there, these seem to be the most common I have seen. Get 3 piece rims, not solid blocks. Why? If you damage a rim, you can take it apart, and rebuild it for a fraction of the cost of replacing it! You will ding up a rim if you do this long enough. Trust me. Remember light is best, and more spokes are better than less spokes for this purpose of racing. Just remember a few things. Corvettes come in a staggered wheels sizes for C5 (17/18) and have wider rears than fronts. If you get lets say 18x10 all around (called a box or square set up), you can order 5 rims and have a mounted spare for failures you can put anywhere. If you are not symmetric in rim/tire sizes you need more extra rim\wheels in a failure for front/rear. Nothing worse than a rim\tire failure on the track to send you home way early. Also make sure you do NOT use the fancy chrome lug nuts on your rims. Heat expands them, and they crack and strip easy. Not good. Also try not to have a wheel lock nut at the track, its a bitch taking the car apart over and over with a wheel lock! Try either the OEM Z06 steel nuts (with the plastic nut covers) these are solid and will not fail on the track or get a lightweight aluminum racing nut (http://www.jscspeed.com/catalog/Univ..._Lug_Nuts.html) the annozied colors are cool, but from experience the impact gun messes up the color on them the first use. Stick to plain colors for the track, and the colors for street and show rims. Lastly invest in a decent torque wrench. A quick and cheap one is at Harbor Freight (http://www.harborfreight.com/1-2-hal...rench-239.html) which is usually $25 but often on sale for $20, and don't forget your 20% off coupon for one item per order! Make sure its the 1/2" kind, and always use an impact socket for the lugs even without the impact gun so it wont round off your nuts. Stock size is 19mm FYI. Getting them off with a breaker bar is the best bet (http://www.harborfreight.com/1-2-hal...bar-30395.html) without an impact gun. See the bottom of the thread for the tools section where items like this are discussed in more detail.
The bigger the rim, wider the tire… the more expensive it gets to rubber them. The wider the tires the less choices in rubber you have to fit it. I’m on big rears, and my choices for tires isn’t that great (or cheap) as a result. ** Run flats sucks *** ** They get hot, they are heavy, and their side walls are too stiff to race on. In fact the one dry hot day I tried runcraps on the track I felt they were very dangerous as they greased over quick and it felt like in the corners I was on banana peels! Nitto, Toyo, Kuhomo, Hoosiers, etc are all fine tires. This is also a vast opinion difference. Also consider if you run dry or wet? If you have Hoosier slicks (R6/A6) on as your only set up, and it rains… Now what? You can’t rain drive without risking your life on slicks. So you spent all this time and money for a HPDE event that you cannot even drive in? Do not get slicks until you are a kick *** driver & can trailer 2 sets of shoes with you. Learn on street tires, not even r-comps. Streets will slide a bit and bark a lot. This allows you to learn car control in a slide, and teaches you track humility.
When choosing non-oem rims and tire combos remember that on the track its not pretty that counts, but grip and unspring weight aka Unsprung Mass.
A vehicle's total weight is the sum of all of its parts and affects its ability to accelerate, brake and corner. Reducing the total weight will enhance the vehicle's performance because less weight needs to be controlled and therefore, less energy is required. Unsprung weight is the weight under the springs which moves up and down as the vehicle rides over uneven roads and leans in the corners. Reducing unsprung weight allows the springs and shock absorbers to be more effective in controlling the suspension's movement. This is a totally different term than a vehicle's rotational weight which includes all parts that spin including everything in the vehicle's driveline from the engine's crankshaft to its wheels and tires. This affects the energy required to change speed as the vehicle accelerates and brakes. As you would guess, reducing the weight of any of these rotating components will enhance the vehicle's performance because less energy will be required to increase or decrease their speed.
Ding up your expensive aluminum wheels? Road rash is no biggie, you can fix that yourself with enough hours and elbow grease. You will have to dismount the tire though and then remount. See a DIY thread on CF here (http://forums.corvetteforum.com/c5-g...lips-pics.html) In many cases it might be worth it to pay someone to do it if you earn enough $$ per hour, its not worth the time and purchase of tools. Warp or dent the rim so it wobbles? Crack the aluminum? Best place I have found to fix it is here: (http://www.wheelcollision.com/) It can cost you between $125 and $280 a rim to fix after all is said and done with dimount, fix, remount, balance. But if its expensive enough its worth it. Nice thing about 3 piece rims (ie CCW Classic) is if you trash a inner/outer badly enough you can just REORDER that shell you need for a fraction of the price of a whole new rim!
Tire Pressure Sensors? Did you know Z06 don't even come with them! They are there so the run flat guys know the car is "running on flats". Personally I like them even though I don't "need them" since one of my CCW wheels the center seam started to leak at Watkins Glenn 2 years ago and the TPS alerted me to it ASAP. You can remove them on the C5 without issues, on the C6 you can't especially on the C6 Z06 withotu driving the system crazy and disabling your car. Youtube Video here on how to rebuild a C5 sensor when they get weird, usually because the battery is dead (
Here is a link to the C6 TPS tool: (http://www.corvetteguys.com/corvette-tpms-tool.html) & How to Use
CF Video on How to use it (http://forums.corvetteforum.com/c6-t...ms-videos.html)
When racing it is BEST to use DRY air and preferably nitrogen. Wet air is more likely to act as a heat sink and EXPAND in the tire giving greater fluxes in tire pressure. Using the cheap $.25 fill up machines at a gas station is the best way to make this mistake. Nitrogen is a more stable gas, different sized molecule, etc and also has less heat/expansion issues than compressed air. (http://auto.howstuffworks.com/question594.htm) Costco uses JUST Nitrogen for cars, and their guys will give you a fill for $5 cash tip no questions asked if you pull up, you might have to let them sit in your car and take a cell phone picture each time for their FB page
You can get a cheap 5 gallon air can at Harbor Freight (http://www.harborfreight.com/5-gallo...ank-65594.html) and also fill it at Costco While you are there for back up nitrogen on the track when you might need to add the second am after a day of bleeding for temps.If you do it super correct you VACUUM out the air first or what's called "square tire" method. Seen here: (http://forums.corvetteforum.com/auto...y-air-etc.html)
Nice write up on CF about Wheel & Tire Technical Notes: (http://forums.corvetteforum.com/auto...ech-notes.html)
I have been asked often lately about the TSW Nurburing Rims for a square 18x10.5 setup, I know nothing personally, but here is a nice thread about them: (http://forums.corvetteforum.com/auto...post1580715133)
OEM Tire Sizes & Wider Tires on OEM rims
Need to Calculate a Rim Offset: http://forums.corvetteforum.com/tire_rim_calculator.php
Below is a list of the OEM tires sizes for C5 & C6 cars (for comparison). Remember even on stock RIM wider tires = larger contact patch = better grip = better handling = faster lap times. Rule of thumb is you can "usually" bump the tire 20mm wider than the stock OEM size without issue. ie. 245 to 265 is fine. When you bump 30mm it is very tire brand and model dependant, and the type of sidewall starts becoming mroe of a concern. Once you hit 40mm over you run the risk of severe roll over and failure. Don't do it. it's not safe. Remember you need to the the height ratio the same on tires as well, so if you change the front form say 45 to 35 you need to change the rear wall height from 40 to 30 as well. If you do not do this you will **** off your active handling often.
*TO recap = 10mm width duh why you askin?!, 20mm almost always safe, 30 maybe but check by manufacturer with others, 40+ never or die :-)
C5 Stock 97 - 04 - GY Eagle F1 GS
Front: 245/45-17 on 17x8.5 rim / offset: 58mm / most common bump: 265/40 easy to find stock ZO6 Sizes
Rear: 275/40-18 on 18x9.5 rim / offset: 68mm / most common bump: 295/35 easy to find stock ZO6 Sizes
Weight OEM: 19.2 lbs, front; 21.4 lbs, rear - 97-99 OEM wagon
Weight OEM: 22.0 lbs, front; 29.0 lbs, rear - 97-99 OEM wagon
Weight OEM: 17.0 lbs, front; 19.5 lbs rear - 97-00 OEM magnesium
Weight OEM: 17.5 lbs, front; 19.5 lbs, rear - 97-00 OEM magnesium
Weight OEM: 18.08 lbs, front; 20.06 rear - 00 OEM standard, thin spoke, high polish
Weight OEM: 17.0 lbs, front; 20.0 lbs, rear - 00 OEM standard, thin spoke, painted, no sensors or centercaps
Weight OEM: 16.0 lbs, front; 20.0 lbs, rear - 01 OEM standard high polish
Weight: 24.0 lbs, 18x10.5 - 00+ FACTORY REPRODUCTION high polish
Weight: 23.0 lbs, front; 26.0 lbs, rear - Z06 chrome FACTORY REPRODUCTION (C5 OEM Size)
C5 Z06 01-04 - GY Eagle F1 SC
Front: 265/40-17 on 17x9.5 rim / 54 mm offset, 7.2" backspace (182.88mm) / most common bump: 275 or 285 (might rub brake ducts at wheel lock)
Rear: 295/35-18 on 18x10.5 rim / 58 mm offset, 7.9" backspace (200.66mm) / most common bump: 305 or 315 (no you won't rub fenders till >335)
Weight OEM Rim: 19.6 lbs, front; 21.4 lbs, rear - 01 Z06 forged will clear some BBK
Weight OEM Rim: 19.2 lbs, front; 21.0 lbs, rear - 02-04 Z06 cast/spun will clear some BBK
Weight: 20.3 lbs, front; 20.7 lbs, rear - SPEEDLINE will clear BBK
Weight: 19.0 lbs front; 20.0 lbs rear - TSW Nurburgring (http://forums.corvetteforum.com/c5-p...group-buy.html) 17x9 +50mm & 18x10.5 +60mm clears BBK
Weight: 28.0 lbs, front; 32.0 lbs, rear - Z06 chrome FACTORY REPRODUCTION (Z06 Size)
Weight: 23.5 lbs, front; 24.5 lbs, rear - Z06 Motorsports FACTORY REPRODUCTION (Z06 Size), polished
Weight OEM Z06 Open Lugnuts: 1.5 oz *** prefered FYI over the Chrome Acorn style w\ wheel lock nuts which can heat crack fail or strip from on/off often
C6 Stock 05 -
Front: 245/40/18 / offset: +56 mm
Rear: 285/35/19 / offset: +79 mm
C6 Z06 06 -
Front: 275/35/18 on 18 x 9.5 Rims / Offset: +40mm & Back Spacing:6.82” (173.35mm)
Rear: 325/30/19 on 19x12 Rims / Offset: +59mm & Back Spacing:8.82” (224.09mm)
C6 Grandsport & Carbon Edition 10 - (same as C6 Z06)
Front: 275/35/18
Rear: 325/30/19
C6 ZR1 09 -
Front: 285/30ZR1
Rear: 335/25ZR20
Question: Will a Stock C6 rim set up fit on a C5. Answer: Yes. But if you lower the C5 enough you might need a rear wheel spacer to prevent inner fender rubs. And you might not have the wheel inside the wheel wells, they might stick out past the body a tad which can increase your road rash if you like lighting up your rear tires.
Street Tire Run Flat: (all runflat OEM tires are bad for HDPE & Tracks)
Michelin: Pilot Sport (PS) - Do not melt / grease as quick as F1's but will get hard after 2-3 heat cycles. Side walls are too stiff for loading the front tires in turns and will create massive understeer on enterance and then the back end will get slick and then oversteer on the turn exit. Nothing nice to say about run flats. Do not let them get above 34lbs hot. Check Michelin Prices here (http://www.rims4less.com/)
Michelin: Pilot Sport 2 (PS2) - same as above, just happens a bit slower in the process. You get a few more minutes on them before they go bad. Cold temp 28/26 and hot 35/33 same for PS.
Goodyear: F1 (EMT) - Just a god awful tire on the track. When they get too hot they will grease over bad and you might as well be on ice skates at that point. The stiffest sidewall imaginable and they are the OEM choice GM tire for the C5. Starting pressure on these is 26/24 and then hot pressures on the track get to about 34/32. Do not exceed these temps or you will have melted drips of tire running down the side of the tread. They make a good left over drifting tire, take your buddies used run flats for free. Mount them for a run day of learning how to drift.
Most Common Rim for Racing in a C5/C6:
Speedlines (Look like hte stock Zo6, speically made for GM) Tried and True in Stock Z06 Sizes (Rear) you can run an 18" square set up. Vendor on CF here for $1000 for the set (http://forums.corvetteforum.com/c5-p...heels-f-s.html).
CCW
FISKE
Street Tire Recommendations: (red denoted a great choice wet & dry if you can get the size)
Nitto: NT05 -for the price great value, good turn in. Good even wear, easy to throttle steer for a street tire. Predictable. Do not get hard after a few heat cycles like many street tires will. Sticky for a street tire. like 28 cold and 34 hot for a starting spot.
Nitto: 555 (not 555R or 555R2) - I have heard very mixed reviews on this tire, probably the only Nitto that doesn't get regularly good reviews from drivers.
Nitto: Motivo - New for Winter 2012, no one I know has tried them. (http://forums.corvetteforum.com/misc...5&prx_t=294466) Message me if You have.
Firestone: Firehawk Wide Oval -Great Tire Rack street/HPDE tire with good wet performance use
Hankook: Ventus V12 Evo K110 - Good for both wet and dry consistently, but not cold, no CCW widths. These tires in the dry keep heating up all day with regular air and need to be bled all day until they finally level out and stop expanding after about 3 sessions. They do not like pressure, and 36lbs makes the tire change from pretty decent to ****ty in a hurry. I like 35 front pressure MAX, and 33-34 rear. You can very consistently drift the car through a corner on these settings. They will need a slow heat cycle or they will grease, first time on track take it easy about 4-6 laps sadly in dry if new. Good turn in, and less power oversteer than the PS or PS2. Again be warned, stay under 36 lbs at 37 lbs they grease and get completely unmanageable and I dropped a wheel off.
Michelin: Pilot Sport Cup (PSC) - OEM choice on many Porsches, ZR1 and Katech cars
Kumho: Ecsta XS (best) or MX or SPT by budget. Great cheap AutoX and street tire combo, decent wet use as well. Consistent from cold to hot with traction and doesn't grease in right pressure range at all.
Kumho: Ecsta V700 -great track wet use tire, needs to be shaved for dry use, good DD street use
BF Goodrich: KD Dry use tire mostly, very poor in wet
BF Goodrich: KDW Wet version of the above tire, noisy for the street but similar in grip and wear to a PS2. CF members seem to say they are relatively grippy in wet and dry, but once they get really hot you can overdrive them quickly. I think this is true though of all street tires. Easy to find, many sizes, good value tire.
Bridgestone: Potenza RE11 - no personal experience, but they have good reviews so far in C6 sizes. Not too noisy on street, good grip for those looking to "hook up" on the rear wheels. No reviews I can find so far that address them on the AutoX or Road Circuits yet. Initial reviews sound good, and price is very reasonable.
Dunlop: Direzza DZ101 Funny these are used buy so many tuner car owners, but rarely on Vettes. Comparable to price with the RE11 but when compared the RE11 do better. Interestingly when you look at the TireRack scores on this tire, it scores well in the survey BUT not so good in the "would you buy it again" section. (http://www.tirerack.com/tires/tires....ireMake=Dunlop) Almost zero reviews on the forum, in fact if you search for the tire you only find it for sale never discussed.
R-Comp:
Toyo: RA1 -comes in the CCW widths, pretty good in wet for the first few weekends then looses the water channels and becomes a dry only tire. I ran these pressures wrong at first, try 39-40 lbs hot in the front and 36-37 rear. Toyo recommends from their website that these like 37-42 lbs for a car in the C5 weight. At 42 they slide corners front. Under 36 they roll the fronts for bad premature wear on the outsides. Rear above 38lbs you start getting power oversteer exiting corners. On full tread, not so hot dry track friendly and really do much better shaved. Full tread tends to be a bit slippery on the preferred hot temps, once they hit the shaved amount they stick great and wear much slower int eh 2nd 50% than the first 50%. They prefer high Camber (btwn 2.5 and 5.0) so if you have an aggressive street set up in the just under 2.0 range expect excessive outer lip wear. Good tire to buy off some other guy who heat cycled them already for a time trial etc and wants to be new for each event. Its cheaper for the tires this way, but the mount and remount costs get expensive too. Operating Temperature RA1: 160�F to 220�F Check prices here (http://www.treadepot.com/sizes/ra1.html). There is a little circle on the outside tire wall that is designed to match up with the location of the tire valve for easier balancing, make sure to remind your installer. CF Forum Vendor often with Deals on RA1: http://forums.corvetteforum.com/auto...uper-deal.html
Toyo: R888 -like dry better than wet, Toyo says they like to start at high pressure for a C5 weight like 34/36lbs and hot at 42-45lbs, this isn't too great in practice. Less grippy than the 555RII & the RA1. Recommended pressures to start: 32/30.5 to end up 38/36. While they are recommended to be "Hot & High Pressure" mine and others experience is they slide too much after 38lbs. hot in rear & understeer too much above 40lbs in the fronts. Do better as well after they have lost 30-50% of the tread life & second half burns away slower, but do not suffer the sliding of new tread depth like the RA-1. I think its a slightly stiffer rubber compound is why, hence less sticky. The least "sticky/grippy" of the 2 Toyo offerings. Can quite often be found as cheap used discards from time attack cars or time trial cars where DOT tires are required. Check Prices Here (http://www.treadepot.com/sizes/r888.html) There is a little circle on the outside tire wall that is designed to match up with the location of the tire valve for easier balancing, make sure to remind your installer. CF Vendor with Deals often on R888: http://forums.corvetteforum.com/auto...w-pricing.html
Nitto: NT01 -is a DOT legal R-comp HPDE designed tire, better in dry than wet. Not in CCW sizes... yet :-) you are seeing theses more and more often on cars running Z06 stock rims for both god grip and cost effectiveness in the stock Z06 rim sizes. They are also very street tire friendly and the wear on the street is pretty decent if not raced on.
Nitto: 555R -is a DOT legal drag radial - Not a HPDE road race tire, side walls too thin.
Nitto: 555RII -is a great choice for Road Racing, great dry and not bad wet with decent tread. Very sticky both at full depth and at shaved depth. Consistent feel all the way to the cords. A must try tire if it comes in your sizes for R-Comps. Not in CCW widths yet. Are in Z06 stock widths.
Nitto: NT05R -is a DOT legal drag radial (pressure cold 32lbs F / 30lbs R - they like to run hot at 40lbs) - Dry use
Falken: Azenis RT-615 -good street tire, but when you push them they get "greasy" fast = not good
Kumho: Victoracer V700 -only in 16" & 17" though great tire (seam issues you can read about here http://forums.corvetteforum.com/auto...s-do-this.html) Have not tried myself but have not heard good stuff, so far have heard about difficulties with pressure, fast & unreliable wear. Have not heard anyone I know who liked them.
Pirelli: PZero Corsa R -good tire if you don't have a price issue, you can buy two for one anything else
Nice thread on the R888 vs 555R2 - Short version Same rubber compound since Toyo & Nitto are the same company (http://forums.corvetteforum.com/c6-f...omparison.html)
Track Slicks:
Hooser: A6 - hands down the better of the 2 Hoosiers, better when new, heat cycles more evenly, don't last long but you will run faster on these than on the R6. Great if you are "racing" vs HPDE.. Starting cold pressures are 21-24 F 20-23 R with hot pressures 30-32 F, 26-28R & operating temps: Hoosier A6 120-140 degrees.
Hoosier: R6 - last much longer than the A6, but starts getting hard & performance wanes with repetitive heat cycles. Won't get you the A6 times, but for HPDE a much better $$ value if .6 secs doesn't matter. operating Temps: Hoosier R6 125-145 degrees
Goodyear: GT
Michelin: Slicks S8D(medium) Front & the S9D (medium) Rear - Stick very nice once they heat cycle. Takes a bit longer to heat cycle these than the GY GT. Start very low cold near 22 lb, and let them heat up. Many people complain they are difficult to mount on rims, and the bead takes a long time to set up on them. Speculation is because they have such a steep camber requirement (F -3 to -4 & R -1 to -2).
Kumho: Victoracer V710 Have no personal experience with these, nor do I have any close friends I have seen out on these. (http://www.tirerack.com/tires/tires....del=ECSTA+V710) They have grooves in them so they are technically DOT legal slicks, but I would hate to get caught in the wet with V710's if the tread was anything but brandy new. My understanding is they are less sticky than their Hoosier counter parts and you will run slower, which for HPDE is not a big deal - big deal if you are time competition however. They grip poorly until the get HOT, and the tread life is a bit longer than the Hoosier which is nice since this is thus a cheaper tire that lasts longer. Operating Temp: Kumho 710 110-170 degrees
BF Goodrich: G-Force R1 (http://www.bfgoodrichtires.com/tire-...force-r1-tires) I have no experience on these, and they are priced nice at (http://www.discounttiredirect.com/di...35&ar=30&rd=18) Discount Tire Direct for my big rear 335's. Can anyone PM me a review on these vs Hoosiers? I want to try them but want others experience with them first.
You will need a pyrometer to check your tire temps until you get the operating temp correct (differs by tire see manufacturer recommendation) also you will need to adjust pressure and camber settings until you can achieve a 10-15F difference with the outside colder than the tires inside. Pyrometers come in contact and infrared/laser models, Longacre makes a contact one for about $140 give or take. A good investment because well running tires last longer so this $140 investment will save you THOU$ANDS in the long run on tread wear.
Learn how to control understeer & oversteer (http://ask.cars.com/2007/04/whats_the_diffe_1.html) at least pretty good before moving to R-comps or better. Video of what that difference between the two looks like here (
Used Tires? I’ll tell you my personal experience with used. I got my CCW classics. They looked great with tires on them. Tires were great to look at. It was a show car set up, and barely used. Problem was I didn’t read the date code on the tires. They were OLD. First HPDE on them, the caulk seals started to go, the tires went hard and started to split / dry rot. I had to fix a small inside lip warp on one with correct a wobble only felt after 120+ mph... etc. In the long run it cost me as much or more even to go used. AND let’s not forget the aggravation. Not saying all deals go like this… but something to think about.
Mini Tub & Mud Guards \ Debris Guards:
Also know after about 315 in the rear (depending on offset), you will probably have to remove the Z06 rear ducts or get rubs. Max tire size before mini-tub usually 335 depending on offsets & they will stick out though; get the APSIS guards to solve this problem. (http://www.apsisusa.com/C5%20Corvett...le%20index.htm), you can see them on my car in the CarDomain pics I have posted. If you want to replace and paint an entire rear quarter to make it a more factory finished wide body look in the rear, Lewis Five MotorSports makes a superb quality kit. (http://www.lewisfivemotorsports.com/index.html) LG Motorsports I hear at this time (9/09) is also working on a flare rear quater and ACP has a widebody kit as well. On the track your car will kick up a LOT of debris, especially small rocks and pebbles and bits of vulcanized rubber off race tires. If you do NOT use a guard, etc expect to slowly over time tear up your rear quarter panels from debris hitting the paint.
LPE MiniTub Kit: http://www.corvettegarage.com/produc...-corvette.html
LPE MiniTub Install Thread: http://forums.corvetteforum.com/c5-f...tallation.html
How to MiniTub a C5: http://teamzr1.com/tubC5.html
C5 DIY MiniTub: http://www.c5forum.com/cgi-bin/ultim...ic/1/3309.html
* Note * For the purpose of Road racing a C5 you will never need to exceed a 335, so MiniTubing is not required in 99% of the cases, ever regardless of how hard core you become. MiniTubing is typically a Drag Racing option for AS BIG AS they get in the rear. However this may not be the case for all wheel/rim offset combos. Talk to your custom wheel dealer before you buy to make sure you do not need to do this.
Air Pressure Gauge:
MANDATORY you will need a good tire pressure gauge with a bleeder valve (http://www.saferacer.com/longacre-ti...?productid=648) I like this one from LongAcre (all great racing stuff) with the big glow face so you can see it in rain and at 5am during prep time. Don't get cheap get a LongAcre! THe local car parts gauge is crap & they are inacurrate especially with hot air int he tires! Figure out your cold temps by bleeding air all day to get it jsut right and then recording the air temp after they cool down. SO next morning (day 2 of event) you can start your tires on these pressures you learned the day before. This will vary by tire type and size/car/suspension set up. You can ask someone in a similar set up as a starting reference, but you need to check ASAP as soon as you jump outa the car in the paddocks! Here is a great tire pressure guide for Hoosiers A6/R6 (https://www.hoosiertire.com/Tctips.htm).
Hubs, Bearings & Spindles:
Again there is some debate on this here. One thing that there is NO debate on is that the stock OEM when you bought your car Hub is junk. No you can't "just replace the bearings", the HUB\bearing comes as one single part. GM even admit this and changed the design later to fix the short comings. You cannot change the bearings alone; you need a full new hub each time. You will start killing Hubs in this hobby quickly, especially if you spin out. You will need an impact gun to do this efficiently and a T55 torx bit to get the 3 bolts that hold the hub to the spindle out. Some people use blue lock-tite on these after, but I dont think its necessary and will just make it that much harder to get the torx bolts out after the heat does a number on it.
You can get an aftermarket at Autozone, Pepboys, etc which is as good if not better in some cases (search forum) than the OEM. Timkin is the way to go for aftermarket on the cheap, with OEM and Timkin arguably the same product but for less money. Autozone (part #513139 front @ $155 & part #512153 rear @ $127) routinely stocks the Timkins since they are also used on Caddys and a few other GM cars as well. Make sure it is labeled "Made in the USA"! Avoid the cheap Chinese made hubs. Don't buy any other cheap OEM but Timkens is the general forum wisdom. But everyone agrees, eventually you will get sick of replacing regular style HUBs and go for the SKF. SKF you might notice is one of those stickers you see on the side of many Nascar and other Pro Race cars. Its because they make their hubs and bearings as well. Its a completely different design than the OEM style hub designed to take much more heat, abuse and lateral loads. Pfadt (http://www.pfadtracing.com) and Hardbar (http://hardbarusa.com) both sell them cheap @ $380 but Hardbar is way cheaper on shipping (flat rate shipping ground for entire order!). The SKF unit also makes all the hubs exactly the same for front and rear = same part! OEM are different units entirely for front/rear which means ordering 2 different parts (2 front & 2 rear). Why does this matter? BACKUPS! You can buy one SKF hub as a back up and take it with you to an event, and it fits anywhere in an emergency fix over a lunch failure with your buddies track side! The OEM hubs will fail in a lateral slide easy, the SKF are more durable in a lateral car slide especially if you hit dirt (*cough* turn 7 on lightning *cough*) so after I failed my OEMs I went to SKF. All SKF bearings are manufactered for a company called Vansteel (http://www.vansteel.com/), no matter who sold you the SKF for racing apps on a C5/C6 Vansteel is the direct buyer and reseller. Recently Phoenix Performance put the SKF hubs on sale to CF members for $350 + SH (http://forums.corvetteforum.com/auto...-for-sale.html).
A walk through on the C5 Front and Rear Hub replacement with pics can be found here by Jake: (http://www.jakelatham.com/c5/misc/) its a GREAT walk through in word doc format!
I have tried the hub bolt kit from Hardbar to replace the torque head OEM hub bolts while you are there for an additional $35 a wheel. It replaces the silly OEM torque bolt design with nice 12 point bolts that you can grip and remove easier/torque down better after install. I found that while they might make a nice change on the fronts, the rear bolt heads stick out too far and get in the way. Couldnt get a wrench on the Harbar ones while the Hub is on the car. I think its a well made & well thoguht out kits but it didn't work so well for me. The kit also comes with a better nut for the ball joint. The OEM nut (especially in the rears) tends to spin when you go to take it apart, this after market kit eliminates that to a small degree and makes you swear less. You may need a spreader for the ball joints, but the drop & hammer tap trick works well for me. CF has some nice already posted walk thrus on these topics, you will need to make sure you have the right size socket for the rear hubs before you start... it’s not a common tool box size. Read your CF walk through linked to above and plan your tools before you jack up the car.
When you super crazy and want to make your car the most insane track car that money can buy, LG Motorsports makes an insane $3000 Drop Spindle to replace the factory OEM drop spindle to allow for proper lowering of the car without changing the GM Engineered suspension geometry. The other great thing about an after market like this is you can change the wheel hubs without removing the lower ball joint / Control arm like you do with OEM. See the Cf Announcement of this product here: (http://forums.corvetteforum.com/auto...-in-stock.html) and on their website here (http://www.lgmotorsports.com/catalog...oducts_id=1937). While these are super awesome and neat, I suggest you do about every other Mod you plan first, since this is so pricey for what you get.
Aerokits, Front Splitters & Rear Wings - Downforce:
RK Sport - Makes several C5 Body kits for Aerodynamics (http://www.rksport.com/main/catalog.asp?mdid=3) I especially love the rear bumper on this car (http://www.rksport.com/main/part_det...mdid=3&catid=4) which has very nice fucntional air channels but they say you NEED to use their exhaust. I'm looking into it. I love this rear end! You can get their stuff sometimes cheaper here (http://www.ilovebodykits.com/product...t_Canards.html)
ACP - Advanced Composite Products - Makes probably one of the best after market body parts you can buy for the C5. Especialy their rear rear wing is amazing. Problem is $$$. Not cheap stuff. (http://www.acproducts.us/corvetteracebod.htm)
Mecham Designs - (http://www.mechamperformance.com/d_docs/p_c5.html) Threads abound on the CF about poor fit and the need for a lot of fancy body work to make this line up properly.
LG MotorSports - GT2 Wing (http://www.lgmotorsports.com/catalog...oducts_id=2153) and Street Sport Wing (http://www.lgmotorsports.com/catalog...oducts_id=1874)
ACI / American Custom Industries - Rear Wings, Side Skirts and Lipped Bumpers (http://www.acivette.com/aci0005f5.htm), excellent quality fit.
Caravaggio Corvette - Website (http://www.caravaggiocorvettes.com/#/exterior) & Catalogue (http://70.86.152.70/~caravagg/pdfs/C5_Exterior.pdf) which is also the makers of the bolt in C5 fiberglass race seats direct to factory OEM seat tracks. They also make a CONVERTIBLE hard top, not a bad idea for the Vert racer, and a nice rear wing / front canards.
Breathless Performance Wing - Both fixed and ADJUSTABLE while moving (http://www.breathlessperformance.com...productId=1130)
CF Vendor Front Lip in Black matte Fiberglass / CF (http://forums.corvetteforum.com/c5-p...ront-lips.html)
Newer Used Rear Wing for Good Price in 2013: Kognition (http://www.kognitiondesign.com/)
CF Thread here o it's use and angles and height settings: (http://forums.corvetteforum.com/auto...ion-wings.html)
Thread on Mounting Rear Wings to a C5Z deck (trunk): (http://forums.corvetteforum.com/auto...periences.html)
Is your rear bumper of the C5 acting as a parachute? Some say yes, others say no. Here is a 2 piece rear race bumper air diffuser kit that requires cutting up the bumper but allows that trapped air an easy way to get out: (http://www.ecrater.com/product.php?pid=4597779)
Nice Aerokit install thread on CF: (http://forums.corvetteforum.com/auto...o-project.html)
AirDams \ Front Splitters \ Spoilers:
The main function of a front wing, is to create downforce that enhances the grip of the front tires. This aids turning ability in fast corners normally above 60 MPH and can amount to up to 25-30% of total downforce, depending on the configuration. Why a front air splitter at the nose? Well in addition to downforce, Bernoulli's Principle states that as the speed of a moving fluid INcreases, the pressure within the fluid DEcreases. What this means simply put is by splitting the air, and thus increasing the velocity of the air as it goes above the car, it will also lower the pressue UNDER the car and thus in short creating a vacuum effect under the body of the vehicle as the pressure above and below are now different. Similar concept but in reverse to how a wing applies lift to an aircraft. There is always debate on what angle a front nose splitter should be set to as well as what engle the rear wing should be set to. Small changes especially in the rear wing can has large implications on both downforce and drag applications, and this can change by track type and air conditions even if you really want to be technical.
Physics and wind tunnel testing tells us that for a front air damn \ nose splitter to be effective BUT not create its own drag in the process it should be about 1" above the ground but no more than 2". Too close to the ground creates drag, too high as well, the sweet spot is about 1". As its name implies a front spoiler's purpose is to "spoil" the fast, smooth, low-drag airflow coming off the roof. By sticking up into the airflow, a spoiler causes the airflow to detach and separate, reducing its velocity and creating a pressure rise that decreases the rear lift tendencies. Although a rear spoiler primarily adds downforce, in some situations it can also decrease drag, depending on the spoiler's height, angle, and length of extension off the deck. The more vertical the spoiler's angle,the more the downforce at the price of increased drag. Exact results vary per vehicle and can only be determined by cut-and-try testing, but some studies suggest that the most down force is achieved with a spoiler height that's about 8 percent of the car's wheelbase. That means about 8.36 inches for the 104.5-inch C5 wheelbase. For any drag decrease, the spoiler height will usually have to be less than 1 inch, but up to 2 inches there is usually no drag penalty. Most important property of the splitter - STIFFNESS! A flimsy splitter with drop in height as the pressures increase and will eventually hit the ground pulling under the car and tearing to shreds!
There are obviously many levels and examples to consider when it comes to a front splitter / diffuser. And yes, each platform is very different. Having a tunnel system for the air to go above and below the splitter is the way most teams run. In general the closer to the ground our splitters are there is a "plunger" effect. Where the car is less likely to want to buck around in turns. And of course you are controlling the amount of air going under the car which can have a buffeting effect. Also drag if you are not running an undertray. An ideal setup is a two tunnel system, where you have a tunnel increasing at angle and width at the cars mid section thru to the rear diffuser. And a second tunnel above the undertray that is pulling air from the engine bay thru to the rear of the car. In this situation, a side dump exhaust is optimum because you are no longer introducing compressed exhaust in the region that you really need a vacuum effect. While this sounds great, many drivers will just the curbing at corners and this could destroy an expensive splitter... a 3" height is a good height if you are a curb hopper, but no higher.
Often the next question is then: What angle should the splitter be at? The front downforce created by the splitter has more to do with the length of the lip (numbers above in inches for the C5) than how far it extends under the car. Since the splitter gets its downforce due to there being a high static pressure area on top (created by the airdam) and a low static pressure underneath. The addition of the splitter actually increases static pressure behind the airdam and under most of the front of the car's underside...but it still creates overall front downforce due to the lip. To answer the actual question though it is best if the splitter is parallel to the ground, but a couple of degrees up or down does not matter overly much. Too much either way will create drag and or rip it off.
Rear Wings:
It stands to reason that if you turn a wing-like shape upside down with the flat surface on top and the curve on the bottom, it will work the opposite way it does on an airplane--it should generate downforce. Done right, upside-down, rear-mounted wings can generate huge amounts of downforce, but unless the wing is integrated into the vehicle's over all body-shape (as on classic Dodge Daytonas and Plymouth Superbirds),there's usually a big drag penalty. However, even though a bulky wing may reduce ultimate top speed, it increases a car's cornering ability so much that overall lap times are dramatically lowered. The problem is implementation. There are literally thousands of potential airfoil shapes, and the wing's interaction with the rest of the body is extremely complex. You cannot just take a generic wing, turn it upside down, haphazardly mount it, and expect it to work. Yet if the wing truly is effective, it can seriously unbalance the car, actually unloading the front tires. At a minimum, a huge cowcatcher-style front spoiler is usually needed to regain balance. Bearing this in mind, there are several things to consider when planning a wing. Thicker and/or more highly cambered shapes generally generate more downforce, but also more drag. On any given wing design, mounting the wing at a lower angle of attack (flatter) has less drag, but is also not as effective. A steeper angle (with the rear higher than the front)yields more down force, but also more drag. Adding a small 90-degree wicker or "Gurney flap" to the rear edge of an existing wing can add downforce with little drag penalty, and varying height wickers can serve as a fine-tuning aid for different tracks and conditions. Vertical side plates at each end of the wing keep air from spilling over the sides,sometimes increasing the wing's effectiveness as much as 30 percent.There are also multi-angle and multi-element wings, which are good if wing size is limited by class rules, as is often the case. If you click the link above to the breathless active aero rear wing, the full package kit from a stock C5 shaved 3 full seconds off a lap time. From what I have read on a C5 with a average wing it has been found that the optimum angle for the rear spoiler is between 55 and 60 degrees from horizontal, depending on the type of racetrack. The longer and faster the track, the less spoiler angle used to run. If people have other information to share, please do and PM me with your data to share with the group.
Here are some nice webpages on Aerodynamics, downforce and drag:
(http://www.hotrod.com/techarticles/b...s/viewall.html)
(http://www.hotrod.com/techarticles/b...#ixzz2e8RLFBkb)
(http://www.rapid-racer.com/aerodynamic-upgrades.php)
Protecting your Paint from Track Debris:
Many people also use painters tape and / or shelf paper to protect the panels, bumper, etc.
Kinda like this: (http://i29.tinypic.com/2qwczz7.jpg) or (http://i151.photobucket.com/albums/s...y/PICT0251.jpg) or (http://i151.photobucket.com/albums/s...reary/tape.jpg)
CF Thread on this Topic for Racing Here: http://forums.corvetteforum.com/auto...ters-tape.html
CF Thread on this Topic for Racing Here: http://forums.corvetteforum.com/auto...ters-tape.html
Other Adhesive products out there for paint protection at track:
Gaffers Tape: http://en.wikipedia.org/wiki/Gaffer_tapeRoad Wrap: http://www.buyroadwrap.com/
Griots Garage: http://www.griotsgarage.com/product/...rrivals&page=1
3M Clear bra: http://solutions.3m.com/wps/portal/3...rotection/Film
How to Install YouTube Video:
I personally use Mirror Covers from C5 Creations (http://www.c5creations.com/c5.php), and leave them in the car after the track. Bought them at Carlisle for $25 for the pair. Takes like 1 minute each mirror, and I do it in the paddocks after tech. i use a mini flat head screw driver that I bent the end with a pliers to get it tucked in BEHIND the mirror.
A front bumper mask can also be purchased form C5 Creations (http://www.c5creations.com/c5.php) which is a very think mesh and air gets thru pretty easily for the show queens that want to try one day at HPDE. It snaps on in about 5 minutes or less once you get the knack, and I have seen it used only once at the track. Might increase your engine temps though with decreaed ventiallation.
If you want to protect the front of the car to look snazzy, and you clearly know this is a one time event for you.. but want your car to never get a ding. Oh and you don't care about money... Speed Lingerie (http://www.speedlingerie.com/corvette-C5.html). FYI the music on their website is cheezy and maddening in about 3 secs. These are high end, color matched leather products and the front bumper protector is over $500. I have only EVER seen these at NCM events. *cough cough* Need I say more?
Last edited by Zenak; 09-06-2013 at 02:08 PM.
08-21-2009, 07:28 PM
#5
Terminal Vette Addict
Thread Starter
Safety Gear - Helmets & Hans (harnesses, seats & bars are later on):
It’s all about helmet weight. Buy the lightest helmet you can afford. The stock seat belt will hold up ok for most people until you get to the upper intermediate levels of HPDE, by the advanced group have a racing seat and harness please. Your $$ will be well spent on Safety gear, harness, seats, etc. Why? A super charger doesn’t keep you alive in a crash. I am a Dr. by day and treat auto accident cases often. When you have an impact the head whips forward and back = whiplash. This could also snap your neck & kill you (Dale Sr). Whiplash is a factor of speed & weight. Your heavy head moves forward and back, this causes the injury. So the heavier the helmet, the more force is applied on your neck in an accident. More likely you will have a severe neck injury! In fact, I would think many of us are safer without the helmets for this reason sadly. For the weight, ease of use and avilability for entry level racing the consensus is: HJC AR10 (http://soloracer.com/hjcar10.html) & the Bell M4 (http://www.saferacer.com/bell-m4-hel...?productid=369) or Bell M4 Pro (http://www.saferacer.com/bell-m4-pro...?productid=361). When you get nutty or are just rich :-) get a lightweight carbon fiber helmet and save your neck.
What to do about the helmet weight snapping your head? A HANS! i.e. Head and Neck Saftey device. Unless you have a special race seat for the standard HANS units which REQUIRES a 5 or 6 point harness, the best device out there for the rest of us is the R3 (google shopping to find vendors). Standard R3 is carbon fiber and $1000! It allows you to attach your helmet firmly to your torso, thus avoiding the whipping motion of the skull and protecting your neck and your life! Recently a composite version came out called the Rage R3 for $650, same device… less pretty. Saves you a lot of $$$. The newest version is the hybrid Rage. From calling several vendors (I did), the consensus is that this device is just as good in crash testing as the older style R3, but doesn’t go as far down your spine. It’s wider on the shoulders, but less bulky (thick) behind you in the seat. It also comes with a pad you can place in hard race seats so you can “leave it behind” embedded in the seat (like a Kirky seat) and then just sit down and strap in. It’s comfortable. It saves lives. Do this before you do any engine power changes. It’s a definite necessity when you change from the beginner to intermediate groups & beyond. The faster you push, the more likely you will spin or crash. Safety is more important than performance! From all I have heard and read, those cheesy neck padded collars do little in a severe impact... but do help in low speed impacts. Better than nothing though. Just FYI.
One last thing, most of the HANS equipment you buy will have hardware that comes with it to attach to the helmet that is #10/32 screw sized. However I found that many modern helmets COME WITH factory mounting points already threaded for the HANs with M6 screw size sites. I went to Sears Hardware and got hardened Alan key bolts for these. Home Depot & Lowes had a crudy selection and many of the items were mixed in draws and hard to find. Easy attachment & removal with no worries about stripping screw heads in the future. I found that the 3/8" bolts worked best, but this may vary helmet to helmet & I had to drill the anchor holes a bit bigger to accept the M6 with cobalt steel bits.
Also don't forget that certain HANS units require a 2" not a 3" harness. Know this when you pick your system that the HANS and Harness are size compatible!
I recently purchased a NeckDefender through ECS (http://forums.corvetteforum.com/auto...-delivery.html) with Free SH to CF members and have yet to install and try it. I personally get annoyed with certain quirks of the R3 and Hans set up, and this system is not only certified for all the crash ratings like the Hans, but is suppose to allow you to take your helmet on and off without unbuckling the unit. It also allows for slightly more left and right turning without that grabbing. However it uses its a different connection to the helmet that is different that the D rings most set ups use. I needed an extra set of hardware for my wifes helmet on the track because we share the car and one Defender. have yet to try it as of now (April 2010) will report back after a few track days on it. Like the standard Hans it does require a full harness, where remember the R3 and R3 Rage are good with stock belts.
Fluids:
OIL or for the newbies "710"
Change your oil often. See a nice Youtube Video here on the "How To for C5" (
). Video even shows you the proper way to reset your oil life indicator. Many people will tell you that the standard 5-30 isn’t great for racing temps, its too thin. 10-30 is better, and for street driving 6.5 quarts is fine but never enter the track without topping yourself off to a full 7.0 quarts to help with oil pressure in the turns and decrease levels after blow by and burn on the track. Lots of debate on "whic is the BEST oil" ie. redline, royal purple & the XPR, Amsol, mobile 1, etc. All subjective. One thing is clear; you cannot watch your oil life % indicator on your DIC when doing HPDEs. You need to change the oil more. Bad oil will = engine wear and higher oil temps racing. You do NEED a magnetic oil drain plug (http://www.customcorvetteaccessories.com/magneticdrainplugkit.html) if you start making HPDE your hobby. Higher stress on the motor needs to be checked often. If you get metal on the plug, you got problems which need addressing before you blow your motor on your next trip to the track! Make sure to start doing your oil yourself in this hobby, not the stealership. Its expensive to hit the dealer, and they will not check your oil plug for debris if you get the magnet one. This simple check can save you a blown motor.
The recommendations range from the 5w30 Mobile1 is fine. To never use anything but straight 40w, etc. I have had oil issues with both the Mobile1 5w30 as well as RP 10w30 (Watkins Glenn July 2010) personally. Both got thin on me (no oil cooler yet) at around 295F and pressure starting getting lost in the engine on hard left handers. Some use the Amsol 15w50, but I think thats just too thick, and some people debate this as true. Some race teams now use 0w to cut down on engine friction and improve fuel consumption. I'm going to be trying the RP XPR next in 10w40 at a recommendation of a Z06 C5 driver from my PCA club. Its a custom order only from Pepboys: 5 Gallon container #05041 and in single quarts #12041 are the part numbers at the order counter. It runs roughly $13/qt, but then again whats an engine worth? I also do add Zmax in each oil change, about 1/4 bottle per oil change to maybe a 1/3 on events that I think it will punish the car harder. One Zmax for 2-4 uses isn't too bad. And I do change the oil after each event, fresh filter and all, this way I can inspect the oil for engine damage on the magnetic plug. Shavings in the oil typically on a LS1/LS6 if from the bearings going bad, and once they fry you will have oil pressure loss at all oil temps... not just high temps.
TRANSMISSION FLUID:
Excellent Youtube video walk through from the same guy who did the oil change (
). You can do this once every 20-40k miles for normal street driving without batting an eyelash! On the track you need to do this a lot more. I do it once or twice a season by the number of track miles / events I run. Once again its cheap insurance over a part failure. Again I recommend a magnetic plug to check for metal pieces in the fluid. Fluid write up to come, have to find the time. 3.6 Quarts. I will note for those using the Redline fluid, it ate my transmission seals in like 3 weeks and I started leaking after my first event at the main rear transmission seal. I CF searched, and guess what I'm not the only person that this happen to!!! I only recommend AMSOIL and Royal Purple now. See link below for a list of fluid types. My understanding is the 1997-2000 uses "paper blockers" and the Dextron III is recommended. 2001-2004 use synthetics, and supposedly can eat the paper. Debate on the forum wages on this, but I have to say I used the RP for a long time with zero issues, the Redline was instant problems.
How to Change C5 Manual Transmission Fluid YouTube Video: (
)
How to Change C5 Manual Transmission Fluid Walk Thru: (http://mysite.verizon.net/res0aae8/tranny.html)
How to Change C5 Manual Transmission Fluid Walk Thruhttp://www.z06vette.com/forums/f5/fi...ts-pics-21657/)
REAR DIFFERENTIAL FLUID:
1-2x a year at same times as tranny fluid. 1.7 quarts. Make sure you know if your oil has additive or you need to buy it extra!
How to Change Rear Diff on C6: (http://www.southerncarparts.com/corv...nge-ex-43.html)
How to Change Rear Diff on C5: (http://www.ehow.com/how_4489235_chan...r-axle-c5.html)
How to Change Rear Diff on C5: (http://mysite.verizon.net/res0aae8/diff.html) *** best one ***
Types of Rear Differential & Manual Transmission: (http://forums.corvetteforum.com/auto...post1571382132) You need to do this every few years for a street car, and atleast annual for an HPDE car... some say more.
BRAKE FLUID
Quick Explanation on Brake Fluid DOT 3,4,5 & Wet vs Dry: (http://www.afcoracing.com/tech_pages/fluid.shtml)
Good Article on Brake Fluid importance, explains boiling points of the fluid specifically wet vs dry and why that is a factor on the track. (http://www.stoptech.com/tech_info/wp...fluid_1a.shtml)
BRAKE FLUID COMPARISON CHART
WET VS. DRY BOILING POINT - Why does it matter?
The term boiling point when used regarding brake fluid means the temperatures that brake fluid will begin to "boil". Boiling creates bubbles, bubbles are AIR, and AIR compressed a lot before the fluid dynamics in the line will then push fluid. Air bubbles creates a "spongy pedal" which means eventually you will push the pedal, and it will go to the floor without the calipers moving at all. This means crashing. Brake fluid maintenance is the SINGLE MOST IMPORTANT safety factor your race car will have! My fluid boiled one time, and I had no pedal... I purposefully ditched into a pebble pit before turn 9 at Watkins Glenn rather then try to make the next few corners and risk a crash.
WET BOILING POINT: The minimum temperatures that brake fluids will begin to boil when the brake system contains 3% water by volume of the system.
DRY BOILING POINT: The temperatures that brake fluid will boil with no water present in the system.
THINGS TO REMEMBER About fluids: Brake fluids dry boiling point is more important then wet boiling point when used in a racing brake system.
Passenger cars very rarely will undergo a brake fluid change making the wet boiling point more important. Racing brake system fluid is changed often and a system with fresh fluid will most likely not contain water unless it was contaminated from poor changing procedures. Because of this, racers should be concerned with the dry boiling point. Racing fluid exceeds DOT 3, 4, and 5.1 dry boiling point specifications. Never use silicone based fluids in racing brake systems.Using racing brake fluid will increase performance of the braking system. Never reuse fluid. Never mix types or brands of brake fluid.
Use smaller fluid containers that can be used quicker, AIR in teh container will contain moister and it simply just sitting in the container for a few months unused will introduce slowly some minimal moisture to the fluid. In a passenger car = who cares. on a track at 160 mph it means life or death.
If fluid remains in container be sure to tightly seal and do not store for long periods of time. Purge system (complete drain) and replace fluid often.
Immediately replace master cylinder reservoir cap following any maintenance, and make sure all seals are AIR tight.
Brand Name: Wet Boiling Point vs Dry Boiling Point (*all Temps are manufacturer claims / ratings)
Castrol SRF______518�F 590�F - $70/Liter -*Best but $$$ (http://www.racerpartswholesale.com/p...61/Brake_Fluid)
Ferodo_________399�F 626�F $39.99
Motul RBF600____420�F 593�F - * Best Value $13.75 to $20.00 / Liter by Vendor
Motul RBF660____401�F 617�F $28.95
Wilwood EXP 600_417�F 626�F - $19/Liter (http://eastcoastspeed.com/cart/index...rd=WIL290-6209)
AP-600_________410�F 572�F
Brembo LCF 600__399�F 600�F
ATE-Super Blue__392�F 536�F - ** Best Value $13/Liter (http://www.lpiracing.com/ATE-Super-B...d-34p37158.htm)
Valvoline________333�F 513�F
Castrol LMA _____311�F 446�F
Ford HD_________290�F 550�F
Wilwood 570_____284�F 570�F
ProSpeed 683____439�F 683�F $39.99
PFC-Z rated_____284�F 550�F
AP-550_________284�F 550�F
You DO need to get a 160 thermostat (http://www.lgmotorsports.com/catalog...products_id=91) and either an engine tune to turn your fans on sooner (easier) or a aftermarket hard wire kit to kick the radiator fan on sooner. Lower temps = longer engine life and less failures. Get a good tune! Don’t forget your coolant. The 50:50 works great for normal driving, but higher water (distilled) to antifreeze ratio will run a bit cooler. Its not a bad idea in a track car to go 70:30 / 60:40 in spring once you know ther eis no issues with freezing for the whole race season, then change back for the winter to 50:50... but its time consuming. Only use STEAM distiled water, NEVER tap or "spring water". Running ALL water = higher pressures, and needs some system items changed/considered first. All water will also corrode the aluminum engine engine parts without the anti-corrosion chemicals in it, and all water = higher pressures hot = faster water pump failure FYI. The redline water wetter will also help keep temps down a few more degrees, this is a MUST for all water systems. The farther away you go from 50:50, the more water wetter you need. Don’t forget to change the fluid in your car if racing for the rear diff and the transmission after every season as well. These parts expensive when they fail. I find that the dealer does a great job on fluid changes CHEAP and reliably IF you get your own fluids and bring them. If I bring all my fluids, the total cost for oil, trans and diff change out is under $90 and saves me a mess & disposal costs. Filter? Mobile 1 is just fine. Oil temps above 300F are not uncommon if you are pushing your stock motor without mods. Ouch. I hit high 260s even on a hot day with the mods for heat discussed here in this tutorial.
Recently I found a local Tuner shop (you know the Honda, subaru, etc. places) that sells all the Redline products, motul, etc. They have a PRICE MATCH policy on all fluids! I went one by one on my fluids I needed on Google Shopping, copied down the best prices for each and bought locally at rock bottom prices! Think about this option. 8q oil, 2q diff, 3q trans, 1q steering, 1q water wetter = $140 all Redline when price matched locally without shipping costs. I also set up an account with them, so next time I will get the same prices automatically! Saved about $25 bucks. Not life changing but they also said they will price match for rotors, pads, and anything else they sell / can order...
Clutch Fluid & Clutch Pedal Issues:
Learn the Ranger clutch reservoir trick! First off use the same high priced brake fluid in your clutch reservoir. Don't be a cheap skate. Next the trick involves getting a 10cc syringe or bigger from your auto parts store (Pepboys has them) with a small hose attached; store it in a freezer bag sized ziplock to keep your tool box clean. It’s usually used for mixing 2 stroke oil, etc. Open your clutch reservoir and STIR up the gunk on the bottom. Then SUCK it all out carefully, it will eat your paint if you drip since there is brake fluid in there. Then dump it into an empty disposable water bottle. Carefully refill with the same good fluid you now use in your brakes, DO NOT OVER FILL, and then get in the car. Pump the pedal 20 times. Start drive 2 minutes. Come back, turn car off. Pump clutch 20 times again. Repeat the flush. This is for the first time only. Then do this after all spirited driving involving shift or clutch dumps (i.e. spinning wheels). Keep at it often and the fluid will be and stay clear! If the fluid brakes down it gets gunky looking snowflakes in it that damage the slave fast! The constant change over of fluid here will keep your slave cylinder clean and avoid clutch failure. It’s cheap insurance. I do it first thing at an HPDE each day, and if it’s a busy morning (4 sessions) I will do it at lunch too. Basically every 4 sessions, I do this procedure to keep the car fresh. Power steering fluid can be changed the same way with a sucking syringe, get the synthetic good stuff not the OE cheap stuff. Just insert wheel left and right a bunch of times with engine on instead of clutch pumps. I only do this two times a season though.
If you have problems with your clutch pedal getting "stuck" in the engaged mode and not releasing you don't have a bad clutch plate, you have a hydrolic issue or a spring issue 90% of the time. The flushing method keeps it from going bad, but not always. If you push the car hard you might want to upgrade the Clutch Master.. Tick Performance makes a nice adjustable one that gets rid of that problematic spring mechanism that plagues so many C5 road racers for a much better higher volume full engagement system all for about $300 (http://www.tick-performance.com/tick...aulics/#master) they also sell a line person bleeder system to flush the whole system like a brake flush would be while you are there. On sale from a CF Vendor here: (http://forums.corvetteforum.com/auto...-shipping.html) Another inline remote clutch bleeder kit can be found here for $90 from TPE (Total performance Engineering) (http://forums.corvetteforum.com/c5-p...he-market.html) haven't tried it yet. If anyone has one, send me a write up.
Let the LS1 Cool when moving:
I like the Z06 race mesh in the front of the car, open up the silly fog screen area and get more air into the engine bay to cool your racing engine! halltech makes this very easy and pretty, but its big $$ and then you need to paint it - I use it an am very happy (http://www.halltechsystems.com/Hallt...p/ratp1500.htm). Cutting open & doing race mesh on the license plate adds even more cold air flowing up and over the engine to keep her cool. A walk thru / how to is on CF which explains how to do this here (http://forums.corvetteforum.com/c5-g...cover-mod.html), unfortunately if you live in NJ or one of those state that requires a front plate you are kinda screwed on this one. You can do the plate change and then get a "flip up plate" to stay legal. For example: (http://www.corvetteguys.com/corvette...wn-holder.html)
A nice new bumper for C5 that opens up the entire front can be found here (http://forums.corvetteforum.com/c5-g...nt-bumper.html) Never hurts to use a front hood seal, gets the air flowing more predictably in the engine compartment and that’s cheap and easy to do.
Radiators & Coolers - Oil, Trans Diff:
A upgraded radiator is a must once you get into the Intermediate & Advanced groups. A definite must as you go faster to save your engine life is a radiator and EOC, remember if the oil gets too hot it gets thin and you can lose oil pressure, and eventually damage the bearings and cylinders. Additionally the coolers increase your total oil quantity: more oil = more engine cooling. Stock OEM is 6.5 quarts, when racing stock is 7.0 quarts. With a cooler you can be at 9 quarts or more. This does slightly increase your oil outlay on each change. Add a Accusump and now you have 2 more quarts yet. DRM has the best single install kit for this purpose that I have found. (http://www.dougrippie.com/) It's a real nice double row aluminum radiator/integrated external oil cooler set up which comes with the radiator unit, the adapter block for the engine which bolts right up and all the A/N plumbing lines. Its a job that needs 2 people to make it work, and some dremeling on the radiator fan shroud isn't a bad idea either while there to increae cross flow. Install thread here (http://www.z06vette.com/forums/f5/ro...nstall-119467/). This is the one I went with after several very nice comments from other road racers with oil temp issues like mine.
Dewitts makes some of the best double thick bolt in radiators and External Oil Cooler comobos (http://www.dewitts.com/pages/categor...s.asp?catID=19). LG sells the G2 Radiator with lines (http://www.lgmotorsports.com/catalog...oducts_id=1488).
Want to turn the radiator cooling fans ON at anytime in your C5/6 with the flick of a switch, without messing up the current harness or affecting the computers ability to do the same on its own? This is a Great inexpensive gizmo for $99 - plug and play simple. This is especially nice since you can COOL the radiator in the pits after the car has been turned off! (http://www.saccitycorvette.com/COOLITv2.html)
The diff/trans/steering cooler are the next step after that. DRM also sells a very nice easy to bolt on trans/diff cooler that fits into the Z06 rear brake duct openings. DRM again makes kits seperate for each, and the coolers sit in the cut out locations for Z06 brake ducts (DRM (http://www.dougrippie.com/) LG makes a kick but cooler as well for big $$$ (http://www.lgmotorsports.com/catalog...oducts_id=1859).
Here is a good link to a separate EOC install when its run seperate from the radiator: (http://forums.corvetteforum.com/c5-f...r-install.html)
Here's a nice discussion on the pitfalls of putting in the Oil Cooler:
(http://forums.corvetteforum.com/auto...or-c5-z06.html)
Here's a nice debate on Combo Radiator / EOC vs. Separate EOC (and Dewitts vs DRM):
(http://forums.corvetteforum.com/auto...il-cooler.html)
When you are there I also recommend changing the water hoses, you are there anyway... right? The silicone ones are better than the braided ones since the braiding will retain heat. The silicone is better than stock rubber because heat will not make them hard, they hold 2x the pressure... and they look cool. LG and Pfadt used to sell them, but stopped. Chip over at CCA does sell them still, and there are group buys on the forum if you look for them. (http://www.customcorvetteaccessories...conehoses.html) Chip sells the stock style worm gear clamps right now only, its better to use the t-bar locking style clamps for a racing application since you don't have to worry about the clamps stripping or failing as easily like on the worm gear ones. If you go worm gear, get stainless, not the cheap ones that rust.
Upgraded Oil Pumps & Increasing Oil Pressure:
LS1 & LS6 motors do pretty great on the track in all conditions. Sad truth is that eventually you can get oiling issues (especialy in cylinder #7) and I will slowly build this section to address this issue. Melling (http://www.hinsonsupercars.com/p-936...gh-volume.aspx) and Ported LS6 oil pumps are a great start to fix this issue. Katech makes a great inexpensive LS6 ported pump (http://katechengines.com/katech_inc/...g/oil-pump.htm).
There are currently (Summer 2010) 2 versions of the Melling Pump out there. 10295 and 10296. The 295 is stock flow until 50psi, the 296 is the high volume one with the stiffer spring. For Road Racing applications you want the 10296, try Summit (http://www.summitracing.com/parts/MEL-10296/) they also have this one cheaper than many other locations. For LS1\LS6 performance applications, Melling has a hard coat anodized high pressure 10355 Select Performance pump. For the older Gen III LS performance applications, the 10296 high volume performance pump will provide 18% more flow.
GM Apparently finally got on the ball with this also, and recently introduced (late 2009) the GM #12612289 Low-pressure Displacement-on-Demand pump, but research I found says these are for L92 engines only (https://store.gmperformanceparts.com...umber=12612289) & (http://www.gmpartsgiant.com/parts/gm-pump-12612289.html) it's been deemed the "LS4 oil pump" and an explanation here (http://www.ls1tech.com/forums/genera...formation.html). The story goes like this: M355 & M365 stock replacement oil pumps that provide 30% more flow as compared to the M295 oil pump (which is used on the original Gen III 5.7L LS-1 engines). The increase in flow is required by the Variable Valve Timing and Displacement On Demand systems. The M355 (which replaces GM 12571885) has a 50 PSI relief spring, while the M365 (replaces GM 12612289) has a 60 PSI relief spring.
It was suggested that the oil pan "suck dry effect" doesn't happen often on the high flow pumps in the LS1 and LS6 applications, but in the LS2/3 it can happen quickly do to the change in the pans design. It is recommended therefore in the LS2/3 application that only a port/polish/blue print of the stock pump is to be done. This means since the pan is being sucked out faster than it can return the pan can literally run dry, pushing too much oil into the upper engine and thus starving the bearings, etc. For some applications it is even suggested that you must drill a larger return / drip hole for the oil on the larger application pumps especially in larger high volume race built motors specifically to avoid this mess.
The Accusump system which easily installs under your front left fender (http://forums.corvetteforum.com/c5-g...with-pics.html) is a on demand pressurized system that senses drops in the system and then will KICK ON and push the oil first into the main engine bearings and up the entire system. It also adds a few more quarts to your system keeping your engine running cooler, and can easily be adapted to a stock motor or one with an external oil cooler. You can get the "kit" for this From LPI Racings (http://www.livermoreperformance.com/...engine.html#LP) with or without an external oil cooler. A great .pdf file you can easily print to help you install the system is here (http://www.racecars360.com/Corvette_...ke_Rotors.html). Threads in the racing section on the Accusump here (http://forums.corvetteforum.com/auto...ad-racing.html) and here (http://forums.corvetteforum.com/auto...questions.html).
Windage is a term associated with crankshafts and oil. When the crank is spinning at a high rate of speed the oil is getting thrown around in the case. The old schoolers found that the less oil that hits the crank the better. You can knife edge the crank, windage trays, and even scrapers. These devices help make more power, control the oil better, and help with oil blow-by. (RandyDRM) An excellent thread on Oil Starvation and difference in LS windage trays can be found here: (http://forums.corvetteforum.com/auto...tarvation.html).
Great Article on whats New with Oil Pumps, Pans, etc: (http://www.enginebuildermag.com/Arti..._and_pans.aspx)
Nice C6 Z06 Oil Starvation Thread: http://forums.corvetteforum.com/c6-z...hard-data.html
LPE Oil Tank for C6 Z06 Thread: http://forums.corvetteforum.com/c6-z...k-results.html
Battery:
I had my original OEM battery leak and corrode my frame when I first started prepping the car. Tony will attest to the PIA it was grinding out the rust and then spray sealing the frame over before doing a small job simply from some lead acid battery leakage. The OEM batteries often can and Will overheat and boil over causing this in track use FYI. Aftermarket good quality batteries are extremely important once you decide to race. Some like the Optima are a good starting point and can be found at Autozone, PepBoys, etc others like the pro style racing Braile batteries, etc are specialty order only. Know what you are looking for in terms of cold cranking amps, reserve capacity and Weight as your battery is the one spot you don’t want to be a weak link on a track day.
How to clean up a car battery Leak: (http://www.ehow.com/how_5764753_clea...tery-leak.html)
Hot Rod Magazine - FAQ on AGM batteries and charging them: (http://www.hotrod.com/techarticles/g...y/viewall.html)
I'm a big fan of the Optima AGM Gel Cell Style batteries for racing if you are going with a commercial street battery. The optima batteries are the only commercial street batteries I will opening recommend, its the perfect HPDE battery for the dual purpose track \ street car. Optima Red & Yellow Top. The spill-proof AGM design can be mounted in most positions, is more vibration resistant and recharges faster than a standard battery. Optima Red Top can provide 2X longer life, has strong 5-second starting power, high temperature and vibration tolerance for severe conditions, designed to be spill-proof and corrosion-resistant = Yup good fit for racing applications. Just because its RED or YELLOW doesn’t make them all the same. Know the one you want by CCA (cold cranking amps) and weight. (see chart below)
The difference between Red vs Yellow? They are the same, except the yellow top is designed as a "deep cycle battery". In other words, you can discharge and recharge it more often without hurting it as much and the deep cycle batteries are more tolerant to total discharge (dead) to recharge without harm. Deep Cycle batteries are often referred to as "marine batteries" since boats will often sit for long periods without use. Deep Cycles tend to "let go" of charge slower however, and aren't always ideal in Wide Open Throttle applications - like racing where heavy draw occurs often.
Optima Red Tops:
Part#: 75-25 Weight 34.05lbs Warranty consists of 3 years free replacement.
720 Cold cranking Amps (910 cranking Amps). 90 reserve minutes.
Post and modified Mount terminals
Part#: 78 Weight 39.53lbs Warranty consists of 3 years free replacement. <== My choice for best CCA to Weight Ratio
800 Cold cranking Amps (1000 cranking Amps). 100 reserve minutes
Modified Mount terminals only
Part#: 34-78 Weight 41.01lbs Warranty consists of 3 years free replacement.
800 Cold cranking Amps (1000 cranking Amps). 100 reserve minutes.
Post and modified Mount terminals
Optima Yellow Tops:
Part#: D34-78 Weight 46.01lbs Warranty consists of 3 years free replacement.
750 Cold cranking Amps (870 cranking Amps) ***. 120 reserve minutes
Post and modified Mount terminals
Part#: D75-25 Weight 38.75lbs Warranty consists of 3 years free replacement.
620 Cold cranking Amps (775 cranking Amps) ***. 100 reserve minutes
Post and modified Mount terminals
FYI: OEM AC Delco Corvette battery is 33.2 lbs for reference value <===
Braille Batteries (http://www.braillebattery.com/) are the way to go for TRUE racing batteries for both Amps / Weight Ratio. They start in comparable ranges to the Optimas, but can be double the price of the Red \ Yellow caps for the higher CCA or the endurance batteries. THey also offer both AGM (Gel Cell) and Lithium Batteries for raccing applications. THey will need a after market bracket and hold down as the OEM battery compartment is designed for a normal sized battery. The Braile come in three series, AGM, Carbon and Endurance. If you are doing a 24 hour race event, obviously it pays to have an Endurance battery, but rmember those are $400+ so over kill is not needed. Select the battery for the application you need carefully. Websites like TireRack 9http://www.tirerack.com/accessories/category.jsp?category=Batteries) and Summit (http://www.summitracing.com/search/b...raille-battery) are good places to price and detail shop. But remember to make sure the battery you buy is "fresh" since the warranty is based on manufacture date, not purchase date often. Braille batteries - since they are racing specific use - are only 1 to 2 years and are pro-rated. Once you go this route you will be shaving in some cases THIRTY pounds off the nose of your car, but you might be replacing the batteries more often for higher operation costs. Also remember that once you remove 30 lbs off the passenger side of the car, there will be an imbalance in your corner weighting that needs to be addressed.
Deka is compared to be similar to Braille without the expense. I have yet to test this.. anyone? (http://www.dekabatteries.com/)
Another brand out there now for us in power sports is Odessy (http://www.odysseybattery.com/) but I have no personal feedback to share on these at this time. (http://www.odysseybatteries.com/applications/racing.htm) If anyone has feedback on these, please share asap and PM me.
Total Power Racing Batteries are designed more for off road sports, they tout themselves as the most impact resistant battery on the market (hopefully not an issue for your road race car) but still if its tough enough for Baja.. its tough enough for a road course. (http://www.totalpower-racingbatterie...tteryspecs.php) If anyone has feedback on these, please share asap and PM me.
Rock Racing Batteries. (http://rockracingbattery.com/home.php?cat=3) If anyone has feedback on these, please share asap and PM me.
Lifeline Racing Batteries. (http://www.lifelinebatteries.com/racingbatteries.php) If anyone has feedback on these, please share asap and PM me.
AntiGravity Batteries - Claims to be the lightest and smallest batteries on earth for motor sports. (http://antigravitybatteries.com/) If anyone has feedback on these, please share asap and PM me.
Power Light Batteries. (http://www.altronicsinc.com/lithium-...tteries-1.html) If anyone has feedback on these, please share asap and PM me.
Lithium Pros. As seen on Power TV. (http://lithiumpros.com/products/racing-16v-batteries/) If anyone has feedback on these, please share asap and PM me.
Need a better wiring connector from the Battery to the cars internal charging system? This is inexpensive, very well made and will (no exageration) increase your cars overall voltage and faster battery recovery without compromising for cheap aftermarket parts. (http://www.saccitycorvette.com/Big-3.html)
CF Thread on Track Batteries: (http://forums.corvetteforum.com/auto...track-car.html)
Want to relocate your battery to the trunk to get weight off the nose and onto the rear tires? Here are a few different threads on teh topic:
(http://www.smokinvette.com/corvettef...ad.php?t=37783)
(http://www.lingenfelter.com/pdf/batt...nsversion2.pdf) - Lingenfelter with Kit
(http://www.lingenfelter.com/mm5/merc...1#.UjDDe8b618E)
(http://forums.corvetteforum.com/c6-c...e-non-z06.html)
Steering Wheel Conversion = Non-AirBag Race Type:
Once you decide that your car is ONLY a track car you are really down the rabbit hole and have a supply of needles to keep injecting your racing fix. Removing the airbag is a big step, since this makes your car no longer streetable and will fail most states inspections for registration etc. I have no personal experience on this topic yet so instead I will make a small list of CF threads on this topic.
C5 DIY Steering Wheel Adapter Thread: (http://forums.corvetteforum.com/c5-t...ns-bummer.html)
C6 Pfadt Momo Adapter Thread: (http://forums.corvetteforum.com/auto...n-your-c6.html)
C5 Momo Steering Wheel Install Thread with PICS!: (http://forums.corvetteforum.com/c5-g...some-pics.html)
C5 Momo install Q & A Thread: (http://forums.corvetteforum.com/c5-g...cting-hub.html)
C5 Basic Conversation on Current Wheels & Kits: (http://forums.corvetteforum.com/auto...ng-wheels.html)
To keep the air bag light off you will need to put a resistor in line to trick the ECU.
Clutch, Pressure Plate & Flywheel:
A vehicle's total weight is the sum of all of its parts and affects its ability to accelerate, brake and corner. Reducing the total weight will enhance the vehicle's performance because less weight needs to be controlled and therefore, less energy is required. A vehicle's rotational weight includes all parts that spin including everything in the vehicle's driveline from the engine's crankshaft to its wheels and tires. This affects the energy required to change speed as the vehicle accelerates and brakes. As you would guess, reducing the weight of any of these rotating components will enhance the vehicle's performance because less energy will be required to increase or decrease their speed. This is especially true in the entire clutch assembly where a good after market clutch and fly wheel can make a huge difference in a race car.
Clutches for Road Racing Threads:
(http://forums.corvetteforum.com/auto...cing-hpde.html)
(http://forums.corvetteforum.com/auto...cing-hpde.html)
Sale here from CF Vendor:
http://forums.corvetteforum.com/auto...-shipping.html
More Coming Soon on Clutches, I'm still learning on this one myself.
Torque Tube & Drive Shafts for Manual (MN6 / MN12):
First all tubes are not the same. The 1997 - 2000 tubes are a size 10mm bolt, the 2001+ tubes are all 12mm bolts. There is no difference in the 2001+ in C5 vs C5Z tubes. So if you are upgrading your drivetrain, you need to know if the trans/rear are set up for the right sized set up 10mm vs 12mm. If you are in a 1997-2000 and decide to do a total drivetrain upgrade, you might want to invest in a 2001+ setup with the stronger safer bigger bolt set up. This means you will need to find a used torque tube in 12mm size.
Most of the time unless you HEAR (see failure symptoms below) the bearings in the tube/shaft failing making a grinding metal on metal noise in the middle under your car, you only will ever need to swap out the rubber couplers (guibos is the technical term). If you are putting together a hodge podge of rebuild parts building a fresh drivetrain with after markets you might want to start with fresh couplers while you are there, since when these do fail its a disaster because they shred destroying everything around them! The Guibo \ Coupler is the most common drivetrain failure point, FYI. GM factory replacements from GMPartshouse.com are about $143 each and you need two! OUCH! I bought BMW couplers instead because they were cheaper and are the same 12mm x 1.5 x 58 dimensions, and lets face it the German stuff is made better. The BMW OEM one is made by Lemforder, there are other brands but most of them do not ahve teh metal sleeves for the bolts, I think with the HP\TRQ of a Vette you would be crazy to get a cheaper all rubber non-sleeved one to save $10 each. The Lemforfder run $117 shipped if you shop around that part number below.
For a FULL TUBE rebuild, you need a slinger ring, 3 bearings and 2 rubber couplers. And one Big A$$ pair of C-Clip pliers or ones like this from harbor Freight (http://www.harborfreight.com/11-inch...campaign=2710B). If in the rebuild you are getting a Carbon Fiber one (http://www.pfadtracing.com/catalog/p...roducts_id/174) which reduces the rotational Mass from 8.85 to 4.28lbs which is 52% less weight but now supports up to 2300lbs of torque. For a CF one you might want to do what Randy at DRM suggests and run rubber coupler up front and solid metal / billet coupler in the rear. Be warned though that the tubes and the shafts aren't all "exactly" the same size and I have heard of issues when trying to build these setups. Make sure you remove your shaft first if you are going after market or swapping shafts and get a perfect measure on it, and compare it perfectly in mm to the one you are swapping in. If there is more an 1mm off in shaft lengths its a bitch to make this work and you might need the shaft cut and customed then for big bucks. FYI manual and auto tubes and shafts are totally different and never compatible.
How do you know if the Torque Tube needs a full rebuilt with bearings and all?
- If you accelarate or brake and it sounds like a a handful of marbles rolling down a hallway
- if you can change the rpm at idle in your engine merely by pushing the clutch in or letting it out
- the shifter is jumping in your hand due to vibration
- if there is a grinding noise somewhere around your clutch
- things go thump by your right thigh when you accelerate
- If any of these things you "think" you have having, its better to do it before it fails on the track proactively.
Slinger Ring - GM part number is 12456208 cost $4.42 from www.gmpartshouse.com.
Bearings -
SKF 6007 2RSJEM SINGLE ROW BALL BRGS 1 $25.64
SKF 6008 2RSJEM SINGLE ROW BALL BRGS 2 $29.33
These are the bearing numbers on the original bearings:
NSK 6007 DU need 1
NSK 6008 DU need 2
Drive Shaft Flex Joint part# K1020-31191 (use this number to find the best deal, should be about $50 - $55 each)
Description: 12mm Bolt pattern x 6
110 mm diameter : Uses (6) 12 x 1.5 x 58 bolt.
Trans Type: 5-Speed Vehicle: 1998 BMW 318ti
Engine - Chassis: M44 : E36
You can get a FEBI coupler or the Lemforder, remember the Lemforder is BMW OEM spec part.
Things to watch when doing this rebuild, and its a great idea to do this at the same time as your clutch since you are there anyhow... Make sure the shaft isn't bent, there is a large plastic wear indicator in there to look at closely. Don't fight the bolts and break tools or strip them! Heat up the bolts and they will come out nicely. The large snap ring can hurt you, make sure you have a big enough snap ring pillars. Thanks to Randy@DRM & geerookie for this section.
It’s all about helmet weight. Buy the lightest helmet you can afford. The stock seat belt will hold up ok for most people until you get to the upper intermediate levels of HPDE, by the advanced group have a racing seat and harness please. Your $$ will be well spent on Safety gear, harness, seats, etc. Why? A super charger doesn’t keep you alive in a crash. I am a Dr. by day and treat auto accident cases often. When you have an impact the head whips forward and back = whiplash. This could also snap your neck & kill you (Dale Sr). Whiplash is a factor of speed & weight. Your heavy head moves forward and back, this causes the injury. So the heavier the helmet, the more force is applied on your neck in an accident. More likely you will have a severe neck injury! In fact, I would think many of us are safer without the helmets for this reason sadly. For the weight, ease of use and avilability for entry level racing the consensus is: HJC AR10 (http://soloracer.com/hjcar10.html) & the Bell M4 (http://www.saferacer.com/bell-m4-hel...?productid=369) or Bell M4 Pro (http://www.saferacer.com/bell-m4-pro...?productid=361). When you get nutty or are just rich :-) get a lightweight carbon fiber helmet and save your neck.
What to do about the helmet weight snapping your head? A HANS! i.e. Head and Neck Saftey device. Unless you have a special race seat for the standard HANS units which REQUIRES a 5 or 6 point harness, the best device out there for the rest of us is the R3 (google shopping to find vendors). Standard R3 is carbon fiber and $1000! It allows you to attach your helmet firmly to your torso, thus avoiding the whipping motion of the skull and protecting your neck and your life! Recently a composite version came out called the Rage R3 for $650, same device… less pretty. Saves you a lot of $$$. The newest version is the hybrid Rage. From calling several vendors (I did), the consensus is that this device is just as good in crash testing as the older style R3, but doesn’t go as far down your spine. It’s wider on the shoulders, but less bulky (thick) behind you in the seat. It also comes with a pad you can place in hard race seats so you can “leave it behind” embedded in the seat (like a Kirky seat) and then just sit down and strap in. It’s comfortable. It saves lives. Do this before you do any engine power changes. It’s a definite necessity when you change from the beginner to intermediate groups & beyond. The faster you push, the more likely you will spin or crash. Safety is more important than performance! From all I have heard and read, those cheesy neck padded collars do little in a severe impact... but do help in low speed impacts. Better than nothing though. Just FYI.
One last thing, most of the HANS equipment you buy will have hardware that comes with it to attach to the helmet that is #10/32 screw sized. However I found that many modern helmets COME WITH factory mounting points already threaded for the HANs with M6 screw size sites. I went to Sears Hardware and got hardened Alan key bolts for these. Home Depot & Lowes had a crudy selection and many of the items were mixed in draws and hard to find. Easy attachment & removal with no worries about stripping screw heads in the future. I found that the 3/8" bolts worked best, but this may vary helmet to helmet & I had to drill the anchor holes a bit bigger to accept the M6 with cobalt steel bits.
Also don't forget that certain HANS units require a 2" not a 3" harness. Know this when you pick your system that the HANS and Harness are size compatible!
I recently purchased a NeckDefender through ECS (http://forums.corvetteforum.com/auto...-delivery.html) with Free SH to CF members and have yet to install and try it. I personally get annoyed with certain quirks of the R3 and Hans set up, and this system is not only certified for all the crash ratings like the Hans, but is suppose to allow you to take your helmet on and off without unbuckling the unit. It also allows for slightly more left and right turning without that grabbing. However it uses its a different connection to the helmet that is different that the D rings most set ups use. I needed an extra set of hardware for my wifes helmet on the track because we share the car and one Defender. have yet to try it as of now (April 2010) will report back after a few track days on it. Like the standard Hans it does require a full harness, where remember the R3 and R3 Rage are good with stock belts.
Fluids:
OIL or for the newbies "710"
Change your oil often. See a nice Youtube Video here on the "How To for C5" (
The recommendations range from the 5w30 Mobile1 is fine. To never use anything but straight 40w, etc. I have had oil issues with both the Mobile1 5w30 as well as RP 10w30 (Watkins Glenn July 2010) personally. Both got thin on me (no oil cooler yet) at around 295F and pressure starting getting lost in the engine on hard left handers. Some use the Amsol 15w50, but I think thats just too thick, and some people debate this as true. Some race teams now use 0w to cut down on engine friction and improve fuel consumption. I'm going to be trying the RP XPR next in 10w40 at a recommendation of a Z06 C5 driver from my PCA club. Its a custom order only from Pepboys: 5 Gallon container #05041 and in single quarts #12041 are the part numbers at the order counter. It runs roughly $13/qt, but then again whats an engine worth? I also do add Zmax in each oil change, about 1/4 bottle per oil change to maybe a 1/3 on events that I think it will punish the car harder. One Zmax for 2-4 uses isn't too bad. And I do change the oil after each event, fresh filter and all, this way I can inspect the oil for engine damage on the magnetic plug. Shavings in the oil typically on a LS1/LS6 if from the bearings going bad, and once they fry you will have oil pressure loss at all oil temps... not just high temps.
TRANSMISSION FLUID:
Excellent Youtube video walk through from the same guy who did the oil change (
How to Change C5 Manual Transmission Fluid YouTube Video: (
How to Change C5 Manual Transmission Fluid Walk Thru: (http://mysite.verizon.net/res0aae8/tranny.html)
How to Change C5 Manual Transmission Fluid Walk Thru
http://www.z06vette.com/forums/f5/fi...ts-pics-21657/)REAR DIFFERENTIAL FLUID:
1-2x a year at same times as tranny fluid. 1.7 quarts. Make sure you know if your oil has additive or you need to buy it extra!
How to Change Rear Diff on C6: (http://www.southerncarparts.com/corv...nge-ex-43.html)
How to Change Rear Diff on C5: (http://www.ehow.com/how_4489235_chan...r-axle-c5.html)
How to Change Rear Diff on C5: (http://mysite.verizon.net/res0aae8/diff.html) *** best one ***
Types of Rear Differential & Manual Transmission: (http://forums.corvetteforum.com/auto...post1571382132) You need to do this every few years for a street car, and atleast annual for an HPDE car... some say more.
BRAKE FLUID
Quick Explanation on Brake Fluid DOT 3,4,5 & Wet vs Dry: (http://www.afcoracing.com/tech_pages/fluid.shtml)
Good Article on Brake Fluid importance, explains boiling points of the fluid specifically wet vs dry and why that is a factor on the track. (http://www.stoptech.com/tech_info/wp...fluid_1a.shtml)
BRAKE FLUID COMPARISON CHART
WET VS. DRY BOILING POINT - Why does it matter?
The term boiling point when used regarding brake fluid means the temperatures that brake fluid will begin to "boil". Boiling creates bubbles, bubbles are AIR, and AIR compressed a lot before the fluid dynamics in the line will then push fluid. Air bubbles creates a "spongy pedal" which means eventually you will push the pedal, and it will go to the floor without the calipers moving at all. This means crashing. Brake fluid maintenance is the SINGLE MOST IMPORTANT safety factor your race car will have! My fluid boiled one time, and I had no pedal... I purposefully ditched into a pebble pit before turn 9 at Watkins Glenn rather then try to make the next few corners and risk a crash.
WET BOILING POINT: The minimum temperatures that brake fluids will begin to boil when the brake system contains 3% water by volume of the system.
DRY BOILING POINT: The temperatures that brake fluid will boil with no water present in the system.
THINGS TO REMEMBER About fluids: Brake fluids dry boiling point is more important then wet boiling point when used in a racing brake system.
Passenger cars very rarely will undergo a brake fluid change making the wet boiling point more important. Racing brake system fluid is changed often and a system with fresh fluid will most likely not contain water unless it was contaminated from poor changing procedures. Because of this, racers should be concerned with the dry boiling point. Racing fluid exceeds DOT 3, 4, and 5.1 dry boiling point specifications. Never use silicone based fluids in racing brake systems.Using racing brake fluid will increase performance of the braking system. Never reuse fluid. Never mix types or brands of brake fluid.
Use smaller fluid containers that can be used quicker, AIR in teh container will contain moister and it simply just sitting in the container for a few months unused will introduce slowly some minimal moisture to the fluid. In a passenger car = who cares. on a track at 160 mph it means life or death.
If fluid remains in container be sure to tightly seal and do not store for long periods of time. Purge system (complete drain) and replace fluid often.
Immediately replace master cylinder reservoir cap following any maintenance, and make sure all seals are AIR tight.
Brand Name: Wet Boiling Point vs Dry Boiling Point (*all Temps are manufacturer claims / ratings)
Castrol SRF______518�F 590�F - $70/Liter -*Best but $$$ (http://www.racerpartswholesale.com/p...61/Brake_Fluid)
Ferodo_________399�F 626�F $39.99
Motul RBF600____420�F 593�F - * Best Value $13.75 to $20.00 / Liter by Vendor
Motul RBF660____401�F 617�F $28.95
Wilwood EXP 600_417�F 626�F - $19/Liter (http://eastcoastspeed.com/cart/index...rd=WIL290-6209)
AP-600_________410�F 572�F
Brembo LCF 600__399�F 600�F
ATE-Super Blue__392�F 536�F - ** Best Value $13/Liter (http://www.lpiracing.com/ATE-Super-B...d-34p37158.htm)
Valvoline________333�F 513�F
Castrol LMA _____311�F 446�F
Ford HD_________290�F 550�F
Wilwood 570_____284�F 570�F
ProSpeed 683____439�F 683�F $39.99
PFC-Z rated_____284�F 550�F
AP-550_________284�F 550�F
You DO need to get a 160 thermostat (http://www.lgmotorsports.com/catalog...products_id=91) and either an engine tune to turn your fans on sooner (easier) or a aftermarket hard wire kit to kick the radiator fan on sooner. Lower temps = longer engine life and less failures. Get a good tune! Don’t forget your coolant. The 50:50 works great for normal driving, but higher water (distilled) to antifreeze ratio will run a bit cooler. Its not a bad idea in a track car to go 70:30 / 60:40 in spring once you know ther eis no issues with freezing for the whole race season, then change back for the winter to 50:50... but its time consuming. Only use STEAM distiled water, NEVER tap or "spring water". Running ALL water = higher pressures, and needs some system items changed/considered first. All water will also corrode the aluminum engine engine parts without the anti-corrosion chemicals in it, and all water = higher pressures hot = faster water pump failure FYI. The redline water wetter will also help keep temps down a few more degrees, this is a MUST for all water systems. The farther away you go from 50:50, the more water wetter you need. Don’t forget to change the fluid in your car if racing for the rear diff and the transmission after every season as well. These parts expensive when they fail. I find that the dealer does a great job on fluid changes CHEAP and reliably IF you get your own fluids and bring them. If I bring all my fluids, the total cost for oil, trans and diff change out is under $90 and saves me a mess & disposal costs. Filter? Mobile 1 is just fine. Oil temps above 300F are not uncommon if you are pushing your stock motor without mods. Ouch. I hit high 260s even on a hot day with the mods for heat discussed here in this tutorial.
Recently I found a local Tuner shop (you know the Honda, subaru, etc. places) that sells all the Redline products, motul, etc. They have a PRICE MATCH policy on all fluids! I went one by one on my fluids I needed on Google Shopping, copied down the best prices for each and bought locally at rock bottom prices! Think about this option. 8q oil, 2q diff, 3q trans, 1q steering, 1q water wetter = $140 all Redline when price matched locally without shipping costs. I also set up an account with them, so next time I will get the same prices automatically! Saved about $25 bucks. Not life changing but they also said they will price match for rotors, pads, and anything else they sell / can order...
Clutch Fluid & Clutch Pedal Issues:
Learn the Ranger clutch reservoir trick! First off use the same high priced brake fluid in your clutch reservoir. Don't be a cheap skate. Next the trick involves getting a 10cc syringe or bigger from your auto parts store (Pepboys has them) with a small hose attached; store it in a freezer bag sized ziplock to keep your tool box clean. It’s usually used for mixing 2 stroke oil, etc. Open your clutch reservoir and STIR up the gunk on the bottom. Then SUCK it all out carefully, it will eat your paint if you drip since there is brake fluid in there. Then dump it into an empty disposable water bottle. Carefully refill with the same good fluid you now use in your brakes, DO NOT OVER FILL, and then get in the car. Pump the pedal 20 times. Start drive 2 minutes. Come back, turn car off. Pump clutch 20 times again. Repeat the flush. This is for the first time only. Then do this after all spirited driving involving shift or clutch dumps (i.e. spinning wheels). Keep at it often and the fluid will be and stay clear! If the fluid brakes down it gets gunky looking snowflakes in it that damage the slave fast! The constant change over of fluid here will keep your slave cylinder clean and avoid clutch failure. It’s cheap insurance. I do it first thing at an HPDE each day, and if it’s a busy morning (4 sessions) I will do it at lunch too. Basically every 4 sessions, I do this procedure to keep the car fresh. Power steering fluid can be changed the same way with a sucking syringe, get the synthetic good stuff not the OE cheap stuff. Just insert wheel left and right a bunch of times with engine on instead of clutch pumps. I only do this two times a season though.
If you have problems with your clutch pedal getting "stuck" in the engaged mode and not releasing you don't have a bad clutch plate, you have a hydrolic issue or a spring issue 90% of the time. The flushing method keeps it from going bad, but not always. If you push the car hard you might want to upgrade the Clutch Master.. Tick Performance makes a nice adjustable one that gets rid of that problematic spring mechanism that plagues so many C5 road racers for a much better higher volume full engagement system all for about $300 (http://www.tick-performance.com/tick...aulics/#master) they also sell a line person bleeder system to flush the whole system like a brake flush would be while you are there. On sale from a CF Vendor here: (http://forums.corvetteforum.com/auto...-shipping.html) Another inline remote clutch bleeder kit can be found here for $90 from TPE (Total performance Engineering) (http://forums.corvetteforum.com/c5-p...he-market.html) haven't tried it yet. If anyone has one, send me a write up.
Let the LS1 Cool when moving:
I like the Z06 race mesh in the front of the car, open up the silly fog screen area and get more air into the engine bay to cool your racing engine! halltech makes this very easy and pretty, but its big $$ and then you need to paint it - I use it an am very happy (http://www.halltechsystems.com/Hallt...p/ratp1500.htm). Cutting open & doing race mesh on the license plate adds even more cold air flowing up and over the engine to keep her cool. A walk thru / how to is on CF which explains how to do this here (http://forums.corvetteforum.com/c5-g...cover-mod.html), unfortunately if you live in NJ or one of those state that requires a front plate you are kinda screwed on this one. You can do the plate change and then get a "flip up plate" to stay legal. For example: (http://www.corvetteguys.com/corvette...wn-holder.html)
A nice new bumper for C5 that opens up the entire front can be found here (http://forums.corvetteforum.com/c5-g...nt-bumper.html) Never hurts to use a front hood seal, gets the air flowing more predictably in the engine compartment and that’s cheap and easy to do.
Radiators & Coolers - Oil, Trans Diff:
A upgraded radiator is a must once you get into the Intermediate & Advanced groups. A definite must as you go faster to save your engine life is a radiator and EOC, remember if the oil gets too hot it gets thin and you can lose oil pressure, and eventually damage the bearings and cylinders. Additionally the coolers increase your total oil quantity: more oil = more engine cooling. Stock OEM is 6.5 quarts, when racing stock is 7.0 quarts. With a cooler you can be at 9 quarts or more. This does slightly increase your oil outlay on each change. Add a Accusump and now you have 2 more quarts yet. DRM has the best single install kit for this purpose that I have found. (http://www.dougrippie.com/) It's a real nice double row aluminum radiator/integrated external oil cooler set up which comes with the radiator unit, the adapter block for the engine which bolts right up and all the A/N plumbing lines. Its a job that needs 2 people to make it work, and some dremeling on the radiator fan shroud isn't a bad idea either while there to increae cross flow. Install thread here (http://www.z06vette.com/forums/f5/ro...nstall-119467/). This is the one I went with after several very nice comments from other road racers with oil temp issues like mine.
Dewitts makes some of the best double thick bolt in radiators and External Oil Cooler comobos (http://www.dewitts.com/pages/categor...s.asp?catID=19). LG sells the G2 Radiator with lines (http://www.lgmotorsports.com/catalog...oducts_id=1488).
Want to turn the radiator cooling fans ON at anytime in your C5/6 with the flick of a switch, without messing up the current harness or affecting the computers ability to do the same on its own? This is a Great inexpensive gizmo for $99 - plug and play simple. This is especially nice since you can COOL the radiator in the pits after the car has been turned off! (http://www.saccitycorvette.com/COOLITv2.html)
The diff/trans/steering cooler are the next step after that. DRM also sells a very nice easy to bolt on trans/diff cooler that fits into the Z06 rear brake duct openings. DRM again makes kits seperate for each, and the coolers sit in the cut out locations for Z06 brake ducts (DRM (http://www.dougrippie.com/) LG makes a kick but cooler as well for big $$$ (http://www.lgmotorsports.com/catalog...oducts_id=1859).
Here is a good link to a separate EOC install when its run seperate from the radiator: (http://forums.corvetteforum.com/c5-f...r-install.html)
Here's a nice discussion on the pitfalls of putting in the Oil Cooler:
(http://forums.corvetteforum.com/auto...or-c5-z06.html)
Here's a nice debate on Combo Radiator / EOC vs. Separate EOC (and Dewitts vs DRM):
(http://forums.corvetteforum.com/auto...il-cooler.html)
When you are there I also recommend changing the water hoses, you are there anyway... right? The silicone ones are better than the braided ones since the braiding will retain heat. The silicone is better than stock rubber because heat will not make them hard, they hold 2x the pressure... and they look cool. LG and Pfadt used to sell them, but stopped. Chip over at CCA does sell them still, and there are group buys on the forum if you look for them. (http://www.customcorvetteaccessories...conehoses.html) Chip sells the stock style worm gear clamps right now only, its better to use the t-bar locking style clamps for a racing application since you don't have to worry about the clamps stripping or failing as easily like on the worm gear ones. If you go worm gear, get stainless, not the cheap ones that rust.
Upgraded Oil Pumps & Increasing Oil Pressure:
LS1 & LS6 motors do pretty great on the track in all conditions. Sad truth is that eventually you can get oiling issues (especialy in cylinder #7) and I will slowly build this section to address this issue. Melling (http://www.hinsonsupercars.com/p-936...gh-volume.aspx) and Ported LS6 oil pumps are a great start to fix this issue. Katech makes a great inexpensive LS6 ported pump (http://katechengines.com/katech_inc/...g/oil-pump.htm).
There are currently (Summer 2010) 2 versions of the Melling Pump out there. 10295 and 10296. The 295 is stock flow until 50psi, the 296 is the high volume one with the stiffer spring. For Road Racing applications you want the 10296, try Summit (http://www.summitracing.com/parts/MEL-10296/) they also have this one cheaper than many other locations. For LS1\LS6 performance applications, Melling has a hard coat anodized high pressure 10355 Select Performance pump. For the older Gen III LS performance applications, the 10296 high volume performance pump will provide 18% more flow.
GM Apparently finally got on the ball with this also, and recently introduced (late 2009) the GM #12612289 Low-pressure Displacement-on-Demand pump, but research I found says these are for L92 engines only (https://store.gmperformanceparts.com...umber=12612289) & (http://www.gmpartsgiant.com/parts/gm-pump-12612289.html) it's been deemed the "LS4 oil pump" and an explanation here (http://www.ls1tech.com/forums/genera...formation.html). The story goes like this: M355 & M365 stock replacement oil pumps that provide 30% more flow as compared to the M295 oil pump (which is used on the original Gen III 5.7L LS-1 engines). The increase in flow is required by the Variable Valve Timing and Displacement On Demand systems. The M355 (which replaces GM 12571885) has a 50 PSI relief spring, while the M365 (replaces GM 12612289) has a 60 PSI relief spring.
It was suggested that the oil pan "suck dry effect" doesn't happen often on the high flow pumps in the LS1 and LS6 applications, but in the LS2/3 it can happen quickly do to the change in the pans design. It is recommended therefore in the LS2/3 application that only a port/polish/blue print of the stock pump is to be done. This means since the pan is being sucked out faster than it can return the pan can literally run dry, pushing too much oil into the upper engine and thus starving the bearings, etc. For some applications it is even suggested that you must drill a larger return / drip hole for the oil on the larger application pumps especially in larger high volume race built motors specifically to avoid this mess.
The Accusump system which easily installs under your front left fender (http://forums.corvetteforum.com/c5-g...with-pics.html) is a on demand pressurized system that senses drops in the system and then will KICK ON and push the oil first into the main engine bearings and up the entire system. It also adds a few more quarts to your system keeping your engine running cooler, and can easily be adapted to a stock motor or one with an external oil cooler. You can get the "kit" for this From LPI Racings (http://www.livermoreperformance.com/...engine.html#LP) with or without an external oil cooler. A great .pdf file you can easily print to help you install the system is here (http://www.racecars360.com/Corvette_...ke_Rotors.html). Threads in the racing section on the Accusump here (http://forums.corvetteforum.com/auto...ad-racing.html) and here (http://forums.corvetteforum.com/auto...questions.html).
Windage is a term associated with crankshafts and oil. When the crank is spinning at a high rate of speed the oil is getting thrown around in the case. The old schoolers found that the less oil that hits the crank the better. You can knife edge the crank, windage trays, and even scrapers. These devices help make more power, control the oil better, and help with oil blow-by. (RandyDRM) An excellent thread on Oil Starvation and difference in LS windage trays can be found here: (http://forums.corvetteforum.com/auto...tarvation.html).
Great Article on whats New with Oil Pumps, Pans, etc: (http://www.enginebuildermag.com/Arti..._and_pans.aspx)
Nice C6 Z06 Oil Starvation Thread: http://forums.corvetteforum.com/c6-z...hard-data.html
LPE Oil Tank for C6 Z06 Thread: http://forums.corvetteforum.com/c6-z...k-results.html
Battery:
I had my original OEM battery leak and corrode my frame when I first started prepping the car. Tony will attest to the PIA it was grinding out the rust and then spray sealing the frame over before doing a small job simply from some lead acid battery leakage. The OEM batteries often can and Will overheat and boil over causing this in track use FYI. Aftermarket good quality batteries are extremely important once you decide to race. Some like the Optima are a good starting point and can be found at Autozone, PepBoys, etc others like the pro style racing Braile batteries, etc are specialty order only. Know what you are looking for in terms of cold cranking amps, reserve capacity and Weight as your battery is the one spot you don’t want to be a weak link on a track day.
How to clean up a car battery Leak: (http://www.ehow.com/how_5764753_clea...tery-leak.html)
Hot Rod Magazine - FAQ on AGM batteries and charging them: (http://www.hotrod.com/techarticles/g...y/viewall.html)
I'm a big fan of the Optima AGM Gel Cell Style batteries for racing if you are going with a commercial street battery. The optima batteries are the only commercial street batteries I will opening recommend, its the perfect HPDE battery for the dual purpose track \ street car. Optima Red & Yellow Top. The spill-proof AGM design can be mounted in most positions, is more vibration resistant and recharges faster than a standard battery. Optima Red Top can provide 2X longer life, has strong 5-second starting power, high temperature and vibration tolerance for severe conditions, designed to be spill-proof and corrosion-resistant = Yup good fit for racing applications. Just because its RED or YELLOW doesn’t make them all the same. Know the one you want by CCA (cold cranking amps) and weight. (see chart below)
The difference between Red vs Yellow? They are the same, except the yellow top is designed as a "deep cycle battery". In other words, you can discharge and recharge it more often without hurting it as much and the deep cycle batteries are more tolerant to total discharge (dead) to recharge without harm. Deep Cycle batteries are often referred to as "marine batteries" since boats will often sit for long periods without use. Deep Cycles tend to "let go" of charge slower however, and aren't always ideal in Wide Open Throttle applications - like racing where heavy draw occurs often.
Optima Red Tops:
Part#: 75-25 Weight 34.05lbs Warranty consists of 3 years free replacement.
720 Cold cranking Amps (910 cranking Amps). 90 reserve minutes.
Post and modified Mount terminals
Part#: 78 Weight 39.53lbs Warranty consists of 3 years free replacement. <== My choice for best CCA to Weight Ratio
800 Cold cranking Amps (1000 cranking Amps). 100 reserve minutes
Modified Mount terminals only
Part#: 34-78 Weight 41.01lbs Warranty consists of 3 years free replacement.
800 Cold cranking Amps (1000 cranking Amps). 100 reserve minutes.
Post and modified Mount terminals
Optima Yellow Tops:
Part#: D34-78 Weight 46.01lbs Warranty consists of 3 years free replacement.
750 Cold cranking Amps (870 cranking Amps) ***. 120 reserve minutes
Post and modified Mount terminals
Part#: D75-25 Weight 38.75lbs Warranty consists of 3 years free replacement.
620 Cold cranking Amps (775 cranking Amps) ***. 100 reserve minutes
Post and modified Mount terminals
FYI: OEM AC Delco Corvette battery is 33.2 lbs for reference value <===
Braille Batteries (http://www.braillebattery.com/) are the way to go for TRUE racing batteries for both Amps / Weight Ratio. They start in comparable ranges to the Optimas, but can be double the price of the Red \ Yellow caps for the higher CCA or the endurance batteries. THey also offer both AGM (Gel Cell) and Lithium Batteries for raccing applications. THey will need a after market bracket and hold down as the OEM battery compartment is designed for a normal sized battery. The Braile come in three series, AGM, Carbon and Endurance. If you are doing a 24 hour race event, obviously it pays to have an Endurance battery, but rmember those are $400+ so over kill is not needed. Select the battery for the application you need carefully. Websites like TireRack 9http://www.tirerack.com/accessories/category.jsp?category=Batteries) and Summit (http://www.summitracing.com/search/b...raille-battery) are good places to price and detail shop. But remember to make sure the battery you buy is "fresh" since the warranty is based on manufacture date, not purchase date often. Braille batteries - since they are racing specific use - are only 1 to 2 years and are pro-rated. Once you go this route you will be shaving in some cases THIRTY pounds off the nose of your car, but you might be replacing the batteries more often for higher operation costs. Also remember that once you remove 30 lbs off the passenger side of the car, there will be an imbalance in your corner weighting that needs to be addressed.
Deka is compared to be similar to Braille without the expense. I have yet to test this.. anyone? (http://www.dekabatteries.com/)
Another brand out there now for us in power sports is Odessy (http://www.odysseybattery.com/) but I have no personal feedback to share on these at this time. (http://www.odysseybatteries.com/applications/racing.htm) If anyone has feedback on these, please share asap and PM me.
Total Power Racing Batteries are designed more for off road sports, they tout themselves as the most impact resistant battery on the market (hopefully not an issue for your road race car) but still if its tough enough for Baja.. its tough enough for a road course. (http://www.totalpower-racingbatterie...tteryspecs.php) If anyone has feedback on these, please share asap and PM me.
Rock Racing Batteries. (http://rockracingbattery.com/home.php?cat=3) If anyone has feedback on these, please share asap and PM me.
Lifeline Racing Batteries. (http://www.lifelinebatteries.com/racingbatteries.php) If anyone has feedback on these, please share asap and PM me.
AntiGravity Batteries - Claims to be the lightest and smallest batteries on earth for motor sports. (http://antigravitybatteries.com/) If anyone has feedback on these, please share asap and PM me.
Power Light Batteries. (http://www.altronicsinc.com/lithium-...tteries-1.html) If anyone has feedback on these, please share asap and PM me.
Lithium Pros. As seen on Power TV. (http://lithiumpros.com/products/racing-16v-batteries/) If anyone has feedback on these, please share asap and PM me.
Need a better wiring connector from the Battery to the cars internal charging system? This is inexpensive, very well made and will (no exageration) increase your cars overall voltage and faster battery recovery without compromising for cheap aftermarket parts. (http://www.saccitycorvette.com/Big-3.html)
CF Thread on Track Batteries: (http://forums.corvetteforum.com/auto...track-car.html)
Want to relocate your battery to the trunk to get weight off the nose and onto the rear tires? Here are a few different threads on teh topic:
(http://www.smokinvette.com/corvettef...ad.php?t=37783)
(http://www.lingenfelter.com/pdf/batt...nsversion2.pdf) - Lingenfelter with Kit
(http://www.lingenfelter.com/mm5/merc...1#.UjDDe8b618E)
(http://forums.corvetteforum.com/c6-c...e-non-z06.html)
Steering Wheel Conversion = Non-AirBag Race Type:
Once you decide that your car is ONLY a track car you are really down the rabbit hole and have a supply of needles to keep injecting your racing fix. Removing the airbag is a big step, since this makes your car no longer streetable and will fail most states inspections for registration etc. I have no personal experience on this topic yet so instead I will make a small list of CF threads on this topic.
C5 DIY Steering Wheel Adapter Thread: (http://forums.corvetteforum.com/c5-t...ns-bummer.html)
C6 Pfadt Momo Adapter Thread: (http://forums.corvetteforum.com/auto...n-your-c6.html)
C5 Momo Steering Wheel Install Thread with PICS!: (http://forums.corvetteforum.com/c5-g...some-pics.html)
C5 Momo install Q & A Thread: (http://forums.corvetteforum.com/c5-g...cting-hub.html)
C5 Basic Conversation on Current Wheels & Kits: (http://forums.corvetteforum.com/auto...ng-wheels.html)
To keep the air bag light off you will need to put a resistor in line to trick the ECU.
Clutch, Pressure Plate & Flywheel:
A vehicle's total weight is the sum of all of its parts and affects its ability to accelerate, brake and corner. Reducing the total weight will enhance the vehicle's performance because less weight needs to be controlled and therefore, less energy is required. A vehicle's rotational weight includes all parts that spin including everything in the vehicle's driveline from the engine's crankshaft to its wheels and tires. This affects the energy required to change speed as the vehicle accelerates and brakes. As you would guess, reducing the weight of any of these rotating components will enhance the vehicle's performance because less energy will be required to increase or decrease their speed. This is especially true in the entire clutch assembly where a good after market clutch and fly wheel can make a huge difference in a race car.
Clutches for Road Racing Threads:
(http://forums.corvetteforum.com/auto...cing-hpde.html)
(http://forums.corvetteforum.com/auto...cing-hpde.html)
Sale here from CF Vendor:
http://forums.corvetteforum.com/auto...-shipping.html
More Coming Soon on Clutches, I'm still learning on this one myself.
Torque Tube & Drive Shafts for Manual (MN6 / MN12):
First all tubes are not the same. The 1997 - 2000 tubes are a size 10mm bolt, the 2001+ tubes are all 12mm bolts. There is no difference in the 2001+ in C5 vs C5Z tubes. So if you are upgrading your drivetrain, you need to know if the trans/rear are set up for the right sized set up 10mm vs 12mm. If you are in a 1997-2000 and decide to do a total drivetrain upgrade, you might want to invest in a 2001+ setup with the stronger safer bigger bolt set up. This means you will need to find a used torque tube in 12mm size.
Most of the time unless you HEAR (see failure symptoms below) the bearings in the tube/shaft failing making a grinding metal on metal noise in the middle under your car, you only will ever need to swap out the rubber couplers (guibos is the technical term). If you are putting together a hodge podge of rebuild parts building a fresh drivetrain with after markets you might want to start with fresh couplers while you are there, since when these do fail its a disaster because they shred destroying everything around them! The Guibo \ Coupler is the most common drivetrain failure point, FYI. GM factory replacements from GMPartshouse.com are about $143 each and you need two! OUCH! I bought BMW couplers instead because they were cheaper and are the same 12mm x 1.5 x 58 dimensions, and lets face it the German stuff is made better. The BMW OEM one is made by Lemforder, there are other brands but most of them do not ahve teh metal sleeves for the bolts, I think with the HP\TRQ of a Vette you would be crazy to get a cheaper all rubber non-sleeved one to save $10 each. The Lemforfder run $117 shipped if you shop around that part number below.
For a FULL TUBE rebuild, you need a slinger ring, 3 bearings and 2 rubber couplers. And one Big A$$ pair of C-Clip pliers or ones like this from harbor Freight (http://www.harborfreight.com/11-inch...campaign=2710B). If in the rebuild you are getting a Carbon Fiber one (http://www.pfadtracing.com/catalog/p...roducts_id/174) which reduces the rotational Mass from 8.85 to 4.28lbs which is 52% less weight but now supports up to 2300lbs of torque. For a CF one you might want to do what Randy at DRM suggests and run rubber coupler up front and solid metal / billet coupler in the rear. Be warned though that the tubes and the shafts aren't all "exactly" the same size and I have heard of issues when trying to build these setups. Make sure you remove your shaft first if you are going after market or swapping shafts and get a perfect measure on it, and compare it perfectly in mm to the one you are swapping in. If there is more an 1mm off in shaft lengths its a bitch to make this work and you might need the shaft cut and customed then for big bucks. FYI manual and auto tubes and shafts are totally different and never compatible.
How do you know if the Torque Tube needs a full rebuilt with bearings and all?
- If you accelarate or brake and it sounds like a a handful of marbles rolling down a hallway
- if you can change the rpm at idle in your engine merely by pushing the clutch in or letting it out
- the shifter is jumping in your hand due to vibration
- if there is a grinding noise somewhere around your clutch
- things go thump by your right thigh when you accelerate
- If any of these things you "think" you have having, its better to do it before it fails on the track proactively.
Slinger Ring - GM part number is 12456208 cost $4.42 from www.gmpartshouse.com.
Bearings -
SKF 6007 2RSJEM SINGLE ROW BALL BRGS 1 $25.64
SKF 6008 2RSJEM SINGLE ROW BALL BRGS 2 $29.33
These are the bearing numbers on the original bearings:
NSK 6007 DU need 1
NSK 6008 DU need 2
Drive Shaft Flex Joint part# K1020-31191 (use this number to find the best deal, should be about $50 - $55 each)
Description: 12mm Bolt pattern x 6
110 mm diameter : Uses (6) 12 x 1.5 x 58 bolt.
Trans Type: 5-Speed Vehicle: 1998 BMW 318ti
Engine - Chassis: M44 : E36
You can get a FEBI coupler or the Lemforder, remember the Lemforder is BMW OEM spec part.
Things to watch when doing this rebuild, and its a great idea to do this at the same time as your clutch since you are there anyhow... Make sure the shaft isn't bent, there is a large plastic wear indicator in there to look at closely. Don't fight the bolts and break tools or strip them! Heat up the bolts and they will come out nicely. The large snap ring can hurt you, make sure you have a big enough snap ring pillars. Thanks to Randy@DRM & geerookie for this section.
Last edited by Zenak; 09-11-2013 at 07:20 PM.
08-21-2009, 07:29 PM
#6
Terminal Vette Addict
Thread Starter
Plugs, Wires & Coil Packs:
Get the NGKs TR55 or TR55 - IX (irridium) plugs (http://www.texas-speed.com/SHOP/cate...MID=3&catid=11), they will hold the higher engine temps for a N/A car with basically stock motor LS1/LS6. NGK recommends the TR5 (http://www.ngksparkplugs.com/part_fi...gineid=1442419), but extensive reading on CF and pro-shops all like the TR55. Forced air systems need different temp plugs. Get the nice MSD wires or GMPP wires, dont get cheap or OE wires!!! The MSD coil packs (http://www.msdignition.com/product.aspx?id=5109) add no horse power but it idles in COLD temps much better in my car, but when I went back from them MSD to the OEM I found (on the exact same tune) the engine oil ran 10 – 15F degrees cooler on average with the MSD coil packs than the OEM coils. No clue why?! The MSD packs are therefore a nice option, but also have a much higher rate of failure & cost a ton of $$$. There is less detonation I hear from those with twin turbos & high boost with the MSD. The OEM packs last forever, and you can always fine one on ebay cheap if you need an OE when one fails.
Get the spark wire plug heat shields, good insurance from a melted wire short & MANDATORY if you have / plan to get long tube headers. I discussed it in the Header section, but here it is again. Make sure you get boot covers (http://www.corvettegarage.com/produc...2-and-ls6.html) for your plugs or you'll melt them with long tube headers and short out your electrical system.
Cold Air Intake:
This is a must. Let her breathe! Vararam (http://www.vararam.com/b2.html) is great if you do not run in heavy water conditions, CF posts abound with hydrolock engine issues. Since I dual purpose my car on the street and don’t mind standing water… I got a Callaway Honker instead (http://store.corvetteforum.com/p-224...iliateid=10142). This again is a highly debated topic. Read before you buy. Also understand the installation pitfalls of each, for example the Honker makes you cut up your radiator shroud to install it. The Blackwing (http://www.corvettegarage.com/produc...rvette.html)is an easier install, and costs significantly less.. but it is just a CAI, and there is no forced air effect like with the Honker / Vararam, plus it pulls engine bay heat not fresh. Breathless Performance also sells the Vortex (http://www.breathlessperformance.com/products/218.asp) ram air system, this is probably one of the most common ones I see in street modded cars since it adds a "look" under the hood for less money. I see these mostly for looks and 1/4 miles though. Note this one also requires you vut up the radiator shroud.
If you have a METAL MAF housing, you can get a cheap ($19.99) plastic housing to swap it with from CorvetteAmerica.com (http://www.corvetteamerica.com/cf/di...ategoryid=X728) part #X2404. The metal housing acts as a heat sink, and this means the MAF once hot will add its own heat to your incoming air. Cheap power fix. A throttle body bypass kit (you can search CF to find out the 3 home depot parts to make it) will keep your hot collant from heating your throttle body. This seems like a nice idea in the winter when the air can be too cold... but seriously how many of you drive the thing in 20F in the snow? Bypassing the throttle body keeps yet another source from heating up your incoming air. Colder air = more volume = more power.
You do not need to do a throttle body upgrade, intake manifold, etc. until you do your big power increase with a head cam / Force air set up. It’s not worth the expense on a stock motor to do those alone, spend the money on seat time to go faster instead! Pay and get the car tuned, however. East Coast Superchargers can email you a pretty close tune based on your easy bolt on mods that you can bring to a local tuner with the right software tune for a 30 secs OBDII port download ($99 at Carlisle and they do it there, $129 - $149 by mail). You do not need a dyno tune from a good tuner, unless you made serious engine & power mods. Many tuners will do a quickie tune, way better than stock, for far less $$$ than on the dyno ($400 & up). A tune can also change your fan temp kick on, as well as disable the CAGS without using the hard wired plug.
Seats, Harness & Bars:
Seats:
Have a Z06 seat and need quick easy pass throughs for your shoulder straps but want to retain a stock Corvette look? Convert your seats easy with the ECS seat covers that also mildly improve side bolstering: (http://www.eastcoastsupercharging.co...r%20Seats.html) Want pretty race seats that bolt right to your factory tracks? Caravaggio (http://www.caravaggiocorvettes.com/) & Arizen (http://www.arizenracingsports.com) both fit on the stock tracks as does the A4 from Corbeau (http://www.corbeau.com/products/reclining_seats/a4/) and this one also allows for back tilting. I recently (March 2010) installed the Caravaggio Race Seats (Fiberglass Shells apx 18+ lbs? per seat no tracks - forgot to weight them). First the Caravaggio is heavier than I expected and this modification (on stock tracks) is equal to or the SAME weight that the stock seats give you. I know, I was surprised too. Next for "OEM easy bolt on", I have to disagree. The Driver side power tracks first need to be at their highest settings prior to removing stock seats. This is because at the lowest setting the Caravaggio Seat will bottom out and HIT the bar in the rear = be careful with these seats trying to go down too far you could damage the seats and / or motor. We had to zip tie the power seat model to the front fixed bar/motor of the power track and really play with and rewrap the wiring harness to make sure nothing would get caught up and torn under there. Next there are no metal reinforments in the fiberglass where the bolts attach the seat. We know this because we had to drill the holes a bit oblong to make them line up with the OEM tracks. This made me very nervous so we used a wider but thin washer to spread out the bolt forces some. Next the OEM bolts for the power seat (bolts attached and fixed to track - nut goes inside seat) had plenty of extra length, but even with just one washer on the OEM bolts for the manual passenger seat (Bolt enters the inside of the seat and then bolts down into the threaded Manual tracks) it just barely had enough thread to be adequate. What does this all mean? I do not know how much I trust the seat when bolted to the track to stay there in a high speed front impact. Fiberglass cracks, the G-Forces of a god for bid 140mph crash I think may crack the bolts outa the bottom of the seats IMHO. With a 6 point harness, I trust the harness to hold me and the seat in the car so I'm confident there. I would NOT trust these seats with a 3 point harness in a HPDE at high speeds. Next on stock OEM tracks at 6"2 & 182 lbs 33" waist the seat was more snug than I want to admit. I think a 36" waist driver might be uncomfy in these. At 6'2 in my FRC / Z06 with a helmet on I can BARELY fit myself in the car and might be forced to take out the seat pad on the track and race with my *** on hard seat. Can't speak to Coupes / Verts. If you are 6'3" you will NEED lower profile tracks, OEM wil not do. The fixed passenger seat is a weird angle when you sit in it and might benefit by the hardbar seat bolt extenders to change the angle so as long as you don't use Brey Kraus bars. Im still trying to figure out how I will use my Brey Kraus stuff though, PM me please if you have a picture or yours install ed with these seats so I can give you my email and we can share notes. The shoulder passes are very low as well with the holes a good 2-3" below my shoulder, also a bit of a concern in a severe impact for a tall guy like me. I also had some difficulty getting the power controller into the mounted box on the seat and needed a triangle file to remove material, and used velcro near the plug on the module to keep it from moving. I bought these used (excellent condition) and had the shells painted Torch Red (red goes faster) but the center section was black. I have Mod Red\Black Interior, and emailed to find out how much to replace JUST THE CENTER sections (padded) parts in Red to keep the theme (removed Mod Red Z06 Seats). $550 / seat for just center padding replacements! They only cost $1400+ each new which is > 1/3 the cost of the seat! All in all, I was happy with the seats but not so impressed as the "Caravaggio Reputation" had lead me to believe on these. You may also want to install a rear seat strut support on these. Mine do. Its a bar that you will bolt to the REAR of the seat, and then bracket bolt it to your harness cross bar. This keeps the fiberglass seat from flexing and supports the seat from being able to more rear / forward rotate = snap off the seat mount. Final words: Cool finished look like a Porsche GT or Ferrari with these Caravagggio Race Seats. 3 Point is just like OEM feel & Brey Kraus kit bolts up friendly as well. Model of Shell "feels & looks like" a certain Sparco Seat (similar to the Arizen original design as well). Cool for performance street use. Will help a lot on auto-cross to bolster my butt in place. Even will make do pretty well I hope for HPDE in the lower run groups with harness only. BUT for higher run group HPDE \ Wheel to Wheel I think these seats are better off used elsewhere. After running for a full weekend with 2 drivers sharing the car, the stiffer seat caused a perfect C5 motorized track to go form tight to rocking. Now have to do the rocking C5 seat fix (http://www.lieblweb.com/c5seatfix.html). My advice, if you do Caravaggio's while you are working on the seat anyhow... do the seat track fix at the same time before - not after - it goes bad because it will fast.
Pics and pricing on the Arizen sold Race seats here, along with a member of CF install thread with pics of this product if you scroll down a few posts. (http://forums.corvetteforum.com/c5-g...for-c5-c6.html)
Want just functional the cloth Sparco is quality and easy, but might make you feel like you are in a tuner Civic. The most commonly sold base model competion ready and tested seat in teh USA by far is the Sparco EVO seat. It's everywhere, its easy to install on the Sparco Seat Tracks and its reliable: (http://www.sparcousa.com/pseats_comp.asp?id=468) I recently tried the Cobra Suzuka S (http://www.cobraseats.com/suzukas_tech.htm) & Cobra Suzuka S GT Seats (Thanks JimZ06), these are the ones Phoenix (http://www.phoenixperformance.net/) prefers lately, and they have a whole set up you can buy with the tracks and the seats all set up for you to bolt in. Pheonix Carges an arm and a leg to install them though, no clue why (~$500). You may need seat tracks if you are tall though to lower the seats for tall guys + helmet thickness. Stock set up will fit up to about 6’2 with helmet. After that you definitely need after market tracks. If you are a wider Corvette owner, you need a different seat to fit your butt than the regular seats. Somewhere between 34-36 inches is the max for the standard seats. If your shoulders are wide, you might need a different seat too. If not sure, go sit in some seats before you buy. Its miserable driving in a seat that doesn’t fit you. You will only need the driver’s seat, but if you plan on having passengers ride along… or instructors in the car they will greatly appreciate their own race seat with harness. If you are doing HPDE these seats above will do better than fine! If you decide to do wheel to wheel events in the future (real racing) these seats will not. You will need a certified FIA seat for "real racing" with impact scores, and once you get to this point you will have also put in a 10 point cage, fire suppression, stripped the interior and HVAC, etc. At this point you are looking at seats like Kirky makes with full head halo supports. These seats tend to be ugly, light and uncomfortable but will save your life in a 200mph crash with roll over and worth every penny once you are at this point in your hobby!
For a good FIAA rated seat that you can install for about $1000 a seat / tracks done that fits easily into the C5/C6 platform is the OMP ARS seat.
(http://www.ompracing-usa.com/detail....uctcode=HA/774) You can buy it here for $700 w/o tracks, etc (http://www.apexperformance.net/prod-146.htm)
Aluminum seats are great, cheap and lightweight for their strength but not so comfortable as a both street / race seat where the composite seats are better like Carbon Fiber or Fiber glass. Aluminum is far cheaper then either of those types. And they also don't catch fire which is a plus. Kirkey is by far the industry leader and name for their race seats for track only cars:
45 Series - Road Race Containment (http://www.kirkeyracing.com/index.ph...&code=Series45)
47 Series - Intermediate Road Race (http://www.kirkeyracing.com/index.ph...47&link=browse)
71 Series - Standard 20 Degree Road Race Containment Seat (http://www.kirkeyracing.com/index.ph...de=Series%2071)
Cheap, down and dirty. Not pretty to look at but gets the job done for less than even the Kirkeys are the (http://www.ultrashieldrace.com/catal...-Race-Seat/159) Ultrashield Pro Road Race Seat:17 in :20 Degree Layback Full Cover Black $413.95 ea x 2 = $827.90 // Hardbar Seat Rails Plain: $365.00 ea x 2 = $730.00 // Shark Bar (sits the harness bar lower and further to the rear than the Hardbar thus providing a better angle for the shoulder belts and use of a HANS device. Order without the belt retainers as you will need to fasten a seat brace to the bar. Use Shaft Collars to keep the belts from sliding //Shark Bar: $425 + $190 for pre drilled interior Quarter Panels (for C6 & save your originals) = $615.00 // I/O Port Quick Adjust Seat Braces: $99.95 x 2 = $199.90 // G Force 6 Point Polyester Pull Up Harness set: $150.00 x 2 = $300.00 // Total will be $2673.00 Plus shipping and incidentals like the shaft collars.
Harnesses & Bars:
5 vs 6 point? I don’t like my Johnson mashed up by the center strap of the 5 point. Nuff said. If you have a sport OEM seat, the Brey Kraus set up is a great match up and you can use those OEM seats. Most clubs will NOT let you use the stock Z06 seat because it does NOT have shoulder pass thrus. BK will work nicely with the Caravaggio set ups, BUT the Brey Kraus (http://www.bkauto.com/corvette/corvetteindex.php) is not always after market seat track friendly (ie wont work with the Arizen Seat\Seat Tracks) because they employ a vertical support upright on the outside of each seat track. You can use a seat stud extender kit from Hardbar ($25 per stud) to make the Brey Kraus "kinda" work better in this scenario. If you are going with an aftermarket track, seat and 6 point all at once… the Hardbar (http://www.hardbarusa.com/hardbar) cross member and sub-belt units are the way to go to avoid issues. Avoid the less known other brands. Don’t skimp on safety when it comes to whats holding your staps and your life in the seat in a god for bid crash. It’s nice that the BK setup allows you to use both stock belts and the 5/6 point with ease on an OEM sport seat. Don’t forget to buy the small carabiner style CLIPS for your harnesses; the harnesses ony ever come with hard mount bolt attachments. You will not be bolting on in most cases for a C5 unless you are stripping the car to bare netal and caging the thing. no one told me, I went to install before figiuring this out. Had to reorder the clips and wait a week to do my install. Im not the only monkey Im sure who did this. When you get the clips, be careful they can if the straps are twisted or (sorry) you are fat sometimes get pulled open while wearing them. They sell PINS to go into the clips that keep them from opening once in place (think cotter pin \ Speed clip) if the harness will be in place for a full weekend of events put in the pins. For Auto-cross this is not an issue like it is on the road courses. Also get a quick CAM release style harness, it’s very easy to get and out especially in an emergency. I like the G-force one, good bang for buck. I found that Soloracer (http://www.soloracer.com/) & SafeRacer (http://www.saferacer.com/) sells most of your seats, belts, clips, etc. cheap and will price match lowest prices quite often. Never hurts to check CF group purchases or google shopping for lowest pricing either. Never buy a harness used because they do degrade over time. And many groups will check the MANUFACTER date, too old and you can’t use it for many groups like the SCCA. For a stock car you do not need a fire extinguisher, but the more you mod your engine the more you will need it.
Want to autocross but keep "flying" outa the seat? Check out this neat belt you can buy from Racerwholesale Called the GF Torso Harness (http://www.racerwholesale.com/produc...roducts_id=195) You attach it around your chest and the seat. I'm not sure its HPDE legal but for autocross why not!
Fixed Projector Lights:
The stock C5 lights have very heavy metal assembly that mount, have motors, etc etc. Needless to say they are heavy... all in all just under 20 lbs a piece? Removing these for fixed projector lights saves a lot of weight if you need it off the front end. Some people argue on the merits here, since its in front of the wheels and makes the nose which already gets light at high speeds lighter. I hate having to pop up my lights in rain on the track personally. There are several kits out there. The "Depot Lights" Kit is the most popular, and ebay is usually the cheapest place to get them, sealed plastic and its either silver or black inside under the clear lenses. You can read about the install here for the Depo Lights: (http://www.fast-corvette.com/headlightProject.html) There is a large discussion here in CF at (http://forums.corvetteforum.com/c5-g...-opinions.html). I went with the Spectre Werkes Kit recent in March 2010. I was not happy with the install. A write up of them is here: (http://forums.corvetteforum.com/c5-g...t-install.html) and you can see them on the vendor site here: (http://www.spectergtr.com/specter-we...oup-5-aero-pa/) and there are 2 types the "bug eye" ones and the clear lens housings. First off, thanks again Tony for your help (again) on this install. Next its a bitch to install! Screw the instructions that makes it seem like a snap! The fenders in C5s are glued on and shift a bit within certain "tolerances", SW made their kit to fit THEIR car! We spent an entire weekend installing this kit to make it align with the body and the clearance gaps. At one point I almost packed it in and went back to the OEM pop ups in frustration. We needed to heat gun the plastic shells, drill the crap outa the brackets for more adjustments, shim the brackets with washers, etc etc. Of course I then saw 2 other installs on these after mine went in and you should see how people have to butcher up these light housings to get the P.O.S. into the car. And the screws are EXPOSED on the lenses. You have to paint the housings to get the screws to blend in... etc etc. If I knew it was a 20 hour project to swap form pop ups to the Spectre Werkes kit, I would have never got it. FYI you were warned. For $1300 these lights should have been a better fit, and needed less work to make them right. A new kit is out on the forum now form a CF Vendor, I have not seen or had experience with them: (http://www.spectergtr.com/specter-we...oup-5-aero-pa/) I'm hoping this kit is a bit easier on the time. Their install looks way more straight forward than the SW ones, and it comes with the whole kit for HID unlike SW which you have to buy. Also the aerodynamics of that kit looks a bit nicer IMHO.
If your fixed projector lights get swirls or scratches, especially if its a Lexan product you have to be very careful what you use to fix it. Using the wrong products, especially on Lexan, can permanently mar the lenses. Novus seems to be the consensus of what is the best product to use. Its a 1- 2- 3 step system to go from deepscratch to light/swirl to polishing. System is about $21 if you shop around, apx $29 shipped. You can also use this on Lexan windshields and Helmet Visors with scratches. I found that the motorcylce places use this the most for their windshields and visors. Best price I found was here (http://www.ridegear.com/detail.cfm?C..._content=10421).
Increasing Your Track "Vision":
Ever not see a guy in your blind spot and almost push him into the infield? Not fun. I like to anticipate my passes as early as posible and give my passes as early as possible for HPDE. Better car control, safer and more fun for all. 2 ways to help this: Mirros and Cameras.
180 Rear Mirror: (http://www.hammacher.com/Product/749...0View%20Mirror) this thing clips on in a hurry, easily handles glare and headlight issues. Mounts on without adhessives and can go on and off your stock mirror at the track in a few minutes, meaning you only need to use it AT the track, and can take it off after when you go home. I found a cheaper version of a similar mirror here, but haven't tried it (http://www.kotulas.com/webapp/wcs/st...&top_category=)
Rear Wide Angle "Back Up" Camera: You can get a license plate wide angle camera that will run into the camera port of a double din Kenwood unit. Ground out the back up wire, and you can then use the camera at any time the car is moving without being in reverse. Why? You can glance down and see the entire track behind you on your screen in the dash. Not as cheap or practical maybe as a 180 mirror, but its definitely cool as sh-t!
Last edited by Zenak; 10-25-2013 at 01:58 PM.
The following 4 users liked this post by Zenak:
08-21-2009, 07:29 PM
#7
Terminal Vette Addict
Thread Starter
Track Side Tool Box & What to Bring:
3 Brake Fluid Bottles & Bleeder Hose \ Bottle
2 quarts of extra oil in the proper grade
1 Extra Serpentine Belt (AC not necessary, but not bad idea)
4 Extra Rotors, 2 Sets of Extra Brake Pads
2 Aluminum Race Jacks & 2 Sets Stands (Harbor Freight with Coupons) & Wheel Chuck (rolling when jacked)
Tire Pressure Gauge that allows air bleed... not that crappy Pepboys Orange one thats never correct
Tool Box: 11mm , 15mm & 16mm wrench (for brakes separate than the Sears box), 1/2" torque wrench and breaker bar, 19mm 1/2" impact socket & 4" extension bar for lugs, pliers, locking pliers, adjustable pliers, needle nose pliers, wire cutter, multi use screw driver, small flat screw driver, long flat head screw driver, small 2 side mallet, zip ties, 4 vette jack pucks, 2" blue painters tape, zip lock bags (you always need these), caliper grease (green), mechanics gloves, 2 clean rags, disc brake spreader, your syringe for sucking fluid outs of the clutch reservoir in a zip lock, wheel lock key!!! Don't forget this if you need it!!!
Sears Craftman's Mechanics Tool Kit: (http://www.sears.com/shc/s/p_10153_1...e=G11&prdNo=11) no kidding you see about a dozen to two dozen of these exact boxes at HPDE events. Everyone gets this one (or very similar) since its easily portable & has about everything you will ever need. I keep this one in the truck unless I "need it" and the other quick tool box comes out to track side.
12 cut 6"x6" wood blocks from a 6 foot 2x6 to hold my calipers up when I pad swap and they also work great to rest the front cradle on in front if you want the car up on all fours :-) hint hint Better then jack stands.
One of those collapsible soccer mom chairs, where were you planning to sit?
spray on sun block - spf 30+ (have seen many bad sun burns by day 3 at events)
Rain poncho, not an umbrella. i recommend a disposable one which when you are under your car in the rain you don't mind that it got trashed.
Papertowel roll & window cleaner
Helmet & Hans Unit \ R3, driving gloves, driving shoes - Helmet Bag for All to Fit
If you can fit it in your car and already own it, one of those collapsible tents that you see at flea markets etc with a roof on it. Nothing better to keep the sun off you and the rain off your car if you need to work under the hood. You got one of these on a 100 degree sunny day with no covered paddock area you are instantly popular!
And I recommend 3 Attached Lid (hinged) storage boxes, labeled with the above contents for easy finding. 2 for supplies, and one for all your tow straps etc in a single easy to find box.
A tarp to cover all your supplies, in event of rain or worse :-)
WATER! You will go through almost an entire case of water over a hot weekend on a three day event. The heat of the asphalt will dehydrate you fast without shade. Snacks, I prefer Cliff bars & trail mixes from Trader Joe's for low carb and high Protein. Avoid Caffeine and Energy Drinks that seem great at 6am teching the car but crash you by the last run of the day. Not all tracks have a food shack, find out before you go and pack a sandwich if not. A coolor of good beer with ice is a great way to make a whole lot of new friends at a new group once the track closes. I have met some great people over end of the day beer, and the more experienced guys will shy away from noobs quite often. Beer at the end of the day allows you to meet and greet, and the conversations at the end of the day will give you the hints & the tricks of that track. End of first day this happens, last day everyone goes home early. These hints and tricks will serve you well first run the next AM and you will have one of those "I get it!" moments running over a curb that you used to apex. Don't forget this is a social event, not just a driving day. Some of my best friends are from my favorite track groups :-)
Race Fuel & Fuel Containers for the Track:
Can I race on Pump gas for my OEM C5 \ C6? Yes of course its designed to!
Can i race on less than 93 octane? Your C5 is designed on 91, but I wouldn't.
Can I use 98 / 100 in my basically stock engine? Yes, but why waste the $$$! No, its not faster!
What does 98 / 100 octane cost at the track? Depends on the track, but about $7.50 to $10.00 a gallon.
Will 98 / 100 damage my stock OEM motor? Probably not, high octane retards knocking and can clean your engine and injectors on a dirty car. I know some guys that put in 2 gallons on the first day to top off their tank just for the cleaning properties since the engine when running hot at WOT burns off crude easier.
Can i buy Race Fuel and bring it to the track? Yes, and its way cheaper that way too!!!
Great ESPN Sports Article on "Race Fuel 101": (http://sports.espn.go.com/rpm/news/s...s=2&id=3046368)
Handling and Proper Storage of Race Fuels: (http://www.stockcarracing.com/howto/...ech/index.html)
Why do I need Fuel Containers? Because you will burn a full tank or more a day easy at HPDE in a stock C5.
What if the track your at only carries 98 & 100 Octane (*cough* Pocono *cough*)? Bring your credit card!
What if the trackside fuel runs out or pump breaks (*cough* Summit SCCA Time Trials *cough*) You're f-cked!
What if your lazy and don't want to have to drive off track mid day? Get a FUEL CONTAINER!
If you are already trailering the car, bring your own fuel containers. They are 5 gallons each, and 2 should do you to make it threw a full day with a full tank for a stock C5 / C6 at an HPDE. You can then refill them at night for making it through the second day. Get SQUARE base ones (not rounds) for easier fitting into your truck/suv and also if you get panels for your trailer designed to fit them so they stay secure and don't move around. Several choice on containers, and hoses \ valves. Don't get cheap! Don't risk dangerous and damaging spills in your truck, SUV or all over your Vette!!! I like the hoses that have a shaker vlave in them that creates presure \ flow so you don't have to gravity feed them, it starts a siphon for you just shaking it up and down. NEVER mouth siphon race fuel unless you also run on 93 octane and like to vomit for hours. The hoses often come with a filter in them to keep debris outa your tank. You would be amazed how much crap these will catch. Why plug up your cars fuel filter if you can catch it here instead?
VP Racing Fuel Containers: (http://www.vpracingfuels.com/page469715.html) rated one of the best & best known name brands, and these are often the brand you see in NASCAR the guy runs out with to gravity feed into the tank at pitstops. Apx $30 for the opaque 5 gallon colored jugs.
Atlantic jet Sport: (http://www.atlanticjetsports.com/fue...&_carriers.htm) I like these with the control valves in the filler hoses, but the siphon style better. Also sells jug holders for trailers.
Pit Stop USA: (http://www.pitstopusa.com/SearchResu...ategoryID=2091) 12 gallon and Aluminum Jugs
Phoenix Race Products: (http://racecaddy.com/Phoenix-Race-Fuel/Products.html) I like these clear Jugs better than the colored ones so you can watch how MUCH you are putting in. They also sell a nice fuel siphon. Great jugs with 2 handles for easy heavy use and comes with a filler hose all for $30! VP ones you need to buy them separate.
Roll Bars & Cages:
You have lots of choice for HPDE, just for basic safety, since Vettes rarely roll over. BUT if you ever plan to wheel to wheel race your Vette, you need a specific cage by rules of either SCCA or NASA. The two largest organizations covering amateur racing events in true competitions with winners & losers - HPDE does not have winners or timed events. Don't put in all the work of a cage for a competition event to find out that you failed the safety inspection for having an improper cage for the competition you are in: ie. Grand AM, GT-1, T1, etc.
Steel vs Chrome Molly? Here's the simple answer. Chrome Molly is stronger and lighter. This means the wall and tube diameter can be smaller for the same safety spec. Lets look at the Wolfe weld in cage 6 point style below for a comparison. The Steel Cage is 130-135lbs installed added to the car, the exact same dimension cage in Chrome Molly is 90-95lbs. That's 40 lbs. Not a HUGE amount, but its still weight, and if you don't worry about $$$, then the added cost of chrome molly is worth the weight savings. Know this though, that Chrome Molly is much harder to work with, the parts have to be cut perfectly and the tolerance for the type of welding have to be perfect. Steel is more forgiving and you can have more crude tools to fabricate and install it, if a gap is off... so what you can fill it. Chrome Molly should only be attempted by experienced welders with all the special notching equipment.
Use the current NASA or SCCA Tech rule books when selection your choice of cages:
http://www.nasaproracing.com/rules/ccr.pdf
http://www.scca.com/contentpage.aspx?content=44
Four Point Roll Bars - Bolt in & Weld In:
IO Port Racing: (http://www.ioportracing.com/Merchant...ory_Code=AP401)
Pfadt Racing: (http://www.pfadtracing.com/catalog/p...roducts_id/155 )
East Coast SuperCharging: (http://www.eastcoastsupercharging.com/Rollbars.html)
Wolfe Racecraft: Bolt in Roll Bar (http://www.wolferacecraft.com/Search...?CategoryID=60)
Wolfe Racecraft: Weld In Roll Bar (http://www.wolferacecraft.com/Search...?CategoryID=63)
RD Racing: Bolt in for Coupe \ Hard Top (http://www.r-dracing.com/stframe1.htm)
Autopower Industries: Bolt in (http://www.autopowerindustries.com/rollbars.asp)
Five Point Roll bars (or Four Point with door bar):
Pheonix Performance: (http://www.phoenixperformanceinc.com/race_shop.htm)
East Coast SuperCharging: (http://www.eastcoastsupercharging.com/Rollbars.html)
Wolfe Racecraft: Bolt in Roll Bar (http://www.wolferacecraft.com/Search...?CategoryID=61)
Wolfe Racecraft: Weld In Roll Bar (http://www.wolferacecraft.com/Search...?CategoryID=64)
Six Point Cages:
Pheonix Performance: The best know T1 specialist for C5 Vettes, they have a CF special deal listed here (http://forums.corvetteforum.com/auto...c5-and-c6.html) and their website is here (http://www.phoenixperformanceinc.com/race_shop.htm)
East Coast SuperCharging: (http://www.eastcoastsupercharging.com/Rollbars.html)
Wolfe Racecraft: Bolt in Roll Bar (http://www.wolferacecraft.com/Search...?CategoryID=62)
Wolfe Racecraft: Weld In Roll Bar (http://www.wolferacecraft.com/Search...?CategoryID=65)
Wolfe Racecraft: Weld in Full Cage (http://www.wolferacecraft.com/Search...?CategoryID=47) for the money dollar for dollar the Wolfe 6 point system is one of the most commonly used for the budget minded do it your selfer full cage set up. Its NHRA compliant, fits easy, and installation is relatively straightforward.
Autopower Industries: Bolt or Weld (http://www.autopowerindustries.com/rollcages.asp)
Eight Point Cages:
Pheonix Performance: The best know T1 specialist for C5 Vettes, they have a CF special deal listed here (http://forums.corvetteforum.com/auto...c5-and-c6.html) and their website is here (http://www.phoenixperformanceinc.com/race_shop.htm)
East Coast SuperCharging: (http://www.eastcoastsupercharging.com/Rollbars.html)
Custom Cages:
VetteSport: CF Thread (http://forums.corvetteforum.com/auto...completed.html)
DRM: CF Thread (http://forums.corvetteforum.com/auto...-pictures.html) and form their site (http://dougrippie.com/?page_id=121)
Roll Bar & Cage Padding:
Discovery Parts: (http://www.discoveryparts.com/cgi-bi...?product=hbars)
Rollbar Padding: (http://www.rollbarpadding.com/downlo..._durometer.pdf)
Pegasus Auto Racing Supply: (http://www.pegasusautoracing.com/pro...p?Product=2397)
Summit Racing: (http://www.summitracing.com/parts/SUM-590102/)
Save Drives: (http://www.safedrives.com/proddetail...=SFIPad&cat=72)
C5 Z06 Cage Install Thread: (http://forums.corvetteforum.com/auto...ress-pics.html)
Tow Hooks:
Pfadt Racing: (http://www.pfadtracing.com/catalog/i...hp/cPath/23_31)
Pheonix Performance: (http://www.phoenixperformanceinc.com...d&productId=11)
HPDE Car Insurance:
Most insurance companies do not cover racing, some do cover HPDE when it’s not timed and there are no winners / losers. Meaning if it’s a “Driver’s Education” event, you might be covered in the beginner groups. *** Assume you are not covered *** Some State Farm policies still cover it to my knowledge like this. You can buy HPDE track insurance at declared value. I saw a 3 day GT3 Porsche destroy the front end on Thunderbolt and get towed away with 253 miles on it. Covered 100% with track insurance. Find out all the conditions though, some do not cover blatant stupidity like running on full slicks in standing water, etc. Know what you buy before you try. A common one used is http://hpdeins.locktonaffinity.com and is the prefered provider for Porsche Club Events. You get a PCA discount, which more than covers the PCA annual member fees. ALSO Porsche Club is a great place to start learning about HPDE. They have an excellent Driver's Education Program, instructors abound, and 5 group skill levels to rise through. THe second most common car there is always a Corvette = C5 then C6.
Think your covered from your regular car insurance in HPDE as some people rumor because it is "not racing"?
My State Farm Policy I read, and here is the excerpt I found below on P.35 #19a&b:
19. ANY COVERED VEHICLE WHILE IT IS:
A) BEING PREPARED FOR, USED IN PRACTICE FOR, OR OPERATED IN ANY RACING CONTEST IN ANY RACING CONTEST, SPEED CONTEST, HILL-CLIMBING CONTEST, JUMPING CONTEST, OR ANY SIMILAR CONTEST, OR
B) ON A TRACK DESIGNED PRIMARILY FOR RACING OR HIGH SPEED DRIVING. This exclusion does not apply if the vehicle is being used in connection with an activity other than racing, high speed driving, or any type of competitive driving.
If you don't think you can damage your car at an AutoCross think again: (
)
Another CF user posted this peson who supposedly selling HPDE "Seasonal" insurance, or a policy which is good for multiple HPDE only events (not time trials or wheel to wheel):
Tom or Jeff Hall from Hall Insurance Associates, Inc
Ph: 336-765-1971 or 800-764-3456 Fax: 336-760-4149 tomhall@hall-insurance.com
401 Olive Street, Winston - Salem, NC 27103
National Corvette Museum (NCM) HPDE Insurance (Updated 09-09-2014)
"The National Corvette Museum and the NCM Insurance Agency are proud to introduce a new insurance offering for our customers. With the NCM Motorsports Park grand opening taking place over Labor Day weekend the NCM Insurance Agency has teamed up with longtime on track insurance provider, Lockton Affinity.
The NCM Insurance Agency is now able to offer On Track Physical Damage Coverage for the vehicles that you wish to use on most tracks across the country. We protect you where you need it most – the track. As you may know, finding the coverage you need to protect your car during HPDE events can be challenging. The vast majority of auto insurers have changed their policies to exclude coverage for these types of events. We know what you’re looking for when it comes to HPDE insurance, because we’re enthusiasts too. You’ll get the coverage you need to protect yourself during HPDE events – plus, it’s fast and easy and all online.
This insurance policy provides physical damage coverage for your automobile while you are participating in a High-Performance Driver's Education event. This physical damage coverage will begin when you enter the grounds of a race course and end when you leave the race course premises. Liability coverage is not included in this policy.
We offer a la carte, single-event policies that protect your vehicle while you are participating in an HPDE event – a great solution if you participate in five events or less per year.
For enthusiasts more active in the hobby, we offer annual HPDE insurance policy options that provide coverage at a discounted rate for multiple events in a policy year. Four different options allow you to choose a package that matches your level of activity in HPDE events.
One great advantage of this program is if you are a student taking part in an HPDE then your car is also covered while an instructor is driving your vehicle. If you are sharing your car with a friend or relative then coverage is extended for one additional driver at no charge. We will just need to know their name during the application process.
This program is available exclusively at: http://www.ncminsurance.com/hpde."
About NCM Insurance Agency
NCM Insurance Agency one of the fastest growing collector car insurance agencies, focuses largely on providing collector car insurance for your Corvette or any other collector car. As part of the National Corvette Museum, our business is Corvettes but the NCM Insurance Agency insures any make or model that is considered a collector car. The National Corvette Museum is a non-profit, 501 (c)(3) foundation, located in Bowling Green, KY.
Note when buying track insurance: One event might be $249 for the event, BUT you can do a "10 pack" for a full season sometimes for about $800 - $1100 by car value (this estiamte for a declared value of about 35-40k). It might seem crazy for 250-300 per event, but when you get the price closer to $80 per event... it doesnt sound so crazy does it? A friend in Porsche Club Recently (August 2009) rolled his track 993 with cage 3 times over sideways at Summit in WV. He had a 10 pack deal, and they paid him out. Don;t think the check comes fast or easy though, it takes about 3-6 weeks of wrangling. You can also sometimes buy your own car back as "scrap" for pennies on the dollar! This is great if you take the $$, buy another of the same car... and now can pull all your performance piece upgrades from the damage car to the new car WAY cheaper than buying them all again!
Final Note:
I hope this helps anyone reading it to avoid the pitfalls of Modding and $$ lost in broken parts, time researching what works and doesn’t, and hours of searching forums for correct answers. Also here are some build threads (send me your or others you know of) so you can see what goes into these..
C5Z06 - ST3 Build (http://forums.corvetteforum.com/auto...z06-build.html)
Suggested Order of MODS if you are completely new to the addiction:
1.) First HPDE = MUST change out all fluids if you haven't in a while. Make sure your diff, trans, coolant, oil and especially your brake fluid are fresh & good quality. Safety of you and your car come first. Buy a good lightweight helmet, cheap neck foam pad and seat belt shoulder pad for the first event.
2.) Spend your first 3-6 track days in a mostly stock car. Get seat time! See if this is for you! Seat time will determine everything else. Experience is far more important to go faster than mods. You want to be on crappy tires in the begining to teach you humility! Crappy tires give feedback (barking) and you will know well in advance of losing grip. R-comps will just hold or not hold. Not good for a new driver.
3.) Once you decided HPDE is for you: brake pads, brake lines, shifter, maybe a better seat & harnesss. Safety first. Contact patch items are the most important early out.
4.) Did I mention seat time and driving schools? Good time to get your 160 thermostat, cold air intake and better spark plugs and wires with Wire boots. The get the car ECU programmed if you haven't already. Might be a good time in invest in brake ducts as well. Keeping your track car cool is a great investment in longevity of the machine. Wrap the ball joints and tierod ends in some kind of heat shielding.
5.) Shifter Kit, Catch Can, Race Pedals, Tunnel Plate, Radiator Screen, Tensioner Pulley
6.) Now your ready! This is a big debate area, but unless you went from loser to god in 5 races, you really aren't going fast enough yet in a 20-30 min HPDE to over heat the engine. I would say bushings \ ball joints \ tie rods and then the rest of the suspension next (sways, links and coil overs) in a cool/moderate climate up north.. then a bigger radiator & external oil cooler followed by the trans and differential coolers after. In a HOT cliamte like Florida, So Cal, Arizona... you need to do this in the opposite order so you don't over cook your motor, trans and diff too fast costing big $$$.
7.) Now move up to a wider rim / better R comp tire (NOT SLICKS) once you are far to ofast to kepe the car on the track in street tires.
8.) All the rest of the bells and whisltes... headers & exhaust if you didn't already after buying it. Bigger rotors and better calipers. Add Down force with your increased horsepower. When it comes to the engine and drive train DEAD LAST after all the rest has been done. Never create more raw power than your current skill level needs or is able to handle. MEH = Money + Ego + HP = Crash.
One last note, if you read this thread, notice how many people say that the hardest thing to learn about this hobby is $$$ management! (http://forums.corvetteforum.com/auto...ad-racing.html) Meaning that it will cost you in time and $$ WAY WAY more than you think! The first track day is cheap. Pads and fluids. The second day isnt too bad either. Its track events 4 to the rest that will bankrupt you! See the resources section I added below for HPDE, Autocross, Driving Schools, Websites, Books, etc.
Books & How to Learn Driving Manuals: Amazon them, multi books = Discount too.
GOING FASTER! Mastering the Art of Race Driving (Paperback) - This is the BIBLE of HPDE instruction. It is a MUST read for the novice! You will learn more from this $20 book than any other $ for $ investment in your HPDE experience. Skip Barber - Going Faster (DVD) - OMG is this the cheeziest video ever! Companion to teh book. You can not substitue this for the book. Its a nice adjunct, and its a nice intro to a friend coming with you. You don't learn a whole lot from it though, and I am sad to say the first 2 times I watched it was before bed and fell asleep both times. Get the book instead. Speed Secrets: Professional Race Driving Techniques (Paperback) - This is a good book, but not the first one to buy. Speed Secrets II: More Professional Race Driving Techniques (Paperback) - The Sequel to the first book, read them in order or be lost here. Speed Secrets 3: (Inner) Mental Strategies to Maximize Your Racing Performance (Paperback) - Speed Secrets 4: Engineering the Driver (Paperback) - Speed Secrets 5: The Complete Driver (Paperback) - Speed Secrets 6: The Perfect Driver (Paperback) - Speed Secrets: Winning Autocross Techniques (Paperback) - Drive to Win: The Essential Guide to Race Driving (Paperback) - SCCA Solo (AutoCross) 2009 Rule Book - FREE in .pdf form here http://scca.com/documents/Solo_Rules...Solo_Rules.pdf
Solo Racer's Autocross Guide - Read here for Free http://soloracer.com/autoxguide.html
NCM First Timer's HPDE Guide - Downlaod the FREE word doc file here http://www.corvettemuseum.com/regist...irstTimers.doc
NCM Getting Your Car Ready for HPDE - Downlaod the FREE word doc file here http://www.corvettemuseum.com/regist...20a%20HPDE.doc
NCM Know Your Boiling Point - Downlaod the FREE word doc file here http://www.corvettemuseum.com/regist...ng%20Point.doc
The Racing & High-Performance Tire: Using Tires to Tune for Grip & Balance - The How to of How Tires affect your Perfoamce on the Track
http://www.amazon.com/exec/obidos/AS...964266-3329434
Competition Car Suspension: A practical handbook - How to of how suspension can be adjusted for faster lap times by Track
 Competition Car Suspension: A Practical Handbook: Allan Staniforth: 9781844253289: Amazon.com: Books
The Competition Car Data Logging Manual - How Data Acquisition Systems can Help you learn to go faster
Competition Car Suspension: A Practical Handbook: Allan Staniforth: 9781844253289: Amazon.com: Books
The Competition Car Data Logging Manual - How Data Acquisition Systems can Help you learn to go faster
Tune to Win - Basic Overall Car performance Tuning of your Car
Race Car Vehicle Dynamics - The true "Geek Out" book of race car science and physics
Engineer to Win - Applies Materials Engineering and your Race Car
Driving Schools, Web Resources, AutoCross\SoloRacing & HDPE Groups:
Schools:
Bondurant: http://www.bondurant.com - The Corvette Experience here is a great place to train in C6 & Open Wheel Cars in Arizona outside Phoenix. They have everythign from one day basic programs to full on SCCA certified Driver's Licensing programs.
Skip Barber: http://www.skipbarber.com/ - Truly the father of all Racing Schools located in Connecticut. If you don't know this school by reputation then you gotta be new!
Exotics Racing: http://www.exoticsracing.com/ - Vettes to Lambos located in Vegas is more Novelty than training program. Gambling, Buffets, Strippers and driving however all in one spot. What's not to love?
Sports Car Driving Experience: http://www.sportscardrivingexperience.com/ - Teaches in C5 Corvettes in Florida
Spring Mountain Advanced Driving School - http://www.springmountainmotorsports.com/ - Driving school for Porsche, Corvette & Lotus Elise located in Vegas outskirts and ahs a decent reputation for good on track instruction program. Again did I mention Vegas?
Bertil Roos: Their program runs at several locations - NJMSP, Pocono & Virginia. Pocono is their home track location. The late great Frank Gonzales (we miss ya Frank) from the CF was one of their lead instructors until he passed in February 2010. Its a better value for open wheel car training than many other programs out there. http://www.racenow.com/home.htm
Website for Racing Events:
Motor Sports Registration: http://www.motorsportreg.com/ - YOU MUST JOIN HERE its a single source listing. Join here, see them ALL! Every region of the county! Both private and public clubs. Set up notifications for certain events and or tracks! It is a must for the hobby HPDE driver.
Sports Car Club of America (SCCA): Need I say more http://www.scca.com/home.aspx, go here for SCCA sponsored HPDE and AutoX Events and anything else for teh hobbiest. Its a good membership to ahve, and the SCCA has tons of AutoX events all over the country. AutoX is a good place to start prior to HPDE. If Autocross scares you. If Autocross has you out washing and waxing your car for fear of pebbles, then HPDE is not for you. HPDE will mess up your ride eventually.
RacingSchool.com:You can buy gift certs for friends, family, etc. My staff chipped in & got me a gift cert from here 2 Christmas's ago(http://www.racingschools.com/home.shtml) and this is also a great way to find out what TYPE of car you can drive at which school easier. Some offer Formula Mazda, some Miata, Some Corvettes, etc. and this site has a nice quick spot to look up a school by this car type search.
MyAutoEvents.com: A listing of all sorts of local events nationwide from off road to autocross http://www.myautoevents.com/
North American Motorsports Pages: A nice place to get all sorts of info on US events, rules, changes for events, etc. http://www.na-motorsports.com/index.html
Grass Roots Motorsports: is a really nice place to get tons of information on the do it yourselfer racer on a limited budget http://grassrootsmotorsports.com/art...orner-weights/
Trackpedia: http://www.trackpedia.com/wiki/Main_Pagethis is a GREAT site! You can look up any individual track and get GPS cross streets etc to find the place, aerial maps, course walk throughs, lap times for several different car types, etc. Before you hit a NEW track, hit here first, then Youtube to see a in car video.
HPDE Groups:
Car and Driver's Article on America's Best Road Courses: (http://www.caranddriver.com/features...ourses-feature)
Track Time for Cars: 6-7 runs in a day! 3 Skill groups. Well organized, but cancels often if poor registration. Very little use of instructors often and teaches in a quick clasroom with single instructor lead follow. Not a good first timer group, but a great group after you have the basic down for TONs of well organized & relatively safe seat time. VERY well priced. Most time you will get in an HPDE per day minute:dollar ratio. I often hit this group with the entire crew at East Coast Superchargers since ECS is a hop skip drive from the NJMP track where they hold 1/3 of their events. Consequently its is a VERY vette friendly group, with C5/C6 making up the largest vehicle type by far in their group.
Porsche Club of America: I recommend highly this group for your FIRST HPDE event. Vette friendly & 0 skill necessary. You can enter this group a scared newbie and leave after a weekend with good basic skills and some well earned confidence. Great classroom time & a excellent value for the $$ spent. Very safe group. Check Locally and on MotorSportsReg for events listed of all the clubs nationwide. You need to have a Porsche to join this group, an active VIN to be a member. It does open to non-PCA members a few weeks out of an event but the first 2 run groups (green & blue) often fill up FAST and rarely do non-PCA members get into these groups. I personally run in the RTR - Riesent�ter Region and its a great friendly group of guys & ladies.
NASA: Good group, instructors abound. HPDE is sane & safe, but their open events allow bumping cars.
BMW Club: not all regions are vette friendly. Some only allow BMWs. Check Locally and on MotorSportsReg for events.
Nation Corvette Museum (NCM) - I do not recommend this group. I know I will take heat for this post, but its true. First its all Vettes. Many of these Vette owners are keeping their cars under covers during registration. DO I need to go on? It rained at the event at NJMP at LIghtning I went to in 2009, they almost canceled the event for a drizzle at 8:00am! Not a down pour! The track officials were ready to open up the event, and Rock (organizer of SPecial events) was afraid to let people out. Not even an optional, and they scared the crap outa people. We eventually did a "skid pad" in the aprking lot. Vettes lined up. The first car went in a white coupe, came out a goey mess of mud, oil and vulcanized rubber. All the cars on line left. The drivers were not courtesous when we FINALLY got out, no one watched their mirrors for crap. No passing except in one spot. THe beginer group was a nightmare, slow speed, bumper to bumper train of cars which means you don't learn anything. It was easier in teh Intermediate group, but all newbies need to run the beginer group one time to get signed off on skill level. People spent more time looking at their cars than driving them. AND its the most expensive HDPE group $/Minute of track time there is. I heard the VIR event in 2009 was a great event, but if you are on a budget, this is not a great group to go out in or learn in. My 2 cents. I would think twice myself before going and risking another day & my $$$ sitting around because of a drizzle.
Hooked on Driving - This is a well run group, but you get little car time on the track for the huge fee the charge to run an event. Personally I am going broke on this hobby, and I always figure out when I register for groups: Total Minutes on Track / Cost of entry fee = Minute : Dollar ration. Good groups are about 1:1 like TrackTime for Cars. This group can be several bucks per minute of drive time just like NCM. However, if you are just doing a single one time event HPDE to try out the "expereince" of it in a totally stock car with no desire to make this a hobby, this is a good one time event for you.
[B]10 10ths Motorsports: a group who's goal it is to put 3 - 4 hours per skill group of actual track time per event. More track time, less sitting is their motto. Have not been to one of their events yet, but a friend was and said it was a good efficient group. Cost per day about $225 - $300 by track.
PDA Driving School I have not gone to this group, but I hear its well run and you get a large amount of track time in the Advnaced run days. NJ MotorSports Park and Pocono only right now. Cost is about $250 - $300 per day which is kinda expensive, but on the advnaced only run days you get a good 4 hours of track time, so this isn't a bad group for advanced drivers. New drivers would be better served in a PCA event for $ to minutes on the track.
MVP Track Time: runs all over the country. Has a nice reputation for being fun, with a nice mix of safety but not overly oppressive with it either.
AutoCross & Solo Groups:
Sports Car Club of America (SCCA): Here is a very comprehensive list of SCCA sponsored Solo Racing events
GoAutoCross.com: This is a nice website that tracks local Autocross events, currently only set up for NE US events.
3 Brake Fluid Bottles & Bleeder Hose \ Bottle
2 quarts of extra oil in the proper grade
1 Extra Serpentine Belt (AC not necessary, but not bad idea)
4 Extra Rotors, 2 Sets of Extra Brake Pads
2 Aluminum Race Jacks & 2 Sets Stands (Harbor Freight with Coupons) & Wheel Chuck (rolling when jacked)
Tire Pressure Gauge that allows air bleed... not that crappy Pepboys Orange one thats never correct
Tool Box: 11mm , 15mm & 16mm wrench (for brakes separate than the Sears box), 1/2" torque wrench and breaker bar, 19mm 1/2" impact socket & 4" extension bar for lugs, pliers, locking pliers, adjustable pliers, needle nose pliers, wire cutter, multi use screw driver, small flat screw driver, long flat head screw driver, small 2 side mallet, zip ties, 4 vette jack pucks, 2" blue painters tape, zip lock bags (you always need these), caliper grease (green), mechanics gloves, 2 clean rags, disc brake spreader, your syringe for sucking fluid outs of the clutch reservoir in a zip lock, wheel lock key!!! Don't forget this if you need it!!!
Sears Craftman's Mechanics Tool Kit: (http://www.sears.com/shc/s/p_10153_1...e=G11&prdNo=11) no kidding you see about a dozen to two dozen of these exact boxes at HPDE events. Everyone gets this one (or very similar) since its easily portable & has about everything you will ever need. I keep this one in the truck unless I "need it" and the other quick tool box comes out to track side.
12 cut 6"x6" wood blocks from a 6 foot 2x6 to hold my calipers up when I pad swap and they also work great to rest the front cradle on in front if you want the car up on all fours :-) hint hint Better then jack stands.
One of those collapsible soccer mom chairs, where were you planning to sit?
spray on sun block - spf 30+ (have seen many bad sun burns by day 3 at events)
Rain poncho, not an umbrella. i recommend a disposable one which when you are under your car in the rain you don't mind that it got trashed.
Papertowel roll & window cleaner
Helmet & Hans Unit \ R3, driving gloves, driving shoes - Helmet Bag for All to Fit
If you can fit it in your car and already own it, one of those collapsible tents that you see at flea markets etc with a roof on it. Nothing better to keep the sun off you and the rain off your car if you need to work under the hood. You got one of these on a 100 degree sunny day with no covered paddock area you are instantly popular!
And I recommend 3 Attached Lid (hinged) storage boxes, labeled with the above contents for easy finding. 2 for supplies, and one for all your tow straps etc in a single easy to find box.
A tarp to cover all your supplies, in event of rain or worse :-)
WATER! You will go through almost an entire case of water over a hot weekend on a three day event. The heat of the asphalt will dehydrate you fast without shade. Snacks, I prefer Cliff bars & trail mixes from Trader Joe's for low carb and high Protein. Avoid Caffeine and Energy Drinks that seem great at 6am teching the car but crash you by the last run of the day. Not all tracks have a food shack, find out before you go and pack a sandwich if not. A coolor of good beer with ice is a great way to make a whole lot of new friends at a new group once the track closes. I have met some great people over end of the day beer, and the more experienced guys will shy away from noobs quite often. Beer at the end of the day allows you to meet and greet, and the conversations at the end of the day will give you the hints & the tricks of that track. End of first day this happens, last day everyone goes home early. These hints and tricks will serve you well first run the next AM and you will have one of those "I get it!" moments running over a curb that you used to apex. Don't forget this is a social event, not just a driving day. Some of my best friends are from my favorite track groups :-)
Race Fuel & Fuel Containers for the Track:
Can I race on Pump gas for my OEM C5 \ C6? Yes of course its designed to!
Can i race on less than 93 octane? Your C5 is designed on 91, but I wouldn't.
Can I use 98 / 100 in my basically stock engine? Yes, but why waste the $$$! No, its not faster!
What does 98 / 100 octane cost at the track? Depends on the track, but about $7.50 to $10.00 a gallon.
Will 98 / 100 damage my stock OEM motor? Probably not, high octane retards knocking and can clean your engine and injectors on a dirty car. I know some guys that put in 2 gallons on the first day to top off their tank just for the cleaning properties since the engine when running hot at WOT burns off crude easier.
Can i buy Race Fuel and bring it to the track? Yes, and its way cheaper that way too!!!
Great ESPN Sports Article on "Race Fuel 101": (http://sports.espn.go.com/rpm/news/s...s=2&id=3046368)
Handling and Proper Storage of Race Fuels: (http://www.stockcarracing.com/howto/...ech/index.html)
Why do I need Fuel Containers? Because you will burn a full tank or more a day easy at HPDE in a stock C5.
What if the track your at only carries 98 & 100 Octane (*cough* Pocono *cough*)? Bring your credit card!
What if the trackside fuel runs out or pump breaks (*cough* Summit SCCA Time Trials *cough*) You're f-cked!
What if your lazy and don't want to have to drive off track mid day? Get a FUEL CONTAINER!
If you are already trailering the car, bring your own fuel containers. They are 5 gallons each, and 2 should do you to make it threw a full day with a full tank for a stock C5 / C6 at an HPDE. You can then refill them at night for making it through the second day. Get SQUARE base ones (not rounds) for easier fitting into your truck/suv and also if you get panels for your trailer designed to fit them so they stay secure and don't move around. Several choice on containers, and hoses \ valves. Don't get cheap! Don't risk dangerous and damaging spills in your truck, SUV or all over your Vette!!! I like the hoses that have a shaker vlave in them that creates presure \ flow so you don't have to gravity feed them, it starts a siphon for you just shaking it up and down. NEVER mouth siphon race fuel unless you also run on 93 octane and like to vomit for hours. The hoses often come with a filter in them to keep debris outa your tank. You would be amazed how much crap these will catch. Why plug up your cars fuel filter if you can catch it here instead?
VP Racing Fuel Containers: (http://www.vpracingfuels.com/page469715.html) rated one of the best & best known name brands, and these are often the brand you see in NASCAR the guy runs out with to gravity feed into the tank at pitstops. Apx $30 for the opaque 5 gallon colored jugs.
Atlantic jet Sport: (http://www.atlanticjetsports.com/fue...&_carriers.htm) I like these with the control valves in the filler hoses, but the siphon style better. Also sells jug holders for trailers.
Pit Stop USA: (http://www.pitstopusa.com/SearchResu...ategoryID=2091) 12 gallon and Aluminum Jugs
Phoenix Race Products: (http://racecaddy.com/Phoenix-Race-Fuel/Products.html) I like these clear Jugs better than the colored ones so you can watch how MUCH you are putting in. They also sell a nice fuel siphon. Great jugs with 2 handles for easy heavy use and comes with a filler hose all for $30! VP ones you need to buy them separate.
Roll Bars & Cages:
You have lots of choice for HPDE, just for basic safety, since Vettes rarely roll over. BUT if you ever plan to wheel to wheel race your Vette, you need a specific cage by rules of either SCCA or NASA. The two largest organizations covering amateur racing events in true competitions with winners & losers - HPDE does not have winners or timed events. Don't put in all the work of a cage for a competition event to find out that you failed the safety inspection for having an improper cage for the competition you are in: ie. Grand AM, GT-1, T1, etc.
Steel vs Chrome Molly? Here's the simple answer. Chrome Molly is stronger and lighter. This means the wall and tube diameter can be smaller for the same safety spec. Lets look at the Wolfe weld in cage 6 point style below for a comparison. The Steel Cage is 130-135lbs installed added to the car, the exact same dimension cage in Chrome Molly is 90-95lbs. That's 40 lbs. Not a HUGE amount, but its still weight, and if you don't worry about $$$, then the added cost of chrome molly is worth the weight savings. Know this though, that Chrome Molly is much harder to work with, the parts have to be cut perfectly and the tolerance for the type of welding have to be perfect. Steel is more forgiving and you can have more crude tools to fabricate and install it, if a gap is off... so what you can fill it. Chrome Molly should only be attempted by experienced welders with all the special notching equipment.
Use the current NASA or SCCA Tech rule books when selection your choice of cages:
http://www.nasaproracing.com/rules/ccr.pdf
http://www.scca.com/contentpage.aspx?content=44
Four Point Roll Bars - Bolt in & Weld In:
IO Port Racing: (http://www.ioportracing.com/Merchant...ory_Code=AP401)
Pfadt Racing: (http://www.pfadtracing.com/catalog/p...roducts_id/155 )
East Coast SuperCharging: (http://www.eastcoastsupercharging.com/Rollbars.html)
Wolfe Racecraft: Bolt in Roll Bar (http://www.wolferacecraft.com/Search...?CategoryID=60)
Wolfe Racecraft: Weld In Roll Bar (http://www.wolferacecraft.com/Search...?CategoryID=63)
RD Racing: Bolt in for Coupe \ Hard Top (http://www.r-dracing.com/stframe1.htm)
Autopower Industries: Bolt in (http://www.autopowerindustries.com/rollbars.asp)
Five Point Roll bars (or Four Point with door bar):
Pheonix Performance: (http://www.phoenixperformanceinc.com/race_shop.htm)
East Coast SuperCharging: (http://www.eastcoastsupercharging.com/Rollbars.html)
Wolfe Racecraft: Bolt in Roll Bar (http://www.wolferacecraft.com/Search...?CategoryID=61)
Wolfe Racecraft: Weld In Roll Bar (http://www.wolferacecraft.com/Search...?CategoryID=64)
Six Point Cages:
Pheonix Performance: The best know T1 specialist for C5 Vettes, they have a CF special deal listed here (http://forums.corvetteforum.com/auto...c5-and-c6.html) and their website is here (http://www.phoenixperformanceinc.com/race_shop.htm)
East Coast SuperCharging: (http://www.eastcoastsupercharging.com/Rollbars.html)
Wolfe Racecraft: Bolt in Roll Bar (http://www.wolferacecraft.com/Search...?CategoryID=62)
Wolfe Racecraft: Weld In Roll Bar (http://www.wolferacecraft.com/Search...?CategoryID=65)
Wolfe Racecraft: Weld in Full Cage (http://www.wolferacecraft.com/Search...?CategoryID=47) for the money dollar for dollar the Wolfe 6 point system is one of the most commonly used for the budget minded do it your selfer full cage set up. Its NHRA compliant, fits easy, and installation is relatively straightforward.
Autopower Industries: Bolt or Weld (http://www.autopowerindustries.com/rollcages.asp)
Eight Point Cages:
Pheonix Performance: The best know T1 specialist for C5 Vettes, they have a CF special deal listed here (http://forums.corvetteforum.com/auto...c5-and-c6.html) and their website is here (http://www.phoenixperformanceinc.com/race_shop.htm)
East Coast SuperCharging: (http://www.eastcoastsupercharging.com/Rollbars.html)
Custom Cages:
VetteSport: CF Thread (http://forums.corvetteforum.com/auto...completed.html)
DRM: CF Thread (http://forums.corvetteforum.com/auto...-pictures.html) and form their site (http://dougrippie.com/?page_id=121)
Roll Bar & Cage Padding:
Discovery Parts: (http://www.discoveryparts.com/cgi-bi...?product=hbars)
Rollbar Padding: (http://www.rollbarpadding.com/downlo..._durometer.pdf)
Pegasus Auto Racing Supply: (http://www.pegasusautoracing.com/pro...p?Product=2397)
Summit Racing: (http://www.summitracing.com/parts/SUM-590102/)
Save Drives: (http://www.safedrives.com/proddetail...=SFIPad&cat=72)
C5 Z06 Cage Install Thread: (http://forums.corvetteforum.com/auto...ress-pics.html)
Tow Hooks:
Pfadt Racing: (http://www.pfadtracing.com/catalog/i...hp/cPath/23_31)
Pheonix Performance: (http://www.phoenixperformanceinc.com...d&productId=11)
HPDE Car Insurance:
Most insurance companies do not cover racing, some do cover HPDE when it’s not timed and there are no winners / losers. Meaning if it’s a “Driver’s Education” event, you might be covered in the beginner groups. *** Assume you are not covered *** Some State Farm policies still cover it to my knowledge like this. You can buy HPDE track insurance at declared value. I saw a 3 day GT3 Porsche destroy the front end on Thunderbolt and get towed away with 253 miles on it. Covered 100% with track insurance. Find out all the conditions though, some do not cover blatant stupidity like running on full slicks in standing water, etc. Know what you buy before you try. A common one used is http://hpdeins.locktonaffinity.com and is the prefered provider for Porsche Club Events. You get a PCA discount, which more than covers the PCA annual member fees. ALSO Porsche Club is a great place to start learning about HPDE. They have an excellent Driver's Education Program, instructors abound, and 5 group skill levels to rise through. THe second most common car there is always a Corvette = C5 then C6.
Think your covered from your regular car insurance in HPDE as some people rumor because it is "not racing"?
My State Farm Policy I read, and here is the excerpt I found below on P.35 #19a&b:
19. ANY COVERED VEHICLE WHILE IT IS:
A) BEING PREPARED FOR, USED IN PRACTICE FOR, OR OPERATED IN ANY RACING CONTEST IN ANY RACING CONTEST, SPEED CONTEST, HILL-CLIMBING CONTEST, JUMPING CONTEST, OR ANY SIMILAR CONTEST, OR
B) ON A TRACK DESIGNED PRIMARILY FOR RACING OR HIGH SPEED DRIVING. This exclusion does not apply if the vehicle is being used in connection with an activity other than racing, high speed driving, or any type of competitive driving.
If you don't think you can damage your car at an AutoCross think again: (
Another CF user posted this peson who supposedly selling HPDE "Seasonal" insurance, or a policy which is good for multiple HPDE only events (not time trials or wheel to wheel):
Tom or Jeff Hall from Hall Insurance Associates, Inc
Ph: 336-765-1971 or 800-764-3456 Fax: 336-760-4149 tomhall@hall-insurance.com
401 Olive Street, Winston - Salem, NC 27103
National Corvette Museum (NCM) HPDE Insurance (Updated 09-09-2014)
"The National Corvette Museum and the NCM Insurance Agency are proud to introduce a new insurance offering for our customers. With the NCM Motorsports Park grand opening taking place over Labor Day weekend the NCM Insurance Agency has teamed up with longtime on track insurance provider, Lockton Affinity.
The NCM Insurance Agency is now able to offer On Track Physical Damage Coverage for the vehicles that you wish to use on most tracks across the country. We protect you where you need it most – the track. As you may know, finding the coverage you need to protect your car during HPDE events can be challenging. The vast majority of auto insurers have changed their policies to exclude coverage for these types of events. We know what you’re looking for when it comes to HPDE insurance, because we’re enthusiasts too. You’ll get the coverage you need to protect yourself during HPDE events – plus, it’s fast and easy and all online.
This insurance policy provides physical damage coverage for your automobile while you are participating in a High-Performance Driver's Education event. This physical damage coverage will begin when you enter the grounds of a race course and end when you leave the race course premises. Liability coverage is not included in this policy.
We offer a la carte, single-event policies that protect your vehicle while you are participating in an HPDE event – a great solution if you participate in five events or less per year.
For enthusiasts more active in the hobby, we offer annual HPDE insurance policy options that provide coverage at a discounted rate for multiple events in a policy year. Four different options allow you to choose a package that matches your level of activity in HPDE events.
One great advantage of this program is if you are a student taking part in an HPDE then your car is also covered while an instructor is driving your vehicle. If you are sharing your car with a friend or relative then coverage is extended for one additional driver at no charge. We will just need to know their name during the application process.
This program is available exclusively at: http://www.ncminsurance.com/hpde."
About NCM Insurance Agency
NCM Insurance Agency one of the fastest growing collector car insurance agencies, focuses largely on providing collector car insurance for your Corvette or any other collector car. As part of the National Corvette Museum, our business is Corvettes but the NCM Insurance Agency insures any make or model that is considered a collector car. The National Corvette Museum is a non-profit, 501 (c)(3) foundation, located in Bowling Green, KY.
Note when buying track insurance: One event might be $249 for the event, BUT you can do a "10 pack" for a full season sometimes for about $800 - $1100 by car value (this estiamte for a declared value of about 35-40k). It might seem crazy for 250-300 per event, but when you get the price closer to $80 per event... it doesnt sound so crazy does it? A friend in Porsche Club Recently (August 2009) rolled his track 993 with cage 3 times over sideways at Summit in WV. He had a 10 pack deal, and they paid him out. Don;t think the check comes fast or easy though, it takes about 3-6 weeks of wrangling. You can also sometimes buy your own car back as "scrap" for pennies on the dollar! This is great if you take the $$, buy another of the same car... and now can pull all your performance piece upgrades from the damage car to the new car WAY cheaper than buying them all again!
Final Note:
I hope this helps anyone reading it to avoid the pitfalls of Modding and $$ lost in broken parts, time researching what works and doesn’t, and hours of searching forums for correct answers. Also here are some build threads (send me your or others you know of) so you can see what goes into these..
C5Z06 - ST3 Build (http://forums.corvetteforum.com/auto...z06-build.html)
Suggested Order of MODS if you are completely new to the addiction:
1.) First HPDE = MUST change out all fluids if you haven't in a while. Make sure your diff, trans, coolant, oil and especially your brake fluid are fresh & good quality. Safety of you and your car come first. Buy a good lightweight helmet, cheap neck foam pad and seat belt shoulder pad for the first event.
2.) Spend your first 3-6 track days in a mostly stock car. Get seat time! See if this is for you! Seat time will determine everything else. Experience is far more important to go faster than mods. You want to be on crappy tires in the begining to teach you humility! Crappy tires give feedback (barking) and you will know well in advance of losing grip. R-comps will just hold or not hold. Not good for a new driver.
3.) Once you decided HPDE is for you: brake pads, brake lines, shifter, maybe a better seat & harnesss. Safety first. Contact patch items are the most important early out.
4.) Did I mention seat time and driving schools? Good time to get your 160 thermostat, cold air intake and better spark plugs and wires with Wire boots. The get the car ECU programmed if you haven't already. Might be a good time in invest in brake ducts as well. Keeping your track car cool is a great investment in longevity of the machine. Wrap the ball joints and tierod ends in some kind of heat shielding.
5.) Shifter Kit, Catch Can, Race Pedals, Tunnel Plate, Radiator Screen, Tensioner Pulley
6.) Now your ready! This is a big debate area, but unless you went from loser to god in 5 races, you really aren't going fast enough yet in a 20-30 min HPDE to over heat the engine. I would say bushings \ ball joints \ tie rods and then the rest of the suspension next (sways, links and coil overs) in a cool/moderate climate up north.. then a bigger radiator & external oil cooler followed by the trans and differential coolers after. In a HOT cliamte like Florida, So Cal, Arizona... you need to do this in the opposite order so you don't over cook your motor, trans and diff too fast costing big $$$.
7.) Now move up to a wider rim / better R comp tire (NOT SLICKS) once you are far to ofast to kepe the car on the track in street tires.
8.) All the rest of the bells and whisltes... headers & exhaust if you didn't already after buying it. Bigger rotors and better calipers. Add Down force with your increased horsepower. When it comes to the engine and drive train DEAD LAST after all the rest has been done. Never create more raw power than your current skill level needs or is able to handle. MEH = Money + Ego + HP = Crash.
One last note, if you read this thread, notice how many people say that the hardest thing to learn about this hobby is $$$ management! (http://forums.corvetteforum.com/auto...ad-racing.html) Meaning that it will cost you in time and $$ WAY WAY more than you think! The first track day is cheap. Pads and fluids. The second day isnt too bad either. Its track events 4 to the rest that will bankrupt you! See the resources section I added below for HPDE, Autocross, Driving Schools, Websites, Books, etc.
Books & How to Learn Driving Manuals: Amazon them, multi books = Discount too.
GOING FASTER! Mastering the Art of Race Driving (Paperback) - This is the BIBLE of HPDE instruction. It is a MUST read for the novice! You will learn more from this $20 book than any other $ for $ investment in your HPDE experience. Skip Barber - Going Faster (DVD) - OMG is this the cheeziest video ever! Companion to teh book. You can not substitue this for the book. Its a nice adjunct, and its a nice intro to a friend coming with you. You don't learn a whole lot from it though, and I am sad to say the first 2 times I watched it was before bed and fell asleep both times. Get the book instead. Speed Secrets: Professional Race Driving Techniques (Paperback) - This is a good book, but not the first one to buy. Speed Secrets II: More Professional Race Driving Techniques (Paperback) - The Sequel to the first book, read them in order or be lost here. Speed Secrets 3: (Inner) Mental Strategies to Maximize Your Racing Performance (Paperback) - Speed Secrets 4: Engineering the Driver (Paperback) - Speed Secrets 5: The Complete Driver (Paperback) - Speed Secrets 6: The Perfect Driver (Paperback) - Speed Secrets: Winning Autocross Techniques (Paperback) - Drive to Win: The Essential Guide to Race Driving (Paperback) - SCCA Solo (AutoCross) 2009 Rule Book - FREE in .pdf form here http://scca.com/documents/Solo_Rules...Solo_Rules.pdf
Solo Racer's Autocross Guide - Read here for Free http://soloracer.com/autoxguide.html
NCM First Timer's HPDE Guide - Downlaod the FREE word doc file here http://www.corvettemuseum.com/regist...irstTimers.doc
NCM Getting Your Car Ready for HPDE - Downlaod the FREE word doc file here http://www.corvettemuseum.com/regist...20a%20HPDE.doc
NCM Know Your Boiling Point - Downlaod the FREE word doc file here http://www.corvettemuseum.com/regist...ng%20Point.doc
The Racing & High-Performance Tire: Using Tires to Tune for Grip & Balance - The How to of How Tires affect your Perfoamce on the Track
http://www.amazon.com/exec/obidos/AS...964266-3329434
Competition Car Suspension: A practical handbook - How to of how suspension can be adjusted for faster lap times by Track
Tune to Win - Basic Overall Car performance Tuning of your Car
Race Car Vehicle Dynamics - The true "Geek Out" book of race car science and physics
Engineer to Win - Applies Materials Engineering and your Race Car
Driving Schools, Web Resources, AutoCross\SoloRacing & HDPE Groups:
Schools:
Bondurant: http://www.bondurant.com - The Corvette Experience here is a great place to train in C6 & Open Wheel Cars in Arizona outside Phoenix. They have everythign from one day basic programs to full on SCCA certified Driver's Licensing programs.
Skip Barber: http://www.skipbarber.com/ - Truly the father of all Racing Schools located in Connecticut. If you don't know this school by reputation then you gotta be new!
Exotics Racing: http://www.exoticsracing.com/ - Vettes to Lambos located in Vegas is more Novelty than training program. Gambling, Buffets, Strippers and driving however all in one spot. What's not to love?
Sports Car Driving Experience: http://www.sportscardrivingexperience.com/ - Teaches in C5 Corvettes in Florida
Spring Mountain Advanced Driving School - http://www.springmountainmotorsports.com/ - Driving school for Porsche, Corvette & Lotus Elise located in Vegas outskirts and ahs a decent reputation for good on track instruction program. Again did I mention Vegas?
Bertil Roos: Their program runs at several locations - NJMSP, Pocono & Virginia. Pocono is their home track location. The late great Frank Gonzales (we miss ya Frank) from the CF was one of their lead instructors until he passed in February 2010. Its a better value for open wheel car training than many other programs out there. http://www.racenow.com/home.htm
Website for Racing Events:
Motor Sports Registration: http://www.motorsportreg.com/ - YOU MUST JOIN HERE its a single source listing. Join here, see them ALL! Every region of the county! Both private and public clubs. Set up notifications for certain events and or tracks! It is a must for the hobby HPDE driver.
Sports Car Club of America (SCCA): Need I say more http://www.scca.com/home.aspx, go here for SCCA sponsored HPDE and AutoX Events and anything else for teh hobbiest. Its a good membership to ahve, and the SCCA has tons of AutoX events all over the country. AutoX is a good place to start prior to HPDE. If Autocross scares you. If Autocross has you out washing and waxing your car for fear of pebbles, then HPDE is not for you. HPDE will mess up your ride eventually.
RacingSchool.com:You can buy gift certs for friends, family, etc. My staff chipped in & got me a gift cert from here 2 Christmas's ago(http://www.racingschools.com/home.shtml) and this is also a great way to find out what TYPE of car you can drive at which school easier. Some offer Formula Mazda, some Miata, Some Corvettes, etc. and this site has a nice quick spot to look up a school by this car type search.
MyAutoEvents.com: A listing of all sorts of local events nationwide from off road to autocross http://www.myautoevents.com/
North American Motorsports Pages: A nice place to get all sorts of info on US events, rules, changes for events, etc. http://www.na-motorsports.com/index.html
Grass Roots Motorsports: is a really nice place to get tons of information on the do it yourselfer racer on a limited budget http://grassrootsmotorsports.com/art...orner-weights/
Trackpedia: http://www.trackpedia.com/wiki/Main_Pagethis is a GREAT site! You can look up any individual track and get GPS cross streets etc to find the place, aerial maps, course walk throughs, lap times for several different car types, etc. Before you hit a NEW track, hit here first, then Youtube to see a in car video.
HPDE Groups:
Car and Driver's Article on America's Best Road Courses: (http://www.caranddriver.com/features...ourses-feature)
Track Time for Cars: 6-7 runs in a day! 3 Skill groups. Well organized, but cancels often if poor registration. Very little use of instructors often and teaches in a quick clasroom with single instructor lead follow. Not a good first timer group, but a great group after you have the basic down for TONs of well organized & relatively safe seat time. VERY well priced. Most time you will get in an HPDE per day minute:dollar ratio. I often hit this group with the entire crew at East Coast Superchargers since ECS is a hop skip drive from the NJMP track where they hold 1/3 of their events. Consequently its is a VERY vette friendly group, with C5/C6 making up the largest vehicle type by far in their group.
Porsche Club of America: I recommend highly this group for your FIRST HPDE event. Vette friendly & 0 skill necessary. You can enter this group a scared newbie and leave after a weekend with good basic skills and some well earned confidence. Great classroom time & a excellent value for the $$ spent. Very safe group. Check Locally and on MotorSportsReg for events listed of all the clubs nationwide. You need to have a Porsche to join this group, an active VIN to be a member. It does open to non-PCA members a few weeks out of an event but the first 2 run groups (green & blue) often fill up FAST and rarely do non-PCA members get into these groups. I personally run in the RTR - Riesent�ter Region and its a great friendly group of guys & ladies.
NASA: Good group, instructors abound. HPDE is sane & safe, but their open events allow bumping cars.
BMW Club: not all regions are vette friendly. Some only allow BMWs. Check Locally and on MotorSportsReg for events.
Nation Corvette Museum (NCM) - I do not recommend this group. I know I will take heat for this post, but its true. First its all Vettes. Many of these Vette owners are keeping their cars under covers during registration. DO I need to go on? It rained at the event at NJMP at LIghtning I went to in 2009, they almost canceled the event for a drizzle at 8:00am! Not a down pour! The track officials were ready to open up the event, and Rock (organizer of SPecial events) was afraid to let people out. Not even an optional, and they scared the crap outa people. We eventually did a "skid pad" in the aprking lot. Vettes lined up. The first car went in a white coupe, came out a goey mess of mud, oil and vulcanized rubber. All the cars on line left. The drivers were not courtesous when we FINALLY got out, no one watched their mirrors for crap. No passing except in one spot. THe beginer group was a nightmare, slow speed, bumper to bumper train of cars which means you don't learn anything. It was easier in teh Intermediate group, but all newbies need to run the beginer group one time to get signed off on skill level. People spent more time looking at their cars than driving them. AND its the most expensive HDPE group $/Minute of track time there is. I heard the VIR event in 2009 was a great event, but if you are on a budget, this is not a great group to go out in or learn in. My 2 cents. I would think twice myself before going and risking another day & my $$$ sitting around because of a drizzle.
Hooked on Driving - This is a well run group, but you get little car time on the track for the huge fee the charge to run an event. Personally I am going broke on this hobby, and I always figure out when I register for groups: Total Minutes on Track / Cost of entry fee = Minute : Dollar ration. Good groups are about 1:1 like TrackTime for Cars. This group can be several bucks per minute of drive time just like NCM. However, if you are just doing a single one time event HPDE to try out the "expereince" of it in a totally stock car with no desire to make this a hobby, this is a good one time event for you.
[B]10 10ths Motorsports: a group who's goal it is to put 3 - 4 hours per skill group of actual track time per event. More track time, less sitting is their motto. Have not been to one of their events yet, but a friend was and said it was a good efficient group. Cost per day about $225 - $300 by track.
PDA Driving School I have not gone to this group, but I hear its well run and you get a large amount of track time in the Advnaced run days. NJ MotorSports Park and Pocono only right now. Cost is about $250 - $300 per day which is kinda expensive, but on the advnaced only run days you get a good 4 hours of track time, so this isn't a bad group for advanced drivers. New drivers would be better served in a PCA event for $ to minutes on the track.
MVP Track Time: runs all over the country. Has a nice reputation for being fun, with a nice mix of safety but not overly oppressive with it either.
AutoCross & Solo Groups:
Sports Car Club of America (SCCA): Here is a very comprehensive list of SCCA sponsored Solo Racing events
GoAutoCross.com: This is a nice website that tracks local Autocross events, currently only set up for NE US events.
Last edited by Zenak; 09-11-2014 at 04:56 PM.
The following 5 users liked this post by Zenak:
06nine (08-01-2017),
AngryJ (08-27-2021),
Highway 61 (07-23-2018),
NoradIV (08-15-2018),
TiptronicSoldier (02-05-2021)
08-21-2009, 08:57 PM
#8
Team Owner

Member Since: Sep 2003
Location: Raleigh / Rolesville NC
Posts: 43,084
Likes: 0
Received 24 Likes
on
24 Posts

Good write up.
One minor and two major recommendations:
Minor, Dont get LEATHER seats. Leather seats are for car shows. That cloth on a race seat is Nomex or a fire resistant fabric. leather is too hot, too slippery and does burn in fires.
Major recomondations
1: Seat time and more set time is more important then HP
2: Order of modifications;
a. Contact patches = brake pads, brake fluids and cooling, tires, seat, harness system.
 08-21-2009, 09:10 PM
#11
it is interesting you don't mention engine, trans and diff coolers. if I had to do it again, i would do those as the first mods after safety equipment is taken care of.
Last edited by longdaddy; 08-21-2009 at 09:44 PM.
08-21-2009, 09:33 PM
#12
Drifting

 Very nice write-up!
When I started reading your post, there were 0 replies.
By the time I finished, there were 10 !!
Thanks for the helpful info.
BTW, can I just let you be my mechanic ?
 08-21-2009, 10:04 PM
#13
Safety Car

Wish I would have know about the FI thing before I bought mine with the Procharger. Belt slip was the best thing that ever happened to me. Once I got that fixed - KABOOM!!!
08-21-2009, 10:37 PM
#14
Le Mans Master


Member Since: Dec 2006
Location: Phoenix Arizona
Posts: 7,251
Likes: 0
Received 14 Likes
on
14 Posts

Good write up.
One minor and two major recommendations:
Minor, Dont get LEATHER seats. Leather seats are for car shows. That cloth on a race seat is Nomex or a fire resistant fabric. leather is too hot, too slippery and does burn in fires.
Major recomondations
1: Seat time and more set time is more important then HP
2: Order of modifications;
a. Contact patches = brake pads, brake fluids and cooling, tires, seat, harness system.
One minor and two major recommendations:
Minor, Dont get LEATHER seats. Leather seats are for car shows. That cloth on a race seat is Nomex or a fire resistant fabric. leather is too hot, too slippery and does burn in fires.
Major recomondations
1: Seat time and more set time is more important then HP
2: Order of modifications;
a. Contact patches = brake pads, brake fluids and cooling, tires, seat, harness system.

good write up!
 08-21-2009, 11:48 PM
#15
Drifting

Wow, I almost want to send you a check for all the time, money and headaches you probably have saved me with this write up.
Good advice and thanks for spending all that time to help the rest of us! Much appreciated.
Good advice and thanks for spending all that time to help the rest of us! Much appreciated.
Last edited by Exotica; 08-22-2009 at 12:01 AM.
08-22-2009, 12:29 AM
#16
Great write up!
Thanks for taking the time to do that!
I just wanted to note that I called state farm back in '99-2001 to see if I would be covered, I was told I was covered as long as it wasn't racing or a timed event but they would drop me afterwards if I totaled my car.
Last week I called to re-visit as its been a very long time (and I have a much more expensive car) and the agent called the claims department to verify I would be covered.
It turns out they do not cover track events even though its not racing or timed.
08-22-2009, 01:31 AM
#17
a gentleman at Pacific ProFormance day this summer mentioned that State Farm now has a policy to cover DE events.
Great write up!
Thanks for taking the time to do that!
I just wanted to note that I called state farm back in '99-2001 to see if I would be covered, I was told I was covered as long as it wasn't racing or a timed event but they would drop me afterwards if I totaled my car.
Last week I called to re-visit as its been a very long time (and I have a much more expensive car) and the agent called the claims department to verify I would be covered.
It turns out they do not cover track events even though its not racing or timed.
Thanks for taking the time to do that!
I just wanted to note that I called state farm back in '99-2001 to see if I would be covered, I was told I was covered as long as it wasn't racing or a timed event but they would drop me afterwards if I totaled my car.
Last week I called to re-visit as its been a very long time (and I have a much more expensive car) and the agent called the claims department to verify I would be covered.
It turns out they do not cover track events even though its not racing or timed.
08-22-2009, 08:21 AM
#19
Race Director

A lot of people will benefit from your write up, thanks. Regarding the GT3 at thunderbolt, I was there too, running in red have we met?
Last edited by GeorgeZNJ; 08-22-2009 at 11:48 AM.


