
DIY alignment?
 11-22-2018, 04:07 PM
#1
Race Director

Thread Starter

anyone here do there own alignment (without a full alignment rack)? Have been frustrated with finding a competent alignment shop in my area and am thinking about buying a few slide plates, longacre camber caster gauges and whatever else I need and giving it a shot...
��looking for wisdom and thoughts and experience.. thanks!
��looking for wisdom and thoughts and experience.. thanks!
 11-22-2018, 04:18 PM
#2
Instructor


Yep, only 20 bucks in material, made my own lower control arm lock plates too, takes an hour or so with strings and jack stands and a ruler, the lower arms sit on wood blocks that have teflon between them so they slide to settle the suspension. I can get more detailed pictures Sunday.
11-22-2018, 04:54 PM
#3
Track Junky
Run a search for some old David Farmer posts. You can do it with a digital level, straight edge across the rim/tire, and tape measure without strings or taking the wheels off. Did it this way for a few years and can get toe to within 1/64� and camber within 0.1*
Last edited by taken19; 11-22-2018 at 04:54 PM.
11-22-2018, 05:21 PM
#4
Instructor
The blocks are cut to set the hub at the same height as when the car is on its tires, this made it easy to make adjustments and checks quicker as opposed to using the plates that go across the tire. I have two 1x2's with nails to locate the stings that sit on the jack stands in front and in the rear of the car. When aligning the front, I put a few plastic bags under the rear tires, and use points on the frame to base the string distance from the car to keep them parallel and square. Use a digital angle gauge for checking camber and calculating caster.
Funny thing is there are a number of good shops around, but spare time and I don't get to meet that often.
Funny thing is there are a number of good shops around, but spare time and I don't get to meet that often.
 11-22-2018, 08:37 PM
#6


anyone here do there own alignment (without a full alignment rack)? Have been frustrated with finding a competent alignment shop in my area and am thinking about buying a few slide plates, longacre camber caster gauges and whatever else I need and giving it a shot...
‘’looking for wisdom and thoughts and experience.. thanks!
‘’looking for wisdom and thoughts and experience.. thanks!
In this post I show what I came up with using lasers. This was for someone else asking similar questions. Total time to take toe measurements is less than 10 minutes, as for time to make adjustments varies on what you are trying to do.
https://www.corvetteforum.com/forums...t-at-home.html
Last edited by cagotzmann; 11-22-2018 at 08:38 PM.
11-22-2018, 11:00 PM
#7
Race Director

very basic guide to measuring everything, more or less the way I've done alignments for 20 years. It's all easy to adjust on most corvettes once you have some practice.
https://www.dropbox.com/s/680iom3g7m...align.pdf?dl=0
https://www.dropbox.com/s/680iom3g7m...align.pdf?dl=0
11-23-2018, 10:54 PM
#9
Racer

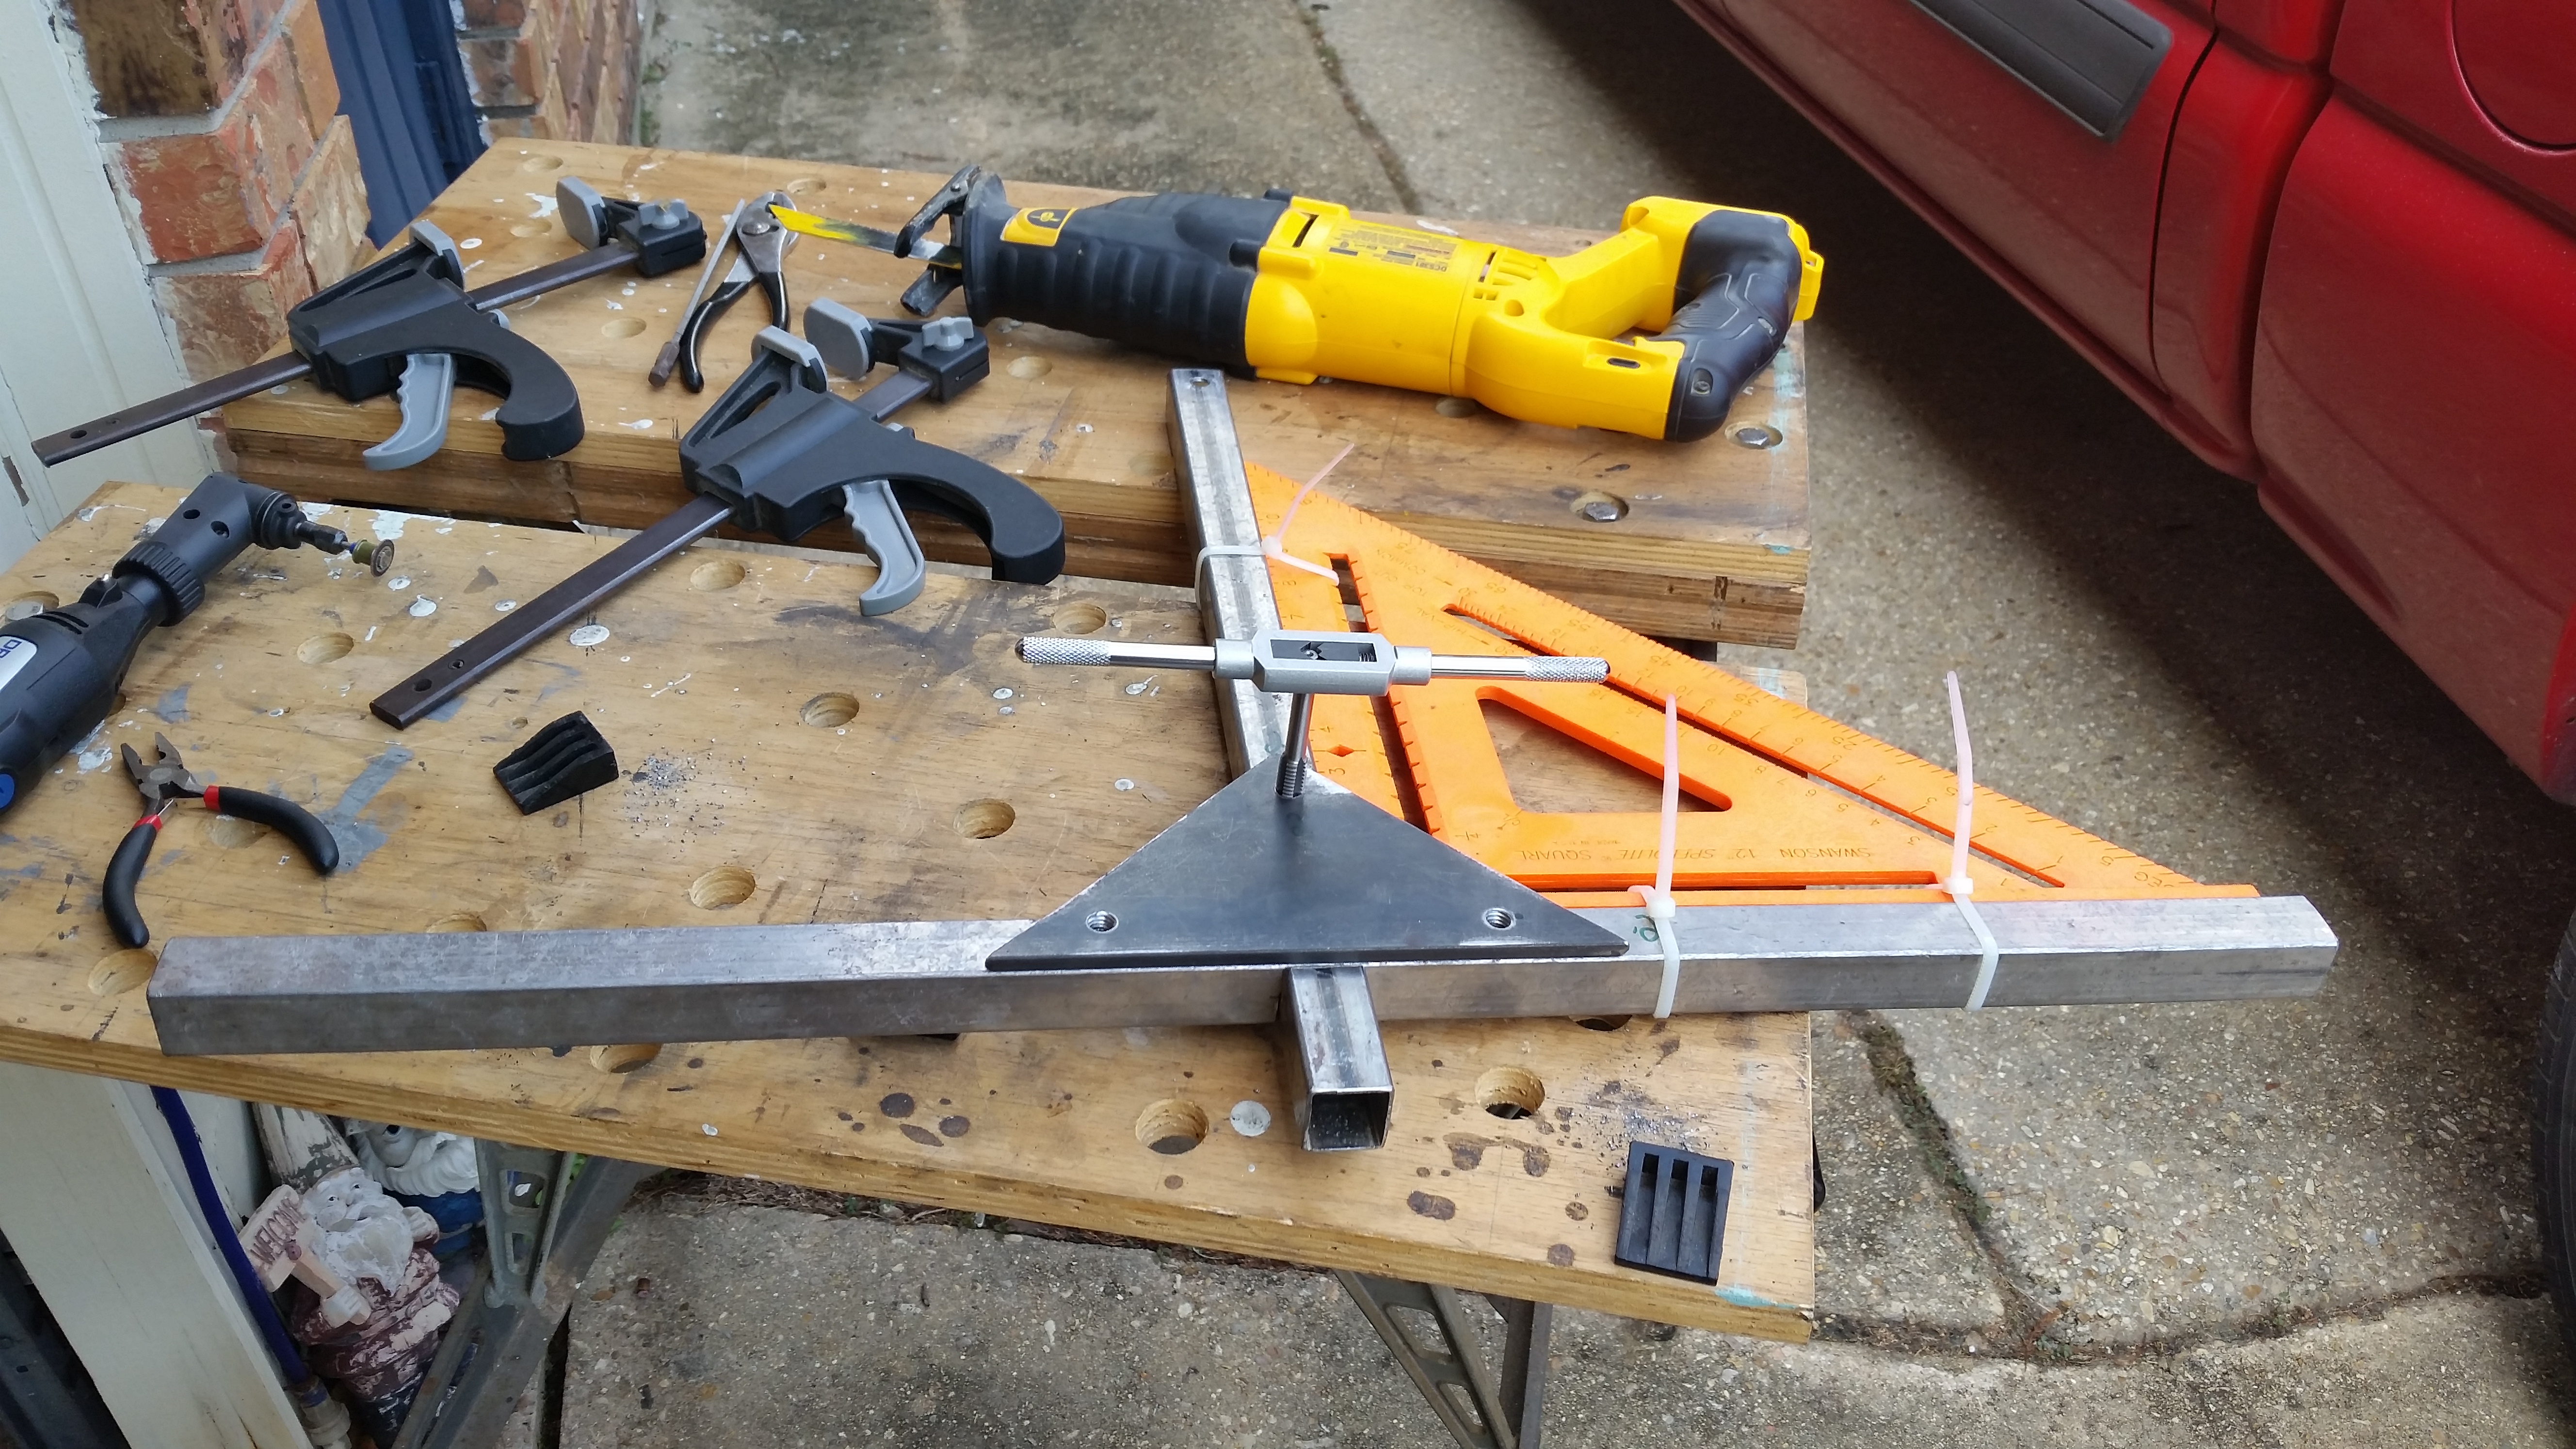
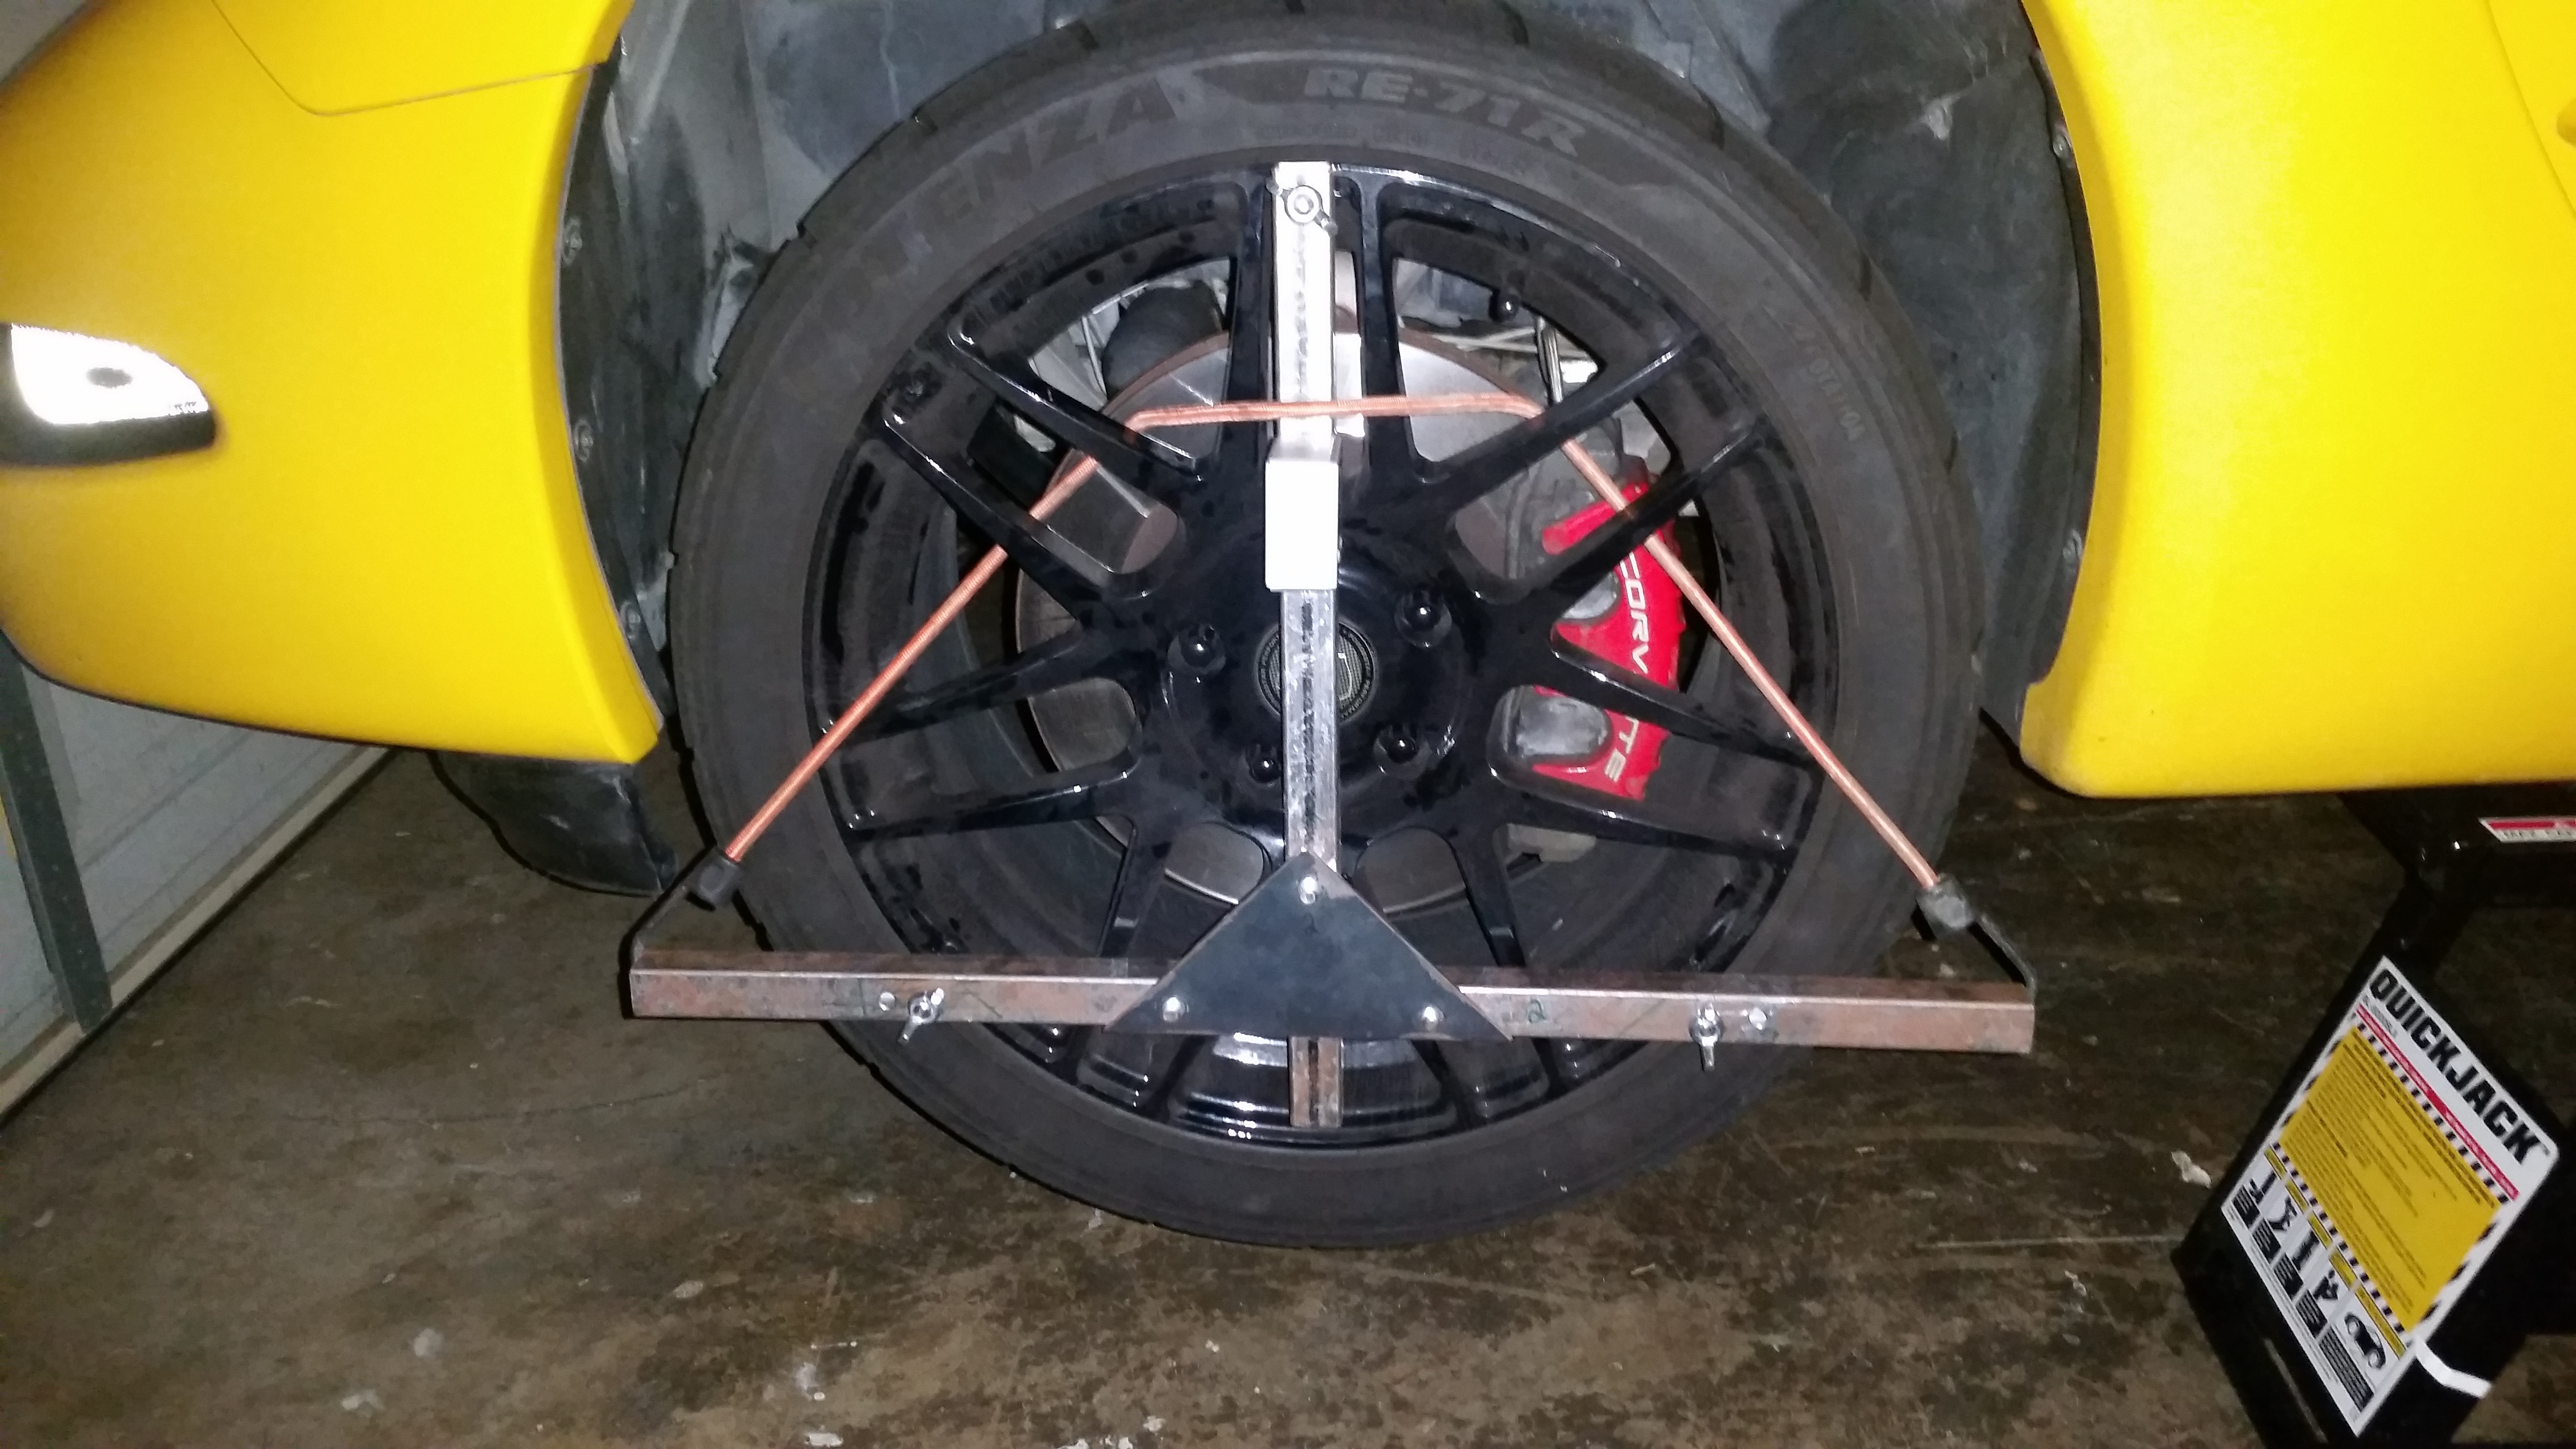
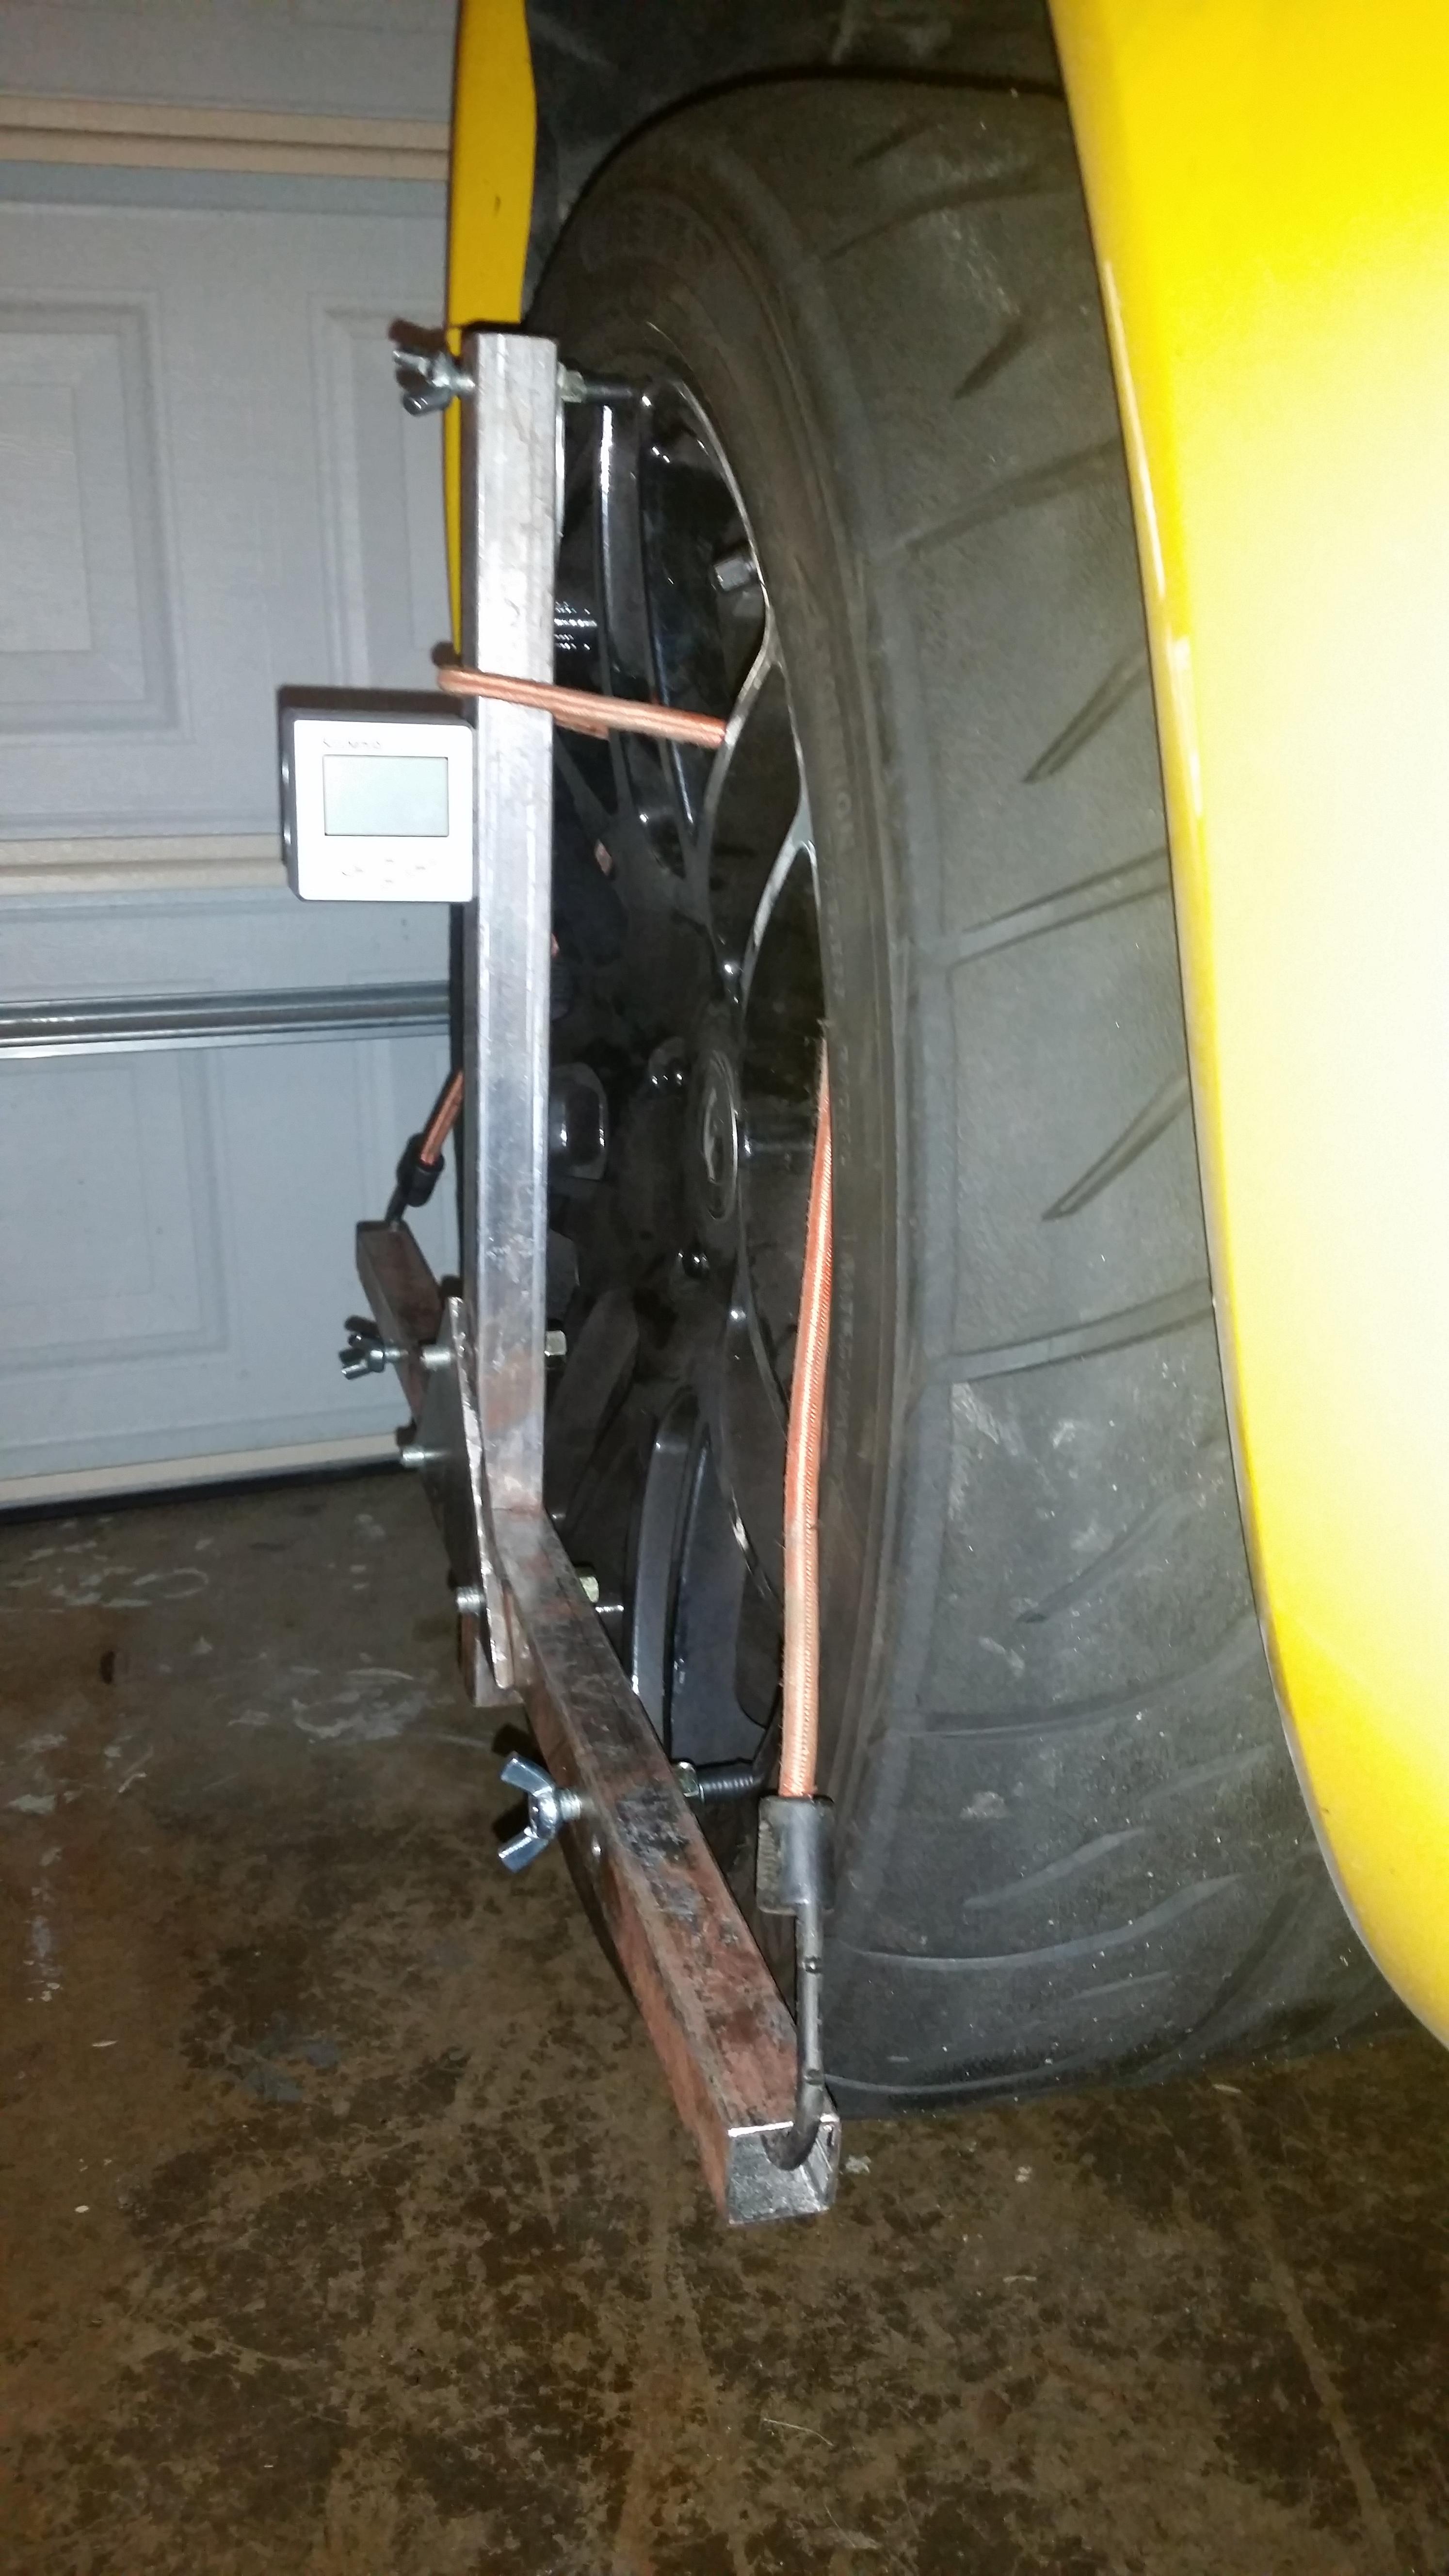
I build my own camber gauges that measure camber, caster and toe.
Before I use it I check the levels of the threaded ends, and then run string to check that the front is parallel with the rear. My toe is always to zero, so I don't dive too deep into adjusting toe other than to get it to zero.
I basically run max camber from the stock bolts, so I just want to make sure that the left and right side are about the same. All depends how flat your floor is (using the digital angle gauge I have).
Last edited by Acid666; 11-23-2018 at 10:55 PM.
12-10-2018, 03:47 PM
#12
Race Director
Yep, only 20 bucks in material, made my own lower control arm lock plates too, takes an hour or so with strings and jack stands and a ruler, the lower arms sit on wood blocks that have teflon between them so they slide to settle the suspension. I can get more detailed pictures Sunday.
Cannot see what is between the wood blocks & lca???
Froggy.
Just the slidy stands, I use smart camber & strings & ok with those. Ones they sell cost a grand.

Last edited by froggy47; 12-10-2018 at 03:48 PM.
12-10-2018, 06:43 PM
#13
20� = 1.5
15� = 2.0
10� = 3.0
Farmer was instructing to turn the steering wheel a 1/2 turn and never says how much to turn the actual wheel. So this method has some gaps to fill in.
When you measure caster you need to make sure each wheel is the same angle, so example lets say you set the left wheel 15 degrees, the right wheel will not be 15 degrees. So when you want to measure the right wheel you again need to take the measurement at the wheel you are measuring.
12-10-2018, 06:53 PM
#14
Can I (we) get more detail on this. What slows me up (the way I do now) is with wheels on, dropping the car to load susp. This looks like what I MUST do to start my c6z alignment, please.
Cannot see what is between the wood blocks & lca???
Froggy.
Just the slidy stands, I use smart camber & strings & ok with those. Ones they sell cost a grand.
Cannot see what is between the wood blocks & lca???
Froggy.
Just the slidy stands, I use smart camber & strings & ok with those. Ones they sell cost a grand.
12-10-2018, 08:42 PM
#15
Instructor
Making adjustments without a lift is a real pain to the bottom adjusters with the wheels on, but with the wheels off, you can adjust and check very quickly. I use shims on the upper arms, but this works great both ways.
Forgive the crude design, I made this as a I wonder if this will work kinda project. The block height is set so the hub center is the same as when the wheels are on the ground. Use plastic bags under the rear wheels. Have two of these, do the front end first then the rear. Added the side retainer 1x2 to help keep the car from sliding off, it's very slick on the teflon when you put a few drops of motor oil on them. They are just cut down cutting boards.
Forgive the crude design, I made this as a I wonder if this will work kinda project. The block height is set so the hub center is the same as when the wheels are on the ground. Use plastic bags under the rear wheels. Have two of these, do the front end first then the rear. Added the side retainer 1x2 to help keep the car from sliding off, it's very slick on the teflon when you put a few drops of motor oil on them. They are just cut down cutting boards.


 12-10-2018, 09:15 PM
#17
Tech Contributor
Member Since: Jun 2004
Location: I tend to be leery of any guy who doesn't own a chainsaw or a handgun.
Posts: 18,360
Received 769 Likes
on
551 Posts

Along with the usual geometry measurements, I'm curious if anyone has a quick, low cost way to measure the Ackermann steering level (the specialty turntables are not in my budget, so probably I would just go the greased tiles route). The measuring concept is obviously pretty simple, but the actual setup to do it looks to be a bit more involved/cumbersome. Just curious if anyone has any bits of wisdom/experience here.
Thanks for any constructive info here.
Thanks for any constructive info here.
12-11-2018, 09:38 PM
#18
Making adjustments without a lift is a real pain to the bottom adjusters with the wheels on, but with the wheels off, you can adjust and check very quickly. I use shims on the upper arms, but this works great both ways.
Forgive the crude design, I made this as a I wonder if this will work kinda project. The block height is set so the hub center is the same as when the wheels are on the ground. Use plastic bags under the rear wheels. Have two of these, do the front end first then the rear. Added the side retainer 1x2 to help keep the car from sliding off, it's very slick on the teflon when you put a few drops of motor oil on them. They are just cut down cutting boards.
Forgive the crude design, I made this as a I wonder if this will work kinda project. The block height is set so the hub center is the same as when the wheels are on the ground. Use plastic bags under the rear wheels. Have two of these, do the front end first then the rear. Added the side retainer 1x2 to help keep the car from sliding off, it's very slick on the teflon when you put a few drops of motor oil on them. They are just cut down cutting boards.

Here is what it looks like doing toe adjustments.

Last edited by cagotzmann; 12-11-2018 at 09:41 PM.