When you click on links to various merchants on this site and make a purchase, this can result in this site earning a commission. Affiliate programs and affiliations include, but are not limited to, the eBay Partner Network.
I LOVE how they did the exhaust. Exactly what I had in mind.
My issue is making a relatively drone free setup with a semi functional rear diffuser. Doing the above alomost eliminates running mufflers under the trunk.
These guys seem like they might have one that could be adapted to a C5 or c6. And they are priced really well. I thought the one for the lotus might workout. I have side dumps on my car with just some small magnaflow round mufflers. Sounds great and not too loud. www.difflow.com
I went to the website and watched the video they had showcasing the Lotus setup. They make a comment about the strings at the trunk lid are facing down noting that there is no turbulence behind the car since the diffuer is installed (and working properly). I would have liked to see the same video clip without the diffuser and watching the trunk lid mounted strings.
IMO $600 seems steep for "hoping" a setup can be adapted to a C5 when using some cardboard as templates then making them from thin aluminum or alumalite could be cheaper and fit properly.
This is a good thread. Gives me some good ideas.
Last edited by smitty2919; Mar 6, 2019 at 01:16 PM.
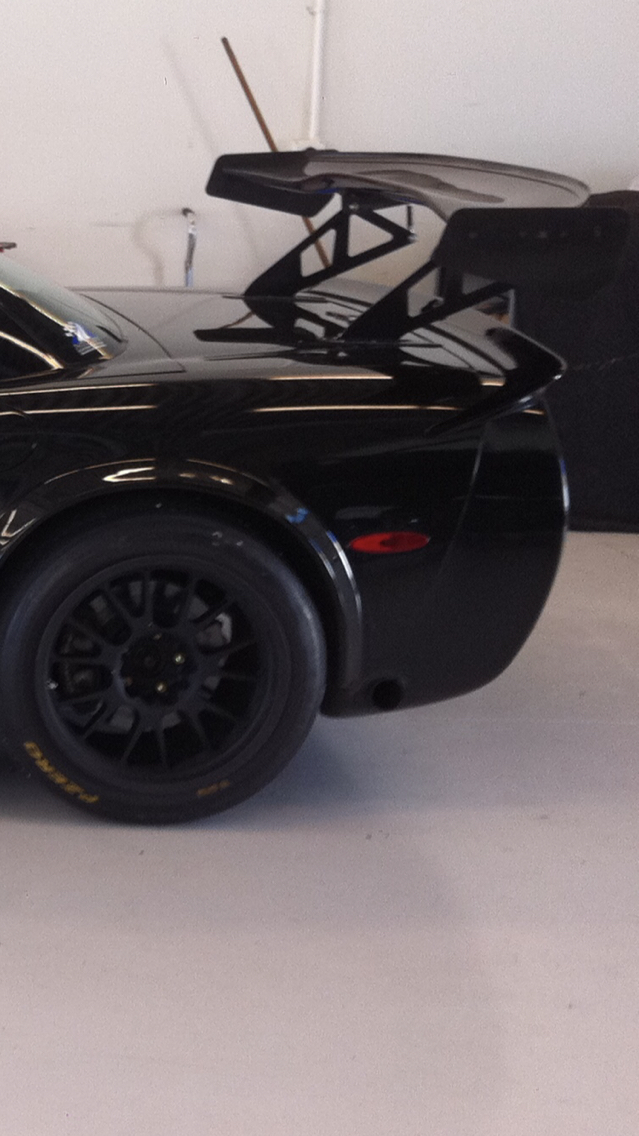
Yes I would get some good measurements out of them before I purchased it for my car but these seemly small DIY projects can get costly also and compared to other functional diffusers I've seen the 600.00 is reasonable. I made these aluminum surrounds for the bumper cover thinking the pipes would melt it, but it really didn't effect the plastic at all.
Doing the bumper side exit or the exit through the diffuser is what I like...however since it's still a street car, the potential drone/cabin noise from running smaller mufflers required to use a diffuer is what has me hesitant.
Plus I'm an exhaust ****...I have made/changed WAY too many exhaust setups either out of boredom or not liking the sound than I care to admit LOL. So a "permanent" setup like bumper side exit may not be in my best interest.
They make a bolt on version for the C7...I don't see why they couldn't make one for the C5 (may require drilling holes in the rear cradle and or perimeter of the bumper cover but that's not too invasive and easily undone/hidden if you remove it).
Last edited by smitty2919; Mar 6, 2019 at 02:41 PM.
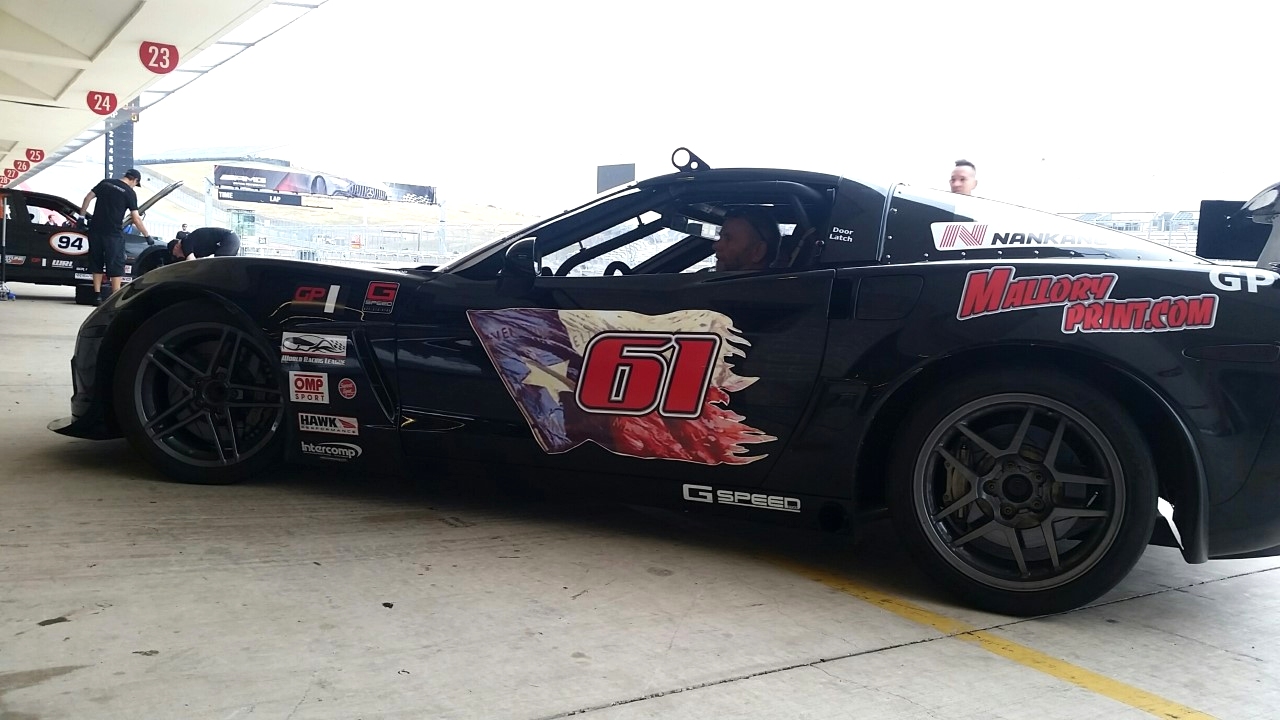
what about side exit. car i rented had it. you can just see it in front of rears. would be curious to see under car routing.
seems like it would eliminate nearly all heat and packaging issues.
Last edited by STANG KILLA SS; Mar 13, 2019 at 11:12 PM.
Side exit is better, because of the flat bottom on the vette if the floor and trans tunnel isn’t cut it will disturb a lot of the air under the car. Heat is a big problem , as shown above.
what about side exit. car i rented had it. you can just see it in front of rears. would be curious to see under car routing.
seems like it would eliminate nearly all heat and packaging issues.
WOW I had to to use 100% brightness and 100% contrast to see it. Looks like it may take a sharp bend forward (at the point a midpipe/catback may bolt together) then exit through rocker panel. Being a full blown race car, they may be able to do some more hacking. Not to mention this pipe will be floating around the gas tanks....so maybe this car has fuel cell?
I suspect the x pipe merge will be pretty far up stream to be able to run some sort of mufflers and then run this side exit setup.
Last edited by smitty2919; Mar 14, 2019 at 12:20 PM.
yeah it was bad on mine too. it was the best pic i had sadly. i did add 5% brightness and 10% contrast to it to help. also the only pic i had that showed the pipe underneath coming to the outlet "backwards"
yes it had rear mounted fuel cell between the chassis rails. i assume the factory tanks are gone. Attachment 48349017
Last edited by STANG KILLA SS; Mar 14, 2019 at 02:50 PM.
Thanks to you guys I can't get this idea out of my head...I spent about 8 hours of my 10hr OSHA training glass going through google images and doodling in my notebook designing the diffuser and how it would mount.
Conclusions so far:
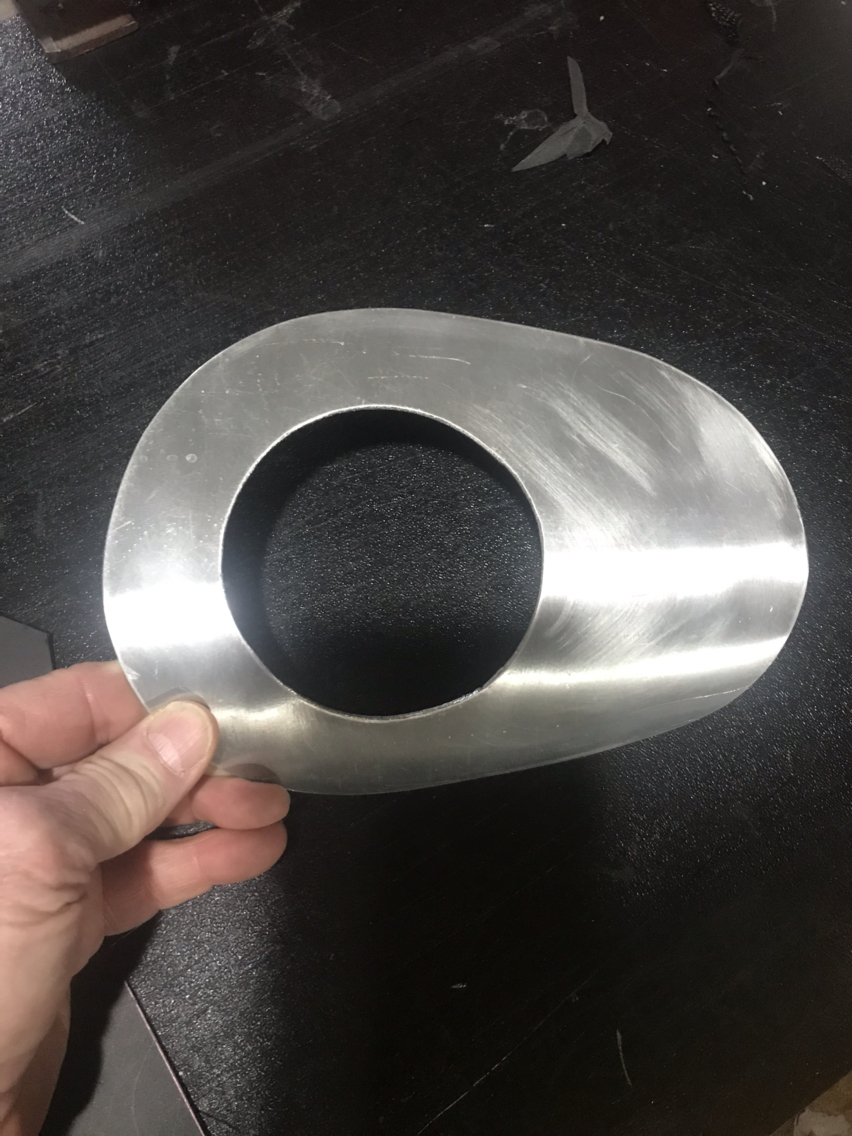
1) I sourced some .063" 3003 Aluminum (bends better than 6061) or 6061 4'x8' sheet for about $140 each (no idea how much I'll need until I make cardboard templates and start adding them together. ABS plastic is not really "cheap" and with aluminum I don't have to worry about something melting.
2) I got some 4'x5' sheets of carboard to start mocking up a template. I'm considering converting it to CAD (DXF file) and have someone laser cut them depending on the complexity of the large radii I may use for the center section to "bend upward" from the cradle to the raised cutout in the bumper where the tips usually sit. The vertical fins of the center section will have straight edges except the long side that follows this bend....quantifying that to put into CAD may be tricky. The "side sections" won't really "bend" upward due to car constraints...they will more or less be "flat" but angled slightly upward. The leading edge of the side sections (behind the tires) will have a vertical plate attaching to the fender liner/bumper cover to block off air from getting above the diffuser and keep dirt/debris from getting stuck on top.
3) The distance from the trunk heat shield to the bottom of the rear bumper cover is roughly 5.5". This means a ~4" MAX tall muffler could be used between the trunk and diffuser (unless you space the diffuser down from the bumper cover)
4) If eliminating all mufflers from the trunk area then you need to convert to a Borla XR-1 or Magnaflow Competition style system with mid mount mufflers. Some Vibrant/Magnaflow "Magnapack" style mufflers /resonoators could be used out back. Or custom make the system with a DI/DO midmount muffler.
5) The intent is to drill holes in the bottom lip of the bumper cover and use rivet nuts and or aluminum strip with rivent nuts around the perimeter. The center section will attach to the rear cradle using a simple 3/4x3/4" aluminum angle. Rivet nut the cradle, rivet nut the bottom face of angle iron with stainless screws.
6) For MY application, I want the diffuser to be "functional" as much as I can engineer it without any testing (I figure the rear of the car is a big parachute and anything can help....really just "logically winging it with engineering background". I want it aesthetically pleasing, not too gaudy or "out of place looking". So...I will keep it mostly within the perimeter of the rear bumper. Not sticking out 1+ foot like a lot of the highly functional diffusers do.
Open items:
Exhaust...exhaust ...exhaust. I have Stock manifolds, stock cats, custom made X pipe to a unknown "borla stinger" knockoff catback. I like the sound/volume/interior noise. Needs to remain civil for DD'ing and long trips. Right now the mufflers are 6" cans and protrude below the bumper cover.
Option 1 (cheapest): Cut the muffler body "flush" with the bumper cover and cap it with a flat plate. Do the same for the top and shift the muffler up gaining clearance. I can't imagine this increases the exhaust note THAT much by losing that much muffler packing space. Cut the tips off and use the blunt ends to poke through the diffuser, trim the blunt ends at the same angle as diffuser.
Option 2 (start over): Midmount muffler with integrated X, remake the over axle pipes and make something like the "borla straight pipe" setup snaking tight around the rear trunk area and straight out through diffuser. No idea how much drone will be present (I hate drone), so it would still be possible to add "Helmholtz resonator" branch pipes or "J pipes" as people call them where the exhaust would usually do a 180* bend under the trunk...need about 32" of pipe for that per side.
Decisions decisions...a lot of this approach is based on the picture I posted in Post# 59
Last edited by smitty2919; Mar 27, 2019 at 12:20 PM.
This is how I did it. FULL CF and Kevlar flat underbody from the splitter to rear diffuser with rear diffuser angle beginning at the rear axle and cradle region.
Flat underbody and rear diffuser FULL Flat underbody back to rear diffuser. Rear Diffuser from the back
Removable strakes with central strake covering trap door which exposes the rear cradle jacking point. Yellow stripe is a Kevlar hinge to allow for durable and smooth hinge for the diffuser angle. Removable trap door exposing jacking point.
Central diffuser strakes are removable with Dzus Fasteners to allow access to rear cradle jacking point.
I removed the rear of my exhaust and diverted it out the rear bumper. My diffuser is a bit too large and still needs to be trimmed a bit which inplan to do in the coming few days.
You made me realize something I missed....a place to jack the car up from. I'll have to plan some sort of access door like you did in the middle of the cradle. I USUALLY use the rear vertical edge to jack the car up....I suppose I could simply use the front lip.
Side note...have you run the car with the belly pan? Seems like it would trap A LOT of heat in the tunnel with the exhaust pipes. And I assume you are now a front breather with a ducted hood?
Last edited by smitty2919; Mar 27, 2019 at 05:33 PM.
If I'm understanding your plans, you want to bring the top of the diffuser up towards the bottom of the bumper?......is so, I honestly don't think it is necessary. I think that the diffuser will work fine even if there is a 4" to 8" gap between the bottom of the rear bumper cover and the top of the diffuser. This would allow you to save a lot on mufflers and exhaust mods plus allow the exhaust heat to vent out the back as it does stock.
If this diffuser is going to be used on the track, it is also easier to make it removable if the unit is a "flat" design that does not curve up with multiple attachment points to seal against the bumper cover. Diffusers work great, but to be functional the fins (strakes) have to be very close to the ground. You can make the fins a two piece design with a sacrificial wear material that will rub on the ground. Once on the track, if they never rub they are too high off the ground for maximum effectiveness IMO. Just trying to drive a car on the street with a functional diffuser is going to be scraping the fins like crazy.
If you are going to "flat bottom" your car as shown in the pics, the biggest challenge will then be transmission and diff temps and keeping them cool on the track (again, my opinion as my car is not flat bottomed).
I look forward to see what you come up with and following your build.
I will agree and disagree with some of what is said here. I have been designing my flat bottom for 9 months now and just now finishing the design and fab. I have looked at this problem from every possible angle.
First, if you leave a gap to allow exhaust placement there are ONLY 2 ways that can happen. #1 the diffuser is pushed closer to the ground and LOWER than the flat bottom of the car in which case air will blow above the diffuser and largely making the diffuser nonfunctional. That was shown in someone's design in another thread. #2 the diffuser angle will have to be very shallow to allow exhaust to remain and again largely negating the diffuser function. Trust me I have measured it. The Max angle of the diffuser is about 5 degrees with the exhaust in place. This is largely because the muffler exhaust near the cradle limits the elevation of the diffuser. Even if curved diffuser it will not be possible to go beyond about 5 degrees.
Second, the diffuser does NOT need to be close to rubbing on the ground to be effective. Just look at the Corvette GTLM car over the last several years where the rules did not allow diffuser strakes. They just used a flat angled diffuser with no strakes. This idea I believe is a fallacy and likely taken from the design of the Viper ACR because it has wear strips on the diffuser and is closer to the ground. The diffuser design simply needs to have a shallow angle and the strakes are there to limit disturbance of airflow causing turbulence largely from the tires. Turbulence lessens the effectiveness of the diffuser. The purpose of the diffuser is to turn maximize a low pressure zone under the car (sucking it to the ground) and slowing the air back down (raising pressure back to ambient pressure) as the surface area increases and air speed slows. This also usually has the effect of decreasing drag at the same time. It has been shown repeatedly that a flat bottom will benefit a diffuser far more than a non flat bottom. The diffuser is also largely assisted with pulling air out from under the car by the low pressure zone under a rear wing and why the wing and diffuser combo work better than the sum of their parts. With all the added rear down force the strakes may contact the ground and may scrape so that is why many race teams use Jabroc (?spelling) wood wear strips but it is not a requirement to work. The airflow that provides the down force is laminar flow at the underbody/diffuser junction not at the level of the ground so again no absolutely necessary to seal it off.
Last, I agree that I have created heat issues and why the car will not see the track for a few more weeks because I plan to upgrade my transmission and diff coolers. I also plan to install trans and diff temp gauges to monitor on track. Worst case scenario I take off pieces of the flat underbody which are all attached with Dzus fasteners.
I have given this mod countless hours of thought and planning. It is not for the faint at heart because every appropriate adaptation of aero principles will impact other aspects of the car and will need to be addressed. I believe I have done that and plan to prove that in several weeks on track.
You made me realize something I missed....a place to jack the car up from. I'll have to plan some sort of access door like you did in the middle of the cradle. I USUALLY use the rear vertical edge to jack the car up....I suppose I could simply use the front lip.
Side note...have you run the car with the belly pan? Seems like it would trap A LOT of heat in the tunnel with the exhaust pipes. And I assume you are now a front breather with a ducted hood?
Yes heat is the next issue to deal with as I mentioned above I will be installing much larger trans and diff coolers. I will also install temp gauges to make sure the larger coolers are enough too.
Designer Imagines A Corvette That Looks More Like a Corvette Than the Corvette
Slideshow: A Jaguar designer's personal project imagines what a modern front-engined Corvette might look like if Chevrolet revisited the golden age of the Stingray.


 Dayum!


