C1 seat cover installation
 03-16-2014, 08:49 PM
#1
Drifting


Thread Starter

I'm wrestling with installing the seat covers for the 58. I did the seats on my 60 a few years back and my hands hurt for weeks after....
I have the Al Knoch video and have watched it twice but I can not figure out how they are able to get the hog ring that attaches the cover to the frame through the seat foam and capture the wire underneath. I'm not talking about the edges of the cover but the flute strip that fits into the groove in the foam and attached to the wire part of the frame.
Ironically on the AL Knoch video they skip over this part when doing the seat bottom. They do show the assembler doing it for the back part of the seat and he seems to struggle a bit.
I remember fighting this on the seats for the 60 and I ended up using some heavy duty wire ties to secure the vinyl cover through the foam and around the wire that is attached to the frame. This worked very well and I know others have done it this way also.
For some silly reason I wanted to do it the "right" way this time using the hog rings, but there seems to be too much material to go through. Any tips will be appreciated.
Tom
 03-16-2014, 11:20 PM
#2

I'm wrestling with installing the seat covers for the 58. I did the seats on my 60 a few years back and my hands hurt for weeks after....
I have the Al Knoch video and have watched it twice but I can not figure out how they are able to get the hog ring that attaches the cover to the frame through the seat foam and capture the wire underneath. I'm not talking about the edges of the cover but the flute strip that fits into the groove in the foam and attached to the wire part of the frame.
Ironically on the AL Knoch video they skip over this part when doing the seat bottom. They do show the assembler doing it for the back part of the seat and he seems to struggle a bit.
I remember fighting this on the seats for the 60 and I ended up using some heavy duty wire ties to secure the vinyl cover through the foam and around the wire that is attached to the frame. This worked very well and I know others have done it this way also.
For some silly reason I wanted to do it the "right" way this time using the hog rings, but there seems to be too much material to go through. Any tips will be appreciated.
Tom
I have the Al Knoch video and have watched it twice but I can not figure out how they are able to get the hog ring that attaches the cover to the frame through the seat foam and capture the wire underneath. I'm not talking about the edges of the cover but the flute strip that fits into the groove in the foam and attached to the wire part of the frame.
Ironically on the AL Knoch video they skip over this part when doing the seat bottom. They do show the assembler doing it for the back part of the seat and he seems to struggle a bit.
I remember fighting this on the seats for the 60 and I ended up using some heavy duty wire ties to secure the vinyl cover through the foam and around the wire that is attached to the frame. This worked very well and I know others have done it this way also.
For some silly reason I wanted to do it the "right" way this time using the hog rings, but there seems to be too much material to go through. Any tips will be appreciated.
Tom
I to had a hard time getting the hog rings through the cover wire, foam and burlap to the anchor wire . I tried a pro set of hog ring pliers that are at a slight angle and hold the ring much better than the cheap ones we all purchase to do the job. I finally used long cable ties in the six spots where the hog rings would be, I used a set of long needle nose pliers to pull the cable ties up from the bottom and then back to the bottom after going over the wire in the cover. After pulling the cable ties down evenly to get the two wires close together then I installed the hog rings and cut the cable ties off. This job is still a tough install but can be done with a little push and shove.
Good luck
Billy
03-17-2014, 09:50 AM
#3
I say save the job for the pros.
I bought a set of new seat bottoms at Kissimmee from Al Knock for my 60. I originally had in mind to send the job out.
I watched all of the seat install videos from youtube, and Al Knock.
I took the seats out and looked at them and said, hey, I can do this job, that doesn't look bad, what's the big deal. I took the seats out, took pictures of how and where all the clips and hog rings were located, put the seats up on the kitchen table and went to work. NOT!
Well my arthritic hands and my hog ring pliers set out to do the job. One, my hands didn't have the strength to do the hog rings, and two my hands could not pull the material around the seats tight enough to put it in proper place. Just like some of the videos I used a heat gun to soften up the material to help pull the material in place.
I gave up, asked around as to who around was the guy to use and he was about 15 minutes from me. He has a shop that he runs out of his basement and garage. I brought the seats to him and he looked at them and said did you have a hard time with the install? I hung my head down in shame and said ahhhhhhhh ya.
He said around $50 bucks, I said for both. He said yup. I said take them.
He called the following week and said they were ready $52.00. For $52.00!!!!!
They were beautiful.
He said unless you put the covers under heat and a steamer they are impossible to get on properly.
03-17-2014, 10:38 AM
#4
Team Owner


I'd have to see some pics of a $52 install to determine the quality of the job but if you're happy then good enough. Al Knoch charged me $370 to do the complete install with new EVERYthing and the tech worked on both seats from 7:30am until 2:30pm with a short lunch break. I felt like I got a bargain and it would pass judging if I cared about that.
Last edited by Frankie the Fink; 03-17-2014 at 10:46 AM.
03-17-2014, 10:56 AM
#5
Safety Car

Member Since: Jan 2000
Location: Poway CA
Posts: 4,844
Received 1,295 Likes
on
560 Posts
2023 C1 of the Year Finalist - Unmodified
2022 C1 of the Year Finalist - Unmodified
2021 C1 of the Year Finalist - Unmodified
2019 C1 of Year Finalist (stock)
2016 C1 of Year Finalist

I also contemplated, then decided to "outsource" the seat foam/cover installation.
I found a local 1-man shop with a good reputation.
I brought him the covers and foam.. he repaired the frames and springs and installed everything for $200 (both seats).
Not NCRS, but I wanted it this way:
I found a local 1-man shop with a good reputation.
I brought him the covers and foam.. he repaired the frames and springs and installed everything for $200 (both seats).
Not NCRS, but I wanted it this way:
03-17-2014, 12:03 PM
#6
My $52.00 install was for bottom covers only. No springs, no foam, no burlap, just covers.
I should have taken pictures of the new seat bottom covers before I put the seats back in the car.
I should have taken pictures of the new seat bottom covers before I put the seats back in the car.
Last edited by stratplus; 03-17-2014 at 12:58 PM.
03-17-2014, 12:38 PM
#7
Team Owner
Not too shabby....
My Al Knoch price covered it all.
Convertible tops and seat covers - I farm out..not the least interested in learning a new skill at 63 that I might need one more time in my life (or not at all)...
My Al Knoch price covered it all.
Convertible tops and seat covers - I farm out..not the least interested in learning a new skill at 63 that I might need one more time in my life (or not at all)...
03-17-2014, 01:00 PM
#8
Drifting
Thread Starter
Tom
I to had a hard time getting the hog rings through the cover wire, foam and burlap to the anchor wire . I tried a pro set of hog ring pliers that are at a slight angle and hold the ring much better than the cheap ones we all purchase to do the job. I finally used long cable ties in the six spots where the hog rings would be, I used a set of long needle nose pliers to pull the cable ties up from the bottom and then back to the bottom after going over the wire in the cover. After pulling the cable ties down evenly to get the two wires close together then I installed the hog rings and cut the cable ties off. This job is still a tough install but can be done with a little push and shove.
Good luck
Billy
I'm one of those who will try anything once. The seats for the 60 came out pretty good but I told myself then that I would farm it out if I ever needed to do it again. Well that was a few year ago and I figured I'd give it another try. I totally disassembled the seats, cleaned / painted the frames, new springs, burlap, foam. All looks real good so far, including the nice "depression" in the seat.
Since everything was movin right along, I dove head long into putting the cover on and that is when I hit the brick wall and recalled myself saying "farm it out next time". Well I'm a bit on the stubborn side and I know I can beat this and do a nice job.
I'll try using the wire ties to pull the cover to the frame and then attach the hog ring. That is a good idea and I can see it working in my mind. We'll see how it works out on the bench......
Thanks
Tom
03-17-2014, 01:02 PM
#9
Drifting
Thread Starter
03-17-2014, 05:33 PM
#10
Drifting
I had my first set of seats done professionally by Futureline in Exton Pa. Then I decided to do a "driver only" set (the ones I keep in the car when I'm working on it or farm some work out to my mechanic). I did the "driver only" set by buying various used seat parts off of Ebay.
This is what I learned. Stay with one vendor to buy all of the foam, covers, burlap etc., there are differences and to mix and match is inviting trouble. And, when i was done doing them myself, I had exactly what I planned, a "driver set", not show quality, but a set I didn't mind getting dirty or possibly cut/scraped.
This is what I learned. Stay with one vendor to buy all of the foam, covers, burlap etc., there are differences and to mix and match is inviting trouble. And, when i was done doing them myself, I had exactly what I planned, a "driver set", not show quality, but a set I didn't mind getting dirty or possibly cut/scraped.
03-17-2014, 09:33 PM
#11
Drifting
Thread Starter
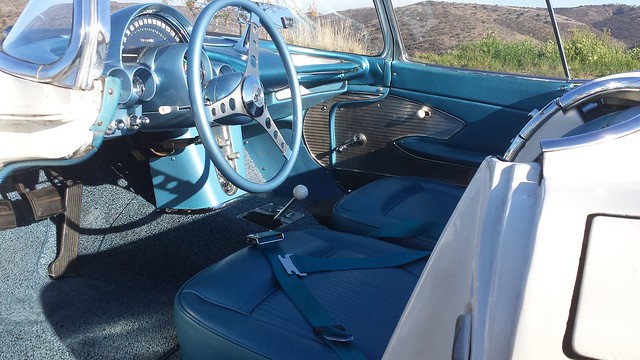
One down, three to go!
Pics were taken before smoothing out the wrinkles with a hair dryer. They look nice now. Any remaining wrinkles should come out on a nice sunny day.
Tom
Pics were taken before smoothing out the wrinkles with a hair dryer. They look nice now. Any remaining wrinkles should come out on a nice sunny day.
Tom
03-17-2014, 10:29 PM
#12
Safety Car
Member Since: Jan 2000
Location: Poway CA
Posts: 4,844
Received 1,295 Likes
on
560 Posts
2023 C1 of the Year Finalist - Unmodified
2022 C1 of the Year Finalist - Unmodified
2021 C1 of the Year Finalist - Unmodified
2019 C1 of Year Finalist (stock)
2016 C1 of Year Finalist
Look great - congrats!
03-17-2014, 10:50 PM
#13
Burning Brakes

Very nice
Mike
Mike

