Follow along as I add a custom frame, LS2 engine & 5-speed to a '65 vette!
 03-14-2007, 09:55 PM
#61
Racer

Thread Starter
Member Since: Jun 2004
Location: freehold NJ
Posts: 384
Likes: 0
Received 0 Likes
on
0 Posts

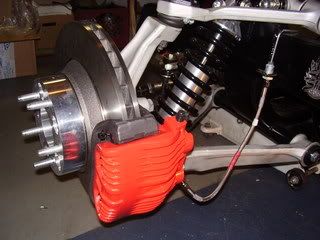
This past week I finished the front brakes then ran into a problem with the power steering lines. The Rack and pinion is from a Mustang (a Corvette rack was too long). So it had 3/8 and 5/16 fittings but the hoses from my new power steering pump were metric of course (16mm). So I had to cut the metal part of each tubing and buy compression nuts to couple the one metric end with the other, standard end.
Next I hooked up the engine harness. All questions were answered by John at Speartech (thanks John). Then I mounted the new computer on the drivers side of the firewall, near the fender. Next I started lowering the body to the frame. Slowly. When it was about 6 inches above the frame, I hooked up the electric fuel pump, starter solenoid and alternator. Hooked up battery to starter, grounded engine to frame and harness to engine. ,Tried turning the ignition key and "Wa-la": it turned over!
Now I'm excited and have to buy some gas and install the radiator and finish lowering the body the rest of the way and bolting it up - that's the plan for the week ahead.
Originally I was hoping to do this in 2 months. Of course it's now been 3 months but I'm nearly there!
http://mysite.verizon.net/coltmckinney/
 03-14-2007, 10:59 PM
#62

Your project is really going well and looks great. I am wondering if you will have to put thick body mounts between the body and the frame so the trans will clear?
You have really answered alot of questions I have had. Keep us posted.
Good job Jeff
You have really answered alot of questions I have had. Keep us posted.
Good job Jeff
 03-15-2007, 07:42 AM
#64
Racer
Thread Starter
Member Since: Jun 2004
Location: freehold NJ
Posts: 384
Likes: 0
Received 0 Likes
on
0 Posts
No, Keisler makes the 5-speed tranny so that it fits right in where the old one did with no mods. You can even put one in without lifting the body off your C2.
Colt
03-15-2007, 10:31 AM
#65
Burning Brakes

Member Since: Feb 1999
Location: Patagonia Arizona
Posts: 1,057
Likes: 0
Received 9 Likes
on
2 Posts

Colt, you are making great progress! Looks like you used Street & Perf accessory brackets, how did that work out? Did you look into doing the anti-lock brakes? What are you going to use for gauges. I'll bet the owner is excited to see it coming together!
Nick
Nick
03-16-2007, 07:37 AM
#66
Racer
Thread Starter
Member Since: Jun 2004
Location: freehold NJ
Posts: 384
Likes: 0
Received 0 Likes
on
0 Posts
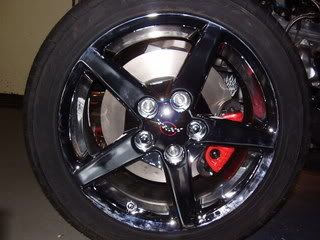
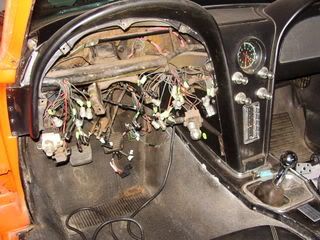
I haven't found much more about the anti-lock brakes. As for the guages, I bouth S&P adapters so I can use the old guages. All I have to do is send out the tach to be converted to electronic ($250). While it's out, the owner wants the whole guage cluster sent out for refurbish and change to 80lb oil pressure and higher tach face. So that will cost another $500 to have done.
Last night night I shimmed and bolted down all body mounts. Next I'm starting on hooking up steering and master cylinder and radiator then that's it!
03-24-2007, 07:30 AM
#67
Racer
Thread Starter
Member Since: Jun 2004
Location: freehold NJ
Posts: 384
Likes: 0
Received 0 Likes
on
0 Posts
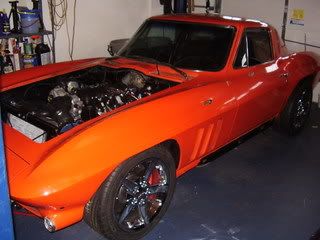
This week I installed the radiator, hoses, expansion tank, and steam line. I finished lowering and centering and shimming the body. It is all bolted on now. I turned the key and it started! What a thrill. But I only ran it for a couple of seconds since the exhast pipes are not yet hooked up. I've hooked up many guage wires to the engine.
I removed the entire guage cluster inside to send away to be revitalized with a converted electronic tach, 80lb oil pressure guage and will replace all the bulbs with slightly brighter bulbs.
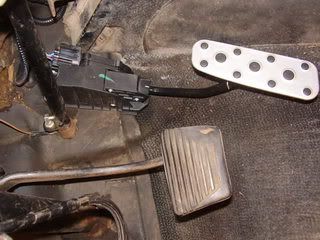
In the coming week, I'll install the master cylinder, electronic gas pedal and steering column to the new rack.
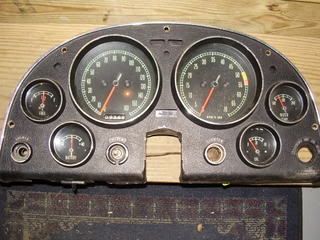
I removed the entire guage cluster inside to send away to be revitalized with a converted electronic tach, 80lb oil pressure guage and will replace all the bulbs with slightly brighter bulbs.
In the coming week, I'll install the master cylinder, electronic gas pedal and steering column to the new rack.
Last edited by 90ZR1; 03-24-2007 at 08:05 AM.
 04-01-2007, 07:23 PM
#69
Racer
Thread Starter
Member Since: Jun 2004
Location: freehold NJ
Posts: 384
Likes: 0
Received 0 Likes
on
0 Posts
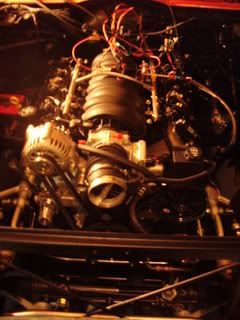
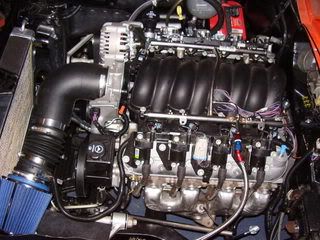
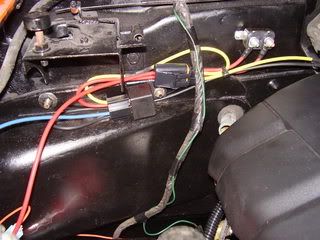
This week I put in the gas pedal, installed the radiator fan and then the fan relay, which is connected to the computer harness for on/off. As I heard would happen, I did have to trim a little of the right engine cover since the alternator was moved up and to that side. That wasn�t too difficult and sanded down well. In preparation of the cluster being returned, I removed all the old 3 watt gauge cluster bulbs and replaced them with 5 watt bulbs.
This car will be painted when I�m through with it, but for now, I applied touch-up paint to the few chips in the paint.
I have on order a heat shield for the air filter so it will draw mostly cold air from the big hole on the driver side of the radiator support.
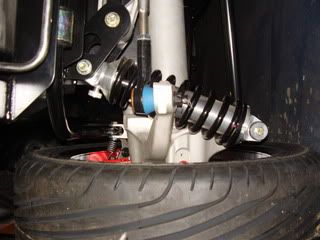
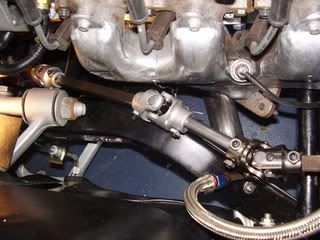
My biggest set-back of the week was the steering linkage, which I still don�t have fully worked out yet. It turns out it will require 3 u-joints which necessitates the need of a heim joint (or rod end) to hold it in place. In the picture you can see the linkage with the 3 u-joints. The heim joint is on order. I don�t want to install the master cylinder yet since that will make the steering linkage more difficult to get to. After that all I really have left is to put the car on top of my lift and connect the custom e-brake kit from below.
55gasser, looks like your project is next in line!
Colt
This car will be painted when I�m through with it, but for now, I applied touch-up paint to the few chips in the paint.
I have on order a heat shield for the air filter so it will draw mostly cold air from the big hole on the driver side of the radiator support.
My biggest set-back of the week was the steering linkage, which I still don�t have fully worked out yet. It turns out it will require 3 u-joints which necessitates the need of a heim joint (or rod end) to hold it in place. In the picture you can see the linkage with the 3 u-joints. The heim joint is on order. I don�t want to install the master cylinder yet since that will make the steering linkage more difficult to get to. After that all I really have left is to put the car on top of my lift and connect the custom e-brake kit from below.
55gasser, looks like your project is next in line!
Colt
04-02-2007, 04:07 AM
#70
Lepus-temperamentalus

Really beautiful work 90ZR1.
But reading the thread here has me wondering about a number of things.
I've been thinking about looking for a rusted out hulk to do pretty much the same thing. I can't afford a nice 67 427 so why not build one, says I?
But as I see the amount of money going into this one, where we're closing in on $40K (with the original car) plus a new interior. Then I start wondering about the value of the car.
While I'd like to build one like that, I wonder how much a pretty much home built car with a vintage body on it is worth? Doesn't that completely destroy any future value to the car?
04-03-2007, 07:54 PM
#71
Racer
Thread Starter
Member Since: Jun 2004
Location: freehold NJ
Posts: 384
Likes: 0
Received 0 Likes
on
0 Posts
Really beautiful work 90ZR1.
But reading the thread here has me wondering about a number of things.
I've been thinking about looking for a rusted out hulk to do pretty much the same thing. I can't afford a nice 67 427 so why not build one, says I?
But as I see the amount of money going into this one, where we're closing in on $40K (with the original car) plus a new interior. Then I start wondering about the value of the car.
While I'd like to build one like that, I wonder how much a pretty much home built car with a vintage body on it is worth? Doesn't that completely destroy any future value to the car?
But reading the thread here has me wondering about a number of things.
I've been thinking about looking for a rusted out hulk to do pretty much the same thing. I can't afford a nice 67 427 so why not build one, says I?
But as I see the amount of money going into this one, where we're closing in on $40K (with the original car) plus a new interior. Then I start wondering about the value of the car.
While I'd like to build one like that, I wonder how much a pretty much home built car with a vintage body on it is worth? Doesn't that completely destroy any future value to the car?
Last edited by 90ZR1; 04-05-2007 at 10:01 PM.
04-04-2007, 05:58 PM
#72
Instructor

Member Since: Dec 2001
Location: Montreal Quebec
Posts: 150
Likes: 0
Received 0 Likes
on
0 Posts
Colt,
Really nice job.....you're going to have a real classic to drive and it's the wave of the future. The value of your classic driver will only increase.
Can I ask what kind of cluster bulbs you used and where you found them.........
Rick.
Really nice job.....you're going to have a real classic to drive and it's the wave of the future. The value of your classic driver will only increase.
Can I ask what kind of cluster bulbs you used and where you found them.........
Rick.
04-04-2007, 06:51 PM
#73
Racer
Thread Starter
Member Since: Jun 2004
Location: freehold NJ
Posts: 384
Likes: 0
Received 0 Likes
on
0 Posts
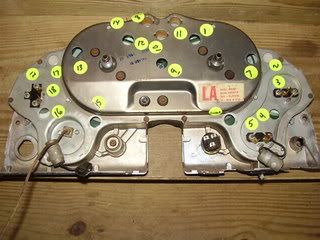
these are the bulbs that replace the 1816s of which there are about 14.
Colt
04-04-2007, 09:16 PM
#74
Intermediate

Member Since: Oct 2006
Location: Wheat Ridge Co
Posts: 38
Likes: 0
Received 0 Likes
on
0 Posts
Colt
Great job! Really lookin good.
I agree on the mods. It will really enhance the value of the car and be way fun to drive, too. I love my C5 but if my 63 comes out even close to as well as yours has and is as fun to drive as I expect, the C5 may get a little more garage time.
Thanks for the thread.
Will
04-06-2007, 01:28 AM
#76
Burning Brakes
Member Since: Dec 2002
Location: Hasbrouck Heights NJ
Posts: 1,062
Likes: 0
Received 4 Likes
on
3 Posts
http://forums.corvetteforum.com/show....php?t=1500985
The conclusion was the newer bulbs drew a bit more power and he had to bump the fuse amperage up, believe to 5A.
http://forums.corvetteforum.com/show...&postcount=283
P.S. I added this to the FAQ, not sure why the stickey was removed, put it in the "General / Other" post.
Last edited by bweaver999; 04-06-2007 at 01:31 AM.


 04-06-2007, 11:12 PM
#80
Tech Contributor

Won't the 5 watt bulbs draw more power? A while back, 62Jeff had issues with standard bulbs blowing the fuse. Resulted in a very lengthy thread:
http://forums.corvetteforum.com/show....php?t=1500985
The conclusion was the newer bulbs drew a bit more power and he had to bump the fuse amperage up, believe to 5A.
http://forums.corvetteforum.com/show...&postcount=283
P.S. I added this to the FAQ, not sure why the stickey was removed, put it in the "General / Other" post.
Yes, I went with a lower rated bulb for much of the main harness, which reduced the draw to a hair over 4 amps. Then I changed the factory 4 amp fuse for a 5 amp.