Detailing an Aluminum Intake Manifold
 06-30-2007, 09:20 PM
#1
Pro

Thread Starter

What is the best way to clean and detail an aluminum intake manifold. Mine is original, and pretty clean, but since I have it off of the car I would like to get it REALLY nice. Thanks
 06-30-2007, 09:48 PM
#2
Drifting

if you have it off the car... media blast is the best,
you can clear it if you like, but the clear will turn amber.
there is this stuff in a can called... alumablast or something of that sort.. and it dries exaclty like winters foundry aluminum...
if you just need to touch up.... brake clean works great, and you can use the nozzle and tube from (Wd-40) to touch up the runners or any area without getting much overspray... that is a great trick.
good luck
Aaron
06-30-2007, 10:58 PM
#3
Le Mans Master


I glass beaded both of mine - one from my '65 L76 and the other from my '78 L82.
The trick to glass beading them is to use as low a pressure as possible and still get it cleaned up.
I'd also STRONGLY recommend removing the tin pan from the underside of the intake first before media blasting it. The tin splash shield is held on by four push-in rivits. you can carefully pry them out with a flat-head screwdriver. Replacements are available at your local chevy parts counter. Oil gets trapped under the splash shield and during media blasting the media particles will stick under there because of the oil and you do NOT want that media to get into your motor after re-installing the intake.
When I did my intakes I removed the pan, glass beaded them at low pressure to clean them, than rinses the intake thoughly with a hose to get all remoaining particles out of the intake runners, etc, than reinstalled the pan with the new push-in rivits.
The intakes come out looking like brand new.
Here are pics of the '65 after cleaning:
http://lbfun.com/Corvette/65Vette/mcu/intake.html
here are pics of my '78 intake: Before and after pics:
http://lbfun.com/Corvette/78Vette/Parts/intake.html
07-01-2007, 08:40 AM
#4
Melting Slicks


The shop I used had nut blast media. It came out very nice.
Absolutely a must to pull the shield first. If you cannot find the "drive screws"/push in rivets, let me know. McMaster Carr must have some or I may still have a few. In any case, I used locktite on them when re-installing.
Search "Drive Screw" at McMaster Carr's web site (p/n 90081A192??)... about $3 a box..
It takes a #8 x 3/8 round head drive screw.. And it turns out I have plenty to send. PM me for details.
Last edited by 66since71; 07-01-2007 at 09:19 AM. Reason: McMaster Carr ... then found my "stock"
07-01-2007, 01:48 PM
#5
Advanced


Member Since: May 2003
Location: Los Altos Ca
Posts: 75
Likes: 0
Received 0 Likes
on
0 Posts
Nothing takes the grease off like aluminum prep. Used to cut aluminum paint I think. Got it from my painter, so I'm not sure of its primary use. Very strong stuff. Cut with water. It'll burn skin. But, it beats everything I've tried in past including degreasers. That last dark stain near head bolts is gone. Amazing stuff.
Dave
Dave

 07-01-2007, 05:45 PM
#7
Le Mans Master
Hi Formula
yep, I was very pleased with the results from the glass beading, especially for the '78. I don't have pics of the "before" on the '65 intake but it wasn't nearly as bad as the 'before" pics of the '78. The '78 actually looked even worst than the pictures show and it came out looking great, especially after beading it and than painting it with the "AlumiBlast". The '65 wasn't painted, just left bare.
yep, I was very pleased with the results from the glass beading, especially for the '78. I don't have pics of the "before" on the '65 intake but it wasn't nearly as bad as the 'before" pics of the '78. The '78 actually looked even worst than the pictures show and it came out looking great, especially after beading it and than painting it with the "AlumiBlast". The '65 wasn't painted, just left bare.

 07-01-2007, 08:12 PM
#10
Le Mans Master
 07-02-2007, 08:12 AM
#11
Melting Slicks


You want it really nice? Send it to Jerry MacNeish at Camaro Hi-Performance in Maryland. Google him and see posts and pictures of his work. His process is secret. Speculation is that that the piece is put in a big vibratory machine in a glass bead slurry. There's lots about this in the archives.
You can get aluminum pretty clean and nice looking with a citrus based cleaner, a scrub brush, Naval Jelly (for AL, not steel), lacquer thinner, and elbow grease. But it'll still be uneven in color. If you want it beautiful and natural looking, it'll need some abrasive cleaning.
There's chemicals you can try. The aircraft industry sells some - Alumiprep, Alodyne, etc. Hard to find naval Jelly these days. It's a weak phosphoric acid solution. But the surface won't look as even as that which was blasted.
Many people (most NCRS people) think that blasting an intake will irrevocably change the surface texture. A Corvette AL intake can go for $500. If you screw it up, it'll cost you. I don't know how to do this.
The fashion 40 years ago was to polish the aluminum so much that it looked like chrome. Eastwood and motorcycle shops sell products for this. Fashion now (because of NCRS) is that the surface look like just cast aluminum. Not bright, not dull, not smooth, little rough, even color, clean aluminum.
You do want to take the heat shield off the bottom for cleaning. Lots of burnt up oil in there. If you clean the intake by blasting, lots of the media will get in there. Do not re-use the rivets. You can buy new ones from GM (in quantities of 25), or get them from the usual Corvette vendors. Some people drill and tap the old rivet holes for #8 or #10 machine screws.
Some paint can look quite good. But, no matter how good, it always looks like paint.
07-02-2007, 08:41 AM
#12
Team Owner


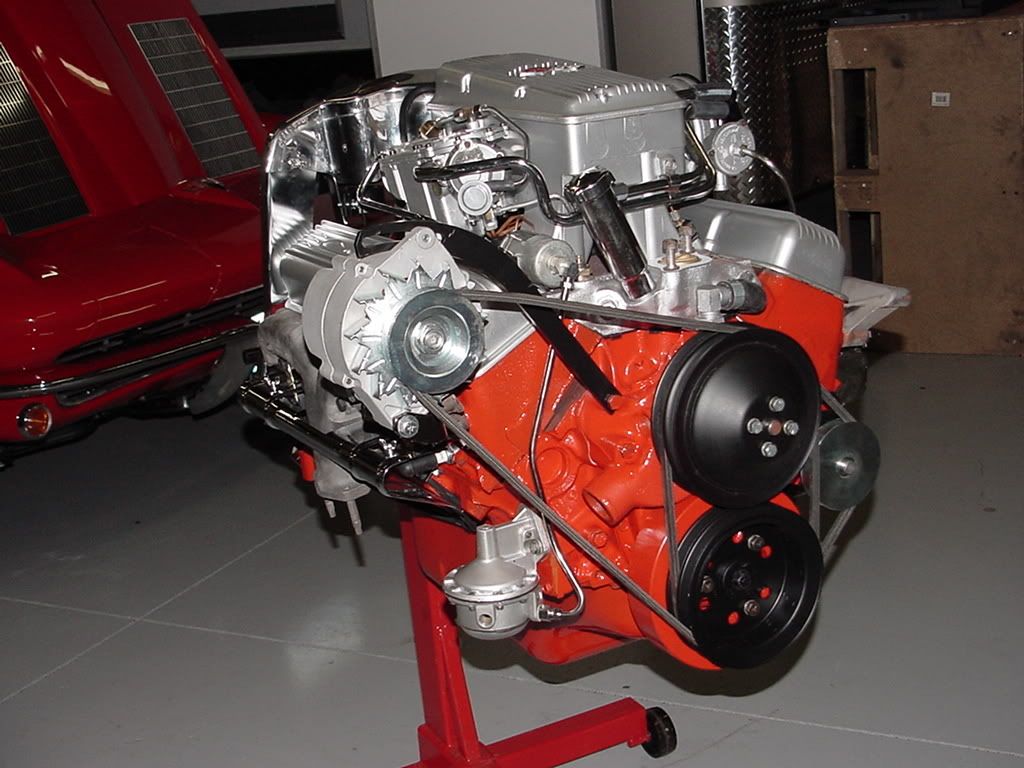
OK, I'll be thrown off the Forum for this...but here goes.
EBay L-79 intake.

1) Spray oven cleaner for grease, scrub with hand brush.
2) Spray paint remover for paint, scrub with hand brush.
3) Clean thoroughly with lacquer thinner.
4) Paint with VHT cast aluminum high-tem engine paint.

That was four years ago. Here is today.

EBay L-79 intake.
1) Spray oven cleaner for grease, scrub with hand brush.
2) Spray paint remover for paint, scrub with hand brush.
3) Clean thoroughly with lacquer thinner.
4) Paint with VHT cast aluminum high-tem engine paint.
That was four years ago. Here is today.
Last edited by Paul L; 07-02-2007 at 08:50 AM.
07-02-2007, 09:28 AM
#13
Melting Slicks
OK, I'll be thrown off the Forum for this...but here goes.
EBay L-79 intake.
1) Spray oven cleaner for grease, scrub with hand brush.
2) Spray paint remover for paint, scrub with hand brush.
3) Clean thoroughly with lacquer thinner.
4) Paint with VHT cast aluminum high-tem engine paint.
That was four years ago. Here is today.
EBay L-79 intake.
1) Spray oven cleaner for grease, scrub with hand brush.
2) Spray paint remover for paint, scrub with hand brush.
3) Clean thoroughly with lacquer thinner.
4) Paint with VHT cast aluminum high-tem engine paint.
That was four years ago. Here is today.
 07-02-2007, 09:55 AM
#14
Melting Slicks
 07-02-2007, 11:06 AM
#16
Team Owner
Harry,
I had no end of problems with the original Holley and just gave up on it. What you are looking at is a 600cfm Edelbrock #1406 with electric choke. There is a black heat spacer (~3/8") between carb and intake. The cylinder is the fuel filter as Edelbrock does not have an internal one. The fuel line was bent and flared by me and is solid steel (no rubber) with -6AN fittings. Neither carb or lines leak.

I had no end of problems with the original Holley and just gave up on it. What you are looking at is a 600cfm Edelbrock #1406 with electric choke. There is a black heat spacer (~3/8") between carb and intake. The cylinder is the fuel filter as Edelbrock does not have an internal one. The fuel line was bent and flared by me and is solid steel (no rubber) with -6AN fittings. Neither carb or lines leak.
07-02-2007, 05:47 PM
#17
Melting Slicks
Paul,
Thanks for the reply. Very nice, top quality work, like we always see on your car!
I understand the Holley problem. After a few rebuilds, the only way I could get the Holley on my 327/350 to work was to buy a new one. Fortunately, they still make the correct '66 carb. And also fortunately, I bought one before the prices got so out of sight!
Thanks again, Paul and thanks to Gimme1moreC1 for letting me hijack the thread for a while.
We now return you to your regularly scheduled program......
Harry
07-02-2007, 05:55 PM
#18
Team Owner
Lars kindly re-built the Holley for me but I never gathered up enough strength to put it back on. It was just such a source of misery what with leaks, blown power valves, fouled plugs, etc. The Edelbrock has been flawless for three years now. I know there is an argument on both sides but I like to drive, not get frustrated.