Birdcage body mount #3 repair completed
 07-01-2008, 02:14 AM
#1
Le Mans Master

Thread Starter

This is a follow up of my previous thread to repair my birdcage at the #3 mount WITHOUT removing the body from the frame. It took a little figuring, but I did complete the job and ended up with a very strong repair (also did not burn up the car in the process 
 ) and no original fiberglass was cut. It took myself and a very skilled metal fabricator a very long 15 hour day to do both left and right sides.
I drove the car to the shop in the early morning and drove it back home very late that night. It was a great feeling on the ride home (even though I was dog tired) to have gotten that done.
I am not advocating this over a body off restoration, and it is not NCRS green underneath anymore, but in my case the frame had already been done by a prior owner (bushings brake lines ect...) and was solid but the birdcage was not addressed. I felt I did not have much to gain by pulling the body off again. In fact, having the body on helped with alignment of the body mount prior to welding.
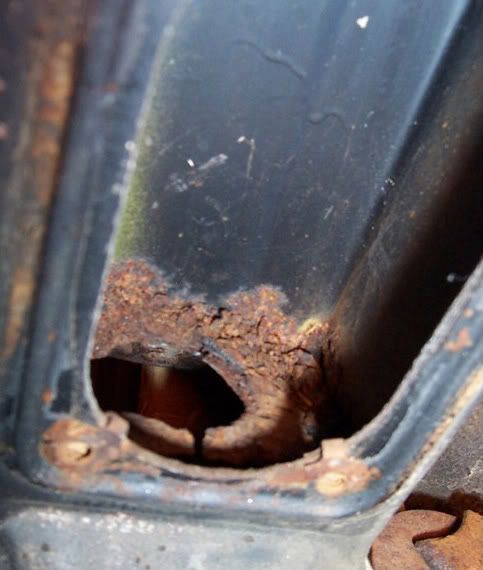
Original rust at #3 mount (access panel removed)

Fabricated corner

Fabricated sill

Parts welded in place

Completed repair finished in POR 15 and access panel replaced

The finished repair and rockers were all done over in POR 15 and except for a small seam where the sleeve overlaps the rocker sill under the car it is nearly impossible to see even up close with everything off. I appreciate the help and advise received from those who replied previously and I hope this will provide inspiration to them and others who may not want to remove the body to accomplish this repair. Pilot Dan
) and no original fiberglass was cut. It took myself and a very skilled metal fabricator a very long 15 hour day to do both left and right sides.I drove the car to the shop in the early morning and drove it back home very late that night. It was a great feeling on the ride home (even though I was dog tired) to have gotten that done.
I am not advocating this over a body off restoration, and it is not NCRS green underneath anymore, but in my case the frame had already been done by a prior owner (bushings brake lines ect...) and was solid but the birdcage was not addressed. I felt I did not have much to gain by pulling the body off again. In fact, having the body on helped with alignment of the body mount prior to welding.
Original rust at #3 mount (access panel removed)
Fabricated corner
Fabricated sill
Parts welded in place
Completed repair finished in POR 15 and access panel replaced
The finished repair and rockers were all done over in POR 15 and except for a small seam where the sleeve overlaps the rocker sill under the car it is nearly impossible to see even up close with everything off. I appreciate the help and advise received from those who replied previously and I hope this will provide inspiration to them and others who may not want to remove the body to accomplish this repair.
Pilot Dan

 07-01-2008, 07:43 AM
#3
Drifting

Member Since: Sep 2007
Location: Detroit MI
Posts: 1,369
Likes: 0
Received 0 Likes
on
0 Posts

Just curious, but you say no fiberglass was cut?? #3 is in front of the rear tire, but it looks like you took some fiberglass out surrounding the access plate. Do you have a pic from a little farther back??
Thanks!!!
Thanks!!!
07-01-2008, 10:57 AM
#4
Le Mans Master
Thread Starter

 Pilot Dan
Last edited by Pilot Dan; 07-01-2008 at 11:10 AM.


 .
07-01-2008, 12:18 PM
.
07-01-2008, 12:18 PM
#7
Racer


Very nice job, I see you got the fiberglass panels off without breaking them. I'm glad to hear about the wet towels ,I guess I'll be using them when I take the plunge on my 67. Jeff
07-01-2008, 02:31 PM
#8
Le Mans Master
Thread Starter
Jeff, we opted to use a plug welding technique which allowed for less concentrated heat at shorter intervals to minimize the heat on the surrounding fiberglass. Each dot you see is a weld. There were 21 alone just in the corner pieces on each side. A heck of a lot stonger than the original spot welds too. It would be best to have a second person manning the water bucket and keeping an eye out for hot spots while the welder is working. If you need any specifics, PM me. Happy 4th  Regards, Dan
Regards, Dan
Last edited by Pilot Dan; 07-01-2008 at 02:34 PM.
 07-02-2008, 12:04 PM
#12

All I can say is WOW!! 
Awsome job!
Now I know I'm not the only one who requests that you post all the pics you have and a detailed description of the repair!
I myself have almost the exact same rot on my 64. I was worried that I would have to pull the fender off to access the cage and weld it up.
Thanks for sharing!
Awsome job!
Now I know I'm not the only one who requests that you post all the pics you have and a detailed description of the repair!
I myself have almost the exact same rot on my 64. I was worried that I would have to pull the fender off to access the cage and weld it up.
Thanks for sharing!
07-02-2008, 04:15 PM
#13
Le Mans Master
Thread Starter
All I can say is WOW!!
Awsome job!
Now I know I'm not the only one who requests that you post all the pics you have and a detailed description of the repair!
I myself have almost the exact same rot on my 64. I was worried that I would have to pull the fender off to access the cage and weld it up.
Thanks for sharing!
Awsome job!
Now I know I'm not the only one who requests that you post all the pics you have and a detailed description of the repair!
I myself have almost the exact same rot on my 64. I was worried that I would have to pull the fender off to access the cage and weld it up.
Thanks for sharing!
yikes!!! Feeling a whole lot better now ....  Pilot Dan
07-03-2008, 06:19 AM
Pilot Dan
07-03-2008, 06:19 AM
#14
Drifting
Member Since: Sep 2007
Location: Detroit MI
Posts: 1,369
Likes: 0
Received 0 Likes
on
0 Posts
The repair pictures are from the rear of the wheelwell looking forward with the access panels removed which is necessary to have room to work. But since they are separate factory bonded pieces, I was able to carefully remove them with a very small pry bar and some patience, clean them up and then put em back on with Vett panel adhesive when I was done. So I did not cut them anywhere just R&R the way they were originally put on.
Pilot Dan
Pilot Dan


 07-05-2008, 09:18 PM
#18
Le Mans Master
Thread Starter
Drivers side (notice brake line lower right)

This is about it for the before pictures. Once you get the access panels off you will be able to see much more. Take your time removing the panels and be very careful around the outside that is bonded to the fender as any damage might be seen on the outside and mess up the fender and paint. Also, be slow around the fuel line area on the right side and the rear brake line on the left. Hitting one of those lines would ruin your day as they are not readily accessible for repair with the body in place.
It would also be best to remove the seats, carpeting and underlayment to minimize the fire risk during welding. My interior was out, so it was not an issue for me.
Good luck with your repairs. This was by no means an easy job, but I was fortunate to be working with an excellent metal fabricator. You will feel 100% better when you are done knowing you have solid metal under you! Pilot Dan
This is about it for the before pictures. Once you get the access panels off you will be able to see much more. Take your time removing the panels and be very careful around the outside that is bonded to the fender as any damage might be seen on the outside and mess up the fender and paint. Also, be slow around the fuel line area on the right side and the rear brake line on the left. Hitting one of those lines would ruin your day as they are not readily accessible for repair with the body in place.
It would also be best to remove the seats, carpeting and underlayment to minimize the fire risk during welding. My interior was out, so it was not an issue for me.
Good luck with your repairs. This was by no means an easy job, but I was fortunate to be working with an excellent metal fabricator. You will feel 100% better when you are done knowing you have solid metal under you!
Pilot Dan
01-18-2014, 09:07 PM
#19
This is a follow up of my previous thread to repair my birdcage at the #3 mount WITHOUT removing the body from the frame. It took a little figuring, but I did complete the job and ended up with a very strong repair (also did not burn up the car in the process ) and no original fiberglass was cut. It took myself and a very skilled metal fabricator a very long 15 hour day to do both left and right sides.
I drove the car to the shop in the early morning and drove it back home very late that night. It was a great feeling on the ride home (even though I was dog tired) to have gotten that done.
I am not advocating this over a body off restoration, and it is not NCRS green underneath anymore, but in my case the frame had already been done by a prior owner (bushings brake lines ect...) and was solid but the birdcage was not addressed. I felt I did not have much to gain by pulling the body off again. In fact, having the body on helped with alignment of the body mount prior to welding.
Original rust at #3 mount (access panel removed)
Fabricated corner
Fabricated sill
Parts welded in place
Completed repair finished in POR 15 and access panel replaced
The finished repair and rockers were all done over in POR 15 and except for a small seam where the sleeve overlaps the rocker sill under the car it is nearly impossible to see even up close with everything off. I appreciate the help and advise received from those who replied previously and I hope this will provide inspiration to them and others who may not want to remove the body to accomplish this repair. Pilot Dan
) and no original fiberglass was cut. It took myself and a very skilled metal fabricator a very long 15 hour day to do both left and right sides.I drove the car to the shop in the early morning and drove it back home very late that night. It was a great feeling on the ride home (even though I was dog tired) to have gotten that done.
I am not advocating this over a body off restoration, and it is not NCRS green underneath anymore, but in my case the frame had already been done by a prior owner (bushings brake lines ect...) and was solid but the birdcage was not addressed. I felt I did not have much to gain by pulling the body off again. In fact, having the body on helped with alignment of the body mount prior to welding.
Original rust at #3 mount (access panel removed)
Fabricated corner
Fabricated sill
Parts welded in place
Completed repair finished in POR 15 and access panel replaced
The finished repair and rockers were all done over in POR 15 and except for a small seam where the sleeve overlaps the rocker sill under the car it is nearly impossible to see even up close with everything off. I appreciate the help and advise received from those who replied previously and I hope this will provide inspiration to them and others who may not want to remove the body to accomplish this repair.
Pilot DanI wanted to Thank You for the post on this repair. I was surprised at how the panel popped off. I am getting ready to start fabricating the metal replacement parts. I was looking for the rest of the thread if it showed how the top piece was fabricated. Do you have the specs that you used for both pieces, Any help on where to buy or fabricate these pieces easier would be appreciated.
Thanks,
Tom
01-22-2014, 08:08 AM
#20
Dan,
I wanted to Thank You for the post on this repair. I was surprised at how the panel popped off. I am getting ready to start fabricating the metal replacement parts. I was looking for the rest of the thread if it showed how the top piece was fabricated. Do you have the specs that you used for both pieces, Any help on where to buy or fabricate these pieces easier would be appreciated.
Thanks,
Tom
I also wanted to know if you can weld on top of por-15 should I leave it bare where I am weldind to.
Thanks,
Tom

