Hooker Sidemount Headers & Sidepipes Installation Complete
 07-05-2010, 09:21 PM
#1
Tech Contributor

Thread Starter
Member Since: Aug 1999
Location: At my Bar drinking and wrenching in Lafayette Colorado
Posts: 13,654
Received 4,924 Likes
on
1,930 Posts

After an extensive wrestling match between me and the Hooker SuperComp Sidemount Headers & Sidepipes (see my post for the problems and product quality issues with these parts: http://forums.corvetteforum.com/c3-t...t-quality.html ), I have finally managed to get the system installed on the car, eliminate interference using a Port-A-Power, floor anchors, a chain fall, and 2 hydraulic rams, fabricate custom sidepipe standoffs to get the pipes parallel to the frame, bend the collectors to equalize the height from left to right sides, cut my rocker panel moldings, and polish them out along with a little painting. Here are some shots of the process and the end results:
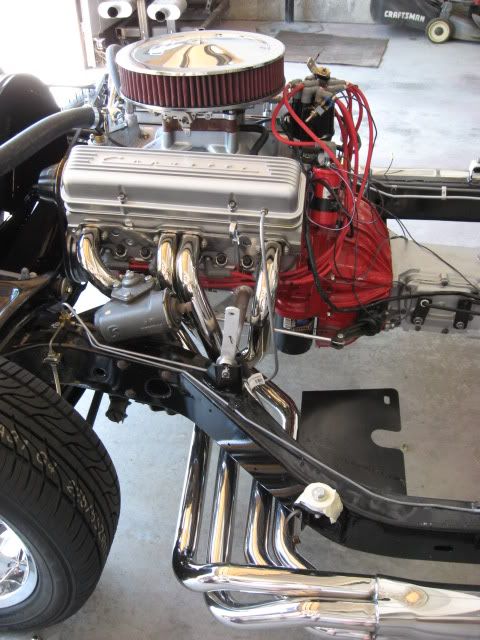
Here are the headers mounted to the engine after being �tweaked� a bit. I installed and removed the headers 5 times to get the fit right and to eliminate several points of chassis and steering interference:
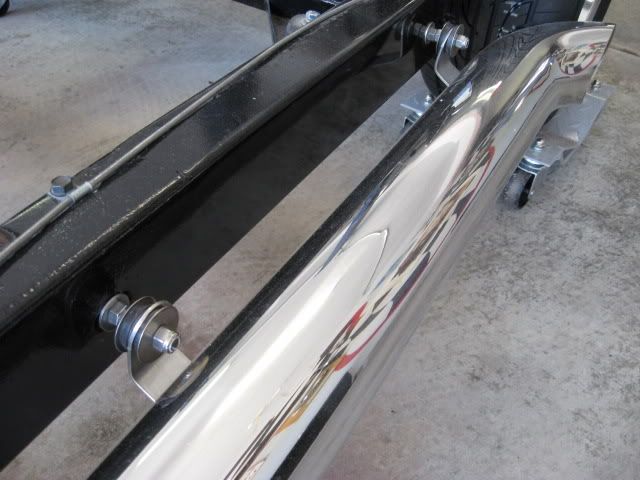
The sidepipe mounting hardware supplied was junk and did not allow alignment of the sidepipes, so I fabricated all new mounting hardware including thick, �� stainless threaded frame inserts and adjustable stainless mounting studs to interface with the supplied rubber cushion mounts. This allowed me to align and make the pipes run level and parallel to the frame rails:
I was lucky to be working on this with the body off the chassis � I can�t imagine doing this amount of work from the bottom of a complete car:

With the system mounted to the chassis, I then lowered the body back on the car � pipes and headers now look and fit well, but still needed final tweaking and alignment using the fabricated adjustable sidepipe mounts:

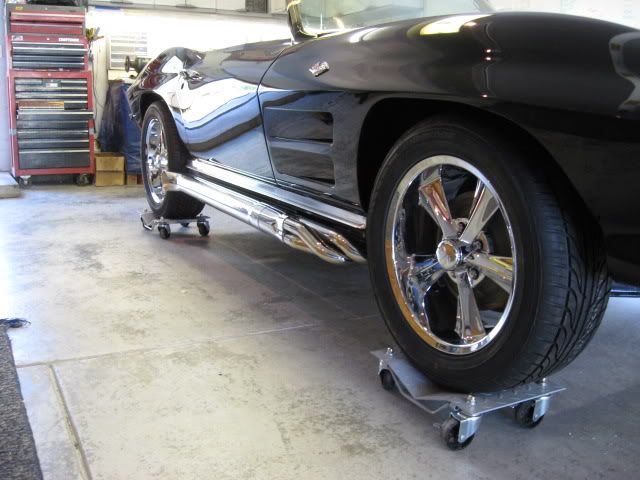
2 more days of cutting, tweaking, and polishing produced the finished result:
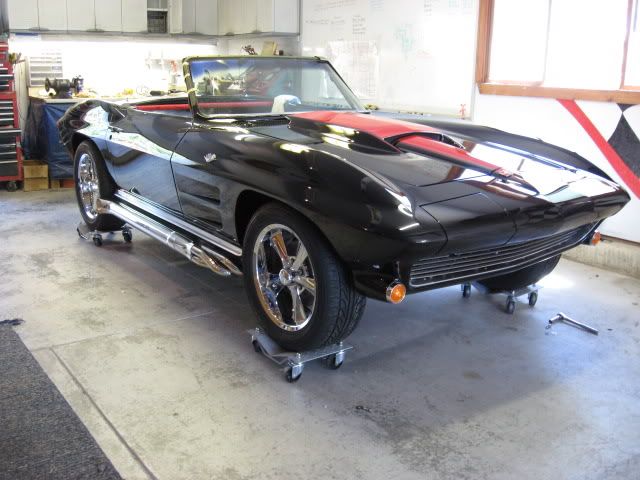
Sidepipes installed with modified rocker molding � molding was sanded and polished on the top surfaces, and given a satin black epoxy coating below the polished surfaces. This accented the polished pipes nicely:
Lars
Here are the headers mounted to the engine after being �tweaked� a bit. I installed and removed the headers 5 times to get the fit right and to eliminate several points of chassis and steering interference:
The sidepipe mounting hardware supplied was junk and did not allow alignment of the sidepipes, so I fabricated all new mounting hardware including thick, �� stainless threaded frame inserts and adjustable stainless mounting studs to interface with the supplied rubber cushion mounts. This allowed me to align and make the pipes run level and parallel to the frame rails:
I was lucky to be working on this with the body off the chassis � I can�t imagine doing this amount of work from the bottom of a complete car:
With the system mounted to the chassis, I then lowered the body back on the car � pipes and headers now look and fit well, but still needed final tweaking and alignment using the fabricated adjustable sidepipe mounts:
2 more days of cutting, tweaking, and polishing produced the finished result:
Sidepipes installed with modified rocker molding � molding was sanded and polished on the top surfaces, and given a satin black epoxy coating below the polished surfaces. This accented the polished pipes nicely:
Lars
 07-05-2010, 10:15 PM
#3
Le Mans Master

Looks good Lars. I FINALLY got the driver's side pipe free and off of the header on my car today. Got my STS baffles in the pipes. Now to get them mounted. I did notice that my pipes kick up in the back, so they will need to be pulled down during mounting. Hopefully I don't need all the tugging that you apparently needed to do...
 07-06-2010, 09:47 AM
#5
Burning Brakes

Sweet!! Have you fired it up yet? Sound must be awesome� I think my car had hooker-type sipepipes in its past (I saw evidence of the mounts on the frame). Yours look beautiful.
Joe
Joe
 07-06-2010, 10:02 AM
#7
Race Director

Member Since: Mar 2009
Location: Canada's capital
Posts: 19,777
Received 4,583 Likes
on
2,157 Posts
2020 Corvette of the Year Finalist (appearance mods)
C1 of Year Finalist (appearance mods) 2019

I can't believe how much trouble you had with these very expensive pipes. I had the same setup in the 80's and they fit first shot and perfectly. I sure hope someone from Hooker is tuning in on this thread. I wonder if they too have moved their production off shore, and this is the result. No one should have to do this amount of work on a "custom fit" finished product. Good for you though, I think most would have just sent them back.
07-06-2010, 10:03 AM
#8
Le Mans Master
Lars, car looks great, I had them on my 63. Only thing is you have to remember to lift your leg or you will burn the ship out of it getting out of the car. I learned after the 5th time but passengers get something to remember the ride by. Looks awersome
07-06-2010, 10:12 AM
#9
Race Director
Member Since: Mar 2009
Location: Canada's capital
Posts: 19,777
Received 4,583 Likes
on
2,157 Posts
2020 Corvette of the Year Finalist (appearance mods)
C1 of Year Finalist (appearance mods) 2019
That's why I went to an under car design. I got tired of girls yelling at me with burnt stockings and legs, and man that is one bad burn, the nylon melts right into the wound. And....I got tired of breathing carbon monoxide sitting in traffic, ughh,cough,cough......One good thing is you don't have to worry about a stereo system, or being a good conversationalist....!
07-06-2010, 11:09 AM
#10
Burning Brakes

Are you bolting the slip joint down? I tried running without it and of course it leaked at the joint. It's real hard to get a bolt in there, though, with the body on, and since the car came this way, I don't have the bolts. What type are they so I can get them? I have easy access to a bolt store.
07-06-2010, 12:09 PM
#11
Safety Car

Member Since: Nov 2004
Location: going faster miles an hour...with the radio on in browns mills new jersey
Posts: 4,153
Likes: 0
Received 71 Likes
on
45 Posts

Are you bolting the slip joint down? I tried running without it and of course it leaked at the joint. It's real hard to get a bolt in there, though, with the body on, and since the car came this way, I don't have the bolts. What type are they so I can get them? I have easy access to a bolt store.
 07-06-2010, 01:39 PM
#14
Tech Contributor
Thread Starter
Member Since: Aug 1999
Location: At my Bar drinking and wrenching in Lafayette Colorado
Posts: 13,654
Received 4,924 Likes
on
1,930 Posts
I've run the engine first on my own run stand, then on the engine dyno to get the tuning right and the "real" numbers down. I've then started it up again mounted in the chassis with the headers and sidepipes installed - with the 4-7 firing order swap, the car sounds like a full-blown NASCAR.
I installed the STS Baffles and drilled a 1/2" hole in the front caps. Sounds very good, and I won't need to worry about upgrading the sound system.
I've worked around enough sidepipe cars on the Tuning for Beer Tours that I'm pretty good with staying aways from the pipes. But passengers are another matter. For this reason, I'll be installing the polished stainless covers that the Cobra guys are using on their cars - they look pretty good.
I threw away the junk mismatched bolts provided by Hooker and installed stainless steel socket head cap screws. I lubricated the slip joints with oxygen sensor high temp anti-seize lube before I slid the pipes on, and then snugged the clamping bolt just enough to keep the pipes from moving. I did have to notch both rockers to clear the bolt heads, even with the small socket head bolts.
Lars
I installed the STS Baffles and drilled a 1/2" hole in the front caps. Sounds very good, and I won't need to worry about upgrading the sound system.
Lars
Last edited by lars; 07-06-2010 at 01:41 PM.
05-15-2019, 04:37 PM
#15


I am curious about your rocker moldings. Did you use the regular moldings or the narrower ones for use with the original style side pipes? How much did you have to cut them? It would be great if you had a couple of detail pictures to show. I am about to do the same thing on my 67.
After an extensive wrestling match between me and the Hooker SuperComp Sidemount Headers & Sidepipes (see my post for the problems and product quality issues with these parts: http://forums.corvetteforum.com/c3-t...t-quality.html ), I have finally managed to get the system installed on the car, eliminate interference using a Port-A-Power, floor anchors, a chain fall, and 2 hydraulic rams, fabricate custom sidepipe standoffs to get the pipes parallel to the frame, bend the collectors to equalize the height from left to right sides, cut my rocker panel moldings, and polish them out along with a little painting. Here are some shots of the process and the end results:
Here are the headers mounted to the engine after being �tweaked� a bit. I installed and removed the headers 5 times to get the fit right and to eliminate several points of chassis and steering interference:
The sidepipe mounting hardware supplied was junk and did not allow alignment of the sidepipes, so I fabricated all new mounting hardware including thick, �� stainless threaded frame inserts and adjustable stainless mounting studs to interface with the supplied rubber cushion mounts. This allowed me to align and make the pipes run level and parallel to the frame rails:
I was lucky to be working on this with the body off the chassis � I can�t imagine doing this amount of work from the bottom of a complete car:
With the system mounted to the chassis, I then lowered the body back on the car � pipes and headers now look and fit well, but still needed final tweaking and alignment using the fabricated adjustable sidepipe mounts:
2 more days of cutting, tweaking, and polishing produced the finished result:
Sidepipes installed with modified rocker molding � molding was sanded and polished on the top surfaces, and given a satin black epoxy coating below the polished surfaces. This accented the polished pipes nicely:
Lars
The following users liked this post:
vjjack04 (05-15-2019)
05-15-2019, 09:01 PM
#16

I can't believe how much trouble you had with these very expensive pipes. I had the same setup in the 80's and they fit first shot and perfectly. I sure hope someone from Hooker is tuning in on this thread. I wonder if they too have moved their production off shore, and this is the result. No one should have to do this amount of work on a "custom fit" finished product. Good for you though, I think most would have just sent them back.
I agree , my Hooker pipes were manufactured in 1975 ( NOS still in box ) and I didn't install them until 2012 . I remember being surprised how perfect they fit on the first try .
05-15-2019, 09:31 PM
#17
Race Director

Member Since: Nov 2003
Location: Cottonwood AZ
Posts: 10,698
Received 3,048 Likes
on
1,934 Posts
C1 of Year Finalist (performance mods) 2019
I installed a set on a 73 I had and they were easy install. The chrome turned blue where they came out of the engine compartment visible from the outside of the car.
 I hope they don't for you. They look nice on a dark colored car.
