C1 indicator stalk not staying down
 10-08-2012, 07:57 PM
#1
Cruising

Thread Starter
Member Since: Oct 2012
Posts: 13
Likes: 0
Received 0 Likes
on
0 Posts
Hi All,
First time poster.
Been reading through some of your threads.
Some awsome info.
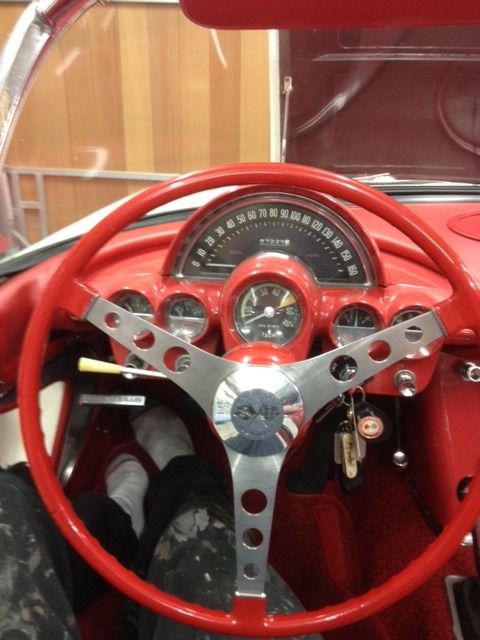
I have a problem with my C1 indicator stalk.
It wont stay clicked down when trying to indicate left.
Whats involved in fixing in replacing the mechanism inside ther steering column?
Steering wheel off first?
Rather than me stuff around for hours possibly starting in the wrong area, can someone here give me some pointers and save me valuable time?
Also, what replacement part I will need?
Thanks
Kind Regards,
John
First time poster.
Been reading through some of your threads.
Some awsome info.
I have a problem with my C1 indicator stalk.
It wont stay clicked down when trying to indicate left.
Whats involved in fixing in replacing the mechanism inside ther steering column?
Steering wheel off first?
Rather than me stuff around for hours possibly starting in the wrong area, can someone here give me some pointers and save me valuable time?
Also, what replacement part I will need?
Thanks
Kind Regards,
John
 10-08-2012, 09:03 PM
#2
Racer
I have a similar problem in my 59 except it involves both right and left..
replacing the turn signal cancelling mechanism was easy...
http://www.zip-corvette.com/ProductD...GR-SR&CTitle=&
it does involves removing the wheel and the replacement took 15 minutes. ( Just be mindful and keep track of other parts such as the horn parts, etc.) But I still have to hold it down/up when turning.... must be a fine tune adjustment somehow...
will be interested in the responses....
btw, clean up the horn contacts while your in there....fine steel wool will do...a dab of dielectric grease won't hurt
Last edited by BobT59; 10-08-2012 at 09:10 PM.
10-08-2012, 09:27 PM
#3
Safety Car


Member Since: Apr 2009
Location: Georgetown TX
Posts: 3,786
Received 573 Likes
on
307 Posts
2021 C2 of the Year Finalist - Unmodified
C2 of Year Finalist (stock) 2019
2016 C2 of Year Finalist

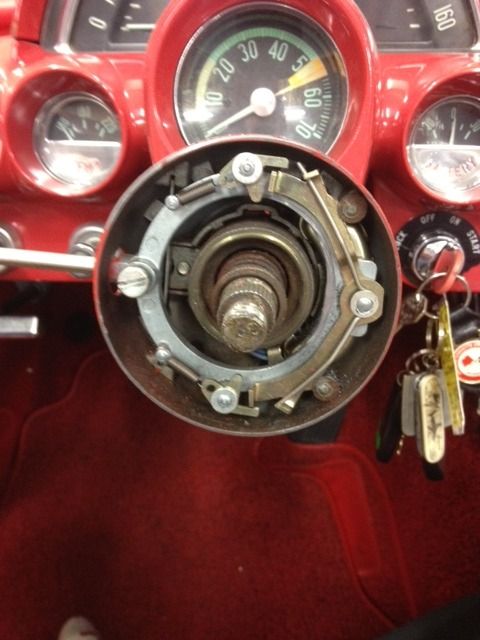
I disconnect the battery first. You will need a steering wheel puller. Cheap at your local FLAPS. Lay parts out as you disassemble. It makes reassembly much easier. Then after you pull the horn button and remove the three screws from the horn ring, you will get to the cancelling mechanism. The horn contact is under the ring and has a spring under it. Don't let it fly out. Under the big screw head on the left in the picture is a flat verticle spring. Sometimes the parts get worn where they are sleeved, etc.
10-08-2012, 09:30 PM
#4
Cruising
Thread Starter
Member Since: Oct 2012
Posts: 13
Likes: 0
Received 0 Likes
on
0 Posts
Thanks for your reply.
I have pulled of a 67 and 68 mustang steering wheel before, but never my 61 corvette.
Keen to give it a go and get the indicator sorted.
I have pulled of a 67 and 68 mustang steering wheel before, but never my 61 corvette.
Keen to give it a go and get the indicator sorted.
Last edited by thirsty; 10-08-2012 at 09:34 PM.
10-08-2012, 09:52 PM
#5
Team Owner


Here is what you want to know about the later C1 turn signal 'innards'. There are reasons beyond just replacing the switch that can cause the indicator not to 'latch' in the blinking position properly !
These two articles should get you going.
If your turn signal area has been unmolested you will find three weird looking screws under your horn button. They are clutch head screws and you can try to remove them with a regular screwdriver but its best to get the proper tool; NAPA has them.
PS You MAY get off easy and find that somebody installed the turn signal 'bell' part incorrectly...the part that holds the canceling pins. It CAN be put on backwards so the pins don't trip the switch and the switch doesn't latch properly either. When properly installed the pins should be at 10 and 8 o'clock when viewed from the driver's seat.
Last edited by Frankie the Fink; 10-08-2012 at 10:16 PM.
10-09-2012, 12:22 AM
#7

Make sure that you have both pins in the wheel so that they can cancel the turn.
As Frank mentioned when the wheel is installed the pins must be at the 8 and 10 O'Clock positions.
As you can see on my photo the pins broke off and they needed to be moved over to a different location. I could not get out the easy outs.
As Frank mentioned when the wheel is installed the pins must be at the 8 and 10 O'Clock positions.
As you can see on my photo the pins broke off and they needed to be moved over to a different location. I could not get out the easy outs.
10-09-2012, 06:08 AM
#8
Team Owner
Ouch -- bad news. Here is the roll pin height BTW...
28/64ths = 14/32nds = 7/16"
I should have added above that if the pin holding piece is installed backward it will constantly cancel the left turn signal on the slightest movement of the steering wheel making it impossible to keep it latched.
 Don't EVEN ask me how I know this
28/64ths = 14/32nds = 7/16"
I should have added above that if the pin holding piece is installed backward it will constantly cancel the left turn signal on the slightest movement of the steering wheel making it impossible to keep it latched.
Don't EVEN ask me how I know this
Last edited by Frankie the Fink; 10-09-2012 at 06:32 AM.
10-09-2012, 07:10 AM
#9
Cruising
Thread Starter
Member Since: Oct 2012
Posts: 13
Likes: 0
Received 0 Likes
on
0 Posts
Just found plenty of parts available on this link.
http://www.corvettepartsworldwide.co...ory_s/1250.htm
I'll take the steeing wheel off and see what I am dealing with.
Learnt plenty today everyone.
This is my first corvette and I cant wait to keep learning more and more about her.
A huge thanks.
Kind Regards,
John
http://www.corvettepartsworldwide.co...ory_s/1250.htm
I'll take the steeing wheel off and see what I am dealing with.
Learnt plenty today everyone.
This is my first corvette and I cant wait to keep learning more and more about her.
A huge thanks.
Kind Regards,
John
Last edited by thirsty; 10-09-2012 at 07:28 AM.
10-09-2012, 07:43 AM
#10

 10-09-2012, 07:48 AM
#11
Team Owner
Well - I guess I should finish up the 'advice to the lovelorn' on C1 turn signals. A couple of tips:
1) If you don't secure the snot out of the turn signal switch housing "retainer wedge" your housing will gradually slip forward and make your turn signals inoperative. This is part #1-32855 53-63 Turn Signal Housing Lock Wedge & Screw
in your link above.
You should dip the end of the wedge that contacts the steering column in some of that do-it-yourself liquid vinyl covering for tool handles you can get at any hardware store and let it dry. This gives it a good grip. Next, the Philips head screw to tighten that wedge is in a location nearly impossible to get it to tighten. Many replace it with an Allen screw or you can order this super shorty Philips bit and use a quarter inch box end wrench on the bit to tighten the original Philip's head screw. A regular Philip's bit is too long.
It's the ONLY thing I've found that actually gets the original screw tight enough:
(next to the last item down): http://pitposse.com/po90de14inhe.html
I guess you could grind the back end off a regular bit to work the same way...I was just too lazy.
Besides the shorty bit was already included in my carburetor adjusting tool kit.
2. I torque the steering wheel nut to the specified 25 ft-lbs. Others do it by feel, I presume they've never had a steering wheel come off in their hands -- very exciting. Definitely a Three Stooges moment.
Last edited by Frankie the Fink; 10-09-2012 at 08:22 AM.
10-09-2012, 07:50 AM
#12
Team Owner
10-09-2012, 08:10 AM
#13
Cruising
Thread Starter
Member Since: Oct 2012
Posts: 13
Likes: 0
Received 0 Likes
on
0 Posts
To add to this, I have another indicator problem which I thought was not related to this, but after just learning about the complication of the brake and indicator switches within the steering column, I am now thinking otherwise.
When I have the indicator turning left, blinks fine.
When I hit the brakes, still works fine
When I have the indicator blinking right works fine.
When I hit the brakes while the indicator is on, the indicator stops flashing and 4 back lights come on.
On further testing, sometimes all 4 lights start flashing.
All from turning right.
Left works fine.
I assumed it was a bad earth and I was about to run a test wire direct from the chassis to each light temporarily to give the best possible earth to see of the problem dissapeared.
Sounds also like the problem could be inside the steering column as well.
What do you think?
10-09-2012, 08:16 AM
#14
Team Owner
Read the two articles (especially the 2nd one) that I supplied above before tearing into the wiring.....all the blinky/brakey electrons goes through that turn signal switch and that is most likely your problem.
Also make REAL sure all the pins in the turn signal harness plastic connector under the steering column are FULLY seated. They just slide in and are notorious for slipping loose.
Also make REAL sure all the pins in the turn signal harness plastic connector under the steering column are FULLY seated. They just slide in and are notorious for slipping loose.
Last edited by Frankie the Fink; 10-09-2012 at 08:20 AM.
10-09-2012, 08:48 AM
#15
Burning Brakes


I just installed all new turn signal stuff on my 1960 restoration project. All the original stuff was missing. I also had the problem of the turn signal not staying engaged when I moved it the Right or Left.
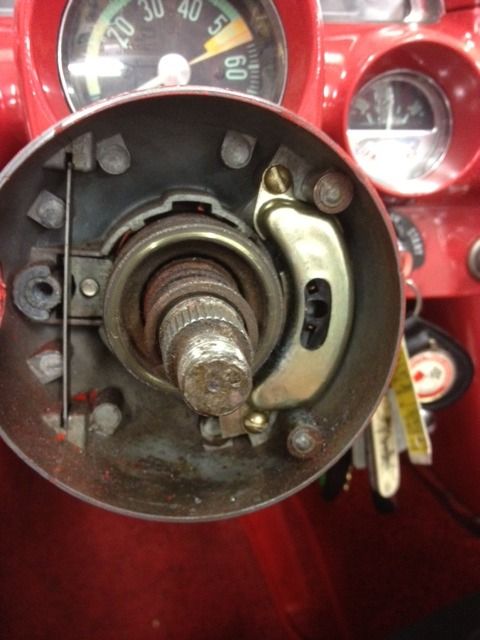
After studying it, what I did was spread the spring open more (blue arrow in the attached picture). The signal engagement is pretty sensative, the way it works is there is an indention in the piece that the above spring pushs outward (red arrow in the attached picture). The outward pressure of the spring causes the idention to engage with the roller pins as shown in the photo. The photo is with the signal engaged in the Right turn position.
If this spring is to weak, the tension of the flat spring that snaps the signal back to center position when the signal is canceled will keep the signal from staying engaged.
You can remove the spring with a fine tipped needle nose plier without removing the whole assembly (which is a pain after the forth or fifth time). I held the center of the spring, the part that goes around the center pin with one set of pliers and then bent that side outward, then did the same to the other side.
I kept doing this adjustment until the signal would stay engaged. Works fine now.
It's worth a try to solve your engagement problem without buying more stuff or taking it all apart. However, doesn't solve your electrical problem.
One other thing to note that I haven't seen anyone mention above, note the position of your steering wheel when you remove it. If you set your wheel to straight ahead, remove the horn button and horn contact, you should see a notch in the steering shaft at the 12 o'clock position. Be sure to reinstall the wheel in the same orientation to the steering column or you will be driving down the road with the wheel off center one side or the other. It's a nit, but it bugs the crap out of me.
Don
Last edited by dharris45; 10-09-2012 at 08:56 AM.
10-09-2012, 09:15 AM
#16
Cruising
Thread Starter
Member Since: Oct 2012
Posts: 13
Likes: 0
Received 0 Likes
on
0 Posts
Great advice, thanks.
I will try and remove the steering wheel tomorrow or the following day after work and post a couple pics of the outcome.
I am unsure how long since this steering wheel has been removed, so it may be an effort for the night just to get the steering wheel off, providing my removal kit has the right bolt size.
10-09-2012, 03:42 PM
#17
Race Director

Member Since: Jun 2006
Location: Inverness FL
Posts: 17,891
Received 727 Likes
on
621 Posts
St. Jude Donor '07
Well - I guess I should finish up the 'advice to the lovelorn' on C1 turn signals. A couple of tips:
1) If you don't secure the snot out of the turn signal switch housing "retainer wedge" your housing will gradually slip forward and make your turn signals inoperative. This is part #1-32855 53-63 Turn Signal Housing Lock Wedge & Screw
in your link above.
You should dip the end of the wedge that contacts the steering column in some of that do-it-yourself liquid vinyl covering for tool handles you can get at any hardware store and let it dry. This gives it a good grip. Next, the Philips head screw to tighten that wedge is in a location nearly impossible to get it to tighten. Many replace it with an Allen screw or you can order this super shorty Philips bit and use a quarter inch box end wrench on the bit to tighten the original Philip's head screw. A regular Philip's bit is too long.
It's the ONLY thing I've found that actually gets the original screw tight enough:
(next to the last item down): http://pitposse.com/po90de14inhe.html
I guess you could grind the back end off a regular bit to work the same way...I was just too lazy.
Besides the shorty bit was already included in my carburetor adjusting tool kit.
2. I torque the steering wheel nut to the specified 25 ft-lbs. Others do it by feel, I presume they've never had a steering wheel come off in their hands -- very exciting. Definitely a Three Stooges moment.
1) If you don't secure the snot out of the turn signal switch housing "retainer wedge" your housing will gradually slip forward and make your turn signals inoperative. This is part #1-32855 53-63 Turn Signal Housing Lock Wedge & Screw
in your link above.
You should dip the end of the wedge that contacts the steering column in some of that do-it-yourself liquid vinyl covering for tool handles you can get at any hardware store and let it dry. This gives it a good grip. Next, the Philips head screw to tighten that wedge is in a location nearly impossible to get it to tighten. Many replace it with an Allen screw or you can order this super shorty Philips bit and use a quarter inch box end wrench on the bit to tighten the original Philip's head screw. A regular Philip's bit is too long.
It's the ONLY thing I've found that actually gets the original screw tight enough:
(next to the last item down): http://pitposse.com/po90de14inhe.html
I guess you could grind the back end off a regular bit to work the same way...I was just too lazy.
Besides the shorty bit was already included in my carburetor adjusting tool kit.
2. I torque the steering wheel nut to the specified 25 ft-lbs. Others do it by feel, I presume they've never had a steering wheel come off in their hands -- very exciting. Definitely a Three Stooges moment.
Bill
10-11-2012, 09:22 AM
#18
Cruising
Thread Starter
Member Since: Oct 2012
Posts: 13
Likes: 0
Received 0 Likes
on
0 Posts
Thanks for your help everyone.
Took a good hour to get the steering wheel off. Its was stuck on solid!
To fix the indicator stalk so it stayed up and down, I spread the spring and lubricated the rollers. One of the rollers looked stuck, but it still seemed to be happy to hold the latch section and release it OK.
The shorting out problem (as explained above) came from the switch.
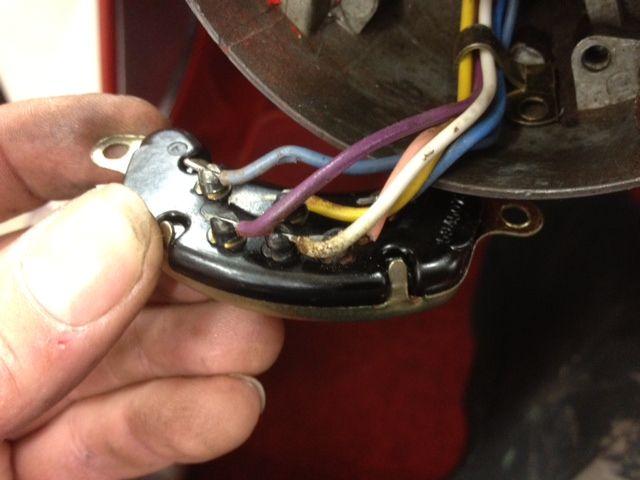
In unscrewing it, I found a couple of the wires had worn through and shorted out against each other at the back.
Photo below clearly shows the white wire needed sorting out.
I re-insulated them for now and this fixed the problem, but I will end up pulling them completely off in the near future and cutting the wires to make fresh soldered joins to the switch terminals.
I may end up buying a new switch just to make it problem free in the future.
Thanks again for everyones help.
This is my first corvette and the pics gave me all the info (and confidence) I needed to pull the steering / turn signal operation apart and fix it.
Took a good hour to get the steering wheel off. Its was stuck on solid!
To fix the indicator stalk so it stayed up and down, I spread the spring and lubricated the rollers. One of the rollers looked stuck, but it still seemed to be happy to hold the latch section and release it OK.
The shorting out problem (as explained above) came from the switch.
In unscrewing it, I found a couple of the wires had worn through and shorted out against each other at the back.
Photo below clearly shows the white wire needed sorting out.
I re-insulated them for now and this fixed the problem, but I will end up pulling them completely off in the near future and cutting the wires to make fresh soldered joins to the switch terminals.
I may end up buying a new switch just to make it problem free in the future.
Thanks again for everyones help.
This is my first corvette and the pics gave me all the info (and confidence) I needed to pull the steering / turn signal operation apart and fix it.
10-11-2012, 09:29 AM
#19
Team Owner
If you can keep your original parts then do so. Those repro switches can take some filing and bending of fiddly bits to get them to work right.
You clearly have some skills and the right attitude to keep a C1 going - good for you.
I especially liked the white wool socks when working in the car so you don't scratch up the sill plates getting in and out -- nice touch

You clearly have some skills and the right attitude to keep a C1 going - good for you.
I especially liked the white wool socks when working in the car so you don't scratch up the sill plates getting in and out -- nice touch
10-11-2012, 09:20 PM
#20
Cruising
Thread Starter
Member Since: Oct 2012
Posts: 13
Likes: 0
Received 0 Likes
on
0 Posts
Would you believe I was going through my parts box this morning and what did I find amongst all the bits that come with the car...............................new turn signal switch, with new wiring already soldered with connectors!!!