67 restomod


The following users liked this post:
chgc267 (12-09-2017)

 This Corvette is coming along great and is really looking great
The following users liked this post:
chgc267 (12-09-2017)
 12-09-2017, 03:18 PM
#183
Le Mans Master

absolutely stunning build!! I have been running a similar (Holly) self tuning ECU on an LS swap in my '72 Suburban for over 3 years/ 20K miles now. I can tell you that it will get better the more you drive it, particularly at part throttle. That being said, after you have 2-3K miles on it, I would definitely take it in to a shop with a dyno and a knowledgable tuner, and have it tweaked...especially given the ITB intake set up you're running. I've found that the "self tuning" ECUs are definitely a 90% solution. If you want to get the tune spot on, you're going to need a knowledgable tuner to go back in and tweak the curves after the ECU has had an opportunity to "learn".
Side note, any chance of getting some details on the modified factory seats? At 6'6, I've looked everywhere for a more supportive solution to the factory pieces, but have yet to find an aftermarket solution that doesn't reduce the available head/leg room.

Side note, any chance of getting some details on the modified factory seats? At 6'6, I've looked everywhere for a more supportive solution to the factory pieces, but have yet to find an aftermarket solution that doesn't reduce the available head/leg room.
12-11-2017, 08:22 PM
#184
Melting Slicks

Member Since: Apr 2002
Location: Ellicott City Maryland
Posts: 2,881
Received 1,962 Likes
on
664 Posts

Here is the latest update...with pics! The first couple pics show what Mike & I designed to conceal all those fuel injector wires (pic in post #165)...It came out looking better than I thought...Nice and clean!! After looking at all the steering wheels out there (Momo, Nardi, Grant..and any other manufacturer I could find) I settled on a C3 wheel that was already wrapped in black leather w/ brush spokes ..it looks great! I think the look goes well with the rest of the car. You can also see the speedo and tach perfectly from the drivers point of view. Pictured is also a sneak preview of the one-off seats I am having made using the stock frames. There is still a little trimming, and I need also need to see how I fit, but they look great! The seats will be wrapped in the same black leather as the dash and coves. The insides of both seats will be perforated leather and have a pattern similar to '66 seats. I was asked by vjjack04 where the ECM was located...You can see in the 3rd picture the unit is where the radio would normally be. I believe mine is smaller than a LS ECM due to the intake I am using. The stereo/amps & Optima battery are located in the back under the decklid and the stereo will be controlled via blue tooth through my I phone.
 12-11-2017, 09:22 PM
#185
Racer


Thread Starter
absolutely stunning build!! I have been running a similar (Holly) self tuning ECU on an LS swap in my '72 Suburban for over 3 years/ 20K miles now. I can tell you that it will get better the more you drive it, particularly at part throttle. That being said, after you have 2-3K miles on it, I would definitely take it in to a shop with a dyno and a knowledgable tuner, and have it tweaked...especially given the ITB intake set up you're running. I've found that the "self tuning" ECUs are definitely a 90% solution. If you want to get the tune spot on, you're going to need a knowledgable tuner to go back in and tweak the curves after the ECU has had an opportunity to "learn".
Side note, any chance of getting some details on the modified factory seats? At 6'6, I've looked everywhere for a more supportive solution to the factory pieces, but have yet to find an aftermarket solution that doesn't reduce the available head/leg room.
Side note, any chance of getting some details on the modified factory seats? At 6'6, I've looked everywhere for a more supportive solution to the factory pieces, but have yet to find an aftermarket solution that doesn't reduce the available head/leg room.
I had to grab the seat from the upholstery shop and bring it back over to the shop. We had to fill in the holes and make new ones after I ditched those c5 seats and went back to the stock frames. I'm actually driving on that seat in the recent pics. I didn't adjust the seat when I got in it though and it was only a couple trips up and down the block.. I'm also not sure if it was all the way back. I did have leg room and I had a great view right over the dash. It it goes further back that will be a bonus. The back and sides felt great on the seat. The thigh bolsters may need to be trimmed a tad. I'll probably have to test fit a few times before we go w/ a final. The car should be ready shortly for the interior to be completed.
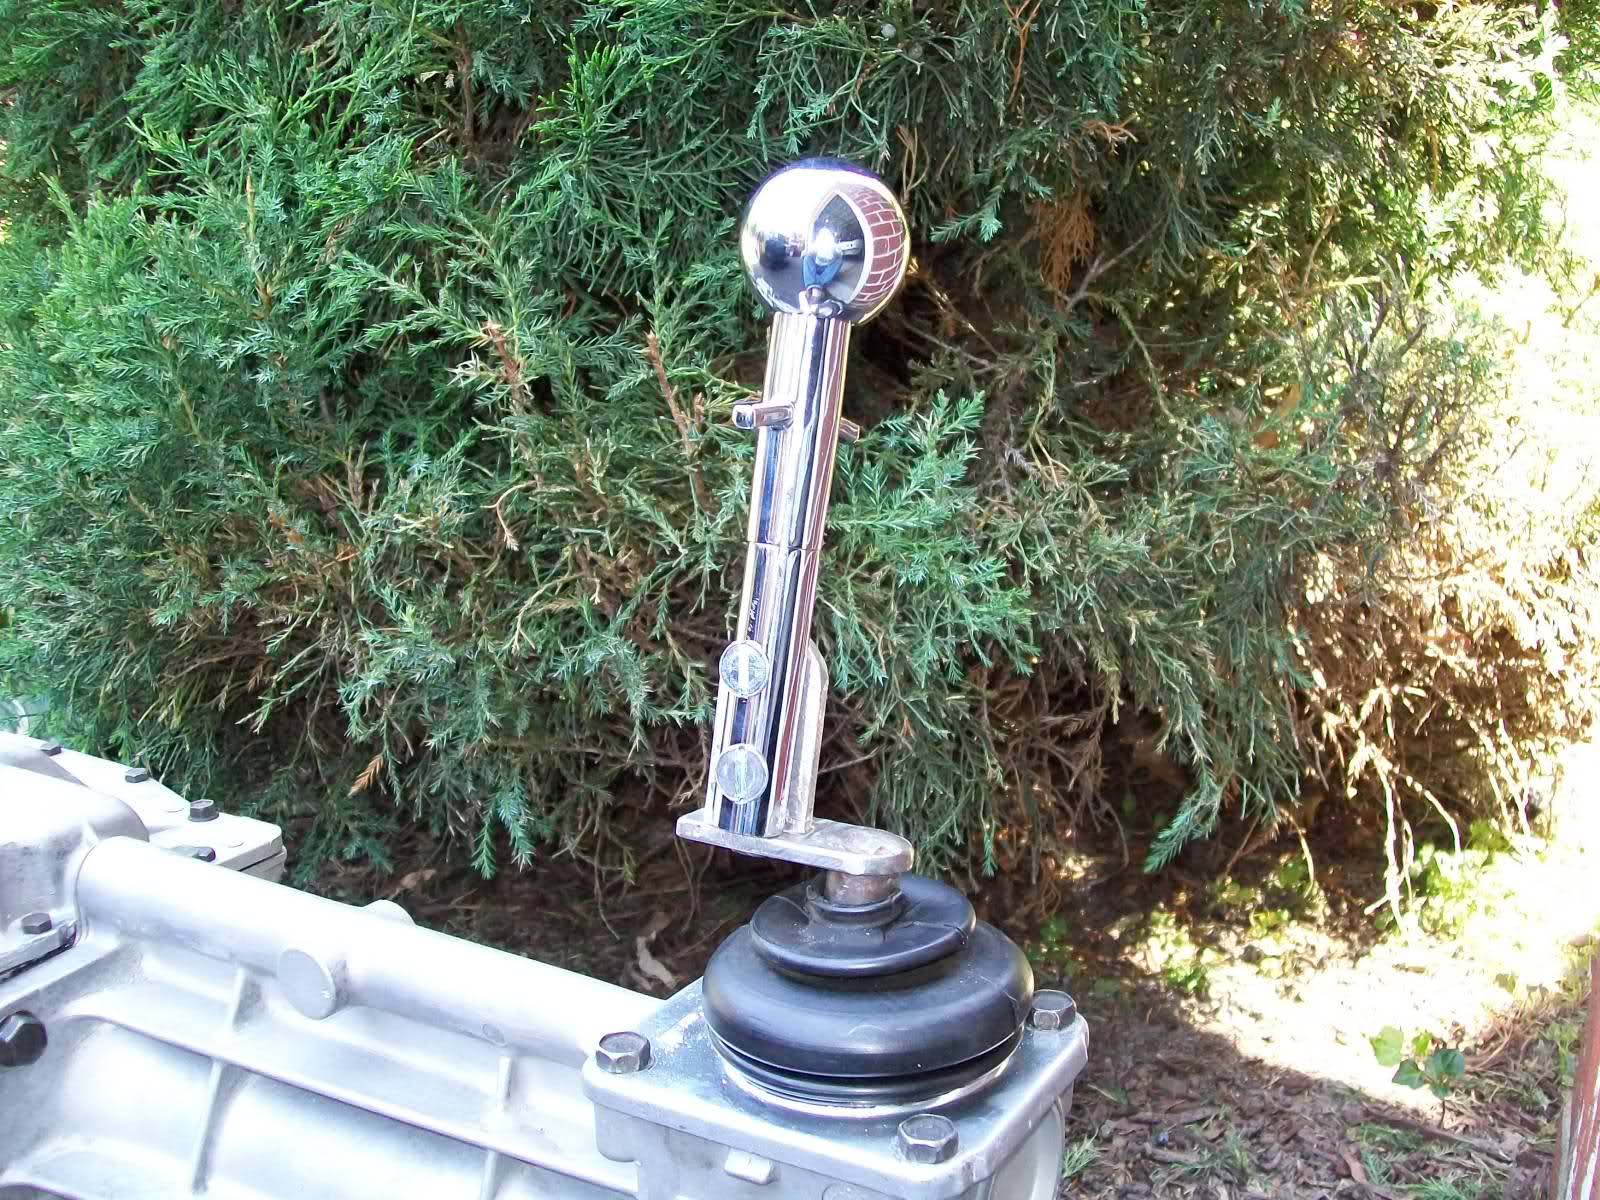
Absolutely beautiful build! . . . I especially like the fuel injection set up - way cool! The only thing that looks slightly out of place is the shifter - too tall. It appears you're using the typical "Hurst" handle sold by many of the vendors for 5 speed transmissions? I have one of those in my '66 with a G-Force Street 5 speed and I modified the shifter to appear more like the original. What I did was clamp the rectangular bottom section in my vise, and using a hacksaw made a vertical cut upwards along the lower round section of the shifter (it's a solid billet piece) and created a "shoulder" the allows the shifter to sit on the shifter base (and the I simply cur off the rectangular bottom part and drilled new holes to bolt the shifter to the base). Here's a photo of what I ended up with:
Attachment 48234318
Attachment 48234318
03-15-2018, 02:25 AM
#186
Racer
Thread Starter
Here is the latest update. We replaced all the weatherstripping in the doors because the rubber was too hard and the doors were not closing properly.. i found weatherstripping that was made in the USA to replace the imported brand. When you looked at both sets they looked similar... but the American made was much softer. The doors close easier and line up much better....so much so that the convertible top didn't line up and i replaced all that weatherstripping as well. The last of the weatherstripping was put in under the hood and we literally just took off the tape that was holding it in place while it dried before I snapped these pics...you can see the hood raised up slightly in the cowl area if you look closely enough... that "should" settle in place after it gets a chance to compress..otherwise more adjusting. Other minor adjustments include the headlight buckets, exhaust pipe on the drivers side needs to be centered and the speedometer needed to be programmed. It will be off to the upholstery shop in the next week or so then on to the finish line! I really like this color too. It looks almost silver in some angles and blue in others depending how the light is hitting it (sun vs florescent). I took most of these pictures this past Saturday...The engine shots are from a few weeks ago.
Last edited by chgc267; 03-15-2018 at 02:27 AM.
The following users liked this post:
chgc267 (03-15-2018)
03-15-2018, 07:55 AM
#188
Safety Car


Love it! I'm sure you are very proud finally getting to this point. Attention to every detail. Right now we are filling sanding filling sanding everyday. This is great inspiration.
The following users liked this post:
chgc267 (03-15-2018)
03-15-2018, 08:23 AM
#189
Hers a option for the top

The following users liked this post:
chgc267 (03-15-2018)
03-15-2018, 10:04 AM
#190
Drifting

Absolutely stunning! Elkhart blue & black stinger is my #1 choice for a 67. Love the stance. And the LED 3rd brake light instead of a reverse light is excellent. Well done.
I agree with you the US made weatherstrips are a lot softer. Bill
I agree with you the US made weatherstrips are a lot softer. Bill
The following users liked this post:
chgc267 (03-15-2018)
03-15-2018, 10:22 AM
#191
Instructor

Beautiful car! I apologize if you've already talked about the stainless or chrome trim around the exhaust tips and I've overlooked it, but it appears you had to make oversized trim pieces to cover the larger than stock exhaust? If so, did you happen to have an extra set made that you might want to sell? I ended up going for larger exhaust through the whole system rather than squeezing down to 2" tips at the end, but that meant having to delete the rear valence trim pieces.
Thanks,
Rick
Thanks,
Rick
The following users liked this post:
chgc267 (03-15-2018)
03-15-2018, 02:15 PM
#192
Instructor
Please disregard previous question. I re-read the full story again and found the pictures on the exhaust tips. Those look amazing, and from the pictures there must've bee a LOT of hours to reproduce those compound curves! Fantastic overall build!
The following users liked this post:
chgc267 (03-15-2018)
The following users liked this post:
chgc267 (03-15-2018)
03-15-2018, 06:16 PM
#194
Racer
Thread Starter
Thanks Rick! Yes those trim pieces were custom made from 304 Stainless and polished. I'm sure it took a lot of time to make...I don't want to know how many hours..I'm just glad I don't have to keep writing checks much longer and finally get to enjoy this thing!!
03-15-2018, 06:28 PM
#195
Racer
Thread Starter
Thank you! The wheels are the "Turbine" edition from EVOD. They are 18"x 9" (6.75" backspace) up front & 18"x 10" (7.75" backspace) in the rear. I had EVOD customize the wheels from how they are shown on their web site. The spokes were all machined smooth and brushed finished (they come rounded and polished). I had them blasted on the inside to add texture, painted them black inside the spokes and inside of the rim too. The Center caps were also custom made for me (they offer a center cap similar to the 63-66 which come with the wheels). I initially had them engrave the flags in the center of the caps but it looked too plain to me. I sent the centers caps back and had them cut a hole in the middle. I was able to use the cross flags that you find on the horn button or other center caps I've seen on line. This saved me $$ because I was ready to do them all over again and it came out great! I purposely did not want to use "Chevrolet" or the bow-tie logo anywhere on the car...Only the cross flags or "Corvette" logos.
Last edited by chgc267; 03-15-2018 at 10:55 PM.
03-26-2018, 06:23 PM
#196
Racer
Thread Starter
Finally dropped the car off last Friday to get the interior finished! Here are a few pics as it comes of the transporter. I held my breath as the car was being backed out of the trailer. The only thing I could think of is "Please don't let that clutch slip as you back that up!" First picture w/ the hood on out in the sun too..Looks great!!

The following users liked this post:
chgc267 (03-28-2018)
03-28-2018, 06:23 PM
#198
Racer
Thread Starter
Thanks!! I really haven't had a chance to drive it except for a few test runs around the industrial park. I have one of those self learning computers and, from what I've been told, I'll need to drive it so it can learn. The car probably has only 5-10 miles on it thus far. When I did get a chance to drive it, it really moved at WOT! However when I let off the gas to drive at a steady speed it ran a little on the rough side. This is where I was told, as well as from FLYNAVY30 in a previous post, where I'll see steady improvements every time I drive it. Fingers crossed!!


The following users liked this post:
chgc267 (04-01-2018)
03-31-2018, 10:43 PM
#200
Melting Slicks

Thanks!! I really haven't had a chance to drive it except for a few test runs around the industrial park. I have one of those self learning computers and, from what I've been told, I'll need to drive it so it can learn. The car probably has only 5-10 miles on it thus far. When I did get a chance to drive it, it really moved at WOT! However when I let off the gas to drive at a steady speed it ran a little on the rough side. This is where I was told, as well as from FLYNAVY30 in a previous post, where I'll see steady improvements every time I drive it. Fingers crossed!!
The following users liked this post:
chgc267 (04-01-2018)