63 Split Window Restomod SRIII Build Thread
 02-20-2014, 11:32 AM
#201
Le Mans Master


65silververt. Are the front to rear brake line you have on your car 3/6"?
Where can i buy wrenches like the one on the picture that fit the fittings on 3/16", 1/4" brake lines and master cylinder fittings
I am sure the wrenches i get here in my country is metric and does not fit proper
I think that using special wrenches like this is the best thing to do and not use regular wrenches that might destroy the fittings on the brake lines when i am going to change the brake lines on my car
Last edited by TheSaint; 02-20-2014 at 11:44 AM.
 02-20-2014, 11:35 AM
#202
Le Mans Master


Member Since: Nov 2003
Location: Maryland
Posts: 5,657
Received 613 Likes
on
368 Posts
St. Jude Donor '05, '09, '15

Where can i buy wrenches like the one on the picture that fit the fittings on 3/16", 1/4" brake lines and master cylinder fittings
I think that using special wrenches like this is the best thing to do and not use regular wrenches that might destroy the fittings on the brake lines when i am going to change the brake lines on my car
I think that using special wrenches like this is the best thing to do and not use regular wrenches that might destroy the fittings on the brake lines when i am going to change the brake lines on my car
Tom
02-20-2014, 11:36 AM
#203
Burning Brakes

65silververt. Are the front to rear brake line you have on your car 3/6"?
Where can i buy wrenches like the one on the picture that fit the fittings on 3/16", 1/4" brake lines and master cylinder fittings
I think that using special wrenches like this is the best thing to do and not use regular wrenches that might destroy the fittings on the brake lines when i am going to change the brake lines on my car
02-20-2014, 12:30 PM
#204
Melting Slicks

65silververt. Are the front to rear brake line you have on your car 3/6"?
Where can i buy wrenches like the one on the picture that fit the fittings on 3/16", 1/4" brake lines and master cylinder fittings
I am sure the wrenches i get here in my country is metric and does not fit proper
I think that using special wrenches like this is the best thing to do and not use regular wrenches that might destroy the fittings on the brake lines when i am going to change the brake lines on my car
http://www.ebay.com/itm/Brake-Line-Wrench-Set-Open-Rings-10-13mm-/251455452745?pt=UK_Baby_BabyFeedingUtensils_EH&hash=item3a8be9b649
02-20-2014, 12:34 PM
#205
Melting Slicks
oops forgot, you're in Norway but need standard size.
This listing ships to Norway.
http://www.ebay.com/itm/3pc-Piece-Flare-Nut-WRENCH-SET-3-Brake-Line-SAE-3-8-7-16-1-2-9-16-5-8-11-16-/370995448958?pt=US_Hand_Tools&hash=item56610d4c7e
This listing ships to Norway.
http://www.ebay.com/itm/3pc-Piece-Flare-Nut-WRENCH-SET-3-Brake-Line-SAE-3-8-7-16-1-2-9-16-5-8-11-16-/370995448958?pt=US_Hand_Tools&hash=item56610d4c7e
02-20-2014, 05:31 PM
#206
Racer

A couple good friends, one a serious gear head and the other a machinist both swear by snap-on tools for brake line work. I bought two snap on wrenches that cover the spectrum of brake lines for my Chevy's on eBay and found that they are stronger and fit tighter than my Craftsman tools.
02-20-2014, 05:49 PM
#207
Safety Car

Thread Starter

My craftsman wrenches are super tight. I actually have to wiggle them into place on most of the brake fittings. I don't think you can go wrong with snap on though...either or, its a toss up.
02-22-2014, 05:09 PM
#208
Le Mans Master
I need to have a brake line wrenches in inches and not metric
What about this set that have the following sizes:
SAE: 1/4 X 5/16, 3/8 X 7/16, 1/2 X 9/16, 5/8 X 11/16 X 3/4 X 13/16, 7/8 X 1"
I suppose this kit have the sizes i need?
What about this set that have the following sizes:
SAE: 1/4 X 5/16, 3/8 X 7/16, 1/2 X 9/16, 5/8 X 11/16 X 3/4 X 13/16, 7/8 X 1"
I suppose this kit have the sizes i need?
02-22-2014, 07:15 PM
#209
Safety Car
Thread Starter
You guys sure do like to talk about wrenches. 
The car bit me for the first time yesterday. I did not initially realize that the hole on the 63 Corvettes was smaller at the # 3 location since they were hard mounted. I am soft mounting this car, so i drilled out the hole for the 64 up mount. I was using my finger to align the mount with the hole and i released the jack pressure too quickly with the other hand. Want to know how long it takes before you realize your finger is pinched between the body and frame? About .02 seconds. Fortunately i did not yank on my finger and jacked the body back up quickly to release my finger. It doesn't look terrible, but the wound is deep under the skin. I've never built a car without wounding myself at least once. I suppose this is rather minor to past injuries.
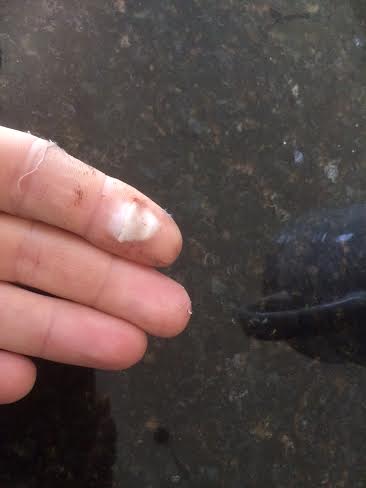
The car bit me for the first time yesterday. I did not initially realize that the hole on the 63 Corvettes was smaller at the # 3 location since they were hard mounted. I am soft mounting this car, so i drilled out the hole for the 64 up mount. I was using my finger to align the mount with the hole and i released the jack pressure too quickly with the other hand. Want to know how long it takes before you realize your finger is pinched between the body and frame? About .02 seconds. Fortunately i did not yank on my finger and jacked the body back up quickly to release my finger. It doesn't look terrible, but the wound is deep under the skin. I've never built a car without wounding myself at least once. I suppose this is rather minor to past injuries.
Last edited by 65silververt; 02-22-2014 at 07:19 PM.
02-22-2014, 09:38 PM
#210
Le Mans Master
You guys sure do like to talk about wrenches.
The car bit me for the first time yesterday. I did not initially realize that the hole on the 63 Corvettes was smaller at the # 3 location since they were hard mounted. I am soft mounting this car, so i drilled out the hole for the 64 up mount. I was using my finger to align the mount with the hole and i released the jack pressure too quickly with the other hand. Want to know how long it takes before you realize your finger is pinched between the body and frame? About .02 seconds. Fortunately i did not yank on my finger and jacked the body back up quickly to release my finger. It doesn't look terrible, but the wound is deep under the skin. I've never built a car without wounding myself at least once. I suppose this is rather minor to past injuries.

The car bit me for the first time yesterday. I did not initially realize that the hole on the 63 Corvettes was smaller at the # 3 location since they were hard mounted. I am soft mounting this car, so i drilled out the hole for the 64 up mount. I was using my finger to align the mount with the hole and i released the jack pressure too quickly with the other hand. Want to know how long it takes before you realize your finger is pinched between the body and frame? About .02 seconds. Fortunately i did not yank on my finger and jacked the body back up quickly to release my finger. It doesn't look terrible, but the wound is deep under the skin. I've never built a car without wounding myself at least once. I suppose this is rather minor to past injuries.
02-22-2014, 09:42 PM
#211
Team Owner


Member Since: Apr 2008
Location: Coloring within the lines
Posts: 27,336
Received 1,919 Likes
on
1,332 Posts


 02-24-2014, 10:37 PM
#212
Safety Car
Thread Starter
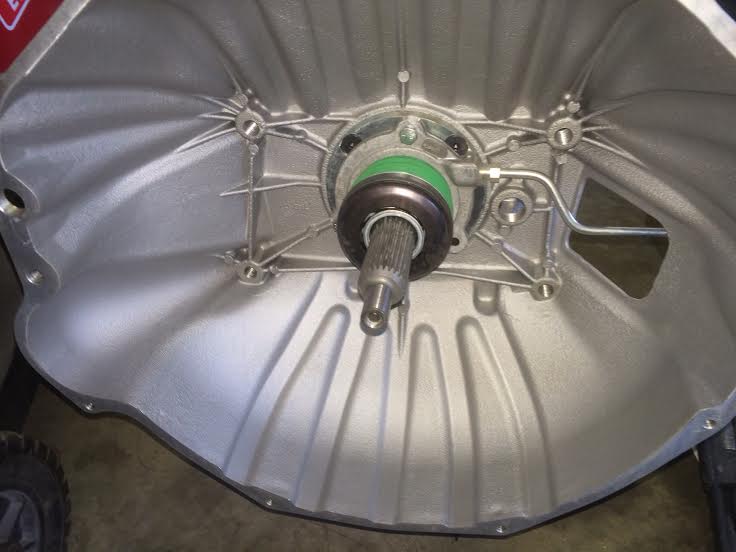
Prepping the TKO 5 speed conversion for install. I removed the bearing retainer, retrieved the bearing race from it, and installed the new bearing retainer and hydraulic throw out bearing.
Other than that, I have just been working on wiring and lots of it.
Other than that, I have just been working on wiring and lots of it.
02-24-2014, 11:10 PM
#213
Safety Car
Thread Starter
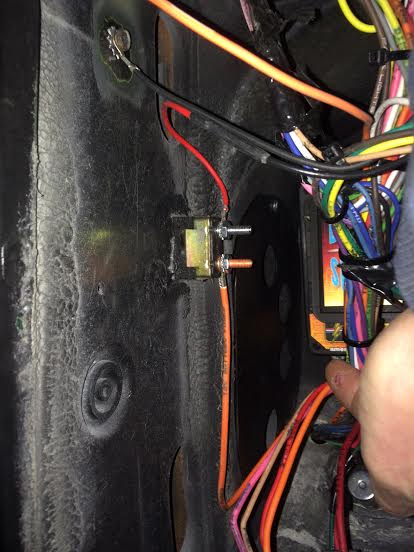
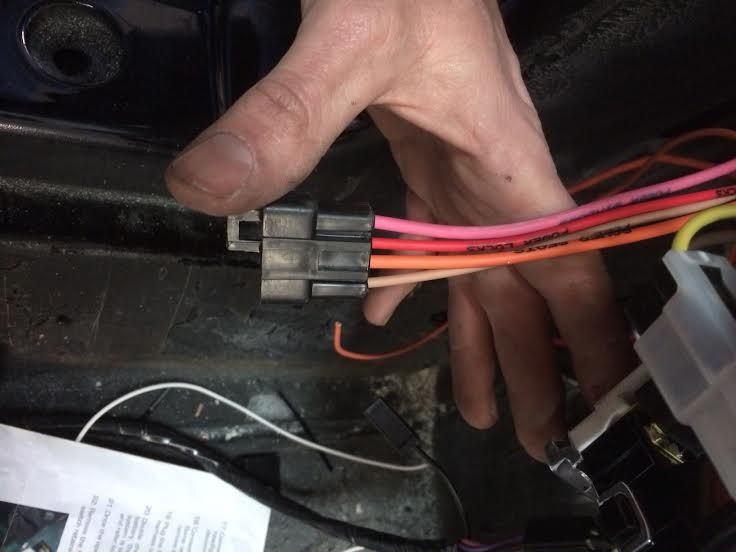
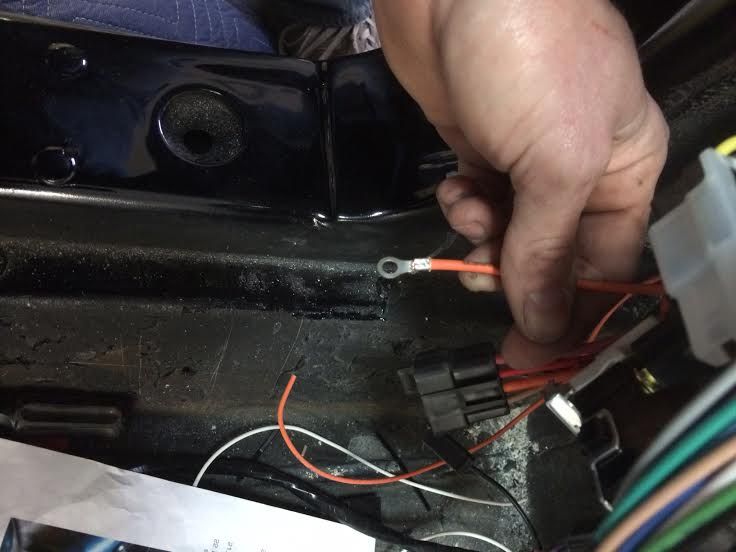
Ok Ben, I finally have the wiring update.
I picked the American AutoWire Builders Series harness, which was around 420.00 i believe.
I mounted it on the left hand side of the firewall in the same location as the original harness. I glassed in the rectangular hole where the original harness passed through the firewall. Excuse the zip ties! They are temporary.
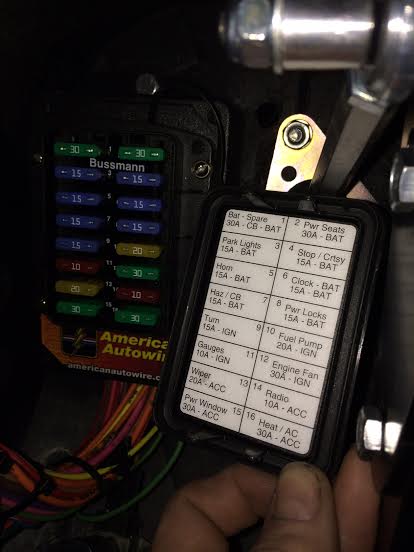
The kit comes with the correct floor dimmer switch, just FYI.
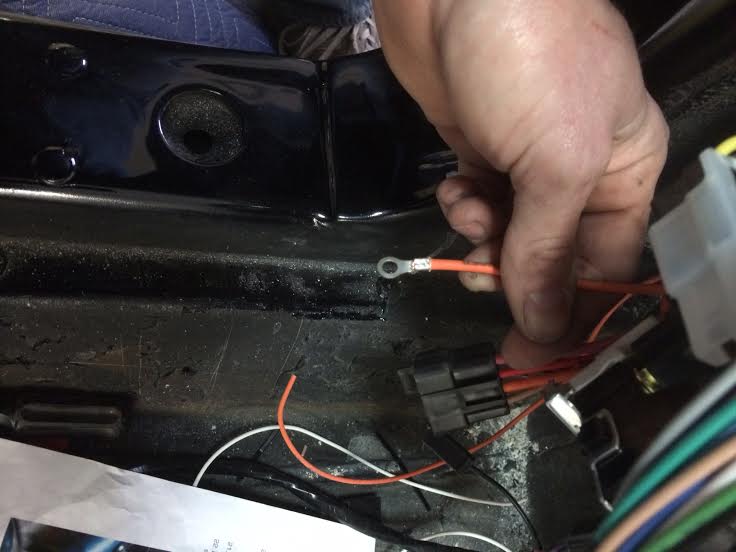
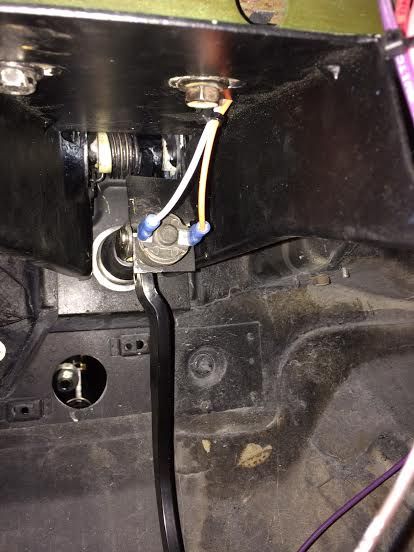
Brake switch wires are very straightforward. I simply used insulated plastic terminals because that was all I had at the moment, but If you want a more finished or original look, the original style push on terminals are available from American auto wire.
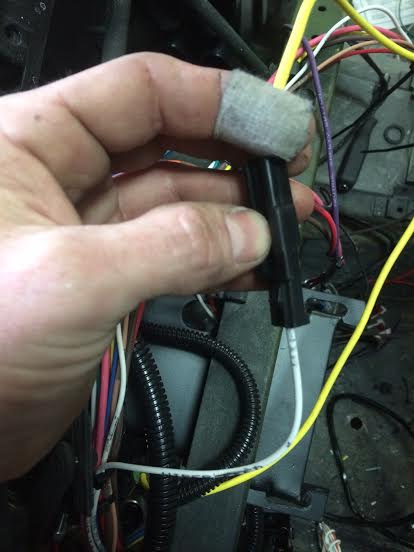
This kit also comes with a new headlamp switch. Since you are using the Detroit Speed headlamp motor kit like me, you will need to move the parking lamp wire to the position where it is not on when the headlamps are on. The instructions from Detroit Speed are very good, so you shouldnt have any issues figuring out what i mean. ALSO, the Detroit speed headlamp kit comes with its own harness, so none of the original harness is needed, unless you want the headlamp warning indicator to still work. The only other wires you will need to run besides turn, parking lamp, high beam, low beam, horn, and fan, are the grounds.
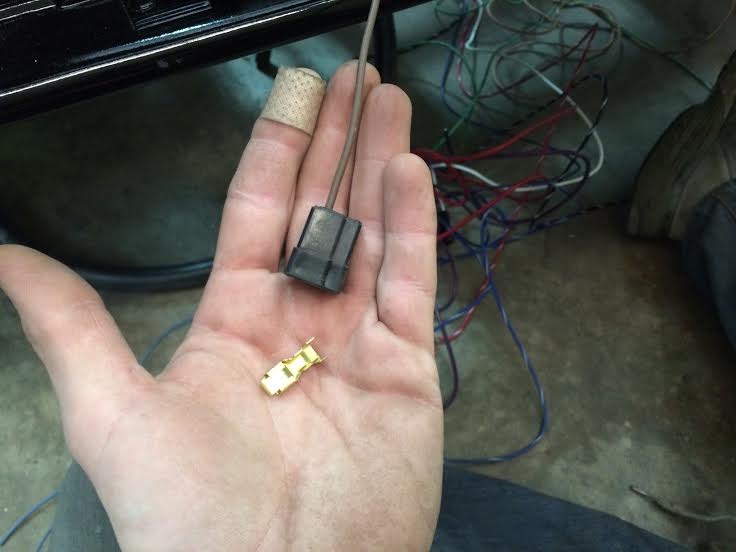
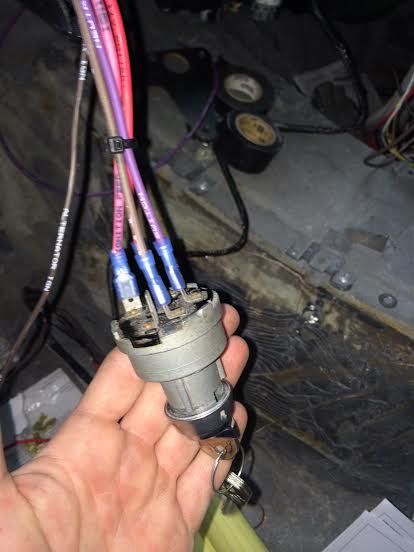
I could not find an extra plug for the ignition switch and I did not want to use the switch that cam with the kit, so i ended up using insulated crimp terminals.

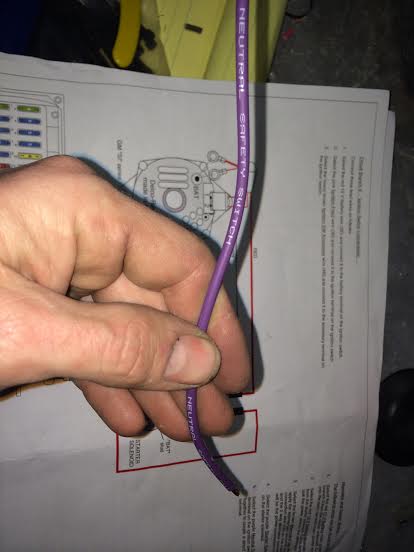
The purple wire can be run directly to the starter solenoid or to a neutral safety switch, then to the starter solenoid. I like to use the neutral safety switch.
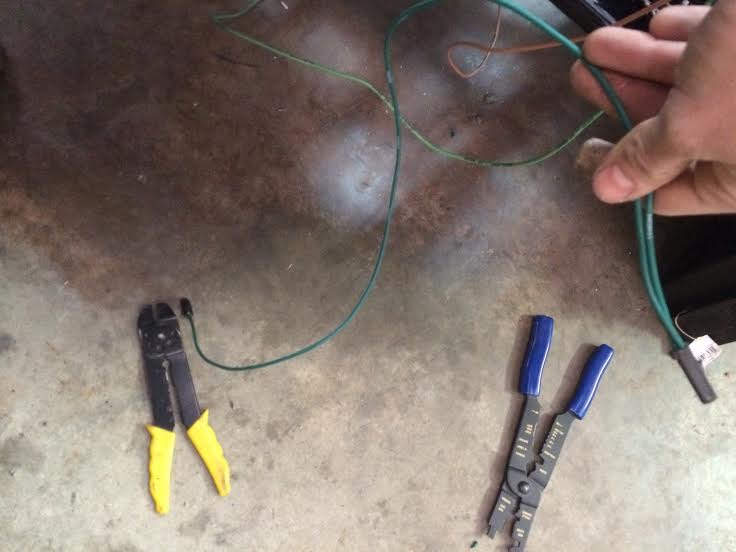
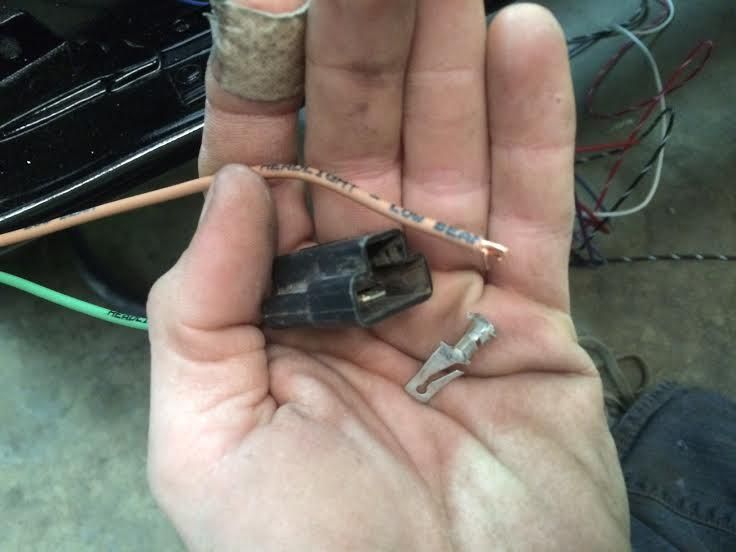
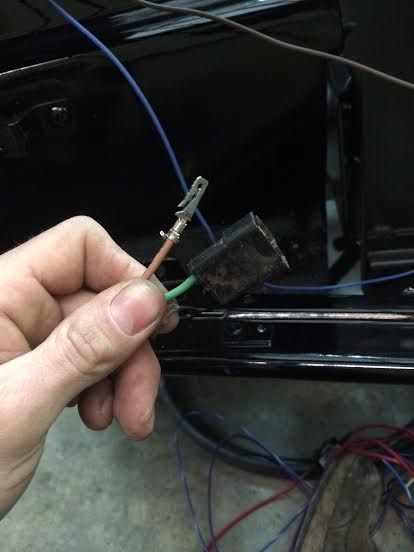
You are going to need to obtain the correct female clips for the parking lamps and headlamps. They can also be purchased from AAW


Horn wiring. If you want to run two horns, then you will need to run a jumper wire from the first plug. These terminals came in the kit.
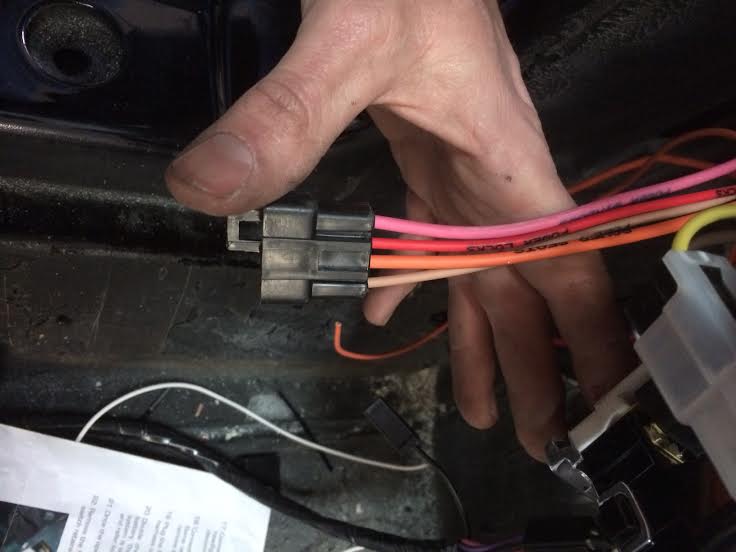
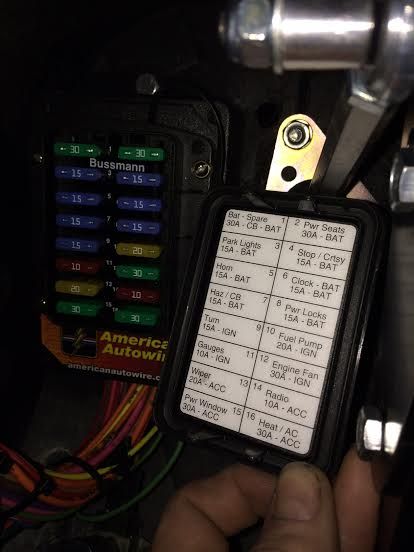
The nice thing about the AAW harness is it comes with plenty of accessory feeds.
I used one of the extra 12V feeds for the headlamp motors. I used a stock style circuit breaker for the motors and the power windows.
I am using the Detroit Speed wiper motor kit, which comes with its own wiring harness, so all you need is the one feed wire from the AAW harness to connect to the detroit speed unit.
It also has a feed wire for the heater/ac unit.
I used a new stock rear harness and simply connected the wires from the AAW harness for brakes, back up lamps, running lights, sending unit, etc.
My GM engine management harness came with relays for the fuel pump and the electric radiator fan. If your harness does not have those, then you will need to purchase and install them.
Also, the AAW system only came with one courtesy lamp connection, so i had to purchase their courtesy lamp kit for 25.00
I hope that helps! Sorry the photos arent the best.
I picked the American AutoWire Builders Series harness, which was around 420.00 i believe.
I mounted it on the left hand side of the firewall in the same location as the original harness. I glassed in the rectangular hole where the original harness passed through the firewall. Excuse the zip ties! They are temporary.
The kit comes with the correct floor dimmer switch, just FYI.
Brake switch wires are very straightforward. I simply used insulated plastic terminals because that was all I had at the moment, but If you want a more finished or original look, the original style push on terminals are available from American auto wire.
This kit also comes with a new headlamp switch. Since you are using the Detroit Speed headlamp motor kit like me, you will need to move the parking lamp wire to the position where it is not on when the headlamps are on. The instructions from Detroit Speed are very good, so you shouldnt have any issues figuring out what i mean. ALSO, the Detroit speed headlamp kit comes with its own harness, so none of the original harness is needed, unless you want the headlamp warning indicator to still work. The only other wires you will need to run besides turn, parking lamp, high beam, low beam, horn, and fan, are the grounds.
I could not find an extra plug for the ignition switch and I did not want to use the switch that cam with the kit, so i ended up using insulated crimp terminals.
The purple wire can be run directly to the starter solenoid or to a neutral safety switch, then to the starter solenoid. I like to use the neutral safety switch.
You are going to need to obtain the correct female clips for the parking lamps and headlamps. They can also be purchased from AAW
Horn wiring. If you want to run two horns, then you will need to run a jumper wire from the first plug. These terminals came in the kit.
The nice thing about the AAW harness is it comes with plenty of accessory feeds.
I used one of the extra 12V feeds for the headlamp motors. I used a stock style circuit breaker for the motors and the power windows.
I am using the Detroit Speed wiper motor kit, which comes with its own wiring harness, so all you need is the one feed wire from the AAW harness to connect to the detroit speed unit.
It also has a feed wire for the heater/ac unit.
I used a new stock rear harness and simply connected the wires from the AAW harness for brakes, back up lamps, running lights, sending unit, etc.
My GM engine management harness came with relays for the fuel pump and the electric radiator fan. If your harness does not have those, then you will need to purchase and install them.
Also, the AAW system only came with one courtesy lamp connection, so i had to purchase their courtesy lamp kit for 25.00
I hope that helps! Sorry the photos arent the best.
Last edited by 65silververt; 02-25-2014 at 08:39 AM.
02-25-2014, 08:54 AM
#214
Melting Slicks

Nice job. In retrospect I should have done that on mine. I had all new stock harnesses already but after adding Speed direct headlight motors & wiper kits, Vintage air, Dakota Digital dash, and an additional 6 panel fuse box you wouldn't even recognize the original harness.
I should have just sold the original harness and bought one of those. Live and learn.
I should have just sold the original harness and bought one of those. Live and learn.
Last edited by biggd; 02-25-2014 at 09:29 AM.
02-25-2014, 11:32 AM
#215
Safety Car
Thread Starter
Nice job. In retrospect I should have done that on mine. I had all new stock harnesses already but after adding Speed direct headlight motors & wiper kits, Vintage air, Dakota Digital dash, and an additional 6 panel fuse box you wouldn't even recognize the original harness.
I should have just sold the original harness and bought one of those. Live and learn.
I should have just sold the original harness and bought one of those. Live and learn.
However, the one piece that does make sense to use is the rear harness.
02-25-2014, 11:58 AM
#216
Melting Slicks
I did that on the 66 I built last year. I ended up cutting out the majority of the front harness, so what is the point? Now that reproduction harnesses cost so much, it's like throwing money down the drain. The main harness gets hacked to pieces as well when aftermarket gauges, radio, and the vintage ac are added. Plus, i would prefer a restomod to have upgraded fuses over the original glass units.
However, the one piece that does make sense to use is the rear harness.
However, the one piece that does make sense to use is the rear harness.
02-25-2014, 01:29 PM
#217
Safety Car
Thread Starter
After having a small fire break out during a stock restoration two years ago, im scared to use old wiring. Im always amazed at how brittle the engine harness usually is. However, ive had main harnesses that appeared to be like new once unwrapped. Old wiring is always good for the connectors though!!! Those little plastic connectors get expensive fast!
02-25-2014, 01:34 PM
#218
Safety Car
Thread Starter
Ben, here is the Courtesy lamp kit you will want if you go with the same harness i used. Im having a hard time finding the terminals you will need on their webpage though. Probably best to order one of their catalogs and just thumb through it for the smaller items.
http://www.americanautowire.com/shop...connection-kit
http://www.americanautowire.com/shop...connection-kit
http://www.americanautowire.com/shop...connection-kit
http://www.americanautowire.com/shop...connection-kit
02-25-2014, 02:09 PM
#219
Ok Ben, I finally have the wiring update.
I picked the American AutoWire Builders Series harness, which was around 420.00 i believe.
I mounted it on the left hand side of the firewall in the same location as the original harness. I glassed in the rectangular hole where the original harness passed through the firewall. Excuse the zip ties! They are temporary.
The kit comes with the correct floor dimmer switch, just FYI.
Brake switch wires are very straightforward. I simply used insulated plastic terminals because that was all I had at the moment, but If you want a more finished or original look, the original style push on terminals are available from American auto wire.
This kit also comes with a new headlamp switch. Since you are using the Detroit Speed headlamp motor kit like me, you will need to move the parking lamp wire to the position where it is not on when the headlamps are on. The instructions from Detroit Speed are very good, so you shouldnt have any issues figuring out what i mean. ALSO, the Detroit speed headlamp kit comes with its own harness, so none of the original harness is needed, unless you want the headlamp warning indicator to still work. The only other wires you will need to run besides turn, parking lamp, high beam, low beam, horn, and fan, are the grounds.
I could not find an extra plug for the ignition switch and I did not want to use the switch that cam with the kit, so i ended up using insulated crimp terminals.
The purple wire can be run directly to the starter solenoid or to a neutral safety switch, then to the starter solenoid. I like to use the neutral safety switch.

You are going to need to obtain the correct female clips for the parking lamps and headlamps. They can also be purchased from AAW

Horn wiring. If you want to run two horns, then you will need to run a jumper wire from the first plug. These terminals came in the kit.

The nice thing about the AAW harness is it comes with plenty of accessory feeds.
I used one of the extra 12V feeds for the headlamp motors. I used a stock style circuit breaker for the motors and the power windows.

I am using the Detroit Speed wiper motor kit, which comes with its own wiring harness, so all you need is the one feed wire from the AAW harness to connect to the detroit speed unit.

It also has a feed wire for the heater/ac unit.
I used a new stock rear harness and simply connected the wires from the AAW harness for brakes, back up lamps, running lights, sending unit, etc.
My GM engine management harness came with relays for the fuel pump and the electric radiator fan. If your harness does not have those, then you will need to purchase and install them.
Also, the AAW system only came with one courtesy lamp connection, so i had to purchase their courtesy lamp kit for 25.00
I hope that helps! Sorry the photos arent the best.
I picked the American AutoWire Builders Series harness, which was around 420.00 i believe.
I mounted it on the left hand side of the firewall in the same location as the original harness. I glassed in the rectangular hole where the original harness passed through the firewall. Excuse the zip ties! They are temporary.
The kit comes with the correct floor dimmer switch, just FYI.
Brake switch wires are very straightforward. I simply used insulated plastic terminals because that was all I had at the moment, but If you want a more finished or original look, the original style push on terminals are available from American auto wire.
This kit also comes with a new headlamp switch. Since you are using the Detroit Speed headlamp motor kit like me, you will need to move the parking lamp wire to the position where it is not on when the headlamps are on. The instructions from Detroit Speed are very good, so you shouldnt have any issues figuring out what i mean. ALSO, the Detroit speed headlamp kit comes with its own harness, so none of the original harness is needed, unless you want the headlamp warning indicator to still work. The only other wires you will need to run besides turn, parking lamp, high beam, low beam, horn, and fan, are the grounds.
I could not find an extra plug for the ignition switch and I did not want to use the switch that cam with the kit, so i ended up using insulated crimp terminals.
The purple wire can be run directly to the starter solenoid or to a neutral safety switch, then to the starter solenoid. I like to use the neutral safety switch.
You are going to need to obtain the correct female clips for the parking lamps and headlamps. They can also be purchased from AAW
Horn wiring. If you want to run two horns, then you will need to run a jumper wire from the first plug. These terminals came in the kit.
The nice thing about the AAW harness is it comes with plenty of accessory feeds.
I used one of the extra 12V feeds for the headlamp motors. I used a stock style circuit breaker for the motors and the power windows.
I am using the Detroit Speed wiper motor kit, which comes with its own wiring harness, so all you need is the one feed wire from the AAW harness to connect to the detroit speed unit.
It also has a feed wire for the heater/ac unit.
I used a new stock rear harness and simply connected the wires from the AAW harness for brakes, back up lamps, running lights, sending unit, etc.
My GM engine management harness came with relays for the fuel pump and the electric radiator fan. If your harness does not have those, then you will need to purchase and install them.
Also, the AAW system only came with one courtesy lamp connection, so i had to purchase their courtesy lamp kit for 25.00
I hope that helps! Sorry the photos arent the best.
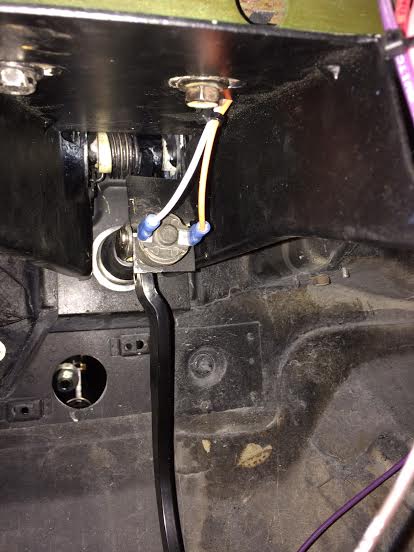
the circuit breaker in the picture will open up under load with high beams on .I need to fine relay to do same thing I can split it up
tying in to the high beam switch to small relay hiding behind kick panel say a two pole dry relay to route new circuit to.Where did you buy your relay from cant fine one . Thanks Richard
 02-25-2014, 04:23 PM
#220
Safety Car
Thread Starter
Here ya go. I haven't installed it yet, but i am going to add it.
http://www.summitracing.com/parts/rfw-hr56/overview/
http://www.summitracing.com/parts/rfw-hr56/overview/