C1 & C2 Corvettes General C1 Corvette & C2 Corvette Discussion, Technical Info, Performance Upgrades, Project Builds, Restorations

63 rear license plate area

Thread Tools
 
Search this Thread
 
Old 12-22-2015, 07:58 PM
  #1  
Frankie the Fink
Team Owner

Thread Starter
 
Frankie the Fink's Avatar
 
Member Since: Aug 2007
Posts: 58,062
Received 7,082 Likes on 4,736 Posts
Army

Default 63 rear license plate area

Could one of you owners of an original 63 take or post a picture of the rear license plate area ? With the license plate removed....

Some prior owner got creative with the holes for the plastic anchors that hold the license plate screws and I'd like to straighten it out

This is what I'm dealing with...
Attached Images  

Last edited by Frankie the Fink; 12-22-2015 at 08:25 PM.
Old 12-22-2015, 08:47 PM
  #2  
SW Vette
Drifting
 
SW Vette's Avatar
 
Member Since: Aug 2015
Location: Santa Monica CA
Posts: 1,391
Received 194 Likes on 158 Posts
C2 of Year Finalist (stock) 2019
2018 C2 of Year Finalist
Default

Originally Posted by Frankie the Fink
Could one of you owners of an original 63 take or post a picture of the rear license plate area ? With the license plate removed....

Some prior owner got creative with the holes for the plastic anchors that hold the license plate screws and I'd like to straighten it out

This is what I'm dealing with...
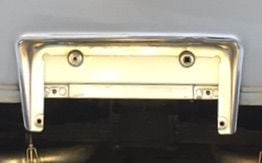
Here ya go Frankie - one side's got the original, small plastic insert; the other side it's removed:
Old 12-22-2015, 10:13 PM
  #3  
Frankie the Fink
Team Owner

Thread Starter
 
Frankie the Fink's Avatar
 
Member Since: Aug 2007
Posts: 58,062
Received 7,082 Likes on 4,736 Posts
Army

Default

Perfect. Just what I needed. Thanks.
Old 12-23-2015, 07:54 AM
  #4  
Frankie the Fink
Team Owner

Thread Starter
 
Frankie the Fink's Avatar
 
Member Since: Aug 2007
Posts: 58,062
Received 7,082 Likes on 4,736 Posts
Army

Default

Originally Posted by SW Vette
Here ya go Frankie - one side's got the original, small plastic insert; the other side it's removed:
Now I have to make THIS look like YOURS
Attached Images  
Old 12-23-2015, 11:45 AM
  #5  
SW Vette
Drifting
 
SW Vette's Avatar
 
Member Since: Aug 2015
Location: Santa Monica CA
Posts: 1,391
Received 194 Likes on 158 Posts
C2 of Year Finalist (stock) 2019
2018 C2 of Year Finalist
Default

Originally Posted by Frankie the Fink
Now I have to make THIS look like YOURS
Much harder to make a hole smaller than bigger. Like I learned in carpentry - you can always cut more off but you can't put it back on. Well, not easily, anyway
Old 12-23-2015, 11:58 AM
  #6  
Frankie the Fink
Team Owner

Thread Starter
 
Frankie the Fink's Avatar
 
Member Since: Aug 2007
Posts: 58,062
Received 7,082 Likes on 4,736 Posts
Army

Default

Yeah and I just love how small jobs turn into 'projects' (* SIGH *)
Attached Images  
Old 12-24-2015, 05:55 AM
  #7  
Chuck Gongloff
Race Director
Support Corvetteforum!
 
Chuck Gongloff's Avatar
 
Member Since: Apr 1999
Location: Beverly Hills/Pine Ridge Florida
Posts: 10,733
Received 561 Likes on 349 Posts

Default

This might help.
Attached Images  
Old 12-24-2015, 06:00 AM
  #8  
Frankie the Fink
Team Owner

Thread Starter
 
Frankie the Fink's Avatar
 
Member Since: Aug 2007
Posts: 58,062
Received 7,082 Likes on 4,736 Posts
Army

Default

That's exactly how mine will look in about 45 minutes after I have coffee and migrate out to the garage. Glass work and paint dried overnight just have to drill the holes for the anchors now. I can't find my square drill bit though...

Are you trying to make me jealous with how clean the underside of that car is ?
Old 12-24-2015, 07:55 AM
  #9  
Chuck Gongloff
Race Director
Support Corvetteforum!
 
Chuck Gongloff's Avatar
 
Member Since: Apr 1999
Location: Beverly Hills/Pine Ridge Florida
Posts: 10,733
Received 561 Likes on 349 Posts

Default

Originally Posted by Frankie the Fink
That's exactly how mine will look in about 45 minutes after I have coffee and migrate out to the garage. Glass work and paint dried overnight just have to drill the holes for the anchors now. I can't find my square drill bit though...

Are you trying to make me jealous with how clean the underside of that car is ?
Harbor Freight sells square drill bits. Problem is they're metric, so you have to sorta grind to make SAE stuff fit.

That pic was taken LONG before I cleaned and detailed the undercarriage, Frank. That photo is a Third Flight level at best.

After 2 solid weeks of work, it looks MUCH better today.

Chuck
Old 12-24-2015, 10:48 AM
  #10  
Frankie the Fink
Team Owner

Thread Starter
 
Frankie the Fink's Avatar
 
Member Since: Aug 2007
Posts: 58,062
Received 7,082 Likes on 4,736 Posts
Army

Default

Done well enough for now...nobody sees this area anyway (besides me)..
If I spend any more time in the garage on Christmas Eve I'm gonna be in trouble.

If the judges looking at my chassis expect that level of cleanliness then there'll be projectile vomiting for sure...there just isn't time enough to strap that on at this point...
Attached Images  

Last edited by Frankie the Fink; 12-24-2015 at 10:53 AM.
Old 12-24-2015, 04:13 PM
  #11  
Chuck Gongloff
Race Director
Support Corvetteforum!
 
Chuck Gongloff's Avatar
 
Member Since: Apr 1999
Location: Beverly Hills/Pine Ridge Florida
Posts: 10,733
Received 561 Likes on 349 Posts

Default

You know I'm teasin' ya.

Your car looks great. Your repair also looks great.

Chuck
Old 12-24-2015, 05:03 PM
  #12  
Frankie the Fink
Team Owner

Thread Starter
 
Frankie the Fink's Avatar
 
Member Since: Aug 2007
Posts: 58,062
Received 7,082 Likes on 4,736 Posts
Army

Default

Except I dropped a socket from overhead when re-installing the spare tire tub. It hit my glasses and chipped my Varilux lens on my glasses. So, getting those correct license plate screws straightened out cost me about $250... Merry Christmas !
Old 12-24-2015, 05:10 PM
  #13  
Chuck Gongloff
Race Director
Support Corvetteforum!
 
Chuck Gongloff's Avatar
 
Member Since: Apr 1999
Location: Beverly Hills/Pine Ridge Florida
Posts: 10,733
Received 561 Likes on 349 Posts

Default

Originally Posted by Frankie the Fink
Except I dropped a socket from overhead when re-installing the spare tire tub. It hit my glasses and chipped my Varilux lens on my glasses. So, getting those correct license plate screws straightened out cost me about $250... Merry Christmas !
Chump change for a man of your means, Frank.

Chuck
Old 12-24-2015, 05:23 PM
  #14  
Frankie the Fink
Team Owner

Thread Starter
 
Frankie the Fink's Avatar
 
Member Since: Aug 2007
Posts: 58,062
Received 7,082 Likes on 4,736 Posts
Army

Default

Originally Posted by Chuck Gongloff
Chump change for a man of your means, Frank.

Chuck
I'm always nervous when a dentist tells me that.
The following users liked this post:
Chuck Gongloff (01-15-2016)
Old 01-15-2016, 10:47 AM
  #15  
gccch
Drifting
 
gccch's Avatar
 
Member Since: Jun 2007
Location: Miami, FL
Posts: 1,474
Received 87 Likes on 35 Posts

Default

Originally Posted by Frankie the Fink
Done well enough for now...nobody sees this area anyway (besides me)..
If I spend any more time in the garage on Christmas Eve I'm gonna be in trouble.

If the judges looking at my chassis expect that level of cleanliness then there'll be projectile vomiting for sure...there just isn't time enough to strap that on at this point...
Is this the correct way to mount the License Bezel? Over the top of the lamp fixture? I am just now going through this now and was thinking the lamp should go on OVER/AFTER the bezel.

Thanks,
Old 01-15-2016, 10:58 AM
  #16  
Frankie the Fink
Team Owner

Thread Starter
 
Frankie the Fink's Avatar
 
Member Since: Aug 2007
Posts: 58,062
Received 7,082 Likes on 4,736 Posts
Army

Default

Originally Posted by gccch
Is this the correct way to mount the License Bezel? Over the top of the lamp fixture? I am just now going through this now and was thinking the lamp should go on OVER/AFTER the bezel.

Thanks,
Hmmm.....I thought you were off your rocker....now I'm wondering if I am

We'll see what others say - I'm fully prepared to be embarrassed (again)
Your way makes sense -- who wants to take the license plate off and remove the bezel to change a light bulb ?

Maybe some other 63 guys will set us (me ?) straight..
Attached Images  

Last edited by Frankie the Fink; 01-15-2016 at 11:27 AM.
Old 01-15-2016, 11:14 AM
  #17  
ChattanoogaJSB
Le Mans Master
Support Corvetteforum!
 
ChattanoogaJSB's Avatar
 
Member Since: Oct 2009
Location: Chattanooga Tennessee
Posts: 5,866
Received 875 Likes on 538 Posts

Default

Frankie- you have high class problems.

Get notified of new replies

To 63 rear license plate area

Old 01-15-2016, 11:51 AM
  #18  
Rich Yanulis
Melting Slicks
 
Rich Yanulis's Avatar
 
Member Since: Feb 2011
Location: Syracuse, NY and Clearwater, FL
Posts: 2,076
Received 196 Likes on 144 Posts

Default

Originally Posted by Frankie the Fink
Maybe some other 63 guys will set us (me ?) straight..
I just looked at my original/unmolested car.

All you do is remove 4 screws and the plastic lens to change the bulb.
Old 01-15-2016, 01:08 PM
  #19  
gccch
Drifting
 
gccch's Avatar
 
Member Since: Jun 2007
Location: Miami, FL
Posts: 1,474
Received 87 Likes on 35 Posts

Default

Originally Posted by Frankie the Fink
Hmmm.....I thought you were off your rocker....now I'm wondering if I am

We'll see what others say - I'm fully prepared to be embarrassed (again)
Your way makes sense -- who wants to take the license plate off and remove the bezel to change a light bulb ?

Maybe some other 63 guys will set us (me ?) straight..
It's not really an issue of changing the bulb... But which goes on first, the bezel or the fixture? From the AIM diagram it is clearly the bezel, but I'm not *sure* that is always an indication of process steps.
Old 01-15-2016, 01:40 PM
  #20  
Rich Yanulis
Melting Slicks
 
Rich Yanulis's Avatar
 
Member Since: Feb 2011
Location: Syracuse, NY and Clearwater, FL
Posts: 2,076
Received 196 Likes on 144 Posts

Default

Originally Posted by gccch
........which goes on first, the bezel or the fixture?
The bezel first, then the light fixture.


Quick Reply: 63 rear license plate area


All times are GMT -4. The time now is 02:01 PM.