Stuck Kingpins


 12-12-2018, 03:54 PM
#22
Le Mans Master

Thread Starter
12-12-2018, 04:35 PM
#23
Drifting


Years ago when I rebuilt my front end, the bushing would fall through, so I guess someone had reamed them, in the past. I ended up making my own bushings. I don't recall how tight, or loose, I fitted them, but they are still good after 100K miles.


 12-13-2018, 07:49 PM
#25
Pro


Don
12-14-2018, 12:49 PM
#26
Le Mans Master
Thread Starter
The shop that I took them to said that they came right out . The problem that I ran into was that there are small plugs below the spring clips that I was not aware of and they were binding. I was wondering why the metal seemed soft when I would hammer on it when the kingpins are hardened . He said that they had to remove the metal plugs first. I guess the older you get you still keep learning . Maybe there is still hope that I will die a smart man .
12-14-2018, 12:56 PM
#27
Le Mans Master
Thread Starter
12-14-2018, 12:59 PM
#28
Race Director


Member Since: Mar 2001
Location: Mustang OK
Posts: 13,842
Received 3,766 Likes
on
1,669 Posts
2023 C1 of the Year Finalist - Modified
2015 C1 of the Year Finalist

The shop that I took them to said that they came right out . The problem that I ran into was that there are small plugs below the spring clips that I was not aware of and they were binding. I was wondering why the metal seemed soft when I would hammer on it when the kingpins are hardened . He said that they had to remove the metal plugs first. I guess the older you get you still keep learning . Maybe there is still hope that I will die a smart man .
I don't think any of us considered this as a problem in removing the kingpins, BECAUSE we THOUGHT that we understood from your earlier comments that you had removed them (as you mentioned, or, as we UNDERSTOOD, that you had removed them in your original post). Quote " I removed the caps and "C" clips--------------------------------- "
Last edited by DZAUTO; 12-14-2018 at 01:16 PM.
12-14-2018, 01:13 PM
#29
Race Director
Member Since: Mar 2001
Location: Mustang OK
Posts: 13,842
Received 3,766 Likes
on
1,669 Posts
2023 C1 of the Year Finalist - Modified
2015 C1 of the Year Finalist
When you rebuild the spindles with new kingpins and bushings, there will be (or should be) two caps, or more correctly, plugs, per side. One goes in the top and one in the bottom--------------------AFTER the kingpin and bushings are installed.
These plugs are welch plugs, which are convex. They fit in a groove in the ends of the spindle bores.
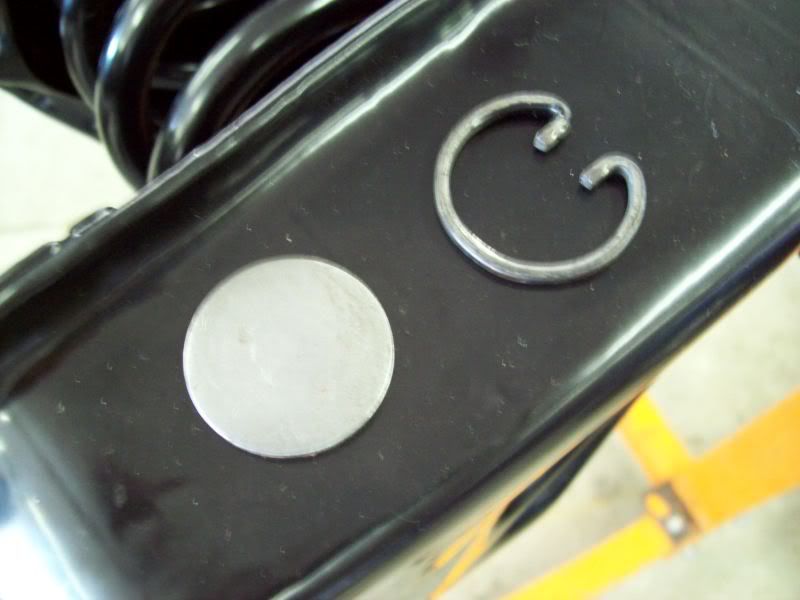
Here is a plug and snap ring.
Here is a plug installed in one end of the spindle bore.
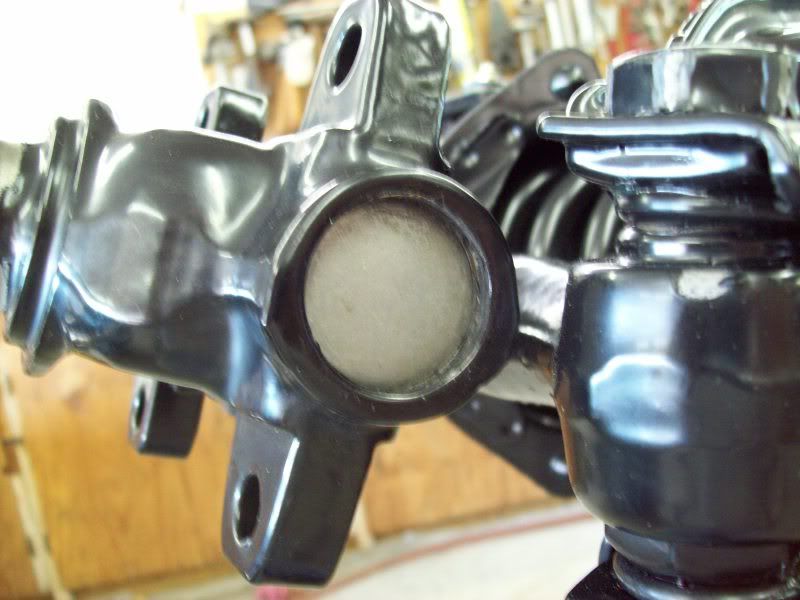
Once the plug is fully seated, then use a punch, ball peen hammer, etc, and firmly tap the convex side of the plug to expand and secure it in the bore.
Then install the snap ring.
USUALLY, kingpin kits come with enough parts to rebuild 2 sides. Each kit has (OR should have) two caps that are installed ONLY on the top of the upper bore. They frequently do not fit very tight, so don't beat on then to get them for fit tight.
These plugs are welch plugs, which are convex. They fit in a groove in the ends of the spindle bores.
Here is a plug and snap ring.
Here is a plug installed in one end of the spindle bore.
Once the plug is fully seated, then use a punch, ball peen hammer, etc, and firmly tap the convex side of the plug to expand and secure it in the bore.
Then install the snap ring.
USUALLY, kingpin kits come with enough parts to rebuild 2 sides. Each kit has (OR should have) two caps that are installed ONLY on the top of the upper bore. They frequently do not fit very tight, so don't beat on then to get them for fit tight.
Last edited by DZAUTO; 12-14-2018 at 01:13 PM.
12-14-2018, 01:18 PM
#30
Race Director
Member Since: Mar 2001
Location: Mustang OK
Posts: 13,842
Received 3,766 Likes
on
1,669 Posts
2023 C1 of the Year Finalist - Modified
2015 C1 of the Year Finalist
Bottom line---------------------------GLAD YOU FINALLY GOT THEM OUT!
12-14-2018, 04:06 PM
#31
Race Director
I always used a center punch to punch through the welch plugs and lever them out. AFTER I removed the center pin retaining bolt.
Doug
Doug
12-14-2018, 05:20 PM
#32
Le Mans Master
Thread Starter
When you rebuild the spindles with new kingpins and bushings, there will be (or should be) two caps, or more correctly, plugs, per side. One goes in the top and one in the bottom--------------------AFTER the kingpin and bushings are installed.
These plugs are welch plugs, which are convex. They fit in a groove in the ends of the spindle bores.
Here is a plug and snap ring.
Here is a plug installed in one end of the spindle bore.
Once the plug is fully seated, then use a punch, ball peen hammer, etc, and firmly tap the convex side of the plug to expand and secure it in the bore.
Then install the snap ring.
USUALLY, kingpin kits come with enough parts to rebuild 2 sides. Each kit has (OR should have) two caps that are installed ONLY on the top of the upper bore. They frequently do not fit very tight, so don't beat on then to get them for fit tight.
12-14-2018, 05:24 PM
#33
Race Director
The drawings in the ST-12 come in handy at times, as well as looking at the parts in the rebuild kit first and saying to your self: I wonder what these flat discs are for?... 
Doug
Doug
12-14-2018, 05:26 PM
#34
Le Mans Master
Member Since: Sep 2008
Location: Lake Minnetonka, Mn
Posts: 5,059
Received 1,717 Likes
on
803 Posts
2018 C1 of Year Finalist

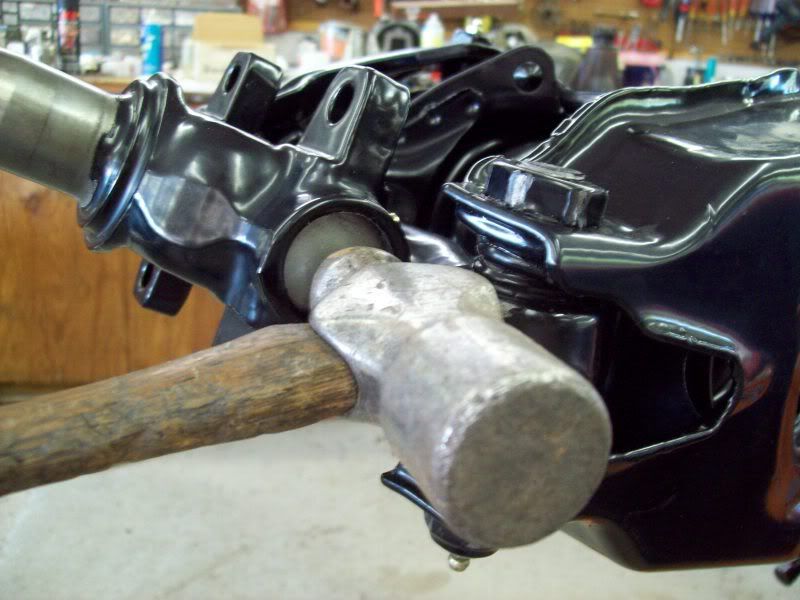
Don't use them on the Kingpins, directly. Use the hammer on the outside of the sleeve and move the hammer around the sleeve. Beforehand, try and use some penetrating oil by removing the zerks and see what happens.
12-14-2018, 05:39 PM
#35
Race Director
Member Since: Mar 2001
Location: Mustang OK
Posts: 13,842
Received 3,766 Likes
on
1,669 Posts
2023 C1 of the Year Finalist - Modified
2015 C1 of the Year Finalist
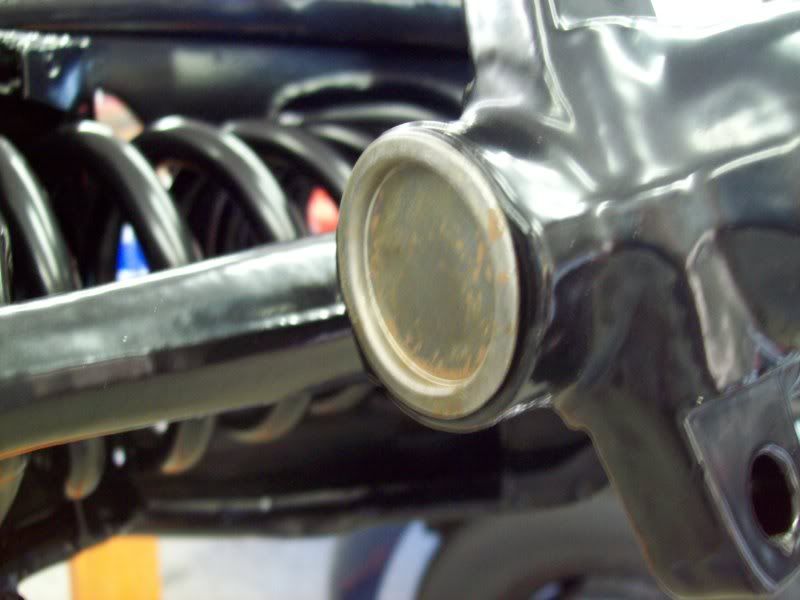
Tom , When I referred to removing the caps I meant the dust caps shown in your bottom photo . Since I never attempted to replace these type of kingpins before and there is no instructions that come with the kit , I was not aware that there were plugs on top of the king pins . What is surprising is that I put them in my 20 ton press and they didn't move . If I would have known that they were there , it would have been easy to remove them before trying to press out the kingpins .
12-14-2018, 06:42 PM
#36
Racer

The shop that I took them to said that they came right out . The problem that I ran into was that there are small plugs below the spring clips that I was not aware of and they were binding. I was wondering why the metal seemed soft when I would hammer on it when the kingpins are hardened . He said that they had to remove the metal plugs first. I guess the older you get you still keep learning . Maybe there is still hope that I will die a smart man .
12-14-2018, 11:26 PM
#37
Le Mans Master
Thread Starter
 12-14-2018, 11:52 PM
#38
Race Director
That's how we learn.
Next time you, or someone else is doing a kingpin job, you can say: I know how to do that!
I have whole catalog of things that didn't go exactly as envisioned, the first time I did them.
Doug
Next time you, or someone else is doing a kingpin job, you can say: I know how to do that!
I have whole catalog of things that didn't go exactly as envisioned, the first time I did them.
Doug

