When you click on links to various merchants on this site and make a purchase, this can result in this site earning a commission. Affiliate programs and affiliations include, but are not limited to, the eBay Partner Network.
There were a lot of guesses as to what the problem could be, but the only way to figure it out is with a good, personal physical inspection of the car.
So Mark trailered the car up from Colorado Springs this morning so we could take a good look at it. He arrived at the Corvette Lounge & Workshop this morning at 10am sharp with the car and beer:
Offloading the car went smooth - the engine would start, but it was making noise...
All set up on the lift for diagnosis:
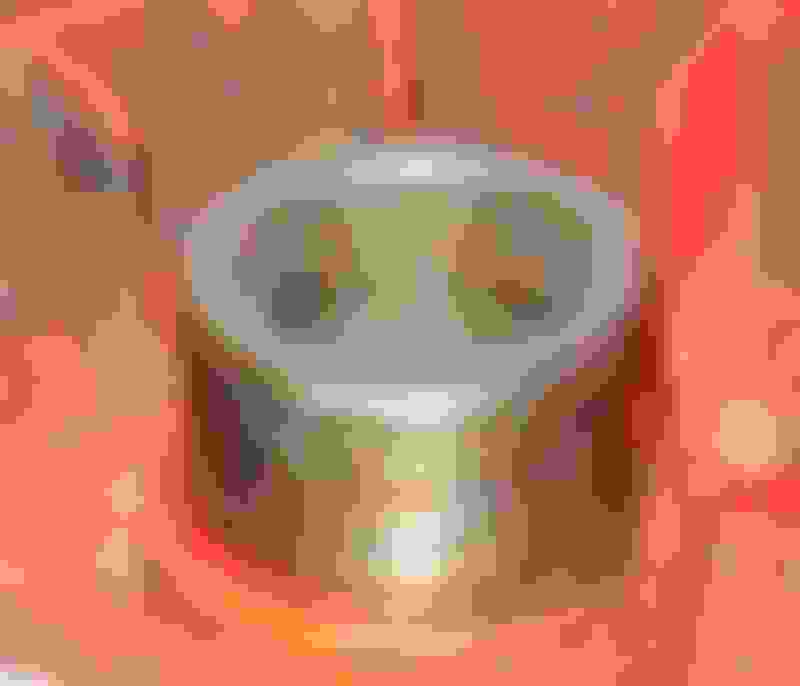
A quick visual inspection showed that the harmonic balancer outer ring had slipped and shifted rearwards over 1/8", so the balancer needs to be replaced.
IMPORTANT NOTE: GM used different balancers over the years with timing lines in different locations. Any time you are going to swap the balancer, do timing chain work, swap timing chain covers, or swap timing pointers, it's a REALLY good idea to verify the actual Top Dead Center (TDC) position of the crankshaft, and to mark this actual position on the harmonic balancer. In the case of Mark's engine, the original 1966 engine had been swapped out with an L79 clone, with the later model timing chain cover. This engine will need the 1969+ balancer in order for the timing lines to be right.
Here the fan and waterpump pulley have been removed, and an air ratchet is used to remove the 3 pulley attach bolts. A 1/2" drive impact was used to removed the balancer center bolt:
Bolts and pulleys removed, and balancer is ready for removal. The rearward shift of the outer ring is now clearly visible:
A good balancer removal tool is essential for easy removal of the pressed-on balancer. It fits easily onto the balancer in the Corvette engine bay:
A few turns of the tool with a ratchet and deep socket...
...and the balancer is off the crank snout:
It is now really obvious where the noise was coming from: The slipped outer ring was rubbing on the timing chain cover just below the timing tab, and it was hitting the raised welded part of the tab:
Lots of rubbing marks on the balancer with heat discoloration from the rubbing friction:
This balancer is shot... outer ring has shifted noticeably rearwards, and it's highly likely that it has also rotated, making timing verification impossible:
A new 8-inch balancer is on order, and the car will be re-assembled and checked out in just a few days. Good thing Mark caught this when he did - these things do a lot of damage if they come apart at elevated rpm...
With the new balancer side-by side the old balancer, I was able to compare the timing marks on the slipped old balancer to the new, correct balancer. The new balancer does not have any of the fancy "turbine" fins on the back side - it's just a sturdy, good quality unit. As noted in my original post, it is important to verify actual TDC of the crankshaft, and to mark this on the balancer. Having done this, both balancers are here placed with their verified "felt-marker" real timing lines in the same position (on the outer diameter not seen in this photos), and the lines you see in this photo are where the actual engraved lines are located. There is a 10-degree difference between the balancers. The new balancer has the felt-marker "verified" line in the same position as the engraved timing line. The old balancer does not. This means that the old balancer has either slipped rotationally (as well as fore-aft), or the wrong balancer was installed for the timing chain cover being used. If you know where you have set your timing, you can check your balancer integrity easily by just shooting it with a timing light: If your timing suddenly changes by 10 degrees with no change in vehicle performance, and for no apparent reason, it's a good indication that your balancer is failing:
A quick coat of Chevy engine orange paint to make it look right:
Then a light coat of grease on both the OD and ID of the balancer hub to assure that it won't gall on the crank snout and to lube the front main seal:
Balancer is then slipped into position on the crank snout, aligning it with the crank snout key:
Balancer installation tool in place, and ready to push the balancer onto the crank:
A few turns of the ratchet with a socket on the tool, and the balancer is firmly seated on the crank:
Installation tool removed, and balancer installed:
Pulleys and all bolts installed:
Job finished up with belts, water pump pulley, and fan:
Engine fired right up, and the job is complete!
However....
I noticed that Mark's vacuum advance control unit is ruptured and leaking vacuum. His timing curve is not set up right. And I don't like the way his carb is set up. I can't let this go. Tomorrow, I'll do a quick performance tune on the car and post the tuning process in a new topic thread here on the Forum. I'll provide a link to that new post here in this thread.
The next car up will be a clutch job on a '62 - watch for that project thread coming up shortly...
Lars, what is your reasoning for replacing the balancer vs rebuilding it by the likes f Damper Dudes in CA. I'm here to learn. Dennis
If it were an original and correct balancer on a numbers-matching engine, that would be a good alternative. However, this is a cheap aftermarket replacement balancer that failed because it wasn't that good to begin with (Mark had it replaced just a few years ago). I can get a better quality part for about $70 and have it delivered here in 2 days.
Thanks Lars. Great meeting you this morning. I knew waiting for you to get an opening in your schedule was going to be worth the wait! I was just getting off I-25 after driving from Lars house back to Colorado Springs when he called and told me what the problem was and the fix. I had the original (I think it was original) balancer replaced in March 2012. Here is the post I started on that problem and how lucky I was not to have it completely disintegrate at a higher speed, https://www.corvetteforum.com/forums...some-help.html
Here is a 2012 photo of the crack in the balancer.
I'll heft a few bottles of Miller Lite tonight in your honor. Larry
Larry -
I'd feel real bad if you hurt yourself drinking that stuff... Mark dropped off some good beer here when he dropped off the car, so in the interest of your health, I should send you a plane ticket so you can sit here in the Corvette Lounge and drink good stuff with proper supervision...
Lars
The Corvette Viking Lounge, where good beer is used to build fast Corvettes:
...and, yes, there is a stripper pole in the lounge, too. It's off to the left out of the picture in the open area for the dancers. I don't want them hitting their heads on the chainfall.
Lars: THANK YOU for your informative and excellent posts here on the CF. We can all learn and benefit from them. Larry
Originally Posted by Factoid
Excellent diagnosis and follow up, thanks for sharing. By the way, I like good beer also!
Thanks for the kind comments - always fun working on this stuff for good people who bring good beer... I'll take a few shots and follow up in this thread with the re-assembly process and test drive results.
I've seen a lot of these fail - it's a very common problem. Every one that I have seen fail has happened suddenly and immediately with no apparent underlying cause or event promoting the failure. Once a balancer has suddenly slipped or shifted (like Mark's did), it will quickly get worse up until it actually comes apart. When they come apart, it's brutal and violent - the last one I saw come apart put a friend in the hospital with a shattered foot from the shrapnel coming out from underneath the parked car he was working on. A short time before that, a Vette that had been in my shop blew the balancer at freeway speed, and the force of the explosion sheared the water pump off the front of the engine, and balancer pieces bouncing back up off the pavement broke the bellhousing in 3 places, and sheared the headpipes off the exhaust manifolds after cutting the hood off the car. This stuff is no joke. Luckily, they usually tend to make a bit of noise (from hitting other parts) before going into catastrophic failure. The oil change and balancer failure were completely coincidental, and were not related events in any way.
Is that side stepping a common thing to inspect for?
I'm moving inspecting mine to top of the work plan as we speak. I've seen the rubber part aged but was unsure at what point was too far to have a safe margin.
Thanks for bringing this forward.
Larry -
I'd feel real bad if you hurt yourself drinking that stuff... Mark dropped off some good beer here when he dropped off the car, so in the interest of your health, I should send you a plane ticket so you can sit here in the Corvette Lounge and drink good stuff with proper supervision...
Lars
The Corvette Viking Lounge, where good beer is used to build fast Corvettes:
...and, yes, there is a stripper pole in the lounge, too. It's off to the left out of the picture in the open area for the dancers. I don't want them hitting their heads on the chainfall.
Lars:
Would it be better if I drank "Dixie" Beer (brewed bottled here in New Orleans) instead ?? It was legend for decades here in the Deep South.....and is now available once again. Except they no longer use Mississippi River water in the recipe.....so the flavor is not as harsh.
In prior days I had a commercial beer dispensing setup at the house, so I have tasted a lot of suds. But time and old age has slowed me down to occasional Miller Lite in cans. Pretty sad, I guess.
Larry
EDIT: Many years ago, just after college, I took an engineering job in SE Texas. I can still remember marking beer runs to west of Dallas to bring back cases of Coors. Once dated the daughter of the South Texas Distributor for Lone Star Beer. That was good times also.
Last edited by Powershift; 01-14-2019 at 07:27 PM.
I once dated the daughter of the South Texas Distributor for Lone Star Beer. That was good times also.
Originally Posted by Factoid
When you’re in SE Texas you drink Shiner!
Hopefully I qualify for your exclusive club and meet your standards. I just took these photos in The Corvette Viking Lounge...
The Lone Star sign hangs above the bar:
If you don't like what's on tap, open the kegerator door and grab a Shiner...:
Lars
Originally Posted by Dennisscars
Is that side stepping a common thing to inspect for?
I'm moving inspecting mine to top of the work plan as we speak. I've seen the rubber part aged but was unsure at what point was too far to have a safe margin.
Thanks for bringing this forward.
The easiest way to check for the condition is to simply throw a timing light on the thing and check your timing. If your timing has suddenly changed from the last time you set it, chances are high that the balancer is failing. The outer ring will usually rotate before it moves forward or backwards, which will give the indication of the timing being way off your normal setting. I caught the balancer on my '85 C4 Vette failing this way, and replaced it before anything bad happened - the outer ring had slipped over 20 degrees, as witnessed by my dial-back timing light.
There was a discussion not long ago about dampers. This is the reason I say no cheap aftermarket dampers. They really don't meet any testing minimums they just make them as cheap as possible and spit them out. They last past warranty so the manufacturer is out of the picture. I only use GM or ATI, stock engine GM race ATI.
Thanks Lars. Great meeting you this morning. I knew waiting for you to get an opening in your schedule was going to be worth the wait! I was just getting off I-25 after driving from Lars house back to Colorado Springs when he called and told me what the problem was and the fix. I had the original (I think it was original) balancer replaced in March 2012. Here is the post I started on that problem and how lucky I was not to have it completely disintegrate at a higher speed, https://www.corvetteforum.com/forums...some-help.html
Here is a 2012 photo of the crack in the balancer.
so you had the original balancer replaced with this one; where did you get the replacement which ultimately failed?
 01-14-2019, 04:39 PM


 Dennis


 Pretty sad, I guess.
 Once dated the daughter of the South Texas Distributor for Lone Star Beer. That was good times also.


