When you click on links to various merchants on this site and make a purchase, this can result in this site earning a commission. Affiliate programs and affiliations include, but are not limited to, the eBay Partner Network.
No, unfortunately that is the Lexan protective liner I’m having trouble removing. I soaked it overnight so hoping to remove the last of it today.
I sure understand the issue you're having with the protective cover on the Lexan. Many years ago I bought a 4' x 8' sheet to make windows for a car I was building at the time. Well, the car got traded before I used the Lexan so that sheet just got stored in my garage. About 25 years later I needed to use some of that Lexan and I thought I'd never get that protective layer off. I almost gave up. I ended up giving the rest of that sheet away.
You all will be happy to know (well, I’m happy to know) the seagull shat stain is gone! I watched a YouTube video where a guy who owned a boat that had Lexan windows with the protective liner in place in the hot sun for years while he built the rest of the boat, shared a trick he learned. Vegetable oil. He spread it on and the next day scraped it off. The crap still gave me a hard time, but I have a plastic scraper in my wrap kit and I had it all off in about 30 minutes. Now, on to the driver side!
As for other changes, I’m open for any suggestions engine bay wise.
Mark there's not a lot of examples of front runner systems out there with a carburetor.
Here's two I found. The valve covers on the 1st one will look familiar.
Those look great for the style of the rest of the car. I’ll give it some thought over the summer while I’m in NY.
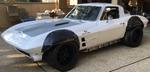
I finished the lights. Like the rest of the car, it’s a 10 footer for sure but I like how it came out.
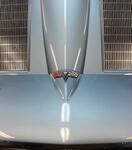
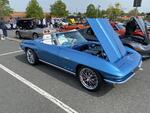
I’m going to finish the hood stripe tomorrow. I think everything hangs together much better than before. I used a strip of ppf to hide some of the unfinished look of the headlight retainers. Might be too much. I’ll live with it awhile and see how I feel. These two were godsends for this job. The plexiglass jigsaw blade ripped through the lexan like butter with virtually no heat. The plexiglass drill bit ensured a perfect hole with little chance of cracking.
Mark it looks great. The headlights and grill totally transformed the front of the car.
"I used a strip of ppf to hide some of the unfinished look of the headlight retainers. Might be too much. I’ll live with it awhile and see how I feel."
As far as your thoughts on the pff go IMCO I think it gives the FIA headlight covers a similar look as the C3 set up. I like it and it's reversible.
Mark,
You're absolutely killing it...looks so much better than before. I know you didn't ask for anyone's opinion BUT...I like the way you did the PPF under the Lexan on either side of the headlight. I think doing that same procedure along the top would look better. Ain't America great!!
Mark
Where did you buy the blade and bit ?
TIA Tom
Amazon. My wife has an account and thinks every package is for her. She gets very excited when they show up and then irritated when “it’s just more car junk”. I find that hilarious!
Completed the main part of the hood stripe today. I’ll do that little front section in the morning. I have to take care of my back and laying out the stripe is backbreaking!
Finding the true centerline on these cars is ridiculous. I’m centering it on the body line even though there is 1/8-1/4” difference when I measure side to side. This worked pretty well. I also made a little cardboard template to ensure the distance between my reference tape stripes are consistent. The orange tape orients the green cutting tape. I’m still irritated at 3M. Cutting tape is supposed to be precise with the cutting wire at the same spot in the tape. Unfortunately, there are some zigs and zags here and there. Once the cutting tape is in place, the orange tape is removed. I cut a piece of 42x15 ppf and trial fit it. It’s wrapped. This one is easy as I just had to push the wrinkles out past the tape. Notice the bumps under the wrap in the front. Two are air bubbles I’ll get out once I trim the ppf. All the others are paint blemishes and dirt under the paint. If I tried to wrap the entire car, it would not look great. This is why people say the surface under a wrap needs to be as smooth as possible. Cut the outer edge of the stripe. And then the two pulls to remove the material between the main stripe and the smaller one. All done with that part. The reason I’m doing the hood in two parts is that I will never be able to get the ppf to lie flat in the acute angle of the hood bulge valley where there is also a converging secondary angle. You will barely be able to see the seam.































 .
.


