
Rookie's first attempt at a restoration...
 01-30-2010, 12:31 AM
#1281
Safety Car

Thread Starter
I was able to scrounge up enough marinetex to start the driver's side panels. I only had enough to bond the rocker cover on though, so I'll have to wait another week before I get to bond the lock pillar plate and dogleg on.
 01-30-2010, 10:46 AM
#1282
Team Owner

Member Since: Sep 2006
Location: Westminster Maryland
Posts: 30,173
Likes: 0
Received 2,878 Likes
on
2,515 Posts

Hi S,
There is something really interesting and beautiful in seeing the birdcage and fiberglass bodywork together. So much great work gets covered up.
I'm posting a picture to show you what I mean. Please don't think I want to disrupt your thread!
Regards,
Alan
There is something really interesting and beautiful in seeing the birdcage and fiberglass bodywork together. So much great work gets covered up.
I'm posting a picture to show you what I mean. Please don't think I want to disrupt your thread!
Regards,
Alan
01-30-2010, 11:29 AM
#1283
Safety Car
Thread Starter
Alan,
I know exactly what you mean...and do not worry about interrupting my thread - you aren't in any way. I enjoy seeing your posts with pics...keeps me motivated. I'm aggravated that I can't bond the lock pillar plate and dog leg on until I get my bonding adhesive in the mail...noone here has marinetex
I guess I will start working on something else for the time being.
01-30-2010, 03:56 PM
#1284
Team Owner
Member Since: Sep 2006
Location: Westminster Maryland
Posts: 30,173
Likes: 0
Received 2,878 Likes
on
2,515 Posts
Hi S,
Trying to make a joke here..... don't they use marine-tex on ICE boats???? I'd think it would be available EVERYWHERE in Alberta in January.
Regards,
Alan
Trying to make a joke here..... don't they use marine-tex on ICE boats???? I'd think it would be available EVERYWHERE in Alberta in January.
Regards,
Alan
01-30-2010, 07:16 PM
#1285
Safety Car
Thread Starter
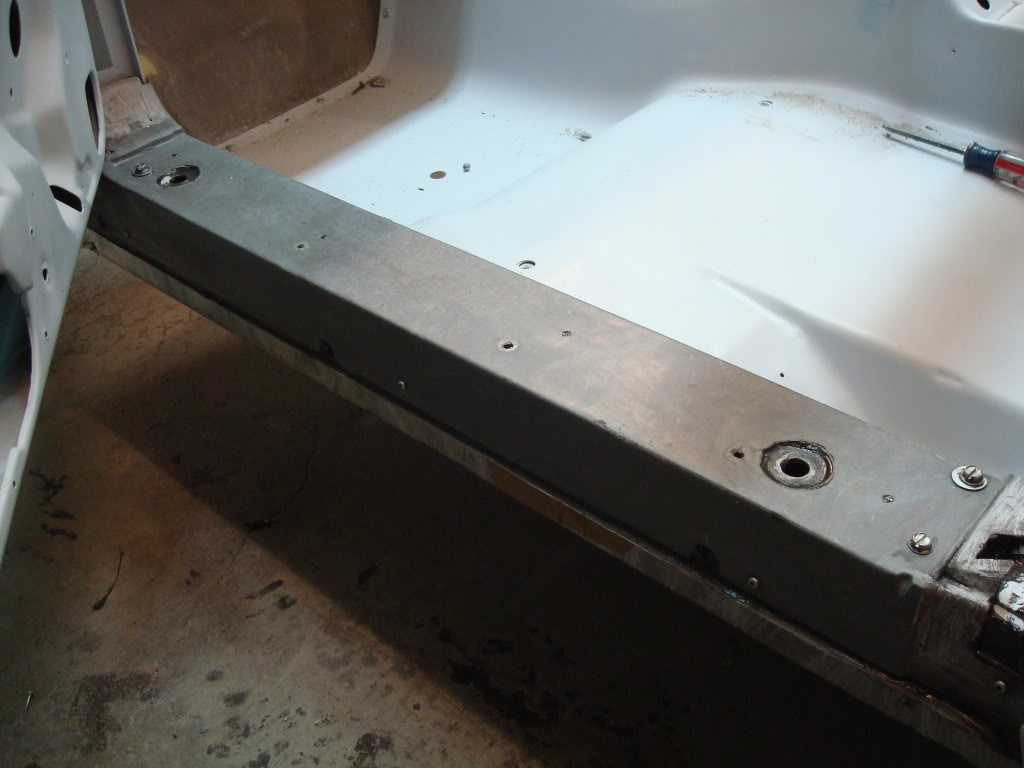
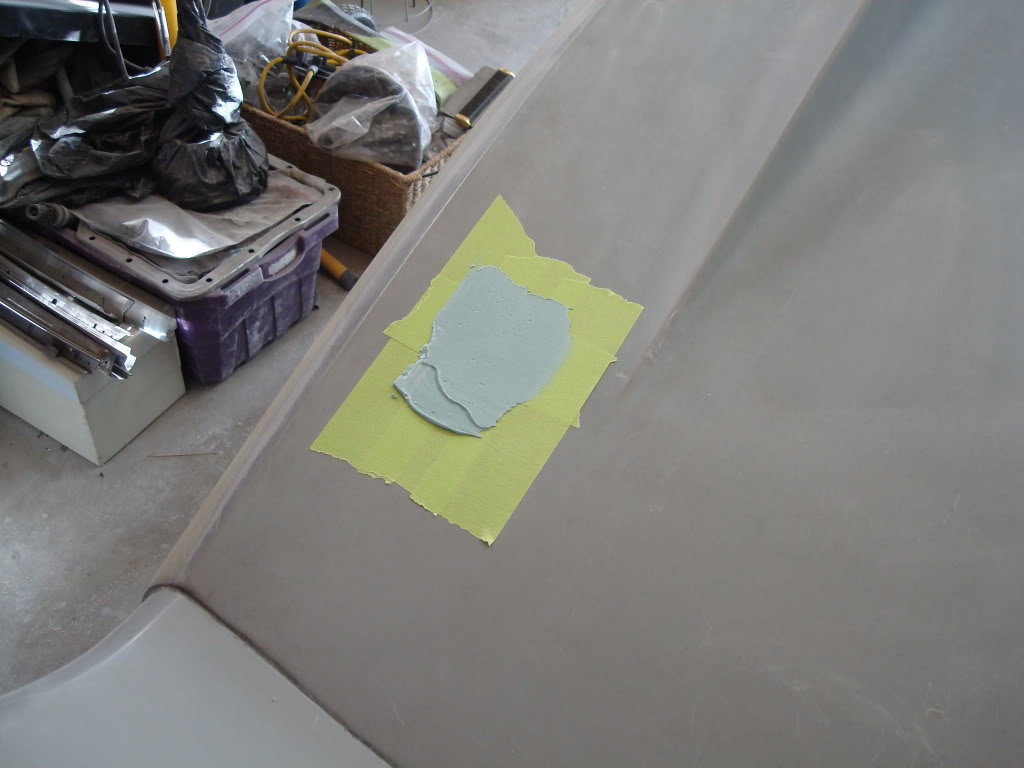
The right bonding seam was bugging me. There were a few air bubbles in it from the last time I did it. I ground the seam down, and added a few layers of glass. I also ground out Bubba's repair, and glassed that in too. I had to grind the holes from the screws until they were way below the panel - this way, they will have no effect on the outer surface. Enjoy the pics - I have a sh*t load of blocking to do tomorrow...and I'm not looking forward to it. I can't stand laying glass...it takes forever.

Last edited by stinger12; 03-13-2011 at 04:37 PM.
02-01-2010, 04:19 PM
#1286
Safety Car
Thread Starter
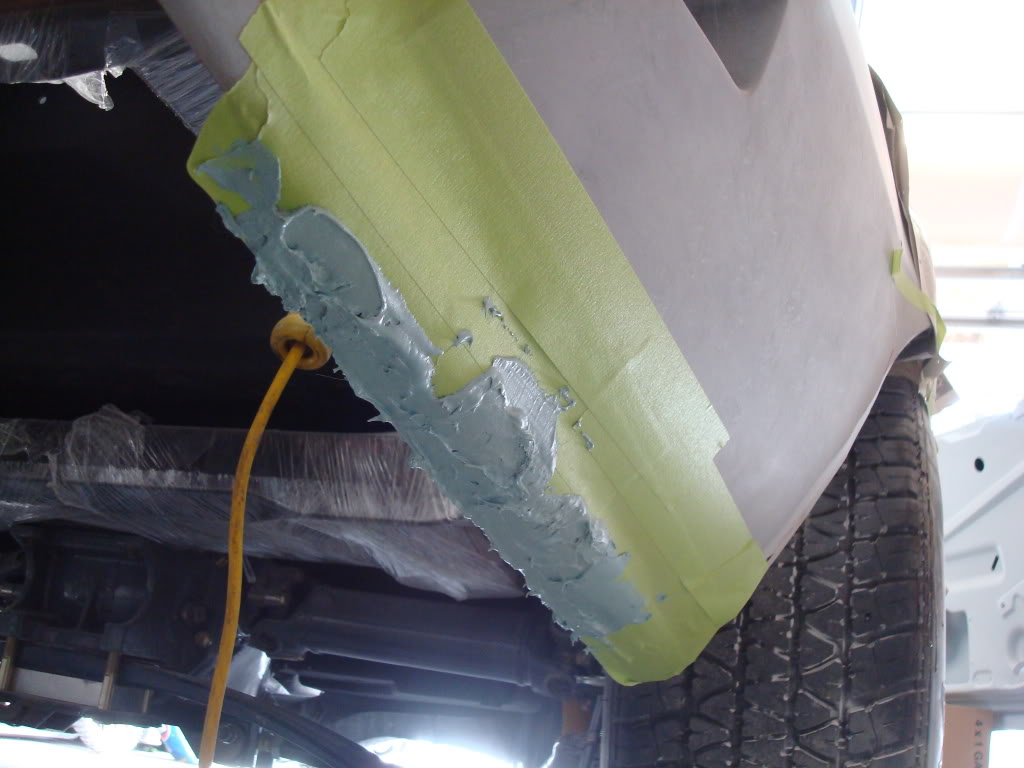
Here are some pics of the right bonding strip...I'm almost done blocking it.
I also started prepping some odds and ends on the body for fiberglass. I'm getting rid of the antenna hole. First I need to put a few layers of glass underneath the hole, then I will grind the outside and glass the hole shut. I also started to repair the bottom of the quarter, where GM broke some fiberglass so it would clear the stock exhaust. Every repair needs to be done with fiberglass matte.
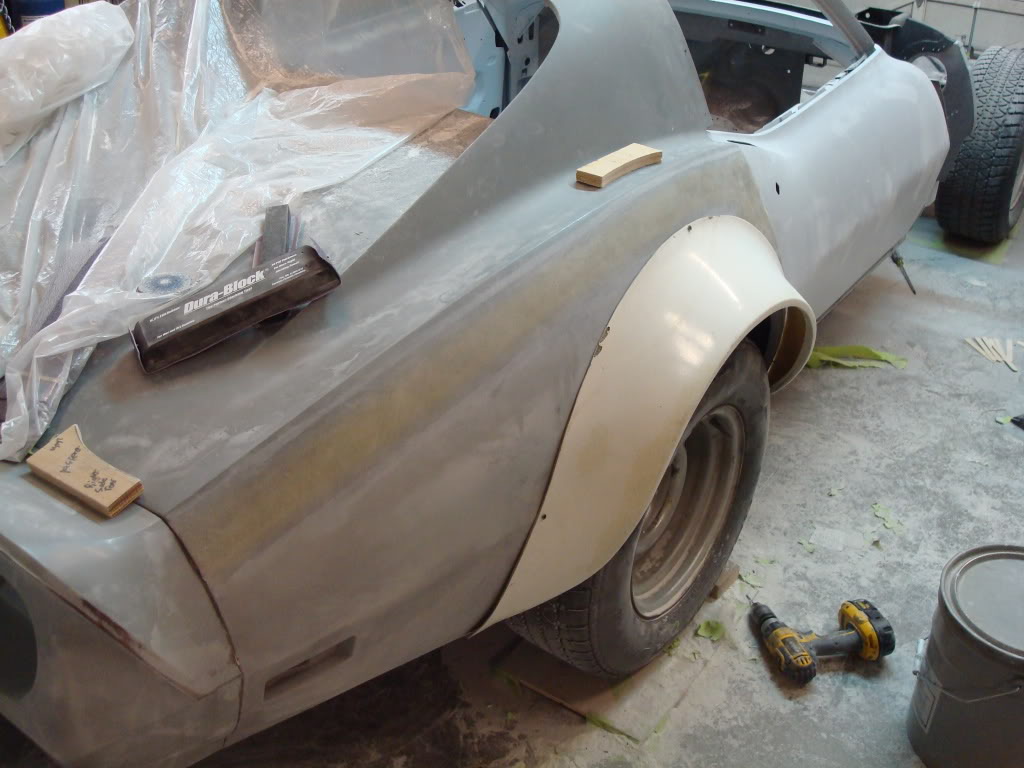
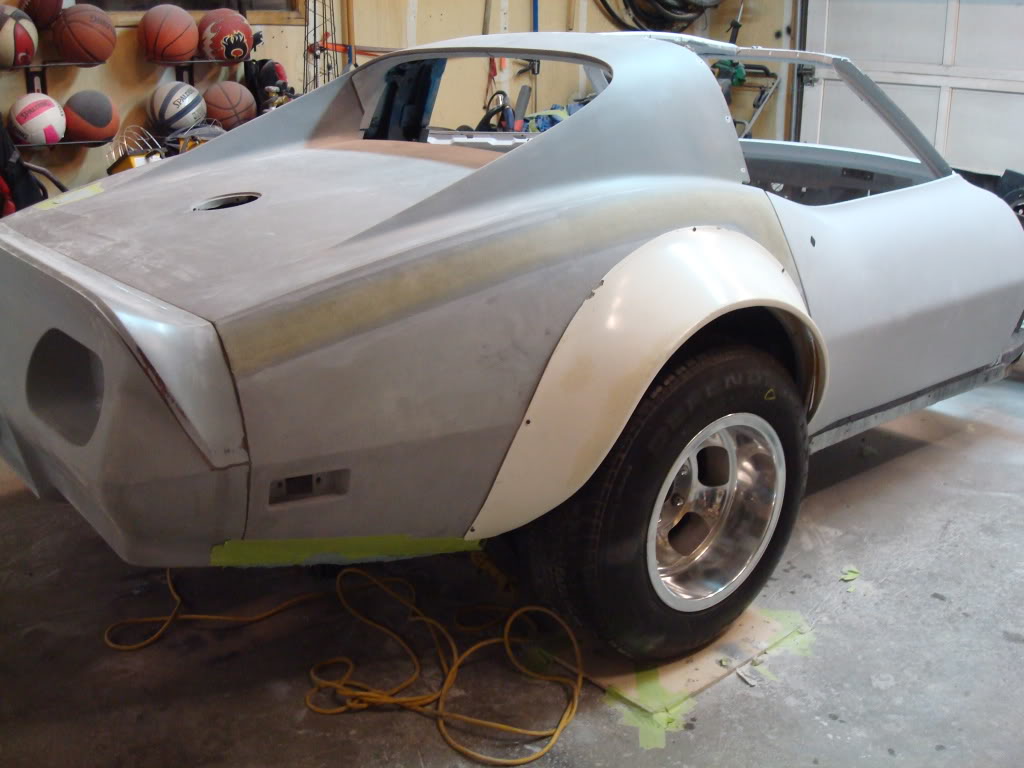
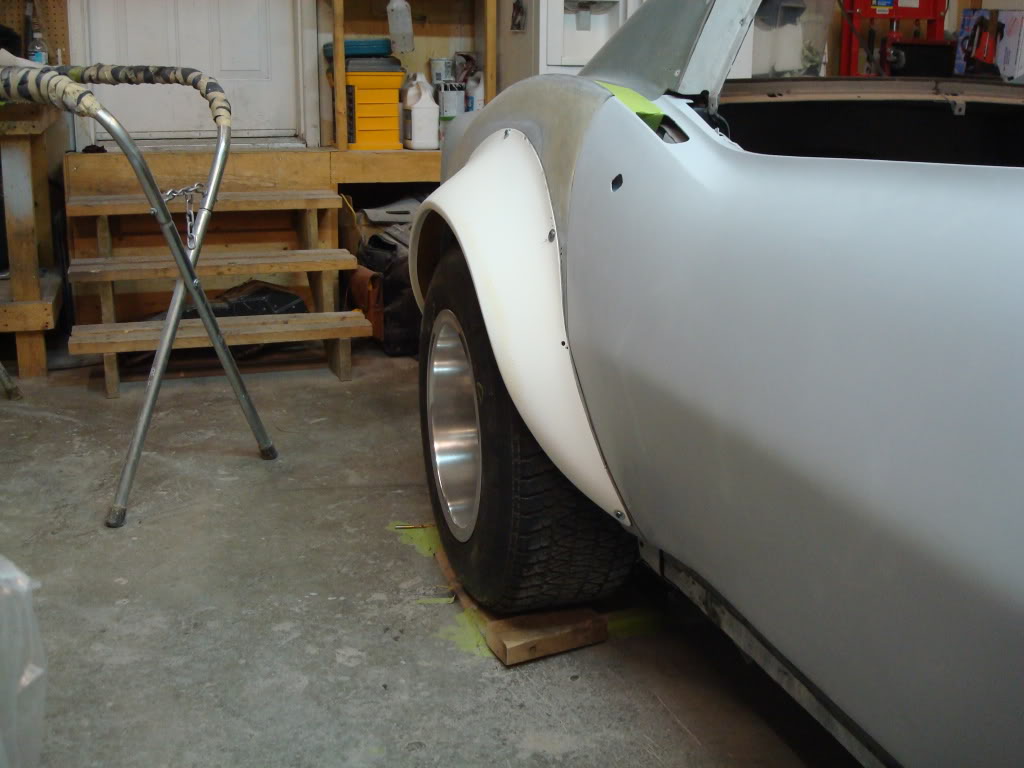
And, I finally cut the mudflap off the right side so I could test fit the flare. I can't go any further with the flares until I get my rear tires from Mike and have them mounted on my rims. The flare is at the exact same height as the original fender edge on the quarter panel.
I also started prepping some odds and ends on the body for fiberglass. I'm getting rid of the antenna hole. First I need to put a few layers of glass underneath the hole, then I will grind the outside and glass the hole shut. I also started to repair the bottom of the quarter, where GM broke some fiberglass so it would clear the stock exhaust. Every repair needs to be done with fiberglass matte.
And, I finally cut the mudflap off the right side so I could test fit the flare. I can't go any further with the flares until I get my rear tires from Mike and have them mounted on my rims. The flare is at the exact same height as the original fender edge on the quarter panel.
02-01-2010, 06:24 PM
#1287
Melting Slicks

I hate that crap too, I'm just glad I don't have flares to set up and mould....and sand and sand and sand....good luck buddy. Mud on....sand off....mud on...sand off. 
Progress...gotta love it. I'm too old to work in the cold.
Progress...gotta love it. I'm too old to work in the cold.
02-01-2010, 07:07 PM
#1288
Melting Slicks

Hey Jeremy,
I love watching you build this car it�s like watching 24 I can�t wait to see what�s next. You are doing things that only the pros would attempt and doing it like you have done it for years. I am sure that I speak for many others when I say �Thank you for taking time to post!�
Keep it up!
Scott
P.S. GREAT JOB!!
02-01-2010, 09:03 PM
#1289
Safety Car
Thread Starter
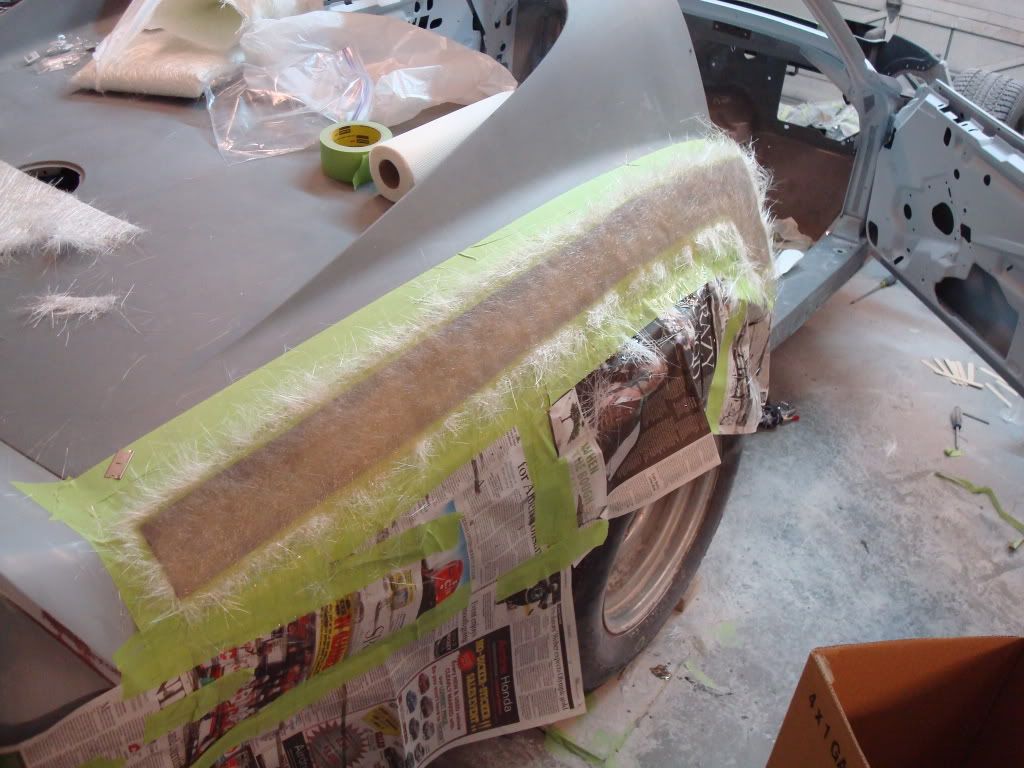
These flares are going to require a ton of work to get them to look right. They are a good starting point, but they still require quite a bit of work because I am putting them on a 76, and the bottoms of them need to be extended. I have to glass these in so that it doesn't take a crap load of body filler to smooth them out right. I'm not a fan of using a ton of body filler. This is going to be an insane amount of work. I'm thinking each flare is going to take me about a week just to bond it on, and glass it in. That is not including how long it is going to take me to grind the inside of them, and glass inside. Not to mention how long it is going to take to smooth them out so they are nice a flowing. I'm not looking forward to it. Laying glass correctly, without any airbubbles, takes lots and lots of time. That bonding strip took me almost three hours to lay out...not fun.
Last edited by stinger12; 02-01-2010 at 09:24 PM.
02-01-2010, 09:09 PM
#1290
Safety Car
Thread Starter
Hey Jeremy,
I love watching you build this car it�s like watching 24 I can�t wait to see what�s next. You are doing things that only the pros would attempt and doing it like you have done it for years. I am sure that I speak for many others when I say �Thank you for taking time to post!�
Keep it up!
Scott
P.S. GREAT JOB!!
I love watching you build this car it�s like watching 24 I can�t wait to see what�s next. You are doing things that only the pros would attempt and doing it like you have done it for years. I am sure that I speak for many others when I say �Thank you for taking time to post!�
Keep it up!
Scott
P.S. GREAT JOB!!
 02-04-2010, 11:15 PM
#1292
Safety Car
Thread Starter
Okay...Okay...I've gotta cool down right now...way too excited!!!! I can't sit still!!!! Mike told me to mount my old tires on the new rims so I could start mocking the flares up (still waiting on the new ones to come in the mail). I've been waiting for this day for a long time, and its finally here!!!!!!! I get to see it all come together with my slot mags on rubber!!!! I'll get some better shots of it outside tomorrow
I have a ton of fitting to do on the flares now...time to get started.
I have a ton of fitting to do on the flares now...time to get started.
Last edited by stinger12; 02-20-2010 at 10:29 AM.

 Nope, still the garage.
02-06-2010, 01:19 AM
Nope, still the garage.
02-06-2010, 01:19 AM
#1295
Safety Car
Thread Starter
This is a long explanation on how to fit the flares, so bare with me. Read it top to bottom and you'll understand why it is so important to do this correctly. A big thanks to Mike for helping me with this. Most of this information is coming straight from him, I'm just typing it out for you guys. There isn't much info in books or on the internet explaining how to install these correctly, which is why I am going through the effort of posting all this. I had to research this issue with the flares (and how to center them) several times, and asked lots of questions along the way.
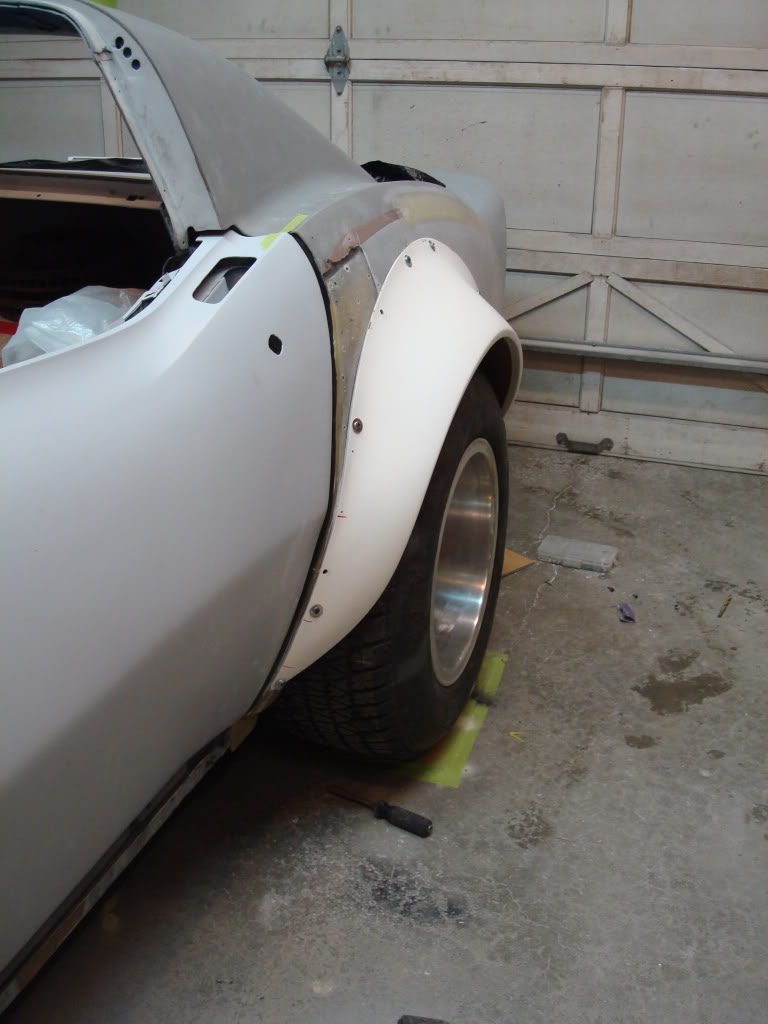
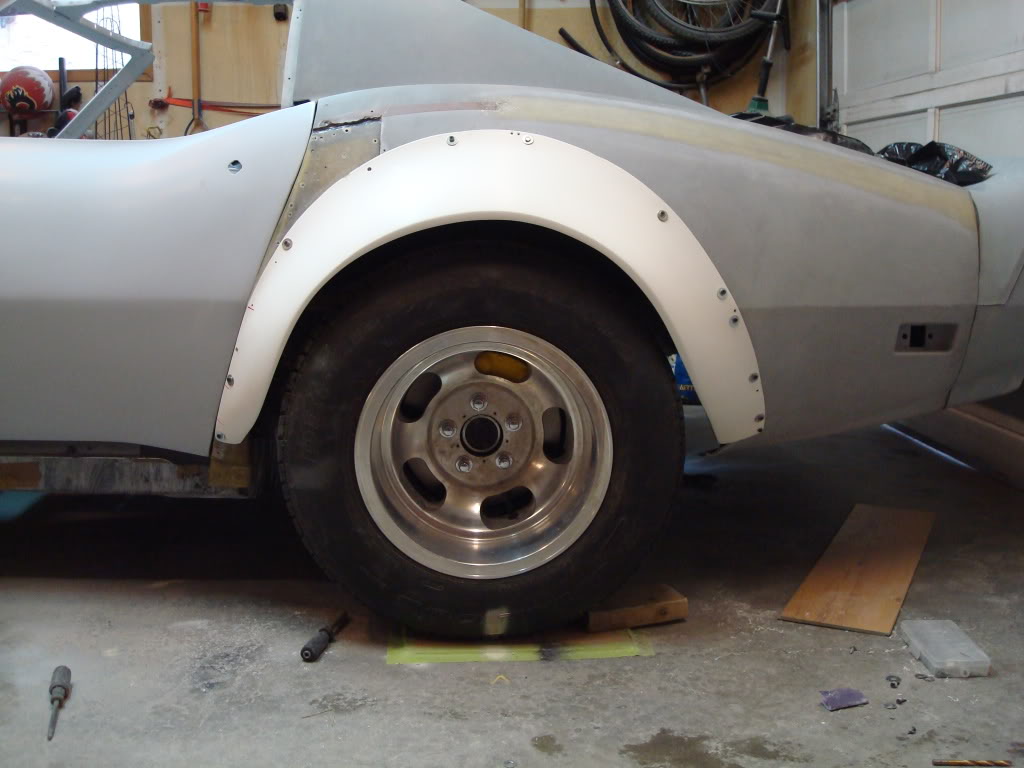
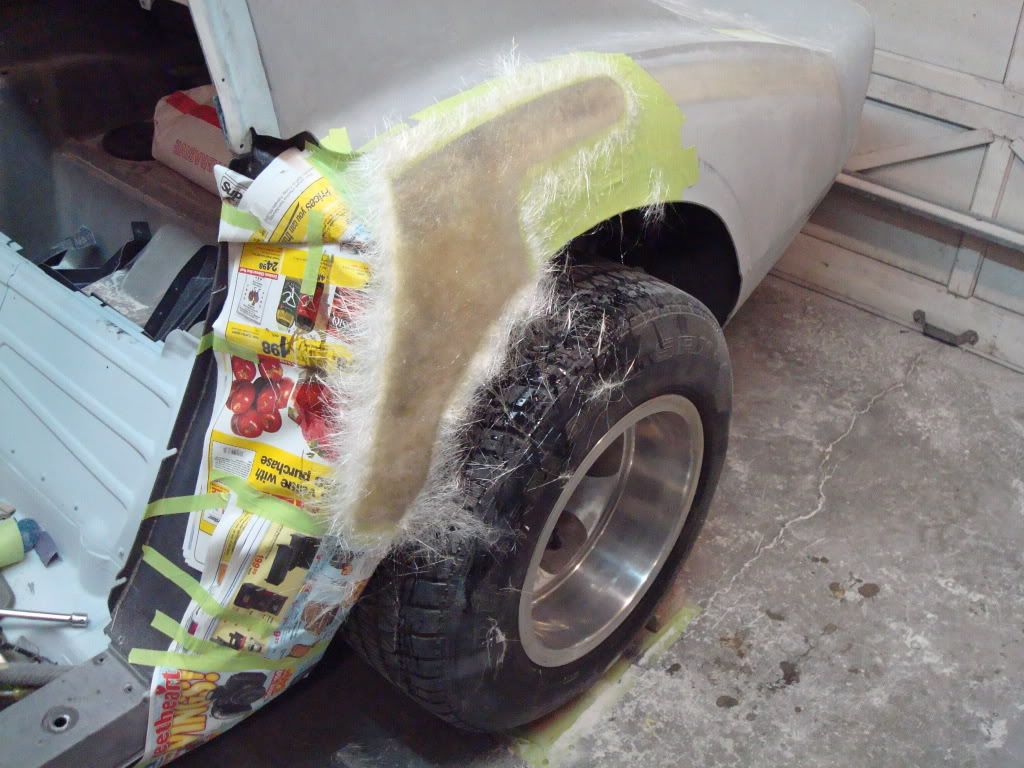
I finished fitting one of the flares today. It took a lot of tweeking, but I think I have it where I want it. I need my new tires to verify that it is perfect, so I'll have to wait until they arrive. Here are some pics.
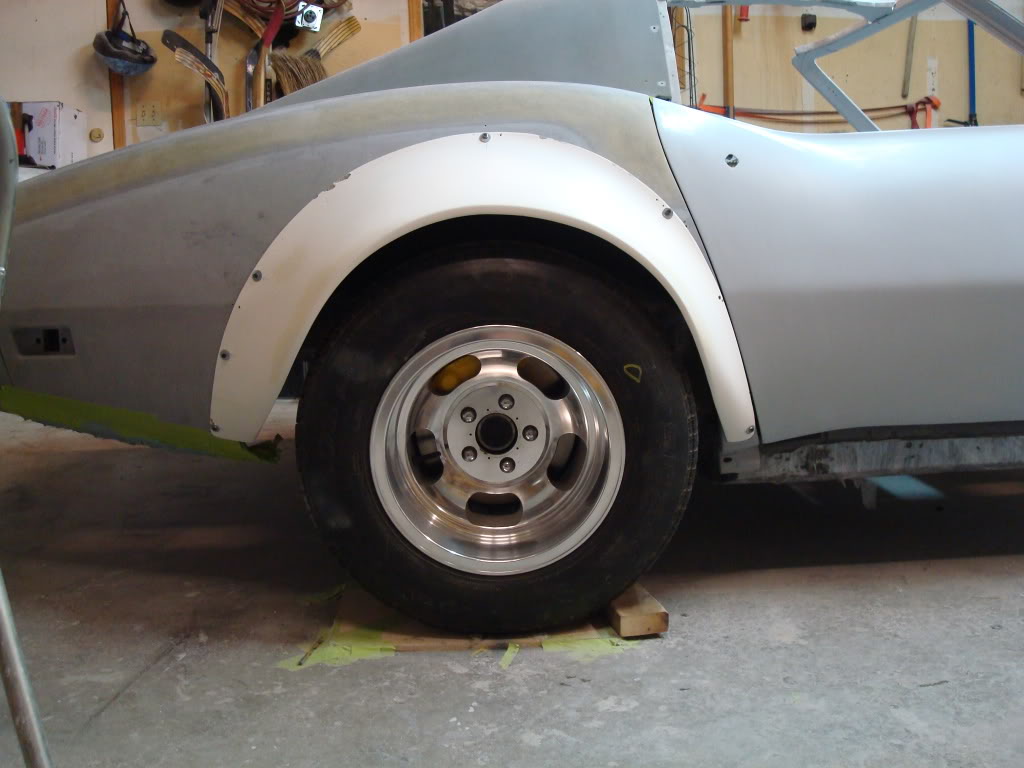
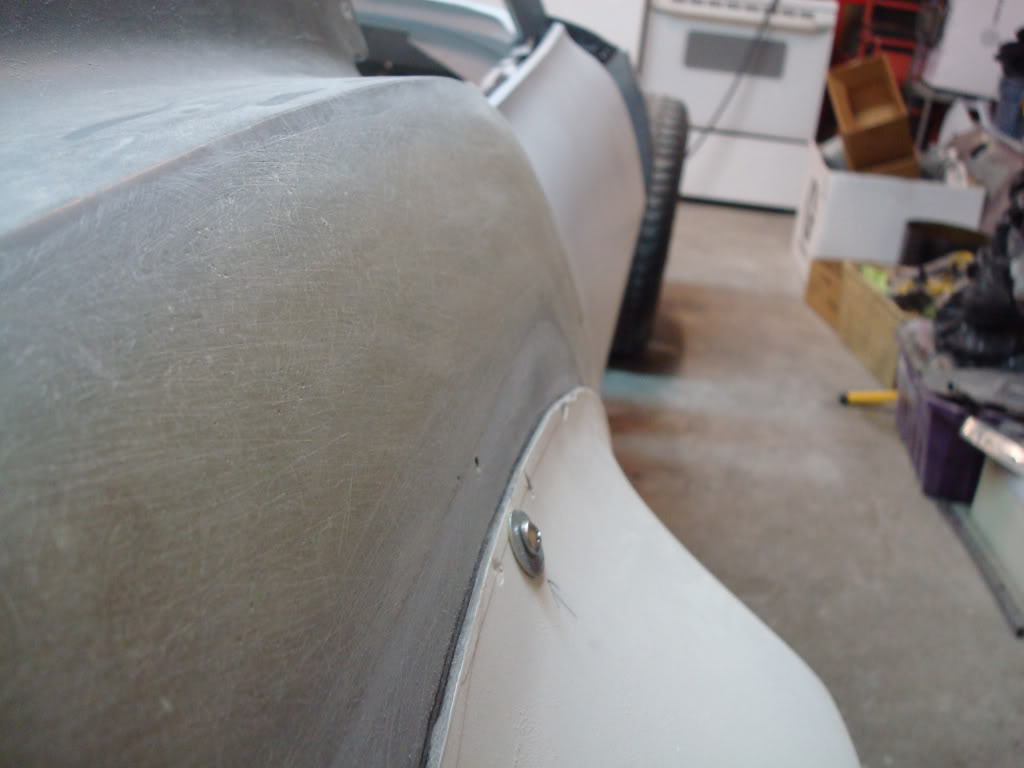
Now, I know what you are thinking right now. "The gap at the front of the tire is too small in comparison to the rear of the flare". I am aware of this. When it comes to fitting the flares properly, you need to take several things into consideration. The first is you want the radius of the flare to be as round as possible. But here is the catch - the factory built these cars with a larger gap behind the tire, and a smaller gap in front. Now, it is minimal, but when you install flares, it is really exaggerated because they "hug the tire" unlike the original fenders. But, while keeping the radius round, you need to make sure you close the gap up behind the tire, so it doesn't end up looking like this...
Now, remember when you levelled your frame, and set the ride height using all thread up front and in the rear? You did this because you needed to fit the flares to the car correctly. The half-shafts MUST be level when you are doing the setup on the rear - that is your ride height, and it is the point the tire is going to ride at when you are driving the car. It is also the farthest point that the rear tire moves backwards. Any arcing of the wheel upwards from this point will also move the tire forward. Remember, the trailing arm moves in an arc, like a compass, pivoting on a central point.
So, how am I going to open the gap up at the front of the tire you ask? Easy. Its so minimal (because of the fitting I did on it) that I will grind on the edge of the flare and clearance it. But before I do that, I will add lots of glass on the inside of the lip of the flare, so that the lip doesn't disappear. Once the clearancing is done, I will add glass to the outside of the flare and resahpe the fender lip until it is a nice round arc from front to back. And, The fender lip will still be a consistent thickness all the way around the flare. Now I will have a perfectly centered wheel in an L-88 Flare. I can also do vise vesa, and bring the lip closer to the tire if I need to in some areas (which I'll probably end up doing in a few spots to make it more round). Stan's flares close up the gap at the rear of the car nicely. I will just have to do some extra work at the front of them. I will also have to extend the flare on the bottoms using glass and lots of shaping once they are bonded in place.
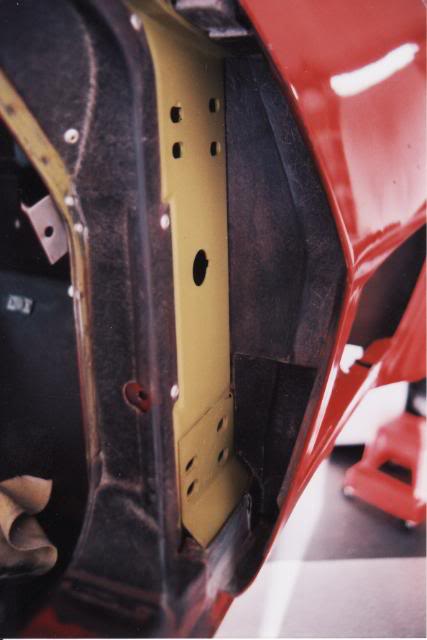
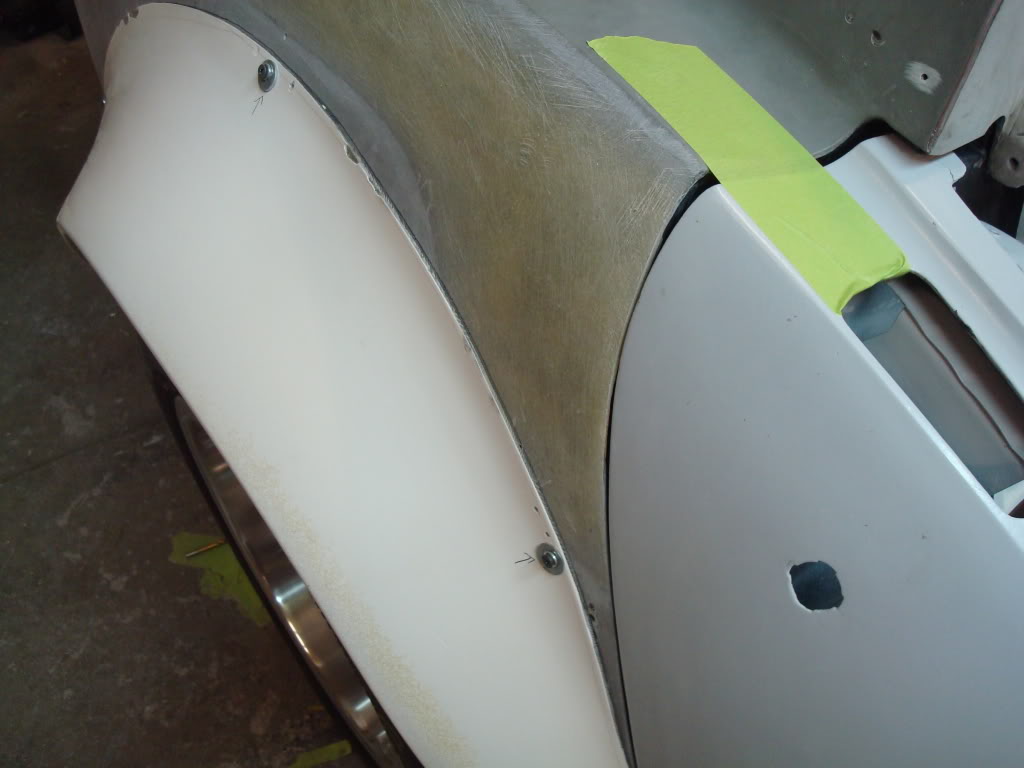
Some of you may have noticed that I haven't finished my door gap at the rear of the doors. And you are right in thinking that it affects the placement of the flare on the dogleg, because the edge of the dogleg is essentially where the flare begins, and that edge also needs to be perfect for your door gap. And here is why none of this matters right now. The following picture is of Zwede's car, the one Mike totally rebuilt. Notice how he glassed the lock pillar plate in so that the edge of the dogleg is one with the lock pillar plate. It makes it stronger, and sexier!
I will be glassing in my lock pillar plates as well. The flare will be glassed in at the front of the dogleg. Everything will become one piece in the end, with one common edge, which is essentially going to be the door gap edge. This edge will get shaped and sanded until the door gap it absolutely perfect. the flare will get glassed, sanded, glassed, sanded until it is perfect with the door edge.
This is why installing flares takes a ton of time. I've seen several pictures of cars where the flares just don't sit right and it isn't pleasing to the eye. In my mind, a flare should look good no matter what angle you look at it from. Take the time to do it right...its worth every bit of aggravation in the end.
I also finished bonding the left dog-leg. Once that cures over the next day, I will begin fitting the left fender flare. I'm starting to get really excited about the bodywork now. I've also figured out that I really enjoy doing this type of work, and I'm pretty darn good at it (thanks to my buddy Mike!!!!!!!!!!!!!!!!)
I finished fitting one of the flares today. It took a lot of tweeking, but I think I have it where I want it. I need my new tires to verify that it is perfect, so I'll have to wait until they arrive. Here are some pics.
Now, I know what you are thinking right now. "The gap at the front of the tire is too small in comparison to the rear of the flare". I am aware of this. When it comes to fitting the flares properly, you need to take several things into consideration. The first is you want the radius of the flare to be as round as possible. But here is the catch - the factory built these cars with a larger gap behind the tire, and a smaller gap in front. Now, it is minimal, but when you install flares, it is really exaggerated because they "hug the tire" unlike the original fenders. But, while keeping the radius round, you need to make sure you close the gap up behind the tire, so it doesn't end up looking like this...
Now, remember when you levelled your frame, and set the ride height using all thread up front and in the rear? You did this because you needed to fit the flares to the car correctly. The half-shafts MUST be level when you are doing the setup on the rear - that is your ride height, and it is the point the tire is going to ride at when you are driving the car. It is also the farthest point that the rear tire moves backwards. Any arcing of the wheel upwards from this point will also move the tire forward. Remember, the trailing arm moves in an arc, like a compass, pivoting on a central point.
So, how am I going to open the gap up at the front of the tire you ask? Easy. Its so minimal (because of the fitting I did on it) that I will grind on the edge of the flare and clearance it. But before I do that, I will add lots of glass on the inside of the lip of the flare, so that the lip doesn't disappear. Once the clearancing is done, I will add glass to the outside of the flare and resahpe the fender lip until it is a nice round arc from front to back. And, The fender lip will still be a consistent thickness all the way around the flare. Now I will have a perfectly centered wheel in an L-88 Flare. I can also do vise vesa, and bring the lip closer to the tire if I need to in some areas (which I'll probably end up doing in a few spots to make it more round). Stan's flares close up the gap at the rear of the car nicely. I will just have to do some extra work at the front of them. I will also have to extend the flare on the bottoms using glass and lots of shaping once they are bonded in place.
Some of you may have noticed that I haven't finished my door gap at the rear of the doors. And you are right in thinking that it affects the placement of the flare on the dogleg, because the edge of the dogleg is essentially where the flare begins, and that edge also needs to be perfect for your door gap. And here is why none of this matters right now. The following picture is of Zwede's car, the one Mike totally rebuilt. Notice how he glassed the lock pillar plate in so that the edge of the dogleg is one with the lock pillar plate. It makes it stronger, and sexier!
I will be glassing in my lock pillar plates as well. The flare will be glassed in at the front of the dogleg. Everything will become one piece in the end, with one common edge, which is essentially going to be the door gap edge. This edge will get shaped and sanded until the door gap it absolutely perfect. the flare will get glassed, sanded, glassed, sanded until it is perfect with the door edge.
This is why installing flares takes a ton of time. I've seen several pictures of cars where the flares just don't sit right and it isn't pleasing to the eye. In my mind, a flare should look good no matter what angle you look at it from. Take the time to do it right...its worth every bit of aggravation in the end.
I also finished bonding the left dog-leg. Once that cures over the next day, I will begin fitting the left fender flare. I'm starting to get really excited about the bodywork now. I've also figured out that I really enjoy doing this type of work, and I'm pretty darn good at it (thanks to my buddy Mike!!!!!!!!!!!!!!!!)
Last edited by stinger12; 02-06-2010 at 01:28 AM.
02-06-2010, 10:09 PM
#1296
Intermediate


Member Since: Feb 2009
Location: Denver CO
Posts: 48
Likes: 0
Received 0 Likes
on
0 Posts
Hey Jeremy,
I, like many others, have been following this thread religiously. Your work, patience, attention to detail, and documentation are amazing. I'm also a rookie attempting a 61 resto-rod. I've worked on a few cars and planes here and there but nothing to the scale I'm doing now. I started with a "trashed" body like you and all my parts (except my new BEAUTIFUL frame from SRIII) have come from parted out cars and junk yards. I've learned more from your thread then any friends, books, magazines, or other web sites. I come back to it constantly for information. I just wanted to say "Thank you!". I can honestly say that you have given me more confidence and my car will look better (maybe even better then yours ) because of your documentation and willingness to teach us. You may be too humble to except this compliment, and it really sounds cheezy. But you're my Mike. Thank you.
I, like many others, have been following this thread religiously. Your work, patience, attention to detail, and documentation are amazing. I'm also a rookie attempting a 61 resto-rod. I've worked on a few cars and planes here and there but nothing to the scale I'm doing now. I started with a "trashed" body like you and all my parts (except my new BEAUTIFUL frame from SRIII) have come from parted out cars and junk yards. I've learned more from your thread then any friends, books, magazines, or other web sites. I come back to it constantly for information. I just wanted to say "Thank you!". I can honestly say that you have given me more confidence and my car will look better (maybe even better then yours
) because of your documentation and willingness to teach us. You may be too humble to except this compliment, and it really sounds cheezy. But you're my Mike. Thank you.
02-08-2010, 02:10 AM
#1297
Safety Car
Thread Starter
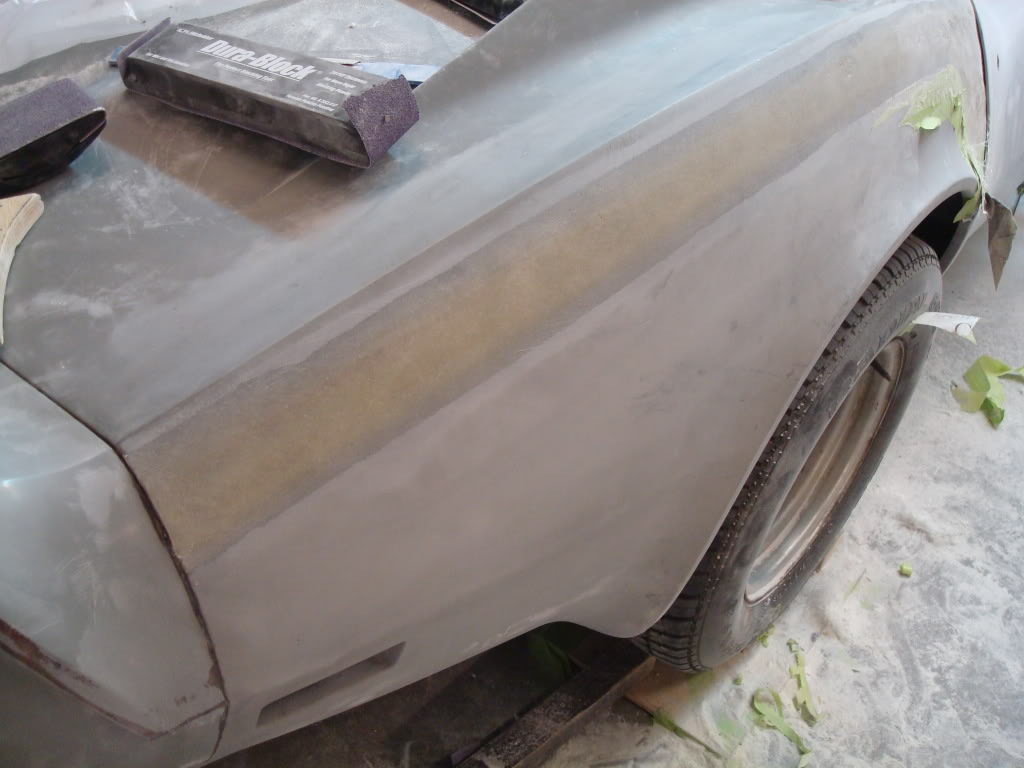
I did a little more sanding on the right side repair. Its finished now...
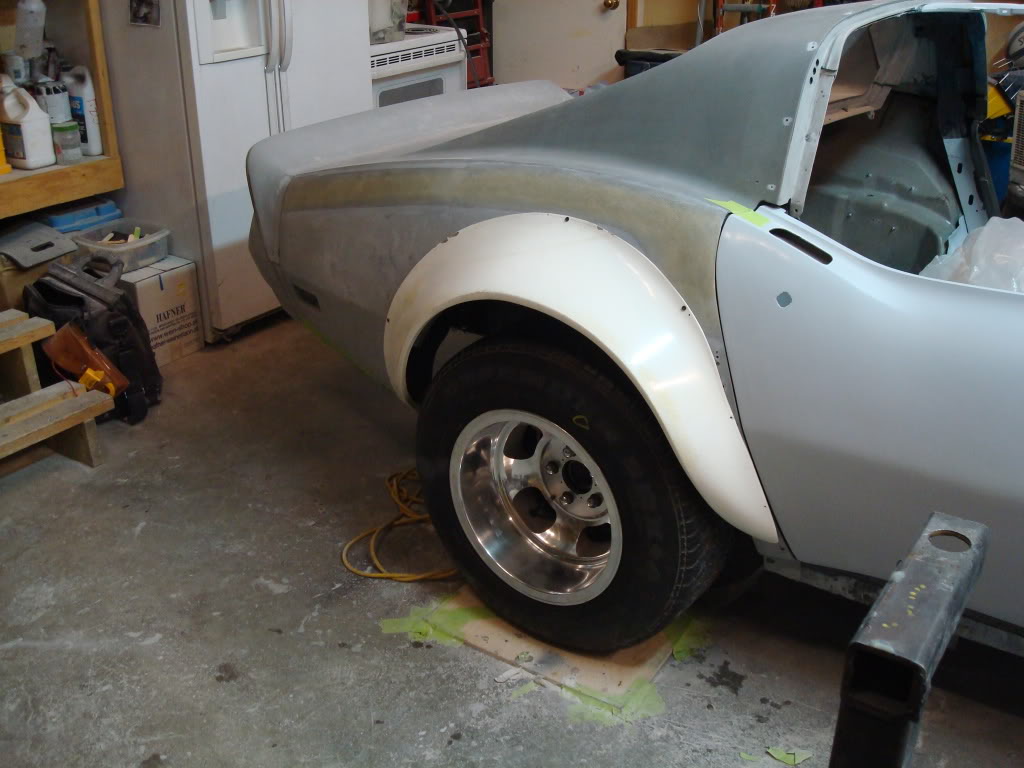
Then I started fitting the left flare.
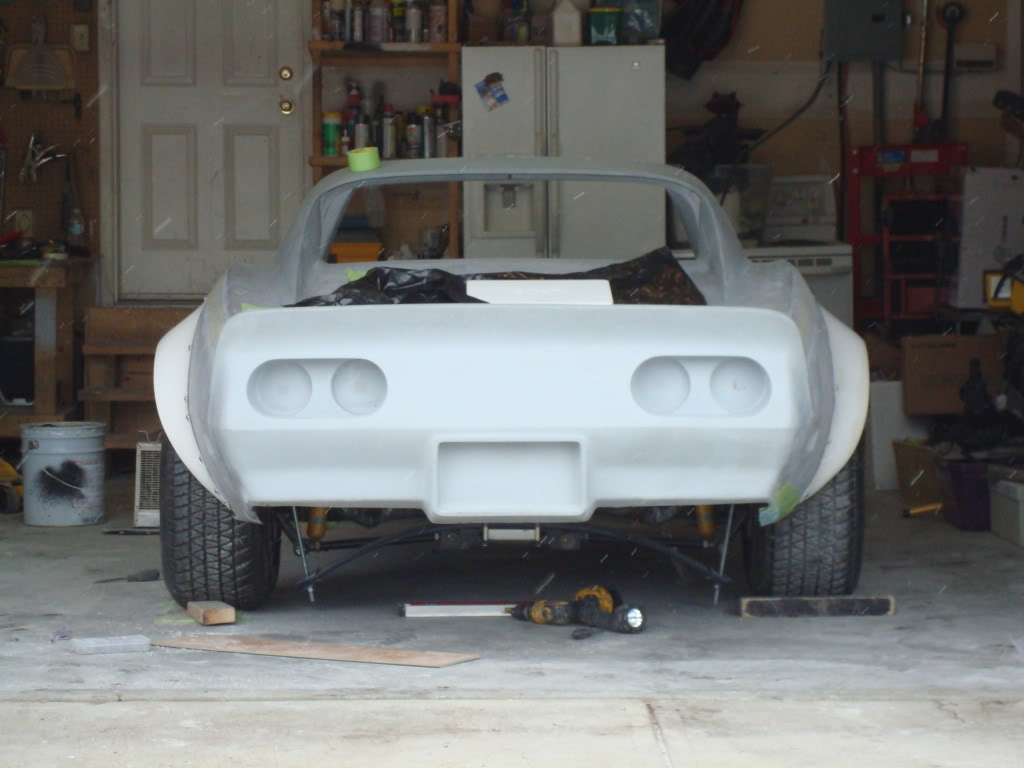
I finally got to see the wide *** stance for the first time!!!!!!!!!
I pulled it off, and started the glass work, just like I did on the right side. Only this time, I had to join the old quarter to the new dogleg, and I had to add to the outside of the dogleg so that I can block it to match the door perfectly.

Can't wait till my new tires show up, so I can get the full effect of the wide stance.
Then I started fitting the left flare.
I finally got to see the wide *** stance for the first time!!!!!!!!!
I pulled it off, and started the glass work, just like I did on the right side. Only this time, I had to join the old quarter to the new dogleg, and I had to add to the outside of the dogleg so that I can block it to match the door perfectly.
Can't wait till my new tires show up, so I can get the full effect of the wide stance.
Last edited by stinger12; 02-20-2010 at 10:28 AM.
02-08-2010, 04:44 PM
#1298
Racer
 02-08-2010, 09:53 PM
#1299
Safety Car
Thread Starter
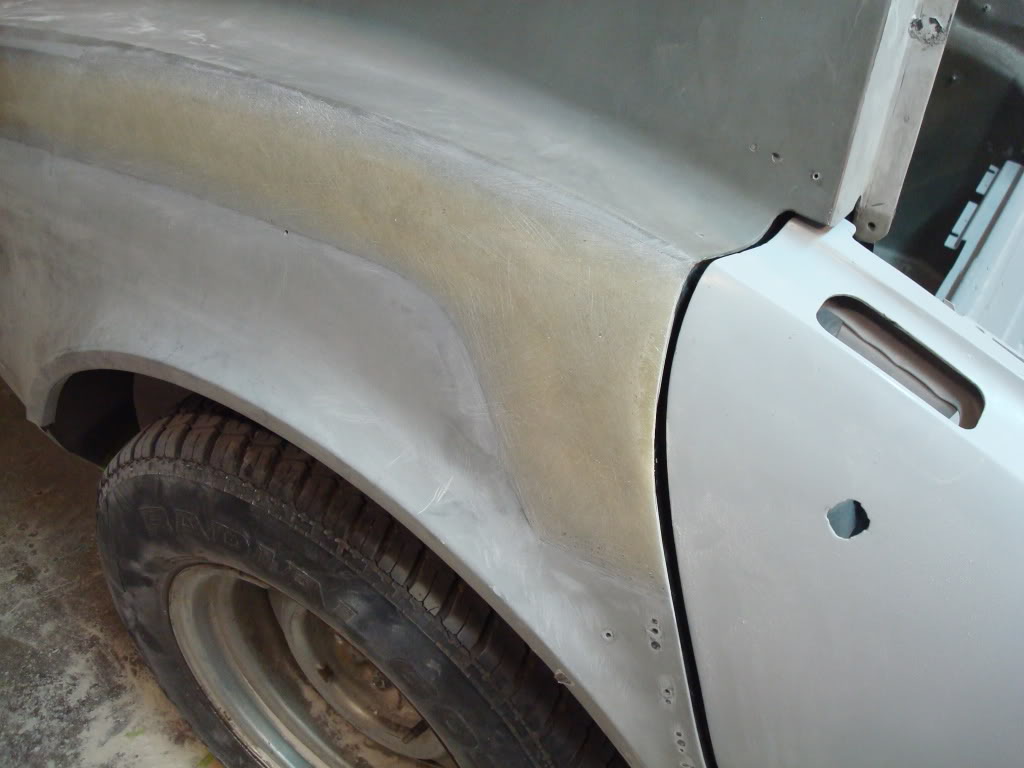
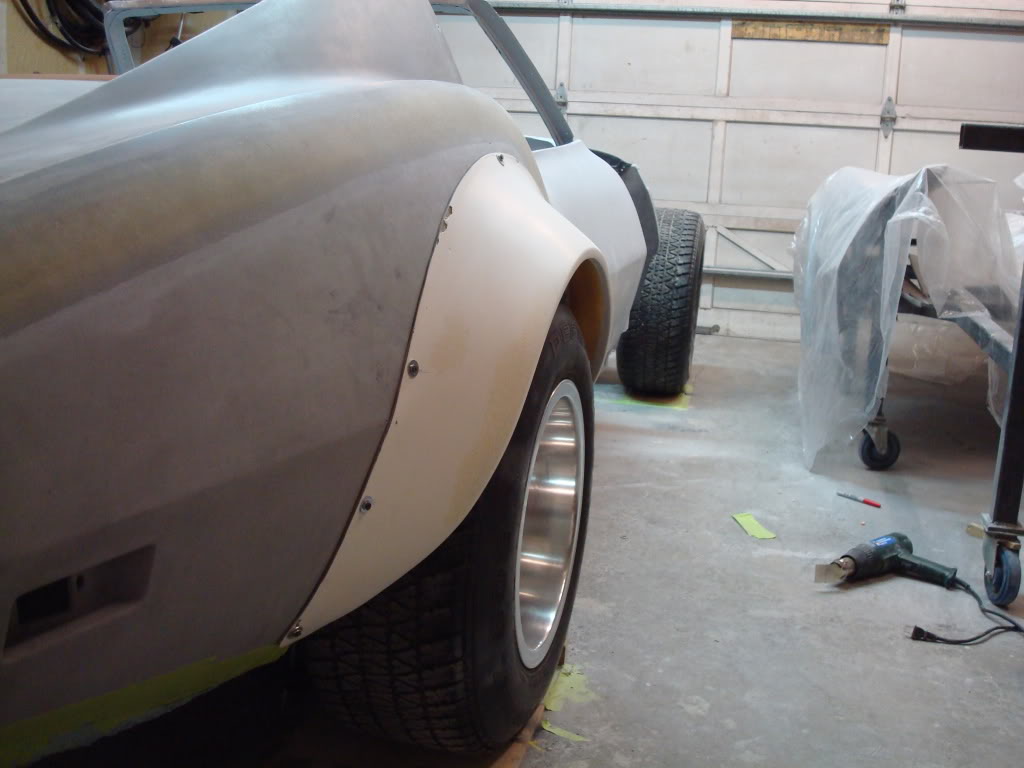
Mike trimmed this side for me when he was test fitting the flare back in Dallas. It still needs a ton of trimming. I purposely left the right side alone, and kept the original fender lip intact. I used it as a reference point for fitting the flares. Yeah, getting those tires to seal on the rim was a bitch but me and my buddy got it to seal eventually. He's a great friend, and is always lending me a helping hand with the vette. He's a mechanic by trade.
Last edited by stinger12; 02-08-2010 at 09:57 PM.
02-09-2010, 07:07 PM
#1300
Pro

Member Since: Sep 2006
Location: WATERTOWN SOUTH DAKOTA
Posts: 559
Likes: 0
Received 5 Likes
on
5 Posts
Jeremy, my dad an I had over 100 hours into fitting the rear flares on my car. I had Stan's flares and they fit pretty good. (still the best ones you can get though) I actually ended up laying 2 layers of cloth over the flares and pulled it off and then I had a thin version of it and I used that on the car because I was able to flex it and fit it around my wheels and get the wheel arch and opening perfectly round with no flat spots. I also had to deal with the fact that my 82 had a 69 butt grafted onto it so that made fitting the flare a pain as well. Lots of resin and lots of sanding, very little filler, it was a ton of work but in the end it turned out AMAZING!
Check out the crappy cell phone pic from last night. We have just started to cut and buff the car. FYI no one has seen the car like this yet, so consider it a world premiere

Check out the crappy cell phone pic from last night. We have just started to cut and buff the car. FYI no one has seen the car like this yet, so consider it a world premiere