
How to drill the wholes for the rear letter emblem?
 06-08-2009, 04:59 PM
#21
Burning Brakes

Member Since: Mar 2006
Location: Lima, OH -- 69 L71 427/435hp
Posts: 915
Likes: 0
Received 1 Like
on
1 Post

1ARACE,
Could I get you to send a copy of that template to smarttnt@cs.com as well? I'm going to be going through this same issue later this summer. Thanx
Terry
Could I get you to send a copy of that template to smarttnt@cs.com as well? I'm going to be going through this same issue later this summer. Thanx
Terry
If you don't mind, send me a PM or reply on this thread how it worked for you. I never got any feedback before how helpful it was, but then again I may have missed the thread or PM box was full at the time. Yet I've never got any negative feedback from using it, so I 'assume' it worked.

If there's anything that could make it better let me know, I can try to improve it.


 06-09-2009, 02:18 PM
#23
Racer

Member Since: May 2008
Location: boulogne buenos aires
Posts: 353
Likes: 0
Received 0 Likes
on
0 Posts
Don´t forget to add some glue just in case the spped nuts fail.. 1 month ago I lost the last E..... ouch.. I have a spare E but its different style from the one I lost the pins are different and its wider. I guess early and late letters are different...So anybody with a spare E?
06-09-2009, 03:47 PM
#24
Le Mans Master


I use a Dremel tool with a 1/8" carbide burr to bore holes in any fibreglass panel. Drill bits can grab and cause cracks! I thread my studs for 8/32 or 6/32 threads and use small nuts to retain the emblems rather than use the "speed nuts" they are provided with as the speed nuts can **** crooked and are one time use only. Good Luck on the job!
03-31-2010, 04:23 PM
#25
1st Gear

Member Since: Mar 2010
Location: Washington
Posts: 1
Likes: 0
Received 0 Likes
on
0 Posts
I too am going to have to drill holes. Could you email me a template also. westenders@comcast.net
Thanks,
Jim
Thanks,
Jim
04-01-2010, 08:32 AM
#26
Burning Brakes
Member Since: Mar 2006
Location: Lima, OH -- 69 L71 427/435hp
Posts: 915
Likes: 0
Received 1 Like
on
1 Post
I too am going to have to drill holes. Could you email me a template also. westenders@comcast.net
Thanks,
Jim
Thanks,
Jim
02-21-2011, 06:54 PM
#27
Intermediate

Member Since: May 2008
Posts: 43
Likes: 0
Received 0 Likes
on
0 Posts
this is a great little tech thread! Thankyou all who have contributed to it.
I am in Oz, repairing a 1970 that has had a repalcement bum at some time and all the lettering holes are just plain wonky and in fact, too squashed up. Normally i have a couple of C3s in the workshop but not at the moment...
so i pop on here, type in rear lettering an bingo! You guys rock. from those pictures i can get it 99% right i am sure.
cheers
darryll
Last edited by spaceboyjohnny; 02-21-2011 at 06:55 PM. Reason: bad spelling
02-21-2011, 08:42 PM
#28
Safety Car

Hello
I am also doing the same thing, but am hesitant about drilling holes for the letters.
Now with some information I am thinking about this again.
How are the letters attached. I dont think my letters have studs long enough to allow for a speed nut on the inside. They appear more to be centering studs and the emblem is glued on.
kdf
06-16-2013, 04:27 AM
#29
Cruising
Member Since: May 2013
Location: Melbourne Victoria
Posts: 11
Likes: 0
Received 0 Likes
on
0 Posts
06-16-2013, 06:32 PM
#30
Race Director


IMO, do the proper layout, but don't drill a damn thing, knock off the studs, and use RTV to glue them in place if done nicely with a Qtip for cleanup, and positioned with tape overnight, the way I just NOW got done with my 'Fuel Injection' emblem off a '65 in the rear of my '72 it was on there with the previous paint for some 15 years....back in place now after some 6 month vacation....


 I am glad this is your opinion...and NOT an industry standard....even though I have run across someone using your "idea" more than once and it taking many hours to put it back CORRECTLY. The studs on the emblems are there for a reason....use them.
 Funny how there is always enough time to.... uhhh .....custom engineer a part installation....than it is to install it like it was intended... so someone like me who has to get into that area and repair or paint has to DEAL WITH this "custom engineered part installation". Been there...seen that...and fixed "stuff" like that.

DUB
08-20-2013, 12:47 PM
#31
3rd Gear

Member Since: Aug 2013
Location: Caledonia Michigan
Posts: 3
Likes: 0
Received 0 Likes
on
0 Posts
08-20-2013, 02:08 PM
#32
Team Owner

I strongly suggest that you use the template to mark up a strip of strudy cardboard first. Put the holes through and install the lettering to make certain that YOUR letters will be straight with the template you have.
There may be more than one vendor of these letters; and the pin locations MAY not be the same.
There may be more than one vendor of these letters; and the pin locations MAY not be the same.
08-20-2013, 04:51 PM
#33
3rd Gear
Member Since: Aug 2013
Location: Caledonia Michigan
Posts: 3
Likes: 0
Received 0 Likes
on
0 Posts
I strongly suggest that you use the template to mark up a strip of strudy cardboard first. Put the holes through and install the lettering to make certain that YOUR letters will be straight with the template you have.
There may be more than one vendor of these letters; and the pin locations MAY not be the same.
There may be more than one vendor of these letters; and the pin locations MAY not be the same.
08-21-2013, 08:23 AM
#34
3rd Gear
Member Since: Aug 2013
Location: Caledonia Michigan
Posts: 3
Likes: 0
Received 0 Likes
on
0 Posts
I have seen prices from $50 from Corvette Central to $150 from other sites. Where or who has the best price and quality for 1969 REAR CORVETTE LETTER SET ??
08-21-2013, 12:59 PM
#35
Team Owner

Member Since: Jun 2000
Location: Southbound
Posts: 38,928
Likes: 0
Received 1,469 Likes
on
1,248 Posts
Cruise-In II Veteran
 11-08-2013, 04:49 PM
#36
Intermediate
11-13-2014, 12:38 PM
#38
Cruising

Member Since: Oct 2014
Location: Goodyear
Posts: 10
Likes: 0
Received 0 Likes
on
0 Posts
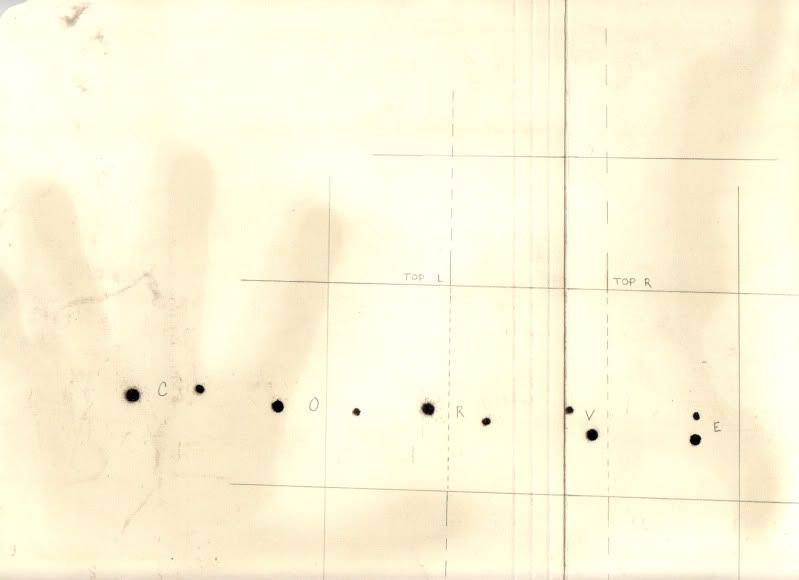
I helped someone with this before, not sure if it's the same thing being passed around or something completely different...
...but I have 2 files I e-mailed and you just print them out, join them together at the overlap and be sure the lines line up vertically/horizontally, and you have a template; looks like this:
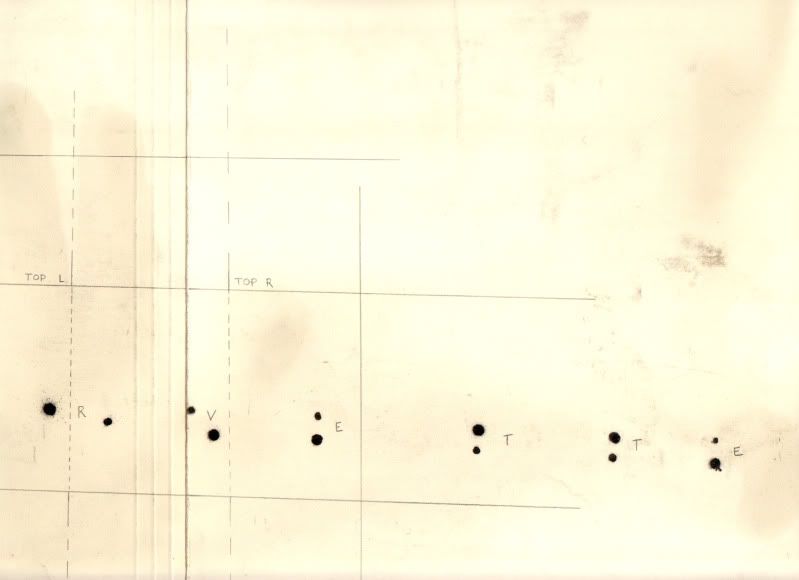
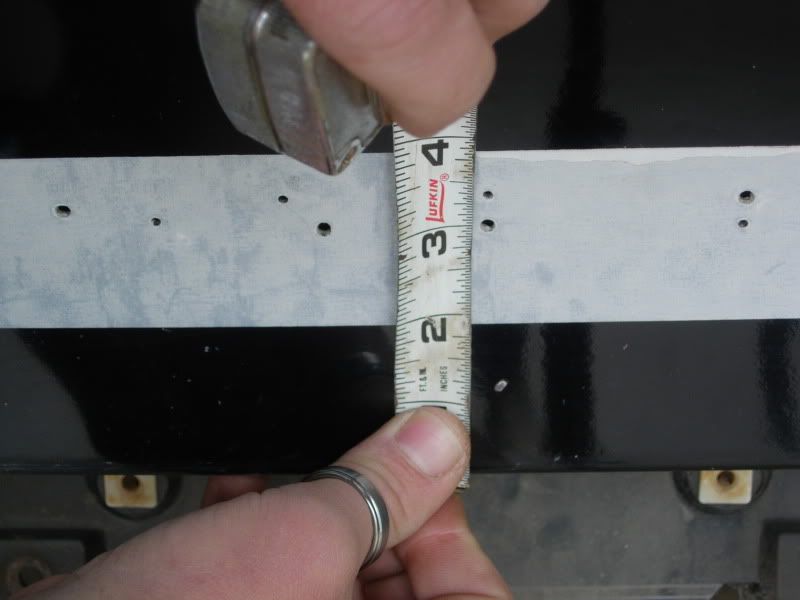
And for starting points; measurement for letter "E":
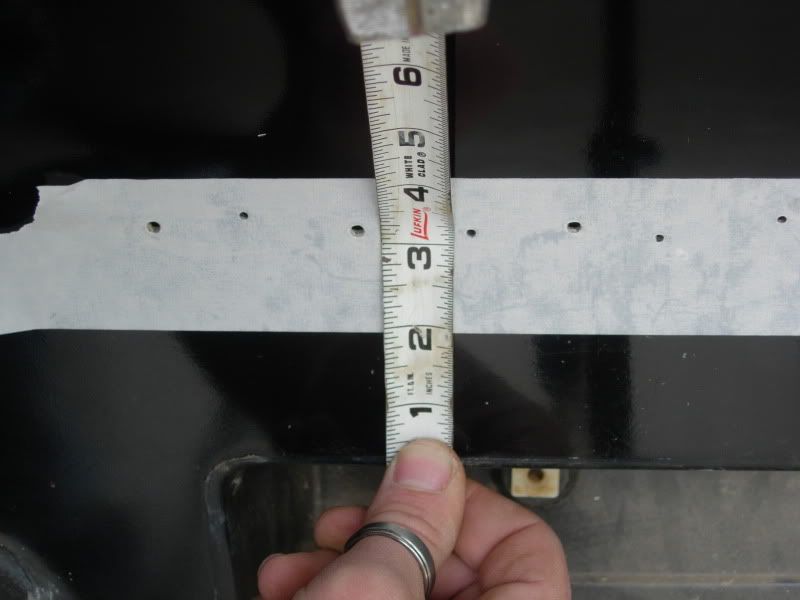
And letter "O":
If you want I can e-mail the files to you for comparison or to use.
If you need anymore help let us know; see what we can do or come up with.
...but I have 2 files I e-mailed and you just print them out, join them together at the overlap and be sure the lines line up vertically/horizontally, and you have a template; looks like this:
And for starting points; measurement for letter "E":
And letter "O":
If you want I can e-mail the files to you for comparison or to use.
If you need anymore help let us know; see what we can do or come up with.
12-08-2017, 08:11 PM
#39
1st Gear

Member Since: Dec 2017
Posts: 1
Likes: 0
Received 0 Likes
on
0 Posts
12-10-2017, 05:37 AM
#40
Burning Brakes
Can I get a copy of the template? Andy.cabral@vigariomgmt.com. Much appraised for any help
If the template proves to be unavailable. I made my own for my 77 with a flexiglas replacement bumper. The bottom of the letters are on the centerline of the screws securing the tail lights. They are centered in the area between the lights, and they are the same width as the outer edges of the molded license plate frame at the bottom of the bumper.
To make a drilling template for the bumper, layout the above dimensions on a sheet of paper and masking tape it to a piece of foamboard. Position the letters so that they appear evenly spaced, with the bottom of each letter directly on the centerline you drew. When positioned, push the letter down, through the paper and foamboard (you may need to use an awl to pierce the dimple left by the pins on the back of each letter to start the hole).
When done, take the paper off of the foamboard and position it on the bumper. You have your template to drill the necessary holes.