
My '76 restoration (long post)


 01-09-2011, 10:23 PM
#62
Drifting


Thread Starter
Member Since: Aug 2010
Location: Kanuckistan
Posts: 1,617
Received 127 Likes
on
68 Posts
2022 C3 of the Year Finalist - Modified

Yet another productive weekend.
My mechanist made me a custom tool to assemble the outer bearing of the rear wheel.
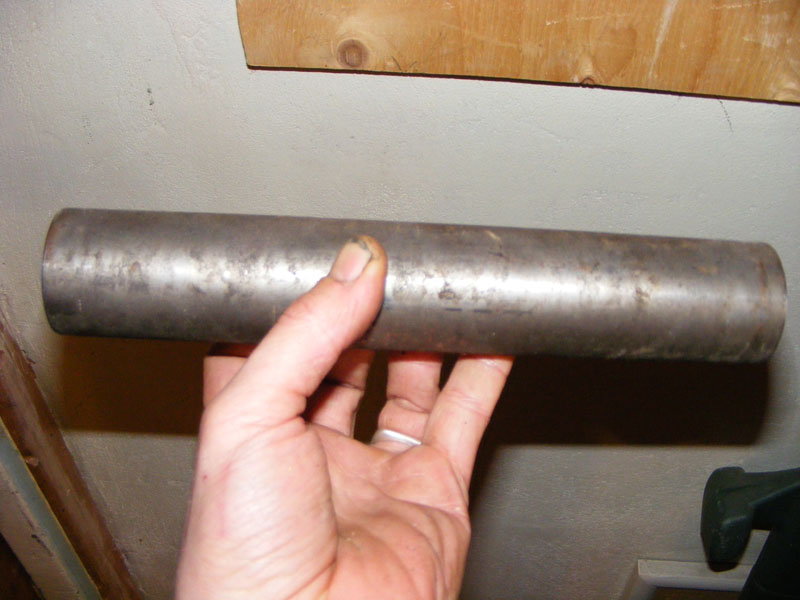
Sure Just a tube of metal, but machined to the perfect diameter for pressing the bearing.

We started taking care of the front clip, that will go to my new birdcage, Sovan was stripping its paint while I was removing it.
The stripping was a easy job, the paint, or I should say the paints, was so thick it would flake of in huge pieces.

Seeing how easily it was coming off, Sovan devised a tools for the job.

A razor sharps metal spatula.
I had to show you that :

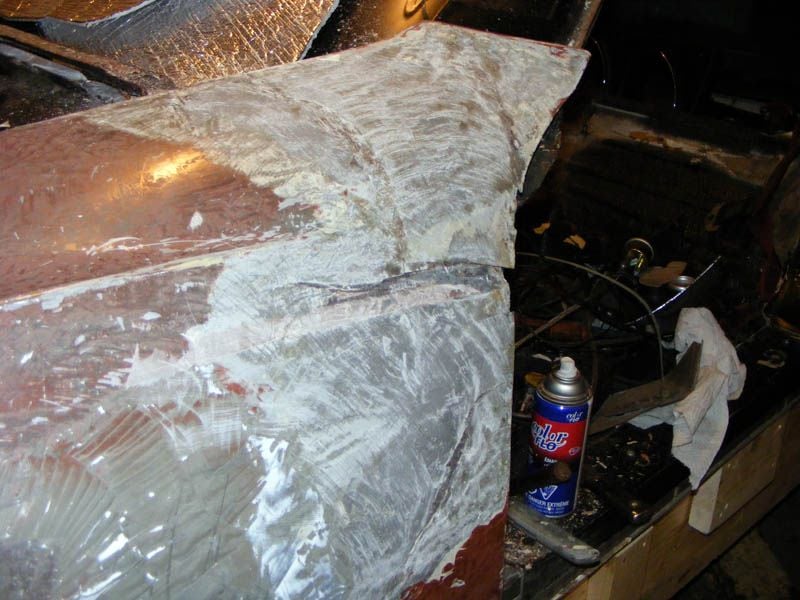
I grinded a bezel for you to see. Yes, 16 layers. You're seeing it back to front. And the PO told me it was a originaly orange corvette. Well, after being at least burgundy and metallic purple. You can't see from this side but the paint also sports several cases of "just paint over the clear coat" *facepalm*
Removing the front clip was another story, we're not done yet, but I wanted to share with you a method that worked well so far, and is IMHO very gently with the body parts.
I used this portable hand saw:

But with the blade reversed, to work like a Japanese wood saw, you actually cut on the move back. Once I started on one side, I would shim just enough for the saw not to be stuck, and I slowly just through the bead of sealant. It's easy to feel and see when you're reaching the fiberglass itself and need to reajust your trajectory.
Of course I used a heat gun to get the sealant soft.
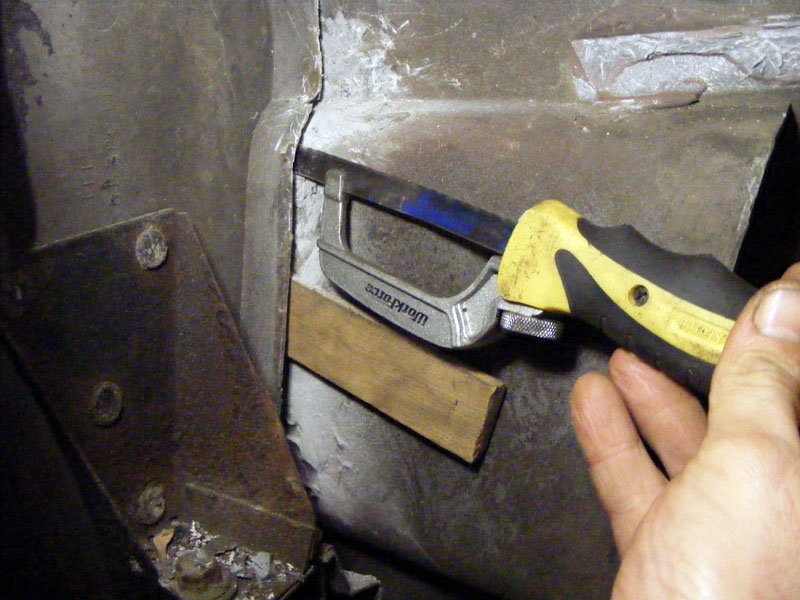
One side is done and we didn't put more crack that it already has.
Phew. Probably the most stressfull task so far.
My mechanist made me a custom tool to assemble the outer bearing of the rear wheel.
Sure Just a tube of metal, but machined to the perfect diameter for pressing the bearing.
We started taking care of the front clip, that will go to my new birdcage, Sovan was stripping its paint while I was removing it.
The stripping was a easy job, the paint, or I should say the paints, was so thick it would flake of in huge pieces.
Seeing how easily it was coming off, Sovan devised a tools for the job.
A razor sharps metal spatula.
I had to show you that :
I grinded a bezel for you to see. Yes, 16 layers. You're seeing it back to front. And the PO told me it was a originaly orange corvette. Well, after being at least burgundy and metallic purple. You can't see from this side but the paint also sports several cases of "just paint over the clear coat" *facepalm*
Removing the front clip was another story, we're not done yet, but I wanted to share with you a method that worked well so far, and is IMHO very gently with the body parts.
I used this portable hand saw:
But with the blade reversed, to work like a Japanese wood saw, you actually cut on the move back. Once I started on one side, I would shim just enough for the saw not to be stuck, and I slowly just through the bead of sealant. It's easy to feel and see when you're reaching the fiberglass itself and need to reajust your trajectory.
Of course I used a heat gun to get the sealant soft.
One side is done and we didn't put more crack that it already has.
Phew. Probably the most stressfull task so far.
 01-10-2011, 11:17 AM
#64
Racer

Member Since: Jul 2010
Location: Manahawkin NJ
Posts: 261
Likes: 0
Received 0 Likes
on
0 Posts
If you don't get an email from me with the photo copies of how to reinstall the front clip in the next few days, email me a reminder.
Someone just gave me a freshly bored, honed and decked 400 block after they heard my cam went flat sending metal through out my old motor. What goes around comes around (both good and bad).
Someone just gave me a freshly bored, honed and decked 400 block after they heard my cam went flat sending metal through out my old motor. What goes around comes around (both good and bad).
01-10-2011, 02:01 PM
#65
Drifting
Thread Starter
Member Since: Aug 2010
Location: Kanuckistan
Posts: 1,617
Received 127 Likes
on
68 Posts
2022 C3 of the Year Finalist - Modified
If you don't get an email from me with the photo copies of how to reinstall the front clip in the next few days, email me a reminder.
Someone just gave me a freshly bored, honed and decked 400 block after they heard my cam went flat sending metal through out my old motor. What goes around comes around (both good and bad).
Someone just gave me a freshly bored, honed and decked 400 block after they heard my cam went flat sending metal through out my old motor. What goes around comes around (both good and bad).
 you deserve it.
 01-12-2011, 12:05 PM
#66
Former Vendor
Member Since: Aug 2006
Location: Jeffersonville Indiana 812-288-7103
Posts: 76,656
Received 1,813 Likes
on
1,458 Posts
St. Jude Donor '08-'09-'10-'11-'12-'13-'14-'15

There are three copper rods through the top of the tank, and two rolled steel plates suspended from the outer rods that act as the anodes. The center rod is my hanging rod.
Combine this with a 40 amp battery charger and you can do your seat frames, core supports, entire trailing arm and pretty much what ever you want that will fit in the tank.
It removes none of the metal only the rust, paint, tar (wipes off). The by-product of using this method is the hydrogen that accumulates in the bubbles on top. It's not dangerous but it scare the hell out of you if you spark it.
What makes this a special treat is that the ph level (from the lye) is so low that you can dump the water out without any worry of epa issues.
I'll see if I can find some pictures of this.... I know I took some but was hesitant to post them.
Willcox
01-12-2011, 12:23 PM
#67
Drifting
Thread Starter
Member Since: Aug 2010
Location: Kanuckistan
Posts: 1,617
Received 127 Likes
on
68 Posts
2022 C3 of the Year Finalist - Modified
This is a great thread and when I saw your bucket I about flipped out. We took this process a step further and used a 55 gallon plastic drum! We also add sodium hydroxide (lye) in there as a cleaning agent combined with soda ash for our electrolyte.
There are three copper rods through the top of the tank, and two rolled steel plates suspended from the outer rods that act as the anodes. The center rod is my hanging rod.
Combine this with a 40 amp battery charger and you can do your seat frames, core supports, entire trailing arm and pretty much what ever you want that will fit in the tank.
It removes none of the metal only the rust, paint, tar (wipes off). The by-product of using this method is the hydrogen that accumulates in the bubbles on top. It's not dangerous but it scare the hell out of you if you spark it.
What makes this a special treat is that the ph level (from the lye) is so low that you can dump the water out without any worry of epa issues.
I'll see if I can find some pictures of this.... I know I took some but was hesitant to post them.
Willcox
01-12-2011, 12:46 PM
#68
Drifting
Thread Starter
Member Since: Aug 2010
Location: Kanuckistan
Posts: 1,617
Received 127 Likes
on
68 Posts
2022 C3 of the Year Finalist - Modified
Yesterday was a bag of mixed feeling.
The good : my heater core arrived, the tracking still tells it's at the departure post office, I guess you have to take those with a grain of salt.
This is a brand new one, bought from our trusty Willcox but never installed. At 25$ that's a steal.
Now I can reassemble my interior once for good.
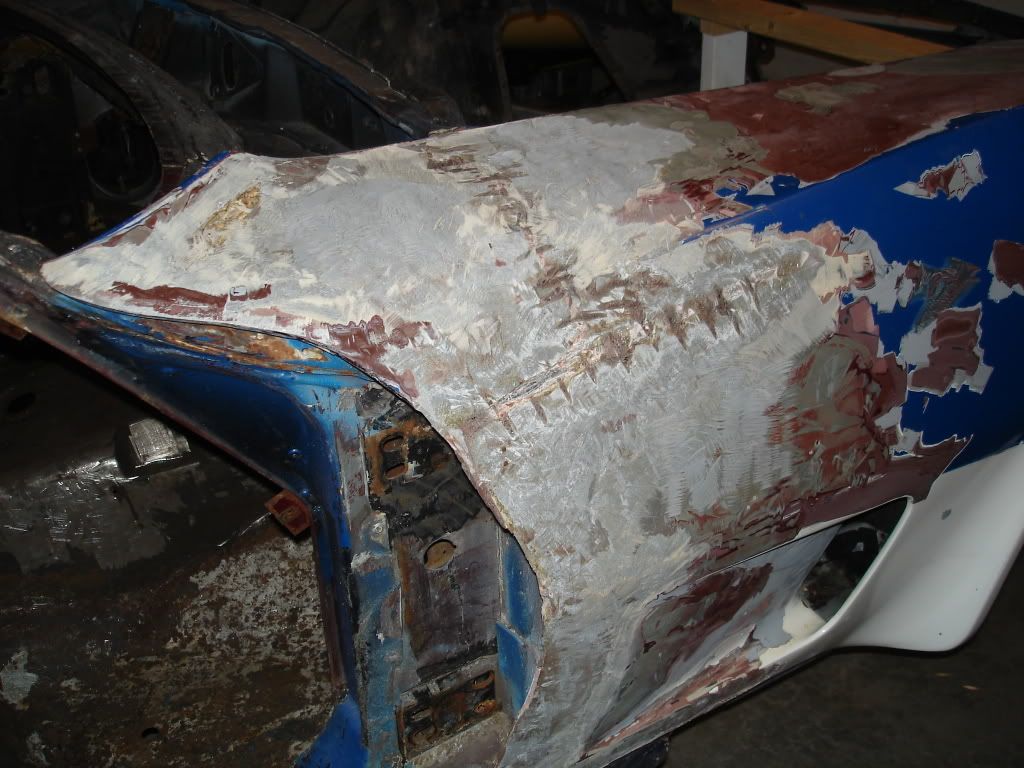
The bad : I kept of removing the paint and what's under is worrying.
You see those two area near at the back of the front clip where there's still the top black paint layer:
Well, turned out under that there is a **** thick layer (around 1/16") of soft yellow repair crap stuff, and under that the fiberglass is bible paper thin.
I'll post picture this evening.
When I talked about the 16 layers of paint to my friend (actually 18, the pink-salmon stuff on the picture turned out to be one of the two last layers before I actually reached the fiberglass) they joked about the fact I'm removing structural strength to be body, looks like it was not such a joke afterall. *sigh*
The good : my heater core arrived, the tracking still tells it's at the departure post office, I guess you have to take those with a grain of salt.
This is a brand new one, bought from our trusty Willcox but never installed. At 25$ that's a steal.
Now I can reassemble my interior once for good.
The bad : I kept of removing the paint and what's under is worrying.
You see those two area near at the back of the front clip where there's still the top black paint layer:
Well, turned out under that there is a **** thick layer (around 1/16") of soft yellow repair crap stuff, and under that the fiberglass is bible paper thin.
I'll post picture this evening.
When I talked about the 16 layers of paint to my friend (actually 18, the pink-salmon stuff on the picture turned out to be one of the two last layers before I actually reached the fiberglass) they joked about the fact I'm removing structural strength to be body, looks like it was not such a joke afterall. *sigh*
Last edited by Denpo; 01-12-2011 at 12:48 PM. Reason: typo
01-13-2011, 11:24 AM
#69
Instructor
Denis
I keep sitting here in the safety of my living room across town, following your progress with amazement at your ingenuity and perseverance.
I think it's safe to say that if you weren't enjoying yourself, there would have been a parts-car for sale long ago.
F�licitations mon ami - j'en reviens pas!
Let me know if you'll be in the man-cave tonight. The habs aren't playing and I'm definitely overdue to pop-over with a 6 pack.
Andre
01-13-2011, 11:38 AM
#70
Drifting
Thread Starter
Member Since: Aug 2010
Location: Kanuckistan
Posts: 1,617
Received 127 Likes
on
68 Posts
2022 C3 of the Year Finalist - Modified
Denis
I keep sitting here in the safety of my living room across town, following your progress with amazement at your ingenuity and perseverance.
I think it's safe to say that if you weren't enjoying yourself, there would have been a parts-car for sale long ago.
F�licitations mon ami - j'en reviens pas!
Let me know if you'll be in the man-cave tonight. The habs aren't playing and I'm definitely overdue to pop-over with a 6 pack.
Andre
I keep sitting here in the safety of my living room across town, following your progress with amazement at your ingenuity and perseverance.
I think it's safe to say that if you weren't enjoying yourself, there would have been a parts-car for sale long ago.
F�licitations mon ami - j'en reviens pas!
Let me know if you'll be in the man-cave tonight. The habs aren't playing and I'm definitely overdue to pop-over with a 6 pack.
Andre
01-13-2011, 07:44 PM
#71
Former Vendor
Member Since: Aug 2006
Location: Jeffersonville Indiana 812-288-7103
Posts: 76,656
Received 1,813 Likes
on
1,458 Posts
St. Jude Donor '08-'09-'10-'11-'12-'13-'14-'15

I have a video of us putting this together so I cropped pictures from it so you guys could see.
1) adding the Lye 1.5 lbs per 55 gal.
2) adding the soda ash
3) copper coated rods are installed through the tank.. (3) two positive and one ground.
4) LH outer plate is installed in tank
5) RH outer plate is installed in tank
6) Connect Positive end of 40-200 amp battery charger to either outer copper rod. The two rods are connected together by a power wire C
7) Connect Ground to B.
Your part is suspended from B and always use copper wire to do this. Also, it's smart on larger items to use multiple suspension wires so the current draw will be equal trough out the part.
Ok.. I'll go back to sleep now with a little disclaimer.. use this at your own risk. The warmer the water the better it works.. We use 200 amp setting to heat up the water faster and once it gets to about 120 degrees we cut it back to 40 amp. We pretty much run this tank non stop.
The main benefit of this tank is that I'm not paying someone to sandblast parts, there is very little cost involved in running it, and boy does it clean...
Willcox
The following users liked this post:
Pegan2261 (08-10-2021)
01-14-2011, 10:46 AM
#72
Drifting
Thread Starter
Member Since: Aug 2010
Location: Kanuckistan
Posts: 1,617
Received 127 Likes
on
68 Posts
2022 C3 of the Year Finalist - Modified
Thanks guys, I'm honored to host your post. This is definitely badass industrial process.
In the meanwhile, the newbie I am got caugth on Ebay. You remember my leaky heater core? Well I rushed to buy a replacement on Ebay. It was an allegedly a "1968-1979 Heater core" bought for Willcox.
On the picture it had the bended tubes, not the two 90� tube like the no A/C car. So I thought is was the right one.
Yesterday I brought it to the garage, just to realize the mistake I made blindly trusting a Ebay seller :

On the left the new core, on the right my leaky one.
Hey, Willcox, since I know you're around could you help me identify this piece? My guess is that it is a '90-something corvette heater.
Looks like my interior completion will have to wait for a while. No big deal, this weekend I'm finishing my trailing arm, and I still have enough works in progress to not be completely stuck.
Still this is a tad depressing.
Hopefully LeSkid showed up with a sixpack and we sipped beers while talking about the project. Just what I needed.
Ok, time to put a "WTB heater core" on the forum.
In the meanwhile, the newbie I am got caugth on Ebay. You remember my leaky heater core? Well I rushed to buy a replacement on Ebay. It was an allegedly a "1968-1979 Heater core" bought for Willcox.
On the picture it had the bended tubes, not the two 90� tube like the no A/C car. So I thought is was the right one.
Yesterday I brought it to the garage, just to realize the mistake I made blindly trusting a Ebay seller :
On the left the new core, on the right my leaky one.
Hey, Willcox, since I know you're around could you help me identify this piece? My guess is that it is a '90-something corvette heater.
Looks like my interior completion will have to wait for a while. No big deal, this weekend I'm finishing my trailing arm, and I still have enough works in progress to not be completely stuck.
Still this is a tad depressing.
Hopefully LeSkid showed up with a sixpack and we sipped beers while talking about the project. Just what I needed.
Ok, time to put a "WTB heater core" on the forum.
Last edited by Denpo; 01-14-2011 at 10:46 AM. Reason: formating
01-15-2011, 04:31 AM
#73
Drifting
Thread Starter
Member Since: Aug 2010
Location: Kanuckistan
Posts: 1,617
Received 127 Likes
on
68 Posts
2022 C3 of the Year Finalist - Modified
Man, not a good week.
We finally, Sovan and I, removed all the gooey crap on the side of the front clip, near the windshield.
Thick layer, average 1/16" with peak at 1/8".
Not done yet.
Under that, some sort of dark resin that get shiny and oily once you heat it, I bet some that never entirely cured.
Once done removing, the grim reality showed up it ugly face:

It's been fractured and put back together in authentic Bubba style.
I'm still wondering how such damage could happen, and really don't know if and how it's fixable.
We finally, Sovan and I, removed all the gooey crap on the side of the front clip, near the windshield.
Thick layer, average 1/16" with peak at 1/8".
Not done yet.
Under that, some sort of dark resin that get shiny and oily once you heat it, I bet some that never entirely cured.
Once done removing, the grim reality showed up it ugly face:
It's been fractured and put back together in authentic Bubba style.
I'm still wondering how such damage could happen, and really don't know if and how it's fixable.
01-15-2011, 02:30 PM
#74
Safety Car

 01-15-2011, 06:43 PM
#75
Former Vendor
Member Since: Aug 2006
Location: Jeffersonville Indiana 812-288-7103
Posts: 76,656
Received 1,813 Likes
on
1,458 Posts
St. Jude Donor '08-'09-'10-'11-'12-'13-'14-'15
Thanks guys, I'm honored to host your post. This is definitely badass industrial process.
In the meanwhile, the newbie I am got caugth on Ebay. You remember my leaky heater core? Well I rushed to buy a replacement on Ebay. It was an allegedly a "1968-1979 Heater core" bought for Willcox.
On the picture it had the bended tubes, not the two 90� tube like the no A/C car. So I thought is was the right one.
Yesterday I brought it to the garage, just to realize the mistake I made blindly trusting a Ebay seller :
On the left the new core, on the right my leaky one.
Hey, Willcox, since I know you're around could you help me identify this piece? My guess is that it is a '90-something corvette heater.
Looks like my interior completion will have to wait for a while. No big deal, this weekend I'm finishing my trailing arm, and I still have enough works in progress to not be completely stuck.
Still this is a tad depressing.
Hopefully LeSkid showed up with a sixpack and we sipped beers while talking about the project. Just what I needed.
Ok, time to put a "WTB heater core" on the forum.

And here is a link that will show you pictures of all cores from 1956-1999 and nothing on there looks like that core.
Willcox
01-15-2011, 07:20 PM
#76
Drifting
Thread Starter
Member Since: Aug 2010
Location: Kanuckistan
Posts: 1,617
Received 127 Likes
on
68 Posts
2022 C3 of the Year Finalist - Modified
First you gonna know that you and Maine Vette are my Mentors. The very guys that convinced me to just this bottom less pit. 
Wow, that's quiet nasty.
Yesterday night I searched your thread for the story of you front clip, too tired, couldn't find it.
Your thread is so enormous it would take and table of content at the front page.
It could be made collectively, you must have most of the forum ask readers.
Wow, that's quiet nasty.
Yesterday night I searched your thread for the story of you front clip, too tired, couldn't find it.
Your thread is so enormous it would take and table of content at the front page.
It could be made collectively, you must have most of the forum ask readers.
01-15-2011, 07:28 PM
#77
Drifting
Thread Starter
Member Since: Aug 2010
Location: Kanuckistan
Posts: 1,617
Received 127 Likes
on
68 Posts
2022 C3 of the Year Finalist - Modified
The part price being same as shipping price I think I can sit on it.
Sheat happens, more sorry for the delay than the greens.
Will ask the seller what-the-heck.
01-15-2011, 09:30 PM
#78
Drifting
Thread Starter
Member Since: Aug 2010
Location: Kanuckistan
Posts: 1,617
Received 127 Likes
on
68 Posts
2022 C3 of the Year Finalist - Modified
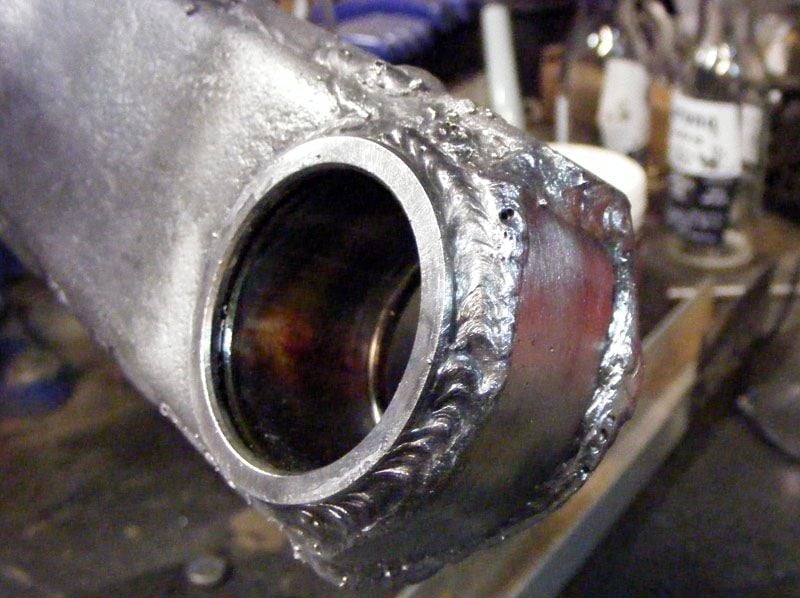
Resto makes sad those day, let's do some mod instead.
A while ago, I bought those Johnny Joint.
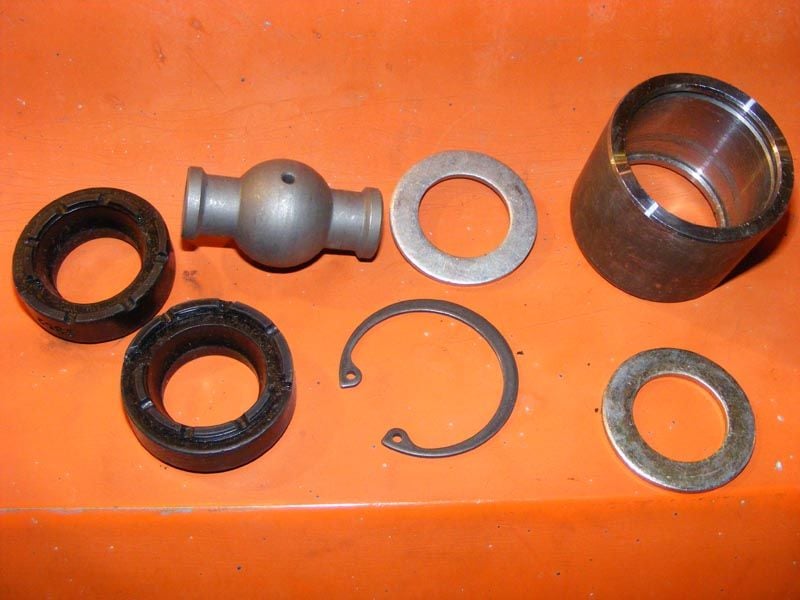
Today I went to Michel garage, Michel is restoring a '72 BBC near Montreal, he proposed his son who is professional welder to help me put them on the trailing arms.
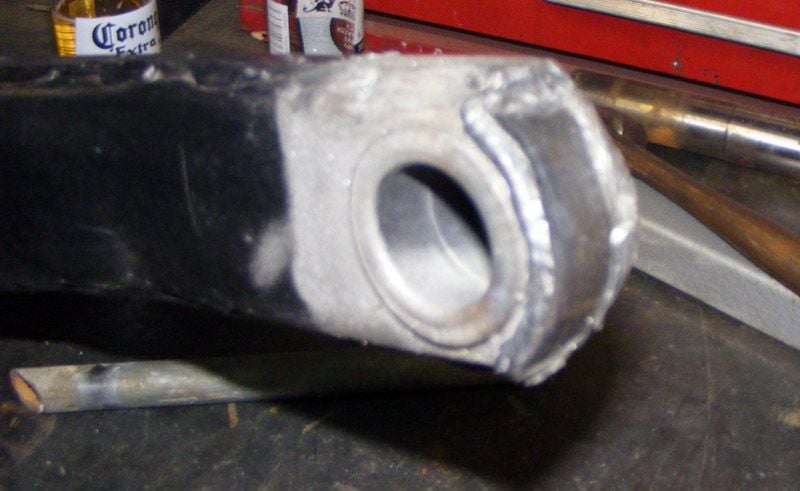
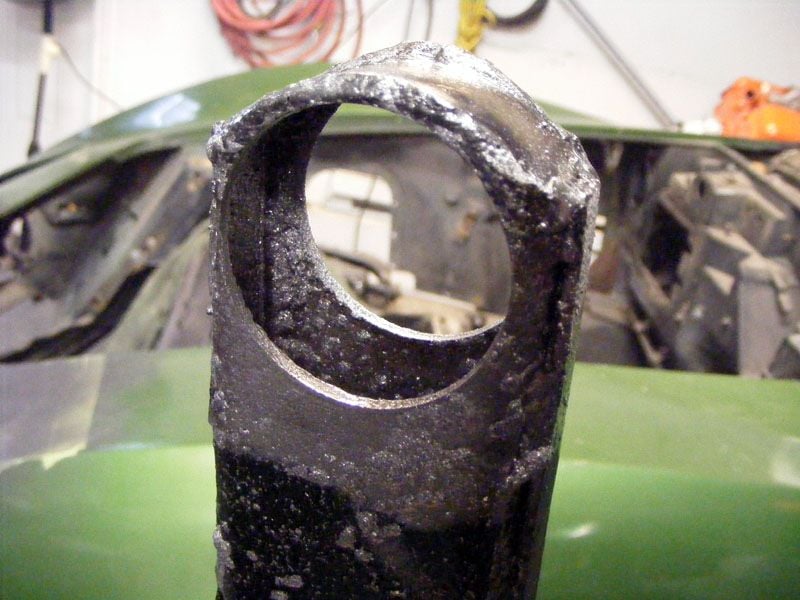
I used his sandblasting booth to clean the tip of the arm.

Steven, Michel's son, welded close them
I Cut a 2" hole in place of the former axis.
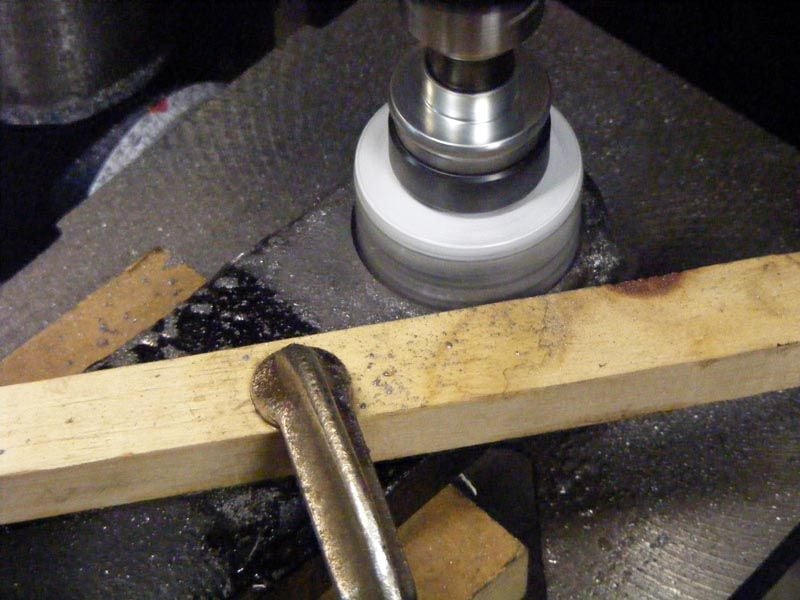
Place the JJ

Weld it

Cleaning

Result
A while ago, I bought those Johnny Joint.
Today I went to Michel garage, Michel is restoring a '72 BBC near Montreal, he proposed his son who is professional welder to help me put them on the trailing arms.
I used his sandblasting booth to clean the tip of the arm.
Steven, Michel's son, welded close them
I Cut a 2" hole in place of the former axis.
Place the JJ
Weld it
Cleaning
Result
01-15-2011, 09:54 PM
#79
Safety Car
First you gonna know that you and Maine Vette are my Mentors. The very guys that convinced me to just this bottom less pit.
Wow, that's quiet nasty.
Yesterday night I searched your thread for the story of you front clip, too tired, couldn't find it.
Your thread is so enormous it would take and table of content at the front page.
It could be made collectively, you must have most of the forum ask readers.
Wow, that's quiet nasty.
Yesterday night I searched your thread for the story of you front clip, too tired, couldn't find it.
Your thread is so enormous it would take and table of content at the front page.
It could be made collectively, you must have most of the forum ask readers.
I ended up installing a one piece front clip. Just keep pushing - I've been going for almost 4 years now, and still have a lot to go.
