
80-82 Front Bumper Assembly Diagram or Pictures
 10-18-2010, 11:39 PM
#1
Drifting

Thread Starter
Member Since: Nov 2004
Posts: 1,624
Received 287 Likes
on
128 Posts
2020 C3 of the Year Finalist - Modified

I've switched my 79's front end to an 80-82 front end using patch panels and trading the underbumper hardware with another memeber a while back.
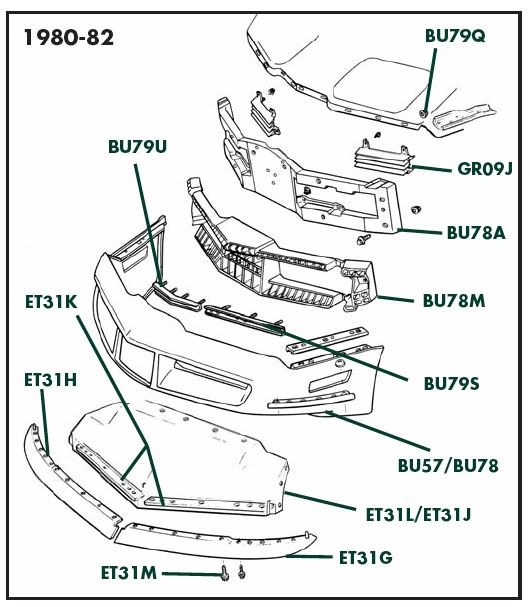
Time for assembly and paint, actually at the painter shop right now. Wondering if there is a diagram show how the center valence piece attaches to the car and to the 80-82 front bumper. (This valence piece is triangle shaped and looks like it helps direct air up to the radiator and is painted car color)
A full exploded diagram would be great or pictures would be good too when putting the vacuum canister back in and all.
Thanks for ya'lls help....I'll be posting pics tomorrow of the progress on the body work and won't be long for color!
Ryan
 10-19-2010, 11:03 AM
#2
Team Owner


Member Since: Jun 2000
Location: Southbound
Posts: 38,928
Likes: 0
Received 1,469 Likes
on
1,248 Posts
Cruise-In II Veteran

The 80 assembly instruction manual (AIM) has the exploded diagrams you want. The AIM shows the installation, original part numbers, etc.

10-19-2010, 12:24 PM
#3
Drifting
Thread Starter
Member Since: Nov 2004
Posts: 1,624
Received 287 Likes
on
128 Posts
2020 C3 of the Year Finalist - Modified
do they have a downloadable version of the AIM's book?
kind of in a need for something quick, the painter is working on it........found some pictures of what I'm actually missing (or cut off), but something like the aim's would comfort my mind that it's put together correctly.
The little "J" hook was cut off and now I'm starting to see somewhat how it's to go together.


 10-20-2010, 02:44 PM
#5
Team Owner
Member Since: Jun 2000
Location: Southbound
Posts: 38,928
Likes: 0
Received 1,469 Likes
on
1,248 Posts
Cruise-In II Veteran
Purchase the AIM; have your painter paint the lower panel body color. You can install it once the car is back from paint.
10-20-2010, 09:19 PM
#6
Melting Slicks


The diagram doesn't show a tube-steel "A" frame member that ties into the frame. That is for both supporting the front nose and impact should you get into a collision. Most guys would recommend putting that on for safety sakes. Let's see some finished pics.
Mark G
Mark G
10-21-2010, 08:49 AM
#7
Drifting
Thread Starter
Member Since: Nov 2004
Posts: 1,624
Received 287 Likes
on
128 Posts
2020 C3 of the Year Finalist - Modified
yeah I definitely have that "A" frame piece in there. I think by what i have here i can figure out how to attach the piece when I get it back from paint. I'll have to build & attach that little "hook" piece to grab the center of the valence (ET31l/ET31J on that diagram) since it was mangled when I got the bumper support.
thanks
ryan
thanks
ryan