
76 seats and carpet kit, DIY??
 12-19-2011, 05:54 PM
#1
Instructor

Thread Starter
Member Since: Aug 2011
Posts: 155
Likes: 0
Received 0 Likes
on
0 Posts
I just ordered new seat covers, foam kits and new carpet kit for my 76.
I am fairly handy (that's code for: I suck) and am wondering if I can handle refitting the seats and installing the carpet kit.
I usually end-up getting frustrated and breaking out the BFH a lot.
Thanks fellas and Happy Holidays to all the Stingray folk out there in Corvette land!!
I am fairly handy (that's code for: I suck) and am wondering if I can handle refitting the seats and installing the carpet kit.
I usually end-up getting frustrated and breaking out the BFH a lot.
Thanks fellas and Happy Holidays to all the Stingray folk out there in Corvette land!!
 12-19-2011, 09:43 PM
#2
Former Vendor
Member Since: Aug 2006
Location: Jeffersonville Indiana 812-288-7103
Posts: 76,656
Received 1,813 Likes
on
1,458 Posts
St. Jude Donor '08-'09-'10-'11-'12-'13-'14-'15

I just ordered new seat covers, foam kits and new carpet kit for my 76.
I am fairly handy (that's code for: I suck) and am wondering if I can handle refitting the seats and installing the carpet kit.
I usually end-up getting frustrated and breaking out the BFH a lot.
Thanks fellas and Happy Holidays to all the Stingray folk out there in Corvette land!!
I am fairly handy (that's code for: I suck) and am wondering if I can handle refitting the seats and installing the carpet kit.
I usually end-up getting frustrated and breaking out the BFH a lot.
Thanks fellas and Happy Holidays to all the Stingray folk out there in Corvette land!!
The carpet set is not that hard... you'll need some patience and trimming... have patience with the rear out wheel well sections they can be confusing and difficult.
The rear compartment is a PITA unless you purchase the complete unit and in that case it's just a drop in place and bolt down. Messing with the rear compartment doors will drive you nuts. In our shop we have the customer purchase the RCU assembly vs. us putting new carpet on his old unit. The time to do this exceeds the cost of a new unit.
You'll do fine on the carpet...
The best advice I can give you on the seat covers is to take on side apart at a time. If you do this take lots of pictures and never assume someone has not been there before. If you goof or forget how something came apart you'll have the other side to check by.
Willcox
Last edited by Willcox Corvette; 12-20-2011 at 08:43 AM.
12-19-2011, 11:30 PM
#3
Team Owner

Nothing on a C3 is "a breeze" when it's a 'first time' repair. There is a learning curve with every project. So, you must learn to have some patience and to just "put the hammer down, and step away from the car!" when your nerves start to go. For, that is the very time that the infamous Bubba shows up. 
You can do this job and make it look almost like 'factory new'. But, you need to have a copy of the AIM for assembly/disassembly reference and you need to plan out your tasks thoroughly. If you just start haphazardly taking stuff apart, you will quickly have a do-able project go very wrong and be unable to reassemble it properly. Bag and label all fasteners and small parts; sequence your work so that you can stage activities; make sure you have all the repair parts/fasteners/cleaning materials/paints/glues that you will need before you begin to tackle some portion of work. It will take you more time to do it this way; but, you will complete the work more quickly and see better results....and that will keep you positively engaged.
Good luck!
Oh! And, ask for help when you get stuck. Don't turn into Bubba and get the BFH out to 'make' it fit.
 12-20-2011, 11:56 AM
#5
Advanced

Member Since: Jul 2011
Posts: 93
Likes: 0
Received 0 Likes
on
0 Posts
There are some on-line free videos out there on re-doing the seat foam and covers, I can't remember where but try Zip or Corvette America, and as previously stated do one seat at a time for reference....Fred
12-20-2011, 12:41 PM
#6
Team Owner


I've done carpet a couple of times and getting ready to do it again on the `73 . . . I'm not sure I have the patience, tools or skills to recover the seats and fight with the hog rings - - but you can always take the stuff to an auto upholstery shop so it turns out as you want it.
While you've got the old carpet out, suggest a trip to Home Depot for a roll of Reflectix to put underneath the carpeting - - it'll reduce road noise and keep the heat out from your exhaust . . . .about $20 . . plus spray adhesive.
Good luck-
While you've got the old carpet out, suggest a trip to Home Depot for a roll of Reflectix to put underneath the carpeting - - it'll reduce road noise and keep the heat out from your exhaust . . . .about $20 . . plus spray adhesive.
Good luck-
 12-20-2011, 05:04 PM
#8
Melting Slicks


The only special tool you will need is a pair of hog ring pliers which can be purchased several places for less than $10. A quality metal bodied box cutter and several new blades will make fitting the carpet easier, and a heavy duty hair dryer or heat gun can help as well. Go slowly, be detail oriented it will come out perfect... mine is close and it was my first Corvette interior too.
12-20-2011, 06:22 PM
#9
Instructor
Member Since: Apr 2006
Location: Windsor PA
Posts: 224
Likes: 0
Received 0 Likes
on
0 Posts
I did mine a few years ago when I had my 76. I bought all of the stuff from Willcox. I had never attempted to do anything like this before. The carpet was not to bad. The seats need to be heated or left out in the sun for awhile so you can stretch them. you will need hog ring pliers too. To me the hardest part was taking off the old door panels and replacing with the new. Take your time, if you get frustrated just walk away for awhile. Good luck.
Started like this.
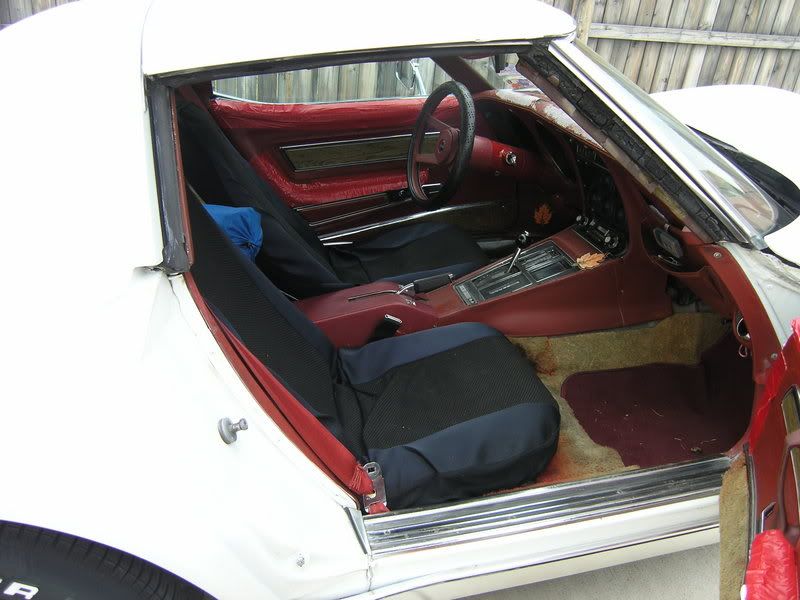
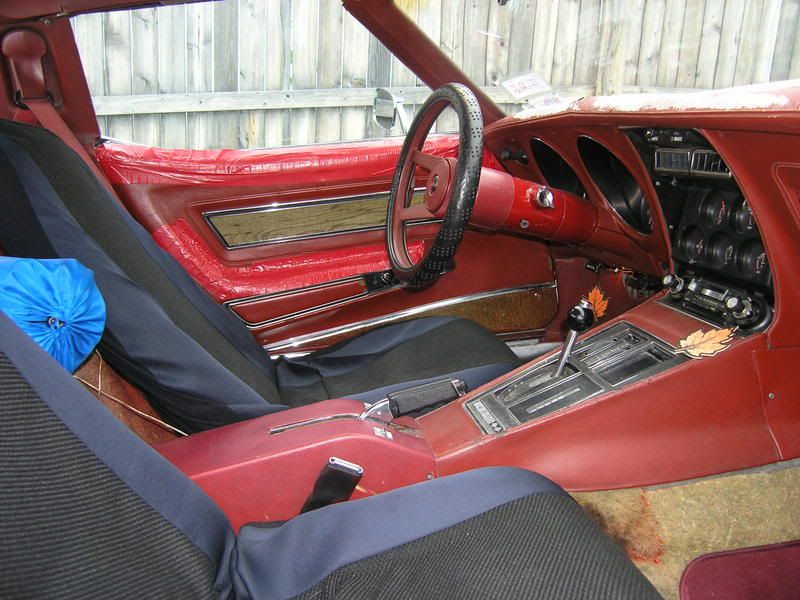
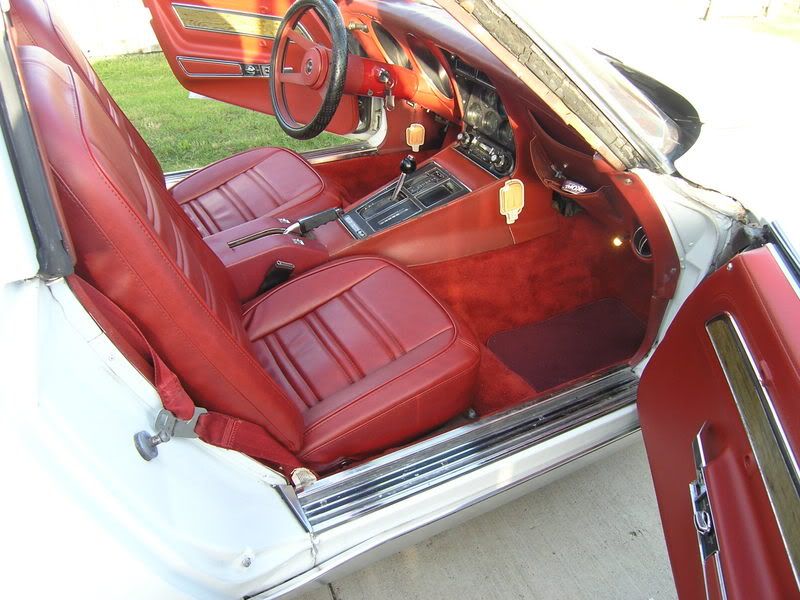
Ended up like this.

Started like this.
Ended up like this.
Last edited by cknorr28; 12-20-2011 at 06:26 PM.
 12-20-2011, 09:27 PM
#11
Former Vendor
Member Since: Aug 2006
Location: Jeffersonville Indiana 812-288-7103
Posts: 76,656
Received 1,813 Likes
on
1,458 Posts
St. Jude Donor '08-'09-'10-'11-'12-'13-'14-'15
CKNorr.. Nice job!
Please take this advice from someone that is an installer...
Stay away from the 10 buck seat installation tools.. they are horrible! Go to the mid level or the professional level ring pliers... or even get a pair of the real "Hog" ring pliers... But stay away from the 10 dollar set.
Old Sarge is got that avatar rocking this year...
12-20-2011, 09:53 PM
#12
Melting Slicks
OK Ernie... I'll bite. Even though my hog ring pliers came off the Snap-On truck 25 years ago I have to ask... for a single use application why not use the least expensive pliers you can find? There are like 30 to 40 rings needed on a pair of C3 seats... I would think any curved and grooved installation tool would serve the purpose once.
12-20-2011, 10:45 PM
#13

My advice is to take your time, take plenty of pictures and be ready for the unexpected. You will need an assembly manual to assist in which pieces need to come out first or put back in before the others.
Remember - it's supposed to be a fun and rewarding experience. When it gets to be otherwise, walk away for a day or so until it is again.
Remember - it's supposed to be a fun and rewarding experience. When it gets to be otherwise, walk away for a day or so until it is again.
12-21-2011, 06:47 AM
#15
Team Owner
I'm curious about the need for fancy hog ring pliers, too. If I recall correctly, I think my available tools was a set of Channel-Loks. I know that I don't have a set of hog ring pliers in my tool sets.
For the few rings you need to install, you can just take your time and keep the rings well aligned with whatever 'squeeze tool' you prefer....but it does need to be something with some leverage behind it and a wide enough jaw to grab the hog rings. Hmmm...I may have put an "initial squeeze" on those rings [keeping enough gap in the ends] before actually engaging them on the wire/seatcover parts.
For the few rings you need to install, you can just take your time and keep the rings well aligned with whatever 'squeeze tool' you prefer....but it does need to be something with some leverage behind it and a wide enough jaw to grab the hog rings. Hmmm...I may have put an "initial squeeze" on those rings [keeping enough gap in the ends] before actually engaging them on the wire/seatcover parts.
12-21-2011, 08:57 AM
#16
Former Vendor
Member Since: Aug 2006
Location: Jeffersonville Indiana 812-288-7103
Posts: 76,656
Received 1,813 Likes
on
1,458 Posts
St. Jude Donor '08-'09-'10-'11-'12-'13-'14-'15
Mark and 7t1
This pliers, pictured below and sold my most vendors and is about as junky as the come. If you can get through two backs and bottoms with this (ROC) set it would indeed be a Christmas miracle.
The pliers you got off the Snap-On Truck are surely of a higher quality then these.... I'm thinking about pulling them from the site just to make sure we Don't sell them!
Hog Ring Pliers. Economy Model 53-96 $6.11
Part Number: 4904
Part Year: 1953-1996
12-21-2011, 09:12 AM
#17
Pro

Member Since: Mar 2007
Location: Porter TX
Posts: 522
Likes: 0
Received 0 Likes
on
0 Posts

Here's a thread I did on my interior restoration.
http://www.corvetteactioncenter.com/...-75-coupe.html
http://www.corvetteactioncenter.com/...-75-coupe.html
01-23-2012, 02:59 AM
#18
2nd Gear

Member Since: Jan 2012
Posts: 2
Likes: 0
Received 0 Likes
on
0 Posts
Scotty-
The carpet set is not that hard... you'll need some patience and trimming... have patience with the rear out wheel well sections they can be confusing and difficult.
The rear compartment is a PITA unless you purchase the complete unit and in that case it's just a drop in place and bolt down. Messing with the rear compartment doors will drive you nuts. In our shop we have the customer purchase the RCU assembly vs. us putting new carpet on his old unit. The time to do this exceeds the cost of a new unit.
You'll do fine on the carpet...
The best advice I can give you on the seat covers is to take on side apart at a time. If you do this take lots of pictures and never assume someone has not been there before. If you goof or forget how something came apart you'll have the other side to check by.
Willcox
i agree with you.. I experience also what he had experienced about those things.
01-23-2012, 03:02 AM
#19
2nd Gear
Member Since: Jan 2012
Posts: 2
Likes: 0
Received 0 Likes
on
0 Posts
i had been gone to steam cleaner in my carpet.Any suggestions about any carpet cleaner?
Upper East Side Carpet Cleaning
park slope carpet cleaning
Upper East Side Carpet Cleaning
park slope carpet cleaning
01-23-2012, 08:09 AM
#20
Drifting


I just finished pulling my 76 seats, cleaning out the old carpet which was garbage when I started pulling it...looked okay but shredded on pulling. No insulation other than a little of that worthless fuzzy crap. The seats are just four bolts, out. I tuned them with tightened hinges, recoated the tracks, lubricated them, tightened the seat adjusters at the back of the seat back after adjusting, checked seat covers, etc. I scraped and cleaned the footwells and under the seats, left the shelf and back carpeting in place which was good and then spray painted with vht flat black paint the cleaned wells. Put a rubber/urethane type 3/16" foam I got with adhesive on the bottom and foil on the top down rather easily on tunnel, firewall, footwell, under seat. Then took molded new carpet, trimmed the side fuzzy crap off carefully that it came with and put it down with minimal trimming along the tunnel side. Reset the seats though I switched them....the passenger side became the driver's side to average the usage on the foam and leather.
Put it back together and bolted it down. Worked well. Happy with the job and hope this summer the tunnel heat and footwell heat is a bit less. Seems just fine so far.
Was not as difficult as expected though rear shelf would have been more work as noted by others. Mine is perfect as is so no need.
Lance P.

