
It's in....
 01-09-2012, 08:48 AM
#1
Melting Slicks

Thread Starter
Member Since: Jul 2001
Location: Massapequa Park NY
Posts: 2,604
Likes: 0
Received 10 Likes
on
8 Posts

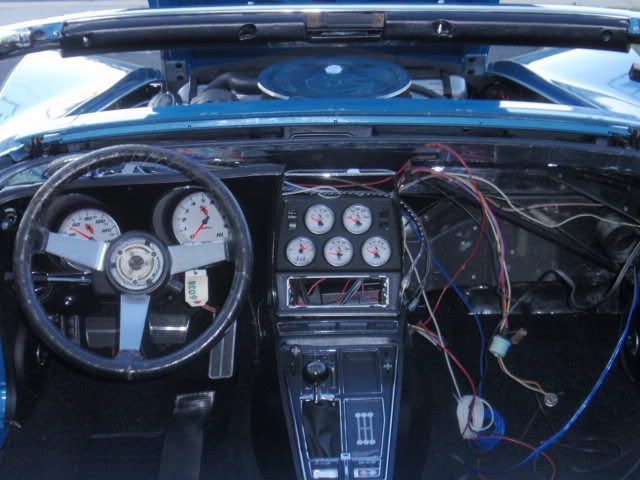
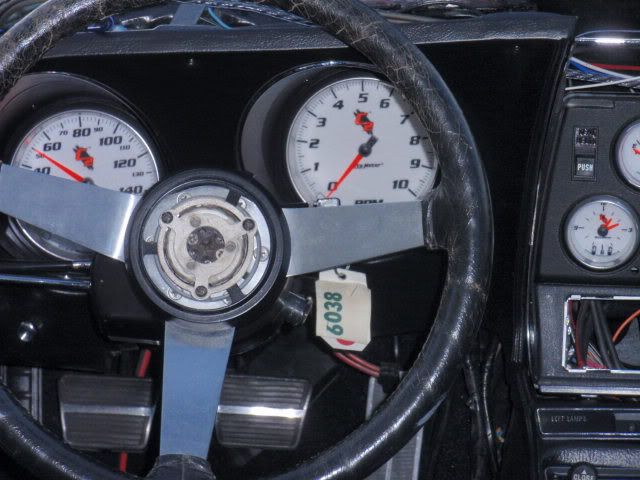
for now  Spent more time than I care to admit fitting everything, getting hoses routed, and modifying the harness for the Auto Meter gauges. But it's in and attached to the D/S dash pad. Now I just need to get the nuts on the bottom studs started
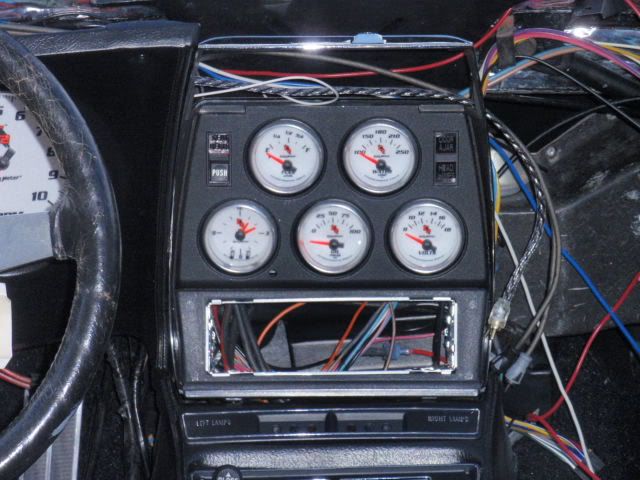
It's a repo console & the center gauge panel has the single DIN adapter which wraps around the bottom. The studs are barely long enough
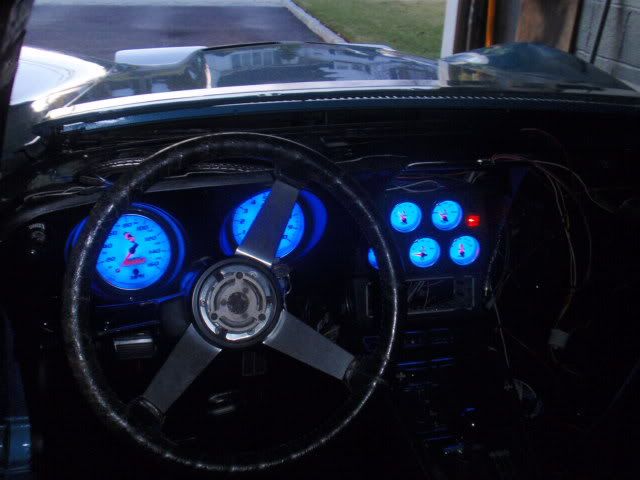
And with the lights on
Next weekend I'll test everything & work on getting the top dash pad in.
Thanks for all the tips
Jim
Spent more time than I care to admit fitting everything, getting hoses routed, and modifying the harness for the Auto Meter gauges. But it's in and attached to the D/S dash pad. Now I just need to get the nuts on the bottom studs started It's a repo console & the center gauge panel has the single DIN adapter which wraps around the bottom. The studs are barely long enough
And with the lights on
Next weekend I'll test everything & work on getting the top dash pad in.
Thanks for all the tips
Jim


 01-09-2012, 12:06 PM
#7
Team Owner

Instead of those studs being "short", could it be that the lower console is not moved fully into proper position? Also, if the bracket/brace to which those studs attach has slotted holes, just start the nuts onto those studs, THEN slide the lower console over them. With those nuts started already, it is much easier to get a 1/4" ratchet/socket on them to tighten. Remember to just snug those nuts up; if you try to lock them down, the studs will break off of that flimsy pot-metal bezel.
01-09-2012, 03:28 PM
#8
Melting Slicks
Thread Starter
Member Since: Jul 2001
Location: Massapequa Park NY
Posts: 2,604
Likes: 0
Received 10 Likes
on
8 Posts
Instead of those studs being "short", could it be that the lower console is not moved fully into proper position? Also, if the bracket/brace to which those studs attach has slotted holes, just start the nuts onto those studs, THEN slide the lower console over them. With those nuts started already, it is much easier to get a 1/4" ratchet/socket on them to tighten. Remember to just snug those nuts up; if you try to lock them down, the studs will break off of that flimsy pot-metal bezel.
The radio plate wraps around the bottom adding a 1/16" or so plus the repo console is pretty thick, much more than an original. Tried to install with the nuts just started, but had no luck. Are the studs pressed in or are they threaded in? Toyed with the idea of replacing them with a longer stud but was afraid to break it, cause then I'd be

blueray72 - The gauges are Auto Meter C2's and I did install their dimmer also. Using the headlight switch the dash lights were either on or off, no dimming.
Twinray -
 I was outside most of the day in a Tee shirt. Big difference from last year at this time. Hoping it stays in the the high 30's low 40's a little while longer. Of course my hands are a little beat up from working on the dash for two days
Thanks
Jim
 01-09-2012, 04:59 PM
#10
Team Owner
Member Since: Sep 2006
Location: Westminster Maryland
Posts: 30,173
Likes: 0
Received 2,878 Likes
on
2,515 Posts

Hi Jim,
Looks VERY cool!!!
The reflection of the gauge light in the gaule bezels is pretty neat looking!
Regards,
Alan
Looks VERY cool!!!
The reflection of the gauge light in the gaule bezels is pretty neat looking!
Regards,
Alan
01-09-2012, 05:03 PM
#11
Melting Slicks


I replaced the nuts with a couple of rod couplers from the hardware store. Makes installation much easier.
01-09-2012, 05:26 PM
#12
Melting Slicks
Man I am really digging those gauges, speedo and tach in a black interior Shark! Seeing several recent reso-mod projects with AutoMeter and they really pop! 
01-09-2012, 09:11 PM
#13
Team Owner
The studs are part of the bezel casting. I do not know whether the threads are cast with the part or if they are chased after the bezel is cast; I suspect the latter.
I suggest that you do what you can [or need to] to make the lower console fit flush with the bottom of the bezel, so that there is no gap left between them. You may have to shim, or install spacers or extend the mounting brackets from tranny tunnel to lift the console a bit more. Otherwise, you will have an unsightly and weakly supported console/bezel assembly.
Good luck.

 01-09-2012, 10:30 PM
#16
Melting Slicks
Thread Starter
Member Since: Jul 2001
Location: Massapequa Park NY
Posts: 2,604
Likes: 0
Received 10 Likes
on
8 Posts
The studs are part of the bezel casting. I do not know whether the threads are cast with the part or if they are chased after the bezel is cast; I suspect the latter.
I suggest that you do what you can [or need to] to make the lower console fit flush with the bottom of the bezel, so that there is no gap left between them. You may have to shim, or install spacers or extend the mounting brackets from tranny tunnel to lift the console a bit more. Otherwise, you will have an unsightly and weakly supported console/bezel assembly.
Good luck.
I suggest that you do what you can [or need to] to make the lower console fit flush with the bottom of the bezel, so that there is no gap left between them. You may have to shim, or install spacers or extend the mounting brackets from tranny tunnel to lift the console a bit more. Otherwise, you will have an unsightly and weakly supported console/bezel assembly.
Good luck.
The console & the reinforcing bracket are loose so they can come up to the gauge panel. Also needs to shift toward the back of the car about 1/4"
Jim
 Don't think I ever realized that