
process of painting chassis
 12-29-2012, 02:42 PM
#1
Melting Slicks

Thread Starter
I'm preparing to paint my chassis (body off) this spring, and I want to know from those that have done it: how did you physically do it? Did you fabricate some sort of rotisserie? Rest on jack stands and paint one side, let dry, flip, then paint the other side?
I would like to see some pictures as well. Thanks for any tips.
I should mention that I am trying to keep costs down on this set-up. I try to maximize how much money I put into the car, and minimize the cost of single-use items.
I would like to see some pictures as well. Thanks for any tips.
I should mention that I am trying to keep costs down on this set-up. I try to maximize how much money I put into the car, and minimize the cost of single-use items.
Last edited by LeMans Pete; 12-29-2012 at 02:52 PM.
 12-29-2012, 05:26 PM
#2
Pro


Member Since: Nov 2012
Location: Chesapeake Virginia
Posts: 672
Likes: 0
Received 0 Likes
on
0 Posts
I'm in the process of a body off restoration on my '81 and I'm in the same boat when it comes to finances, my first thought was to do all the stripping and painting myself to save money. after pulling the body and seeing all the nooks and crannies that would be a pain to get clean, I did some checking around and found a place that will media blast and powder coat the frame, upper and lower control arms, radiator support, sway bar and a few other small parts for $450.00...... I don't think that I could strip it and paint it for that little and the paint won't hold up near as well.
it's your call and only you know how deep your wallet is but I would spend some time calling around and get some prices, you might be supprised.
it's your call and only you know how deep your wallet is but I would spend some time calling around and get some prices, you might be supprised.
12-29-2012, 06:23 PM
#3
Melting Slicks
Thread Starter
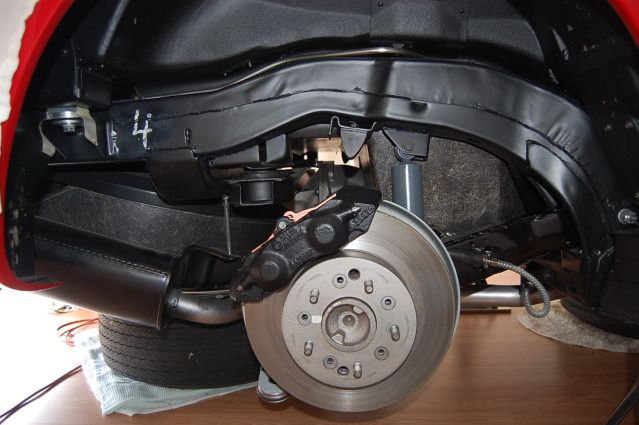
Jig, I took a wire wheel to the frame then got in all the nooks with a dremel tool w/ a wire wheel attachment. Frame is ready for paint (I'm using Eastwood's Extreme Chassis Black satin finish). I will clean, prime and double coat the frame.
I'm curious as to how to physically accomplish the painting step. I want a very smooth, uniform paint job.
I'm curious as to how to physically accomplish the painting step. I want a very smooth, uniform paint job.
12-29-2012, 06:27 PM
#4
Drifting

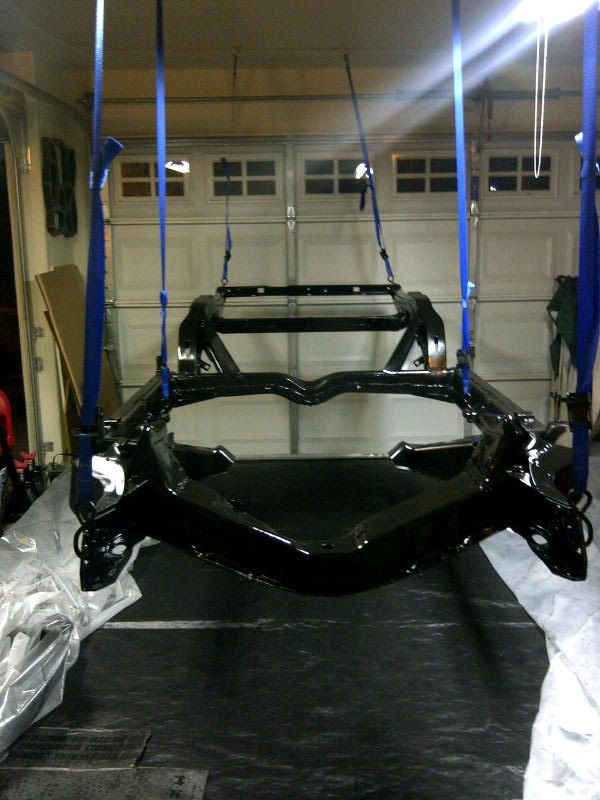
I put six eyelet screws in the ceiling and hung the frame using straps... Kneeled underneath to get the underside of the frame... PITA, but got the job done...
Rogman
Rogman
12-29-2012, 06:43 PM
#5
Team Owner

Member Since: Sep 2006
Location: Westminster Maryland
Posts: 30,173
Likes: 0
Received 2,878 Likes
on
2,515 Posts

Hi,
One thing I think adds to the finished appearance of the frame is to remove all the weld splatter on the it. There's generally a lot, and it's relatively easy to do.
I also smoothed out some of the obvious imperfections with a little grinding but didn't go as far as to use any filler.
It really depends on how you want the frame to look as to how much cosmetic work you do.
Regards,
Alan
12-29-2012, 10:43 PM
#6
Racer


I went through the same. I had it media blasted and then 2 part powder coated. Paint, however is also excellent.
One thing I did want to mention is to not neglect the inside of the frame. I used Eastwood's interior rust spray. Sprays on green and it seeps through all the cracks and covers very well! It uses a 360 degree spray wand. Since it seeps it would be best to do that first and then paint he exterior.
Well spent $$$$$
12-30-2012, 01:09 AM
#7
Melting Slicks
I went through the same. I had it media blasted and then 2 part powder coated. Paint, however is also excellent.
One thing I did want to mention is to not neglect the inside of the frame. I used Eastwood's interior rust spray. Sprays on green and it seeps through all the cracks and covers very well! It uses a 360 degree spray wand. Since it seeps it would be best to do that first and then paint he exterior.
Well spent $$$$$
One thing I did want to mention is to not neglect the inside of the frame. I used Eastwood's interior rust spray. Sprays on green and it seeps through all the cracks and covers very well! It uses a 360 degree spray wand. Since it seeps it would be best to do that first and then paint he exterior.
Well spent $$$$$
 Definitely do the inside first. There will be overspray and drips. You want to be able to clean up the drips and cover the overspray with the finish coat on the outside.
12-30-2012, 06:09 AM
Definitely do the inside first. There will be overspray and drips. You want to be able to clean up the drips and cover the overspray with the finish coat on the outside.
12-30-2012, 06:09 AM
#8
Safety Car


I like the look of your paint finish. What did you use and how would you described the shade? Also how did you remove weld splatter?
Last edited by hunt4cleanair; 12-31-2012 at 05:09 AM.
12-30-2012, 11:49 AM
#9
Melting Slicks
Hi,
One thing I think adds to the finished appearance of the frame is to remove all the weld splatter on the it. There's generally a lot, and it's relatively easy to do.
I also smoothed out some of the obvious imperfections with a little grinding but didn't go as far as to use any filler.
It really depends on how you want the frame to look as to how much cosmetic work you do.
Regards,
Alan
One thing I think adds to the finished appearance of the frame is to remove all the weld splatter on the it. There's generally a lot, and it's relatively easy to do.
I also smoothed out some of the obvious imperfections with a little grinding but didn't go as far as to use any filler.
It really depends on how you want the frame to look as to how much cosmetic work you do.
Regards,
Alan

 12-30-2012, 12:02 PM
#10
Melting Slicks
Thread Starter
Rogman, I like this idea, and may give it a shot. I need to check on my trusses can hold - they currently span 20'. I think I could use some come-alongs and raise the frame up to 4 1/2'. Thanks for the suggestion.
12-30-2012, 12:05 PM
#11
Melting Slicks
Thread Starter
Hi,
One thing I think adds to the finished appearance of the frame is to remove all the weld splatter on the it. There's generally a lot, and it's relatively easy to do.
I also smoothed out some of the obvious imperfections with a little grinding but didn't go as far as to use any filler.
It really depends on how you want the frame to look as to how much cosmetic work you do.
Regards,
Alan
One thing I think adds to the finished appearance of the frame is to remove all the weld splatter on the it. There's generally a lot, and it's relatively easy to do.
I also smoothed out some of the obvious imperfections with a little grinding but didn't go as far as to use any filler.
It really depends on how you want the frame to look as to how much cosmetic work you do.
Regards,
Alan
Is your car in your living room? Looks like hardwoods underneath??
12-30-2012, 01:46 PM
#12
Drifting
12-30-2012, 02:18 PM
#13
Team Owner
Member Since: Sep 2006
Location: Westminster Maryland
Posts: 30,173
Likes: 0
Received 2,878 Likes
on
2,515 Posts
Hi h4ca
I first stripped the frame completely myself using wire brushes, wire wheels, emory cloth, and a little grinding.
I used small chisels and a ball peen hammer to knock the splatter off. Most of it comes off very easily.
I then had the frame powder coated semi-flat black. I felt it was too shiny for the appearance I wanted, so I sanded the frame by hand using 400 and painted it with Krylon 1613.
It's WAY too nice, but it has the look I wanted. I think it's a nice contrast for everything that's mounted on it.
While I was doing this I really didn't think Flight Judging was in the car's future.
When I decided to have it Flight Judged I just added the shim counts, shim tape, and part#/date stencil. It was noted on the judging sheet that the frame appeared to be over-restored. That was fine with me..... the whole car is over-retored. I understand that.
The car scored far higher at a Chapter Meet than I thought it would! It's strength really is in the number of parts on it that have been restored, but are still the parts this car left St.Louis with.
Thanks for asking.
Regards,
Alan
12-30-2012, 02:23 PM
#14
Melting Slicks
Thread Starter
Hi h4ca
I first stripped the frame completely myself using wire brushes, wire wheels, emory cloth, and a little grinding.
I used small chisels and a ball peen hammer to knock the splatter off. Most of it comes off very easily.
I then had the frame powder coated semi-flat black. I felt it was too shiny for the appearance I wanted, so I sanded the frame by hand using 400 and painted it with Krylon 1613.
It's WAY too nice, but it has the look I wanted. I think it's a nice contrast for everything that's mounted on it.
While I was doing this I really didn't think Flight Judging was in the car's future.
When I decided to have it Flight Judged I just added the shim counts, shim tape, and part#/date stencil. It was noted on the judging sheet that the frame appeared to be over-restored. That was fine with me..... the whole car is over-retored. I understand that.
The car scored far higher at a Chapter Meet than I thought it would! It's strength really is in the number of parts on it that have been restored, but are still the parts this car left St.Louis with.
Thanks for asking.
Regards,
Alan
I first stripped the frame completely myself using wire brushes, wire wheels, emory cloth, and a little grinding.
I used small chisels and a ball peen hammer to knock the splatter off. Most of it comes off very easily.
I then had the frame powder coated semi-flat black. I felt it was too shiny for the appearance I wanted, so I sanded the frame by hand using 400 and painted it with Krylon 1613.
It's WAY too nice, but it has the look I wanted. I think it's a nice contrast for everything that's mounted on it.
While I was doing this I really didn't think Flight Judging was in the car's future.
When I decided to have it Flight Judged I just added the shim counts, shim tape, and part#/date stencil. It was noted on the judging sheet that the frame appeared to be over-restored. That was fine with me..... the whole car is over-retored. I understand that.
The car scored far higher at a Chapter Meet than I thought it would! It's strength really is in the number of parts on it that have been restored, but are still the parts this car left St.Louis with.
Thanks for asking.
Regards,
Alan
12-30-2012, 02:33 PM
#15
Team Owner
Member Since: Sep 2006
Location: Westminster Maryland
Posts: 30,173
Likes: 0
Received 2,878 Likes
on
2,515 Posts
Hi LM Pete,
Pete, I was typing this as you made your last post. So I added this line to let you know.
As I wrote to Clean Air I have had my car Flight Judged.
At the Chapter level the over restoration was noted, and a few points taken on various items! I'm sure it will take more serious hits at the Regional and National levels. I was stunned at the score it received at the Chapter Level.
Losing points is really o.k. because as much as I'm involved with, and believe in, the NCRS, I believe you have to do what YOU want with your car, not what other people think you should do.
The goal when I started this restoration more than 20 years ago was that the car would be restored to a level beyond what it was when I drove it home from the dealer the first day. I think I accomplished that. I always made EVERY part prettier than it should have been.
It was only when it's 40th year came around that I decided to have it Flight Judged for it's birthday. I would have waited for it's 50th, but it'll be someone else's car by then. I hope THEY have it Flight Judged.
I hope you're enjoying your car too!
Regards,
Alan
Last edited by Alan 71; 12-30-2012 at 02:50 PM.