
Doorgunner's '68 Convertible Project
 02-11-2014, 01:48 PM
#201
Burning Brakes


I'd better hurry.....the lawn is starting to turn from tan to slightly green in spots!
Lawn ~ is that is what is under the foot and a half of the white stuff?
(OOOOPS....I nearly forgot---I need to install some shelving for Precious before I disappear into the garage....Man! That would have been a major point-deduction!)
Lawn ~ is that is what is under the foot and a half of the white stuff?
(OOOOPS....I nearly forgot---I need to install some shelving for Precious before I disappear into the garage....Man! That would have been a major point-deduction!)


 02-12-2014, 09:01 AM
#203
Nam Labrat


Thread Starter
Member Since: Sep 2013
Location: New Orleans Loo-z-anna
Posts: 33,883
Received 4,153 Likes
on
2,726 Posts

I'm trying to get it roadworthy/Inspected by the end of this week...and then put some miles on it to see what needs a little more attention.
It will be easy to recognize......new interior/"old school-look" chromed Harley mufflers centered under differential/incorrect front & rear caps/terrible black paint/driver with smile from ear-to-ear wearing Saints cap.
It will be easy to recognize......new interior/"old school-look" chromed Harley mufflers centered under differential/incorrect front & rear caps/terrible black paint/driver with smile from ear-to-ear wearing Saints cap.
 02-12-2014, 09:36 AM
#205
Nam Labrat
Thread Starter
Member Since: Sep 2013
Location: New Orleans Loo-z-anna
Posts: 33,883
Received 4,153 Likes
on
2,726 Posts
but remember---the V.A. meds sometimes have me asking myself the next day "Why did I do THAT?!"
 02-12-2014, 10:16 AM
#207
Nam Labrat
Thread Starter
Member Since: Sep 2013
Location: New Orleans Loo-z-anna
Posts: 33,883
Received 4,153 Likes
on
2,726 Posts
persuader.......
BIG LOL!
I really need to re-install my rebuilt trailing arm ........................................ ........................................ ........................................ ......................
but.............................
one more cup of coffee first while I put fresh batteries in the "camraa".
Last edited by doorgunner; 02-13-2014 at 01:16 AM.
02-12-2014, 11:40 PM
#208
Nam Labrat
Thread Starter
Member Since: Sep 2013
Location: New Orleans Loo-z-anna
Posts: 33,883
Received 4,153 Likes
on
2,726 Posts
I managed to get some work done installing the trailing arm--but had to do a few fix-its first--like chasing a few threads....
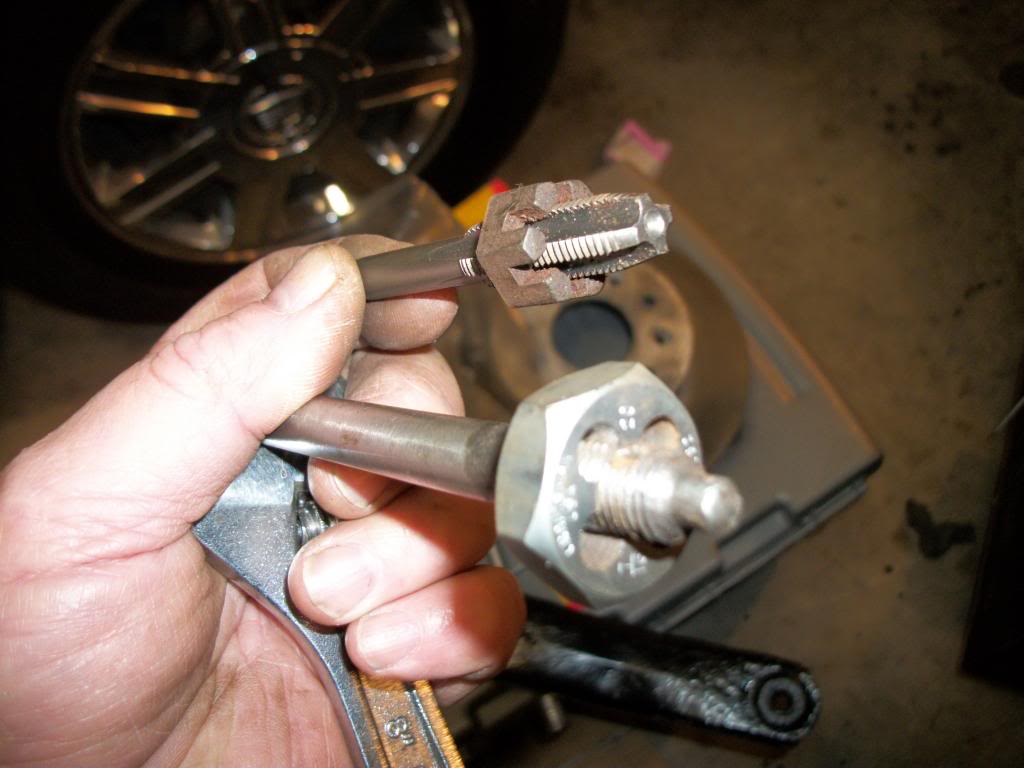
The amazing 3-handed 1pliers/2screwdriver/3camera shot.....
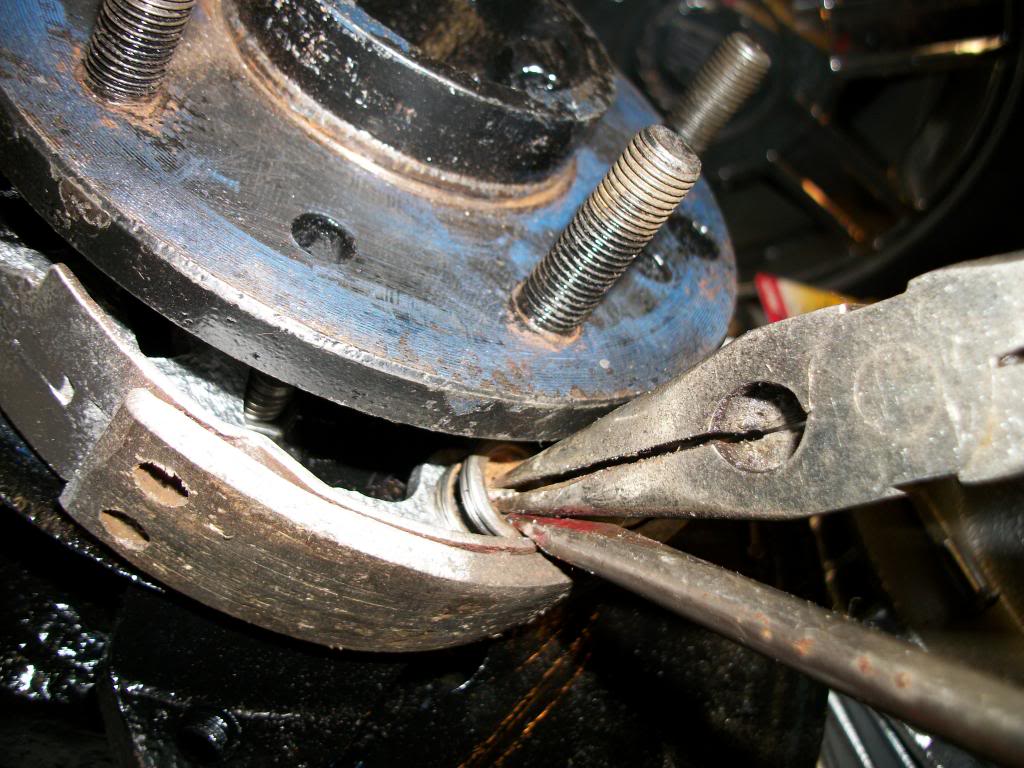
EEEEEEEE-brake installed..........

Trailing arm is bolted into chassis.................

The strut rod is bolted in place and most of the bolts are installed in the half-shaft......
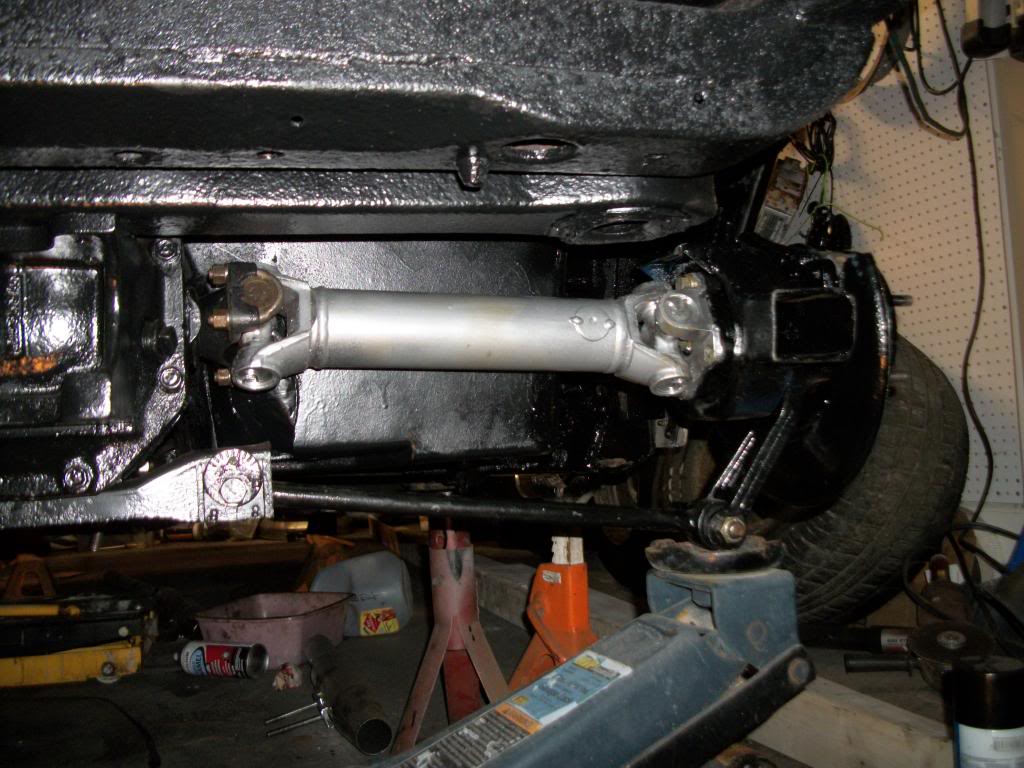
(ARRRRGGGHHH.............Looks like it's time to de-clutter my side of the garage......................AGAIN!)
That's as far as I got tonight...hopefully the rest of the install will be done tomorrow.
The amazing 3-handed 1pliers/2screwdriver/3camera shot.....
EEEEEEEE-brake installed..........
Trailing arm is bolted into chassis.................
The strut rod is bolted in place and most of the bolts are installed in the half-shaft......
(ARRRRGGGHHH.............Looks like it's time to de-clutter my side of the garage......................AGAIN!)
That's as far as I got tonight...hopefully the rest of the install will be done tomorrow.
Last edited by doorgunner; 02-13-2014 at 12:23 AM.
02-15-2014, 01:05 AM
#209
Nam Labrat
Thread Starter
Member Since: Sep 2013
Location: New Orleans Loo-z-anna
Posts: 33,883
Received 4,153 Likes
on
2,726 Posts
A few things were done tonight.....the half-shaft was bolted up completely and the rotor was checked for run-out which was .005"/close enough considering that someone drilled out the rivets, but never had the rotors turned(they must have had the E-brake drum turned since it had new shoes that were never used)....
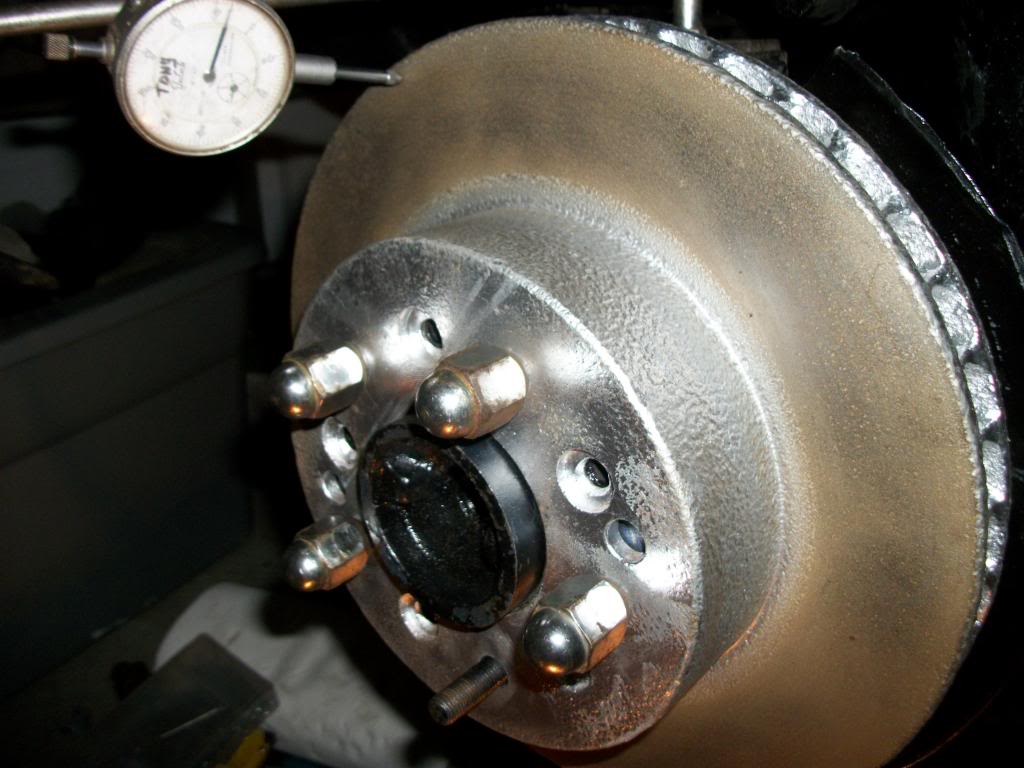
The caliper is installed and the brake line is loosely positioned until the new rubber hose is installed.....

I finally found the box of new brakes hoses....in the '34 SBC.....

The caliper is installed and the brake line is loosely positioned until the new rubber hose is installed.....
I finally found the box of new brakes hoses....in the '34 SBC.....

 02-15-2014, 11:44 AM
#211
Nam Labrat
Thread Starter
Member Since: Sep 2013
Location: New Orleans Loo-z-anna
Posts: 33,883
Received 4,153 Likes
on
2,726 Posts
I thought it over.....I'm waiting until the brakes are bled and the wheels are installed....then I can degrease my side of the garage and give it a good scrubbing since the messy work will be finished (maybe even a coat of epoxy concrete paint.
I wonder if a deep-red would match the interior of the car/maybe my wife wouldn't notice
02-15-2014, 11:50 AM
#212
Race Director

Thanks for the support....but it's daily driver quality paint job "in person"....LOL.
I thought it over.....I'm waiting until the brakes are bled and the wheels are installed....then I can degrease my side of the garage and give it a good scrubbing since the messy work will be finished (maybe even a coat of epoxy concrete paint.
I wonder if a deep-red would match the interior of the car/maybe my wife wouldn't notice
 ) HOT water, cleared out all I could and mopped to holy sheet out of my garage...big difference!
 Now that my new engine is actually in my vette, I can get my truck back in the garage
 02-15-2014, 12:27 PM
#213
Nam Labrat
Thread Starter
Member Since: Sep 2013
Location: New Orleans Loo-z-anna
Posts: 33,883
Received 4,153 Likes
on
2,726 Posts
I bought an old school string mop and ringer bucket from harbor freight. Tons of soapy (TSP ) HOT water, cleared out all I could and mopped to holy sheet out of my garage...big difference!
Now that my new engine is actually in my vette, I can get my truck back in the garage
) HOT water, cleared out all I could and mopped to holy sheet out of my garage...big difference! Now that my new engine is actually in my vette, I can get my truck back in the garage
 tools that are used on a daily basis/keep the economy going until the politicians completely destroy it...
 )
)EDIT: I found it! http://forums.corvetteforum.com/c3-t...int-383-a.html
Last edited by doorgunner; 02-15-2014 at 12:37 PM.
02-17-2014, 03:40 PM
#214
Nam Labrat
Thread Starter
Member Since: Sep 2013
Location: New Orleans Loo-z-anna
Posts: 33,883
Received 4,153 Likes
on
2,726 Posts
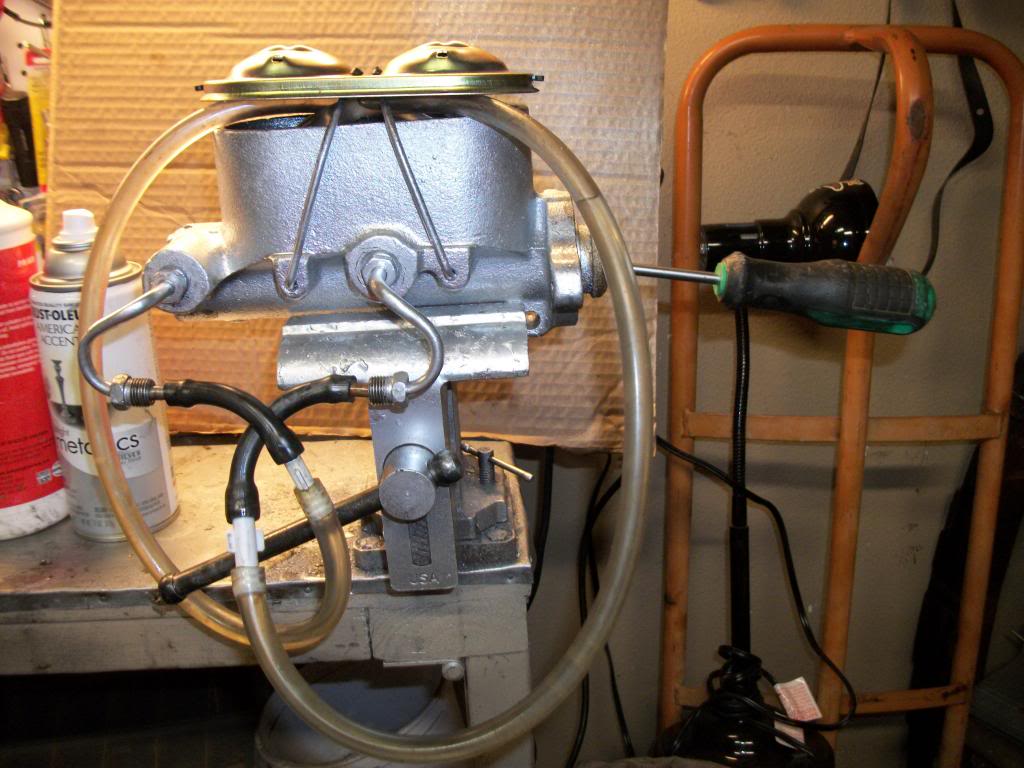
Gimme a break, Brakes! I forgot to bench bleed the M.C.
(But I did manage to replace all four flex hoses because of chafing/dryrotting)....and to think that I was going to save $50 toward the purchase of the rear bumpers by NOT rplacing the flex hoses.....good thing that I listened to you members!

So.....off the firewall and into the vice....
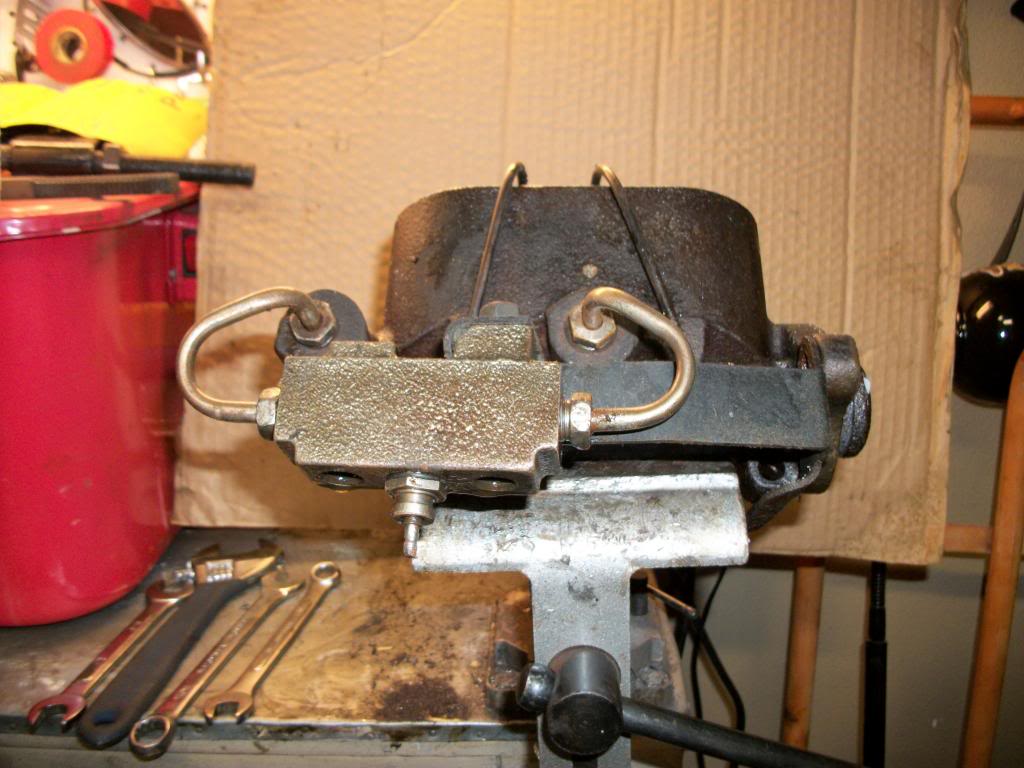
I removed the diverter valve block for disassembly......
The low-pressure switch had to come out first since the plunger held the piston in the correct location in the block bore...
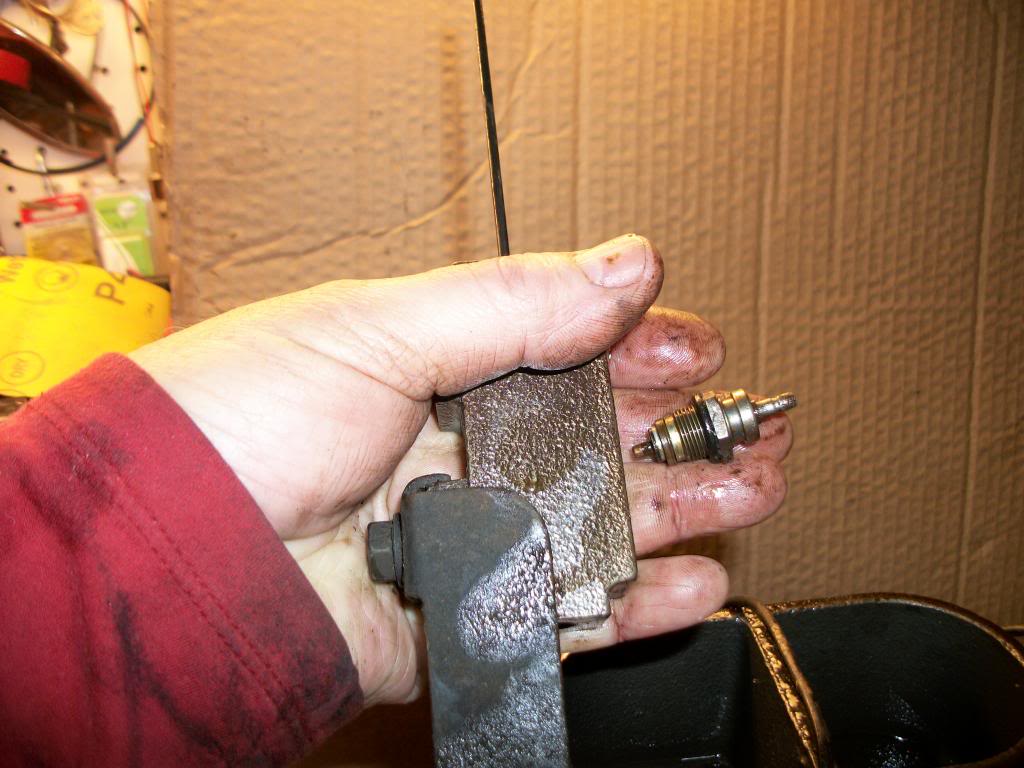
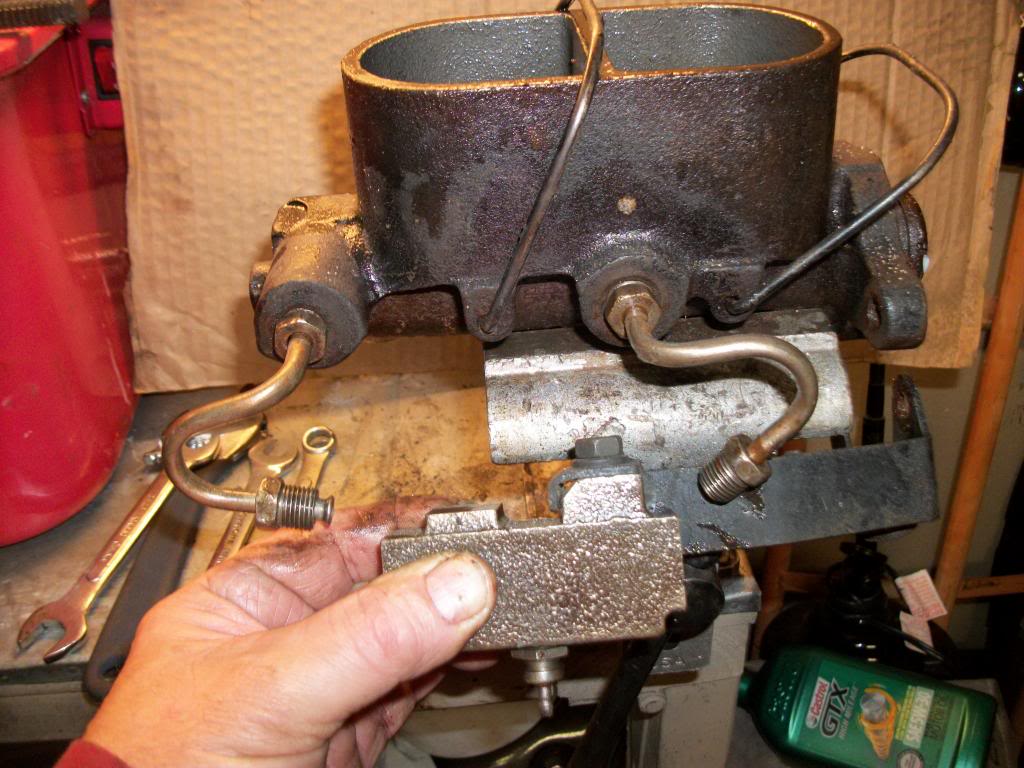
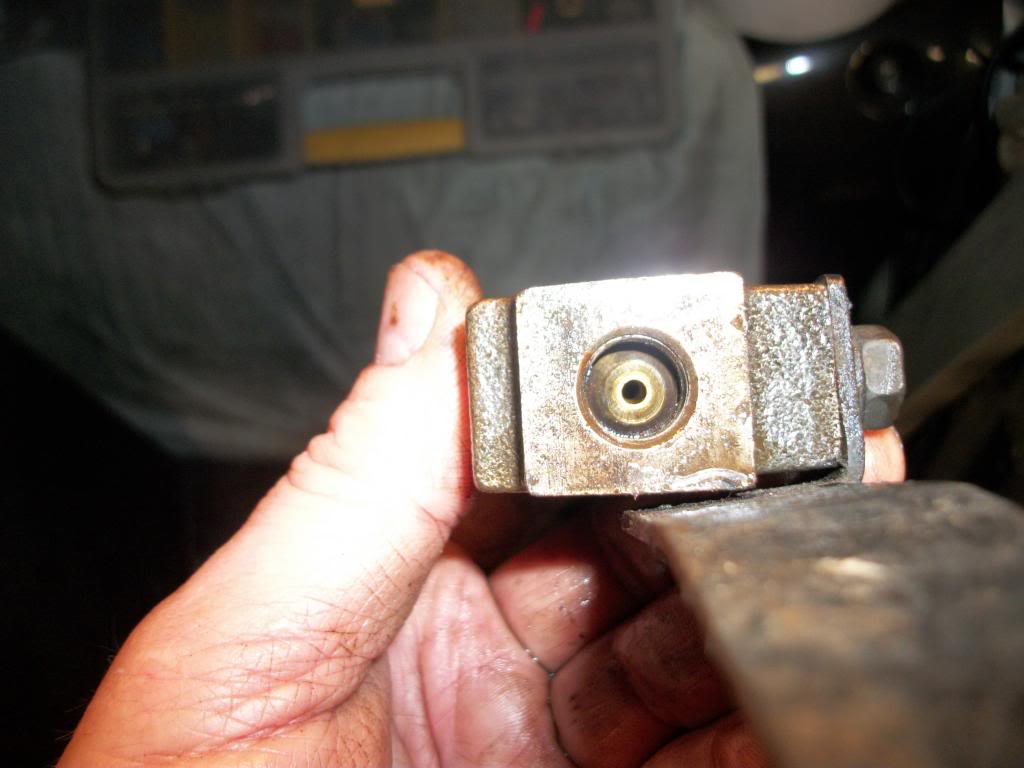
Some tapping with a small rod from the opposite end of the block caused the brass fitting/piston/spring assembly to pop out......

I managed to find enough tubing to bleed the M.C. (the tubing was actually too long, but I couldn't cut it because it was needed for another project)......
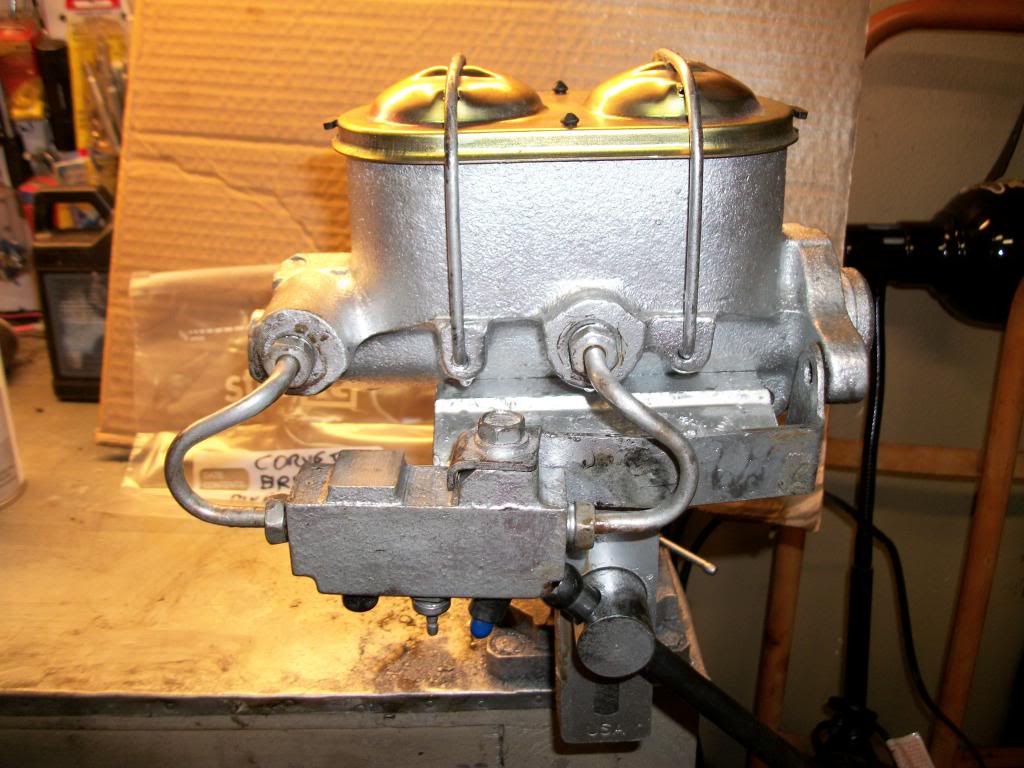
I reinstalled the piston-less diverter block/allowed fluid to gravity-bleed from the bottom two threaded ports in the block/then plugged the ports so the M.C. could be reinstalled back onto the firewall......
 ....
....
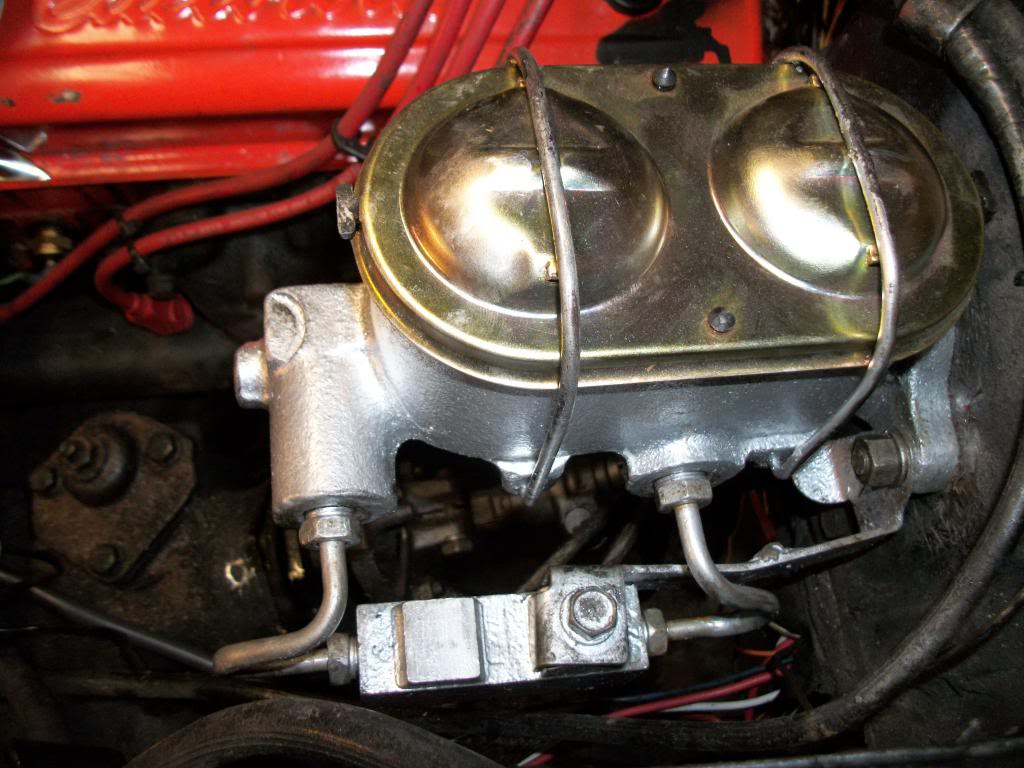
I reconnected the two main pressure lines....one at a time....then bolted the M.C. back onto the firewall.........WHEW.....
Now......gobble down a sandwich/Gatorade......and get back to the garage (Maybe I can talk Precious into pumping the brake pedal after I use the mightyvac to draw fluid to the rear calipers.....MAYBE).
EDIT: Later that same day. Thanks to everyone for all the brake-bleeding advice/threads. Once I removed the diverter piston (it was stuck off-center again) and reinstalled everything, the rear calipers began gravity-bleeding themselves when I opened the bleeder screws. A pint of brake fluid later, the pedal has firmed up--I'll re-bleed again once the car is driven around the block a few times this coming weekend.
(But I did manage to replace all four flex hoses because of chafing/dryrotting)....and to think that I was going to save $50 toward the purchase of the rear bumpers by NOT rplacing the flex hoses.....good thing that I listened to you members!
So.....off the firewall and into the vice....
I removed the diverter valve block for disassembly......
The low-pressure switch had to come out first since the plunger held the piston in the correct location in the block bore...
Some tapping with a small rod from the opposite end of the block caused the brass fitting/piston/spring assembly to pop out......
I managed to find enough tubing to bleed the M.C. (the tubing was actually too long, but I couldn't cut it because it was needed for another project)......
I reinstalled the piston-less diverter block/allowed fluid to gravity-bleed from the bottom two threaded ports in the block/then plugged the ports so the M.C. could be reinstalled back onto the firewall......
....I reconnected the two main pressure lines....one at a time....then bolted the M.C. back onto the firewall.........WHEW.....
Now......gobble down a sandwich/Gatorade......and get back to the garage (Maybe I can talk Precious into pumping the brake pedal after I use the mightyvac to draw fluid to the rear calipers.....MAYBE).
EDIT: Later that same day. Thanks to everyone for all the brake-bleeding advice/threads. Once I removed the diverter piston (it was stuck off-center again) and reinstalled everything, the rear calipers began gravity-bleeding themselves when I opened the bleeder screws. A pint of brake fluid later, the pedal has firmed up--I'll re-bleed again once the car is driven around the block a few times this coming weekend.
Last edited by doorgunner; 02-28-2014 at 10:17 AM.
02-23-2014, 05:58 PM
#215
Nam Labrat
Thread Starter
Member Since: Sep 2013
Location: New Orleans Loo-z-anna
Posts: 33,883
Received 4,153 Likes
on
2,726 Posts
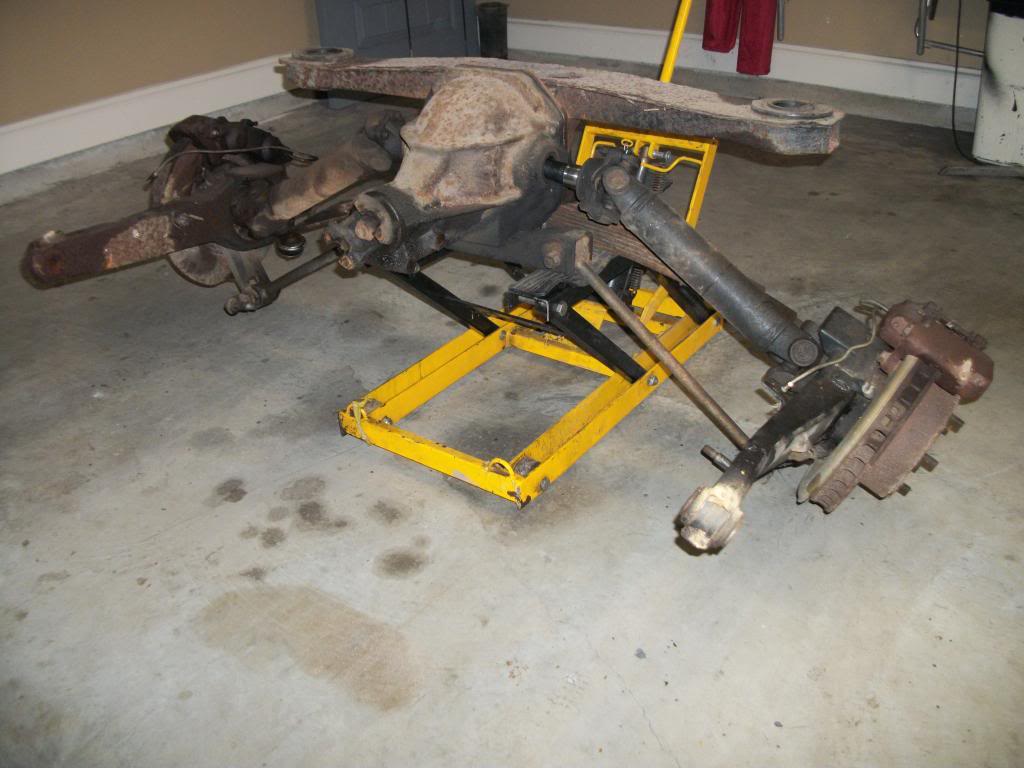
I have posted measurements and pics of what I have discovered concerning half-shaft alignment problems......
The passenger's side halfshaft had 1/2" clearance between the mounting flange and the spindle-yoke flange when I unbolted it from the spindle flange.
The driver's side half-shaft was in a bind between the spindle flange and the differential side-shaft yoke after I removed all the bolts from both ends of it, causing me to need a prybar to pop it out of it's location.....
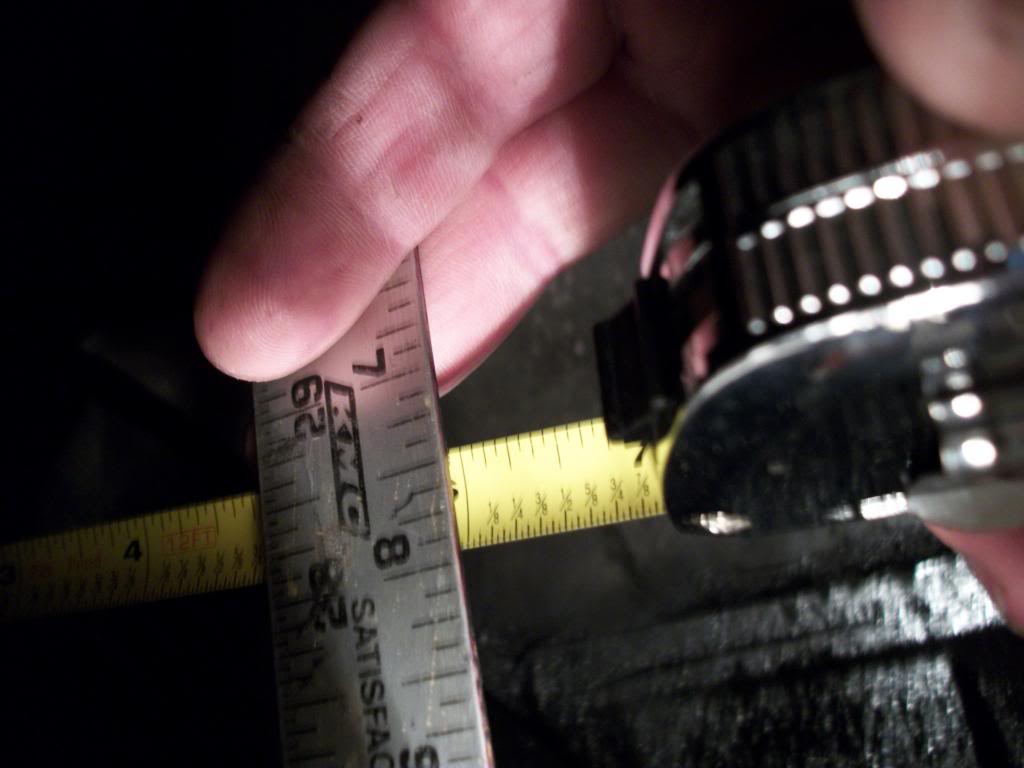
After I measured/remeasured/re-re-measured everything, I corrected the problem, and these are the measurements that I ended up with.....
The Driver's side rotor face to frame is 6" (including width of measuring stick)
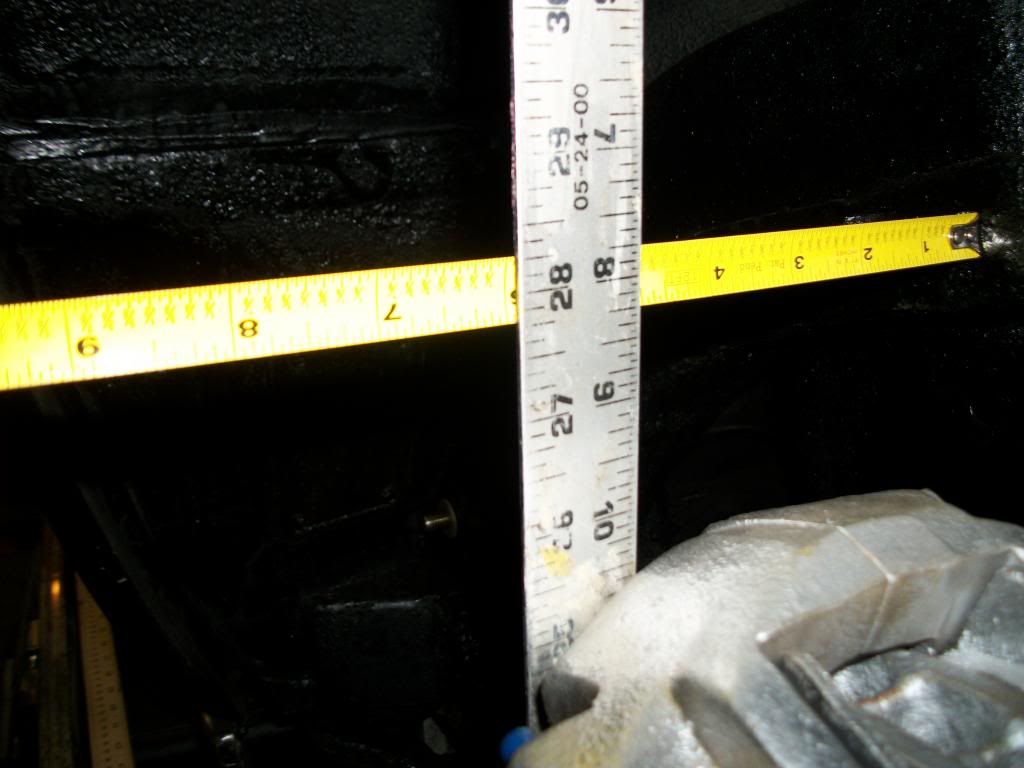
The Passenger's side rotor face to frame is 5 & 15/16" (including width of measuring stick).......
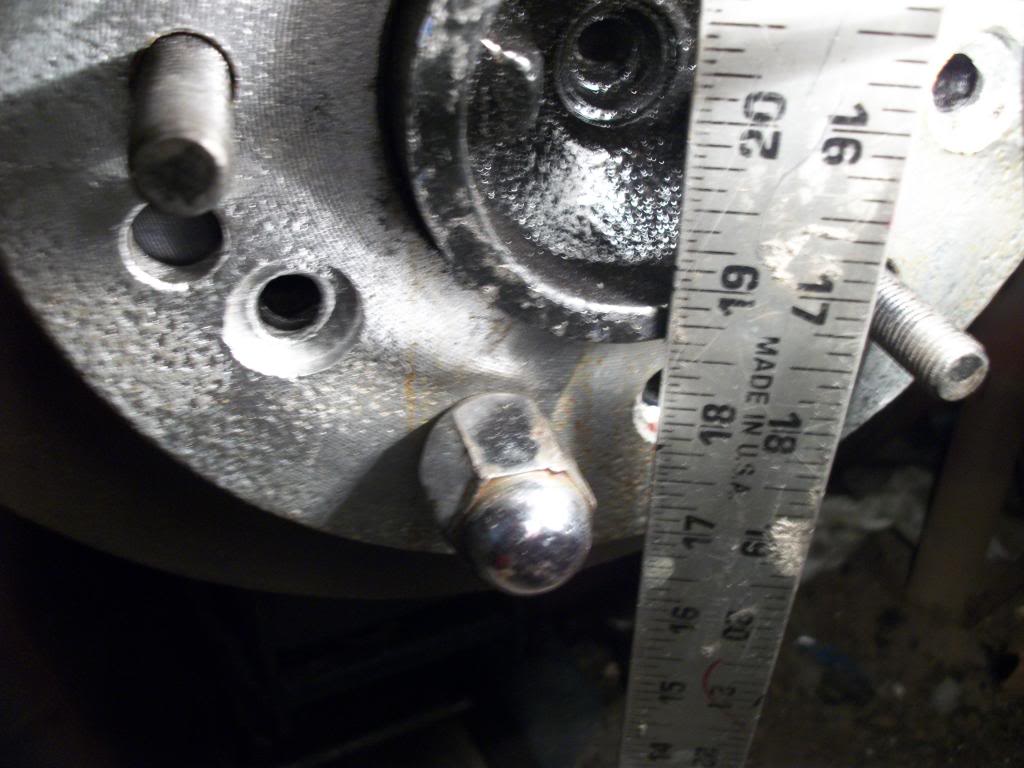
The Driver's side Hub edge is 18 & 1/2" from floor as a reference point only to compare measurements on passenger's side..........
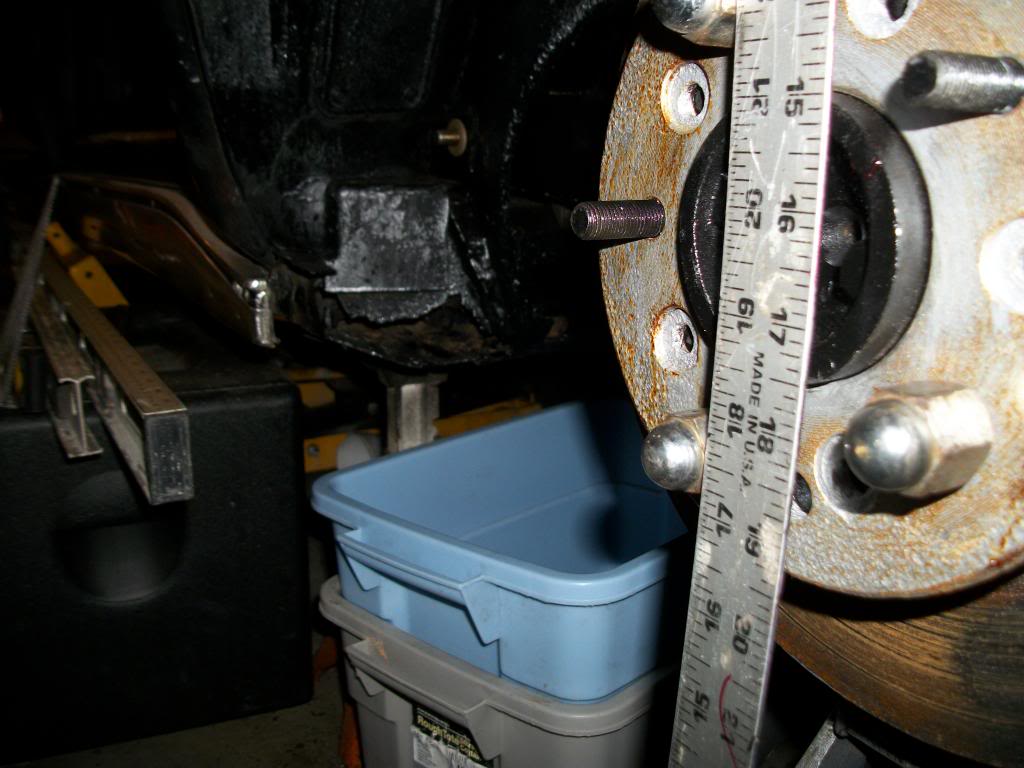
The Passenger's side Hub edge is 18 & 9/16" from the floor........
The distance from the Driver's side spindle yoke face to edge of spring-centering hole is 22 & 1/4".......
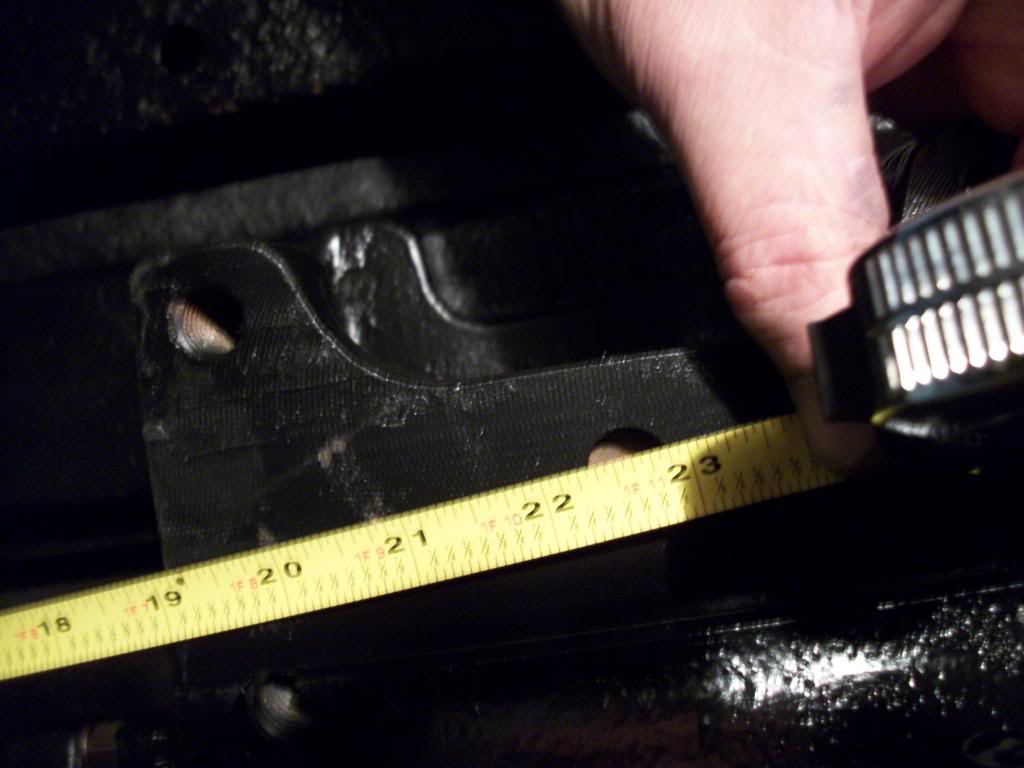
The distance from the Passenger's side spindle yoke face to edge of spring-centering hole is 22 & 3/16".........
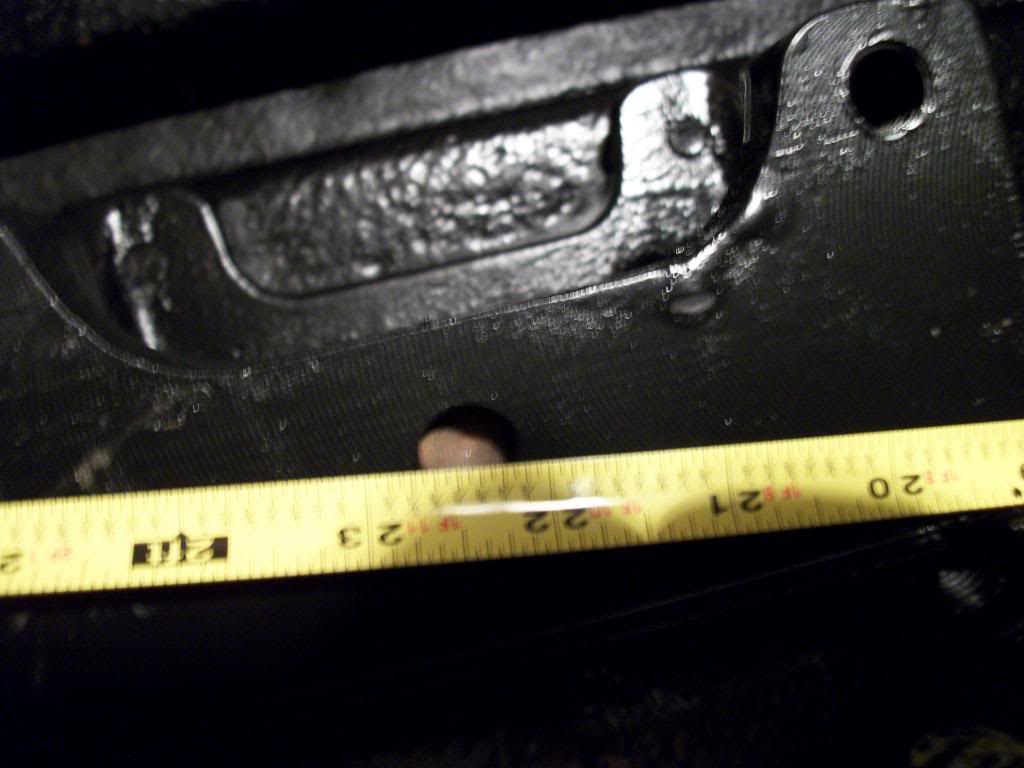
SO.....basically, ALL THE LEFT-SIDE AND RIGHT-SIDE measurements are within 1/16" of each other......WHICH IS GOOD!
HOWEVER......IF I HAD NOT REDRILLED THE MOUNTING HOLES IN THE DIFFERENTIAL CROSSMEMBER to relocate the differential.........all the measurements would still be more than 1/2" off total after shimming the trailing arms between the left and right sides--the differential would be 1/4" closer to the left trailing arm.
Again.....this is something I noticed with my car when I was reinstalling the half-shafts.
I'll drive the car this year to get any mechanical problems worked out....this coming winter I will remove the body to repair some frame rust-through.....and also have the frame checked--straightened if needed.
The passenger's side halfshaft had 1/2" clearance between the mounting flange and the spindle-yoke flange when I unbolted it from the spindle flange.
The driver's side half-shaft was in a bind between the spindle flange and the differential side-shaft yoke after I removed all the bolts from both ends of it, causing me to need a prybar to pop it out of it's location.....
After I measured/remeasured/re-re-measured everything, I corrected the problem, and these are the measurements that I ended up with.....
The Driver's side rotor face to frame is 6" (including width of measuring stick)
The Passenger's side rotor face to frame is 5 & 15/16" (including width of measuring stick).......
The Driver's side Hub edge is 18 & 1/2" from floor as a reference point only to compare measurements on passenger's side..........
The Passenger's side Hub edge is 18 & 9/16" from the floor........
The distance from the Driver's side spindle yoke face to edge of spring-centering hole is 22 & 1/4".......
The distance from the Passenger's side spindle yoke face to edge of spring-centering hole is 22 & 3/16".........
SO.....basically, ALL THE LEFT-SIDE AND RIGHT-SIDE measurements are within 1/16" of each other......WHICH IS GOOD!
HOWEVER......IF I HAD NOT REDRILLED THE MOUNTING HOLES IN THE DIFFERENTIAL CROSSMEMBER to relocate the differential.........all the measurements would still be more than 1/2" off total after shimming the trailing arms between the left and right sides--the differential would be 1/4" closer to the left trailing arm.
Again.....this is something I noticed with my car when I was reinstalling the half-shafts.
I'll drive the car this year to get any mechanical problems worked out....this coming winter I will remove the body to repair some frame rust-through.....and also have the frame checked--straightened if needed.
Last edited by doorgunner; 02-28-2014 at 10:08 AM.
02-24-2014, 10:22 PM
#216
Nam Labrat
Thread Starter
Member Since: Sep 2013
Location: New Orleans Loo-z-anna
Posts: 33,883
Received 4,153 Likes
on
2,726 Posts
Flashback!
Good news.......the spring-end is no longer about to rub the wheel on the passenger's side. Now that I have relocated the differential, the 295-15 tires that were already on the car will have enough clearance....
The spring assembly cleaned up nicely--about 4 hours start to finish---with a small delay of chasing down a new bolt because the original bolt popped aloose as I was about to re-install the spring pack onto the differential.....
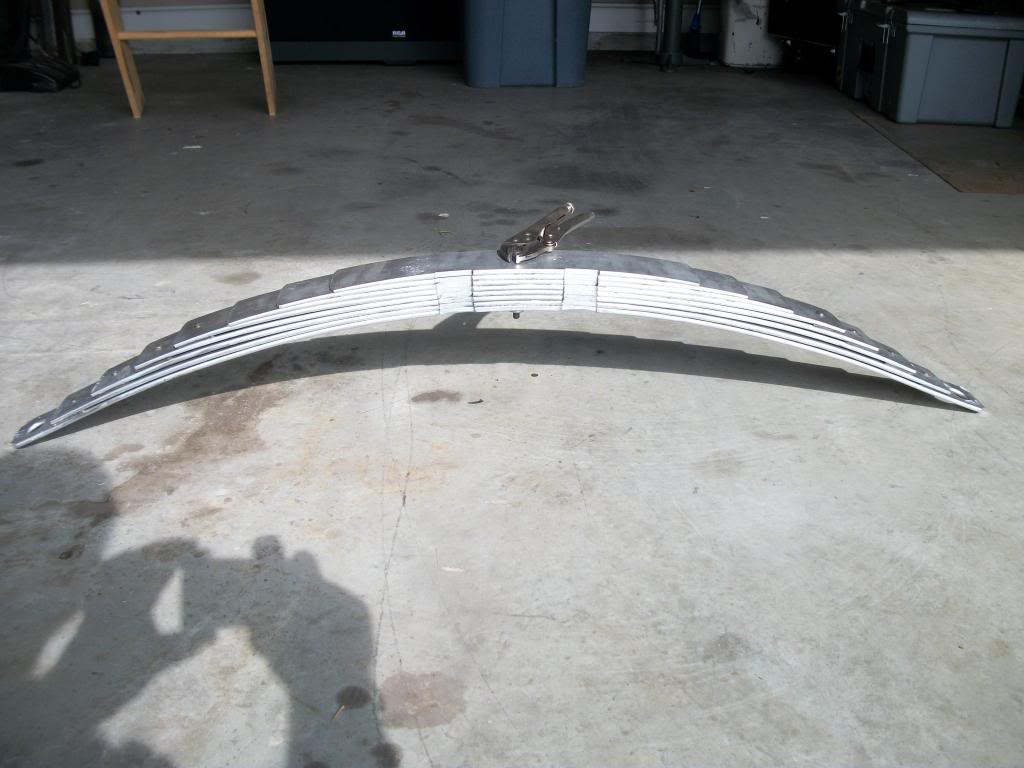
I remembered to not torque the four main spring-mounting-bolts until the weight of the car was on the spring!

Tomorrow's Check-list:
Buy a set of rear shocks
grease all the u-joint fitting
recheck the differential oil level
re-install the exhaust pipes
clean the wheels, balance, re-install them
re-torque the 4 spring-mounting-bolts
level the suspension & half-shafts to prevent binding...then....
run the car in drive on the jackstands for a few minutes to check everything.
(Man! That garage floor is a mess!)
EDIT: The Check-list is postponed another day.....the riding mower got bumped to the top of the "fix-it" list.
Good news.......the spring-end is no longer about to rub the wheel on the passenger's side. Now that I have relocated the differential, the 295-15 tires that were already on the car will have enough clearance....
The spring assembly cleaned up nicely--about 4 hours start to finish---with a small delay of chasing down a new bolt because the original bolt popped aloose as I was about to re-install the spring pack onto the differential.....
I remembered to not torque the four main spring-mounting-bolts until the weight of the car was on the spring!
Tomorrow's Check-list:
Buy a set of rear shocks
grease all the u-joint fitting
recheck the differential oil level
re-install the exhaust pipes
clean the wheels, balance, re-install them
re-torque the 4 spring-mounting-bolts
level the suspension & half-shafts to prevent binding...then....
run the car in drive on the jackstands for a few minutes to check everything.
(Man! That garage floor is a mess!)
EDIT: The Check-list is postponed another day.....the riding mower got bumped to the top of the "fix-it" list.
Last edited by doorgunner; 03-19-2014 at 07:50 PM.
02-27-2014, 09:17 AM
#217
Nam Labrat
Thread Starter
Member Since: Sep 2013
Location: New Orleans Loo-z-anna
Posts: 33,883
Received 4,153 Likes
on
2,726 Posts
After being on this Forum for 6 months, and learning more about "what I have....and what I don't have" .....
I would like to thank all those who have not bashed me or my poor car!


.....I would like to thank all those who have not bashed me or my poor car!
02-27-2014, 09:42 AM
#218
Burning Brakes
I would like to thank you for your inspiration, seeing what can be done and is being done helps me with my confidence of tearing into something. Putting it back together is another issue.
In the words of my Father in law "Someone dumber than you put it together""What's the worse that can happen its already broke"
 02-27-2014, 09:45 AM
#219
Nam Labrat
Thread Starter
Member Since: Sep 2013
Location: New Orleans Loo-z-anna
Posts: 33,883
Received 4,153 Likes
on
2,726 Posts
I would like to thank you for your inspiration, seeing what can be done and is being done helps me with my confidence of tearing into something. Putting it back together is another issue.
In the words of my Father in law "Someone dumber than you put it together""What's the worse that can happen its already broke"
In the words of my Father in law "Someone dumber than you put it together""What's the worse that can happen its already broke"
I've fallen down laughing....and don't care if I get up!
Thanks.......I needed that!

On another note.....I copied this from another thread...
Last month a gentlemen started to tell me a story about how he bought a property with several Corvettes in the barn. If the Corvettes were not removed a such and such day they would become his. Well at the last hour the owner of the cars showed up with a car hauler and claimed them.
Then he proceeded to tell me about the Corvette he bought for 1K that he found in a barn that belonged to women who's son was killed in Vietnam. The old "Chevy for sale" story. AKA Private Malone.
Then he proceeded to tell me about the Corvette he bought for 1K that he found in a barn that belonged to women who's son was killed in Vietnam. The old "Chevy for sale" story. AKA Private Malone.
funny you should mention that story about the kid getting killed in nam, i have heard that one probably 500 times in the last 25 yrs, keeping that in mind when i lived in desmoines iowa in 88-89 i was told of a 69 camaro for sale at a farm about 5 miles west of desmoines. so i go out there with a guy from the area and there it is a barn fresh pale yellow 69 camaro with like a 1/2 inch of dirt bird poo and hay on it.
we talked to the older lady and her husband and i bought the car for 1800 bucks inline 6 turbo 350 nice clean 30,000 mile car after about 15 bucks at the car wash. plane janer with black interior. the old man told me there son went to nam and made it home only to kill himself on a brand new motorcycle the first week he was home. That is why the car sat there they told me they didnt want to sell it for the longest time but were ready to let it go then.... I get sooooooooo much sh$t when i tell people that story as they think its a bs wivestale!!!! LOL
we talked to the older lady and her husband and i bought the car for 1800 bucks inline 6 turbo 350 nice clean 30,000 mile car after about 15 bucks at the car wash. plane janer with black interior. the old man told me there son went to nam and made it home only to kill himself on a brand new motorcycle the first week he was home. That is why the car sat there they told me they didnt want to sell it for the longest time but were ready to let it go then.... I get sooooooooo much sh$t when i tell people that story as they think its a bs wivestale!!!! LOL
We were 18 to 20 year olds pulling in $00.25 cents per hour/24/7 plus $60 per month combat pay and 3,000 rounds of ammunition per day for our M60s. The "Government" allowed us a $10,000 life insurance policy which could be changed "at will" (which was a huge some of money for a blue-collar-patriot in those days who didn't "know" a Congressman who could keep him out of Nam). Later the Army stopped the "at will" ability to change your beneficiary.
Any time a "short guy" (someone who's tour-of-duty was nearly over) would receive his "going home orders", all his buddies who were still "in country" would assign him as the beneficiary of their life insurance policies in case they "didn't make it home"....with the condition that he use the money he might receive from the death of one of his buddies to buy a "brand new Corvette to remember them by".
That was life in Nam....mind-wrenching/gut-wrenching/immature/very little hope...and then....a lifetime of nightmares.
Maybe one of you really does have a "honorable special Vette" bought with a buddy's blood....Maybe that's what made me buy my basket-case?

(I think I'll make a copy of this and hand it to each person that tells me the "Dead Nam Vet story" on an FYI basis)
Last edited by doorgunner; 02-28-2014 at 10:12 AM.
02-27-2014, 08:49 PM
#220
Melting Slicks

I can't really tell by your pic's of your half shafts,you do know you should use french locks or something along those lines.If you knew that all ready forget I said anything.