
70 wiper broken bolts advise needed

 10-05-2016, 11:18 PM
#2
Burning Brakes

I made my own jig to drill out the broken bolts. If you want to send the door to me I can do it for you. How many bolts we talking here, and are they broken off flush?
 10-06-2016, 08:27 AM
#4
Burning Brakes
My method includes several days soak with atf/acetone mix down each bolt hole, then the bolts are drilled out. You may be looking at up to 2 weeks out & back for the job. Your cost would just be shipping out & back to you. Figure postage to 68005. 
10-06-2016, 10:12 AM
#5
Melting Slicks


A few companies offer this service. I would highly recommend letting a professional do this, with a drilling jig. The threaded holes have to be in the precise location and angle, or the wiper door will jamb up in operation.
The wiper door is cast aluminum and the bolts probably had lock-tite on them from the factory. Replacement bolts had a dab on them. Lou.
The wiper door is cast aluminum and the bolts probably had lock-tite on them from the factory. Replacement bolts had a dab on them. Lou.
Last edited by loup68; 10-06-2016 at 10:13 AM.
10-06-2016, 12:18 PM
#6
Team Owner

Basically, you're screwed. {sorry for the pun} The alignment of those threaded holes is critical to the door working correctly. If you just drill them out, there is no way to get them tapped and have them properly aligned.
As mentioned above, you CAN develop some kind of drill 'jig' by buying or making a drill bushing that snuggly fits into that counterbore at the end of those threaded holes. The inner diameter of that bushing should be sized for the drill needed to produce the required threads; the outer diameter needs to be .001" [or so] smaller than the counterbore. It must be snug with no 'wiggle' to it when installed.
You can drill out the broken screw shaft, then completely fill only the threaded portion of that hole with a super-hard epoxy (JB Weld putty/stick works well). After curing completely, use the jig and drill a new hole for tapping new threads. I've done this successfully. You just don't want to put much torque on the new screws as the epoxy does not have as much strength as the metal in the wiper door. Since these screws are merely the pivots for the linkage, the screws don't really need to be that tight anyway.
Mine has worked for several years since being repaired without ANY problem. BUT, breaking those screws off is really a big PITA!!!
Last edited by 7T1vette; 10-06-2016 at 12:21 PM.
The following users liked this post:
530planeman (10-06-2016)
 10-06-2016, 12:27 PM
#8
Safety Car

While I've never had Dave J remove bolts from my wiper door he has helped with other items and I can tell you he does high quality work.

The following users liked this post:
530planeman (10-06-2016)
10-06-2016, 03:53 PM
#9
Team Owner
Member Since: Sep 2006
Location: Westminster Maryland
Posts: 30,173
Likes: 0
Received 2,878 Likes
on
2,515 Posts

Hi Dave,
VERY nice of you to offer your service gratis!!!
Regards,
Alan
VERY nice of you to offer your service gratis!!!
Regards,
Alan
The following users liked this post:
530planeman (10-06-2016)
10-06-2016, 07:30 PM
#10
Race Director


You know how to get a hold of me if you need me.
I have done MANY just like that. And I guess I am lucky as heck...because....these bolts do not have to be in the EXACT same spot to work. I guess voicing a concern is better than nothing at all.
I have drilled an installed heli-coils when needed..had the holes welded up and re-drilled...and also used the 'form a thread' product....and so far...I have yet to have one not operate correctly
DUB
The following users liked this post:
530planeman (10-07-2016)
10-06-2016, 09:39 PM
#11
Burning Brakes
Alan, Thank you for your kind words. I like helping other members out that contribute to our little corner of the world here.
Shane, You make a great wing man. Thank you. You will soon have another vacuum component to field test for me. I think you will like it.
Guys, My Daddy always told me that cool heads prevail. So it goes. If there is any question on the quality of my work, can anyone tell me which one of the two bolts are threaded through the bolt hole I drilled out with my jig? (Hint, the other bolt hole is still factory clean).
Wes, I don't do this professionally, but I'm here if you would like me to take care of your wiper door.
Regards.......Dave
Shane, You make a great wing man. Thank you. You will soon have another vacuum component to field test for me. I think you will like it.
Guys, My Daddy always told me that cool heads prevail. So it goes. If there is any question on the quality of my work, can anyone tell me which one of the two bolts are threaded through the bolt hole I drilled out with my jig? (Hint, the other bolt hole is still factory clean).


Wes, I don't do this professionally, but I'm here if you would like me to take care of your wiper door.
Regards.......Dave
10-06-2016, 10:39 PM
#12
Drifting

Thread Starter

Alan, Thank you for your kind words. I like helping other members out that contribute to our little corner of the world here.
Shane, You make a great wing man. Thank you. You will soon have another vacuum component to field test for me. I think you will like it.
Guys, My Daddy always told me that cool heads prevail. So it goes. If there is any question on the quality of my work, can anyone tell me which one of the two bolts are threaded through the bolt hole I drilled out with my jig? (Hint, the other bolt hole is still factory clean).
Wes, I don't do this professionally, but I'm here if you would like me to take care of your wiper door.
Regards.......Dave
Shane, You make a great wing man. Thank you. You will soon have another vacuum component to field test for me. I think you will like it.
Guys, My Daddy always told me that cool heads prevail. So it goes. If there is any question on the quality of my work, can anyone tell me which one of the two bolts are threaded through the bolt hole I drilled out with my jig? (Hint, the other bolt hole is still factory clean).
Wes, I don't do this professionally, but I'm here if you would like me to take care of your wiper door.
Regards.......Dave
I just finished stripping send me an address my e mail
Wesbrenton@gmail.com
Really appreciate it
Wes
10-07-2016, 12:52 AM
#13
Team Owner
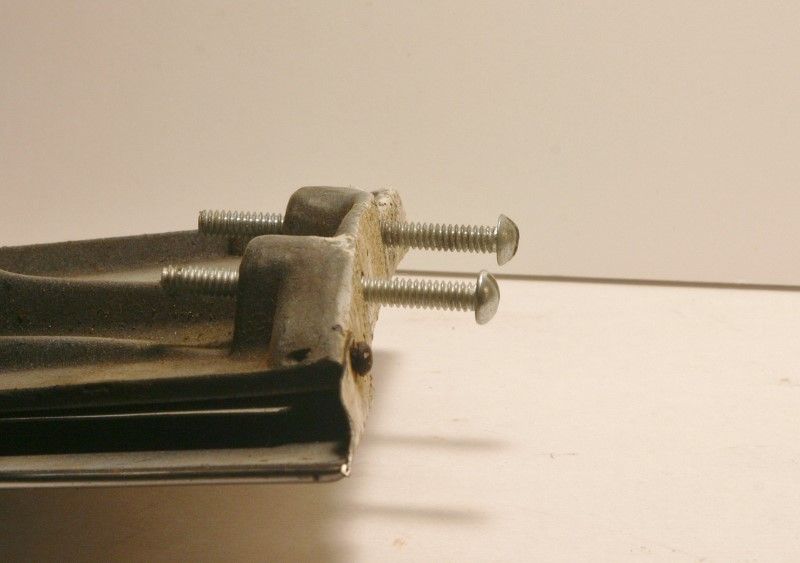
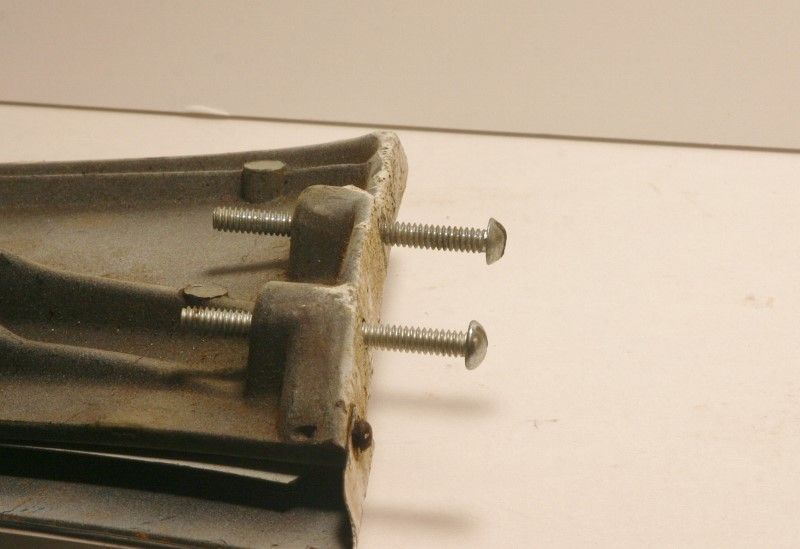
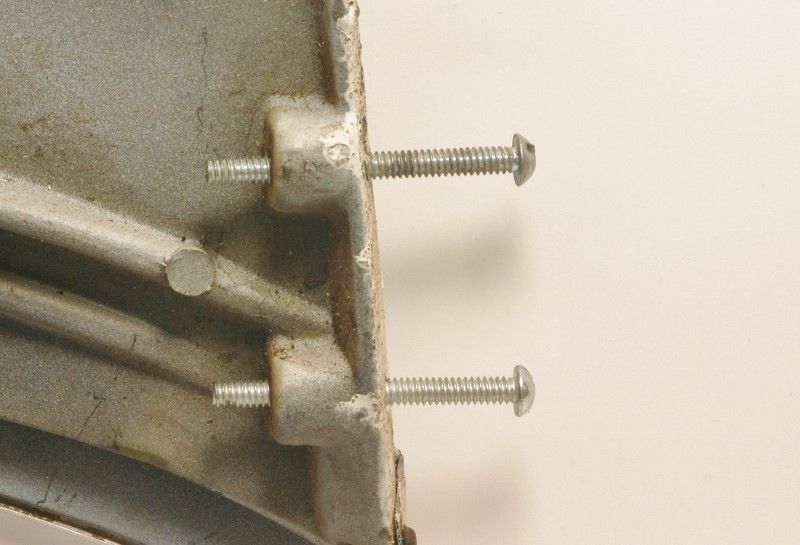
I'm guessing that the one toward the front (first two pics) & bottom (3rd pic) is the original. It appears to still have the counterbore at the outer face of the door. The other appears to have had that counterbore filled in. It also appears to be a bit askew in the lower photo.
But, if it's "close enough" and works, so be it.
P.S. With lens parallax in close-up mode, it's hard to tell what alignment those screws have. It would be easier to see if actually looking at it and viewing at different angles.
But, if it's "close enough" and works, so be it.
P.S. With lens parallax in close-up mode, it's hard to tell what alignment those screws have. It would be easier to see if actually looking at it and viewing at different angles.
Last edited by 7T1vette; 10-07-2016 at 12:55 AM.
10-07-2016, 09:51 AM
#14
Le Mans Master


Member Since: Jul 2006
Location: charlotte north carolina
Posts: 8,117
Likes: 0
Received 100 Likes
on
92 Posts

IF there are enough threads exposed to allow a bolt to be inserted correctly into the hole, cut off a short (3/8 inch or so) length of bolt and center drill it with a small diameter bit. Best method is to use a drill press to drill a hole into a piece of hard wood and screw the bolt into the hole. Once the bolt segment is prepared, screw it into the door and use the small diameter hole as a guide to drill into the broken segment. Then slowly increase the bit size until most of the broken piece is removed, and then tap the hole to remove the last few remnants. I've done this several times in various areas where I've gotten a little too enthusiastic with wrenches. The plastic bushings used on the door will allow a little "wiggle" room.
10-07-2016, 10:01 AM
#15
Team Owner
Member Since: Sep 2006
Location: Westminster Maryland
Posts: 30,173
Likes: 0
Received 2,878 Likes
on
2,515 Posts
Hi,
Old Mr. Chevrolet was REALLY setting us up with the configuration of these bolts!!!!!!
Regards,
Alan
Dave, I was hoping to see a photo that showed your 'jig'! Or it it 'classified material'?
Old Mr. Chevrolet was REALLY setting us up with the configuration of these bolts!!!!!!
Regards,
Alan
Dave, I was hoping to see a photo that showed your 'jig'! Or it it 'classified material'?
Last edited by Alan 71; 10-07-2016 at 10:03 AM.
10-07-2016, 06:06 PM
#16
Race Director
DUB
10-07-2016, 06:09 PM
#17
Race Director
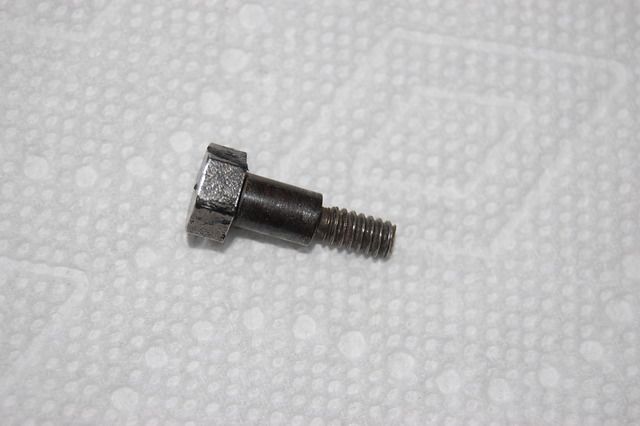
I have 'touched' on this subject before. I machine out new bolts when I am paid to do so ...so that where the threads stop on the shoulder of the bolt...it does NOT get thinner there...and be a break point...like you can see in this photo Alan posted.
DUB
DUB
Last edited by DUB; 10-07-2016 at 06:09 PM.
10-07-2016, 08:38 PM
#19
Drifting
Thread Starter
First I hope you are ok with the weather problem?
When putting the wiper door bolts in is there a recommended process or so I find someone with tiny hands?
Thanks
Wes
10-07-2016, 09:34 PM
#20
Former Vendor
Member Since: Aug 2006
Location: Jeffersonville Indiana 812-288-7103
Posts: 76,656
Received 1,813 Likes
on
1,458 Posts
St. Jude Donor '08-'09-'10-'11-'12-'13-'14-'15
IMHO, 530planeman I'd take Dave up on his offer there is no finer person in craftsmanship... While he doesn't do this for a living he's probably as OCD as I am for perfection and I'm sure he'll do you a good job... But for free only the cost of postage... impeccable and commendable offer...
@530planeman .. Find someone with tiny hands, it makes no difference in the order of assembly.
-Willcox
Last edited by Willcox Corvette; 10-07-2016 at 09:34 PM.
The following users liked this post:
530planeman (10-11-2016)