When you click on links to various merchants on this site and make a purchase, this can result in this site earning a commission. Affiliate programs and affiliations include, but are not limited to, the eBay Partner Network.
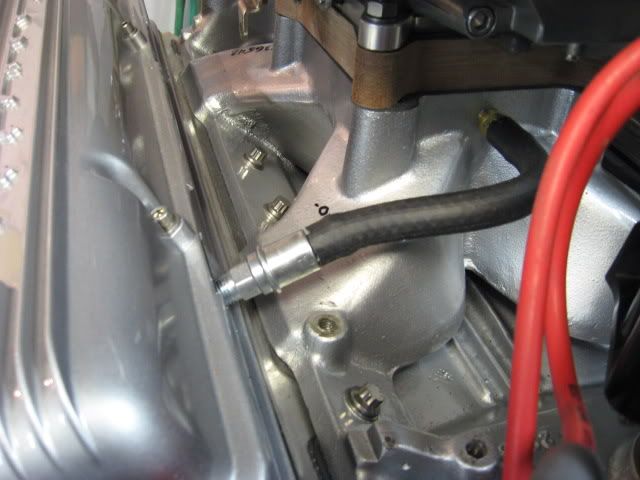
This is the attached picture of the PCV & Booster line connection on my 72 Vette - base 200 hp coupe. The car has so many butchered connections, both vacuum & electrical, on it that I'm not sure how the Power Brake Booster & PCV line should be hooked up. I'd appreciate any help, with photo's, of how a "true" 200 hp, base engine should be connected. Going by the picture, is this really how it should be, even though it has the wrong carb/manifold on it now, I have the correct parts to put on.
The thing that bothers me is the the "t" in the PB line. I always keep it going to a dedicated 3/8 vacuum port.
There should be another small vac port on the front of that lil Holley, make sure to use the full time not ported vacuum. And I would address that rubber fuel line as well.
...The thing that bothers me is the the "t" in the PB line...
The AIM shows the original power brake installation. The booster line ran from a fitting at the rear of the original Q-Jet. It's a dedicated line and should have no take offs.
The AIM shows the original power brake installation. The booster line ran from a fitting at the rear of the original Q-Jet. It's a dedicated line and should have no take offs.
Here`s a couple shots of the quadrajet on my 1971 270 horse. The fitting Mike mentioned, and a hard line that the hose connects to. (My hose still needs to be replaced, I`m still working on it.) The carb I just got from Lars, so I KNOW it`s right.
The AIM (assembly instruction manual) for your model year is a great investment. Reasonably priced and will show final assembly detail drawings of all base vehicle and options. If you DIY, you need one.
I agree with the assembly instruction manual too, but sometimes a picture speaks a thousand words. We call it a chinese blueprint where I work. It gives you that ahaa moment.
The AIM won't help him with that aftermarket Holley: The Holley only has a single vacuum port for either power brakes or PCV, but not both. For setups like this with an aftermarket Holley, you need to drill and tap the intake manifold for a second port. A good spot is usually right in the front vertical surface of the carb mounting pad - there is usually a little bit of a vertical surface right there (it will be under the heat shield shown on the OP's picture). Drill and tap the manifold right there to punch into the plenum area under the carb with a 1/4" pipe thread and screw in a nipple for 3/8" hose. Hook the PCV up to that location and keep the power brake hose where it is.
Here is an example of an additional fitting I installed on my own engine. This is a Victor Jr. manifold, so it has a little more "rise" to it, but the concept is the same. In my case, I punched the PCV into the rear wall of the plenum due to the rearward location of my PCV. If you do the same thing on the forward side, it will closely match the stock Q-Jet carb's forward-facing PCV connection location:
Good job on the "alternate installation" orientation on your distributor. That's exactly what it should look like to keep that tach cable nice and straight!
If you have the room between your carb air filter and the hood, you can add a 1/2-3/4" aluminum spacer between the carb and intake with 2 extra vacuum ports. That's what I did.

 02-22-2017, 08:16 PM