When you click on links to various merchants on this site and make a purchase, this can result in this site earning a commission. Affiliate programs and affiliations include, but are not limited to, the eBay Partner Network.
Am adding the "HEADLAMP" warning to my '79. It's what tells you the lamps are on but the doors are not fully locked up into position.
Having read about them here numerous times I expected a fragile item. The first went in with no problem--the second broke while hand tightening! Very doubtful that the supplier will replace it so I tried numerous repairs.
Simply gluing on the plastic "bolt" was a joke. I used ABS cement--wrong kind of plastic. Epoxy (plastic welder) gave a bit better results but broke off during installation. Gorilla glue also broke off during installation.
Then I made a small right-angle bracket from a piece of 3/16" or so thick aluminum and threaded a #10 hole where where the center of the plastic "bolt" located. I then drilled a hole through the plastic "bolt" and threaded it as well. Then I glued the aluminum bracket to the switch with Gorilla glue. With far more glue area the bracket is held VERY securely. Finally I cut a small length of #10 machine screw, threaded everything together and have a still working, still weatherproof and much sturdier switch.
Hi SeM,
Pretty ingenious repair!
I did a 'repair' on one of my switches and couldn't really find anything (glue) that would actually bond the pieces together.
Regards,
Alan
Hi,
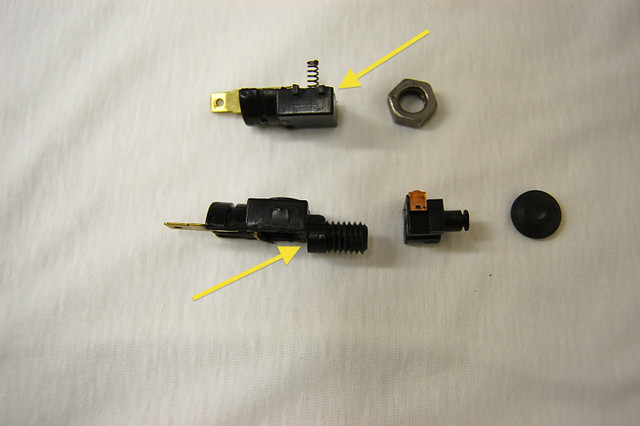
The 'button' on one of the switches was sticking so I took the switch apart.
That quickly made it clear why the threaded part of the switch breaks so easily�. it's supported by just half of the switch body.
The way the switch is mounted in the headlight mechanism just begs for a break at that point.
Regards,
Alan
Since I try to complete the threads I start, after testing with numerous operations while driving there was a small problem. After repair the plastic "bolt" seems to be a bit farther back then original. Given the tiny travel of the switch a "bit" matters Even though the headlamp door locked the warning light did not always go out.
My quick fix and verification was to put a strip of self-adhesive foam on the metal piece that depresses the switch. Problem solved. I know that won't last forever so when it fails I'll remove the switch and extend the button a tad.
To Alan71: I certainly noticed that hideously weak design! Not surprisingly--and I do understand--the vendor did not replace the switch. While I said "I", it was actually my helper who installed both switches. This was his second and he assured me it broke when simply hand tightening. Fortunately my neck surgery is next week and I'll soon be able to do my own work again
Hi SeM,
I had to make a little pad and stick it in place at one time to get one of my switches to work dependably/consistently too.
The warning lamp is a nice detail, but it seems the hardware wasn't up to surviving for long in the real world.
Regards,
Alan

 03-11-2017, 04:25 PM


 Even though the headlamp door locked the warning light did not always go out.